- Yii Tutorial
- Yii - Home
- Yii - Overview
- Yii - Installation
- Yii - Create Page
- Yii - Application Structure
- Yii - Entry Scripts
- Yii - Controllers
- Yii - Using Controllers
- Yii - Using Actions
- Yii - Models
- Yii - Widgets
- Yii - Modules
- Yii - Views
- Yii - Layouts
- Yii - Assets
- Yii - Asset Conversion
- Yii - Extensions
- Yii - Creating Extensions
- Yii - HTTP Requests
- Yii - Responses
- Yii - URL Formats
- Yii - URL Routing
- Yii - Rules of URL
- Yii - HTML Forms
- Yii - Validation
- Yii - Ad Hoc Validation
- Yii - AJAX Validation
- Yii - Sessions
- Yii - Using Flash Data
- Yii - Cookies
- Yii - Using Cookies
- Yii - Files Upload
- Yii - Formatting
- Yii - Pagination
- Yii - Sorting
- Yii - Properties
- Yii - Data Providers
- Yii - Data Widgets
- Yii - ListView Widget
- Yii - GridView Widget
- Yii - Events
- Yii - Creating Event
- Yii - Behaviors
- Yii - Creating a Behavior
- Yii - Configurations
- Yii - Dependency Injection
- Yii - Database Access
- Yii - Data Access Objects
- Yii - Query Builder
- Yii - Active Record
- Yii - Database Migration
- Yii - Theming
- Yii - RESTful APIs
- Yii - RESTful APIs in Action
- Yii - Fields
- Yii - Testing
- Yii - Caching
- Yii - Fragment Caching
- Yii - Aliases
- Yii - Logging
- Yii - Error Handling
- Yii - Authentication
- Yii - Authorization
- Yii - Localization
- Yii - Gii
- Gii – Creating a Model
- Gii – Generating Controller
- Gii – Generating Module
- Yii Useful Resources
- Yii - Quick Guide
- Yii - Useful Resources
- Yii - Discussion
Yii - Models
Models are objects representing business logic and rules. To create a model, you should extend the yii\base\Model class or its subclasses.
Attributes
Attributes represent the business data. They can be accessed like array elements or object properties. Each attribute is a publicly accessible property of a model. To specify what attributes a model possesses, you should override the yii\base\Model::attributes() method.
Let us have a look at the ContactForm model of the basic application template.
<?php
   namespace app\models;
   use Yii;
   use yii\base\Model;
   /**
   * ContactForm is the model behind the contact form.
   */
   class ContactForm extends Model {
      public $name;
      public $email;
      public $subject;
      public $body;
      public $verifyCode;
      /**
      * @return array the validation rules.
      */
      public function rules() {
         return [
            // name, email, subject and body are required
            [['name', 'email', 'subject', 'body'], 'required'],
            // email has to be a valid email address
            ['email', 'email'],
            // verifyCode needs to be entered correctly
            ['verifyCode', 'captcha'],
         ];
      }
      /**
      * @return array customized attribute labels
      */
      public function attributeLabels() {
         return [
            'verifyCode' => 'Verification Code',
         ];
      }
      /**
      * Sends an email to the specified email address using the information
         collected by this model.
      * @param  string  $email the target email address
      * @return boolean whether the model passes validation
      */
      public function contact($email) {
         if ($this->validate()) {
            Yii::$app->mailer->compose()
               ->setTo($email)
               ->setFrom([$this->email => $this->name])
               ->setSubject($this->subject)
               ->setTextBody($this->body)
               ->send();
            return true;
         }
         return false;
      }
   }
?>
Step 1 − Create a function called actionShowContactModel in the SiteController with the following code.
public function actionShowContactModel() {
   $mContactForm = new \app\models\ContactForm();
   $mContactForm->name = "contactForm";
   $mContactForm->email = "user@gmail.com";
   $mContactForm->subject = "subject";
   $mContactForm->body = "body";
   var_dump($mContactForm);
}
In the above code, we define the ContactForm model, set attributes, and display the model on the screen.
Step 2 − Now, if you type http://localhost:8080/index.php?r=site/show-contact-model in the address bar of the web browser, you will see the following.
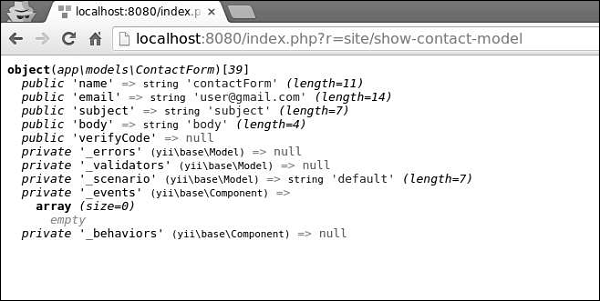
If your model extends from yii\base\Model, then all its member variables (public and non-static) are attributes. There are five attributes in the ContactForm model − name, email, subject, body, verifyCode and you can easily add new ones.
Attribute Labels
You often need to display labels associated with attributes. By default, attribute labels are automatically generated by the yii\base\Model::generateAttributeLabel() method. To manually declare attribute labels, you may override the yii\base\Model::attributeLabels() method.
Step 1 − If you open http://localhost:8080/index.php?r=site/contact, you will see the following page.
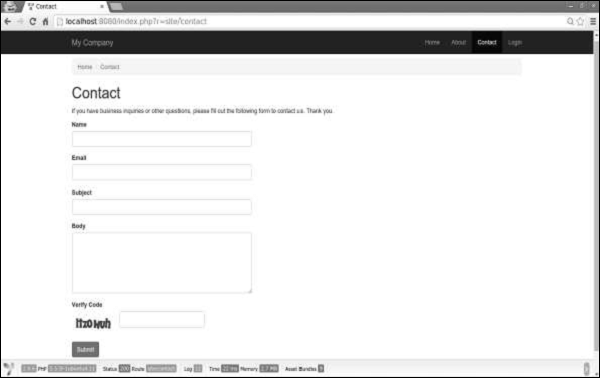
Note that the attribute labels are the same as their names.
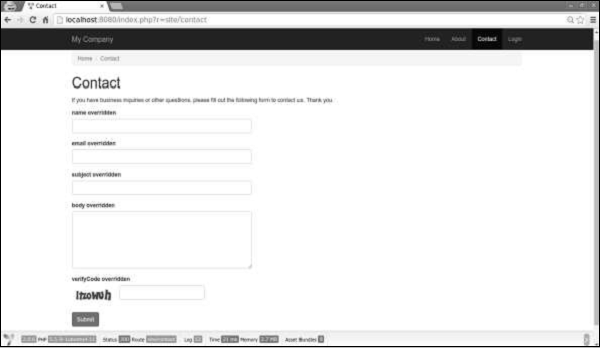
Step 2 − Now, modify the attributeLabels function in the ContactForm model in the following way.
public function attributeLabels() {
   return [
      'name' => 'name overridden',
      'email' => 'email overridden',
      'subject' => 'subject overridden',
      'body' => 'body overridden',
      'verifyCode' => 'verifyCode overridden',
   ];
}
Step 3 − If you open http://localhost:8080/index.php?r=site/contact again, you will notice that the labels have changed as shown in the following image.
Scenarios
You can use a model in different scenarios. For example, when a guest wants to send a contact form, we need all the model attributes. When a user wants to do the same thing, he is already logged in, so we do not need his name, as we can easily take it from the DB.
To declare scenarios, we should override the scenarios() function. It returns an array whose keys are the scenario names and values are active attributes. Active attributes are the ones to validate. They can also be massively assigned.
Step 1 − Modify the ContactForm model in the following way.
<?php
   namespace app\models;
   use Yii;
   use yii\base\Model;
   /**
   * ContactForm is the model behind the contact form.
   */
   class ContactForm extends Model {
      public $name;
      public $email;
      public $subject;
      public $body;
      public $verifyCode;
      const SCENARIO_EMAIL_FROM_GUEST = 'EMAIL_FROM_GUEST';
      const SCENARIO_EMAIL_FROM_USER = 'EMAIL_FROM_USER';
      public function scenarios() {
         return [
            self::SCENARIO_EMAIL_FROM_GUEST => ['name', 'email', 'subject',
               'body', 'verifyCode'],
            self::SCENARIO_EMAIL_FROM_USER => ['email' ,'subject', 'body',
               'verifyCode'],
         ];
      }
      /**
      * @return array the validation rules.
      */
      public function rules() {
         return [
            // name, email, subject and body are required
            [['name', 'email', 'subject', 'body'], 'required'],
            // email has to be a valid email address
            ['email', 'email'],
            // verifyCode needs to be entered correctly
            ['verifyCode', 'captcha'],
         ];
      }
      /**
      * @return array customized attribute labels
      */
      public function attributeLabels() {
         return [
            'name' => 'name overridden',
            'email' => 'email overridden',
            'subject' => 'subject overridden',
            'body' => 'body overridden',
            'verifyCode' => 'verifyCode overridden',
         ];
      }
      /**
      * Sends an email to the specified email address using the information
         collected by this model.
      * @param  string  $email the target email address
      * @return boolean whether the model passes validation
      */
      public function contact($email) {
         if ($this -> validate()) {
            Yii::$app->mailer->compose()
               ->setTo($email)
               ->setFrom([$this->email => $this->name])
               ->setSubject($this->subject)
               ->setTextBody($this->body)
               ->send();
            return true;
         }
         return false;
      }
   }
?>
We have added two scenarios. One for the guest and another for authenticated user. When the user is authenticated, we do not need his name.
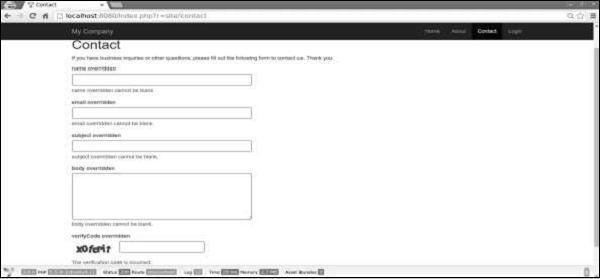
Step 2 − Now, modify the actionContact function of the SiteController.
public function actionContact() {
   $model = new ContactForm();
   $model->scenario = ContactForm::SCENARIO_EMAIL_FROM_GUEST;
   if ($model->load(Yii::$app->request->post()) && $model->
      contact(Yii::$app->params ['adminEmail'])) {
         Yii::$app->session->setFlash('contactFormSubmitted');
         return $this->refresh();
   }
   return $this->render('contact', [
      'model' => $model,
   ]);
}
Step 3 − Type http://localhost:8080/index.php?r=site/contact in the web browser. You will notice that currently, all model attributes are required.
Step 4 − If you change the scenario of the model in the actionContact, as given in the following code, you will find that the name attribute is no longer required.
$model->scenario = ContactForm::SCENARIO_EMAIL_FROM_USER;

Massive Assignment
Massive assignment is a convenient way of creating a model from multiple input attributes via a single line of code.
The lines of code are −
$mContactForm = new \app\models\ContactForm;
$mContactForm->attributes = \Yii::$app->request->post('ContactForm');
The above given lines of code are equivalent to −
$mContactForm = new \app\models\ContactForm;
$postData = \Yii::$app->request->post('ContactForm', []);
$mContactForm->name = isset($postData['name']) ? $postData['name'] : null;
$mContactForm->email = isset($postData['email']) ? $postData['email'] : null;
$mContactForm->subject = isset($postData['subject']) ? $postData['subject'] : null;
$mContactForm->body = isset($postData['body']) ? $postData['body'] : null;
The former is much cleaner. Notice that massive assignment only applies to the safe attributes. They are just the current scenario attributes listed in the scenario() function.
Data Export
The Models often need to be exported in different formats. To convert the model into an array, modify the actionShowContactModel function of the SiteController −
public function actionShowContactModel() {
   $mContactForm = new \app\models\ContactForm();
   $mContactForm->name = "contactForm";
   $mContactForm->email = "user@gmail.com";
   $mContactForm->subject = "subject";
   $mContactForm->body = "body";
   var_dump($mContactForm->attributes);
}
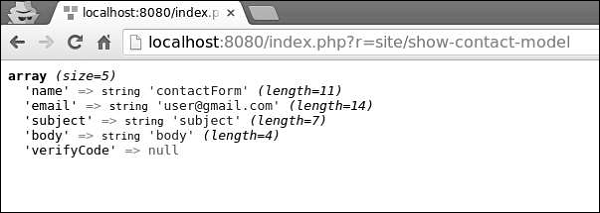
Type http://localhost:8080/index.php?r=site/show-contact-model in the address bar and you will see the following −
To convert the Model to the JSON format, modify the actionShowContactModel function in the following way −
public function actionShowContactModel() {
   $mContactForm = new \app\models\ContactForm();
   $mContactForm->name = "contactForm";
   $mContactForm->email = "user@gmail.com";
   $mContactForm->subject = "subject";
   $mContactForm->body = "body";
   return \yii\helpers\Json::encode($mContactForm);
}
Browser output −
{
   "name":"contactForm",
   "email":"user@gmail.com",
   "subject":"subject",
   "body":"body ",
   "verifyCode":null
}
Important Points
Models are usually much faster than controllers in a well-designed application. Models should −
- Contain business logic.
- Contain validation rules.
- Contain attributes.
- Not embed HTML.
- Not directly access requests.
- Not have too many scenarios.