- Yii Tutorial
- Yii - Home
- Yii - Overview
- Yii - Installation
- Yii - Create Page
- Yii - Application Structure
- Yii - Entry Scripts
- Yii - Controllers
- Yii - Using Controllers
- Yii - Using Actions
- Yii - Models
- Yii - Widgets
- Yii - Modules
- Yii - Views
- Yii - Layouts
- Yii - Assets
- Yii - Asset Conversion
- Yii - Extensions
- Yii - Creating Extensions
- Yii - HTTP Requests
- Yii - Responses
- Yii - URL Formats
- Yii - URL Routing
- Yii - Rules of URL
- Yii - HTML Forms
- Yii - Validation
- Yii - Ad Hoc Validation
- Yii - AJAX Validation
- Yii - Sessions
- Yii - Using Flash Data
- Yii - Cookies
- Yii - Using Cookies
- Yii - Files Upload
- Yii - Formatting
- Yii - Pagination
- Yii - Sorting
- Yii - Properties
- Yii - Data Providers
- Yii - Data Widgets
- Yii - ListView Widget
- Yii - GridView Widget
- Yii - Events
- Yii - Creating Event
- Yii - Behaviors
- Yii - Creating a Behavior
- Yii - Configurations
- Yii - Dependency Injection
- Yii - Database Access
- Yii - Data Access Objects
- Yii - Query Builder
- Yii - Active Record
- Yii - Database Migration
- Yii - Theming
- Yii - RESTful APIs
- Yii - RESTful APIs in Action
- Yii - Fields
- Yii - Testing
- Yii - Caching
- Yii - Fragment Caching
- Yii - Aliases
- Yii - Logging
- Yii - Error Handling
- Yii - Authentication
- Yii - Authorization
- Yii - Localization
- Yii - Gii
- Gii – Creating a Model
- Gii – Generating Controller
- Gii – Generating Module
- Yii Useful Resources
- Yii - Quick Guide
- Yii - Useful Resources
- Yii - Discussion
Yii - Database Access
Yii DAO (Database Access Object) provides an API for accessing databases. It also serves as the foundation for other database access methods: active record and query builder.
Yii DAO supports the following databases −
- MySQL
- MSSQL
- SQLite
- MariaDB
- PostgreSQL
- ORACLE
- CUBRID
Creating a Database Connection
Step 1 − To create a database connection, you need to create an instance of the yii\db\Connection class.
$mydb = new yii\db\Connection([
   'dsn' => 'mysql:host=localhost;dbname=mydb',
   'username' => 'username',
   'password' => 'password',
   'charset' => 'utf8',
]);
A common practice is to configure a DB connection inside the application components. For example, in the basic application template the DB connection configuration is located in the config/db.php file as shown in the following code.
<?php
   return [
      'class' => 'yii\db\Connection',
      'dsn' => 'mysql:host = localhost;dbname = helloworld',
      'username' => 'vladimir',
      'password' => '123574896',
      'charset' => 'utf8',
   ];
?>
Step 2 − To access the DB connection you may use this expression.
Yii::$app->db
To configure a DB connection, you should specify its DSN (Data Source Name) via the dsn property. The DSN format varies for different databases −
MySQL, MariaDB − mysql:host = localhost;dbname = mydb
PostgreSQL − pgsql:host = localhost;port = 5432;dbname = mydb
SQLite − sqlite:/path/to/db/file
MS SQL Server (via sqlsrv driver) − sqlsrv:Server = localhost;Database = mydb
MS SQL Server (via mssql driver) − mssql:host = localhost;dbname = mydb
MS SQL Server (via dblib driver) − dblib:host = localhost;dbname = mydb
CUBRID − cubrid:dbname = mydb;host = localhost;port = 33000
Oracle − oci:dbname = //localhost:1521/mydb
To show database querying in action, we need data.
Preparing the DB
Step 1 − Create a new database. Database can be prepared in the following two ways.
In the terminal run mysql -u root –p.
Create a new database via CREATE DATABASE helloworld CHARACTER SET utf8 COLLATE utf8_general_ci;
Step 2 − Configure the database connection in the config/db.php file. The following configuration is for the system used currently.
<?php
   return [
      'class' => 'yii\db\Connection',
      'dsn' => 'mysql:host = localhost;dbname = helloworld',
      'username' => 'vladimir',
      'password' => '12345',
      'charset' => 'utf8',
   ];
?>
Step 3 − Inside the root folder run ./yii migrate/create test_table. This command will create a database migration for managing our DB. The migration file should appear in the migrations folder of the project root.
Step 4 − Modify the migration file (m160106_163154_test_table.php in this case) this way.
<?php
   use yii\db\Schema;
   use yii\db\Migration;
   class m160106_163154_test_table extends Migration {
      public function safeUp() {
         $this->createTable("user", [
            "id" => Schema::TYPE_PK,
            "name" => Schema::TYPE_STRING,
            "email" => Schema::TYPE_STRING,
         ]);
         $this->batchInsert("user", ["name", "email"], [
            ["User1", "user1@gmail.com"],
            ["User2", "user2@gmail.com"],
            ["User3", "user3@gmail.com"],
            ["User4", "user4@gmail.com"],
            ["User5", "user5@gmail.com"],
            ["User6", "user6@gmail.com"],
            ["User7", "user7@gmail.com"],
            ["User8", "user8@gmail.com"],
            ["User9", "user9@gmail.com"],
            ["User10", "user10@gmail.com"],
            ["User11", "user11@gmail.com"],
         ]);
      }
      public function safeDown() {
         $this->dropTable('user');
      }
   }
?>
The above migration creates a user table with these fields: id, name, and email. It also adds a few demo users.
Step 5 − Inside the project root run ./yii migrate to apply the migration to the database.
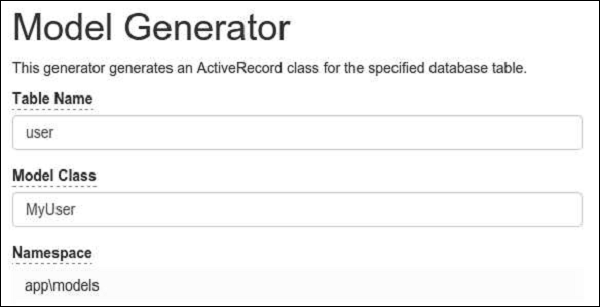
Step 6 − Now, we need to create a model for our user table. For the sake of simplicity, we are going to use the Gii code generation tool. Open up this url: http://localhost:8080/index.php?r=gii. Then, click the “Start” button under the “Model generator” header. Fill in the Table Name (“user”) and the Model Class (“MyUser”), click the “Preview” button and finally, click the “Generate” button.
The MyUser model should appear in the models directory.