- Yii Tutorial
- Yii - Home
- Yii - Overview
- Yii - Installation
- Yii - Create Page
- Yii - Application Structure
- Yii - Entry Scripts
- Yii - Controllers
- Yii - Using Controllers
- Yii - Using Actions
- Yii - Models
- Yii - Widgets
- Yii - Modules
- Yii - Views
- Yii - Layouts
- Yii - Assets
- Yii - Asset Conversion
- Yii - Extensions
- Yii - Creating Extensions
- Yii - HTTP Requests
- Yii - Responses
- Yii - URL Formats
- Yii - URL Routing
- Yii - Rules of URL
- Yii - HTML Forms
- Yii - Validation
- Yii - Ad Hoc Validation
- Yii - AJAX Validation
- Yii - Sessions
- Yii - Using Flash Data
- Yii - Cookies
- Yii - Using Cookies
- Yii - Files Upload
- Yii - Formatting
- Yii - Pagination
- Yii - Sorting
- Yii - Properties
- Yii - Data Providers
- Yii - Data Widgets
- Yii - ListView Widget
- Yii - GridView Widget
- Yii - Events
- Yii - Creating Event
- Yii - Behaviors
- Yii - Creating a Behavior
- Yii - Configurations
- Yii - Dependency Injection
- Yii - Database Access
- Yii - Data Access Objects
- Yii - Query Builder
- Yii - Active Record
- Yii - Database Migration
- Yii - Theming
- Yii - RESTful APIs
- Yii - RESTful APIs in Action
- Yii - Fields
- Yii - Testing
- Yii - Caching
- Yii - Fragment Caching
- Yii - Aliases
- Yii - Logging
- Yii - Error Handling
- Yii - Authentication
- Yii - Authorization
- Yii - Localization
- Yii - Gii
- Gii – Creating a Model
- Gii – Generating Controller
- Gii – Generating Module
- Yii Useful Resources
- Yii - Quick Guide
- Yii - Useful Resources
- Yii - Discussion
Yii - Quick Guide
Yii - Overview
The Yii[ji:] framework is an open-source PHP framework for rapidly-developing, modern Web applications. It is built around the Model-View-Controller composite pattern.
Yii provides secure and professional features to create robust projects rapidly. The Yii framework has a component-based architecture and a full solid caching support. Therefore, it is suitable for building all kinds of Web applications: forums, portals, content managements systems, RESTful services, e-commerce websites, and so forth. It also has a code generation tool called Gii that includes the full CRUD(Create-Read-Update-Delete) interface maker.
Core Features
The core features of Yii are as follows −
- Yii implements the MVC architectural pattern.
- It provides features for both relational and NoSQL databases.
- Yii never over-designs things for the sole purpose of following some design pattern.
- It is extremely extensible.
- Yii provides multi-tier caching support.
- Yii provides RESTful API development support.
- It has high performance.
Overall, if all you need is a neat interface for the underlying database, then Yii is the right choice. Currently, Yii has two versions: 1.1 and 2.0.
Version 1.1 is now in maintenance mode and Version 2 adopts the latest technologies, including Composer utility for package distribution, PSR levels 1, 2, and 4, and many PHP 5.4+ features. It is version 2 that will receive the main development effort over the next few years.
Yii is a pure OOP (Object-Oriented Programming) framework. Hence, it requires a basic knowledge of OOP. The Yii framework also uses the latest features of PHP, like traits and namespaces. It would be easier for you to pick up Yii 2.0 if you understand these concepts.
Environment
The major requirements for Yii2 are PHP 5.4+ and a web server. Yii is a powerful console tool, which manages database migrations, asset compilation, and other stuff. It is recommended to have a command line access to the machine where you develop your application.
For development purpose, we will use −
- Linux Mint 17.1
- PHP 5.5.9
- PHP built-in web server
Pre-installation check
To check whether your local machine is good to go with the latest Yii2 version, do the following −
Step 1 − Install the latest php version.
sudo apt-get install php5
Step 2 − Install the latest mysql version.
sudo apt-get install mysql-server
Step 3 − Download the Yii2 basic application template.
composer create-project --prefer-dist --stability=dev yiisoft/yii2-app-basic basic
Step 4 − To start a PHP built-in server, inside the basic folder run.
php -S localhost:8080
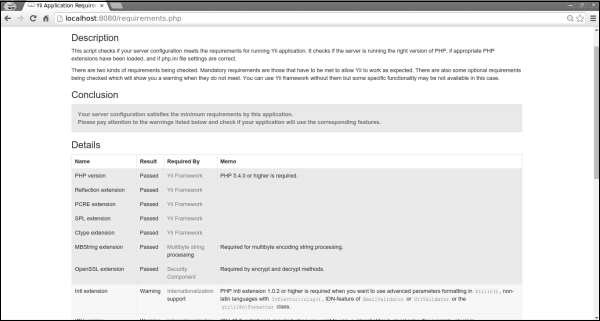
There is a useful script, requirements.php. It checks whether your server meets the requirements to run the application. You can find this script in the root folder of your application.
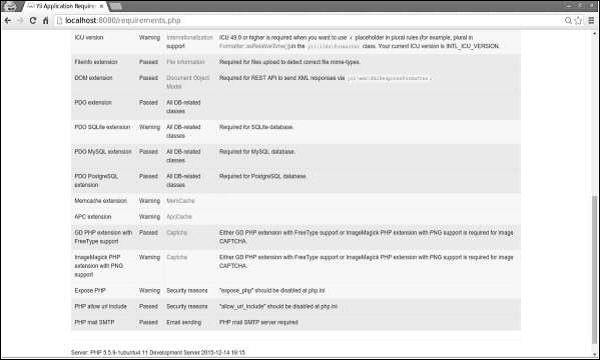
If you type http://localhost:8080/requirements.php in the address bar of the web browser, the page looks like as shown in the following screenshot −
Yii - Installation
The most straightforward way to get started with Yii2 is to use the basic application template provided by the Yii2 team. This template is also available through the Composer tool.
Step 1 − Find a suitable directory in your hard drive and download the Composer PHAR (PHP archive) via the following command.
curl -sS https://getcomposer.org/installer | php
Step 2 − Then move this archive to the bin directory.
mv composer.phar /usr/local/bin/composer
Step 3 − With the Composer installed, you can install Yii2 basic application template. Run these commands.
composer global require "fxp/composer-asset-plugin:~1.1.1"
composer create-project --prefer-dist yiisoft/yii2-app-basic helloworld
The first command installs the composer asset plugin, which manages npm and bower dependencies. The second command installs Yii2 basic application template in a directory called helloworld.
Step 4 − Now open the helloworld directory and launch the web server built into PHP.
php -S localhost:8080 -t web
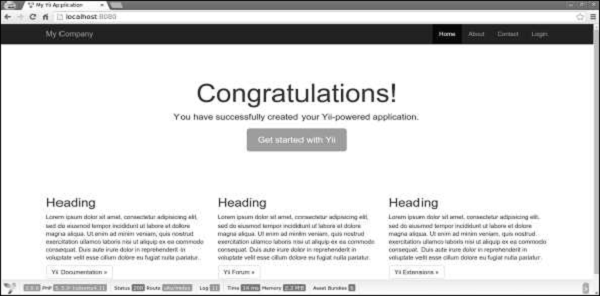
Step 5 − Then open http://localhost:8080 in your browser. You can see the welcome page.
Yii - Create Page
Now we are going to create a “Hello world” page in your application. To create a page, we must create an action and a view.
Actions are declared in controllers. The end user will receive the execution result of an action.
Step 1 − Declare the speak action in the existing SiteController, which is defined in the class file controllers/SiteController.php.
<?php
   namespace app\controllers;
   use Yii;
   use yii\filters\AccessControl;
   use yii\web\Controller;
   use yii\filters\VerbFilter;
   use app\models\LoginForm;
   use app\models\ContactForm;
   class SiteController extends Controller {
      /* other code */
      public function actionSpeak($message = "default message") {
         return $this->render("speak",['message' => $message]);
      }
   }
?>
We defined the speak action as a method called actionSpeak. In Yii, all action methods are prefixed with the word action. This is how the framework differentiates action methods from non-action ones. If an action ID requires multiple words, then they will be concatenated by dashes. Hence, the action ID add-post corresponds to the action method actionAddPost.
In the code given above, the ‘out’ function takes a GET parameter, $message. We also call a method named ‘render’ to render a view file called speak. We pass the message parameter to the view. The rendering result is a complete HTML page.
View is a script that generates a response's content. For the speak action, we create a speak view that prints our message. When the render method is called, it looks for a PHP file names as view/controllerID/vewName.php.
Step 2 − Therefore, inside the views/site folder create a file called speak.php with the following code.
<?php
   use yii\helpers\Html;
?>
<?php echo Html::encode($message); ?>
Note that we HTML-encode the message parameter before printing to avoid XSS attack.
Step 3 − Type the following in your web browser http://localhost:8080/index.php?r=site/speak&message=hello%20world.
You will see the following window −
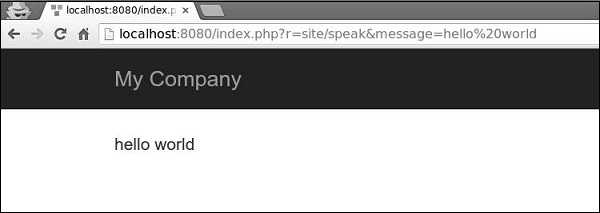
The ‘r’ parameter in the URL stands for route. The route's default format is controllerID/actionID. In our case, the route site/speak will be resolved by the SiteController class and the speak action.
Yii - Application Structure
There is only one folder in the overall code base that is publicly available for the web server. It is the web directory. Other folders outside the web root directory are out of reach for the web server.
Note − All project dependencies are located in the composer.json file. Yii2 has a few important packages that are already included in your project by Composer. These packages are the following −
- Gii – The code generator tool
- The debug console
- The Codeception testing framework
- The SwiftMailer library
- The Twitter Bootstrap UI library
The first three packages are only useful in the development environment.
Yii2's application structure is precise and clear. It contains the following folders −
Assets − This folder includes all .js and .css files referenced in the web page.
Commands − This folder includes the controllers that can be used from the terminal.
Config − This folder contains config files for managing database, application and application parameters.
Mail − This folder includes the mail layout.
Models − This folder includes the models used in the application.
Runtime − This folder is for storing runtime data.
Tests − This folder includes all the tests (acceptance, unit, functional).
Vendor − This folder contains all the third-party packages managed by Composer.
Views − This folder is for views, that are displayed by the controllers. The layout folder is a for page template.
Web − The entry point from web.
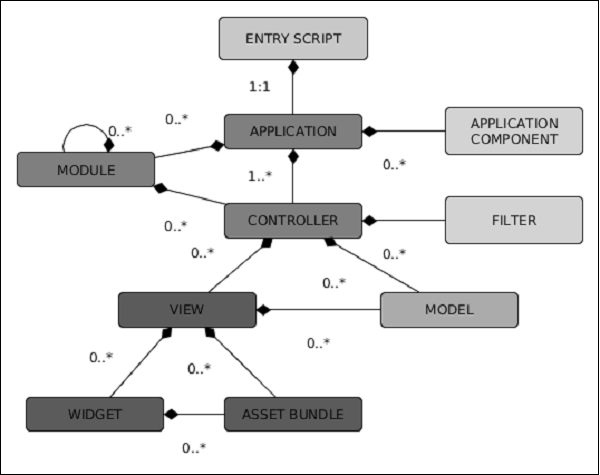
Application Structure
Following is the diagrammatic representation of the application structure.

Yii2 – Objects
The following list contains all Yii2's objects −
Models, Views, and Controllers
Models are for data representation (usually from the database). View are for displaying the data. Controllers are for processing requests and generating responses.
Components
To create a reusable functionality, the user can write his own components. Components are just objects that contain logic. For example, a component could be a weight converter.
Application components
These are objects that instanced just one time in the whole application. The main difference between Components and Application components is that the latter can have only one instance in the whole application.
Widgets
Widgets are reusable objects containing both logic and rendering code. A widget could be, for example, a gallery slider.
Filters
Filters are objects that run before or after the execution of the Controller actions.
Modules
You can consider Modules as reusable subapps, containing Models, Views, Controllers, and so forth.
Extensions
Extensions are packages that can be managed by the Composer.
Yii - Entry Scripts
Entry scripts are responsible for starting a request handling cycle. They are just PHP scripts accessible by users.
The following illustration shows the structure of an application −
Web application (as well as console application) has a single entry script. The End user makes request to the entry script. Then the entry script instantiates application instances and forwards requests to them.
Entry script for a console application is usually stored in a project base path and named as yii.php. Entry script for a web application must be stored under a web accessible directory. It is often called index.php.
The Entry scripts do the following −
- Define constants.
- Register Composer autoloader.
- Include Yii files.
- Load configuration.
- Create and configure an application instance.
- Process the incoming request.
The following is the entry script for the basic application template −
<?php
   //defining global constants
   defined('YII_DEBUG') or define('YII_DEBUG', true);
   defined('YII_ENV') or define('YII_ENV', 'dev');

   //register composer autoloader
   require(__DIR__ . '/../vendor/autoload.php');
   //include yii files
   require(__DIR__ . '/../vendor/yiisoft/yii2/Yii.php');

   //load application config
   $config = require(__DIR__ . '/../config/web.php');

   //create, config, and process reques
   (new yii\web\Application($config))->run();
?>
The following is the entry script for the console application −
#!/usr/bin/env php
<?php
   /**
   * Yii console bootstrap file.
   * @link http://www.yiiframework.com/
   * @copyright Copyright (c) 2008 Yii Software LLC
   * @license http://www.yiiframework.com/license/
   */
   //defining global constants
   defined('YII_DEBUG') or define('YII_DEBUG', true);

   //register composer autoloader
   require(__DIR__ . '/vendor/autoload.php');
   require(__DIR__ . '/vendor/yiisoft/yii2/Yii.php');

   //load config
   $config = require(__DIR__ . '/config/console.php');

   //apply config the application instance
   $application = new yii\console\Application($config);

   //process request
   $exitCode = $application->run();
   exit($exitCode);
?>
The best place for defining global constants is entry scripts. There are three supported by Yii constants −
YII_DEBUG − Defines whether you are in debug mode or not. If set to true, then we will see more log data and detail error call stack.
YII_ENV − Defines the environment mode. The default value is prod. Available values are prod, dev, and test. They are used in configuration files to define, for example, a different DB connection (local and remote) or other values.
YII_ENABLE_ERROR_HANDLER − Specifies whether to enable the default Yii error handler.
To define a global constant the following code is used −
//defining global constants
defined('YII_DEBUG') or define('YII_DEBUG', true);
which is equivalent to:
if(!defined('YII_DEBUG')) {
   define('YII_DEBUG', true);
}
Note − The global constants should be defined at the beginning of an entry script in order to take effect when other PHP files are included.
Yii - Controllers
Controllers are responsible for processing requests and generating responses. After user's request, the controller will analyze request data, pass them to model, then insert the model result into a view, and generate a response.
Understanding Actions
Controllers include actions. They are the basic units that user can request for execution. A controller can have one or several actions.
Let us have a look at the SiteController of the basic application template −
<?php
   namespace app\controllers;
   use Yii;
   use yii\filters\AccessControl;
   use yii\web\Controller;
   use yii\filters\VerbFilter;
   use app\models\LoginForm;
   use app\models\ContactForm;
   class SiteController extends Controller {
      public function behaviors() {
         return [
            'access' => [
               'class' => AccessControl::className(),
               'only' => ['logout'],
               'rules' => [
                  [
                     'actions' => ['logout'],
                     'allow' => true,
                     'roles' => ['@'],
                  ],
               ],
            ],
            'verbs' => [
               'class' => VerbFilter::className(),
               'actions' => [
                  'logout' => ['post'],
               ],
            ],
         ];
      }
      public function actions() {
         return [
            'error' => [
               'class' => 'yii\web\ErrorAction',
            ],
            'captcha' => [
               'class' => 'yii\captcha\CaptchaAction',
               'fixedVerifyCode' => YII_ENV_TEST ? 'testme' : null,
            ],
         ];
      }
      public function actionIndex() {
         return $this->render('index');
      }
      public function actionLogin() {
         if (!\Yii::$app->user->isGuest) {
            return $this->goHome();
         }
         $model = new LoginForm();
         if ($model->load(Yii::$app->request->post()) && $model->login()) {
            return $this->goBack();
         }
         return $this->render('login', [
            'model' => $model,
         ]);
      }
      public function actionLogout() {
         Yii::$app->user->logout();
         return $this->goHome();
      }
      public function actionContact() {
         //load ContactForm model
         $model = new ContactForm();
         //if there was a POST request, then try to load POST data into a model
         if ($model->load(Yii::$app->request->post()) && $model>contact(Yii::$app->params
            ['adminEmail'])) {
            Yii::$app->session->setFlash('contactFormSubmitted');
            return $this->refresh();
         }
         return $this->render('contact', [
            'model' => $model,
         ]);
      }
      public function actionAbout() {
         return $this->render('about');
      }
      public function actionSpeak($message = "default message") {
         return $this->render("speak",['message' => $message]);
      }
   }
?>
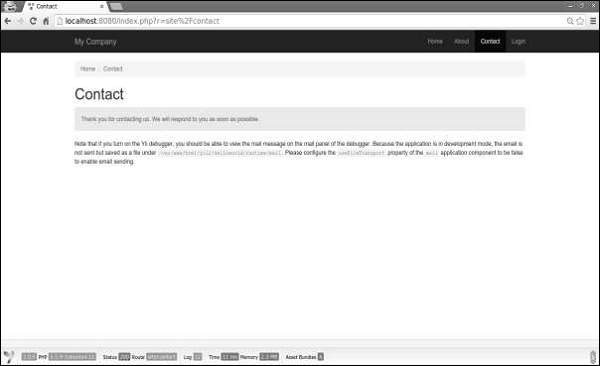
Run the basic application template using PHP built-in server and go to the web browser at http://localhost:8080/index.php?r=site/contact. You will see the following page −
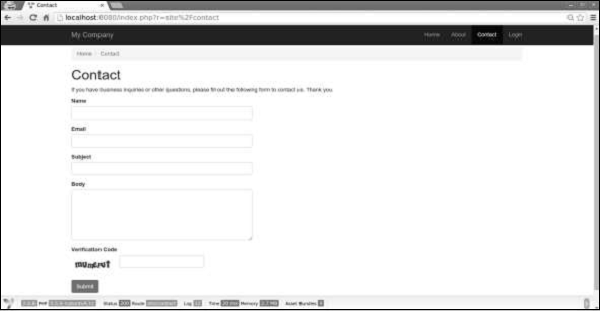
When you open this page, the contact action of the SiteController is executed. The code first loads the ContactForm model. Then it renders the contact view and passes the model into it.
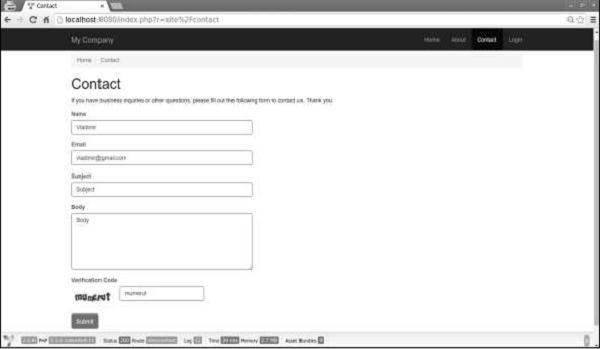
If you fill in the form and click the submit button, you will see the following −
Notice that this time the following code is executed −
if ($model->load(Yii::$app->request->post()) && $model->contact(Yii::$app>params ['adminEmail'])) {
   Yii::$app->session->setFlash('contactFormSubmitted');
   return $this->refresh();
}
If there was a POST request, we assign the POST data to the model and try to send an email. If we success then we set a flash message with the text “Thank you for contacting us. We will respond to you as soon as possible.” and refresh the page.
Understanding Routes
In the above example, in the URL, http://localhost:8080/index.php?r=site/contact, the route is site/contact. The contact action (actionContact) in the SiteController will be executed.
A route consists of the following parts−
moduleID − If the controller belongs to a module, then this part of the route exists.
controllerID (site in the above example) − A unique string that identifies the controller among all controllers within the same module or application.
actionID (contact in the above example) − A unique string that identifies the action among all actions within the same controller.
The format of the route is controllerID/actionID. If the controller belongs to a module, then it has the following format: moduleID/controllerID/actionID.
Yii - Using Controllers
Controllers in web applications should extend from yii\web\Controller or its child classes. In console applications, they should extend from yii\console\Controller or its child classes.
Let us create an example controller in the controllers folder.
Step 1 − Inside the Controllers folder, create a file called ExampleController.php with the following code.
<?php
   namespace app\controllers;
   use yii\web\Controller;
   class ExampleController extends Controller {
      public function actionIndex() {
         $message = "index action of the ExampleController";
         return $this->render("example",[
            'message' => $message
         ]);
      }
   }
?>
Step 2 − Create an example view in the views/example folder. Inside that folder, create a file called example.php with the following code.
<?php
   echo $message;
?>
Each application has a default controller. For web applications, the site is the controller, while for console applications it is help. Therefore, when the http://localhost:8080/index.php URL is opened, the site controller will handle the request. You can change the default controller in the application configuration.
Consider the given code −
'defaultRoute' => 'main'
Step 3 − Add the above code to the following config/web.php.
<?php
   $params = require(__DIR__ . '/params.php');
   $config = [
      'id' => 'basic',
      'basePath' => dirname(__DIR__),
      'bootstrap' => ['log'],
      'components' => [
         'request' => [
            // !!! insert a secret key in the following (if it is empty) - this is
               //required by cookie validation
            'cookieValidationKey' => 'ymoaYrebZHa8gURuolioHGlK8fLXCKjO',
         ],
         'cache' => [
            'class' => 'yii\caching\FileCache',
         ],
         'user' => [
            'identityClass' => 'app\models\User',
            'enableAutoLogin' => true,
         ],
         'errorHandler' => [
            'errorAction' => 'site/error',
         ],
         'mailer' => [
            'class' => 'yii\swiftmailer\Mailer',
            // send all mails to a file by default. You have to set
            // 'useFileTransport' to false and configure a transport
            // for the mailer to send real emails.
            'useFileTransport' => true,
         ],
         'log' => [
            'traceLevel' => YII_DEBUG ? 3 : 0,
            'targets' => [
               [
                  'class' => 'yii\log\FileTarget',
                  'levels' => ['error', 'warning'],
               ],
            ],
         ],
         'db' => require(__DIR__ . '/db.php'),
      ],
      //changing the default controller
      'defaultRoute' => 'example',
      'params' => $params,
   ];
   if (YII_ENV_DEV) {
      // configuration adjustments for 'dev' environment
      $config['bootstrap'][] = 'debug';
      $config['modules']['debug'] = [
         'class' => 'yii\debug\Module',
      ];
      $config['bootstrap'][] = 'gii';
      $config['modules']['gii'] = [
         'class' => 'yii\gii\Module',
      ];
   }
   return $config;
?>
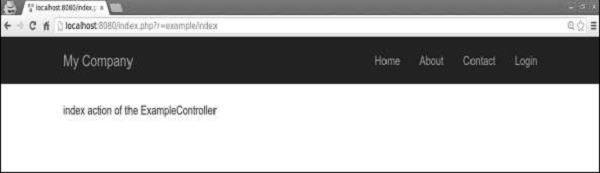
Step 4 − Type http://localhost:8080/index.php in the address bar of the web browser, you will see that the default controller is the example controller.
Note − The Controller IDs should contain English letters in lower case, digits, forward slashes, hyphens, and underscores.
To convert the controller ID to the controller class name, you should do the following −
- Take the first letter from all words separated by hyphens and turn it into uppercase.
- Remove hyphens.
- Replace forward slashes with backward ones.
- Add the Controller suffix.
- Prepend the controller namespace.
Examples
page becomes app\controllers\PageController.
post-article becomes app\controllers\PostArticleController.
user/post-article becomes app\controllers\user\PostArticleController.
userBlogs/post-article becomes app\controllers\userBlogs\PostArticleController.
Yii - Using Actions
To create an action in a controller class, you should define a public method whose name starts with the word action. The return data of an action represents the response to be sent to the end user.
Step 1 − Let us define the hello-world action in our ExampleController.
<?php
   namespace app\controllers;
   use yii\web\Controller;
   class ExampleController extends Controller {
      public function actionIndex() {
         $message = "index action of the ExampleController";
         return $this->render("example",[
            'message' => $message
         ]);
      }
      public function actionHelloWorld() {
         return "Hello world!";
      }
   }
?>
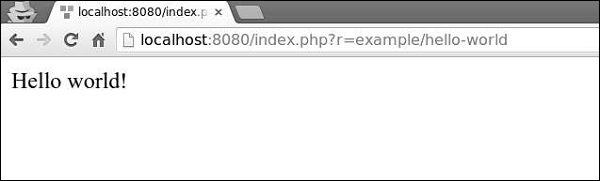
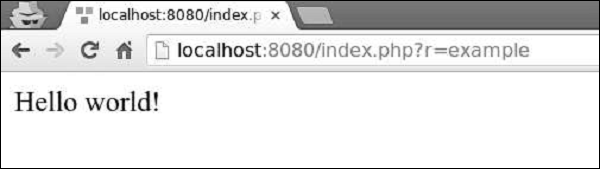
Step 2 − Type http://localhost:8080/index.php?r=example/hello-world in the address bar of the web browser. You will see the following.
Action IDs are usually verbs, such as create, update, delete and so on. This is because actions are often designed to perform a particular change if a resource.
Action IDs should contain only these characters − English letters in lower case, digits, hyphens, and underscores.
There are two types of actions: inline and standalone.
Inline actions are defined in the controller class. The names of the actions are derived from action IDs this way −
- Turn the first letter in all words of the action ID into uppercase.
- Remove hyphens.
- Add the action prefix.
Examples −
- index becomes actionIndex.
- hello-world(as in the example above) becomes actionHelloWorld.
If you plan to reuse the same action in different places, you should define it as a standalone action.
Create a Standalone Action Class
To create a standalone action class, you should extend yii\base\Action or a child class, and implement a run() method.
Step 1 − Create a components folder inside your project root. Inside that folder create a file called GreetingAction.php with the following code.
<?php
   namespace app\components;
   use yii\base\Action;
   class GreetingAction extends Action {
      public function run() {
         return "Greeting";
      }
   }
?>
We have just created a reusable action. To use it in our ExampleController, we should declare our action in the action map by overriding the actions() method.
Step 2 − Modify the ExampleController.php file this way.
<?php
   namespace app\controllers;
   use yii\web\Controller;
   class ExampleController extends Controller {
      public function actions() {
         return [
            'greeting' => 'app\components\GreetingAction',
         ];
      }
      public function actionIndex() {
         $message = "index action of the ExampleController";

         return $this->render("example",[
            'message' => $message
         ]);
      }
      public function actionHelloWorld() {
         return "Hello world!";
      }
   }
?>
The actions() method returns an array whose values are class names and keys are action IDs.
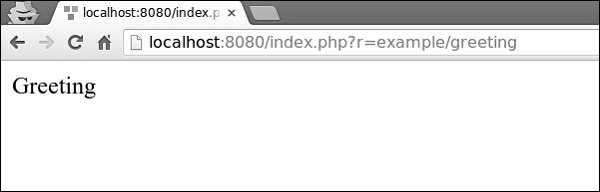
Step 3 − Go to http://localhost:8080/index.php?r=example/greeting. You will see the following output.
Step 4 − You can also use actions to redirect users to other URLs. Add the following action to the ExampleController.php.
public function actionOpenGoogle() {
   // redirect the user browser to http://google.com
   return $this->redirect('http://google.com');
}
Now, if you open http://localhost:8080/index.php?r=example/open-google, you will be redirected to http://google.com.
The action methods can take parameters, called action parameters. Their values are retrieved from $_GET using the parameter name as the key.
Step 5 − Add the following action to our example controller.
public function actionTestParams($first, $second) {
   return "$first $second";
}
Step 6 − Type the URL http://localhost:8080/index.php?r=example/testparams&first=hello&second=world in the address bar of your web browser, you will see the following output.

Each controller has a default action. When a route contains the controller ID only, it means that the default action is requested. By default, the action is index. You can easily override this property in the controller.
Step 7 − Modify our ExampleController this way.
<?php
   namespace app\controllers;
   use yii\web\Controller;
   class ExampleController extends Controller {
      public $defaultAction = "hello-world";
      /* other actions */
   }
?>
Step 8 − Now, if you go to http://localhost:8080/index.php?r=example, you will see the following.
To fulfill the request, the controller will undergo the following lifecycle −
The yii\base\Controller:init() method is called.
The controller creates an action based on the action ID.
The controller sequentially calls the beforeAction() method of the web application, module, and the controller.
The controller runs the action.
The controller sequentially calls the afterAction() method of the web application, module, and the controller.
The application assigns action result to the response.
Important Points
The Controllers should −
- Be very thin. Each action should contain only a few lines of code.
- Use Views for responses.
- Not embed HTML.
- Access the request data.
- Call methods of models.
- Not process the request data. These should be processed in the model.
Yii - Models
Models are objects representing business logic and rules. To create a model, you should extend the yii\base\Model class or its subclasses.
Attributes
Attributes represent the business data. They can be accessed like array elements or object properties. Each attribute is a publicly accessible property of a model. To specify what attributes a model possesses, you should override the yii\base\Model::attributes() method.
Let us have a look at the ContactForm model of the basic application template.
<?php
   namespace app\models;
   use Yii;
   use yii\base\Model;
   /**
   * ContactForm is the model behind the contact form.
   */
   class ContactForm extends Model {
      public $name;
      public $email;
      public $subject;
      public $body;
      public $verifyCode;
      /**
      * @return array the validation rules.
      */
      public function rules() {
         return [
            // name, email, subject and body are required
            [['name', 'email', 'subject', 'body'], 'required'],
            // email has to be a valid email address
            ['email', 'email'],
            // verifyCode needs to be entered correctly
            ['verifyCode', 'captcha'],
         ];
      }
      /**
      * @return array customized attribute labels
      */
      public function attributeLabels() {
         return [
            'verifyCode' => 'Verification Code',
         ];
      }
      /**
      * Sends an email to the specified email address using the information
         collected by this model.
      * @param  string  $email the target email address
      * @return boolean whether the model passes validation
      */
      public function contact($email) {
         if ($this->validate()) {
            Yii::$app->mailer->compose()
               ->setTo($email)
               ->setFrom([$this->email => $this->name])
               ->setSubject($this->subject)
               ->setTextBody($this->body)
               ->send();
            return true;
         }
         return false;
      }
   }
?>
Step 1 − Create a function called actionShowContactModel in the SiteController with the following code.
public function actionShowContactModel() {
   $mContactForm = new \app\models\ContactForm();
   $mContactForm->name = "contactForm";
   $mContactForm->email = "user@gmail.com";
   $mContactForm->subject = "subject";
   $mContactForm->body = "body";
   var_dump($mContactForm);
}
In the above code, we define the ContactForm model, set attributes, and display the model on the screen.
Step 2 − Now, if you type http://localhost:8080/index.php?r=site/show-contact-model in the address bar of the web browser, you will see the following.
If your model extends from yii\base\Model, then all its member variables (public and non-static) are attributes. There are five attributes in the ContactForm model − name, email, subject, body, verifyCode and you can easily add new ones.
Attribute Labels
You often need to display labels associated with attributes. By default, attribute labels are automatically generated by the yii\base\Model::generateAttributeLabel() method. To manually declare attribute labels, you may override the yii\base\Model::attributeLabels() method.
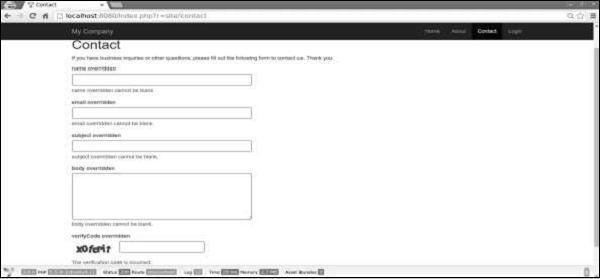
Step 1 − If you open http://localhost:8080/index.php?r=site/contact, you will see the following page.
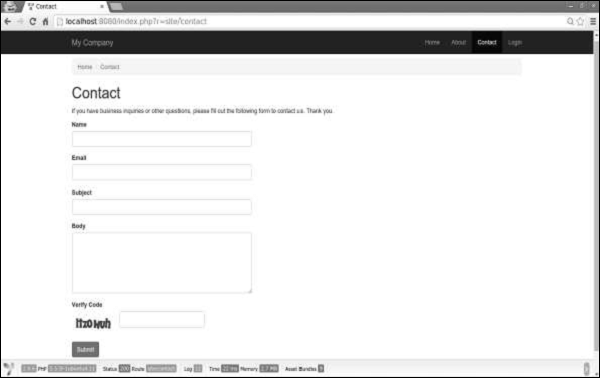
Note that the attribute labels are the same as their names.
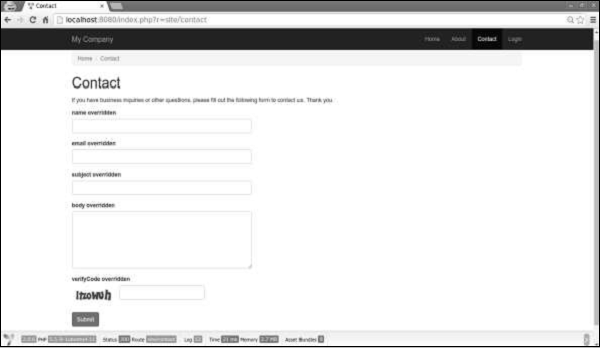
Step 2 − Now, modify the attributeLabels function in the ContactForm model in the following way.
public function attributeLabels() {
   return [
      'name' => 'name overridden',
      'email' => 'email overridden',
      'subject' => 'subject overridden',
      'body' => 'body overridden',
      'verifyCode' => 'verifyCode overridden',
   ];
}
Step 3 − If you open http://localhost:8080/index.php?r=site/contact again, you will notice that the labels have changed as shown in the following image.
Scenarios
You can use a model in different scenarios. For example, when a guest wants to send a contact form, we need all the model attributes. When a user wants to do the same thing, he is already logged in, so we do not need his name, as we can easily take it from the DB.
To declare scenarios, we should override the scenarios() function. It returns an array whose keys are the scenario names and values are active attributes. Active attributes are the ones to validate. They can also be massively assigned.
Step 1 − Modify the ContactForm model in the following way.
<?php
   namespace app\models;
   use Yii;
   use yii\base\Model;
   /**
   * ContactForm is the model behind the contact form.
   */
   class ContactForm extends Model {
      public $name;
      public $email;
      public $subject;
      public $body;
      public $verifyCode;
      const SCENARIO_EMAIL_FROM_GUEST = 'EMAIL_FROM_GUEST';
      const SCENARIO_EMAIL_FROM_USER = 'EMAIL_FROM_USER';
      public function scenarios() {
         return [
            self::SCENARIO_EMAIL_FROM_GUEST => ['name', 'email', 'subject',
               'body', 'verifyCode'],
            self::SCENARIO_EMAIL_FROM_USER => ['email' ,'subject', 'body',
               'verifyCode'],
         ];
      }
      /**
      * @return array the validation rules.
      */
      public function rules() {
         return [
            // name, email, subject and body are required
            [['name', 'email', 'subject', 'body'], 'required'],
            // email has to be a valid email address
            ['email', 'email'],
            // verifyCode needs to be entered correctly
            ['verifyCode', 'captcha'],
         ];
      }
      /**
      * @return array customized attribute labels
      */
      public function attributeLabels() {
         return [
            'name' => 'name overridden',
            'email' => 'email overridden',
            'subject' => 'subject overridden',
            'body' => 'body overridden',
            'verifyCode' => 'verifyCode overridden',
         ];
      }
      /**
      * Sends an email to the specified email address using the information
         collected by this model.
      * @param  string  $email the target email address
      * @return boolean whether the model passes validation
      */
      public function contact($email) {
         if ($this -> validate()) {
            Yii::$app->mailer->compose()
               ->setTo($email)
               ->setFrom([$this->email => $this->name])
               ->setSubject($this->subject)
               ->setTextBody($this->body)
               ->send();
            return true;
         }
         return false;
      }
   }
?>
We have added two scenarios. One for the guest and another for authenticated user. When the user is authenticated, we do not need his name.
Step 2 − Now, modify the actionContact function of the SiteController.
public function actionContact() {
   $model = new ContactForm();
   $model->scenario = ContactForm::SCENARIO_EMAIL_FROM_GUEST;
   if ($model->load(Yii::$app->request->post()) && $model->
      contact(Yii::$app->params ['adminEmail'])) {
         Yii::$app->session->setFlash('contactFormSubmitted');
         return $this->refresh();
   }
   return $this->render('contact', [
      'model' => $model,
   ]);
}
Step 3 − Type http://localhost:8080/index.php?r=site/contact in the web browser. You will notice that currently, all model attributes are required.
Step 4 − If you change the scenario of the model in the actionContact, as given in the following code, you will find that the name attribute is no longer required.
$model->scenario = ContactForm::SCENARIO_EMAIL_FROM_USER;

Massive Assignment
Massive assignment is a convenient way of creating a model from multiple input attributes via a single line of code.
The lines of code are −
$mContactForm = new \app\models\ContactForm;
$mContactForm->attributes = \Yii::$app->request->post('ContactForm');
The above given lines of code are equivalent to −
$mContactForm = new \app\models\ContactForm;
$postData = \Yii::$app->request->post('ContactForm', []);
$mContactForm->name = isset($postData['name']) ? $postData['name'] : null;
$mContactForm->email = isset($postData['email']) ? $postData['email'] : null;
$mContactForm->subject = isset($postData['subject']) ? $postData['subject'] : null;
$mContactForm->body = isset($postData['body']) ? $postData['body'] : null;
The former is much cleaner. Notice that massive assignment only applies to the safe attributes. They are just the current scenario attributes listed in the scenario() function.
Data Export
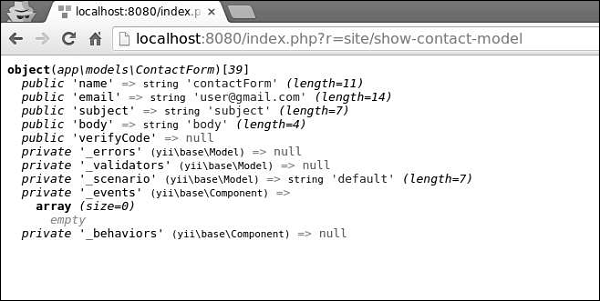
The Models often need to be exported in different formats. To convert the model into an array, modify the actionShowContactModel function of the SiteController −
public function actionShowContactModel() {
   $mContactForm = new \app\models\ContactForm();
   $mContactForm->name = "contactForm";
   $mContactForm->email = "user@gmail.com";
   $mContactForm->subject = "subject";
   $mContactForm->body = "body";
   var_dump($mContactForm->attributes);
}
Type http://localhost:8080/index.php?r=site/show-contact-model in the address bar and you will see the following −
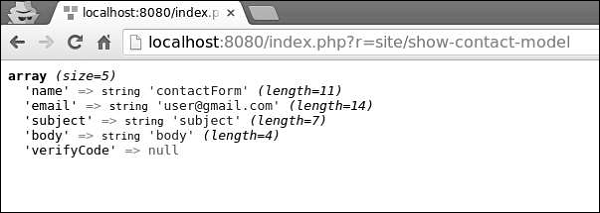
To convert the Model to the JSON format, modify the actionShowContactModel function in the following way −
public function actionShowContactModel() {
   $mContactForm = new \app\models\ContactForm();
   $mContactForm->name = "contactForm";
   $mContactForm->email = "user@gmail.com";
   $mContactForm->subject = "subject";
   $mContactForm->body = "body";
   return \yii\helpers\Json::encode($mContactForm);
}
Browser output −
{
   "name":"contactForm",
   "email":"user@gmail.com",
   "subject":"subject",
   "body":"body ",
   "verifyCode":null
}
Important Points
Models are usually much faster than controllers in a well-designed application. Models should −
- Contain business logic.
- Contain validation rules.
- Contain attributes.
- Not embed HTML.
- Not directly access requests.
- Not have too many scenarios.
Yii - Widgets
A widget is a reusable client-side code, which contains HTML, CSS, and JS. This code includes minimal logic and is wrapped in a yii\base\Widget object. We can easily insert and apply this object in any view.
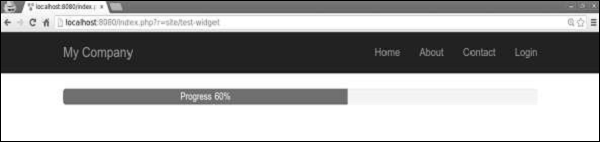
Step 1 − To see widgets in action, create an actionTestWidget function in the SiteController with the following code.
public function actionTestWidget() {
   return $this->render('testwidget');
}
In the above example, we just returned a View called “testwidget”.
Step 2 − Now, inside the views/site folder, create a View file called testwidget.php.
<?php
   use yii\bootstrap\Progress;
?>
<?= Progress::widget(['percent' => 60, 'label' => 'Progress 60%']) ?>
Step 3 − If you go to http://localhost:8080/index.php?r=site/test-widget, you will see the progress bar widget.
Using Widgets
To use a widget in a View, you should call the yii\base\Widget::widget() function. This function takes a configuration array for initializing the widget. In the previous example, we inserted a progress bar with percent and labelled parameters of the configuration object.
Some widgets take a block of content. It should be enclosed between yii\base\Widget::begin() and yii\base\Widget::end() functions. For example, the following widget displays a contact form −
<?php $form = ActiveForm::begin(['id' => 'contact-form']); ?>
   <?= $form->field($model, 'name') ?>
   <?= $form->field($model, 'email') ?>
   <?= $form->field($model, 'subject') ?>
   <?= $form->field($model, 'body')->textArea(['rows' => 6]) ?>
   <?= $form->field($model, 'verifyCode')->widget(Captcha::className(), [
      'template' =>
         '<div class="row">
            <div class = "col-lg-3">{image}</div>
            <div class = "col-lg-6">{input}</div>
         </div>',
   ]) ?>
   <div class = "form-group">
      <?= Html::submitButton('Submit', ['class' => 'btn btn-primary',
         'name' => 'contact-button']) ?>
   </div>
<?php ActiveForm::end(); ?>
Creating Widgets
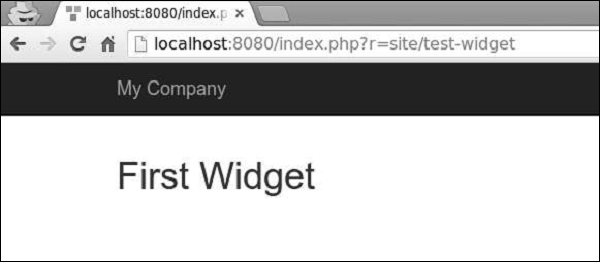
To create a widget, you should extend from yii\base\Widget. Then you should override the yii\base\Widget::init() and yii\base\Widget::run() functions. The run() function should return the rendering result. The init() function should normalize the widget properties.
Step 1 − Create a components folder in the project root. Inside that folder, create a file called FirstWidget.php with the following code.
<?php
   namespace app\components;
   use yii\base\Widget;
   class FirstWidget extends Widget {
      public $mes;
      public function init() {
         parent::init();
         if ($this->mes === null) {
            $this->mes = 'First Widget';
         }
      }
      public function run() {
         return "<h1>$this->mes</h1>";
      }
   }
?>
Step 2 − Modify the testwidget view in the following way.
<?php
   use app\components\FirstWidget;
?>
<?= FirstWidget∷widget() ?>
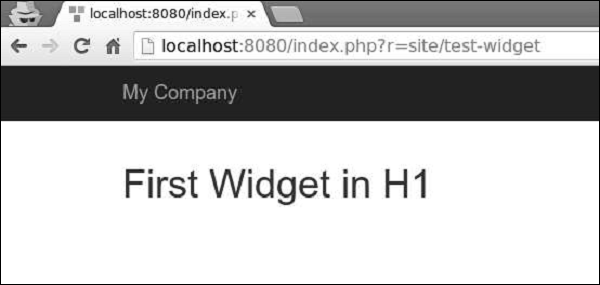
Step 3 − Go to http://localhost:8080/index.php?r=site/test-widget. You will see the following.
Step 4 − To enclose the content between the begin() and end() calls, you should modify the FirstWidget.php file.
<?php
   namespace app\components;
   use yii\base\Widget;
   class FirstWidget extends Widget {
      public function init() {
         parent::init();
         ob_start();
      }
      public function run() {
         $content = ob_get_clean();
         return "<h1>$content</h1>";
      }
   }
?>
Step 5 − Now h1 tags will surround all the content. Notice that we use the ob_start() function to buffer the output. Modify the testwidget view as given in the following code.
<?php
   use app\components\FirstWidget;
?>
<?php FirstWidget::begin(); ?>
   First Widget in H1
<?php FirstWidget::end(); ?>
You will see the following output −
Important Points
Widgets should −
Be created following the MVC pattern. You should keep presentation layers in views and logic in widget classes.
Be designed to be self-contained. The end developer should be able to design it into a View.
Yii - Modules
A module is an entity that has its own models, views, controllers, and possibly other modules. It is practically an application inside the application.
Step 1 − Create a folder called modules inside your project root. Inside the modules folder, create a folder named hello. This will be the basic folder for our Hello module.
Step 2 − Inside the hello folder, create a file Hello.php with the following code.
<?php
   namespace app\modules\hello;
   class Hello extends \yii\base\Module {
      public function init() {
         parent::init();
      }
   }
?>
We have just created a module class. This should be located under the module's base path. Every time a module is accessed, an instance of the correspondent module class is created. The init() function is for initializing the module's properties.
Step 3 − Now, add two more directories inside the hello folder − controllers and views. Add a CustomController.php file to the controller’s folder.
<?php
   namespace app\modules\hello\controllers;
   use yii\web\Controller;
   class CustomController extends Controller {
      public function actionGreet() {
         return $this->render('greet');
      }
   }
?>
When creating a module, a convention is to put the controller classes into the controller’s directory of the module's base path. We have just defined the actionGreet function, that just returns a greet view.
Views in the module should be put in the views folder of the module's base path. If views are rendered by a controller, they should be located in the folder corresponding to the controllerID. Add custom folder to the views folder.
Step 4 − Inside the custom directory, create a file called greet.php with the following code.
<h1>Hello world from custom module!</h1>
We have just created a View for our actionGreet. To use this newly created module, we should configure the application. We should add our module to the modules property of the application.
Step 5 − Modify the config/web.php file.
<?php
   $params = require(__DIR__ . '/params.php');
   $config = [
      'id' => 'basic',
      'basePath' => dirname(__DIR__),
      'bootstrap' => ['log'],
      'components' => [
         'request' => [
            // !!! insert a secret key in the following (if it is empty) - this is
               //required by cookie validation
            'cookieValidationKey' => 'ymoaYrebZHa8gURuolioHGlK8fLXCKjO',
         ],
         'cache' => [
            'class' => 'yii\caching\FileCache',
         ],
         'user' => [
            'identityClass' => 'app\models\User',
            'enableAutoLogin' => true,
         ],
         'errorHandler' => [
            'errorAction' => 'site/error',
         ],
         'mailer' => [
            'class' => 'yii\swiftmailer\Mailer',
            // send all mails to a file by default. You have to set
            // 'useFileTransport' to false and configure a transport
            // for the mailer to send real emails.
            'useFileTransport' => true,
         ],
         'log' => [
            'traceLevel' => YII_DEBUG ? 3 : 0,
            'targets' => [
               [
                  'class' => 'yii\log\FileTarget',
                  'levels' => ['error', 'warning'],
               ],
            ],
         ],
         'db' => require(__DIR__ . '/db.php'),
      ],
      'modules' => [
         'hello' => [
            'class' => 'app\modules\hello\Hello',
         ],
      ],
      'params' => $params,
   ];
   if (YII_ENV_DEV) {
      // configuration adjustments for 'dev' environment
      $config['bootstrap'][] = 'debug';
      $config['modules']['debug'] = [
         'class' => 'yii\debug\Module',
      ];
      $config['bootstrap'][] = 'gii';
      $config['modules']['gii'] = [
         'class' => 'yii\gii\Module',
      ];
   }
   return $config;
?>
A route for a module's controller must begin with the module ID followed by the controller ID and action ID.
Step 6 − To run the actionGreet in our application, we should use the following route.
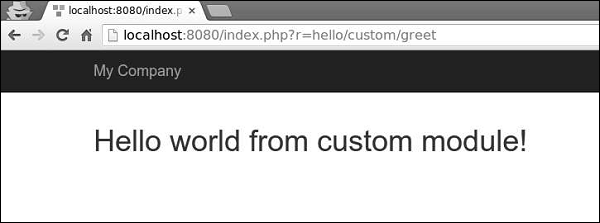
hello/custom/greet
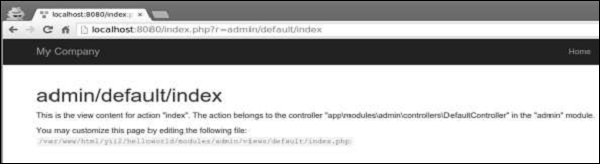
Where hello is a module ID, custom is a controller ID and greet is an action ID.
Step 7 − Now, type http://localhost:8080/index.php?r=hello/custom/greet and you will see the following output.
Important Points
Modules should −
Be used in large applications. You should divide its features into several groups. Each feature group can be developed as a module.
Be reusable. Some commonly used features, as SEO management or blog management, can be developed as modules, so that you can easily reuse them in future projects.
Yii - Views
Views are responsible for presenting the data to end users. In web applications, Views are just PHP script files containing HTML and PHP code.
Creating Views
Step 1 − Let us have a look at the ‘About’ view of the basic application template.
<?php
   /* @var $this yii\web\View */
   use yii\helpers\Html;
   $this->title = 'About';
   $this->params['breadcrumbs'][] = $this->title;
?>
<div class="site-about">
   <h1><?= Html::encode($this->title) ?></h1>
   <p>
      This is the About page. You may modify the following file to customize its content:
   </p>
   <code><?= __FILE__ ?></code>
</div>
The $this variable refers to the view component that manages and renders this view template.
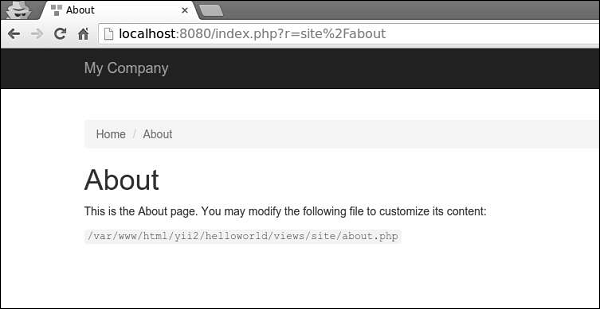
This is how the ‘About’ page looks like −
It is important to encode and/or filter the data coming from the end user in order to avoid the XSS attacks. You should always encode a plain text by calling yii\helpers\Html::encode() and HTML content by calling yii\helpers\HtmlPurifier.
Step 2 − Modify the ‘About’ View in the following way.
<?php
   /* @var $this yii\web\View */
   use yii\helpers\Html;
   use yii\helpers\HtmlPurifier;
   $this->title = 'About';
   $this->params['breadcrumbs'][] = $this->title;
?>
<div class="site-about">
   <h1><?= Html::encode($this->title) ?></h1>
   <p>
      This is the About page. You may modify the following file to customize its content:
   </p>
   <p>
      <?= Html::encode("<script>alert('alert!');</script><h1>ENCODE EXAMPLE</h1>>") ?>
   </p>
   <p>
      <?= HtmlPurifier::process("<script>alert('alert!');</script><h1> HtmlPurifier EXAMPLE</h1>") ?>
   </p>
   <code><?= __FILE__ ?></code>
</div>
Step 3 − Now type http://localhost:8080/index.php?r=site/about. You will see the following screen.
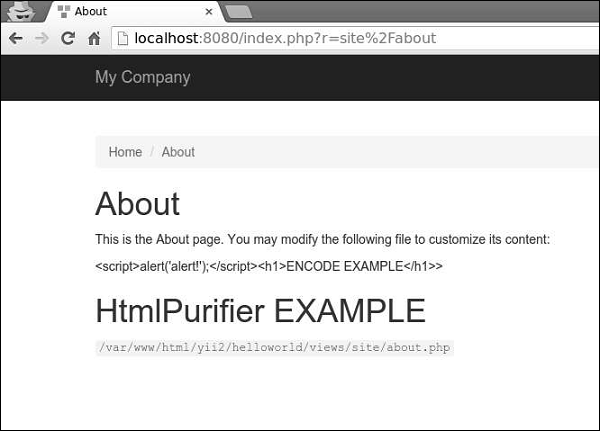
Notice, that the javascript code inside the Html::encode() function is displayed as plain text. The same thing is for HtmlPurifier::process() call. Only h1 tag is being displayed.
Views follow these conventions −
Views, which are rendered by a controller, should be put into the @app/views/controllerID folder.
Views, which are rendered in a widget, should be put into the widgetPath/views folder.
To render a view within a controller, you may use the following methods −
render() − Renders a view and applies a layout.
renderPartial() − Renders a view without a layout.
renderAjax() − Renders a view without a layout, but injects all registered js and css files.
renderFile() − Renders a view in a given file path or alias.
renderContent() − Renders a static string and applies a layout.
To render a view within another view, you may use the following methods −
render() − Renders a view.
renderAjax() − Renders a view without a layout, but injects all registered js and css files.
renderFile() − Renders a view in a given file path or alias.
Step 4 − Inside the views/site folder, create two view files: _part1.php and _part2.php.
_part1.php −
<h1>PART 1</h1>
_part2.php −
<h1>PART 2</h1>
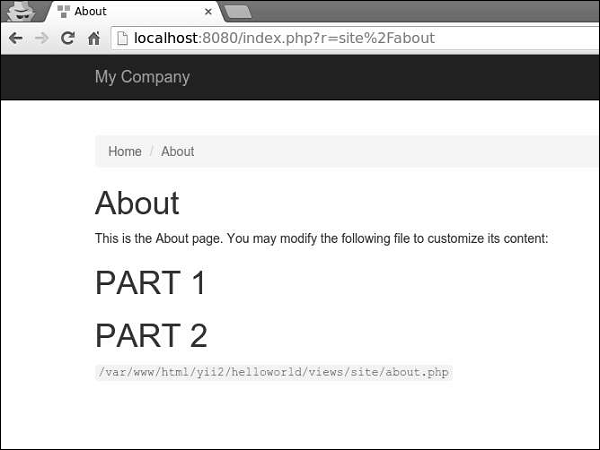
Step 5 − Finally, render these two newly created views inside the ‘About’ View.
<?php
   /* @var $this yii\web\View */
   use yii\helpers\Html;
   $this->title = 'About';
   $this->params['breadcrumbs'][] = $this->title;
?>
<div class="site-about">
   <h1><?= Html::encode($this->title) ?></h1>
   <p>
      This is the About page. You may modify the following file to customize its content:
   </p>
   <?= $this->render("_part1") ?>
   <?= $this->render("_part2") ?>
   <code><?= __FILE__ ?></code>
</div>
You will see the following output −
When rendering a view, you can define the view using as a view name or a view file path/alias. A view name is resolved in the following way −
A view name can omit the extension. For example, the about view corresponds to the about.php file.
If the view name starts with “/”, then if currently active module is forum, and the view name is comment/post, the path would be @app/modules/forum/views/comment/post. If there is no active module, the path would be @app/views/comment/post.
If the view name starts with “//”, the corresponding path would be @app/views/ViewName. For example, //site/contact corresponds to @app/views/site/contact.php.
If the view name is contact, and the context controller is SiteController, then the path would be @app/views/site/contact.php.
If the price view is rendered within the goods view, then price would be resolved as @app/views/invoice/price.php if it is being rendered in the @app/views/invoice/goods.php.
Accessing Data in Views
To access data within a view, you should pass the data as the second parameter to the view rendering method.
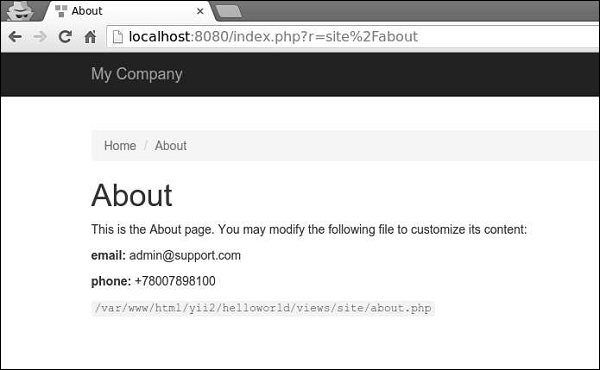
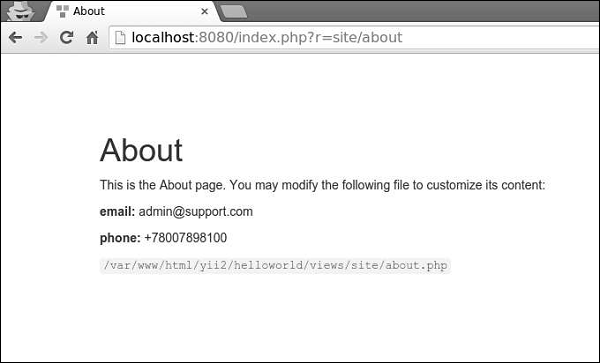
Step 1 − Modify the actionAbout of the SiteController.
public function actionAbout() {
   $email = "admin@support.com";
   $phone = "+78007898100";
   return $this->render('about',[
      'email' => $email,
      'phone' => $phone
   ]);
}
In the code given above, we pass two variables $email and $phone to render in the About view.
Step 2 − Change the about view code.
<?php
   /* @var $this yii\web\View */
   use yii\helpers\Html;
   $this->title = 'About';
   $this->params['breadcrumbs'][] = $this->title;
?>
<div class = "site-about">
   <h1><?= Html::encode($this->title) ?></h1>
   <p>
      This is the About page. You may modify the following file to customize its content:
   </p>
   <p>
      <b>email:</b> <?= $email ?>
   </p>
   <p>
      <b>phone:</b> <?= $phone ?>
   </p>
   <code><?= __FILE__ ?></code>
</div>
We have just added two variables that we received from the SiteController.
Step 3 − Type the URL http://localhost:8080/index.php?r=site/about in the web browser, you will see the following.
Yii - Layouts
Layouts represent the common parts of multiple views i.e. for example, page header and footer. By default, layouts should be stored in the views/layouts folder.
Let us have a look at the main layout of the basic application template −
<?php
   /* @var $this \yii\web\View */
   /* @var $content string */
   use yii\helpers\Html;
   use yii\bootstrap\Nav;
   use yii\bootstrap\NavBar;
   use yii\widgets\Breadcrumbs;
   use app\assets\AppAsset;
   AppAsset::register($this);
?>
<?php $this->beginPage() ?>
<!DOCTYPE html>
<html lang = "<?= Yii::$app->language ?>">
   <head>
      <meta charset = "<?= Yii::$app->charset ?>">
      <meta name = "viewport" content = "width = device-width, initial-scale = 1">
      <?= Html::csrfMetaTags() ?>
      <title><?= Html::encode($this->title) ?></title>
      <?php $this->head() ?>
   </head>
   <body>
      <?php $this->beginBody() ?>
         <div class = "wrap">
            <?php
               NavBar::begin([
                  'brandLabel' => 'My Company',
                  'brandUrl' => Yii::$app->homeUrl,
                  'options' => [
                     'class' => 'navbar-inverse navbar-fixed-top',
                  ],
               ]);
               echo Nav::widget([
                  'options' => ['class' => 'navbar-nav navbar-right'],
                  'items' => [
                     ['label' => 'Home', 'url' => ['/site/index']],
                     ['label' => 'About', 'url' => ['/site/about']],
                     ['label' => 'Contact', 'url' => ['/site/contact']],
                     Yii::$app->user->isGuest ?
                        ['label' => 'Login', 'url' => ['/site/login']] :
                        [
                           'label' => 'Logout (' . Yii::$app->user->identity->username.')',
                           'url' => ['/site/logout'],
                           'linkOptions' => ['data-method' => 'post']
                        ],
                  ],
               ]);
               NavBar::end();
            ?>
            <div class = "container">
               <?= Breadcrumbs::widget([
                  'links' => isset($this->params['breadcrumbs']) ? $this>params
                     ['breadcrumbs'] : [],
               ]) ?>
               <?= $content ?>
            </div>
         </div>
         <footer class = "footer">
            <div class = "container">
               <p class = "pull-left">© My Company <?= date('Y') ?></p>
               <p class = "pull-right"><?= Yii::powered() ?></p>
            </div>
         </footer>
      <?php $this->endBody() ?>
   </body>
</html>
<?php $this->endPage() ?>
This layout generates the HTML page that is common for all pages. The $content variable is the rendering result of content views. The following methods trigger events about the rendering process so that the scripts and tags registered in other places could be properly injected −
head() − Should be called within the head section. Generates a placeholder, which will be replaced with the registered HTML targeted at the head position.
beginBody() − Should be called at the beginning of the body section. Triggers the EVENT_BEGIN_BODY event. Generates a placeholder which will be replaced with the registered HTML targeted at the body begin position.
endBody() − Should be called at the end of the body section. Triggers the EVENT_END_BODY event. Generates a placeholder, which will be replaced with the registered HTML targeted at the body end position.
beginPage() − Should be called at the beginning of the layout. Triggers the EVENT_BEGIN_PAGE event.
endPage() − Should be called at the end of the layout. Triggers the EVENT_END_PAGE event.
Create a Layout
Step 1 − Inside the views/layouts directory, create a file called newlayout.php with the following code.
<?php
   /* @var $this \yii\web\View */
   /* @var $content string */
   use yii\helpers\Html;
   use yii\bootstrap\Nav;
   use yii\bootstrap\NavBar;
   use yii\widgets\Breadcrumbs;
   use app\assets\AppAsset;
   AppAsset::register($this);
?>
<?php $this->beginPage() ?>
<!DOCTYPE html>
<html lang = "<?= Yii::$app->language ?>">
   <head>
      <meta charset = "<?= Yii::$app->charset ?>">
      <meta name = "viewport" content = "width = device-width, initial-scale = 1">
      <? = Html::csrfMetaTags() ?>
      <title><? = Html::encode($this->title) ?></title>
      <?php $this->head() ?>
   </head>

   <body>
      <?php $this->beginBody() ?>
         <div class = "wrap">
            <div class = "container">
               <? = $content ?>
            </div>
         </div>

         <footer class = "footer">
            <div class = "container">
               <p class = "pull-left">© My Company <?= date('Y') ?></p>
               <p class = "pull-right"><? = Yii::powered() ?></p>
            </div>
         </footer>
      <?php $this->endBody() ?>
   </body>

</html>
<?php $this->endPage() ?>
We have removed the top menu bar.
Step 2 − To apply this layout to the SiteController, add the $layout property to the SiteController class.
<?php
   namespace app\controllers;
   use Yii;
   use yii\filters\AccessControl;
   use yii\web\Controller;
   use yii\filters\VerbFilter;
   use app\models\LoginForm;
   use app\models\ContactForm;
   class SiteController extends Controller {
      public $layout = “newlayout”;
      /* other methods */
   }
?>
Step 3 − Now if you go to the web browser at any view of the SiteController, you will see that the layout has changed.
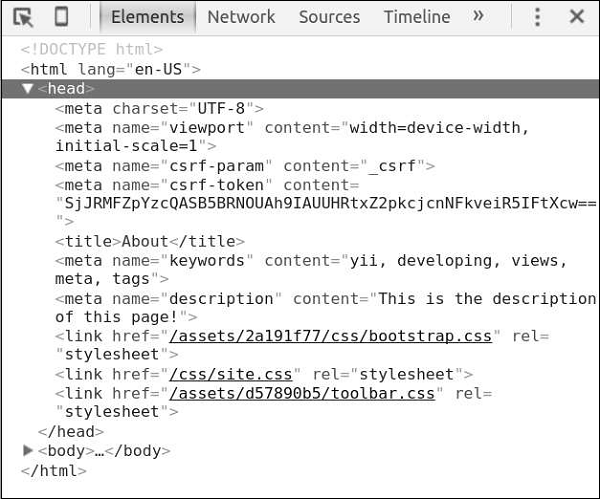
Step 4 − To register various meta tags, you can call yii\web\View::registerMetaTag() in a content view.
Step 5 − Modify the ‘About’ view of the SiteController.
<?php
   /* @var $this yii\web\View */
   use yii\helpers\Html;
   $this->title = 'About';
   $this->params['breadcrumbs'][] = $this->title;
   $this->registerMetaTag(['name' => 'keywords', 'content' => 'yii, developing, views,
      meta, tags']);
   $this->registerMetaTag(['name' => 'description', 'content' => 'This is the description
      of this page!'], 'description');
?>
<div class="site-about">
   <h1><?= Html::encode($this->title) ?></h1>
   <p>
      This is the About page. You may modify the following file to customize its content:
   </p>
   <code><?= __FILE__ ?></code>
</div>
We have just registered two meta tags − keywords and description.
Step 6 − Now go to http://localhost:8080/index.php?r=site/about, you will find the meta tags in the head section of the page as shown in the following screenshot.
Views trigger several events −
EVENT_BEGIN_BODY − triggered in layouts by the call of yii\web\View::beginBody().
EVENT_END_BODY − triggered in layouts by the call of yii\web\View::endBody().
EVENT_BEGIN_PAGE − triggered in layouts by the call of yii\web\View::beginPage().
EVENT_END_PAGE − triggered in layouts by the call of yii\web\View::endPage().
EVENT_BEFORE_RENDER − triggered in a controller at the beginning of rendering a file.
EVENT_AFTER_RENDER − triggered after rendering a file.
You may respond to these events to inject content into views.
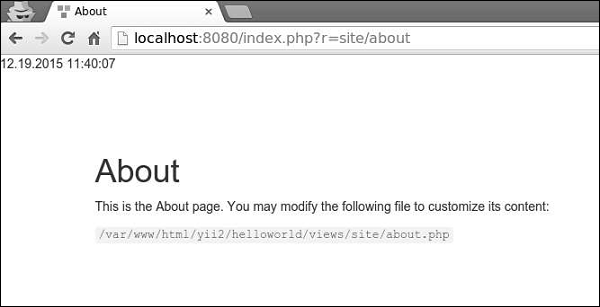
Step 7 − To display the current date and time in the actionAbout of the SiteController, modify it this way.
public function actionAbout() {
   \Yii::$app->view->on(View::EVENT_BEGIN_BODY, function () {
      echo date('m.d.Y H:i:s');
   });
   return $this->render('about');
}
Step 8 − Type http://localhost:8080/index.php?r=site/about in the address bar of the web browser and you will see the following.
Important Points
To make Views more manageable you should −
- Divide complex views into several smaller ones.
- Use layouts for common HTML sections (headers, footers, menus and so forth).
- Use widgets.
Views should −
- Contain HTML and simple PHP code to format and render data.
- NOT process requests.
- NOT modify model properties.
- NOT perform database queries.
Yii - Assets
An asset is a file (css, js, video, audio or image, etc.) that may be referenced in a web page. Yii manages assets in asset bundles. The purpose of an asset bundle is to have a group of related JS or CSS files in the code base and to be able to register them within a single PHP call. Asset bundles can also depend on other asset bundles.
Inside the assets folder, you will find the asset bundle for the basic application template −
<?php
   namespace app\assets;
   use yii\web\AssetBundle;
   /**
   * @author Qiang Xue <qiang.xue@gmail.com>
   * @since 2.0
   */
   class AppAsset extends AssetBundle {
      public $basePath = '@webroot';
      public $baseUrl = '@web';
      public $css = [
         'css/site.css',
      ];
      public $js = [];
      public $depends = [
         'yii\web\YiiAsset',
         'yii\bootstrap\BootstrapAsset',
      ];
   }
?>
The above class specifies that the asset files are located inside the @webroot folder, which corresponds to the URL @web. The bundle contains no JS files and a single CSS file. The bundle depends on other bundles −
yii\web\YiiAsset and yii\bootstrap\BootstrapAsset.
Properties of AssetBundle
Following are the properties of AssetBundle.
basePath − Defines a web-accessible directory that contains the asset files in this bundle.
baseUrl − Specifies the URL corresponding to the basePath property.
js − Defines an array of the JS files contained in this bundle.
css − Defines an array of the CSS files contained in this bundle.
depends − Defines an array of the asset bundles that this bundle depends on. It means that CSS and JS files of the current asset bundle will be included after the bundles, which are declared by the depends property.
sourcePath − Defines the root directory that contains the asset files. You should set this property if the root directory is not web accessible. Otherwise, you should set the basePath and baseUrl properties.
cssOptions − Defines the options that will be passed to the yii\web\View∷registerCssFile function.
jsOptions − Defines the options that will be passed to the yii\web\View::registerJsFile function.
publishOptions: Specifies the options that will be passed to the yii\web\AssetManager::publish function.
Classification of Assets
Depending on location, assets can be classified as −
Source Assets − The assets are located in the directory that cannot be directly accessed via web. They should be copied to a web directory in order to use source assets in a page. This process is called asset publishing.
Published Assets − The assets are located in a web accessible directory
External Assets − The assets are located on another web server.
Using Asset Bundles
Step 1 − Inside the assets folder, create a new file called DemoAsset.php with the following content.
<?php
   namespace app\assets;
   use yii\web\AssetBundle;
   class DemoAsset extends AssetBundle {
      public $basePath = ‘@webroot’;
      public $baseUrl = ‘@web’;
      public $js = [‘js/demo.js’];
   }
?>
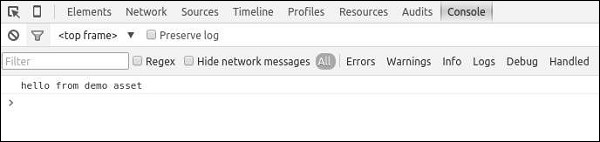
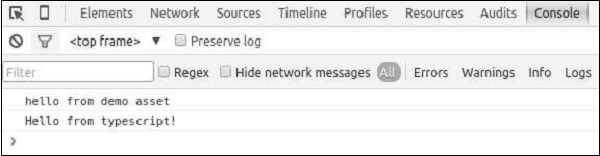
Step 2 − We have just declared a new asset bundle with a single demo.js file. Now, inside the web/js folder, create a file called demo.js with this code.
console.log("hello from demo asset");
Step 3 − To register the newly created asset bundle, go to the views/layouts directory and at the top of the main.php file, add the following line.
\app\assets\DemoAsset::register($this);
Step 4 − If point your web browser at http://localhost:8080/index.php, you should see the following chrome console output.
You can also define the jsOptions and cssOptions properties to customize the way that CSS and JS files are included in a page. By default, JS files are included before the closing body tag.
Step 5 − To include JS files in the head section, modify the DemoAsset.php file in the following way.
<?php
   namespace app\assets;
   use yii\web\AssetBundle;
   use yii\web\View;
   class DemoAsset extends AssetBundle {
      public $basePath = '@webroot';
      public $baseUrl = '@web';
      public $js = ['js/demo.js'];
      public  $jsOptions = ['position' => View::POS_HEAD];
   }
?>
Step 6 − Now go to http://localhost:8080/index.php, you should see that the demo.js script is included in the head section of the page.

It is a common practice for a web application, running in production mode, to enable HTTP caching for assets. By doing so, the last modification timestamp will be appended to all published assets.
Step 7 − Go to the config folder and modify the web.php file as shown in the following code.
<?php
   $params = require(__DIR__ . '/params.php');
   $config = [
      'id' => 'basic',
      'basePath' => dirname(__DIR__),
      'bootstrap' => ['log'],
      'components' => [
         'assetManager' => [
            'appendTimestamp' => true,
         ],
         'request' => [
            // !!! insert a secret key in the following (if it is empty) - this is
               //required by cookie validation
            'cookieValidationKey' => 'ymoaYrebZHa8gURuolioHGlK8fLXCKjO',
         ],
         'cache' => [
            'class' => 'yii\caching\FileCache',
         ],
         'user' => [
            'identityClass' => 'app\models\User',
            'enableAutoLogin' => true,
         ],
         'errorHandler' => [
            'errorAction' => 'site/error',
         ],
         'mailer' => [
            'class' => 'yii\swiftmailer\Mailer',
            // send all mails to a file by default. You have to set
            // 'useFileTransport' to false and configure a transport
            // for the mailer to send real emails.
            'useFileTransport' => true,
         ],
         'log' => [
            'traceLevel' => YII_DEBUG ? 3 : 0,
            'targets' => [
               [
                  'class' => 'yii\log\FileTarget',
                  'levels' => ['error', 'warning'],
               ],
            ],
         ],
         'db' => require(__DIR__ . '/db.php'),
      ],
      'modules' => [
         'hello' => [
            'class' => 'app\modules\hello\Hello',
         ],
      ],
      'params' => $params,
   ];
   if (YII_ENV_DEV) {
      // configuration adjustments for 'dev' environment
      $config['bootstrap'][] = 'debug';
      $config['modules']['debug'] = [
         'class' => 'yii\debug\Module',
      ];
      $config['bootstrap'][] = 'gii';
      $config['modules']['gii'] = [
         'class' => 'yii\gii\Module',
      ];
   }
   return $config;
?>
We have added the AssetManager component and set the appendTimestamp property.
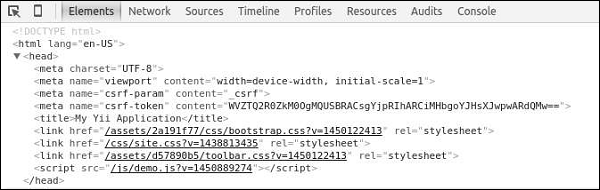
Step 8 − Now type http://localhost:8080/index.php in the address bar of the web browser. You will notice that all the assets now have a timestamp as shown in the following image.
Core Yii Assetbundles
Following are the Core Yii Assetbundles.
yii\web\JqueryAsset − Includes the jquery.js file.
yii\web\YiiAsset − Includes the yii.js file, which implements a mechanism of organizing JS code in modules.
yii\bootstrap\BootstrapAsset − Includes the CSS file from the Twitter Bootstrap framework.
yii\bootstrap\BootstrapPluginAsset − Includes the JS file from the Twitter Bootstrap framework.
yii\jui\JuiAsset − Includes the CSS and JS files from the jQuery UI library.
Yii - Asset Conversion
Instead of writing CSS or JS code, developers often use extended syntax, like LESS, SCSS, Stylus for CSS and TypeScript, CoffeeScript for JS. Then they use special tools to convert these files into real CSS and JS.
The asset manager in Yii converts assets in extended syntax into CSS and JS, automatically. When the view is rendered, it will include the CSS and JS files in the page, instead of the original assets in extended syntax.
Step 1 − Modify the DemoAsset.php file this way.
<?php
   namespace app\assets;
   use yii\web\AssetBundle;
   use yii\web\View;
   class DemoAsset extends AssetBundle {
      public $basePath = '@webroot';
      public $baseUrl = '@web';
      public $js = [
         'js/demo.js',
         'js/greeting.ts'
      ];
      public  $jsOptions = ['position' => View::POS_HEAD];
   }
?>
We have just added a typescript file.
Step 2 − Inside the web/js directory, create a file called greeting.ts with the following code.
class Greeter {
   constructor(public greeting: string) { }
   greet() {
      return this.greeting;
   }
};
var greeter = new Greeter("Hello from typescript!");
console.log(greeter.greet());
In the above code, we define a Greeter class with a single method greet(). We write our greeting to the chrome console.
Step 3 − Go to the URL http://localhost:8080/index.php. You will notice that the greeting.ts file is converted into the greeting.js file as shown in the following screenshot.
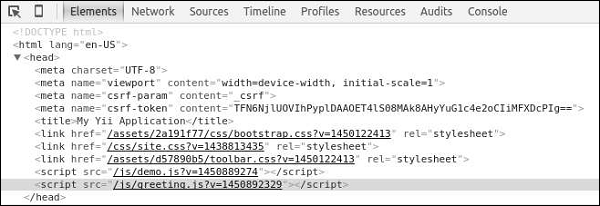
Following will be the output.
Yii - Extensions
Extensions are packages specifically designed to be used in Yii applications. You can share your own code as an extension or use third-party extensions to add features to your application.
Using Extensions
Most extensions are distributed as Composer packages. Composer installs packages from Packagist – the repository for Composer packages.
To install a third-party extension, you should −
Add the extension to a composer.json file.
Run composer install.
Adding Date and Time Widget
Let us add a neat datetime widget to our project.
Step 1 − Modify the composer.json file of the basic application template this way.
{
   "name": "yiisoft/yii2-app-basic",
   "description": "Yii 2 Basic Project Template",
   "keywords": ["yii2", "framework", "basic", "project template"],
   "homepage": "http://www.yiiframework.com/",
   "type": "project",
   "license": "BSD-3-Clause",
   "support": {
      "issues": "https://github.com/yiisoft/yii2/issues?state=open",
      "forum": "http://www.yiiframework.com/forum/",
      "wiki": "http://www.yiiframework.com/wiki/",
      "irc": "irc://irc.freenode.net/yii",
      "source": "https://github.com/yiisoft/yii2"
   },
   "minimum-stability": "stable",
   "require": {
      "php": ">=5.4.0",
      "yiisoft/yii2": ">=2.0.5",
      "yiisoft/yii2-bootstrap": "*",
      "yiisoft/yii2-swiftmailer": "*",
      "kartik-v/yii2-widget-datetimepicker": "*"
   },
   "require-dev": {
      "yiisoft/yii2-codeception": "*",
      "yiisoft/yii2-debug": "*",
      "yiisoft/yii2-gii": "*",
      "yiisoft/yii2-faker": "*"
   },
   "config": {
      "process-timeout": 1800
   },
   "scripts": {
      "post-create-project-cmd": [
         "yii\\composer\\Installer::postCreateProject"
      ]
   },
   "extra": {
      "yii\\composer\\Installer::postCreateProject": {
         "setPermission": [
            {
               "runtime": "0777",
               "web/assets": "0777",
               "yii": "0755"
            }
         ],
         "generateCookieValidationKey": [
            "config/web.php"
         ]
      },
      "asset-installer-paths": {
         "npm-asset-library": "vendor/npm",
         "bower-asset-library": "vendor/bower"
      }
   }
}
We have added the dependency "kartik-v/yii2-widget-datetimepicker": "*" to the required section.
Step 2 − Now, inside the project root, run the composer update to update all the dependencies.
We have just installed the extension. You will find it inside the vendor/kartik-v/yii2widget-datetimepicker folder.
Step 3 − To display the newly installed widget in the page, modify the About view of the actionAbout method of the SiteController.
<?php
/* @var $this yii\web\View */
use kartik\datetime\DateTimePicker;
use yii\helpers\Html;
$this->title = 'About';
$this->params['breadcrumbs'][] = $this->title;
$this->registerMetaTag(['name' => 'keywords', 'content' => 'yii, developing, views,
meta, tags']);
$this->registerMetaTag(['name' => 'description',
'content' => 'This is the description of this page!'], 'description');
?>
<div class="site-about">
<h1><?= Html::encode($this->title) ?></h1>
<p>
This is the About page. You may modify the following file to customize its content:
</p>
<?php
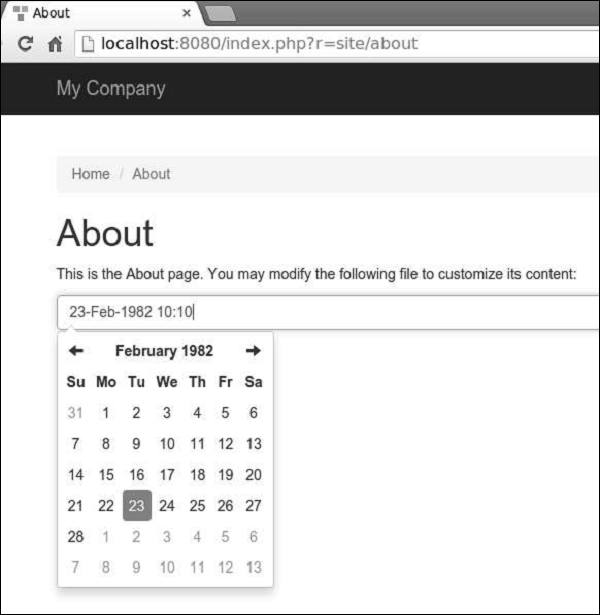
echo DateTimePicker::widget([
'name' => 'dp_1',
'type' => DateTimePicker::TYPE_INPUT,
'value' => '23-Feb-1982 10:10',
'pluginOptions' => [
'autoclose'=>true,
'format' => 'dd-M-yyyy hh:ii'
]
]);
?>
</div>
Step 4 − Now, run the built-in php server from the project root via the php -S localhost:8080t web command.
Step 5 − Go to http://localhost:8080/index.php?r=site/about. You will see a neat datetime picker as shown in the following screenshot.
Yii - Creating Extensions
Let us create a simple extension displaying a standard “Hello world” message. This extension will be distributed via the Packagist repository.
Step 1 − Create a folder called hello-world in your hard drive but not inside the Yii basic application template). Inside the hello-world directory, create a file named composer.json with the following code.
{
    "name": "tutorialspoint/hello-world",
    "authors": [
        {
            "name": "tutorialspoint"
        }
    ],
    "require": {},
    "autoload": {
        "psr-0": {
            "HelloWorld": "src/"
        }
    }
}
We have declared that we are using the PSR-0 standard and all extension files are under the src folder.
Step 2 − Create the following directory path: hello-world/src/HelloWorld.
Step 3 − Inside the HelloWorld folder, create a file called SayHello.php with the following code.
<?php
   namespace HelloWorld;
   class SayHello {
      public static function world() {
         return 'Hello World, Composer!';
      }
   }
?>
We have defined a SayHello class with a world static function, which returns our hello message.
Step 4 − The extension is ready. Now create an empty repository at your github account and push this extension there.
Inside the hello-world folder run −
- git init
- git add
- git commit -m “initial commit”
- git remote add origin <YOUR_NEWLY_CREATED_REPOSITORY>
- git push -u origin master
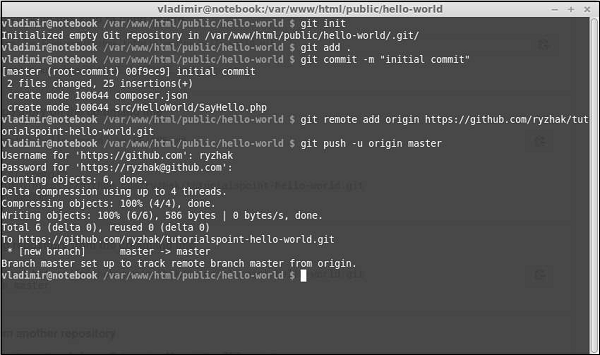
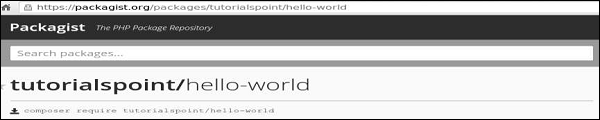
We have just sent our extension to the github. Now, go to the https://packagist.org, sign in and click “submit” at the top menu.
You will see a page where you should enter your github repository to publish it.
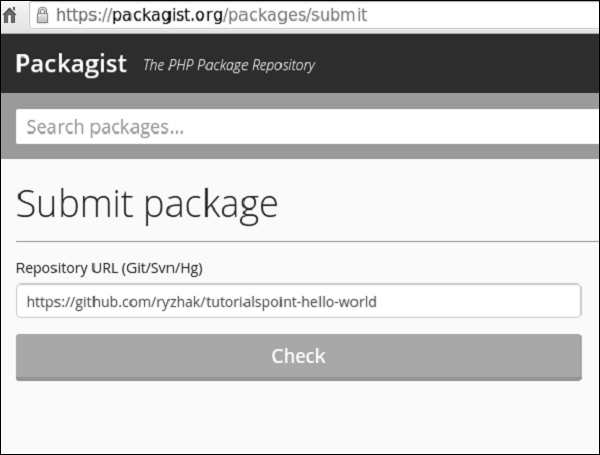
Step 5 − Click the “check” button and your extension is published.
Step 6 − Go back to the basic application template. Add the extension to the composer.json.
{
   "name": "yiisoft/yii2-app-basic",
   "description": "Yii 2 Basic Project Template",
   "keywords": ["yii2", "framework", "basic", "project template"],
   "homepage": "http://www.yiiframework.com/",
   "type": "project",
   "license": "BSD-3-Clause",
   "support": {
      "issues": "https://github.com/yiisoft/yii2/issues?state=open",
      "forum": "http://www.yiiframework.com/forum/",
      "wiki": "http://www.yiiframework.com/wiki/",
      "irc": "irc://irc.freenode.net/yii",
      "source": "https://github.com/yiisoft/yii2"
   },
   "minimum-stability": "dev",
   "prefer-stable" : true,
   "require": {
      "php": ">=5.4.0",
      "yiisoft/yii2": ">=2.0.5",
      "yiisoft/yii2-bootstrap": "*",
      "yiisoft/yii2-swiftmailer": "*",
      "kartik-v/yii2-widget-datetimepicker": "*",
      "tutorialspoint/hello-world": "*"
   },
   "require-dev": {
      "yiisoft/yii2-codeception": "*",
      "yiisoft/yii2-debug": "*",
      "yiisoft/yii2-gii": "*",
      "yiisoft/yii2-faker": "*"
   },
   "config": {
      "process-timeout": 1800
   },
   "scripts": {
      "post-create-project-cmd": [
         "yii\\composer\\Installer::postCreateProject"
      ]
   },
   "extra": {
      "yii\\composer\\Installer::postCreateProject": {
         "setPermission": [
            {
               "runtime": "0777",
               "web/assets": "0777",
               "yii": "0755"
            }
         ],
         "generateCookieValidationKey": [
            "config/web.php"
         ]
      },
      "asset-installer-paths": {
         "npm-asset-library": "vendor/npm",
         "bower-asset-library": "vendor/bower"
      }
   }
}
Step 7 − Inside the project root folder, run the composer update to install/update all the dependencies.
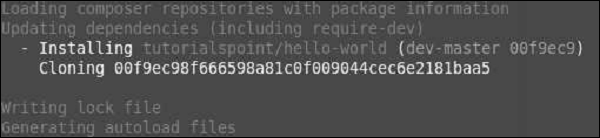
Step 8 − Our extension should be installed. To use it, modify the About view of the actionAbout method of the SiteController.
<?php
/* @var $this yii\web\View */
use yii\helpers\Html;
$this->title = 'About';
$this->params['breadcrumbs'][] = $this->title;
$this->registerMetaTag(['name' => 'keywords', 'content' => 'yii, developing, views,
meta, tags']);
$this->registerMetaTag(['name' => 'description', 'content' => 'This is the
description of this page!'], 'description');
?>
<div class = "site-about">
<h1><?= Html::encode($this->title) ?></h1>
<p>
This is the About page. You may modify the following file to customize its content:
</p>
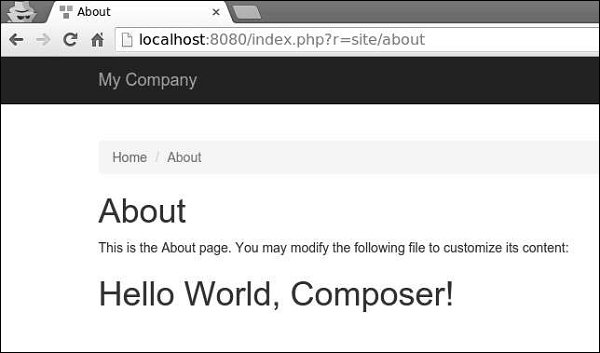
<h1><?= HelloWorld\SayHello::world(); ?></h1>
</div>
Step 9 − Type http://localhost:8080/index.php?r=site/about in the web browser. You will see a hello world message from our extension.
Yii - HTTP Requests
Requests are represented by the yii\web\Request object, which provides information about HTTP headers, request parameters, cookies, and so forth.
The methods get() and post() return request parameters of the request component.
Example −
$req = Yii::$app->request;
   /*
   * $get = $_GET;
   */
   $get = $req->get();

   /*
   * if(isset($_GET['id'])) {
   *     $id = $_GET['id'];
   * } else {
   *     $id = null;
   * }
   */
   $id = $req->get('id');

   /*
   * if(isset($_GET['id'])) {
   *     $id = $_GET['id'];
   * } else {
   *     $id = 1;
   * }
   */
   $id = $req->get('id', 1);

   /*
   * $post = $_POST;
	*/
   $post = $req->post();

   /*
   * if(isset($_POST['name'])) {
   *     $name = $_POST['name'];
   * } else {
   *     $name = null;
   * }
   */
   $name = $req->post('name');

   /*
   * if(isset($_POST['name'])) {
   *     $name = $_POST['name'];
   * } else {
   *     $name = '';
   * }
   */
   $name = $req->post('name', '');
Step 1 − Add an actionTestGet function to the SiteController of the basic application template.
public function actionTestGet() {
   var_dump(Yii::$app->request->get());
}
Step 2 − Now go to http://localhost:8080/index.php?r=site/testget&id=1&name=tutorialspoint&message=welcome, you will see the following.
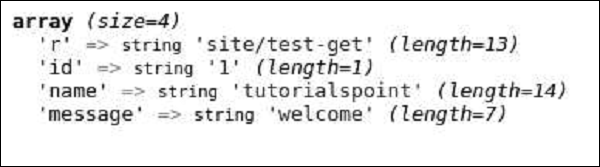
To retrieve parameters of other request methods (PATCH, DELETE, etc.), use the yii\web\Request::getBodyParam() method.
To get the HTTP method of the current request, use the Yii::$app→request→method property.
Step 3 − Modify the actionTestGet function as shown in the following code.
public function actionTestGet() {
   $req = Yii::$app->request;
   if ($req->isAjax) {
      echo "the request is AJAX";
   }
   if ($req->isGet) {
      echo "the request is GET";
   }
   if ($req->isPost) {
      echo "the request is POST";
   }
   if ($req->isPut) {
      echo "the request is PUT";
   }
}
Step 4 − Go to http://localhost:8080/index.php?r=site/test-get. You will see the following.
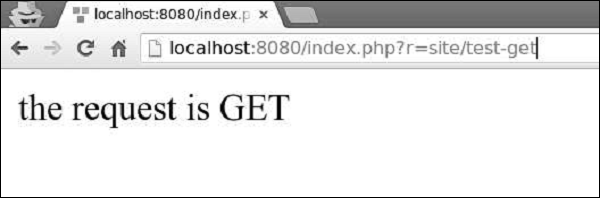
The request component provides many properties to inspect the requested URL.
Step 5 − Modify the actionTestGet function as follows.
public function actionTestGet() {
   //the URL without the host
   var_dump(Yii::$app->request->url);

   //the whole URL including the host path
   var_dump(Yii::$app->request->absoluteUrl);

   //the host of the URL
   var_dump(Yii::$app->request->hostInfo);

   //the part after the entry script and before the question mark
   var_dump(Yii::$app->request->pathInfo);

   //the part after the question mark
   var_dump(Yii::$app->request->queryString);

   //the part after the host and before the entry script
   var_dump(Yii::$app->request->baseUrl);

   //the URL without path info and query string
   var_dump(Yii::$app->request->scriptUrl);

   //the host name in the URL
   var_dump(Yii::$app->request->serverName);

   //the port used by the web server
   var_dump(Yii::$app->request->serverPort);
}
Step 6 − In the address bar of the web browser, type http://localhost:8080/index.php?r=site/testget&id=1&name=tutorialspoint&message=welcome, you will see the following.
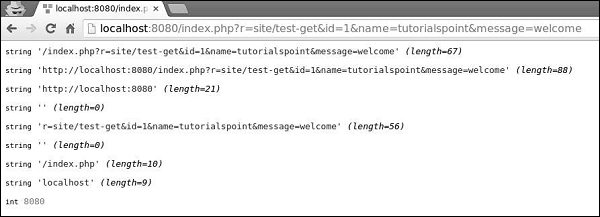
Step 7 − To get the HTTP header information, you may use the yii\web\Request::$headers property. Modify the actionTestGet function this way.
public function actionTestGet() {
   var_dump(Yii::$app->request->headers);
}
Step 8 − If you go to the URL http://localhost:8080/index.php?r=site/testget&id=1&name=tutorialspoint&message=welcome, you will see the output as shown in the following code.
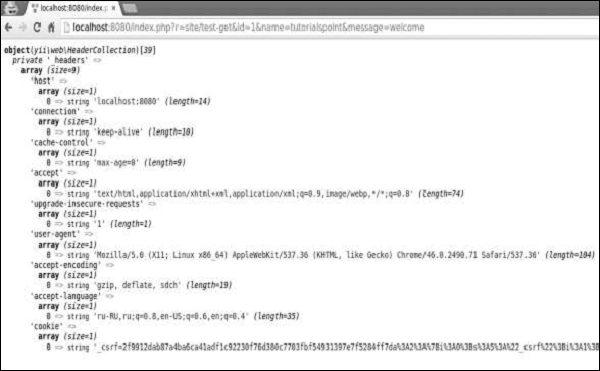
To get the host name and IP address of the client machine, use userHost and userIP properties.
Step 9 − Modify the actionTestGet function this way.
public function actionTestGet() {
   var_dump(Yii::$app->request->userHost);
   var_dump(Yii::$app->request->userIP);
}
Step 10 − Go to the address http://localhost:8080/index.php?r=site/test-get and you see the following screen.

Yii - Responses
When a web application handles a request, it generates a response object, which contains HTTP headers, body, and HTTP status code. In most cases, you will use the response application component. By default, it is an instance of yii\web\Response.
To manage response HTTP status codes, use the yii\web\Response::$statusCode property. The default value of yii\web\Response::$statusCode is 200.
Step 1 − Add a function named actionTestResponse to the SiteController.
public function actionTestResponse() {
   Yii::$app→response->statusCode = 201;
}
Step 2 − If you point your web browser at http://localhost:8080/index.php?r=site/testresponse, you should notice the 201 Created response HTTP status.

If you want to indicate that the request is unsuccessful, you may throw one of the predefined HTTP exceptions −
yii\web\BadRequestHttpException − status code 400.
yii\web\UnauthorizedHttpException − status code 401.
yii\web\ForbiddenHttpException − status code 403.
yii\web\NotFoundHttpException − status code 404.
yii\web\MethodNotAllowedHttpException − status code 405.
yii\web\NotAcceptableHttpException − status code 406.
yii\web\ConflictHttpException − status code 409.
yii\web\GoneHttpException − status code 410.
yii\web\UnsupportedMediaTypeHttpException − status code 415.
yii\web\TooManyRequestsHttpException − status code 429.
yii\web\ServerErrorHttpException − status code 500.
Step 3 − Modify the actionTestResponse function as shown in the following code.
public function actionTestResponse() {
   throw new \yii\web\GoneHttpException;
}
Step 4 − Type http://localhost:8080/index.php?r=site/test-response in the address bar of the web browser, you can see the 410 Gone response HTTP status as shown in the following image.
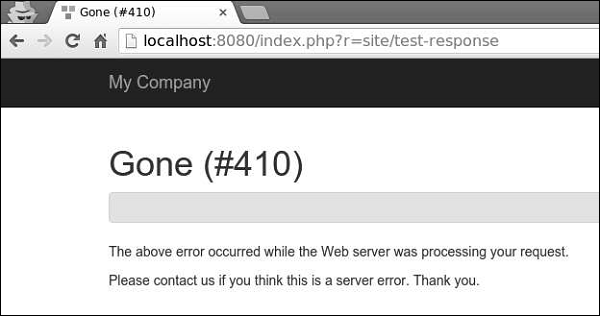
Step 5 − You can send HTTP headers by modifying the headers property of the response component. To add a new header to a response, modify the actionTestResponse function as given in the following code.
public function actionTestResponse() {
   Yii::$app->response->headers->add('Pragma', 'no-cache');
}
Step 6 − Go to http://localhost:8080/index.php?r=site/test-response, you will see our Pragma header.
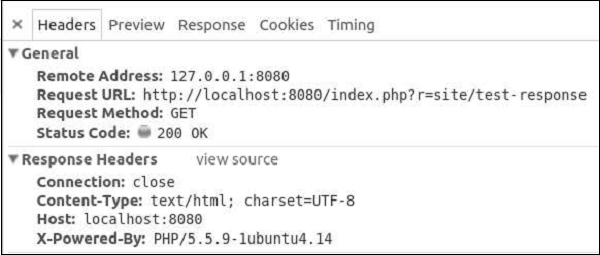
Yii supports the following response formats −
HTML − implemented by yii\web\HtmlResponseFormatter.
XML − implemented by yii\web\XmlResponseFormatter.
JSON − implemented by yii\web\JsonResponseFormatter.
JSONP − implemented by yii\web\JsonResponseFormatter.
RAW − the response without any formatting.
Step 7 − To respond in the JSON format, modify the actionTestResponse function.
public function actionTestResponse() {
   \Yii::$app->response->format = \yii\web\Response::FORMAT_JSON;
   return [
      'id' => '1',
      'name' => 'Ivan',
      'age' => 24,
      'country' => 'Poland',
      'city' => 'Warsaw'
   ];
}
Step 8 − Now, type http://localhost:8080/index.php?r=site/test-response in the address bar, you can see the following JSON response.

Yii implements a browser redirection by sending a Location HTTP header. You can call the yii\web\Response::redirect() method to redirect the user browser to a URL.
Step 9 − Modify the actionTestResponse function this way.
public function actionTestResponse() {
   return $this->redirect('http://www.tutorialspoint.com/');
}
Now, if you go to http://localhost:8080/index.php?r=site/test-response, your browser will be redirected at the TutorialsPoint web site.
Sending Files
Yii provides the following methods to support file sending −
yii\web\Response::sendFile() − Sends an existing file.
yii\web\Response::sendStreamAsFile() − Sends an existing file stream as a file.
yii\web\Response::sendContentAsFile() − Sends a text string as a file.
Modify the actionTestResponse function this way −
public function actionTestResponse() {
   return \Yii::$app->response->sendFile('favicon.ico');
}
Type http://localhost:8080/index.php?r=site/test-response, you will see a download dialog window for the favicon.ico file −
The response is not sent until the yii\web\Response::send() function is called. By default, this method is called at the end of the yii\base\Application::run() method. To send a response, the yii\web\Response::send() method follows these steps −
- Triggers the yii\web\Response::EVENT_BEFORE_SEND event.
- Calls the yii\web\Response::prepare() method.
- Triggers the yii\web\Response::EVENT_AFTER_PREPARE event.
- Calls the yii\web\Response::sendHeaders() method.
- Calls the yii\web\Response::sendContent() method.
- Triggers the yii\web\Response::EVENT_AFTER_SEND event.
Yii - URL Formats
When a Yii application processes a requested URL, first, it parses the URL into a route. Then, to handle the request, this route is used to instantiate the corresponding controller action. This process is called routing. The reverse process is called URL creation. The urlManager application component is responsible for routing and URL creation. It provides two methods −
parseRequest() − Parses a request into a route.
createUrl() − Creates a URL from a given route.
URL Formats
The urlManager application component supports two URL formats −
The default format uses a query parameter r to represent the route. For example, the URL /index.php?r=news/view&id=5 represents the route news/view and the id query parameter 5.
The pretty URL format uses the extra path with the entry script name. For example, in the previous example, pretty format would be /index.php/news/view/5. To use this format you need to set the URL rules.
To enable the pretty URL format and hide the entry script name, follow these steps −
Step 1 − Modify the config/web.php file in the following way.
<?php
   $params = require(__DIR__ . '/params.php');
   $config = [
      'id' => 'basic',
      'basePath' => dirname(__DIR__),
      'bootstrap' => ['log'],
      'components' => [
         'request' => [
            // !!! insert a secret key in the following (if it is empty) -
               //this is required by cookie validation
            'cookieValidationKey' => 'ymoaYrebZHa8gURuolioHGlK8fLXCKjO',
         ],
         'cache' => [
            'class' => 'yii\caching\FileCache',
         ],
         'user' => [
            'identityClass' => 'app\models\User',
            'enableAutoLogin' => true,
         ],
         'errorHandler' => [
            'errorAction' => 'site/error',
         ],
         'mailer' => [
            'class' => 'yii\swiftmailer\Mailer',
            // send all mails to a file by default. You have to set
            // 'useFileTransport' to false and configure a transport
            // for the mailer to send real emails.
            'useFileTransport' => true,
         ],
         'log' => [
            'traceLevel' => YII_DEBUG ? 3 : 0,
            'targets' => [
               [
                  'class' => 'yii\log\FileTarget',
                  'levels' => ['error', 'warning'],
               ],
            ],
         ],
         'urlManager' => [
            'showScriptName' => false,
            'enablePrettyUrl' => true
         ],
         'db' => require(__DIR__ . '/db.php'),
      ],
      'modules' => [
         'hello' => [
            'class' => 'app\modules\hello\Hello',
         ],
      ],
      'params' => $params,
   ];
   if (YII_ENV_DEV) {
      // configuration adjustments for 'dev' environment
      $config['bootstrap'][] = 'debug';
      $config['modules']['debug'] = [
         'class' => 'yii\debug\Module',
      ];
      $config['bootstrap'][] = 'gii';
      $config['modules']['gii'] = [
         'class' => 'yii\gii\Module',
      ];
   }
   return $config;
?>
We have just enabled the pretty URL format and have disabled the entry script name.
Step 2 − Now, if you type http://localhost:8080/site/about in the address bar of the web browser, you will see the pretty URL in action.
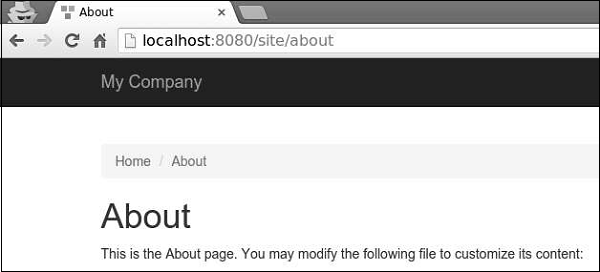
Notice, that the URL is no more http://localhost:8080/index.php?r=site/about.
Yii - URL Routing
To change the default route of the application, you should configure the defaultRoute property.
Step 1 − Modify the config/web.php file in the following way.
<?php
   $params = require(__DIR__ . '/params.php');
   $config = [
      'id' => 'basic',
      'basePath' => dirname(__DIR__),
      'bootstrap' => ['log'],
      'defaultRoute' => 'site/contact',
      'components' => [
         //other code
?>
Step 2 − Got to http://localhost:8080/index.php. You will see the default contact page.
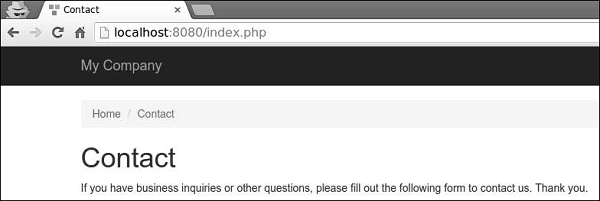
To put your application in maintenance mode temporarily, you should configure the yii\web\Application::$catchAll property.
Step 3 − Add the following function to the SiteController.
public function actionMaintenance() {
   echo "<h1>Maintenance</h1>";
}
Step 4 − Then, modify the config/web.php file in the following way.
<?php
   $params = require(__DIR__ . '/params.php');
   $config = [
      'id' => 'basic',
      'basePath' => dirname(__DIR__),
      'bootstrap' => ['log'],
      'catchAll' => ['site/maintenance'],
      'components' => [
         //OTHER CODE
Step 5 − Now enter any URL of your application, you will see the following.
Creating URLs
To create various kinds of URLs you may use the yii\helpers\Url::to() helper method. The following example assumes the default URL format is being used.
Step 1 − Add an actionRoutes() method to the SiteController.
public function actionRoutes() {
   return $this->render('routes');
}
This method simply renders the routes view.
Step 2 − Inside the views/site directory, create a file called routes.php with the following code.
<?php
   use yii\helpers\Url;
?>

<h4>
   <b>Url::to(['post/index']):</b>
   <?php
      // creates a URL to a route: /index.php?r = post/index
      echo Url::to(['post/index']);
   ?>
</h4>

<h4>
   <b>Url::to(['post/view', 'id' => 100]):</b>
   <?php
      // creates a URL to a route with parameters: /index.php?r = post/view&id=100
      echo Url::to(['post/view', 'id' => 100]);
   ?>
</h4>

<h4>
   <b>Url::to(['post/view', 'id' => 100, '#' => 'content']):</b>
   <?php
      // creates an anchored URL: /index.php?r = post/view&id=100#content
      echo Url::to(['post/view', 'id' => 100, '#' => 'content']);
   ?>
</h4>

<h4>
   <b>Url::to(['post/index'], true):</b>
   <?php
      // creates an absolute URL: http://www.example.com/index.php?r=post/index
      echo Url::to(['post/index'], true);
   ?>
</h4>

<h4>
   <b>Url::to(['post/index'], 'https'):</b>
   <?php
      // creates an absolute URL using the https scheme: https://www.example.com/index.php?r=post/index
      echo Url::to(['post/index'], 'https');
   ?>
</h4>
Step 3 − Type http://localhost:8080/index.php?r=site/routes, you will see some uses of the to() function.
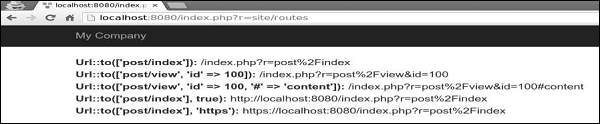
The route passed to the yii\helpers\Url::to() method can be relative or absolute according to the following rules −
if the route is empty, the currently requested route will be used.
if the route has no leading slash, it is considered to be a route relative to the current module.
if the route contains no slashes, it is considered to be an action ID of the current controller.
The yii\helpers\Url helper class also provides several useful methods.
Step 4 − Modify the routes View as given in the following code.
<?php
   use yii\helpers\Url;
?>

<h4>
   <b>Url::home():</b>
   <?php
      // home page URL: /index.php?r=site/index
      echo Url::home();
   ?>
</h4>

<h4>
   <b>Url::base():</b>
   <?php
      // the base URL, useful if the application is deployed in a sub-folder of the Web root
      echo Url::base();
   ?>
</h4>

<h4>
   <b>Url::canonical():</b>
   <?php
      // the canonical URL of the currently requested URL
      // see https://en.wikipedia.org/wiki/Canonical_link_element
      echo Url::canonical();
   ?>
</h4>

<h4>
   <b>Url::previous():</b>
   <?php
      // remember the currently requested URL and retrieve it back in later requests
      Url::remember();
      echo Url::previous();
   ?>
</h4>
Step 5 − If you enter the address http://localhost:8080/index.php?r=site/routes in the web browser, you will see the following.

Yii - Rules of URL
A URL rule is an instance if yii\web\UrlRule. The urlManager components uses the URL rules declared in its rules property when the pretty URL format is enabled.
To parse a request, the URL manager obtains the rules in the order they are declared and looks for the first rule.
Step 1 − Modify the urlManager component in the config/web.php file.
'urlManager' => [
   'showScriptName' => false,
   'enablePrettyUrl' => true,
   'rules' => [
      'about' => 'site/about',
   ]
],
Step 2 − Go to your web browser at http://localhost:8080/about, you will see the about page.
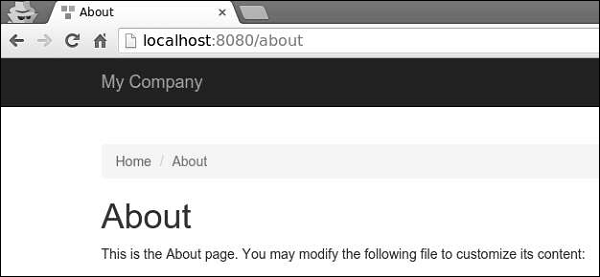
A URL rule can be associated with query parameters in this pattern −
<ParamName:RegExp>, where −
ParamName − The parameter name
RegExp − An optional regular expression used to match parameter values
Suppose, we have declared the following URL rules −
[
   'articles/<year:\d{4}>/<category>' => 'article/index',
   'articles' => 'article/index',
   'article/<id:\d+>' => 'article/view',
]
When the rules are used for parsing −
- /index.php/articles is parsed into the article/index
- /index.php/articles/2014/php is parsed into the article/index
- /index.php/article/100 is parsed into the article/view
- /index.php/articles/php is parsed into articles/php
When the rules are used for creating URLs −
Url::to(['article/index']) creates /index.php/articles
Url::to(['article/index', 'year' => 2014, 'category' => 'php']) creates /index.php/articles/2014/php
Url::to(['article/view', 'id' => 100]) creates /index.php/article/100
Url::to(['article/view', 'id' => 100, 'source' => 'ad']) creates /index.php/article/100?source=ad
Url::to(['article/index', 'category' => 'php']) creates /index.php/article/index?category=php
To add a suffix to the URL, you should configure the yii\web\UrlManager::$suffix property.
Step 3 − Modify the urlComponent in the config/web.php file.
'urlManager' => [
   'showScriptName' => false,
   'enablePrettyUrl' => true,
   'enableStrictParsing' => true,
   'suffix' => '.html'
],
Step 4 − Type the address http://localhost:8080/site/contact.html in the address bar of the web browser and you will see the following on your screen. Notice the html suffix.
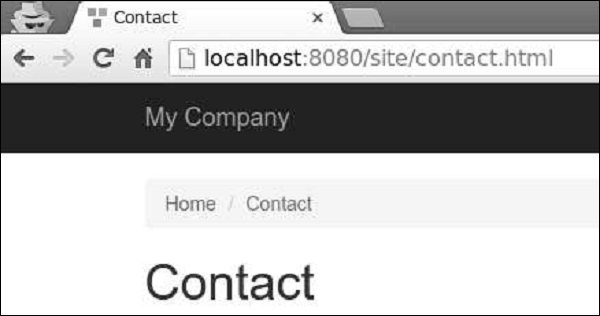
Yii - HTML Forms
When a form is based upon a model, the common way of creating this form in Yii is via the yii\widgets\ActiveForm class. In most cases, a form has a corresponding model which is used for data validation. If the model represents data from a database, then the model should be derived from the ActiveRecord class. If the model captures arbitrary input, it should be derived from the yii\base\Model class.
Let us create a registration form.
Step 1 − Inside the models folder, create a file called RegistrationForm.php with the following code.
<?php
   namespace app\models;
   use Yii;
   use yii\base\Model;
   class RegistrationForm extends Model {
      public $username;
      public $password;
      public $email;
      public $subscriptions;
      public $photos;
      /**
      * @return array customized attribute labels
      */
      public function attributeLabels() {
         return [
            'username' => 'Username',
            'password' => 'Password',
            'email' => 'Email',
            'subscriptions' => 'Subscriptions',
            'photos' => 'Photos',
         ];
      }
   }
?>
We have declared a model for our registration form with five properties − username, password, email, subscriptions, and photos.
Step 2 − To display this form, add the actionRegistration method to the SiteController.
public function actionRegistration() {
   $mRegistration = new RegistrationForm();
   return $this->render('registration', ['model' => $mRegistration]);
}
We create an instance of the RegistrationForm and pass it to the registration view. Now, it is time to create a view.
Step 3 − Inside the views/site folder, add a file called registration.php with the following code.
<?php
   use yii\bootstrap\ActiveForm;
   use yii\bootstrap\Html;
?>
<div class = "row">
   <div class = "col-lg-5">
      <?php $form = ActiveForm::begin(['id' => 'registration-form']); ?>
      <?= $form->field($model, 'username') ?>
      <?= $form->field($model, 'password')->passwordInput() ?>
      <?= $form->field($model, 'email')->input('email') ?>
      <?= $form->field($model, 'photos[]')->fileInput(['multiple'=>'multiple']) ?>
      <?= $form->field($model, 'subscriptions[]')->checkboxList(['a' => 'Item A',
         'b' => 'Item B', 'c' => 'Item C']) ?>
      <div class = "form-group">
         <?= Html::submitButton('Submit', ['class' => 'btn btn-primary',
            'name' => 'registration-button']) ?>
      </div>
      <?php ActiveForm::end(); ?>
   </div>
</div>
We observe the following −
The ActiveForm::begin() function marks the beginning of the form. All the code between ActiveForm::begin() and ActiveForm::end() functions will be wrapped within the form tag.
To create a field in the form you should call the ActiveForm::field() method. It creates all the input and label tags. Input names are determined automatically.
For example, the password attribute will be RegistrationForm[password]. If you want an attribute to take an array, you should append [ ] to the attribute name.
Step 4 − If you go to the address bar of the web browser and type http://localhost:8080/index.php?r=site/registration, you will see our form.
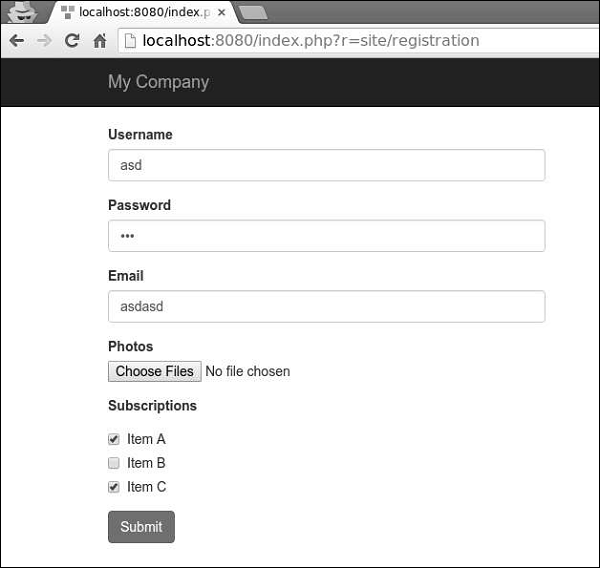
Yii - Validation
You should never trust the data received from users. To validate a model with user inputs, you should call yii\base\Model::validate() method. It returns a Boolean value if the validation succeeds. If there are errors, you may get them from the yii\base\Model::$errors property.
Using Rules
To make the validate() function work, you should override the yii\base\Model::rules() method.
Step 1 − The rules() method returns an array in the following format.
[
   // required, specifies which attributes should be validated
   ['attr1', 'attr2', ...],
   // required, specifies the type a rule.
   'type_of_rule',
   // optional, defines in which scenario(s) this rule should be applied
   'on' => ['scenario1', 'scenario2', ...],
   // optional, defines additional configurations
   'property' => 'value', ...
]
For each rule, you should define at least which attributes the rule applies to and the type of rule applied.
The core validation rules are − boolean, captcha, compare, date, default, double, each, email, exist, file, filter, image, ip, in, integer, match, number, required, safe, string, trim, unique, url.
Step 2 − Create a new model in the models folder.
<?php
   namespace app\models;
   use Yii;
   use yii\base\Model;
   class RegistrationForm extends Model {
      public $username;
      public $password;
      public $email;
      public $country;
      public $city;
      public $phone;
      public function rules() {
         return [
            // the username, password, email, country, city, and phone attributes are
            //required
            [['username' ,'password', 'email', 'country', 'city', 'phone'], 'required'],
            // the email attribute should be a valid email address
            ['email', 'email'],
         ];
      }
   }
?>
We have declared the model for the registration form. The model has five properties − username, password, email, country, city, and phone. They are all required and the email property must be a valid email address.
Step 3 − Add the actionRegistration method to the SiteController where we create a new RegistrationForm model and pass it to a view.
public function actionRegistration() {
   $model = new RegistrationForm();
   return $this->render('registration', ['model' => $model]);
}
Step 4 − Add a view for our registration form. Inside the views/site folder, create a file called registration.php with the following code.
<?php
   use yii\bootstrap\ActiveForm;
   use yii\bootstrap\Html;
?>

<div class = "row">
   <div class = "col-lg-5">
      <?php $form = ActiveForm::begin(['id' => 'registration-form']); ?>
         <?= $form->field($model, 'username') ?>
         <?= $form->field($model, 'password')->passwordInput() ?>
         <?= $form->field($model, 'email')->input('email') ?>
         <?= $form->field($model, 'country') ?>
         <?= $form->field($model, 'city') ?>
         <?= $form->field($model, 'phone') ?>
         <div class = "form-group">
            <?= Html::submitButton('Submit', ['class' => 'btn btn-primary',
               'name' => 'registration-button']) ?>
         </div>
      <?php ActiveForm::end(); ?>
   </div>
</div>
We are using the ActiveForm widget for displaying our registration form.
Step 5 − If you go to the local host http://localhost:8080/index.php?r=site/registration and click the submit button, you will see validation rules in action.
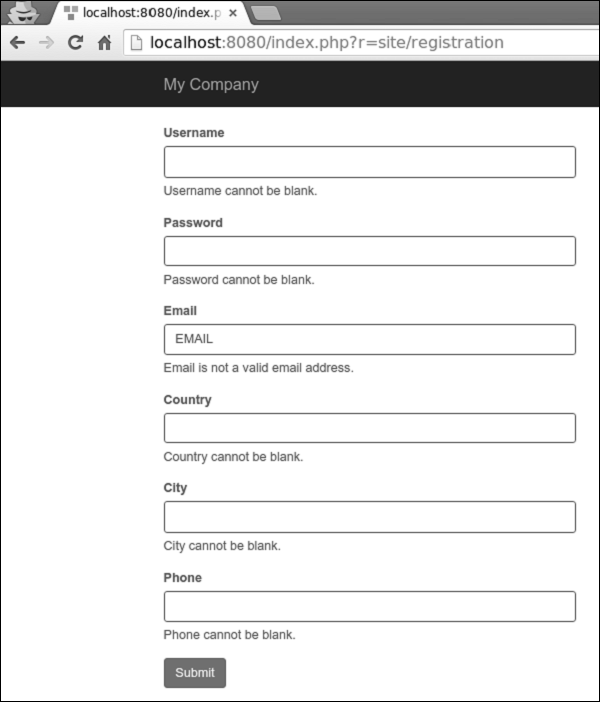
Step 6 − To customize the error message for the username property, modify the rules() method of the RegistrationForm in the following way.
public function rules() {
   return [
      // the username, password, email, country, city, and phone attributes are required
      [['password', 'email', 'country', 'city', 'phone'], 'required'],
      ['username', 'required', 'message' => 'Username is required'],
      // the email attribute should be a valid email address
      ['email', 'email'],
   ];
}
Step 7 − Go to the local host http://localhost:8080/index.php?r=site/registration and click the submit button. You will notice that the error message of the username property has changed.
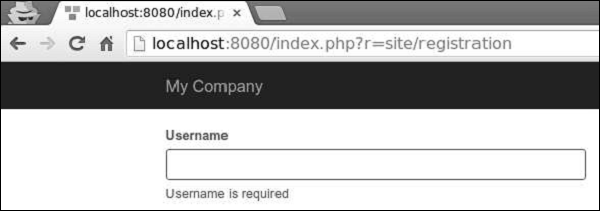
Step 8 − To customize the validation process, you may override these methods.
yii\base\Model::beforeValidate(): triggers a
yii\base\Model::EVENT_BEFORE_VALIDATE event.
yii\base\Model::afterValidate(): triggers a
yii\base\Model::EVENT_AFTER_VALIDATE event.
Step 9 − To trim the spaces around the country property and turn empty input of the city property into a null, you may the trim and default validators.
public function rules() {
   return [
      // the username, password, email, country, city, and phone attributes are required
      [['password', 'email', 'country', 'city', 'phone'], 'required'],
      ['username', 'required', 'message' => 'Username is required'],
      ['country', 'trim'],
      ['city', 'default'],
      // the email attribute should be a valid email address
      ['email', 'email'],
   ];
}
Step 10 − If an input is empty, you can set a default value for it.
public function rules() {
   return [
      ['city', 'default', 'value' => 'Paris'],
   ];
}
If the city property is empty, then the default “Paris” value will be used.
Yii - Ad Hoc Validation
Sometimes you need to validate values that are not bound to any model. You can use the yii\base\DynamicModel class, which supports defining both attributes and rules on the fly.
Step 1 − Add the actionAdHocValidation method to the SiteController.
public function actionAdHocValidation() {
   $model = DynamicModel::validateData([
      'username' => 'John',
      'email' => 'john@gmail.com'
   ], [
      [['username', 'email'], 'string', 'max' => 12],
      ['email', 'email'],
   ]);

   if ($model->hasErrors()) {
      var_dump($model->errors);
   } else {
      echo "success";
   }
}
In the above code, we define a “dynamic” model with username and email attributes and validate them.
Step 2 − Type http://localhost:8080/index.php?r=site/ad-hoc-validation in the address bar of the web browser, you will see an error message because our email is 14 characters long.
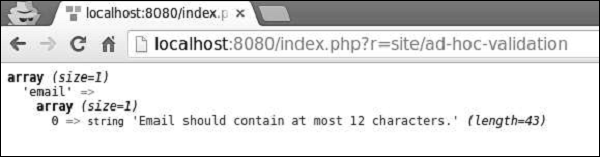
Custom Validators
There are two types of custom validators −
- Inline validators
- Standalone validators
An inline validator is defined by a model method or an anonymous function. If an attribute fails the validation, you should call the yii\base\Model::addError() method to save the error message.
The following example of the RegistrationForm validates the city property, so it can accept only two values – London and Paris.
<?php
   namespace app\models;
   use Yii;
   use yii\base\Model;
   class RegistrationForm extends Model {
      public $username;
      public $password;
      public $email;
      public $country;
      public $city;
      public $phone;
      public function rules() {
         return [
            ['city', 'validateCity']
         ];
      }
      public function validateCity($attribute, $params) {
         if (!in_array($this->$attribute, ['Paris', 'London'])) {
            $this->addError($attribute, 'The city must be either "London" or "Paris".');
         }
      }
   }
?>
A standalone validator extends the yii\validators\Validator class. To implement the validation logic, you should override the yii\validators\Validator::validateAttribute() method.
Step 1 − To implement the previous example using the standalone validator, add a CityValidator.php file to the components folder.
<?php
   namespace app\components;
   use yii\validators\Validator;
   class CityValidator extends Validator {
      public function validateAttribute($model, $attribute) {
         if (!in_array($model->$attribute, ['Paris', 'London'])) {
            $this->addError($model, $attribute, 'The city must be either "Paris"
               or "London".');
         }
      }
   }
?>
Step 2 − Then, modify the RegistrationForm model this way.
<?php
   namespace app\models;
   use app\components\CityValidator;
   use Yii;
   use yii\base\Model;
   class RegistrationForm extends Model {
      public $username;
      public $password;
      public $email;
      public $country;
      public $city;
      public $phone;
      public function rules() {
         return [
            ['city', CityValidator::className()]
         ];
      }
   }
?>
Yii - AJAX Validation
The username validation should only be done on the server side because only the server has the needed information. In this case, you can use AJAX-based validation.
Step 1 − To enable the AJAX validation, modify the registration view this way.
<?php
   use yii\bootstrap\ActiveForm;
   use yii\bootstrap\Html;
?>

<div class = "row">
   <div class = "col-lg-5">

      <?php $form = ActiveForm::begin(['id' => 'registration-form',
         'enableAjaxValidation' => true]); ?>
      <?= $form->field($model, 'username') ?>
      <?= $form->field($model, 'password')->passwordInput() ?>
      <?= $form->field($model, 'email')->input('email') ?>
      <?= $form->field($model, 'country') ?>
      <?= $form->field($model, 'city') ?>
      <?= $form->field($model, 'phone') ?>
      <div class = "form-group">
         <?= Html::submitButton('Submit', ['class' => 'btn btn-primary',
            'name' => 'registration-button']) ?>
      </div>

      <?php ActiveForm::end(); ?>
   </div>
</div>
We should also prepare the server, so that it can handle the AJAX requests.
Step 2 − Modify the actionRegistration method of the SiteController this way.
public function actionRegistration() {
   $model = new RegistrationForm();
   if (Yii::$app->request->isAjax && $model->load(Yii::$app->request>post())) {
      Yii::$app->response->format = Response::FORMAT_JSON;
      return ActiveForm::validate($model);
   }
   return $this->render('registration', ['model' => $model]);
}
Step 3 − Now, go to http://localhost:8080/index.php?r=site/registration, you will notice that the form validation is done by AJAX requests.

Yii - Sessions
Sessions make data accessible across various pages. A session creates a file on the server in a temporary directory where all session variables are stored. This data is available to all the pages of your web site during the visit of that particular user.
When a session starts, the following happens −
PHP creates a unique ID for that particular session.
A cookie called PHPSESSID is sent on the client side (to the browser).
The server creates a file in the temporary folder where all session variables are saved.
When a server wants to retrieve the value from a session variable, PHP automatically gets the unique session ID from the PHPSESSID cookie. Then, it looks in its temporary directory for the needed file.
To start a session, you should call the session_start() function. All session variables are stored in the $_SESSION global variable. You can also use the isset() function to check whether the session variable is set −
<?php
   session_start();
   if( isset( $_SESSION['number'] ) ) {
      $_SESSION['number'] += 1;
   }else {
      $_SESSION['number'] = 1;
   }
   $msg = "This page was visited ".  $_SESSION['number'];
   $msg .= "in this session.";
   echo $msg;
?>
To destroy a session, you should call the session_destroy() function. To destroy a single session variable, call the unset() function −
<?php
   unset($_SESSION['number']);
   session_destroy();
?>
Using Sessions in Yii
Sessions allow data to be persisted across user requests. In PHP, you may access them through the $_SESSION variable. In Yii, you can get access to sessions via the session application component.
Step 1 − Add the actionOpenAndCloseSession method to the SiteController.
public function actionOpenAndCloseSession() {
   $session = Yii::$app->session;
   // open a session
   $session->open();
   // check if a session is already opened
   if ($session->isActive) echo "session is active";
   // close a session
   $session->close();
   // destroys all data registered to a session
   $session->destroy();
}
In the above code, we get the session application component, open a session, check whether it is active, close the session, and finally destroy it.
Step 2 − Type http://localhost:8080/index.php?r=site/open-and-close-session in the address bar of the web browser, you will see the following.
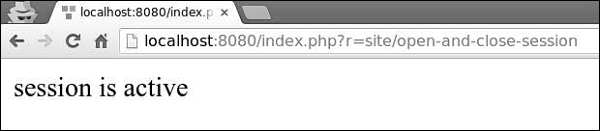
To access session variables, you may use set() and get() methods.
Step 3 − Add an actionAccessSession method to the SiteController.
public function actionAccessSession() {

   $session = Yii::$app->session;

   // set a session variable
   $session->set('language', 'ru-RU');

   // get a session variable
   $language = $session->get('language');
   var_dump($language);

   // remove a session variable
   $session->remove('language');

   // check if a session variable exists
   if (!$session->has('language')) echo "language is not set";

   $session['captcha'] = [
      'value' => 'aSBS23',
      'lifetime' => 7200,
   ];
   var_dump($session['captcha']);
}
Step 4 − Go to http://localhost:8080/index.php?r=site/access-session, you will see the following.
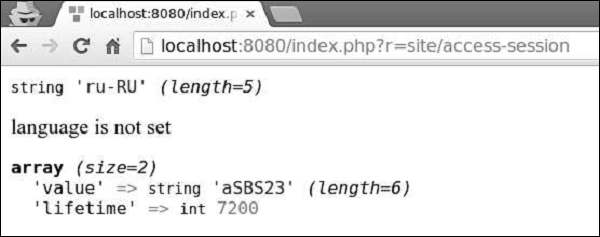
Yii - Using Flash Data
Yii provides a concept of flash data. Flash data is a session data which −
- Is set in one request.
- Will only be available on the next request.
- Will be automatically deleted afterwards.
Step 1 − Add an actionShowFlash method to the SiteController.
public function actionShowFlash() {
   $session = Yii::$app->session;
   // set a flash message named as "greeting"
   $session->setFlash('greeting', 'Hello user!');
   return $this->render('showflash');
}
Step 2 − Inside the views/site folder, create a View file called showflash.php.
<?php
   use yii\bootstrap\Alert;
   echo Alert::widget([
      'options' => ['class' => 'alert-info'],
      'body' => Yii::$app->session->getFlash('greeting'),
   ]);
?>
Step 3 − When you type http://localhost:8080/index.php?r=site/show-flash in the address bar of the web browser, you will see the following.
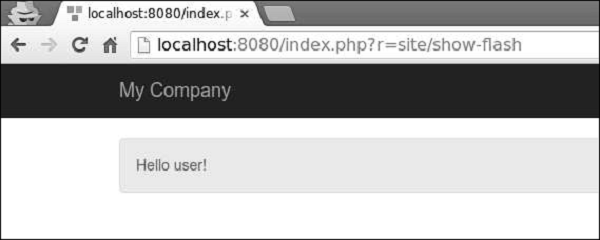
Yii also provides the following session classes −
yii\web\CacheSession − Stores session information in a cache.
yii\web\DbSession − Stores session information in a database.
yii\mongodb\Session − Stores session information in a MongoDB.
yii\redis\Session − Stores session information using redis database.
Yii - Cookies
Cookies are plain text files stored on the client side. You can use them for tracking purpose.
There are three steps to identify a returning user −
Server sends a set of cookies to the client (browser). For example, id or token.
Browser stores it.
Next time a browser sends a request to the web server, it also sends those cookies, so that the server can use that information to identify the user.
Cookies are usually set in an HTTP header as shown in the following code.
HTTP/1.1 200 OK
Date: Fri, 05 Feb 2015 21:03:38 GMT
Server: Apache/1.3.9 (UNIX) PHP/4.0b3
Set-Cookie: name = myname; expires = Monday, 06-Feb-16 22:03:38 GMT;
   path = /; domain = tutorialspoint.com
Connection: close
Content-Type: text/html
PHP provides the setcookie() function to set cookies −
setcookie(name, value, expire, path, domain, security);
where −
name − Sets the name of the cookie and is stored in an environment variable called HTTP_COOKIE_VARS.
value − Sets the value of the named variable.
expiry − Specifies a future time in seconds since 00:00:00 GMT on 1st Jan 1970. After this time cookie will become inaccessible.
path − Specifies the directories for which the cookie is valid.
domain − This can be used to define the domain name in very large domains. All cookies are only valid for the host and domain which created them.
security − If set to, it means that the cookie should only be sent by HTTPS, otherwise, when set to 0, cookie can be sent by regular HTTP.
To access cookies in PHP, you may use the $_COOKIE or $HTTP_COOKIE_VARS variables.
<?php
   echo $_COOKIE["token"]. "<br />";
   /* is equivalent to */
   echo $HTTP_COOKIE_VARS["token"]. "<br />";
   echo $_COOKIE["id"] . "<br />";
   /* is equivalent to */
   echo $HTTP_COOKIE_VARS["id"] . "<br />";
?>
To delete a cookie, you should set the cookie with a date that has already expired.
<?php
   setcookie( "token", "", time()- 60, "/","", 0);
   setcookie( "id", "", time()- 60, "/","", 0);
?>
Yii - Using Cookies
Cookies allow data to be persisted across requests. In PHP, you may access them through the $_COOKIE variable. Yii represents cookie as an object of the yii\web\Cookie class. In this chapter, we describe several methods for reading cookies.
Step 1 − Create an actionReadCookies method in the SiteController.
public function actionReadCookies() {
   // get cookies from the "request" component
   $cookies = Yii::$app->request->cookies;
   // get the "language" cookie value
   // if the cookie does not exist, return "ru" as the default value
   $language = $cookies->getValue('language', 'ru');
   // an alternative way of getting the "language" cookie value
   if (($cookie = $cookies->get('language')) !== null) {
      $language = $cookie->value;
   }
   // you may also use $cookies like an array
   if (isset($cookies['language'])) {
      $language = $cookies['language']->value;
   }
   // check if there is a "language" cookie
   if ($cookies->has('language')) echo "Current language: $language";
}
Step 2 − To see sending cookies in action, create a method called actionSendCookies in the SiteController.
public function actionSendCookies() {
   // get cookies from the "response" component
   $cookies = Yii::$app->response->cookies;
   // add a new cookie to the response to be sent
   $cookies->add(new \yii\web\Cookie([
      'name' => 'language',
      'value' => 'ru-RU',
   ]));
   $cookies->add(new \yii\web\Cookie([
      'name' => 'username',
      'value' => 'John',
   ]));
   $cookies->add(new \yii\web\Cookie([
      'name' => 'country',
      'value' => 'USA',
   ]));
}
Step 3 − Now, if you go to http://localhost:8080/index.php?r=site/send-cookies, you will notice that cookies are saved inside the browser.
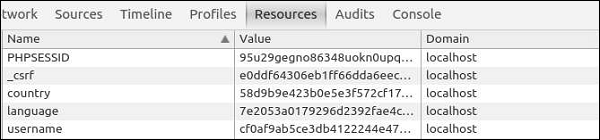
In Yii, by default, cookie validation is enabled. It protects the cookies from being modified on the client side. The hash string from the config/web.php file signs each cookie.
<?php
   $params = require(__DIR__ . '/params.php');
   $config = [
      'id' => 'basic',
      'basePath' => dirname(__DIR__),
      'bootstrap' => ['log'],
      'components' => [
         'request' => [
            // !!! insert a secret key in the following (if it is empty) - this is
            //required by cookie validation
            'cookieValidationKey' => 'ymoaYrebZHa8gURuolioHGlK8fLXCKjO',
         ],
         'cache' => [
            'class' => 'yii\caching\FileCache',
         ],
         'user' => [
            'identityClass' => 'app\models\User',
            'enableAutoLogin' => true,
         ],
         'errorHandler' => [
            'errorAction' => 'site/error',
         ],
         'mailer' => [
            'class' => 'yii\swiftmailer\Mailer',
            // send all mails to a file by default. You have to set
            // 'useFileTransport' to false and configure a transport
            // for the mailer to send real emails.
            'useFileTransport' => true,
         ],
         'log' => [
            'traceLevel' => YII_DEBUG ? 3 : 0,
            'targets' => [
               [
                  'class' => 'yii\log\FileTarget',
                     'levels' => ['error', 'warning'],
                ],
            ],
         ],
         'urlManager' => [
            //'showScriptName' => false,
            //'enablePrettyUrl' => true,
            //'enableStrictParsing' => true,
            //'suffix' => '/'
         ],
         'db' => require(__DIR__ . '/db.php'),
      ],
      'modules' => [
         'hello' => [
            'class' => 'app\modules\hello\Hello',
         ],
      ],
      'params' => $params,
   ];
   if (YII_ENV_DEV) {
      // configuration adjustments for 'dev' environment
      $config['bootstrap'][] = 'debug';
      $config['modules']['debug'] = [
         'class' => 'yii\debug\Module',
      ];
      $config['bootstrap'][] = 'gii';
      $config['modules']['gii'] = [
         'class' => 'yii\gii\Module',
      ];
   }
   return $config;
?>
You can disable cookie validation by setting the yii\web\Request::$enableCookieValidation property to false.
Yii - Files Upload
You can easily implement a file uploading function with the help of yii\web\UploadedFile, models and yii\widgets\ActiveForm.
Create a directory ‘uploads’ in the root folder. This directory will hold all of the uploaded images. To upload a single file, you need to create a model and an attribute of the model for uploaded file instance. You should also validate the file upload.
Step 1 − Inside the models folder, create a file called UploadImageForm.php with the following content.
<?php
   namespace app\models;
   use yii\base\Model;
   class UploadImageForm extends Model {
      public $image;
      public function rules() {
         return [
            [['image'], 'file', 'skipOnEmpty' => false, 'extensions' => 'jpg, png'],
         ];
      }
      public function upload() {
         if ($this->validate()) {
            $this->image->saveAs('../uploads/' . $this->image->baseName . '.' .
               $this->image->extension);
            return true;
         } else {
            return false;
         }
      }
   }
?>
The image attribute is used to keep the file instance. The file validation rule ensures that a file has a png or a jpg extension. The upload function validates the file and saves it on the server.
Step 2 − Now, add the actionUploadImage function to the SiteController.
public function actionUploadImage() {
   $model = new UploadImageForm();
   if (Yii::$app->request->isPost) {
      $model->image = UploadedFile::getInstance($model, 'image');
      if ($model->upload()) {
         // file is uploaded successfully
         echo "File successfully uploaded";
         return;
     }
   }
   return $this->render('upload', ['model' => $model]);
}
Step 3 − When the form is submitted, we call the yii\web\UploadedFile::getInstance() function to represent the uploaded file as an UploadedFile instance. Then, we validate the file and save it on the server.
Step 4 − Next, create an upload.php view file inside the views/site directory.
<?php
   use yii\widgets\ActiveForm;
?>
<?php $form = ActiveForm::begin(['options' => ['enctype' => 'multipart/form-data']])?>
<?= $form->field($model, 'image')->fileInput() ?>
   <button>Submit</button>
<?php ActiveForm::end() ?>
Remember to add the enctype option when you upload a file. The fileInput() method renders the following html code −
<input type = "file">
The above html code allows the users to select and upload files.
Step 5 − Now, if you go to http://localhost:8080/index.php?r=site/upload-image, you will see the following.
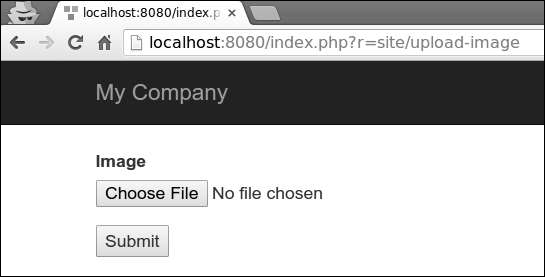
Step 6 − Select an image to upload and click the “submit” button. The file will be saved on the server inside the ‘uploads’ folder.
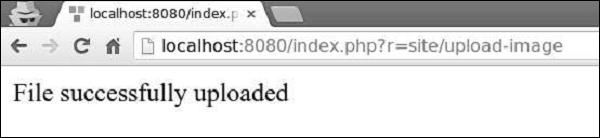
Yii - Formatting
To display data in a readable format, you can use the formatter application component.
Step1 − Add the actionFormatter method to the SiteController.
public function actionFormatter(){
   return $this->render('formatter');
}
In the above code, we just render the formatter view.
Step 2 − Now, create a formatter.php view file inside the views/site folder.
<?php
   $formatter = \Yii::$app->formatter;
   // output: January 1, 2016
   echo $formatter->asDate('2016-01-01', 'long'),"<br>";
   // output: 51.50%
   echo $formatter->asPercent(0.515, 2),"<br>";
   // output: <a href = "mailto:test@test.com">test@test.com</a>
   echo $formatter->asEmail('test@test.com'),"<br>";
   // output: Yes
   echo $formatter->asBoolean(true),"<br>";
   // output: (Not set)
   echo $formatter->asDate(null),"<br>";
?>
Step 3 − Go to http://localhost:8080/index.php?r=site/formatter, you will see the following output.
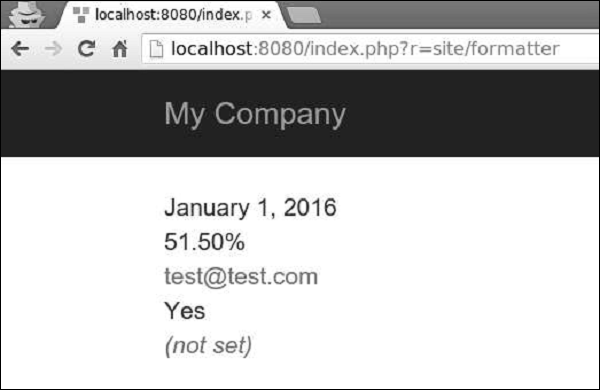
The formatter component supports the following formats related with date and time −
| Output format | Example |
|---|---|
| date | January 01, 2016 |
| time | 16:06 |
| datetime | January 01, 2016 16:06 |
| timestamp | 1512609983 |
| relativeTime | 1 hour ago |
| duration | 5 minutes |
Step 4 − Modify the formatter view this way.
<?php
   $formatter = \Yii::$app->formatter;
   echo $formatter->asDate(date('Y-m-d'), 'long'),"<br>";
   echo $formatter->asTime(date("Y-m-d")),"<br>";
   echo $formatter->asDatetime(date("Y-m-d")),"<br>";

   echo $formatter->asTimestamp(date("Y-m-d")),"<br>";
   echo $formatter->asRelativeTime(date("Y-m-d")),"<br>";
?>
Step 5 − Type http://localhost:8080/index.php?r=site/formatter in the address bar of your web browser, you will see the following output.
Date Formats
There are also four date format shortcuts: short, medium, long, and full.
Step 1 − Modify the formatter view file this way.
<?php
   $formatter = \Yii::$app->formatter;
   echo $formatter->asDate(date('Y-m-d'), 'short'),"<br>";
   echo $formatter->asDate(date('Y-m-d'), 'medium'),"<br>";
   echo $formatter->asDate(date('Y-m-d'), 'long'),"<br>";
   echo $formatter->asDate(date('Y-m-d'), 'full'),"<br>";
?>
Step 2 − If you go to the web browser and type http://localhost:8080/index.php?r=site/formatter, you will see the following output.
Number Formats
The formatter component supports the following formats related with numbers −
| Output format | Example |
|---|---|
| integer | 51 |
| decimal | 105.51 |
| percent | 51% |
| scientific | 1.050000E+2 |
| currency | $105 |
| size | 105 bytes |
| shortSize | 105 B |
Step 1 − Modify the formatter view this way.
<?php
   $formatter = \Yii::$app->formatter;
   echo Yii::$app->formatter->asInteger(105),"<br>";
   echo Yii::$app->formatter->asDecimal(105.41),"<br>";
   echo Yii::$app->formatter->asPercent(0.51),"<br>";
   echo Yii::$app->formatter->asScientific(105),"<br>";
   echo Yii::$app->formatter->asCurrency(105, "$"),"<br>";
   echo Yii::$app->formatter->asSize(105),"<br>";
   echo Yii::$app->formatter->asShortSize(105),"<br>";
?>
Step 2 − Go to http://localhost:8080/index.php?r=site/formatter, you will see the following output.
Other Formats
Yii also supports other formats −
text − The value is HTML-encoded.
raw − The value is outputted as is.
paragraphs − The value is formatted as HTML text paragraphs wrapped into the p tag.
ntext − The value is formatted as an HTML plain text where newlines are converted into line breaks.
html − The value is purified using HtmlPurifier to avoid XSS attacks.
image − The value is formatted as an image tag.
boolean − The value is formatted as a boolean.
url − The value is formatted as a link.
email − The value is formatted as a mailto-link.
The formatter may use the currently active locale to determine how to format a value for a specific country.
The following example shows how to format date for different locales.
<?php
   Yii::$app->formatter->locale = 'ru-RU';
   echo Yii::$app->formatter->asDate('2016-01-01'); // output: 1 января 2016 г.
   Yii::$app->formatter->locale = 'de-DE';
   // output: 1. Januar 2016
   echo Yii::$app->formatter->asDate('2016-01-01');
   Yii::$app->formatter->locale = 'en-US';
   // output: January 1, 2016
   echo Yii::$app->formatter->asDate('2016-01-01');
?>
Yii - Pagination
When you have too much data to display on a single page, you should display it on multiple pages. This is also known as pagination.
To show pagination in action, we need data.
Preparing the DB
Step 1 − Create a new database. Database can be prepared in the following two ways.
In the terminal run mysql -u root -p
Create a new database via CREATE DATABASE helloworld CHARACTER SET utf8 COLLATE utf8_general_ci;
Step 2 − Configure the database connection in the config/db.php file. The following configuration is for the system used currently.
<?php
   return [
      'class' => 'yii\db\Connection',
      'dsn' => 'mysql:host = localhost;dbname = helloworld',
      'username' => 'vladimir',
      'password' => '12345',
      'charset' => 'utf8',
   ];
?>
Step 3 − Inside the root folder run ./yii migrate/create test_table. This command will create a database migration for managing our DB. The migration file should appear in the migrations folder of the project root.
Step 4 − Modify the migration file (m160106_163154_test_table.php in this case) this way.
<?php
   use yii\db\Schema;
   use yii\db\Migration;
   class m160106_163154_test_table extends Migration {
      public function safeUp() {
         $this->createTable("user", [
            "id" => Schema::TYPE_PK,
            "name" => Schema::TYPE_STRING,
            "email" => Schema::TYPE_STRING,
         ]);
         $this->batchInsert("user", ["name", "email"], [
            ["User1", "user1@gmail.com"],
            ["User2", "user2@gmail.com"],
            ["User3", "user3@gmail.com"],
            ["User4", "user4@gmail.com"],
            ["User5", "user5@gmail.com"],
            ["User6", "user6@gmail.com"],
            ["User7", "user7@gmail.com"],
            ["User8", "user8@gmail.com"],
            ["User9", "user9@gmail.com"],
            ["User10", "user10@gmail.com"],
            ["User11", "user11@gmail.com"],
         ]);
      }
      public function safeDown() {
         $this->dropTable('user');
      }
   }
?>
The above migration creates a user table with these fields: id, name, and email. It also adds a few demo users.
Step 5 − Inside the project root run ./yii migrate to apply the migration to the database.
Step 6 − Now, we need to create a model for our user table. For the sake of simplicity, we are going to use the Gii code generation tool. Open up this url: http://localhost:8080/index.php?r=gii. Then, click the “Start” button under the “Model generator” header. Fill in the Table Name (“user”) and the Model Class (“MyUser”), click the “Preview” button and finally, click the “Generate” button.
The MyUser model appears in the models directory.
Pagination in Action
Step 1 − Add an actionPagination method to the SiteController.
public function actionPagination() {
   //preparing the query
   $query = MyUser::find();
   // get the total number of users
   $count = $query->count();
   //creating the pagination object
   $pagination = new Pagination(['totalCount' => $count, 'defaultPageSize' => 10]);
   //limit the query using the pagination and retrieve the users
   $models = $query->offset($pagination->offset)
      ->limit($pagination->limit)
      ->all();
   return $this->render('pagination', [
      'models' => $models,
      'pagination' => $pagination,
   ]);
}
Step 2 − Create a view file called pagination.php inside the views/site folder.
<?php
   use yii\widgets\LinkPager;
?>
<?php foreach ($models as $model): ?>
   <?= $model->id; ?>
   <?= $model->name; ?>
   <?= $model->email; ?>
   <br/>
<?php endforeach; ?>
<?php
   // display pagination
   echo LinkPager::widget([
      'pagination' => $pagination,
   ]);
?>
Now, go to the local host http://localhost:8080/index.php?r=site/pagination through the web browser, you will see a pagination widget −
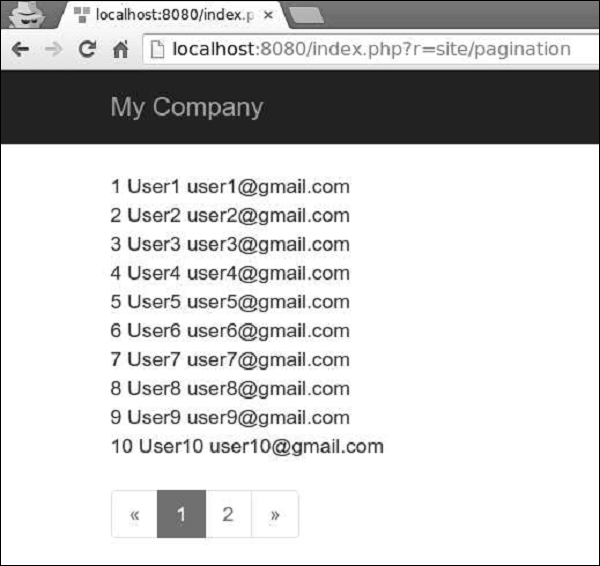
Yii - Sorting
When displaying lots of data, we often need to sort the data. Yii uses an yii\data\Sort object to represent a sorting schema.
To show sorting in action, we need data.
Preparing the DB
Step 1 − Create a new database. Database can be prepared in the following two ways.
In the terminal run mysql -u root –p
Create a new database via CREATE DATABASE helloworld CHARACTER SET utf8 COLLATE utf8_general_ci;
Step 2 − Configure the database connection in the config/db.php file. The following configuration is for the system used currently.
<?php
   return [
      'class' => 'yii\db\Connection',
      'dsn' => 'mysql:host=localhost;dbname=helloworld',
      'username' => 'vladimir',
      'password' => '12345',
      'charset' => 'utf8',
   ];
?>
Step 3 − Inside the root folder run ./yii migrate/create test_table. This command will create a database migration for managing our DB. The migration file should appear in the migrations folder of the project root.
Step 4 − Modify the migration file (m160106_163154_test_table.php in this case) this way.
<?php
   use yii\db\Schema;
   use yii\db\Migration;
   class m160106_163154_test_table extends Migration {
      public function safeUp() {
         $this->createTable("user", [
            "id" => Schema::TYPE_PK,
            "name" => Schema::TYPE_STRING,
            "email" => Schema::TYPE_STRING,
         ]);
         $this->batchInsert("user", ["name", "email"], [
            ["User1", "user1@gmail.com"],
            ["User2", "user2@gmail.com"],
            ["User3", "user3@gmail.com"],
            ["User4", "user4@gmail.com"],
            ["User5", "user5@gmail.com"],
            ["User6", "user6@gmail.com"],
            ["User7", "user7@gmail.com"],
            ["User8", "user8@gmail.com"],
            ["User9", "user9@gmail.com"],
            ["User10", "user10@gmail.com"],
            ["User11", "user11@gmail.com"],
         ]);
      }
      public function safeDown() {
         $this->dropTable('user');
      }
   }
?>
The above migration creates a user table with these fields: id, name, and email. It also adds a few demo users.
Step 5 − Inside the project root run ./yii migrate to apply the migration to the database.
Step 6 − Now, we need to create a model for our user table. For the sake of simplicity, we are going to use the Gii code generation tool. Open up this url: http://localhost:8080/index.php?r=gii. Then, click the “Start” button under the “Model generator” header. Fill in the Table Name (“user”) and the Model Class(“MyUser”), click the “Preview” button and finally, click the “Generate” button.
The MyUser model should appear in the models directory.
Sorting in Action
Step 1 − Add an actionSorting method to the SiteController.
public function actionSorting() {
   //declaring the sort object
   $sort = new Sort([
      'attributes' => ['id', 'name', 'email'],
   ]);
   //retrieving all users
   $models = MyUser::find()
      ->orderBy($sort->orders)
      ->all();
   return $this->render('sorting', [
      'models' => $models,
      'sort' => $sort,
   ]);
}
Step 2 − Create a View file called sorting inside the views/site folder.
<?php
   // display links leading to sort actions
   echo $sort->link('id') . ' | ' . $sort->link('name') . ' | ' . $sort->link('email');
?><br/>
<?php foreach ($models as $model): ?>
   <?= $model->id; ?>
   <?= $model->name; ?>
   <?= $model->email; ?>
   <br/>
<?php endforeach; ?>
Step 3 − Now, if you type http://localhost:8080/index.php?r=site/sorting in the web browser, you can see that the id, name, and email fields is sortable as shown in the following image.
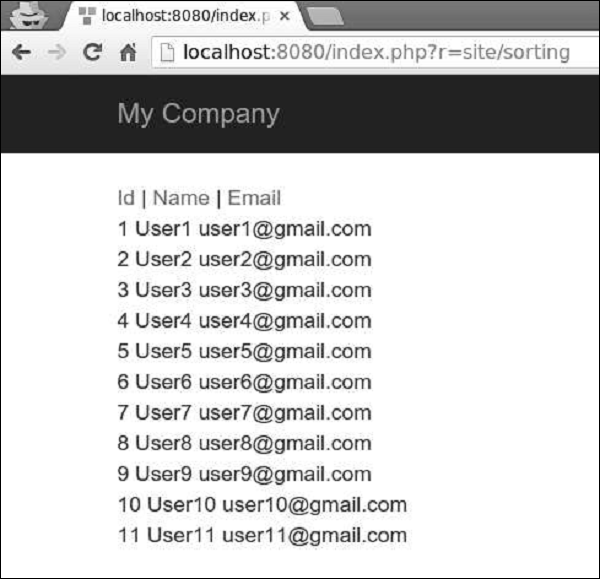
Yii - Properties
Class member variables in PHP are also called properties. They represent the state of class instance. Yii introduces a class called yii\base\Object. It supports defining properties via getter or setter class methods.
A getter method starts with the word get. A setter method starts with set. You can use properties defined by getters and setters like class member variables.
When a property is being read, the getter method will be called. When a property is being assigned, the setter method will be called. A property defined by a getter is read only if a setter is not defined.
Step 1 − Create a file called Taxi.php inside the components folder.
<?php
   namespace app\components;
   use yii\base\Object;
   class Taxi extends Object {
      private $_phone;
      public function getPhone() {
         return $this->_phone;
      }
      public function setPhone($value) {
         $this->_phone = trim($value);
      }
   }
?>
In the code above, we define the Taxi class derived from the Object class. We set a getter – getPhone() and a setter – setPhone().
Step 2 − Now, add an actionProperties method to the SiteController.
public function actionProperties() {
   $object = new Taxi();
   // equivalent to $phone = $object->getPhone();
   $phone = $object->phone;
   var_dump($phone);
   // equivalent to $object->setLabel('abc');
   $object->phone = '79005448877';
   var_dump($object);
}
In the above function we created a Taxi object, tried to access the phone property via the getter, and set the phone property via the setter.
Step 3 − In your web browser, type http://localhost:8080/index.php?r=site/properties, in the address bar, you should see the following output.
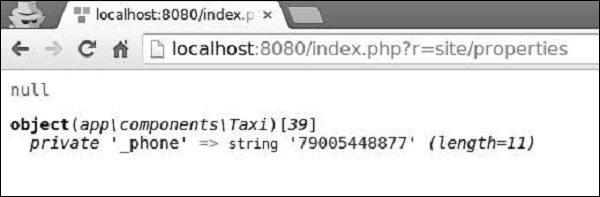
Yii - Data Providers
Yii provides a set of data provider classes that encapsulate pagination and sorting. A data provider implements yii\data\DataProviderInterface. It supports retrieving sorted and paginated data. Data providers usually work with data widgets.
Yii includes −
ActiveDataProvider − Uses yii\db\ActiveQuery or yii\db\Query to query data from databases.
SqlDataProvider − Executes SQL and returns data as arrays.
ArrayDataProvider − Takes a big array and returns a slice of it.
You define the sorting and pagination behaviors of a data-provider by configuring its pagination and sort properties. Data widgets, such as yii\grid\GridView, have a property called dataProvider, which takes a data provider instance and displays the data on the screen.
Preparing the DB
Step 1 − Create a new database. Database can be prepared in the following two ways.
In the terminal run mysql -u root –p.
Create a new database via CREATE DATABASE helloworld CHARACTER SET utf8 COLLATE utf8_general_ci;
Step 2 − Configure the database connection in the config/db.php file. The following configuration is for the system used currently.
<?php
   return [
      'class' => 'yii\db\Connection',
      'dsn' => 'mysql:host = localhost;dbname = helloworld',
      'username' => 'vladimir',
      'password' => '12345',
      'charset' => 'utf8',
   ];
?>
Step 3 − Inside the root folder run ./yii migrate/create test_table. This command will create a database migration for managing our DB. The migration file should appear in the migrations folder of the project root.
Step 4 − Modify the migration file (m160106_163154_test_table.php in this case) this way.
<?php
   use yii\db\Schema;
   use yii\db\Migration;
   class m160106_163154_test_table extends Migration {
      public function safeUp() {
         $this->createTable("user", [
            "id" => Schema::TYPE_PK,
            "name" => Schema::TYPE_STRING,
            "email" => Schema::TYPE_STRING,
         ]);
         $this->batchInsert("user", ["name", "email"], [
            ["User1", "user1@gmail.com"],
            ["User2", "user2@gmail.com"],
            ["User3", "user3@gmail.com"],
            ["User4", "user4@gmail.com"],
            ["User5", "user5@gmail.com"],
            ["User6", "user6@gmail.com"],
            ["User7", "user7@gmail.com"],
            ["User8", "user8@gmail.com"],
            ["User9", "user9@gmail.com"],
            ["User10", "user10@gmail.com"],
            ["User11", "user11@gmail.com"],
         ]);
      }
      public function safeDown() {
         $this->dropTable('user');
      }
   }
?>
The above migration creates a user table with these fields: id, name, and email. It also adds a few demo users.
Step 5 − Inside the project root run ./yii migrate to apply the migration to the database.
Step 6 − Now, we need to create a model for our user table. For the sake of simplicity, we are going to use the Gii code generation tool. Open up this url: http://localhost:8080/index.php?r=gii. Then, click the “Start” button under the “Model generator” header. Fill in the Table Name (“user”) and the Model Class (“MyUser”), click the “Preview” button and finally, click the “Generate” button.
The MyUser model should appear in the models directory.
Active Data Provider
Step 1 − Create a function called actionDataProvider inside the SiteController.
public function actionDataProvider(){
   $query = MyUser::find();
   $provider = new ActiveDataProvider([
      'query' => $query,
      'pagination' => [
         'pageSize' => 2,
      ],
   ]);
   // returns an array of users objects
   $users = $provider->getModels();
   var_dump($users);
}
In the code above, we define an instance of the ActiveDataProvider class and display users from the first page. The yii\data\ActiveDataProvider class uses the DB application component as the DB connection.
Step 2 − If you enter the local host address http://localhost:8080/index.php?r=site/dataprovider, you will see the following output.
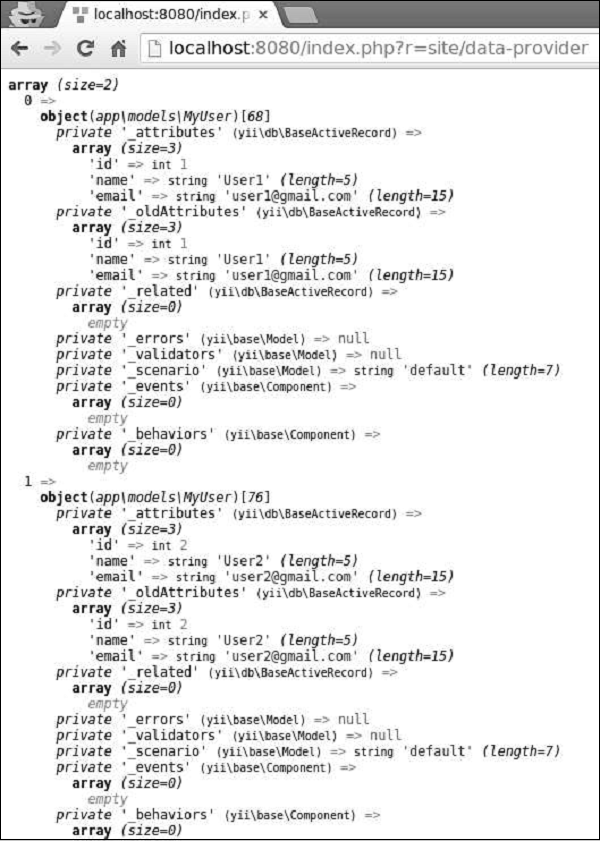
SQL Data Provider
The yii\data\SqlDataProvider class works with raw SQL statements.
Step 1 − Modify the actionDataProvider method this way.
public function actionDataProvider() {
   $count = Yii::$app->db->createCommand('SELECT COUNT(*) FROM user')->queryScalar();
   $provider = new SqlDataProvider([
      'sql' => 'SELECT * FROM user',
      'totalCount' => $count,
      'pagination' => [
         'pageSize' => 5,
      ],
      'sort' => [
         'attributes' => [
            'id',
            'name',
            'email',
         ],
      ],
   ]);
   // returns an array of data rows
   $users = $provider->getModels();
   var_dump($users);
}
Step 2 − Type http://localhost:8080/index.php?r=site/data-provider in the address bar of the web browser, you will see the following output.
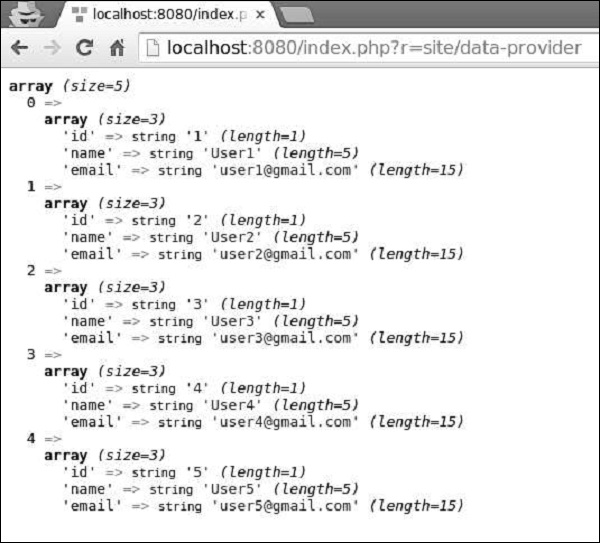
Array Data Provider
The yii\data\ArrayDataProvider class is best for working with big arrays. Elements in this array can be either query results of DAO or Active Record instances.
Step 1 − Modify the actionDataProvider method this way.
public function actionDataProvider() {
   $data = MyUser::find()->asArray()->all();
   $provider = new ArrayDataProvider([
      'allModels' => $data,
      'pagination' => [
         'pageSize' => 3,
      ],
      'sort' => [
         'attributes' => ['id', 'name'],
      ],
   ]);
   // get the rows in the currently requested page
   $users = $provider->getModels();
   var_dump($users);
}
Step 2 − If you go to the address http://localhost:8080/index.php?r=site/data-provider through the web browser, you will see the following output.
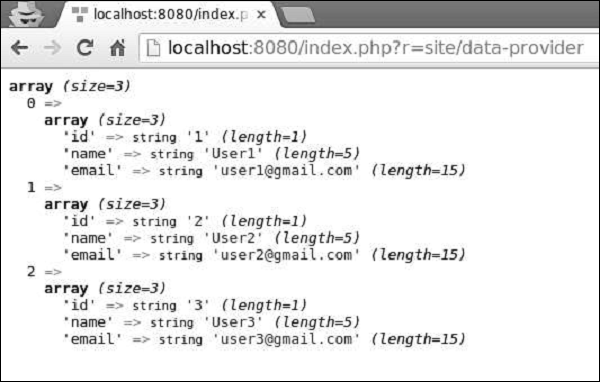
Notice, that unlike SQL Data Provider and Active Data Provider, Array Data Provider loads all data into the memory, so it is less efficient.
Yii - Data Widgets
Yii provides a set of widgets for displaying data. You can use the DetailView widget to display a single record. The ListView widget, as well as Grid View, can be used to display a table of records with features like filtering, sorting, and pagination.
Preparing the DB
Step 1 − Create a new database. Database can be prepared in the following two ways.
In the terminal run mysql -u root –p
Create a new database via CREATE DATABASE helloworld CHARACTER SET utf8 COLLATE utf8_general_ci;
Step 2 − Configure the database connection in the config/db.php file. The following configuration is for the system used currently.
<?php
   return [
      'class' => 'yii\db\Connection',
      'dsn' => 'mysql:host=localhost;dbname=helloworld',
      'username' => 'vladimir',
      'password' => '12345',
      'charset' => 'utf8',
   ];
?>
Step 3 − Inside the root folder run./yii migrate/create test_table. This command will create a database migration for managing our DB. The migration file should appear in the migrations folder of the project root.
Step 4 − Modify the migration file (m160106_163154_test_table.php in this case) this way.
<?php
   use yii\db\Schema;
   use yii\db\Migration;
   class m160106_163154_test_table extends Migration {
      public function safeUp() {
         $this->createTable("user", [
            "id" => Schema::TYPE_PK,
            "name" => Schema::TYPE_STRING,
            "email" => Schema::TYPE_STRING,
         ]);
         $this->batchInsert("user", ["name", "email"], [
            ["User1", "user1@gmail.com"],
            ["User2", "user2@gmail.com"],
            ["User3", "user3@gmail.com"],
            ["User4", "user4@gmail.com"],
            ["User5", "user5@gmail.com"],
            ["User6", "user6@gmail.com"],
            ["User7", "user7@gmail.com"],
            ["User8", "user8@gmail.com"],
            ["User9", "user9@gmail.com"],
            ["User10", "user10@gmail.com"],
            ["User11", "user11@gmail.com"],
         ]);
      }
      public function safeDown() {
         $this->dropTable('user');
      }
   }
?>
The above migration creates a user table with these fields: id, name, and email. It also adds a few demo users.
Step 5 − Inside the project root run./yii migrate to apply the migration to the database.
Step 6 − Now, we need to create a model for our user table. For the sake of simplicity, we are going to use the Gii code generation tool. Open up this url: http://localhost:8080/index.php?r=gii. Then, click the “Start” button under the “Model generator” header. Fill in the Table Name (“user”) and the Model Class(“MyUser”), click the “Preview” button and finally, click the “Generate” button.
The MyUser model should appear in the models directory.
DetailView Widget
The DetailView widget shows the data of a single model. The $attributes property defines which model attributes should be displayed.
Step 1 − Add the actionDataWidget method to the SiteController.
public function actionDataWidget() {
   $model = MyUser::find()->one();
   return $this->render('datawidget', [
      'model' => $model
   ]);
}
In the above code, we find that the first MyUser model and pass it to the datawidget view.
Step 2 − Create a file called datawidget.php inside the views/site folder.
<?php
   use yii\widgets\DetailView;
   echo DetailView::widget([
      'model' => $model,
      'attributes' => [
         'id',
         //formatted as html
         'name:html',
         [
            'label' => 'e-mail',
            'value' => $model->email,
         ],
      ],
   ]);
?>
Step 3 − If you go to http://localhost:8080/index.php?r=site/data-widget, you will see a typical usage of the DetailView widget.
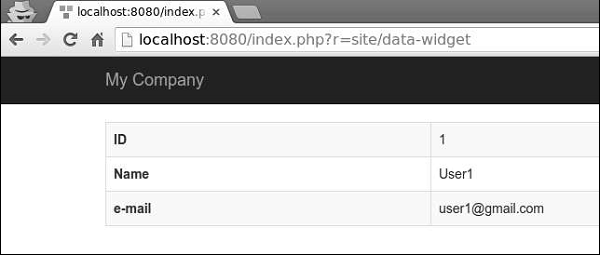
Yii - ListView Widget
The ListView widget uses a data provider to display data. Each model is rendered using the specified view file.
Step 1 − Modify the actionDataWidget() method this way.
public function actionDataWidget() {
   $dataProvider = new ActiveDataProvider([
      'query' => MyUser::find(),
      'pagination' => [
         'pageSize' => 20,
      ],
   ]);
   return $this->render('datawidget', [
      'dataProvider' => $dataProvider
   ]);
}
In the above code, we create a data provider and pass it to the datawidget view.
Step 2 − Modify the datawidget view file this way.
<?php
   use yii\widgets\ListView;
   echo ListView::widget([
      'dataProvider' => $dataProvider,
      'itemView' => '_user',
   ]);
?>
We render the ListView widget. Each model is rendered in the _user view.
Step 3 − Create a file called _user.php inside the views/site folder.
<?php
   use yii\helpers\Html;
   use yii\helpers\HtmlPurifier;
?>
<div class = "user">
   <?= $model->id ?>
   <?= Html::encode($model->name) ?>
   <?= HtmlPurifier::process($model->email) ?>
</div>
Step 4 − Type http://localhost:8080/index.php?r=site/data-widget in the address bar of the web browser, you will see the following.
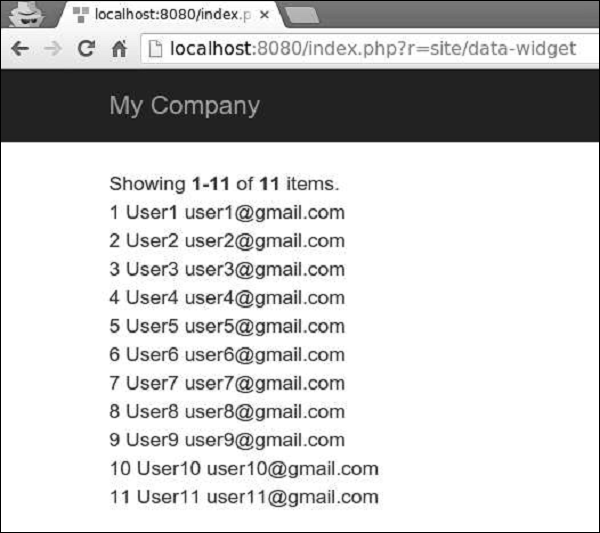
Yii - GridView Widget
The GridView widget takes data from a data provider and presents data in the form of a table. Each row of the table represents a single data item, and a column represents an attribute of the item.
Step 1 − Modify the datawidget view this way.
<?php
   use yii\grid\GridView;
   echo GridView::widget([
      'dataProvider' => $dataProvider,
   ]);
?>
Step 2 − Go to http://localhost:8080/index.php?r=site/data-widget, you will see a typical usage of the DataGrid widget.
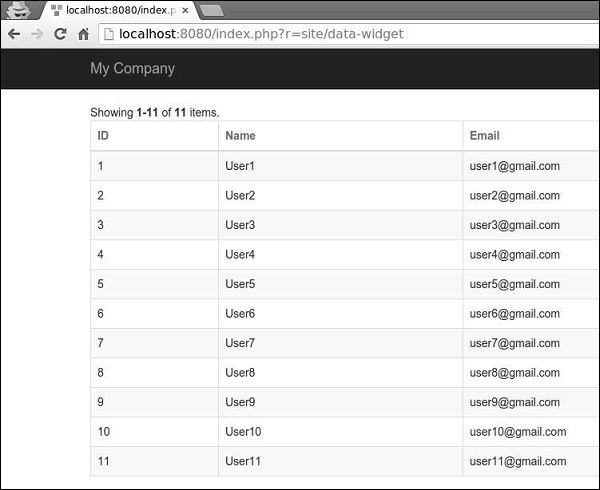
The columns of the DataGrid widget are configured in terms of the yii\grid\Column class. It represents a model attribute and can be filtered and sorted.
Step 3 − To add a custom column to the grid, modify the datawidget view this way.
<?php
   yii\grid\GridView;
   echo GridView::widget([
      'dataProvider' => $dataProvider,
      'columns' => [
         'id',
         [
            'class' => 'yii\grid\DataColumn', // can be omitted, as it is the default
            'label' => 'Name and email',
            'value' => function ($data) {
               return $data->name . " writes from " . $data->email;
            },
         ],
      ],
   ]);
?>
Step 4 − If you go to the address http://localhost:8080/index.php?r=site/data-widget, you will see the output as shown in the following image.
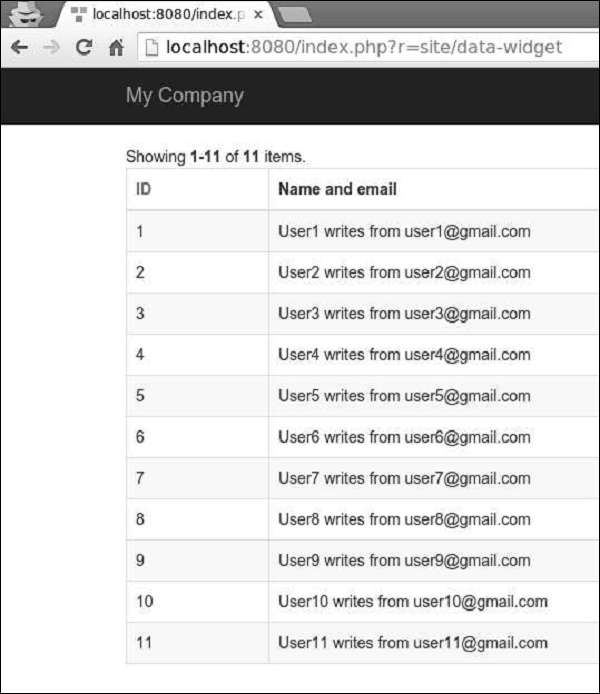
Grid columns can be customized by using different column classes, like yii\grid\SerialColumn, yii\grid\ActionColumn, and yii\grid\CheckboxColumn.
Step 5 − Modify the datawidget view in the following way.
<?php
   use yii\grid\GridView;
   echo GridView::widget([
      'dataProvider' => $dataProvider,
      'columns' => [
         ['class' => 'yii\grid\SerialColumn'], 'name',
         ['class' => 'yii\grid\ActionColumn'],
         ['class' => 'yii\grid\CheckboxColumn'],
      ],
   ]);
?>
Step 6 −Go to http://localhost:8080/index.php?r=site/data-widget, you will see the following.

Yii - Events
You can use events to inject custom code at certain execution points. You can attach custom code to an event, and when the event is triggered, the code gets executed. For example, a logger object may trigger a userRegistered event when a new user registers on your web site. If a class needs to trigger events, you should extend it from the yii\base\Component class.
An event handler is a PHP callback. You can use the following callbacks −
A global PHP function specified as a string.
An anonymous function.
An array of a class name and a method as a string, for example, ['ClassName', 'methodName']
An array of an object and a method as a string, for example, [$obj, 'methodName']
Step 1 − To attach a handler to an event you should call the yii\base\Component::on() method.
$obj = new Obj;
// this handler is a global function
$obj->on(Obj::EVENT_HELLO, 'function_name');
// this handler is an object method
$obj->on(Obj::EVENT_HELLO, [$object, 'methodName']);
// this handler is a static class method
$obj->on(Obj::EVENT_HELLO, ['app\components\MyComponent', 'methodName']);
// this handler is an anonymous function

$obj->on(Obj::EVENT_HELLO, function ($event) {
   // event handling logic
});
You can attach one or more handlers to an event. The attached handlers are called in the order they were attached to the event.
Step 2 − To stop in the invocation of the handlers, you should set the yii\base\Event::$handled property to true.
$obj->on(Obj::EVENT_HELLO, function ($event) {
   $event->handled = true;
});
Step 3 − To insert the handler at the start of the queue, you may call yii\base\Component::on(), passing false for the fourth parameter.
$obj->on(Obj::EVENT_HELLO, function ($event) {
   // ...
}, $data, false);
Step 4 − To trigger an event, call the yii\base\Component::trigger() method.
namespace app\components;
use yii\base\Component;
use yii\base\Event;
class Obj extends Component {
   const EVENT_HELLO = 'hello';
   public function triggerEvent() {
      $this->trigger(self::EVENT_HELLO);
   }
}
Step 5 − To detach a handler from an event, you should call the yii\base\Component::off() method.
$obj = new Obj;
// this handler is a global function
$obj->off(Obj::EVENT_HELLO, 'function_name');
// this handler is an object method
$obj->off(Obj::EVENT_HELLO, [$object, 'methodName']);
// this handler is a static class method
$obj->off(Obj::EVENT_HELLO, ['app\components\MyComponent', 'methodName']);
// this handler is an anonymous function

$obj->off(Obj::EVENT_HELLO, function ($event) {
   // event handling logic
});
Yii - Creating Event
In this chapter we will see to create an event in Yii. To show events in action, we need data.
Preparing the DB
Step 1 − Create a new database. Database can be prepared in the following two ways.
In the terminal run mysql -u root –p
Create a new database via CREATE DATABASE helloworld CHARACTER SET utf8 COLLATE utf8_general_ci;
Step 2 − Configure the database connection in the config/db.php file. The following configuration is for the system used currently.
<?php
   return [
      'class' => 'yii\db\Connection',
      'dsn' => 'mysql:host=localhost;dbname=helloworld',
      'username' => 'vladimir',
      'password' => '12345',
      'charset' => 'utf8',
   ];
?>
Step 3 − Inside the root folder run ./yii migrate/create test_table. This command will create a database migration for managing our DB. The migration file should appear in the migrations folder of the project root.
Step 4 − Modify the migration file (m160106_163154_test_table.php in this case) this way.
<?php
   use yii\db\Schema;
   use yii\db\Migration;
   class m160106_163154_test_table extends Migration {
      public function safeUp() {
         $this->createTable("user", [
            "id" => Schema::TYPE_PK,
            "name" => Schema::TYPE_STRING,
            "email" => Schema::TYPE_STRING,
         ]);
         $this->batchInsert("user", ["name", "email"], [
            ["User1", "user1@gmail.com"],
            ["User2", "user2@gmail.com"],
            ["User3", "user3@gmail.com"],
            ["User4", "user4@gmail.com"],
            ["User5", "user5@gmail.com"],
            ["User6", "user6@gmail.com"],
            ["User7", "user7@gmail.com"],
            ["User8", "user8@gmail.com"],
            ["User9", "user9@gmail.com"],
            ["User10", "user10@gmail.com"],
            ["User11", "user11@gmail.com"],
         ]);
      }
      public function safeDown() {
         $this->dropTable('user');
      }
   }
?>
The above migration creates a user table with these fields: id, name, and email. It also adds a few demo users.
Step 5 − Inside the project root run ./yii migrate to apply the migration to the database.
Step 6 − Now, we need to create a model for our user table. For the sake of simplicity, we are going to use the Gii code generation tool. Open up this url: http://localhost:8080/index.php?r=gii. Then, click the “Start” button under the “Model generator” header. Fill in the Table Name (“user”) and the Model Class (“MyUser”), click the “Preview” button and finally, click the “Generate” button.
The MyUser model should appear in the models directory.
Create an Event
Assume we want to send an email to the admin whenever a new user registers on our web site.
Step 1 − Modify the models/MyUser.php file this way.
<?php
   namespace app\models;
   use Yii;
   /**
   * This is the model class for table "user".
   *
   * @property integer $id
   * @property string $name
   * @property string $email
   */
   class MyUser extends \yii\db\ActiveRecord {
      const EVENT_NEW_USER = 'new-user';
      public function init() {
         // first parameter is the name of the event and second is the handler.
         $this->on(self::EVENT_NEW_USER, [$this, 'sendMailToAdmin']);
      }
      /**
      * @inheritdoc
      */
      public static function tableName() {
         return 'user';
      }
      /**
      * @inheritdoc
      */
      public function rules() {
         return [
            [['name', 'email'], 'string', 'max' => 255]
         ];
      }
      /**
      * @inheritdoc
      */
      public function attributeLabels() {
         return [
            'id' => 'ID',
            'name' => 'Name',
            'email' => 'Email',
         ];
      }
      public function sendMailToAdmin($event) {
         echo 'mail sent to admin using the event';
      }
   }
?>
In the above code, we define a “new-user” event. Then, in the init() method we attach the sendMailToAdmin function to the “new-user” event. Now, we need to trigger this event.
Step 2 − Create a method called actionTestEvent in the SiteController.
public function actionTestEvent() {
   $model = new MyUser();
   $model->name = "John";
   $model->email = "john@gmail.com";
   if($model->save()) {
      $model->trigger(MyUser::EVENT_NEW_USER);
   }
}
In the above code, we create a new user and trigger the “new-user” event.
Step 3 − Now type http://localhost:8080/index.php?r=site/test-event, you will see the following.
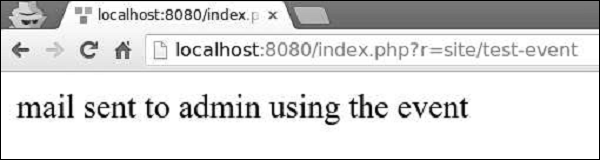
Yii - Behaviors
Behaviors are instances of the yii\base\Behavior class. A behavior injects its methods and properties to the component it is attached to. Behaviors can also respond to the events triggered by the component.
Step 1 − To define a behavior, extend the yii\base\Behavior class.
namespace app\components;
use yii\base\Behavior;
class MyBehavior extends Behavior {
   private $_prop1;
   public function getProp1() {
      return $this->_prop1;
   }
   public function setProp1($value) {
      $this->_prop1 = $value;
   }
   public function myFunction() {
      // ...
   }
}
The above code defines the behavior with one property (prop1) and one method (myFunction). When this behavior is attached to a component, that component will also have the prop1 property and the myFunction method.
To access the component the behavior is attached to, you may use the yii\base\Behavior::$owner property.
Step 2 − If you want a behavior to respond to the component events, you should override the yii\base\Behavior::events() method.
namespace app\components;
use yii\db\ActiveRecord;
use yii\base\Behavior;
class MyBehavior extends Behavior {
   public function events() {
      return [
         ActiveRecord::EVENT_AFTER_VALIDATE => 'afterValidate',
      ];
   }
   public function afterValidate($event) {
      // ...
   }
}
Step 3 − To attach a behavior, you should override the behaviors() method of the component class.
namespace app\models;
use yii\db\ActiveRecord;
use app\components\MyBehavior;
class MyUser extends ActiveRecord {
   public function behaviors() {
      return [
         // anonymous behavior, behavior class name only
         MyBehavior::className(),
         // named behavior, behavior class name only
         'myBehavior2' => MyBehavior::className(),
         // anonymous behavior, configuration array
         [
            'class' => MyBehavior::className(),
            'prop1' => 'value1',
            'prop2' => 'value2',
            'prop3' => 'value3',
         ],
         // named behavior, configuration array
         'myBehavior4' => [
            'class' => MyBehavior::className(),
            'prop1' => 'value1'
         ]
      ];
   }
}
Step 4 − To detach a behavior, call the yii\base\Component::detachBehavior() method.
$component->detachBehavior('myBehavior');
To show behaviors in action, we need data.
Preparing the DB
Step 1 − Create a new database. Database can be prepared in the following two ways.
In the terminal run mysql -u root –p.
Create a new database via CREATE DATABASE helloworld CHARACTER SET utf8 COLLATE utf8_general_ci;
Step 2 − Configure the database connection in the config/db.php file. The following configuration is for the system used currently.
<?php
   return [
      'class' => 'yii\db\Connection',
      'dsn' => 'mysql:host = localhost;dbname = helloworld',
      'username' => 'vladimir',
      'password' => '12345',
      'charset' => 'utf8',
   ];
?>
Step 3 − Inside the root folder run ./yii migrate/create test_table. This command will create a database migration for managing our DB. The migration file should appear in the migrations folder of the project root.
Step 4 − Modify the migration file (m160106_163154_test_table.php in this case) this way.
<?php
   use yii\db\Schema;
   use yii\db\Migration;
   class m160106_163154_test_table extends Migration {
      public function safeUp() {
         $this->createTable("user", [
            "id" => Schema::TYPE_PK,
            "name" => Schema::TYPE_STRING,
            "email" => Schema::TYPE_STRING,
         ]);
         $this->batchInsert("user", ["name", "email"], [
            ["User1", "user1@gmail.com"],
            ["User2", "user2@gmail.com"],
            ["User3", "user3@gmail.com"],
            ["User4", "user4@gmail.com"],
            ["User5", "user5@gmail.com"],
            ["User6", "user6@gmail.com"],
            ["User7", "user7@gmail.com"],
            ["User8", "user8@gmail.com"],
            ["User9", "user9@gmail.com"],
            ["User10", "user10@gmail.com"],
            ["User11", "user11@gmail.com"],
         ]);
      }
      public function safeDown() {
         $this->dropTable('user');
      }
   }
?>
The above migration creates a user table with these fields: id, name, and email. It also adds a few demo users.
Step 5 −Inside the project root run./yii migrate to apply the migration to the database.
Step 6 − Now, we need to create a model for our user table. For the sake of simplicity, we are going to use the Gii code generation tool. Open up this url: http://localhost:8080/index.php?r=gii. Then, click the “Start” button under the “Model generator” header. Fill in the Table Name (“user”) and the Model Class (“MyUser”), click the “Preview” button and finally, click the “Generate” button.
The MyUser model should appear in the models directory.
Yii - Creating a Behavior
Assume we want to create a behavior that will uppercase the “name” property of the component the behavior is attached to.
Step 1 − Inside the components folder, create a file called UppercaseBehavior.php with the following code.
<?php
   namespace app\components;
   use yii\base\Behavior;
   use yii\db\ActiveRecord;
   class UppercaseBehavior extends Behavior {
      public function events() {
         return [
            ActiveRecord::EVENT_BEFORE_VALIDATE => 'beforeValidate',
         ];
      }
      public function beforeValidate($event) {
         $this->owner->name = strtoupper($this->owner->name);
     }
   }
?>
In the above code we create the UppercaseBehavior, which uppercase the name property when the “beforeValidate” event is triggered.
Step 2 − To attach this behavior to the MyUser model, modify it this way.
<?php
   namespace app\models;
   use app\components\UppercaseBehavior;
   use Yii;
   /**
   * This is the model class for table "user".
   *
   * @property integer $id
   * @property string $name
   * @property string $email
   */
   class MyUser extends \yii\db\ActiveRecord {
      public function behaviors() {
         return [
            // anonymous behavior, behavior class name only
            UppercaseBehavior::className(),
         ];
      }
      /**
      * @inheritdoc
      */
      public static function tableName() {
         return 'user';
      }
      /**
      * @inheritdoc
      */
      public function rules() {
         return [
            [['name', 'email'], 'string', 'max' => 255]
         ];
      }
      /**
      * @inheritdoc
      */
      public function attributeLabels() {
         return [
            'id' => 'ID',
            'name' => 'Name',
            'email' => 'Email',
         ];
      }
   }
Now, whenever we create or update a user, its name property will be in uppercase.
Step 3 − Add an actionTestBehavior function to the SiteController.
public function actionTestBehavior() {
   //creating a new user
   $model = new MyUser();
   $model->name = "John";
   $model->email = "john@gmail.com";
   if($model->save()){
      var_dump(MyUser::find()->asArray()->all());
   }
}
Step 4 − Type http://localhost:8080/index.php?r=site/test-behavior in the address bar you will see that the name property of your newly created MyUser model is in uppercase.
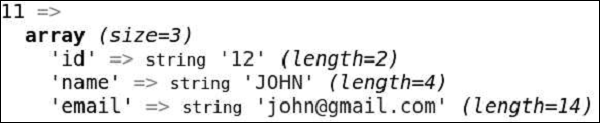
Yii - Configurations
Configurations are used to create new objects or initializing the existing ones. Configurations usually include a class name and a list of initial values. They may also include a list of event handlers and behaviors.
The following is an example of the database configuration −
<?php
   $config = [
      'class' => 'yii\db\Connection',
      'dsn' => 'mysql:host = localhost;dbname = helloworld',
      'username' => 'vladimir',
      'password' => '12345',
      'charset' => 'utf8',
   ];
   $db = Yii::createObject($config);
?>
The Yii::createObject() method takes a configuration array and creates an object based on the class named in the configuration.
The format of a configuration −
[
   //a fully qualified class name for the object being created
   'class' => 'ClassName',
   //initial values for the named property
   'propertyName' => 'propertyValue',
   //specifies what handlers should be attached to the object's events
   'on eventName' => $eventHandler,
   //specifies what behaviors should be attached to the object
   'as behaviorName' => $behaviorConfig,
]
The configuration file of a basic application template is one of the most complex −
<?php
   $params = require(__DIR__ . '/params.php');
   $config = [
      'id' => 'basic',
      'basePath' => dirname(__DIR__),
      'bootstrap' => ['log'],
      'components' => [
         'request' => [
            // !!! insert a secret key in the following (if it is empty) - this
               //is required by cookie validation
            'cookieValidationKey' => 'ymoaYrebZHa8gURuolioHGlK8fLXCKjO',
         ],
         'cache' => [
            'class' => 'yii\caching\FileCache',
         ],
         'user' => [
            'identityClass' => 'app\models\User',
            'enableAutoLogin' => true,
         ],
         'errorHandler' => [
            'errorAction' => 'site/error',
         ],
         'mailer' => [
            'class' => 'yii\swiftmailer\Mailer',
            // send all mails to a file by default. You have to set
            // 'useFileTransport' to false and configure a transport
            // for the mailer to send real emails.
            'useFileTransport' => true,
         ],
         'log' => [
            'traceLevel' => YII_DEBUG ? 3 : 0,
            'targets' => [
               [
                  'class' => 'yii\log\FileTarget',
                  'levels' => ['error', 'warning'],
               ],
            ],
         ],
         'urlManager' => [
            //'showScriptName' => false,
            //'enablePrettyUrl' => true,
            //'enableStrictParsing' => true,
            //'suffix' => '/'
         ],
         'db' => require(__DIR__ . '/db.php'),
      ],
      'modules' => [
         'hello' => [
            'class' => 'app\modules\hello\Hello',
         ],
      ],
      'params' => $params,
   ];
   if (YII_ENV_DEV) {
      // configuration adjustments for 'dev' environment
      $config['bootstrap'][] = 'debug';
      $config['modules']['debug'] = [
         'class' => 'yii\debug\Module',
      ];
      $config['bootstrap'][] = 'gii';
      $config['modules']['gii'] = [
         'class' => 'yii\gii\Module',
      ];
   }
   return $config;
?>
In the above configuration file, we do not define the class name. This is because we have already defined it in the index.php file −
<?php
   //defining global constans
   defined('YII_DEBUG') or define('YII_DEBUG', true);
   defined('YII_ENV') or define('YII_ENV', 'dev');
   //register composer autoloader
   require(__DIR__ . '/../vendor/autoload.php');
   //include yii files
   require(__DIR__ . '/../vendor/yiisoft/yii2/Yii.php');
   //load application config
   $config = require(__DIR__ . '/../config/web.php');
   //create, config, and process request
   (new yii\web\Application($config))->run();
?>
Many widgets also use configurations as shown in the following code.
<?php
   NavBar::begin([
      'brandLabel' => 'My Company',
      'brandUrl' => Yii::$app->homeUrl,
      'options' => [
         'class' => 'navbar-inverse navbar-fixed-top',
      ],
   ]);
   echo Nav::widget([
      'options' => ['class' => 'navbar-nav navbar-right'],
      'items' => [
         ['label' => 'Home', 'url' => ['/site/index']],
         ['label' => 'About', 'url' => ['/site/about']],
         ['label' => 'Contact', 'url' => ['/site/contact']],
         Yii::$app->user->isGuest ?
         ['label' => 'Login', 'url' => ['/site/login']] :
         [
            'label' => 'Logout (' . Yii::$app->user->identity->username . ')',
            'url' => ['/site/logout'],
            'linkOptions' => ['data-method' => 'post']
         ],
      ],
   ]);
   NavBar::end();
?>
When a configuration is too complex, a common practice is to create a PHP file, which returns an array. Take a look at the config/console.php configuration file −
<?php
   Yii::setAlias('@tests', dirname(__DIR__) . '/tests');

   $params = require(__DIR__ . '/params.php');
   $db = require(__DIR__ . '/db.php');

   return [
      'id' => 'basic-console',
      'basePath' => dirname(__DIR__),
      'bootstrap' => ['log', 'gii'],
      'controllerNamespace' => 'app\commands',
      'modules' => [
         'gii' => 'yii\gii\Module',
      ],
      'components' => [
         'cache' => [
            'class' => 'yii\caching\FileCache',
         ],
         'log' => [
            'targets' => [
               [
                  'class' => 'yii\log\FileTarget',
                  'levels' => ['error', 'warning'],
               ],
            ],
         ],
         'db' => $db,
      ],
      'params' => $params,
   ];
?>
The default configurations can be specified by calling the Yii::$container->set() method. It allows you to apply default configurations to all instances of the specified classes when they are called via the Yii::createObject() method.
For example, to customize the yii\widgets\LinkPager class, so that all link pagers will show at most three buttons, you can use the following code.
\Yii::$container->set('yii\widgets\LinkPager', [
   'maxButtonCount' => 3,
]);
Yii - Dependency Injection
A DI(dependency injection) container is an object that knows how to instantiate and configure objects. Yii provides the DI container via the yii\di\Container class.
It supports the following kinds of DI −
- Setter and property injection
- PHP callable injection
- Constructor injection
- Controller action injection
The DI container supports constructor injection with the help of type hints −
class Object1 {
   public function __construct(Object2 $object2) {

   }
}
$object1 = $container->get('Object1');
// which is equivalent to the following:
$object2 = new Object2;
$object1 = new Object1($object2);
Property and setter injections are supported through configurations −
<?php
   use yii\base\Object;
   class MyObject extends Object {
      public $var1;
      private $_var2;
      public function getVar2() {
         return $this->_var2;
      }
      public function setVar2(MyObject2 $var2) {
         $this->_var2 = $var2;
      }
   }
   $container->get('MyObject', [], [
      'var1' => $container->get('MyOtherObject'),
      'var2' => $container->get('MyObject2'),
   ]);
?>
In case of the PHP callable injection, the container will use a registered PHP callback to build new instances of a class −
$container->set('Object1', function () {
   $object1 = new Object1(new Object2);
   return $object1;
});
$object1 = $container->get('Object1');
Controller action injection is a type of DI where dependencies are declared using the type hints. It is useful for keeping the MVC controllers slim light-weighted and slim −
public function actionSendToAdmin(EmailValidator $validator, $email) {
   if ($validator->validate($email)) {
      // sending email
   }
}
You can use the yii\db\Container::set() method to register dependencies −
<?php
   $container = new \yii\di\Container;
   // register a class name as is. This can be skipped.
   $container->set('yii\db\Connection');
   // register an alias name. You can use $container->get('MyObject')
   // to create an instance of Connection
   $container->set('MyObject', 'yii\db\Connection');
   // register an interface
   // When a class depends on the interface, the corresponding class
   // will be instantiated as the dependent object
   $container->set('yii\mail\MailInterface', 'yii\swiftmailer\Mailer');
   // register an alias name with class configuration
   // In this case, a "class" element is required to specify the class
   $container->set('db', [
      'class' => 'yii\db\Connection',
      'dsn' => 'mysql:host=127.0.0.1;dbname = helloworld',
      'username' => 'vladimir',
      'password' => '12345',
      'charset' => 'utf8',
   ]);
   // register a class with configuration. The configuration
   // will be applied when the class is instantiated by get()
   $container->set('yii\db\Connection', [
      'dsn' => 'mysql:host=127.0.0.1;dbname = helloworld',
      'username' => 'vladimir',
      'password' => '12345',
      'charset' => 'utf8',
   ]);
   // register a PHP callable
   // The callable will be executed each time when $container->get('db') is called
   $container->set('db', function ($container, $params, $config) {
      return new \yii\db\Connection($config);
   });
   // register a component instance
   // $container->get('pageCache') will return the same instance each time when it
      //is called
   $container->set('pageCache', new FileCache);
?>
Using the DI
Step 1 − Inside the components folder create a file called MyInterface.php with the following code.
<?php
   namespace app\components;
   interface MyInterface {
      public function test();
   }
?>
Step 2 − Inside the components folder, create two files.
First.php −
<?php
   namespace app\components;
   use app\components\MyInterface;
   class First implements MyInterface {
      public function test() {
         echo "First class <br>";
      }
   }
?>
Second.php −
<?php
   app\components;
   use app\components\MyInterface;
      class Second implements MyInterface {
      public function test() {
         echo "Second class <br>";
      }
   }
?>
Step 3 − Now, add an actionTestInterface to the SiteController.
public function actionTestInterface() {
   $container = new \yii\di\Container();
   $container->set
      ("\app\components\MyInterface","\app\components\First");
   $obj = $container->get("\app\components\MyInterface");
   $obj->test(); // print "First class"
   $container->set
      ("\app\components\MyInterface","\app\components\Second");
   $obj = $container->get("\app\components\MyInterface");
   $obj->test(); // print "Second class"
}
Step 4 − Go to http://localhost:8080/index.php?r=site/test-interface you should see the following.
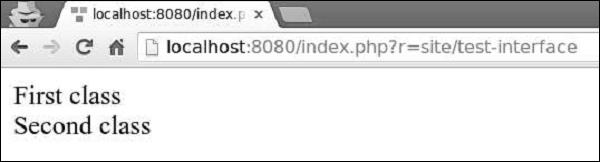
This approach is convenient as we can set classes in one place and other code will use new classes automatically.
Yii - Database Access
Yii DAO (Database Access Object) provides an API for accessing databases. It also serves as the foundation for other database access methods: active record and query builder.
Yii DAO supports the following databases −
- MySQL
- MSSQL
- SQLite
- MariaDB
- PostgreSQL
- ORACLE
- CUBRID
Creating a Database Connection
Step 1 − To create a database connection, you need to create an instance of the yii\db\Connection class.
$mydb = new yii\db\Connection([
   'dsn' => 'mysql:host=localhost;dbname=mydb',
   'username' => 'username',
   'password' => 'password',
   'charset' => 'utf8',
]);
A common practice is to configure a DB connection inside the application components. For example, in the basic application template the DB connection configuration is located in the config/db.php file as shown in the following code.
<?php
   return [
      'class' => 'yii\db\Connection',
      'dsn' => 'mysql:host = localhost;dbname = helloworld',
      'username' => 'vladimir',
      'password' => '123574896',
      'charset' => 'utf8',
   ];
?>
Step 2 − To access the DB connection you may use this expression.
Yii::$app->db
To configure a DB connection, you should specify its DSN (Data Source Name) via the dsn property. The DSN format varies for different databases −
MySQL, MariaDB − mysql:host = localhost;dbname = mydb
PostgreSQL − pgsql:host = localhost;port = 5432;dbname = mydb
SQLite − sqlite:/path/to/db/file
MS SQL Server (via sqlsrv driver) − sqlsrv:Server = localhost;Database = mydb
MS SQL Server (via mssql driver) − mssql:host = localhost;dbname = mydb
MS SQL Server (via dblib driver) − dblib:host = localhost;dbname = mydb
CUBRID − cubrid:dbname = mydb;host = localhost;port = 33000
Oracle − oci:dbname = //localhost:1521/mydb
To show database querying in action, we need data.
Preparing the DB
Step 1 − Create a new database. Database can be prepared in the following two ways.
In the terminal run mysql -u root –p.
Create a new database via CREATE DATABASE helloworld CHARACTER SET utf8 COLLATE utf8_general_ci;
Step 2 − Configure the database connection in the config/db.php file. The following configuration is for the system used currently.
<?php
   return [
      'class' => 'yii\db\Connection',
      'dsn' => 'mysql:host = localhost;dbname = helloworld',
      'username' => 'vladimir',
      'password' => '12345',
      'charset' => 'utf8',
   ];
?>
Step 3 − Inside the root folder run ./yii migrate/create test_table. This command will create a database migration for managing our DB. The migration file should appear in the migrations folder of the project root.
Step 4 − Modify the migration file (m160106_163154_test_table.php in this case) this way.
<?php
   use yii\db\Schema;
   use yii\db\Migration;
   class m160106_163154_test_table extends Migration {
      public function safeUp() {
         $this->createTable("user", [
            "id" => Schema::TYPE_PK,
            "name" => Schema::TYPE_STRING,
            "email" => Schema::TYPE_STRING,
         ]);
         $this->batchInsert("user", ["name", "email"], [
            ["User1", "user1@gmail.com"],
            ["User2", "user2@gmail.com"],
            ["User3", "user3@gmail.com"],
            ["User4", "user4@gmail.com"],
            ["User5", "user5@gmail.com"],
            ["User6", "user6@gmail.com"],
            ["User7", "user7@gmail.com"],
            ["User8", "user8@gmail.com"],
            ["User9", "user9@gmail.com"],
            ["User10", "user10@gmail.com"],
            ["User11", "user11@gmail.com"],
         ]);
      }
      public function safeDown() {
         $this->dropTable('user');
      }
   }
?>
The above migration creates a user table with these fields: id, name, and email. It also adds a few demo users.
Step 5 − Inside the project root run ./yii migrate to apply the migration to the database.
Step 6 − Now, we need to create a model for our user table. For the sake of simplicity, we are going to use the Gii code generation tool. Open up this url: http://localhost:8080/index.php?r=gii. Then, click the “Start” button under the “Model generator” header. Fill in the Table Name (“user”) and the Model Class (“MyUser”), click the “Preview” button and finally, click the “Generate” button.
The MyUser model should appear in the models directory.
Yii - Data Access Objects
To execute an SQL query, you should follow these steps −
- Create an yii\db\Command with an SQL query.
- Bind parameters (not required)
- Execute the command.
Step 1 − Create a function called actionTestDb in the SiteController.
public function actionTestDb(){
   // return a set of rows. each row is an associative array of column names and values.
   // an empty array is returned if the query returned no results
   $users = Yii::$app->db->createCommand('SELECT * FROM user LIMIT 5')
      ->queryAll();
   var_dump($users);
   // return a single row (the first row)
   // false is returned if the query has no result
   $user = Yii::$app->db->createCommand('SELECT * FROM user WHERE id=1')
      ->queryOne();
   var_dump($user);
   // return a single column (the first column)
   // an empty array is returned if the query returned no results
   $userName = Yii::$app->db->createCommand('SELECT name FROM user')
      ->queryColumn();
   var_dump($userName);
   // return a scalar value
   // false is returned if the query has no result
   $count = Yii::$app->db->createCommand('SELECT COUNT(*) FROM user')
      ->queryScalar();
   var_dump($count);
}
The above example shows various ways of fetching data from a DB.
Step 2 − Go to the address http://localhost:8080/index.php?r=site/test-db, you will see the following output.
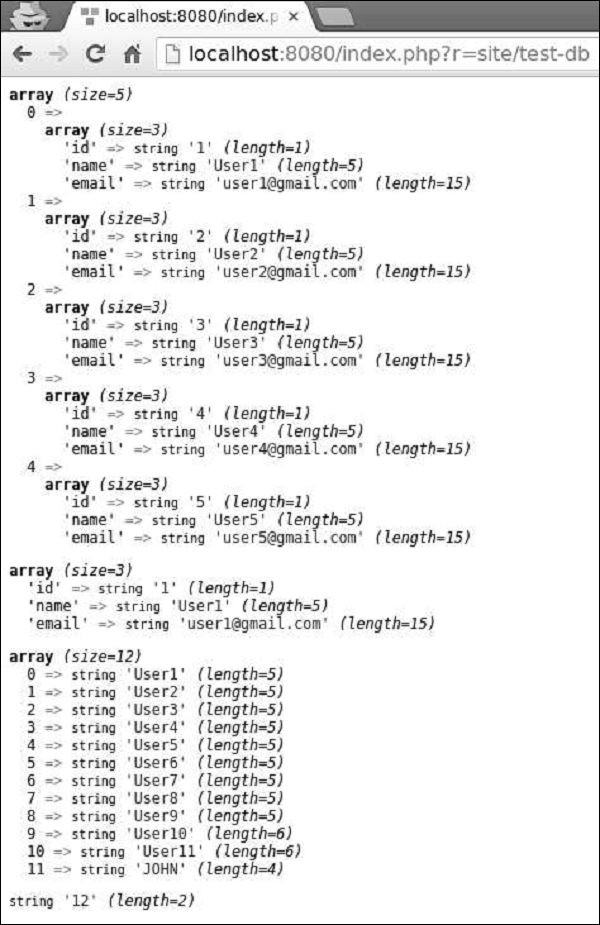
Create an SQL Command
To create an SQL command with parameters, you should always use the approach of binding parameters to prevent the SQL injection.
Step 1 − Modify the actionTestDb method this way.
public function actionTestDb() {
   $firstUser = Yii::$app->db->createCommand('SELECT * FROM user WHERE id = :id')
      ->bindValue(':id', 1)
      ->queryOne();
   var_dump($firstUser);
   $params = [':id' => 2, ':name' => 'User2'];
   $secondUser = Yii::$app->db->createCommand('SELECT * FROM user WHERE
      id = :id AND name = :name')
      ->bindValues($params)
      ->queryOne();
   var_dump($secondUser);
      //another approach
   $params = [':id' => 3, ':name' => 'User3'];
   $thirdUser = Yii::$app->db->createCommand('SELECT * FROM user WHERE
      id = :id AND name = :name', $params)
      ->queryOne();
   var_dump($thirdUser);
}
In the code above −
bindValue() − binds a single parameter value.
bindValues() − binds multiple parameter values.
Step 2 − If you go to the address http://localhost:8080/index.php?r=site/test-db, you will see the following output.
INSERT, UPDATE and DELETE Queries
For INSERT, UPDATE, and DELETE queries, you may call insert(), update(), and delete() methods.
Step 1 − Modify the actionTestDb method this way.
public function actionTestDb() {
   public function actionTestDb(){
      // INSERT (table name, column values)
      Yii::$app->db->createCommand()->insert('user', [
         'name' => 'My New User',
         'email' => 'mynewuser@gmail.com',
      ])->execute();
      $user = Yii::$app->db->createCommand('SELECT * FROM user WHERE name = :name')
         ->bindValue(':name', 'My New User')
         ->queryOne();
      var_dump($user);
      // UPDATE (table name, column values, condition)
      Yii::$app->db->createCommand()->update('user', ['name' => 'My New User
         Updated'], 'name = "My New User"')->execute();
      $user = Yii::$app->db->createCommand('SELECT * FROM user WHERE name = :name')
         ->bindValue(':name', 'My New User Updated')
         ->queryOne();
      var_dump($user);
      // DELETE (table name, condition)
      Yii::$app->db->createCommand()->delete('user', 'name = "My New User
         Updated"')->execute();
      $user = Yii::$app->db->createCommand('SELECT * FROM user WHERE name = :name')
         ->bindValue(':name', 'My New User Updated')
         ->queryOne();
      var_dump($user);
   }
}
Step 2 − Type the URL http://localhost:8080/index.php?r=site/test-db in the address bar of the web browser and you will see the following output.
Yii - Query Builder
Query builder allows you to create SQL queries in a programmatic way. Query builder helps you write more readable SQL-related code.
To use query builder, you should follow these steps −
- Build an yii\db\Query object.
- Execute a query method.
To build an yii\db\Query object, you should call different query builder functions to define different parts of an SQL query.
Step 1 − To show a typical usage of the query builder, modify the actionTestDb method this way.
public function actionTestDb() {
   //generates "SELECT id, name, email FROM user WHERE name = 'User10';"
   $user = (new \yii\db\Query())
      ->select(['id', 'name', 'email'])
      ->from('user')
      ->where(['name' => 'User10'])
      ->one();
   var_dump($user);
}
Step 2 − Go to http://localhost:8080/index.php?r=site/test-db, you will see the following output.
Where() function
The where() function defines the WHERE fragment of a query. To specify a WHERE condition, you can use three formats.
string format − 'name = User10'
hash format − ['name' => 'User10', 'email => user10@gmail.com']
operator format − ['like', 'name', 'User']
Example of String format
public function actionTestDb() {
   $user = (new \yii\db\Query())
      ->select(['id', 'name', 'email'])
      ->from('user')
      ->where('name = :name', [':name' => 'User11'])
      ->one();
   var_dump($user);
}
Following will be the output.
Example of Hash format
public function actionTestDb() {
   $user = (new \yii\db\Query())
      ->select(['id', 'name', 'email'])
      ->from('user')
      ->where([
         'name' => 'User5',
         'email' => 'user5@gmail.com'
      ])
      ->one();
   var_dump($user);
}
Following will be the output.
Operator format allows you to define arbitrary conditions in the following format −
[operator, operand1, operand2]
The operator can be −
and − ['and', 'id = 1', 'id = 2'] will generate id = 1 AND id = 2 or: similar to the and operator
between − ['between', 'id', 1, 15] will generate id BETWEEN 1 AND 15
not between − similar to the between operator, but BETWEEN is replaced with NOT BETWEEN
in − ['in', 'id', [5,10,15]] will generate id IN (5,10,15)
not in − similar to the in operator, but IN is replaced with NOT IN
like − ['like', 'name', 'user'] will generate name LIKE '%user%'
or like − similar to the like operator, but OR is used to split the LIKE predicates
not like − similar to the like operator, but LIKE is replaced with NOT LIKE
or not like − similar to the not like operator, but OR is used to concatenate the NOT LIKE predicates
exists − requires one operand which must be an instance of the yii\db\Query class
not exists − similar to the exists operator, but builds a NOT EXISTS (subquery) expression
<, <=, >, >=, or any other DB operator: ['<', 'id', 10] will generate id<10
Example of Operator format
public function actionTestDb() {
   $users = (new \yii\db\Query())
      ->select(['id', 'name', 'email'])
      ->from('user')
      ->where(['between', 'id', 5, 7])
      ->all();
   var_dump($users);
}
Following will be the output.
OrderBy() Function
The orderBy() function defines the ORDER BY fragment.
Example −
public function actionTestDb() {
   $users = (new \yii\db\Query())
      ->select(['id', 'name', 'email'])
      ->from('user')
      ->orderBy('name DESC')
      ->all();
   var_dump($users);
}
Following will be the output.
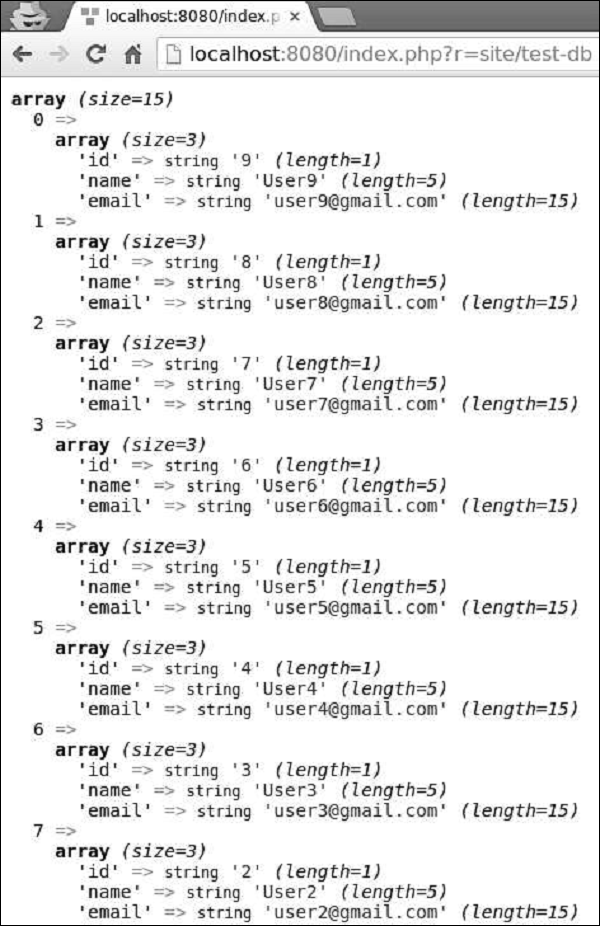
groupBy() Function
The groupBy() function defines the GROUP BY fragment, while the having() method specifies the HAVING fragment.
Example −
public function actionTestDb() {
   $users = (new \yii\db\Query())
      ->select(['id', 'name', 'email'])
      ->from('user')
      ->groupBy('name')
      ->having('id < 5')
      ->all();
   var_dump($users);
}
Following will be the output.
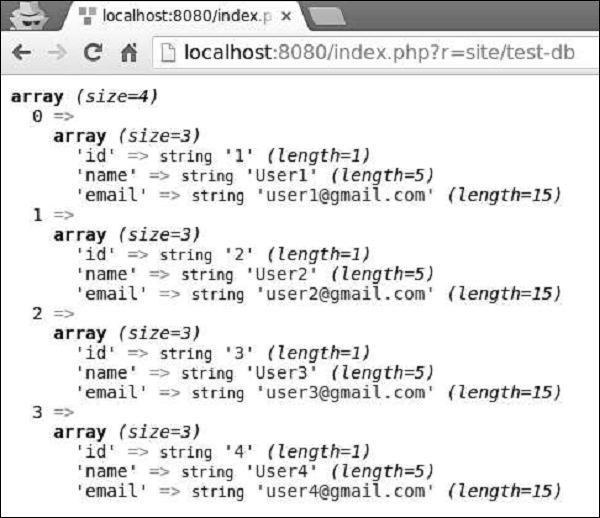
The limit() and offset() methods defines the LIMIT and OFFSET fragments.
Example −
public function actionTestDb() {
   $users = (new \yii\db\Query())
      ->select(['id', 'name', 'email'])
      ->from('user')
      ->limit(5)
      ->offset(5)
      ->all();
   var_dump($users);
}
You can see the following output −
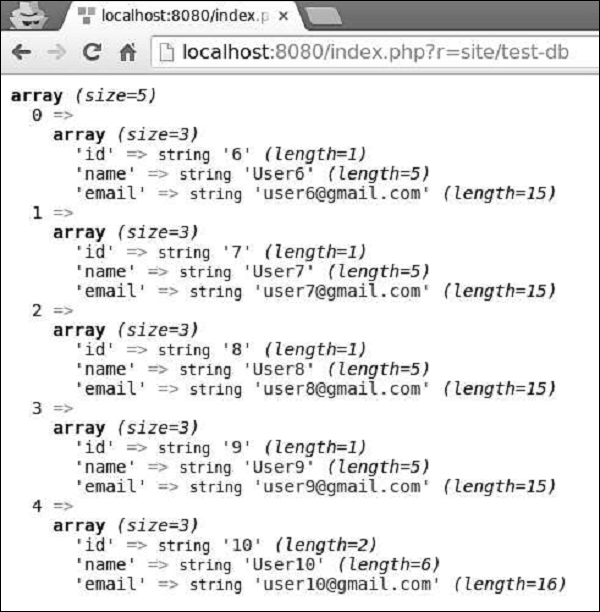
The yii\db\Query class provides a set of methods for different purposes −
all() − Returns an array of rows of name-value pairs.
one() − Returns the first row.
column() − Returns the first column.
scalar() − Returns a scalar value from the first row and first column of the result.
exists() − Returns a value indicating whether the query contains any result
count() Returns the result of a COUNT query
other aggregation query methods − Includes sum($q), average($q), max($q), min($q). The $q parameter can be either a column name or a DB expression.
Yii - Active Record
Active Record provides an object-oriented API for accessing data. An Active Record class is associated with a database table.
Yii provides the Active Record support for the following relational databases −
- MySQL 4.1 or later
- SQLite 2 and 3:
- PostgreSQL 7.3 or later
- Microsoft SQL Server 2008 or later
- CUBRID 9.3 or later
- Oracle
- ElasticSearch
- Sphinx
Additionally, the Active Record class supports the following NoSQL databases −
- Redis 2.6.12 or later
- MongoDB 1.3.0 or later
After declaring an Active Record class(MyUser model in our case) for a separate database table, you should follow these steps to query data from it −
- Create a new query object, using the yii\db\ActiveRecord::find() method.
- Build the query object.
- Call a query method to retrieve data.
Step 1 − Modify the actionTestDb() method this way.
public function actionTestDb() {
   // return a single user whose ID is 1
   // SELECT * FROM `user` WHERE `id` = 1
   $user = MyUser::find()
      ->where(['id' => 1])
      ->one();
   var_dump($user);
   // return the number of users
   // SELECT COUNT(*) FROM `user`
   $users = MyUser::find()
      ->count();
   var_dump($users);
   // return all users and order them by their IDs
   // SELECT * FROM `user` ORDER BY `id`
   $users = MyUser::find()
      ->orderBy('id')
      ->all();
   var_dump($users);
}
The code given above shows how to use ActiveQuery to query data.
Step 2 − Go to http://localhost:8080/index.php?r=site/test-db, you will see the following output.
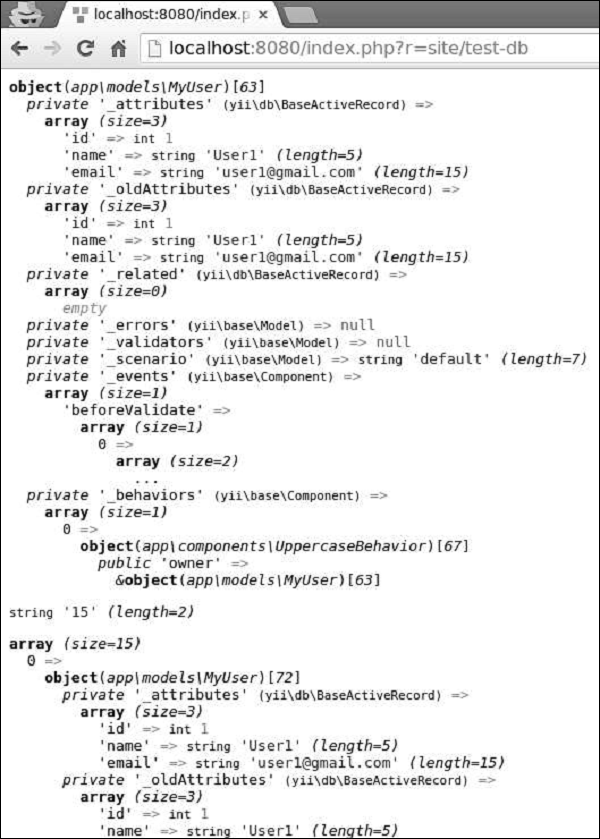
Querying by primary key values or a set of column values is a common task, that is why Yii provides the following methods −
yii\db\ActiveRecord::findOne() − Returns a single Active Record instance
yi\db\ActiveRecord::findAll() − Returns an array of Active Record instances
Example −
public function actionTestDb() {
   // returns a single customer whose ID is 1
   // SELECT * FROM `user` WHERE `id` = 1
   $user = MyUser::findOne(1);
   var_dump($user);
   // returns customers whose ID is 1,2,3, or 4
   // SELECT * FROM `user` WHERE `id` IN (1,2,3,4)
   $users = MyUser::findAll([1, 2, 3, 4]);
   var_dump($users);
   // returns a user whose ID is 5
   // SELECT * FROM `user` WHERE `id` = 5
   $user = MyUser::findOne([
      'id' => 5
   ]);
   var_dump($user);
}
Save Data to Database
To save data to the database, you should call the yii\db\ActiveRecord::save() method.
Step 1 − Modify the actionTestDb() method this way.
public function actionTestDb() {
   // insert a new row of data
   $user = new MyUser();
   $user->name = 'MyCustomUser2';
   $user->email = 'mycustomuser@gmail.com';
   $user->save();
   var_dump($user->attributes);

   // update an existing row of data
   $user = MyUser::findOne(['name' => 'MyCustomUser2']);
   $user->email = 'newemail@gmail.com';
   $user->save();
   var_dump($user->attributes);
}
Step 2 − Go to http://localhost:8080/index.php?r=site/test-db, you will see the following output.
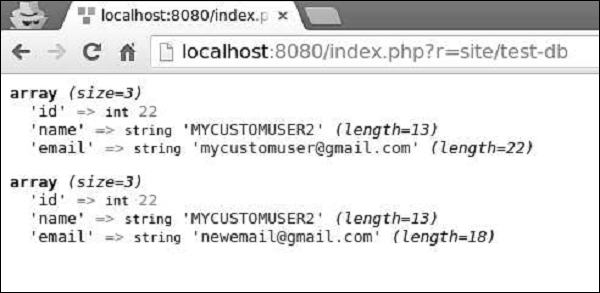
To delete a single row of data, you should −
Retrieve the Active Record instance
Call the yii\db\ActiveRecord::delete() method
Step 1 − Modify the actionTestDb() method this way.
public function actionTestDb() {
   $user = MyUser::findOne(2);
   if($user->delete()) {
      echo "deleted";
   }
}
Step 2 − Type http://localhost:8080/index.php?r=site/test-db in the address bar of the web browser, you will see the following output.

Step 3 − You can also call the yii\db\ActiveRecord::deleteAll() method to delete multiple rows of data, for example.
public function actionTestDb() {
    MyUser::deleteAll('id >= 20');
}
Yii - Database Migration
During the developing of a database-driven application, the database structure evolves with the source code. Yii provides the database migration feature that allows you to keep track of database changes.
Yii provides the following migration command line tools −
- Create new migrations
- Revert migrations
- Apply migrations
- Re-apply migrations
- Show migration status and history
Creating a Migration
Let us create a new database migration.
Step 1 − Inside the project root of the basic application template open the console window and run.
./yii migrate/create add_news_table
The above command will create a new migration file (m160113_102634_add_news_table.php in this case) in the migrations folder.
The file contains the following code −
<?php
   use yii\db\Schema;
   use yii\db\Migration;
   class m160113_102634_add_news_table extends Migration {
      public function up() {

      }
      public function down() {
         echo "m160113_102634_add_news_table cannot be reverted.\n";
         return false;
      }
      /*
      // Use safeUp/safeDown to run migration code within a transaction
      public function safeUp() {

      }
      public function safeDown() {

      }
      */
   }
?>
Each DB migrations is a PHP class extending the yii\db\Migration class. The class name is generated in the following format −
m<YYMMDD_HHMMSS>_<Name>
where <YYMMDD_HMMSS> is the UTC datetime at which the migration command was executed and <Name> is the argument you provided in the console command.
The up() method is invoked when you upgrade your database, while the down() method is called when you downgrade it.
Step 2 − To add a new table to the database, modify the migration file this way.
<?php
   use yii\db\Schema;
   use yii\db\Migration;
   class m160113_102634_add_news_table extends Migration {
      public function up() {
         $this->createTable("news", [
            "id" => Schema::TYPE_PK,
            "title" => Schema::TYPE_STRING,
            "content" => Schema::TYPE_TEXT,
         ]);
      }
      public function down() {
         $this->dropTable('news');
      }
      /*
      // Use safeUp/safeDown to run migration code within a transaction
      public function safeUp() {

      }
      public function safeDown() {

      }
      */
   }
?>
In the above code we created a new table called news in the up() method and dropped this table in the down() method.
The news table consists of three fields: id, title, and content. When creating a table or a column we should use abstract types so that migrations are independent of a database type. For example, in the case of MySQL, TYPE_PK will be converted into int(11) NOT NUL AUTO_INCREMETN PRIMARY KEY.
Step 3 − To upgrade a database, run this command.
./yii migrate
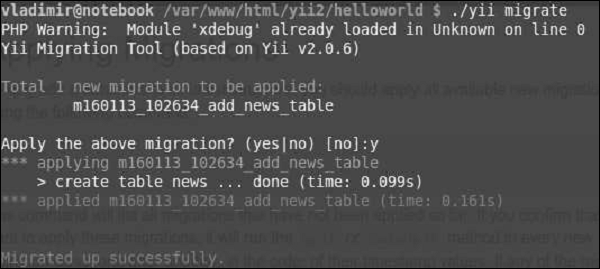
The above command will list all available migrations that have not been applied yet. Then, if you confirm to apply migrations, it will run safeUp() or up() in all new migration classes.
Step 4 − To apply only three available migrations, you may run.
./yii migrate 3
Step 5 − You can also define a particular migration the database should be migrated to.
# using timestamp to specify the migration
yii migrate/to 160202_195501
# using a string that can be parsed by strtotime()
yii migrate/to "2016-01-01 19:55:01"
# using full name
yii migrate/to m160202_195501_create_news_table
# using UNIX timestamp
yii migrate/to 1393964718
Step 6 − To revert a migration(execute down() or safeDown() methods), run.
./yii migrate/down
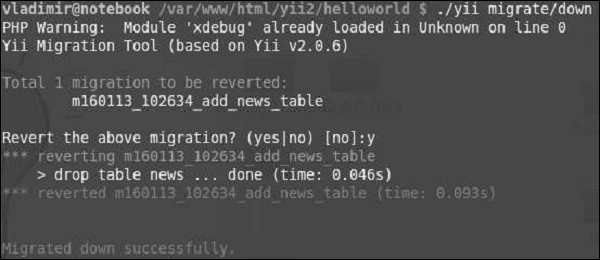
Step 7 − To revert the most five recently applied migrations, you may run.
./yii migrate/down 5
Step 8 − To redo(revert and then apply again) migrations, run.
./yii migrate/redo
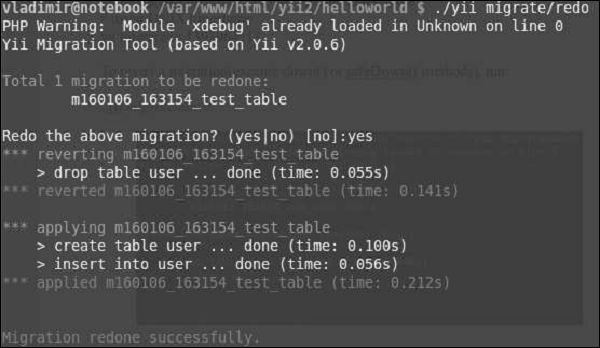
To list the migrations already applied, use these commands −
yii migrate/new # shows the first 10 new migrations
yii migrate/new 3 # shows the first 3 new migrations
yii migrate/new all # shows all new migrations
yii migrate/history # shows the last 10 applied migrations
yii migrate/history 20 # shows the last 20 applied migrations
yii migrate/history all # shows all applied migrations
Sometimes you need to add or drop a column from a specific table. You can use addColumn() and dropColumn() methods.
Step 1 − Create a new migration.
./yii migrate/create add_category_to_news
Step 2 − Modify the newly created migration file this way.
<?php
   use yii\db\Schema;
   use yii\db\Migration;
   class m160113_110909_add_category_to_news extends Migration {
      public function up() {
         $this->addColumn('news', 'category', $this->integer());
      }
      public function down() {
         $this->dropColumn('news', 'category');
      }
   }
?>
Now, if you run ./yii migrate, the category column should be added to the news table. On the contrary, if you run ./yii migrate/down 1, the category column should be dropped.
When performing DB migrations, it is important to ensure each migration has succeded or failed. It is recommended to enclose DB operations in a transaction. To implement transactional migrations, you should just put the migration code in the safeUp() and safeDown() methods. If any operation in these methods fails, all previous operations will be rolled back.
The previous example in the “transactional way” will be −
<?php
   use yii\db\Schema;
   use yii\db\Migration;
   class m160113_110909_add_category_to_news extends Migration {
      public function safeUp() {
         $this->addColumn('news', 'category', $this->integer());
      }
      public function safeDown() {
         $this->dropColumn('news', 'category');
      }
   }
?>
The yii\db\Migration class provides the following methods for manipulating databases −
execute() − Executes a raw SQL statement
createTable() − Creates a table
renameTable() − Renames a table
insert() − Inserts a single row
batchInsert() − Inserts multiple rows
update() − Updates rows
delete() − Deletes rows
addColumn() − Adds a column
renameColumn() − Renames a column
dropColumn() − Removes a column
alterColumn() − Alters a column
dropTable() − Removes a table
truncateTable() − Removes all rows in a table
createIndex() − Creates an index
dropIndex() − Removes an index
addPrimaryKey() − Adds a primary key
dropPrimaryKey() − Removes a primary key
addForeignKey() − Adds a foreign key
dropForeignKey() − Removes a foreign key
Yii - Theming
Theming helps you replace a set of views with another one without the need of modifying original view files. You should set the theme property of the view application component to use theming.
You should also define the following properties −
yii\base\Theme::$basePath − Defines the base directory for CSS, JS, images, and so forth.
yii\base\Theme::$baseUrl − Defines the base URL of the themed resources.
yii\base\Theme::$pathMap − Defines the replacement rules.
For example, if you call $this->render('create') in UserController, the @app/views/user/create.php view file will be rendered. Nevertheless, if you enable theming like in the following application configuration, the view file @app/themes/basic/user/create.php will be rendered, instead.
Step 1 − Modify the config/web.php file this way.
<?php
   $params = require(__DIR__ . '/params.php');
   $config = [
      'id' => 'basic',
      'basePath' => dirname(__DIR__),
      'bootstrap' => ['log'],
      'components' => [
         'request' => [
            // !!! insert a secret key in the following (if it is empty) - this
               //is required by cookie validation
            'cookieValidationKey' => 'ymoaYrebZHa8gURuolioHGlK8fLXCKjO',
         ],
         'cache' => [
            'class' => 'yii\caching\FileCache',
         ],
         'user' => [
            'identityClass' => 'app\models\User',
            'enableAutoLogin' => true,
         ],
         'errorHandler' => [
            'errorAction' => 'site/error',
         ],
         'mailer' => [
            'class' => 'yii\swiftmailer\Mailer',
            // send all mails to a file by default. You have to set
            // 'useFileTransport' to false and configure a transport
            // for the mailer to send real emails.
            'useFileTransport' => true,
         ],
         'log' => [
            'traceLevel' => YII_DEBUG ? 3 : 0,
            'targets' => [
               [
                  'class' => 'yii\log\FileTarget',
                  'levels' => ['error', 'warning'],
               ],
            ],
         ],
         'view' => [
            'theme' => [
               'basePath' => '@app/themes/basic',
               'baseUrl' => '@web/themes/basic',
               'pathMap' => [
                  '@app/views' => '@app/themes/basic',
               ],
            ],
         ],
         'db' => require(__DIR__ . '/db.php'),
      ],
      'modules' => [
         'hello' => [
            'class' => 'app\modules\hello\Hello',
         ],
      ],
      'params' => $params,
   ];
   if (YII_ENV_DEV) {
      // configuration adjustments for 'dev' environment
      $config['bootstrap'][] = 'debug';
      $config['modules']['debug'] = [
         'class' => 'yii\debug\Module',
      ];
      $config['bootstrap'][] = 'gii';
      $config['modules']['gii'] = [
         'class' => 'yii\gii\Module',
      ];
   }
   return $config;
?>
We have added the view application component.
Step 2 − Now create the web/themes/basic directory structure and themes/basic/site. Inside the themes/basic/site folder create a file called about.php with the following code.
<?php
/* @var $this yii\web\View */
use yii\helpers\Html;
$this->title = 'About';
$this->params['breadcrumbs'][] = $this->title;
$this->registerMetaTag(['name' => 'keywords', 'content' => 'yii, developing,
views, meta, tags']);
$this->registerMetaTag(['name' => 'description', 'content' => 'This is the
description of this page!'], 'description');
?>
<div class = "site-about">
<h1><?= Html::encode($this->title) ?></h1>
<p style = "color: red;">
This is the About page. You may modify the following file to customize its content:
</p>
</div>
Step 3 − Now, go to http://localhost:8080/index.php?r=site/about, the themes/basic/site/about.php file will be rendered, instead of views/site/about.php.

Step 4 − To theme modules, configure the yii\base\Theme::$pathMap property this way.
'pathMap' => [ '@app/views' => '@app/themes/basic', '@app/modules' => '@app/themes/basic/modules', ],
Step 5 − To theme widgets, configure the yii\base\Theme::$pathMap property this way.
'pathMap' => [ '@app/views' => '@app/themes/basic', '@app/widgets' => '@app/themes/basic/widgets', // <-- !!! ],
Sometimes you need to specify a basic theme which contains a basic look and feel of the application. To achieve this goal, you can use theme inheritance.
Step 6 − Modify the view application component this way.
'view' => [
'theme' => [
'basePath' => '@app/themes/basic',
'baseUrl' => '@web/themes/basic',
'pathMap' => [
'@app/views' => [
'@app/themes/christmas',
'@app/themes/basic',
],
]
],
],
In the above configuration, the @app/views/site/index.php view file will be themed as either @app/themes/christmas/site/index.php or @app/themes/basic/site/index.php, depending on which file exists. If both files exist, the first one will be used.
Step 7 − Create the themes/christmas/site directory structure.
Step 8 − Now, inside the themes/christmas/site folder, create a file called about.php with the following code.
<?php
/* @var $this yii\web\View */
use yii\helpers\Html;
$this->title = 'About';
$this->params['breadcrumbs'][] = $this->title;
$this->registerMetaTag(['name' => 'keywords', 'content' => 'yii, developing,
views, meta, tags']);
$this->registerMetaTag(['name' => 'description', 'content' => 'This is the
description of this page!'], 'description');
?>
<div class = "site-about">
<h2>Christmas theme</h2>
<img src = "http://pngimg.com/upload/fir_tree_PNG2514.png" alt = ""/>
<p style = "color: red;">
This is the About page. You may modify the following file to customize its content:
</p>
</div>
Step 9 − If you go to http://localhost:8080/index.php?r=site/about, you will see the updated about page using the Christmas theme.

Yii - RESTful APIs
Yii provides the following useful features for implementing RESTful APIs −
- Quick prototyping
- Customizable object serialization
- Response format (supporting JSON and XML by default)
- Formatting of collection data and validation errors
- Efficient routing
- Support for HATEOAS
- Built-in support for the OPTIONS and HEAD verbs
- Data caching and HTTP caching
- Authentication and authorization
- Rate limiting
To show RESTful APIs in action, we need data.
Preparing the DB
Step 1 − Create a new database. Database can be prepared in the following two ways.
In the terminal run mysql -u root –p.
Create a new database via CREATE DATABASE helloworld CHARACTER SET utf8 COLLATE utf8_general_ci;
Step 2 − Configure the database connection in the config/db.php file. The following configuration is for the system used currently.
<?php
return [
'class' => 'yii\db\Connection',
'dsn' => 'mysql:host = localhost;dbname = helloworld',
'username' => 'vladimir',
'password' => '12345',
'charset' => 'utf8',
];
?>
Step 3 − Inside the root folder run ./yii migrate/create test_table. This command will create a database migration for managing our DB. The migration file should appear in the migrations folder of the project root.
Step 4 − Modify the migration file (m160106_163154_test_table.php in this case) this way.
<?php
use yii\db\Schema;
use yii\db\Migration;
class m160106_163154_test_table extends Migration {
public function safeUp() {
$this->createTable("user", [
"id" => Schema::TYPE_PK,
"name" => Schema::TYPE_STRING,
"email" => Schema::TYPE_STRING,
]);
$this->batchInsert("user", ["name", "email"], [
["User1", "user1@gmail.com"],
["User2", "user2@gmail.com"],
["User3", "user3@gmail.com"],
["User4", "user4@gmail.com"],
["User5", "user5@gmail.com"],
["User6", "user6@gmail.com"],
["User7", "user7@gmail.com"],
["User8", "user8@gmail.com"],
["User9", "user9@gmail.com"],
["User10", "user10@gmail.com"],
["User11", "user11@gmail.com"],
]);
}
public function safeDown() {
$this->dropTable('user');
}
}
?>
The above migration creates a user table with these fields: id, name, and email. It also adds a few demo users.
Step 5 − Inside the project root run ./yii migrate to apply the migration to the database.
Step 6 − Now, we need to create a model for our user table. For the sake of simplicity, we are going to use the Gii code generation tool. Open up this url: http://localhost:8080/index.php?r=gii. Then, click the “Start” button under the “Model generator” header. Fill in the Table Name (“user”) and the Model Class (“MyUser”), click the “Preview” button and finally, click the “Generate” button.
The MyUser model should appear in the models directory.
Installing Postman
Postman is a handy tool when developing a RESTful service. It provides a useful interface for constructing requests.
You can find this tool at https://chrome.google.com/webstore/detail/postman/fhbjgbiflinjbdggehcddcbncdddomop?hl=en .
To install it, press the “Add to Chrome” button.
Yii - RESTful APIs in Action
The controller class extends from the yii\rest\ActiveController class, which implements common RESTful actions. We specify the $modelClass property so that the controller knows which model to use for manipulating data.
Step 1 − Create a file called UserController.php inside the controllers folder.
<?php
namespace app\controllers;
use yii\rest\ActiveController;
class UserController extends ActiveController {
public $modelClass = 'app\models\MyUser';
}
?>
Next we need to set up the urlManager component, so that the user data can be accessed and manipulated with meaningful HTTP verbs and pretty URLs. To let the API access data in JSON, we should configure the parsers property of the request application component.
Step 2 − Modify the config/web.php file this way −
<?php
$params = require(__DIR__ . '/params.php');
$config = [
'id' => 'basic',
'basePath' => dirname(__DIR__),
'bootstrap' => ['log'],
'components' => [
'request' => [
// !!! insert a secret key in the following (if it is empty) - this is
//required by cookie validation
'cookieValidationKey' => 'ymoaYrebZHa8gURuolioHGlK8fLXCKjO',
],
'cache' => [
'class' => 'yii\caching\FileCache',
],
'user' => [
'identityClass' => 'app\models\User',
'enableAutoLogin' => true,
],
'errorHandler' => [
'errorAction' => 'site/error',
],
'mailer' => [
'class' => 'yii\swiftmailer\Mailer',
// send all mails to a file by default. You have to set
// 'useFileTransport' to false and configure a transport
// for the mailer to send real emails.
'useFileTransport' => true,
],
'log' => [
'traceLevel' => YII_DEBUG ? 3 : 0,
'targets' => [
[
'class' => 'yii\log\FileTarget',
'levels' => ['error', 'warning'],
],
],
],
'urlManager' => [
'enablePrettyUrl' => true,
'enableStrictParsing' => true,
'showScriptName' => false,
'rules' => [
['class' => 'yii\rest\UrlRule', 'controller' => 'user'],
],
],
'request' => [
'parsers' => [
'application/json' => 'yii\web\JsonParser',
]
],
'db' => require(__DIR__ . '/db.php'),
],
'modules' => [
'hello' => [
'class' => 'app\modules\hello\Hello',
],
],
'params' => $params,
];
if (YII_ENV_DEV) {
// configuration adjustments for 'dev' environment
$config['bootstrap'][] = 'debug';
$config['modules']['debug'] = [
'class' => 'yii\debug\Module',
];
$config['bootstrap'][] = 'gii';
$config['modules']['gii'] = [
'class' => 'yii\gii\Module',
];
}
return $config;
?>
With the minimal amount of effort, we've just built a RESTful API for accessing user data. The APIs include −
GET /users − list all users page by page
HEAD /users − show the overview information of user listing
POST /users − create a new user
GET /users/20 − return the details of the user 20
HEAD /users/20 − show the overview information of user 20
PATCH /users/ 20 and PUT /users/20 − update the user 20
DELETE /users/20 − delete the user 20
OPTIONS /users − show the supported verbs regarding endpoint /users
OPTIONS /users/20 − show the supported verbs regarding endpoint /users/ 20
Notice, that Yii automatically pluralizes controller name.
Step 3 − Now, open Postman, punch in http://localhost:8080/users, and click “Send”. You will see the following.
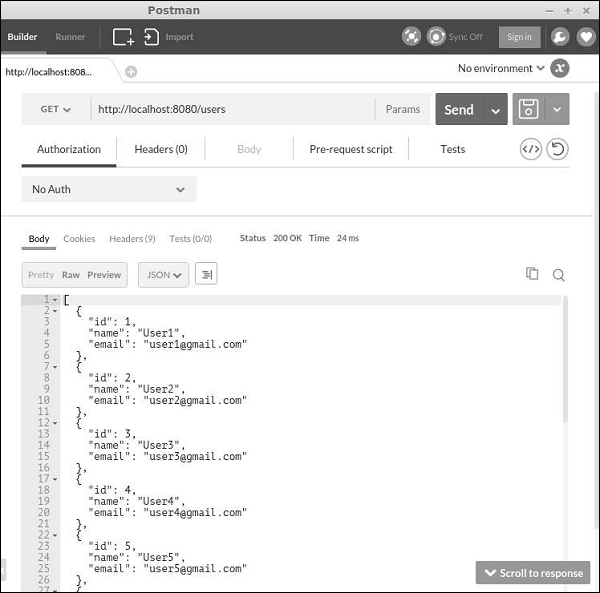
Step 4 − To create a new user, change the request type to POST, add two body parameters: name and email, and click “Send”.
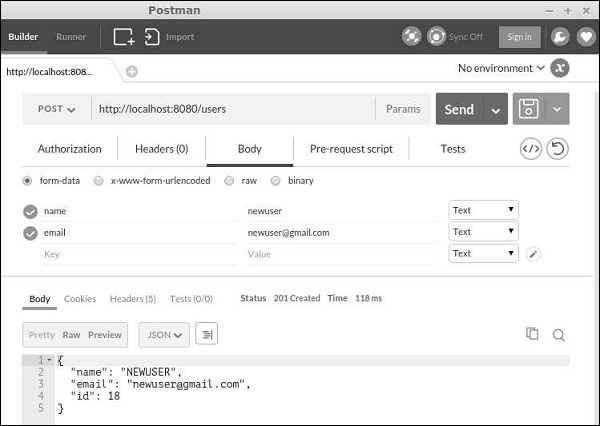
Step 5 − You can use the fields parameter to specify which fields should be included in the result. For example, the URL http://localhost:8080/users?fields=id, name will only return the id and name fields as shown in the following screenshot.
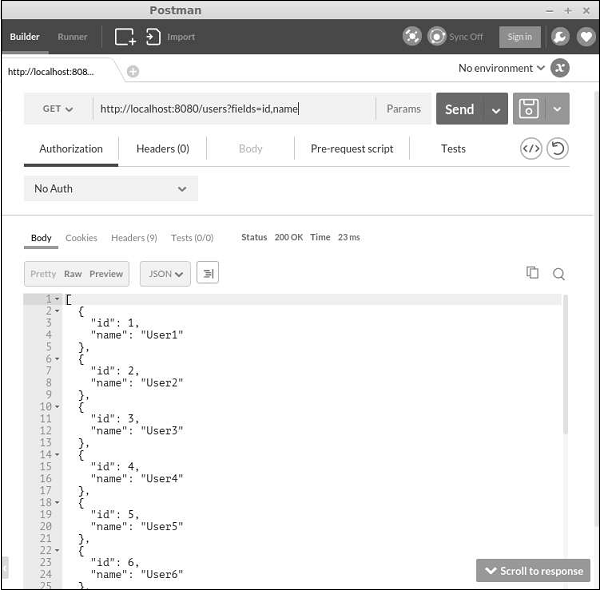
Yii - Fields
By overriding fields() and extraFields() methods, you can define what data can be put into a response. The difference between these two methods is that the former defines the default set of fields, which should be included in the response while the latter defines additional fields, which may be included in the response if an end user requests for them via the expand query parameter.
Step 1 − Modify the MyUser model this way.
<?php
namespace app\models;
use app\components\UppercaseBehavior;
use Yii;
/**
* This is the model class for table "user".
*@property integer $id
* @property string $name
* @property string $email
*/
class MyUser extends \yii\db\ActiveRecord {
public function fields() {
return [
'id',
'name',
//PHP callback
'datetime' => function($model) {
return date("d:m:Y H:i:s");
}
];
}
/**
* @inheritdoc
*/
public static function tableName() {
return 'user';
}
/**
* @inheritdoc
*/
public function rules() {
return [
[['name', 'email'], 'string', 'max' => 255]
];
}
/**
* @inheritdoc
*/
public function attributeLabels() {
return [
'id' => 'ID',
'name' => 'Name',
'email' => 'Email',
];
}
}
?>
Besides default fields: id and name, we have added a custom field – datetime.
Step 2 − In Postman, run the URL http://localhost:8080/users.
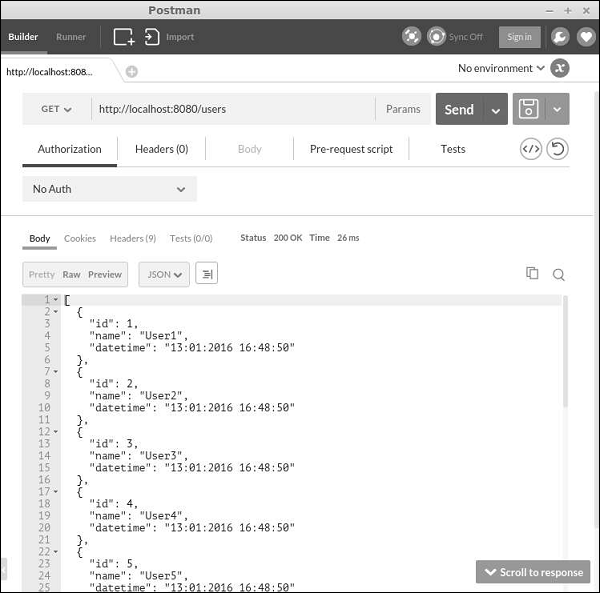
Step 3 − Now, modify the MyUser model this way.
<?php
namespace app\models;
use app\components\UppercaseBehavior;
use Yii;
/**
* This is the model class for table "user".
*
* @property integer $id
* @property string $name
* @property string $email
*/
class MyUser extends \yii\db\ActiveRecord {
public function fields() {
return [
'id',
'name',
];
}
public function extraFields() {
return ['email'];
}
/**
* @inheritdoc
*/
public static function tableName() {
return 'user';
}
/**
* @inheritdoc
*/
public function rules() {
return [
[['name', 'email'], 'string', 'max' => 255]
];
}
/**
* @inheritdoc
*/
public function attributeLabels() {
return [
'id' => 'ID',
'name' => 'Name',
'email' => 'Email',
];
}
}
?>
Notice, that the email field is returned by the extraFields() method.
Step 4 − To get data with this field, run http://localhost:8080/users?expand=email.
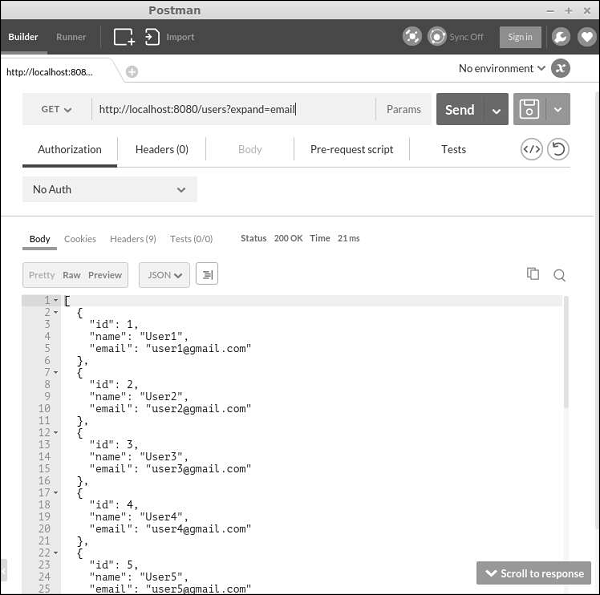
Customizing Actions
The yii\rest\ActiveController class provides the following actions −
Index − Lists resources page by page
View − Returns the details of a specified resource
Create − Creates a new resource
Update − Updates an existing resource
Delete − Deletes the specified resource
Options − Returns the supported HTTP methods
All above actions are declared in the actions method().
To disable the “delete” and “create” actions, modify the UserController this way −
<?php
namespace app\controllers;
use yii\rest\ActiveController;
class UserController extends ActiveController {
public $modelClass = 'app\models\MyUser';
public function actions() {
$actions = parent::actions();
// disable the "delete" and "create" actions
unset($actions['delete'], $actions['create']);
return $actions;
}
}
?>
Handling Errors
When obtaining a RESTful API request, if there is an error in the request or something unexpected happens on the server, you may simply throw an exception. If you can identify the cause of the error, you should throw an exception along with a proper HTTP status code. Yii REST uses the following statuses −
200 − OK.
201 − A resource was successfully created in response to a POST request. The Location header contains the URL pointing to the newly created resource.
204 − The request was handled successfully and the response contains no content.
304 − The resource was not modified.
400 − Bad request.
401 − Authentication failed.
403 − The authenticated user is not allowed to access the specified API endpoint.
404 − The resource does not exist.
405 − Method not allowed.
415 − Unsupported media type.
422 − Data validation failed.
429 − Too many requests.
500 − Internal server error.
Yii - Testing
When we write a PHP class, we debug it step by step or use die or echo statements to verify how it works. If we develop a web application, we are entering test data in forms to ensure the page works as we expected. This test process can be automated.
Automatic test approach makes sense for long term projects, which are −
- Complex and large
- Grows constantly
- Too expensive in terms of cost of the failure
If your project is not getting complex and is relatively simple or it is just a one-time project, then automated testing can be an overkill.
Preparing for the Tests
Step 1 − Install the Codeception framework. Run the following code.
composer global require "codeception/codeception = 2.0.*" composer global require "codeception/specify = *" composer global require "codeception/verify = *"
Step 2 − Run the following.
composer global status
The output is “Changed current directory to <directory>”. You should add the '<directory>/vendor/bin' to your PATH variable. In this case, run the following code −
export PATH = $PATH:~/.composer/vendor/bin
Step 3 − Create a new database called 'yii2_basic_tests'.
Step 4 − Inside the tests directory run.
codeception/bin/yii migrate
The database configuration can be found at tests/codeception/config/config.php.
Step 5 − Build the test suites via.
codecept build
Fixtures
The main purpose of fixtures is to set up the environment in an unknown state so that your tests run in an expected way. Yii provides a near fixture framework. A key concept of the Yii fixture framework is the fixture object. It represents a particular aspect of a test environment. The fixture object is an instance of the yii\test\Fixture class.
To define a fixture, you should create a new class and extend it from yii\test\Fixture or yii\test\ActiveFixture. The former is better for general purpose fixtures while the latter is specifically designed to work with database and ActiveRecord.
Unit Tests
Unit tests help you testing individual functions. For example, model functions or a component class.
Step 1 − Create a new fixture in the file called ExampleFixture.php under the tests/codeception/fixtures directory.
<?php
namespace app\tests\codeception\fixtures;
use yii\test\ActiveFixture;
class ExampleFixture extends ActiveFixture {
public $modelClass = ‘app⊨’MyUser';
}
?>
Step 2 − Then, create a new test file called ExampleTest.php in the tests/codeception/unit/models folder.
<?php
namespace tests\codeception\unit\models;
use app\models\MyUser;
use yii\codeception\TestCase;
class ExampleTest extends TestCase {
public function testCreateMyUser() {
$m = new MyUser();
$m->name = "myuser";
$m->email = "myser@email.com";
$this->assertTrue($m->save());
}
public function testUpdateMyUser() {
$m = new MyUser();
$m->name = "myuser2";
$m->email = "myser2@email.com";
$this->assertTrue($m->save());
$this->assertEquals("myuser2", $m->name);
}
public function testDeleteMyUser() {
$m = MyUser::findOne(['name' => 'myuser2']);
$this->assertNotNull($m);
MyUser::deleteAll(['name' => $m->name]);
$m = MyUser::findOne(['name' => 'myuser2']);
$this->assertNull($m);
}
}
?>
In the above code, we define three tests −
- testCreateMyUser,
- testUpdateMyUser, and
- testDeleteMyUser.
We just created a new user, updated his name, and trying to delete him. We manage the MyUser model in terms of the yii2_basic_tests database, which is a complete copy of our real DB.
Step 3 − To start the tests, move to the tests folder and run.
codecept run unit models/ExampleTest
It should pass all the tests. You will see the following −
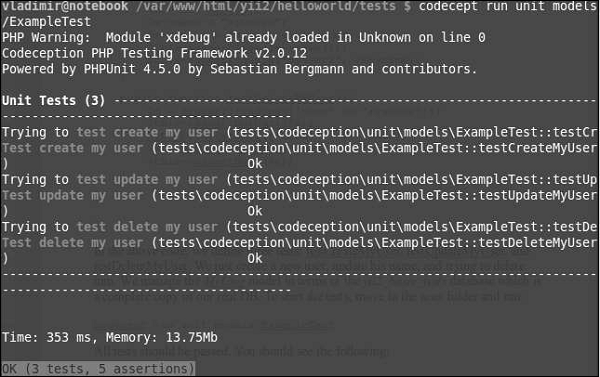
Functional Tests
Functional tests help you in −
- testing the application using browser emulator
- verify that the function works properly
- interact with the database
- submit data to server-side scripts
Inside the tests folder run −
generate:cept functional AboutPageCept
The above command creates the AboutPageCept.php file under the tests/codeception/functional folder. In this functional test, we are going to check whether our about page exists.
Step 1 − Modify the AboutPageCept.php file.
<?php
$I = new FunctionalTester($scenario);
$I->wantTo('perform actions and see result');
$I->amOnPage('site/about');
$I->see('about');
$I->dontSee('apple');
?>
In the above given code, we checked whether we are on the about page. Obviously, we should see the word 'about' and no 'apple' on the page.
Step 2 − Run the test via.
run functional AboutPageCept
You will see the following output −
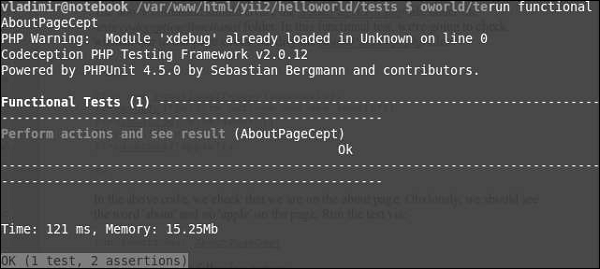
Yii - Caching
Caching is an effective way to improve the performance of your application. Caching mechanisms store static data in cache and get it from cache when requested. On the server side, you may use cache to store basic data, such as a list of most recent news. You can also store page fragments or whole web pages. On the client side, you can use HTTP caching to keep most recently visited pages in the browser cache.
Preparing the DB
Step 1 − Create a new database. Database can be prepared in the following two ways.
In the terminal run mysql -u root –p
.Create a new database via CREATE DATABASE helloworld CHARACTER SET utf8 COLLATE utf8_general_ci;
Step 2 − Configure the database connection in the config/db.php file. The following configuration is for the system used currently.
<?php
return [
'class' => 'yii\db\Connection',
'dsn' => 'mysql:host=localhost;dbname=helloworld',
'username' => 'vladimir',
'password' => '12345',
'charset' => 'utf8',
];
?>
Step 3 − Inside the root folder run ./yii migrate/create test_table. This command will create a database migration for managing our DB. The migration file should appear in the migrations folder of the project root.
Step 4 − Modify the migration file (m160106_163154_test_table.php in this case) this way.
<?php
use yii\db\Schema;
use yii\db\Migration;
class m160106_163154_test_table extends Migration {
public function safeUp()\ {
$this->createTable("user", [
"id" => Schema::TYPE_PK,
"name" => Schema::TYPE_STRING,
"email" => Schema::TYPE_STRING,
]);
$this->batchInsert("user", ["name", "email"], [
["User1", "user1@gmail.com"],
["User2", "user2@gmail.com"],
["User3", "user3@gmail.com"],
["User4", "user4@gmail.com"],
["User5", "user5@gmail.com"],
["User6", "user6@gmail.com"],
["User7", "user7@gmail.com"],
["User8", "user8@gmail.com"],
["User9", "user9@gmail.com"],
["User10", "user10@gmail.com"],
["User11", "user11@gmail.com"],
]);
}
public function safeDown() {
$this->dropTable('user');
}
}
?>
The above migration creates a user table with these fields: id, name, and email. It also adds a few demo users.
Step 5 − Inside the project root run ./yii migrate to apply the migration to the database.
Step 6 − Now, we need to create a model for our user table. For the sake of simplicity, we are going to use the Gii code generation tool. Open up this url: http://localhost:8080/index.php?r=gii. Then, click the “Start” button under the “Model generator” header. Fill in the Table Name (“user”) and the Model Class (“MyUser”), click the “Preview” button and finally, click the “Generate” button.
The MyUser model should appear in the models directory.
Data Caching
Data caching helps you in storing PHP variables in cache and retrieve them later. Data caching relies on cache components, which are usually registered as application components. To access the application component, you may call Yii::$app → cache. You can register several cache application components.
Yii supports the following cache storages −
yii\caching\DbCache − Uses a database table to store cached data. Uou must create a table as specified in yii\caching\DbCache::$cacheTable.
yii\caching\ApcCache − Uses PHP APC extension.
yii\caching\FileCache − Uses files to store cached data.
yii\caching\DummyCache − Serves as a cache placeholder which does no real caching. The purpose of this component is to simplify the code that needs to check the availability of cache.
yii\caching\MemCache − Uses PHP memcache extension.
yii\caching\WinCache − Uses PHP WinCache extension.
yii\redis\Cache − Implements a cache component based on Redis database.
yii\caching\XCache − Uses PHP XCache extension.
All cache components support the following APIs −
get() − Retrieves a data value from cache with a specified key. A false value will be returned if the data value is expired/invalidated or not found.
add() − Stores a data value identified by a key in cache if the key is not found in the cache.
set() − Stores a data value identified by a key in cache.
multiGet() − Retrieves multiple data values from cache with the specified keys.
multiAdd() − Stores multiple data values in cache. Each item is identified by a key. If a key already exists in the cache, the data value will be skipped.
multiSet() − Stores multiple data values in cache. Each item is identified by a key.
exists() − Returns a value indicating whether the specified key is found in the cache.
flush() − Removes all data values from the cache.
delete() − Removes a data value identified by a key from the cache.
A data value stored in a cache will remain there forever unless it is removed. To change this behavior, you can set an expiration parameter when calling the set() method to store a data value.
Cached data values can also be invalidated by changes of the cache dependencies −
yii\caching\DbDependency − The dependency is changed if the query result of the specified SQL statement is changed.
yii\caching\ChainedDependency − The dependency is changed if any of the dependencies on the chain is changed.
yii\caching\FileDependency − The dependency is changed if the file's last modification time is changed.
yii\caching\ExpressionDependency − The dependency is changed if the result of the specified PHP expression is changed.
Now, add the cache application component to your application.
Step 1 − Modify the config/web.php file.
<?php
$params = require(__DIR__ . '/params.php');
$config = [
'id' => 'basic',
'basePath' => dirname(__DIR__),
'bootstrap' => ['log'],
'components' => [
'request' => [
// !!! insert a secret key in the following (if it is empty) - this
//is required by cookie validation
'cookieValidationKey' => 'ymoaYrebZHa8gURuolioHGlK8fLXCKjO',
],
'cache' => [
'class' => 'yii\caching\FileCache',
],
'user' => [
'identityClass' => 'app\models\User',
'enableAutoLogin' => true,
],
'errorHandler' => [
'errorAction' => 'site/error',
],
'mailer' => [
'class' => 'yii\swiftmailer\Mailer',
// send all mails to a file by default. You have to set
// 'useFileTransport' to false and configure a transport
// for the mailer to send real emails.
'useFileTransport' => true,
],
'log' => [
'traceLevel' => YII_DEBUG ? 3 : 0,
'targets' => [
[
'class' => 'yii\log\FileTarget',
'levels' => ['error', 'warning'],
],
],
],
'db' => require(__DIR__ . '/db.php'),
],
'modules' => [
'hello' => [
'class' => 'app\modules\hello\Hello',
],
],
'params' => $params,
];
if (YII_ENV_DEV) {
// configuration adjustments for 'dev' environment
$config['bootstrap'][] = 'debug';
$config['modules']['debug'] = [
'class' => 'yii\debug\Module',
];
$config['bootstrap'][] = 'gii';
$config['modules']['gii'] = [
'class' => 'yii\gii\Module',
];
}
return $config;
?>
Step 2 − Add a new function called actionTestCache() to the SiteController.
public function actionTestCache() {
$cache = Yii::$app->cache;
// try retrieving $data from cache
$data = $cache->get("my_cached_data");
if ($data === false) {
// $data is not found in cache, calculate it from scratch
$data = date("d.m.Y H:i:s");
// store $data in cache so that it can be retrieved next time
$cache->set("my_cached_data", $data, 30);
}
// $data is available here
var_dump($data);
}
Step 3 − Type http://localhost:8080/index.php?r=site/test-cache in the address bar of the web browser, you will see the following.
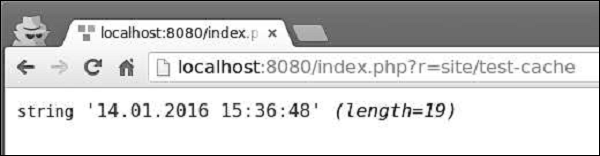
Step 4 − If you reload the page, you should notice the date has not changed. The date value is cached and the cache will expire within 30 seconds. Reload the page after 30 seconds.
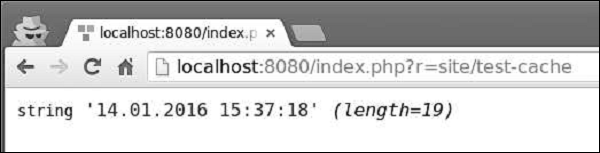
Query Caching
Query caching provides you caching the result of database queries. Query caching requires a DB connection and the cache application component.
Step 1 − Add a new method called actionQueryCaching() to the SiteController.
public function actionQueryCaching() {
$duration = 10;
$result = MyUser::getDb()->cache(function ($db) {
return MyUser::find()->count();
}, $duration);
var_dump($result);
$user = new MyUser();
$user->name = "cached user name";
$user->email = "cacheduseremail@gmail.com";
$user->save();
echo "==========";
var_dump(MyUser::find()->count());
}
In the above code, we cache the database query, add a new user, and display user count.
Step 2 − Go to the URL http://localhost:8080/index.php?r=site/query-caching and reload the page.
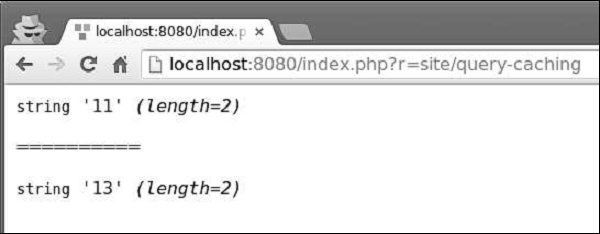
When we open the page for the first, we cache the DB query and display all users count. When we reload the page, the result of the cached DB query is the same as it was because the database query is cached.
You can flush the cache from the console using the following commands −
yii cache − Shows the available cache components.
yii cache/flush cache1 cache2 cache3 − Flushes the cache components cache1, cache2, and cache3.
yii cache/flush-all − Flushes all cache components.
Step 3 − Inside the project root of your application run ./yii cache/flush-all.

Yii - Fragment Caching
Fragment caching provides caching of a fragment of a web page.
Step 1 − Add a new function called actionFragmentCaching() to the SiteController.
public function actionFragmentCaching() {
$user = new MyUser();
$user->name = "cached user name";
$user->email = "cacheduseremail@gmail.com";
$user->save();
$models = MyUser::find()->all();
return $this->render('cachedview', ['models' => $models]);
}
In the above code, we created a new user and displayed a cachedview view file.
Step 2 − Now, create a new file called cachedview.php in the views/site folder.
<?php if ($this->beginCache('cachedview')) { ?>
<?php foreach ($models as $model): ?>
<?= $model->id; ?>
<?= $model->name; ?>
<?= $model->email; ?>
<br/>
<?php endforeach; ?>
<?php $this->endCache(); } ?>
<?php echo "Count:", \app\models\MyUser::find()->count(); ?>
We have enclosed a content generation logic in a pair of beginCache() and endCache() methods. If the content is found in cache, the beginCache() method will render it.
Step 3 − Go to the URL http://localhost:8080/index.php?r=site/fragment-caching and reload the page. Following will be the output.
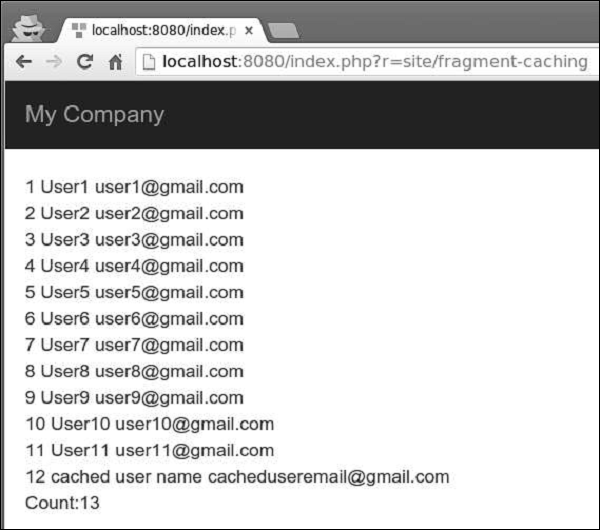
Notice, that the content between the beginCache() and endCache() methods is cached. In the database, we have 13 users but only 12 are displayed.
Page Caching
Page caching provides caching the content of a whole web page. Page caching is supported by yii\filter\PageCache.
Step 1 − Modify the behaviors() function of the SiteController.
public function behaviors() {
return [
'access' => [
'class' => AccessControl::className(),
'only' => ['logout'],
'rules' => [
[
'actions' => ['logout'],
'allow' => true,
'roles' => ['@'],
],
],
],
'verbs' => [
'class' => VerbFilter::className(),
'actions' => [
'logout' => ['post'],
],
],
[
'class' => 'yii\filters\PageCache',
'only' => ['index'],
'duration' => 60
],
];
}
The above code caches the index page for 60 seconds.
Step 2 − Go to the URL http://localhost:8080/index.php?r=site/index. Then, modify the congratulation message of the index view file. If you reload the page, you will not notice any changes because the page is cached. Wait a minute and reload the page again.
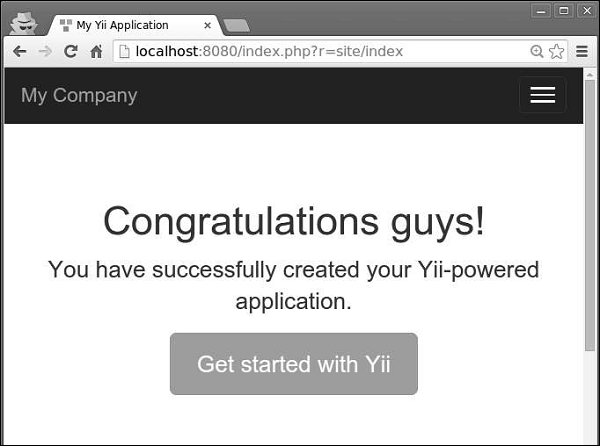
HTTP Caching
Web applications can also use client-side caching. To use it, you may configure the yii\filter\HttpCache filter for controller actions.
The Last-Modified header uses a timestamp to indicate whether the page has been modified.
Step 1 − To enable sending the Last-Modified header, configure the yii\filter\HttpCache::$lastModified property.
public function behaviors() {
return [
[
'class' => 'yii\filters\HttpCache',
'only' => ['index'],
'lastModified' => function ($action, $params) {
$q = new \yii\db\Query();
return $q->from('news')->max('created_at');
},
],
];
}
In the above code, we enabled the HTTP caching only for the index page. When a browser opens the index page for the first time, the page is generated on the server side and sent to the browser. The second time, if no news is created, the server will not regenerate the page.
The Etag header provides a hash representing the content of the page. If the page is changed, the hash will be changed as well.
Step 2 − To enable sending the Etag header, configure the yii\filters\HttpCache::$etagSeed property.
public function behaviors() {
return [
[
'class' => 'yii\filters\HttpCache',
'only' => ['index'],
'etagSeed' => function ($action, $params) {
$user = $this->findModel(\Yii::$app->request->get('id'));
return serialize([$user->name, $user->email]);
},
],
];
}
In the above code, we enabled the HTTP caching for the index action only. It should generate the Etag HTTP header based on the name and email of the user. When a browser opens the index page for the first time, the page is generated on the server side and sent to the browser. The second time, if there are no changes to the name or email, the server will not regenerate the page.
Yii - Aliases
Aliases help you not to hard-code absolute paths or URLs in your project. An alias starts with the @ character.
To define an alias you should call the Yii::setAlias() method −
// an alias of a file path
Yii::setAlias('@alias', '/path/to/alias');
// an alias of a URL
Yii::setAlias('@urlAlias', 'http://www.google.com');
You can also derive a new alias from an existing one −
Yii::setAlias('@pathToSomewhere', '@alias/path/to/somewhere');
You can call the Yii::setAlias() method in the entry script or in a writable property called aliases in the application configuration −
$config = [
'id' => 'basic',
'basePath' => dirname(__DIR__),
'bootstrap' => ['log'],
'components' => [
'aliases' => [
'@alias' => '/path/to/somewhere',
'@urlAlias' => 'http://www.google.com',
],
//other components...
]
]
To resolve alias, you should call the Yii::getAlias() method.
Yii predefines the following aliases −
@app − The base path of the application.
@yii − The folder where the BaseYii.php file is located.
@webroot − The Web root directory of the application.
@web − The base URL of the application.
@runtime − The runtime path of the application. Defaults to @app/runtime.
@vendor − The Composer vendor directory. Defaults to @app/vendor.
@npm − The root directory for npm packages. Defaults to @vendor/npm.
@bower − The root directory for bower packages. Defaults to @vendor/bower.
Now, add a new function called actionAliases() to the SiteController −
public function actionAliases() {
Yii::setAlias("@components", "@app/components");
Yii::setAlias("@imagesUrl", "@web/images");
var_dump(Yii::getAlias("@components"));
var_dump(Yii::getAlias("@imagesUrl"));
}
In the above code, we created two aliases: @components for application components and @imagesUrl for URL where we stored all application images.
Type http://localhost:8080/index.php?r=site/aliases, you will see the following output −
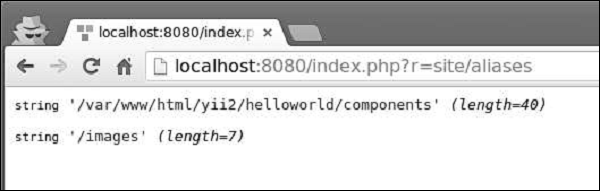
Yii - Logging
Yii provides a highly customizable and extensible framework. With the help of this framework, you can easily log various types of messages.
To log a message, you should call one of the following methods −
Yii::error() − Records a fatal error message.
Yii::warning() − Records a warning message.
Yii::info() − Records a message with some useful information.
Yii::trace() − Records a message to trace how a piece of code runs.
The above methods record log messages at various categories. They share the following function signature −
function ($message, $category = 'application')
where −
$message − The log message to be recorded
$category − The category of the log message
A simple and convenient way of naming scheme is using the PHP __METHOD__ magic constant. For example −
Yii::info('this is a log message', __METHOD__);
A log target is an instance of the yii\log\Target class. It filters all log messages by categories and exports them to file, database, and/or email.
Step 1 − You can register multiple log target as well, like.
return [
// the "log" component is loaded during bootstrapping time
'bootstrap' => ['log'],
'components' => [
'log' => [
'targets' => [
[
'class' => 'yii\log\DbTarget',
'levels' => ['error', 'warning', 'trace', 'info'],
],
[
'class' => 'yii\log\EmailTarget',
'levels' => ['error', 'warning'],
'categories' => ['yii\db\*'],
'message' => [
'from' => ['log@mydomain.com'],
'to' => ['admin@mydomain.com', 'developer@mydomain.com'],
'subject' => 'Application errors at mydomain.com',
],
],
],
],
],
];
In the code above, two targets are registered. The first target selects all errors, warnings, traces, and info messages and saves them in a database. The second target sends all error and warning messages to the admin email.
Yii provides the following built-in log targets −
yii\log\DbTarget − Stores log messages in a database.
yii\log\FileTarget − Saves log messages in files.
yii\log\EmailTarget − Sends log messages to predefined email addresses.
yii\log\SyslogTarget − Saves log messages to syslog by calling the PHP function syslog().
By default, log messages are formatted as follows −
Timestamp [IP address][User ID][Session ID][Severity Level][Category] Message Text
Step 2 − To customize this format, you should configure the yii\log\Target::$prefix property. For example.
[
'class' => 'yii\log\FileTarget',
'prefix' => function ($message) {
$user = Yii::$app->has('user', true) ? Yii::$app->get('user') :
'undefined user';
$userID = $user ? $user->getId(false) : 'anonym';
return "[$userID]";
}
]
The above code snippet configures a log target to prefix all log messages with the current userID.
By default, log messages include the values from these global PHP variables: $_GET, $_POST, $_SESSION, $_COOKIE, $_FILES, and $_SERVER. To modify this behavior, you should configure the yii\log\Target::$logVars property with the names of variables that you want to include.
All log messages are maintained in an array by the logger object. The logger object flushed the recorded messages to the log targets each time the array accumulates a certain number of messages(default is 1000).
Step 3 − To customize this number, you should call the flushInterval property.
return [
'bootstrap' => ['log'],
'components' => [
'log' => [
'flushInterval' => 50, // default is 1000
'targets' => [...],
],
],
];
Even when the logger object flushes log messages to log targets, they do not get exported immediately. The export occurs when a log target accumulates a certain number of messages(default is 1000).
Step 4 − To customize this number, you should configure the exportInterval property.
[ 'class' => 'yii\log\FileTarget', 'exportInterval' => 50, // default is 1000 ]
Step 5 − Now, modify the config/web.php file this way.
<?php
$params = require(__DIR__ . '/params.php');
$config = [
'id' => 'basic',
'basePath' => dirname(__DIR__),
'bootstrap' => ['log'],
'components' => [
'request' => [
// !!! insert a secret key in the following (if it is empty) - this
//is required by cookie validation
'cookieValidationKey' => 'ymoaYrebZHa8gURuolioHGlK8fLXCKjO',
],
'cache' => [
'class' => 'yii\caching\FileCache',
],
'user' => [
'identityClass' => 'app\models\User',
'enableAutoLogin' => true,
],
'errorHandler' => [
'errorAction' => 'site/error',
],
'mailer' => [
'class' => 'yii\swiftmailer\Mailer',
// send all mails to a file by default. You have to set
// 'useFileTransport' to false and configure a transport
// for the mailer to send real emails.
'useFileTransport' => true,
],
'log' => [
'flushInterval' => 1,
'traceLevel' => YII_DEBUG ? 3 : 0,
'targets' => [
[
'class' => 'yii\log\FileTarget',
'exportInterval' => 1,
'logVars' => []
],
],
],
'db' => require(__DIR__ . '/db.php'),
],
'modules' => [
'hello' => [
'class' => 'app\modules\hello\Hello',
],
],
'params' => $params,
];
if (YII_ENV_DEV) {
// configuration adjustments for 'dev' environment
$config['bootstrap'][] = 'debug';
$config['modules']['debug'] = [
'class' => 'yii\debug\Module',
];
$config['bootstrap'][] = 'gii';
$config['modules']['gii'] = [
'class' => 'yii\gii\Module',
];
}
return $config;
?>
In the above code, we define the log application component, set the flushInterval and exportInteval properties to 1 so that all log messages appear in the log files immediately. We also omit the levels property of the log target. It means that log messages of all categories(error, warning, info, trace) will appear in the log files.
Step 6 − Then, create a function called actionLog() in the SiteController.
public function actionLog() {
Yii::trace('trace log message');
Yii::info('info log message');
Yii::warning('warning log message');
Yii::error('error log message');
}
In the above code, we just write four log messages of different categories to the log files.
Step 7 − Type the URL http://localhost:8080/index.php?r=site/log in the address bar of the web browser. Log messages should appear under the app/runtime/logs directory in the app.log file.
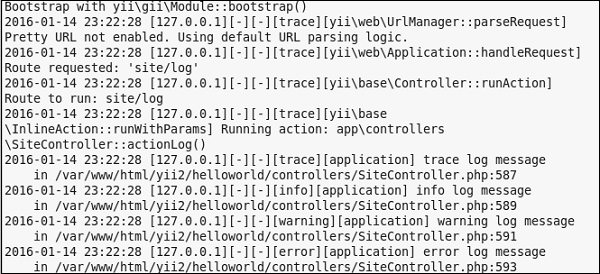
Yii - Error Handling
Yii includes a built-in error handler. The Yii error handler does the following −
- Converts all non-fatal PHP errors into catchable exceptions.
- Displays all errors and exceptions with a detailed call stack.
- Supports different error formats.
- Supports using a controller action to display errors.
To disable the error handler, you should define the YII_ENABLE_ERROR_HANDLER constant to be false in the entry script. The error handler is registered as an application component.
Step 1 − You can configure it in the following way.
return [
'components' => [
'errorHandler' => [
'maxSourceLines' => 10,
],
],
];
The above configuration sets the number of source code lines to be displayed to 10. The error handler converts all non-fatal PHP errors into catchable exceptions.
Step 2 − Add a new function called actionShowError() to the SiteController.
public function actionShowError() {
try {
5/0;
} catch (ErrorException $e) {
Yii::warning("Ooops...division by zero.");
}
// execution continues...
}
Step 3 − Go to the URL http://localhost:8080/index.php?r=site/show-error. You will see a warning message.
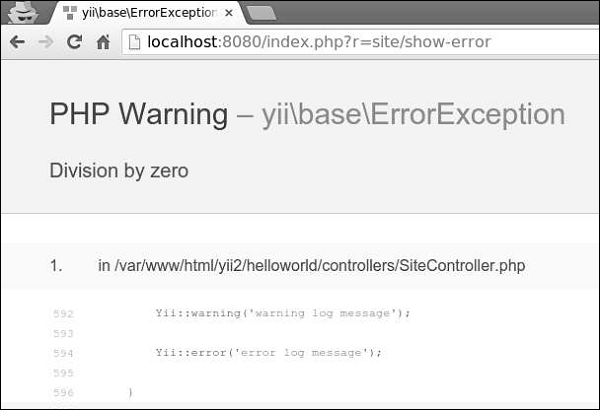
If you want to show the user that his request is invalid, you may throw the yii\web\NotFoundHttpException.
Step 4 − Modify the actionShowError() function.
public function actionShowError() {
throw new NotFoundHttpException("Something unexpected happened");
}
Step 5 − Type the address http://localhost:8080/index.php?r=site/show-error in the address bar. You will see the following HTTP error.
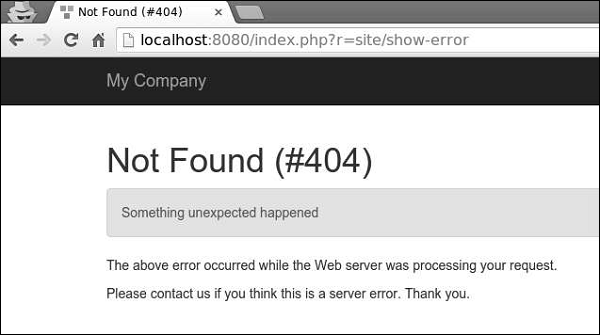
When the YII_DEBUG constant is true, the error handler will display errors with a detailed call stack. When the constant is false, only the error message will be displayed. By default, the error handler shows errors using these views −
@yii/views/errorHandler/exception.php − the view file is used when errors should be displayed with call stack information.
@yii/views/errorHandler/error.php − the view file is used when errors should be displayed without call stack information.
You can use dedicated error actions to customize the error display.
Step 6 − Modify the errorHandler application component in the config/web.php file.
<?php
$params = require(__DIR__ . '/params.php');
$config = [
'id' => 'basic',
'basePath' => dirname(__DIR__),
'bootstrap' => ['log'],
'components' => [
'request' => [
// !!! insert a secret key in the following (if it is empty) - this
//is required by cookie validation
'cookieValidationKey' => 'ymoaYrebZHa8gURuolioHGlK8fLXCKjO',
],
'cache' => [
'class' => 'yii\caching\FileCache',
],
'user' => [
'identityClass' => 'app\models\User',
'enableAutoLogin' => true,
],
'errorHandler' => [
'errorAction' => 'site/error',
],
//other components...
'db' => require(__DIR__ . '/db.php'),
],
'modules' => [
'hello' => [
'class' => 'app\modules\hello\Hello',
],
],
'params' => $params,
];
if (YII_ENV_DEV) {
// configuration adjustments for 'dev' environment
$config['bootstrap'][] = 'debug';
$config['modules']['debug'] = [
'class' => 'yii\debug\Module',
];
$config['bootstrap'][] = 'gii';
$config['modules']['gii'] = [
'class' => 'yii\gii\Module',
];
}
return $config;
?>
The above configuration defines that when an error needs to be displayed without the call stack, the site/error action will be executed.
Step 7 − Modify the actions() method of the SiteController.
public function actions() {
return [
'error' => [
'class' => 'yii\web\ErrorAction',
],
];
}
The above code defines, that when an error occurs, the error view will be rendered.
Step 8 − Create a file called error.php under the views/site directory.
<?php
/* @var $this yii\web\View */
/* @var $name string */
/* @var $message string */
/* @var $exception Exception */
use yii\helpers\Html;
$this->title = $name;
?>
<div class = "site-error">
<h2>customized error</h2>
<h1><?= Html::encode($this->title) ?></h1>
<div class = "alert alert-danger">
<?= nl2br(Html::encode($message)) ?>
</div>
<p>
The above error occurred while the Web server was processing your request.
</p>
<p>
Please contact us if you think this is a server error. Thank you.
</p>
</div>
Step 9 − Go to the address http://localhost:8080/index.php?r=site/show-error, you will see the customized error view.
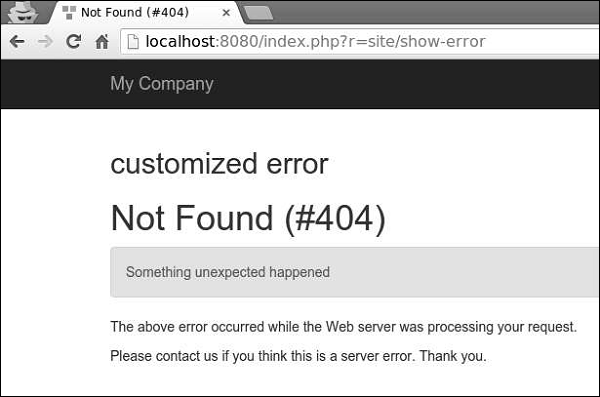
Yii - Authentication
The process of verifying the identity of a user is called authentication. It usually uses a username and a password to judge whether the user is one who he claims as.
To use the Yii authentication framework, you need to −
- Configure the user application component.
- Implement the yii\web\IdentityInterface interface.
The basic application template comes with a built-in authentication system. It uses the user application component as shown in the following code −
<?php
$params = require(__DIR__ . '/params.php');
$config = [
'id' => 'basic',
'basePath' => dirname(__DIR__),
'bootstrap' => ['log'],
'components' => [
'request' => [
// !!! insert a secret key in the following (if it is empty) - this
//is required by cookie validation
'cookieValidationKey' => 'ymoaYrebZHa8gURuolioHGlK8fLXCKjO',
],
'cache' => [
'class' => 'yii\caching\FileCache',
],
'user' => [
'identityClass' => 'app\models\User',
'enableAutoLogin' => true,
],
//other components...
'db' => require(__DIR__ . '/db.php'),
],
'modules' => [
'hello' => [
'class' => 'app\modules\hello\Hello',
],
],
'params' => $params,
];
if (YII_ENV_DEV) {
// configuration adjustments for 'dev' environment
$config['bootstrap'][] = 'debug';
$config['modules']['debug'] = [
'class' => 'yii\debug\Module',
];
$config['bootstrap'][] = 'gii';
$config['modules']['gii'] = [
'class' => 'yii\gii\Module',
];
}
return $config;
?>
In the above configuration, the identity class for user is configured to be app\models\User.
The identity class must implement the yii\web\IdentityInterface with the following methods −
findIdentity() − Looks for an instance of the identity class using the specified user ID.
findIdentityByAccessToken() − Looks for an instance of the identity class using the specified access token.
getId() − It returns the ID of the user.
getAuthKey() − Returns a key used to verify cookie-based login.
validateAuthKey() − Implements the logic for verifying the cookie-based login key.
The User model from the basic application template implements all the above functions. User data is stored in the $users property −
<?php
namespace app\models;
class User extends \yii\base\Object implements \yii\web\IdentityInterface {
public $id;
public $username;
public $password;
public $authKey;
public $accessToken;
private static $users = [
'100' => [
'id' => '100',
'username' => 'admin',
'password' => 'admin',
'authKey' => 'test100key',
'accessToken' => '100-token',
],
'101' => [
'id' => '101',
'username' => 'demo',
'password' => 'demo',
'authKey' => 'test101key',
'accessToken' => '101-token',
],
];
/**
* @inheritdoc
*/
public static function findIdentity($id) {
return isset(self::$users[$id]) ? new static(self::$users[$id]) : null;
}
/**
* @inheritdoc
*/
public static function findIdentityByAccessToken($token, $type = null) {
foreach (self::$users as $user) {
if ($user['accessToken'] === $token) {
return new static($user);
}
}
return null;
}
/**
* Finds user by username
*
* @param string $username
* @return static|null
*/
public static function findByUsername($username) {
foreach (self::$users as $user) {
if (strcasecmp($user['username'], $username) === 0) {
return new static($user);
}
}
return null;
}
/**
* @inheritdoc
*/
public function getId() {
return $this->id;
}
/**
* @inheritdoc
*/
public function getAuthKey() {
return $this->authKey;
}
/**
* @inheritdoc
*/
public function validateAuthKey($authKey) {
return $this->authKey === $authKey;
}
/**
* Validates password
*
* @param string $password password to validate
* @return boolean if password provided is valid for current user
*/
public function validatePassword($password) {
return $this->password === $password;
}
}
?>
Step 1 − Go to the URL http://localhost:8080/index.php?r=site/login and log in into the web site using admin for a login and a password.
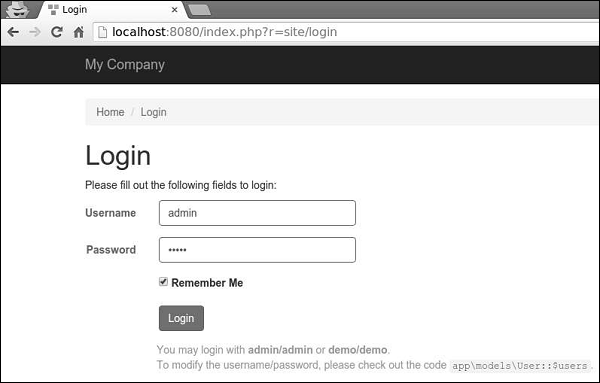
Step 2 − Then, add a new function called actionAuth() to the SiteController.
public function actionAuth(){
// the current user identity. Null if the user is not authenticated.
$identity = Yii::$app->user->identity;
var_dump($identity);
// the ID of the current user. Null if the user not authenticated.
$id = Yii::$app->user->id;
var_dump($id);
// whether the current user is a guest (not authenticated)
$isGuest = Yii::$app->user->isGuest;
var_dump($isGuest);
}
Step 3 − Type the address http://localhost:8080/index.php?r=site/auth in the web browser, you will see the detailed information about admin user.
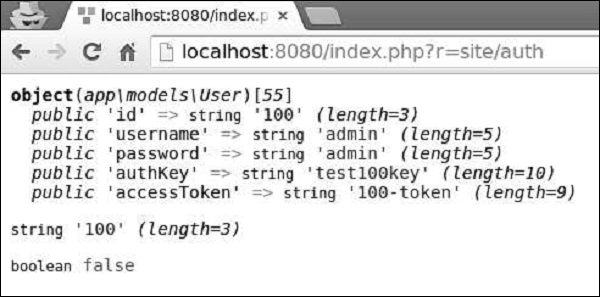
Step 4 − To login and logou,t a user you can use the following code.
public function actionAuth() {
// whether the current user is a guest (not authenticated)
var_dump(Yii::$app->user->isGuest);
// find a user identity with the specified username.
// note that you may want to check the password if needed
$identity = User::findByUsername("admin");
// logs in the user
Yii::$app->user->login($identity);
// whether the current user is a guest (not authenticated)
var_dump(Yii::$app->user->isGuest);
Yii::$app->user->logout();
// whether the current user is a guest (not authenticated)
var_dump(Yii::$app->user->isGuest);
}
At first, we check whether a user is logged in. If the value returns false, then we log in a user via the Yii::$app → user → login() call, and log him out using the Yii::$app → user → logout() method.
Step 5 − Go to the URL http://localhost:8080/index.php?r=site/auth, you will see the following.
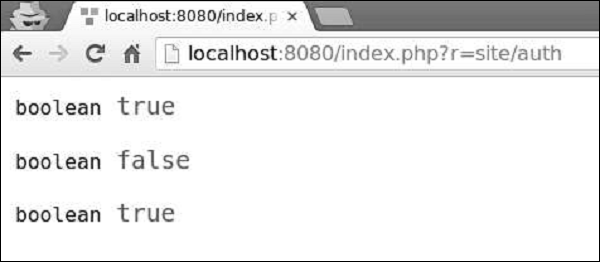
The yii\web\User class raises the following events −
EVENT_BEFORE_LOGIN − Raised at the beginning of yii\web\User::login()
EVENT_AFTER_LOGIN − Raised after a successful login
EVENT_BEFORE_LOGOUT − Raised at the beginning of yii\web\User::logout()
EVENT_AFTER_LOGOUT − Raised after a successful logout
Yii - Authorization
The process of verifying that a user has enough permission to do something is called authorization. Yii provides an ACF (Access Control Filter), an authorization method implemented as yii\filters\AccessControl. Modify the behaviors() function of the SiteController −
public function behaviors() {
return [
'access' => [
'class' => AccessControl::className(),
'only' => ['about', 'contact'],
'rules' => [
[
'allow' => true,
'actions' => ['about'],
'roles' => ['?'],
],
[
'allow' => true,
'actions' => ['contact', 'about'],
'roles' => ['@'],
],
],
],
];
}
In the above code, ACF is attached as a behavior. The only property specifies that the ACF should be applied only to the about and contact actions. All other actions are not subjected to the access control. The rules property lists the access rules. All guests (with the “?” role) will be allowed to access the about action. All authenticated users(with the “@” role) will be allowed to access the contact and about actions.
If you go to the URL http://localhost:8080/index.php?r=site/about, you will see the page, but if you open the URL http://localhost:8080/index.php?r=site/contact, you will be redirected to the login page because only authenticated users can access the contact action.
Access rules support many options −
allow − Defines whether this is an "allow" or "deny" rule.
actions − Defines which actions this rule matches.
controllers − Defines which controllers this rule matches.
roles − Defines user roles that this rule matches. Two special roles are recognized −
? − matches a guest user.
@ − matches an authenticated user.
ips − Defines IP addresses this rule matches.
verbs − Defines which request method (POST, GET, PUT, etc.) this rule matches.
matchCallback − Defines a PHP callable function that should be called to check if this rule should be applied.
denyCallback − Defines a PHP callable function that should be called when this rule will deny the access.
Passwords
Step 1 − Yii provides the following handy methods for working with passwords.
public function actionAuth() {
$password = "asd%#G3";
//generates password hasg
$hash = Yii::$app->getSecurity()->generatePasswordHash($password);
var_dump($hash);
//validates password hash
if (Yii::$app->getSecurity()->validatePassword($password, $hash)) {
echo "correct password";
} else {
echo "incorrect password";
}
//generate a token
$key = Yii::$app->getSecurity()->generateRandomString();
var_dump($key);
//encrypt data with a secret key
$encryptedData = Yii::$app->getSecurity()->encryptByPassword("mydata", $key);
var_dump($encryptedData);
//decrypt data with a secret key
$data = Yii::$app->getSecurity()->decryptByPassword($encryptedData, $key);
var_dump($data);
//hash data with a secret key
$data = Yii::$app->getSecurity()->hashData("mygenuinedata", $key);
var_dump($data);
//validate data with a secret key
$data = Yii::$app->getSecurity()->validateData($data, $key);
var_dump($data);
}
Step 2 − Enter the URL http://localhost:8080/index.php?r=site/auth, you will see the following.
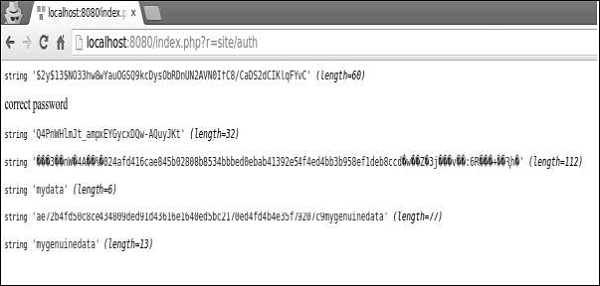
Yii - Localization
I18N (Internationalization) is the process of designing an application that can be adapted to various languages. Yii offers a full spectrum of I18N features.
Locale is a set of parameters that specify a user's language and country. For example, the en-US stands for the English locale and the United States. Yii provides two types of languages: source language and target language. The source language is the language in which all text messages in the application are written. The target language is the language that should be used to display content to end users.
The message translation component translates text messages from the source language to the target language. To translate the message, the message translation service must look it up in a message source.
To use the message translation service, you should −
- Wrap text messages you want to be translated in the Yii::t() method.
- Configure message sources.
- Store messages in the message source.
Step 1 − The Yii::t() method can be used like this.
echo \Yii::t('app', 'This is a message to translate!');
In the above code snippet, the 'app' stands for a message category.
Step 2 − Now, modify the config/web.php file.
<?php
$params = require(__DIR__ . '/params.php');
$config = [
'id' => 'basic',
'basePath' => dirname(__DIR__),
'bootstrap' => ['log'],
'components' => [
'request' => [
// !!! insert a secret key in the following (if it is empty) - this
//is required by cookie validation
'cookieValidationKey' => 'ymoaYrebZHa8gURuolioHGlK8fLXCKjO',
],
'cache' => [
'class' => 'yii\caching\FileCache',
],
'i18n' => [
'translations' => [
'app*' => [
'class' => 'yii\i18n\PhpMessageSource',
'fileMap' => [
'app' => 'app.php'
],
],
],
],
'user' => [
'identityClass' => 'app\models\User',
'enableAutoLogin' => true,
],
'errorHandler' => [
'errorAction' => 'site/error',
],
'mailer' => [
'class' => 'yii\swiftmailer\Mailer',
// send all mails to a file by default. You have to set
// 'useFileTransport' to false and configure a transport
// for the mailer to send real emails.
'useFileTransport' => true,
],
'log' => [
'flushInterval' => 1,
'traceLevel' => YII_DEBUG ? 3 : 0,
'targets' => [
[
'class' => 'yii\log\FileTarget',
'exportInterval' => 1,
'logVars' => [],
],
],
],
'db' => require(__DIR__ . '/db.php'),
],
// set target language to be Russian
'language' => 'ru-RU',
// set source language to be English
'sourceLanguage' => 'en-US',
'modules' => [
'hello' => [
'class' => 'app\modules\hello\Hello',
],
],
'params' => $params,
];
if (YII_ENV_DEV) {
// configuration adjustments for 'dev' environment
$config['bootstrap'][] = 'debug';
$config['modules']['debug'] = [
'class' => 'yii\debug\Module',
];
$config['bootstrap'][] = 'gii';
$config['modules']['gii'] = [
'class' => 'yii\gii\Module',
];
}
return $config;
?>
In the above code, we define the source and the target languages. We also specify a message source supported by yii\i18n\PhpMessageSource. The app* pattern indicates that all messages categories starting with app must be translated using this particular message source. In the above configuration, all Russian translations will be located in the messages/ru-RU/app.php file.
Step 3 − Now, create the messages/ru-RU directory structure. Inside the ru-RU folder create a file called app.php. This will store all EN → RU translations.
<?php
return [
'This is a string to translate!' => 'Эта строка для перевода!'
];
?>
Step 4 − Create a function called actionTranslation() in the SiteController.
public function actionTranslation() {
echo \Yii::t('app', 'This is a string to translate!');
}
Step 5 − Enter the URL http://localhost:8080/index.php?r=site/translation in the web browser, you will see the following.
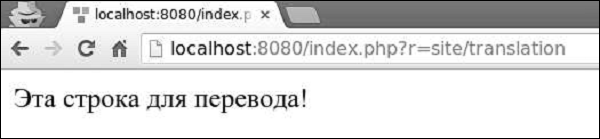
The message was translated into Russian as we set the target language to ru-RU. We can dynamically change the language of the application.
Step 6 − Modify the actionTranslation() method.
public function actionTranslation() {
\Yii::$app->language = 'en-US';
echo \Yii::t('app', 'This is a string to translate!');
}
Now, the message is displayed in English −
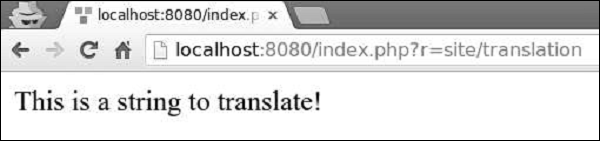
Step 7 − In a translated message, you can insert one or multiple parameters.
public function actionTranslation() {
$username = 'Vladimir';
// display a translated message with username being "Vladimir"
echo \Yii::t('app', 'Hello, {username}!', [
'username' => $username,
]), "<br>";
$username = 'John';
// display a translated message with username being "John"
echo \Yii::t('app', 'Hello, {username}!', [
'username' => $username,
]), "<br>";
$price = 150;
$count = 3;
$subtotal = 450;
echo \Yii::t('app', 'Price: {0}, Count: {1}, Subtotal: {2}', [$price, $count, $subtotal]);
}
Following will be the output.
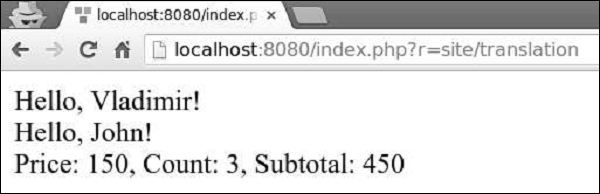
You can translate a whole view script, instead of translating individual text messages. For example, if the target language is ru-RU and you want to translate the views/site/index.php view file, you should translate the view and save it under the views/site/ru-RU directory.
Step 8 − Create the views/site/ru-RU directory structure. Then, inside the ru-RU folder create a file called index.php with the following code.
<?php
/* @var $this yii\web\View */
$this->title = 'My Yii Application';
?>
<div class = "site-index">
<div class = "jumbotron">
<h1>Добро пожаловать!</h1>
</div>
</div>
Step 9 − The target language is ru-RU, so if you enter the URL http://localhost:8080/index.php?r=site/index, you will see the page with Russian translation.
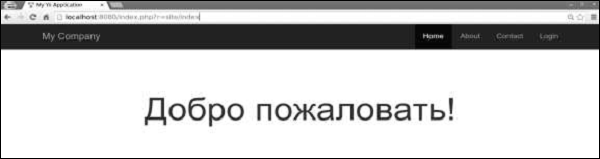
Yii - Gii
Gii is the extension, that provides a web-based code generator for generating models, forms, modules, CRUD, and so forth.
By default, the following generators are available −
Model Generator − Generates an ActiveRecord class for the specified database table.
CRUD Generator − Generates a controller and views that implement CRUD (Create, Read, Update, Delete) operations for the specified model.
Controller Generator − Generates a new controller class with one or several controller actions and their corresponding views.
Form Generator − Generates a view script file that displays a form to collect input for the specified model class.
Module Generator − Generates the skeleton code needed by an Yii module.
Extension Generator − GenerateS the files needed by a Yii extension.
To open the gii generation tool, type http://localhost:8080/index.php?r=gii: in the address bar of the web browser.
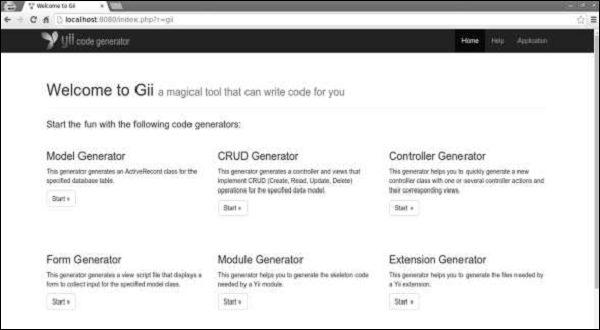
Preparing the DB
Step 1 − Create a new database. Database can be prepared in the following two ways −
In the terminal run mysql -u root –p
Create a new database via CREATE DATABASE helloworld CHARACTER SET utf8 COLLATE utf8_general_ci;
Step 2 − Configure the database connection in the config/db.php file. The following configuration is for the system used currently.
<?php
return [
'class' => 'yii\db\Connection',
'dsn' => 'mysql:host=localhost;dbname=helloworld',
'username' => 'vladimir',
'password' => '12345',
'charset' => 'utf8',
];
?>
Step 3 − Inside the root folder run ./yii migrate/create test_table. This command will create a database migration for managing our DB. The migration file should appear in the migrations folder of the project root.
Step 4 − Modify the migration file (m160106_163154_test_table.php in this case) this way.
<?php
use yii\db\Schema;
use yii\db\Migration;
class m160106_163154_test_table extends Migration {
public function safeUp() {
$this->createTable("user", [
"id" => Schema::TYPE_PK,
"name" => Schema::TYPE_STRING,
"email" => Schema::TYPE_STRING,
]);
$this->batchInsert("user", ["name", "email"], [
["User1", "user1@gmail.com"],
["User2", "user2@gmail.com"],
["User3", "user3@gmail.com"],
["User4", "user4@gmail.com"],
["User5", "user5@gmail.com"],
["User6", "user6@gmail.com"],
["User7", "user7@gmail.com"],
["User8", "user8@gmail.com"],
["User9", "user9@gmail.com"],
["User10", "user10@gmail.com"],
["User11", "user11@gmail.com"],
]);
}
public function safeDown() {
$this->dropTable('user');
}
}
?>
The above migration creates a user table with these fields: id, name, and email. It also adds a few demo users.
Step 5 − Inside the project root run ./yii migrate to apply the migration to the database.
Step 6 − Now, we need to create a model for our user table. For the sake of simplicity, we are going to use the Gii code generation tool. Open up this url: http://localhost:8080/index.php?r=gii. Then, click the “Start” button under the “Model generator” header. Fill in the Table Name (“user”) and the Model Class (“MyUser”), click the “Preview” button and finally, click the “Generate” button.
The MyUser model should appear in the models directory.
Gii - Creating a Model
To create a Model in Gii −
<?php
namespace app\models;
use app\components\UppercaseBehavior;
use Yii;
/**
* This is the model class for table "user".
*
* @property integer $id
* @property string $name
* @property string $email
*/
class MyUser extends \yii\db\ActiveRecord {
/**
* @inheritdoc
*/
public static function tableName() {
return 'user';
}
/**
* @inheritdoc
*/
public function rules() {
return [
[['name', 'email'], 'string', 'max' => 255]
];
}
/**
* @inheritdoc
*/
public function attributeLabels() {
return [
'id' => 'ID',
'name' => 'Name',
'email' => 'Email',
];
}
}
?>
Generating CRUD
Let us generate CRUD for the MyUser model.
Step 1 − Open the CRUD generator interface, fill in the form.
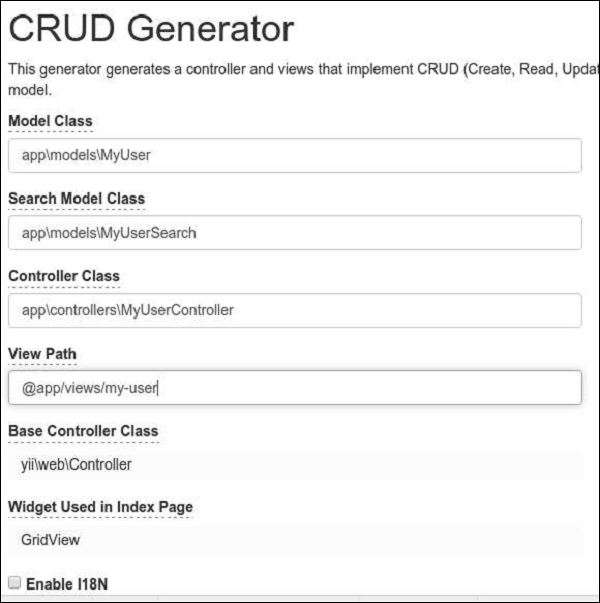
Step 2 − Then, click the “Preview” button and “Generate”. Go to the URL http://localhost:8080/index.php?r=my-user, you will see the list of all users.
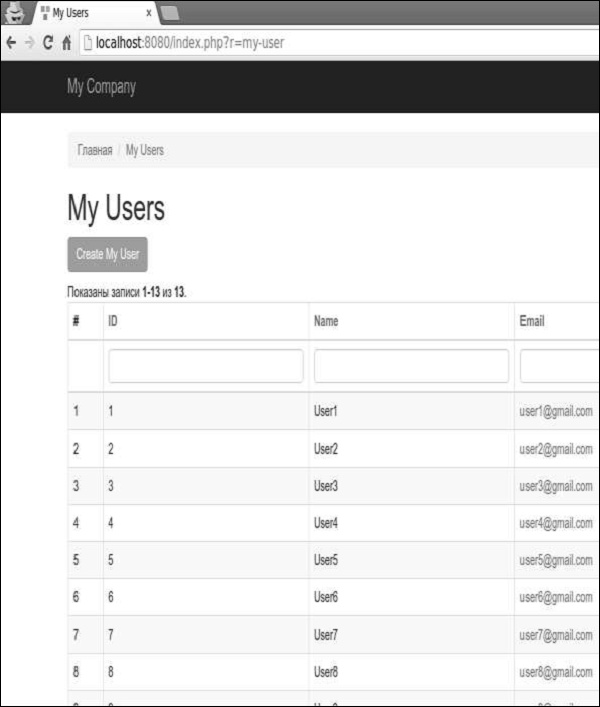
Step 3 − Open the URL http://localhost:8080/index.php?r=my-user/create. You should see a user create form.
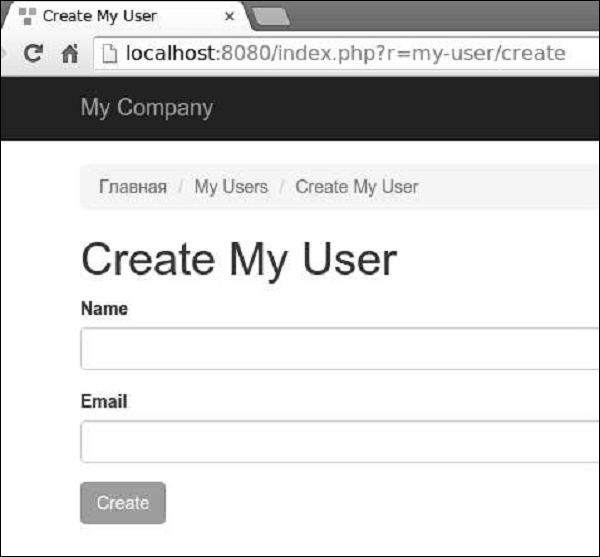
Gii - Generating Controller
Let us see how to generate a Controller.
Step 1 − To generate a controller with several actions, open the controller generator interface fill in the form.
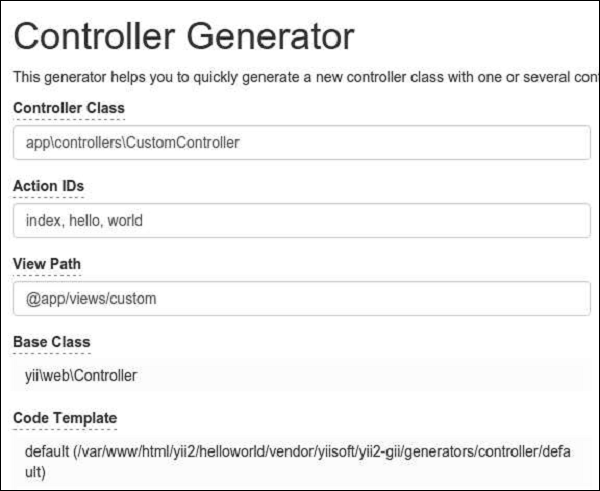
Step 2 − Then, click the “Preview” button and “Generate”. The CustomController.php file with index, hello, and world actions will be generated in the controllers folder.
<?php
namespace app\controllers;
class CustomController extends \yii\web\Controller {
public function actionHello() {
return $this->render('hello');
}
public function actionIndex() {
return $this->render('index');
}
public function actionWorld() {
return $this->render('world');
}
}
?>
Form Generation
Step 1 − To generate a view file from an existing model, open the form generation interface and fill in the form.
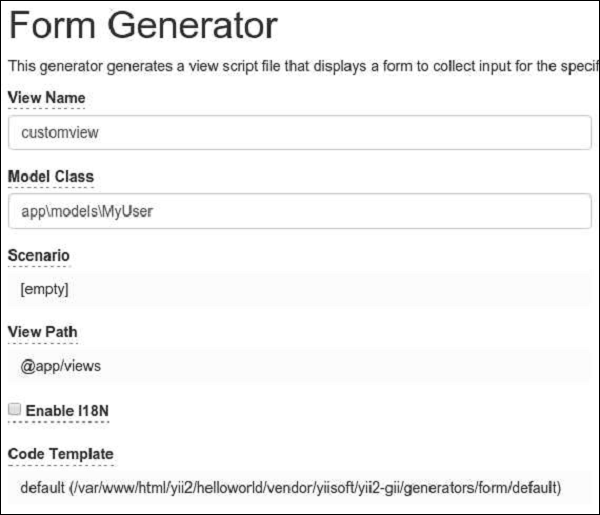
Then, click the “Preview” button and “Generate”. The customview view file will be generated in the view folder.
Step 2 − To display it, add a new method to the CustomController.
public function actionView() {
$model = new MyUser();
return $this->render('/customview', [
'model' => $model,
]);
}
Step 3 − To see the generated view file, open the URL http://localhost:8080/index.php?r=custom/view.
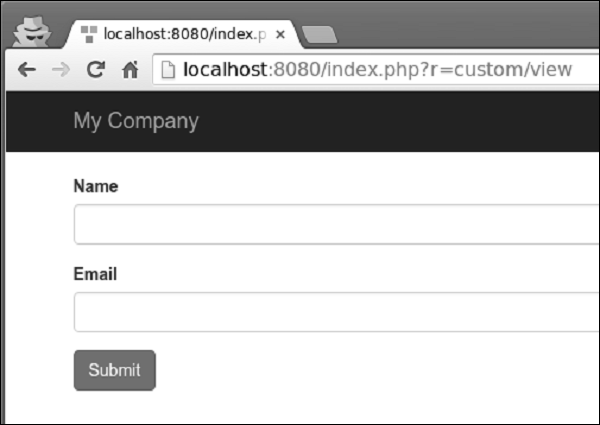
Gii - Generating Module
Let us see how to generate a Module.
Step 1 − To generate a module, open the module generation interface and fill in the form.
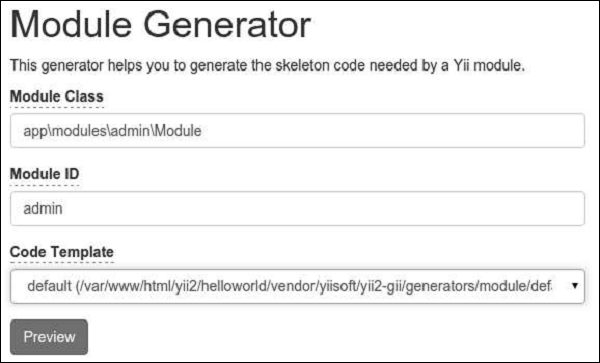
Step 2 − Then, click the “Preview” button and “Generate”.
Step 3 − We need to activate the module. Modify the modules application component in the config/web.php file.
'modules' => [
'admin' => [
'class' => 'app\modules\admin\Module',
],
],
Step 4 − To check whether our newly generated module works, type the UR http://localhost:8080/index.php?r=admin/default/index in the web browser.