- Python Basics
- Python - Home
- Python - Overview
- Python - History
- Python - Features
- Python vs C++
- Python - Hello World Program
- Python - Application Areas
- Python - Interpreter
- Python - Environment Setup
- Python - Virtual Environment
- Python - Basic Syntax
- Python - Variables
- Python - Data Types
- Python - Type Casting
- Python - Unicode System
- Python - Literals
- Python - Operators
- Python - Arithmetic Operators
- Python - Comparison Operators
- Python - Assignment Operators
- Python - Logical Operators
- Python - Bitwise Operators
- Python - Membership Operators
- Python - Identity Operators
- Python - Operator Precedence
- Python - Comments
- Python - User Input
- Python - Numbers
- Python - Booleans
- Python Control Statements
- Python - Control Flow
- Python - Decision Making
- Python - If Statement
- Python - If else
- Python - Nested If
- Python - Match-Case Statement
- Python - Loops
- Python - for Loops
- Python - for-else Loops
- Python - While Loops
- Python - break Statement
- Python - continue Statement
- Python - pass Statement
- Python - Nested Loops
- Python Functions & Modules
- Python - Functions
- Python - Default Arguments
- Python - Keyword Arguments
- Python - Keyword-Only Arguments
- Python - Positional Arguments
- Python - Positional-Only Arguments
- Python - Arbitrary Arguments
- Python - Variables Scope
- Python - Function Annotations
- Python - Modules
- Python - Built in Functions
- Python Strings
- Python - Strings
- Python - Slicing Strings
- Python - Modify Strings
- Python - String Concatenation
- Python - String Formatting
- Python - Escape Characters
- Python - String Methods
- Python - String Exercises
- Python Lists
- Python - Lists
- Python - Access List Items
- Python - Change List Items
- Python - Add List Items
- Python - Remove List Items
- Python - Loop Lists
- Python - List Comprehension
- Python - Sort Lists
- Python - Copy Lists
- Python - Join Lists
- Python - List Methods
- Python - List Exercises
- Python Tuples
- Python - Tuples
- Python - Access Tuple Items
- Python - Update Tuples
- Python - Unpack Tuples
- Python - Loop Tuples
- Python - Join Tuples
- Python - Tuple Methods
- Python - Tuple Exercises
- Python Sets
- Python - Sets
- Python - Access Set Items
- Python - Add Set Items
- Python - Remove Set Items
- Python - Loop Sets
- Python - Join Sets
- Python - Copy Sets
- Python - Set Operators
- Python - Set Methods
- Python - Set Exercises
- Python Dictionaries
- Python - Dictionaries
- Python - Access Dictionary Items
- Python - Change Dictionary Items
- Python - Add Dictionary Items
- Python - Remove Dictionary Items
- Python - Dictionary View Objects
- Python - Loop Dictionaries
- Python - Copy Dictionaries
- Python - Nested Dictionaries
- Python - Dictionary Methods
- Python - Dictionary Exercises
- Python Arrays
- Python - Arrays
- Python - Access Array Items
- Python - Add Array Items
- Python - Remove Array Items
- Python - Loop Arrays
- Python - Copy Arrays
- Python - Reverse Arrays
- Python - Sort Arrays
- Python - Join Arrays
- Python - Array Methods
- Python - Array Exercises
- Python File Handling
- Python - File Handling
- Python - Write to File
- Python - Read Files
- Python - Renaming and Deleting Files
- Python - Directories
- Python - File Methods
- Python - OS File/Directory Methods
- Object Oriented Programming
- Python - OOPs Concepts
- Python - Object & Classes
- Python - Class Attributes
- Python - Class Methods
- Python - Static Methods
- Python - Constructors
- Python - Access Modifiers
- Python - Inheritance
- Python - Polymorphism
- Python - Method Overriding
- Python - Method Overloading
- Python - Dynamic Binding
- Python - Dynamic Typing
- Python - Abstraction
- Python - Encapsulation
- Python - Interfaces
- Python - Packages
- Python - Inner Classes
- Python - Anonymous Class and Objects
- Python - Singleton Class
- Python - Wrapper Classes
- Python - Enums
- Python - Reflection
- Python Errors & Exceptions
- Python - Syntax Errors
- Python - Exceptions
- Python - try-except Block
- Python - try-finally Block
- Python - Raising Exceptions
- Python - Exception Chaining
- Python - Nested try Block
- Python - User-defined Exception
- Python - Logging
- Python - Assertions
- Python - Built-in Exceptions
- Python Multithreading
- Python - Multithreading
- Python - Thread Life Cycle
- Python - Creating a Thread
- Python - Starting a Thread
- Python - Joining Threads
- Python - Naming Thread
- Python - Thread Scheduling
- Python - Thread Pools
- Python - Main Thread
- Python - Thread Priority
- Python - Daemon Threads
- Python - Synchronizing Threads
- Python Synchronization
- Python - Inter-thread Communication
- Python - Thread Deadlock
- Python - Interrupting a Thread
- Python Networking
- Python - Networking
- Python - Socket Programming
- Python - URL Processing
- Python - Generics
- Python Libraries
- NumPy Tutorial
- Pandas Tutorial
- SciPy Tutorial
- Matplotlib Tutorial
- Django Tutorial
- OpenCV Tutorial
- Python Miscellenous
- Python - Date & Time
- Python - Maths
- Python - Iterators
- Python - Generators
- Python - Closures
- Python - Decorators
- Python - Recursion
- Python - Reg Expressions
- Python - PIP
- Python - Database Access
- Python - Weak References
- Python - Serialization
- Python - Templating
- Python - Output Formatting
- Python - Performance Measurement
- Python - Data Compression
- Python - CGI Programming
- Python - XML Processing
- Python - GUI Programming
- Python - Command-Line Arguments
- Python - Docstrings
- Python - JSON
- Python - Sending Email
- Python - Further Extensions
- Python - Tools/Utilities
- Python - GUIs
- Python Useful Resources
- Python Compiler
- NumPy Compiler
- Matplotlib Compiler
- SciPy Compiler
- Python - Programming Examples
- Python - Quick Guide
- Python - Useful Resources
- Python - Discussion
Python - GUI Programming
Python provides various options for developing graphical user interfaces (GUIs). The most important features are listed below.
Tkinter − Tkinter is the Python interface to the Tk GUI toolkit shipped with Python. We would look at this option in this chapter.
wxPython − This is an open-source Python interface for wxWidgets GUI toolkit. You can find a complete tutorial on WxPython here.
PyQt − This is also a Python interface for a popular cross-platform Qt GUI library. TutorialsPoint has a very good tutorial on PyQt5 here.
PyGTK − PyGTK is a set of wrappers written in Python and C for GTK + GUI library. The complete PyGTK tutorial is available here.
PySimpleGUI − PySimpleGui is an open source, cross-platform GUI library for Python. It aims to provide a uniform API for creating desktop GUIs based on Python's Tkinter, PySide and WxPython toolkits. For a detaile PySimpleGUI tutorial, click here.
Pygame − Pygame is a popular Python library used for developing video games. It is free, open source and cross-platform wrapper around Simple DirectMedia Library (SDL). For a comprehensive tutorial on Pygame, visit this link.
Jython − Jython is a Python port for Java, which gives Python scripts seamless access to the Java class libraries on the local machinehttp: //www.jython.org.
There are many other interfaces available, which you can find them on the net.
Tkinter Programming
Tkinter is the standard GUI library for Python. Python when combined with Tkinter provides a fast and easy way to create GUI applications. Tkinter provides a powerful object-oriented interface to the Tk GUI toolkit.
The tkinter package includes following modules −
Tkinter − Main Tkinter module.
tkinter.colorchooser − Dialog to let the user choose a color.
tkinter.commondialog − Base class for the dialogs defined in the other modules listed here.
tkinter.filedialog − Common dialogs to allow the user to specify a file to open or save.
tkinter.font − Utilities to help work with fonts.
tkinter.messagebox − Access to standard Tk dialog boxes.
tkinter.scrolledtext − Text widget with a vertical scroll bar built in.
tkinter.simpledialog − Basic dialogs and convenience functions.
tkinter.ttk − Themed widget set introduced in Tk 8.5, providing modern alternatives for many of the classic widgets in the main tkinter module.
Creating a GUI application using Tkinter is an easy task. All you need to do is perform the following steps.
Import the Tkinter module.
Create the GUI application main window.
Add one or more of the above-mentioned widgets to the GUI application.
Enter the main event loop to take action against each event triggered by the user.
Example
# note that module name has changed from Tkinter in Python 2
# to tkinter in Python 3

import tkinter
top = tkinter.Tk()

# Code to add widgets will go here...
top.mainloop()
This would create a following window −
When the program becomes more complex, using an object-oriented programming approach makes the code more organized.
import tkinter as tk
class App(tk.Tk):
   def __init__(self):
      super().__init__()

app = App()
app.mainloop()
Tkinter Widgets
Tkinter provides various controls, such as buttons, labels and text boxes used in a GUI application. These controls are commonly called widgets.
There are currently 15 types of widgets in Tkinter. We present these widgets as well as a brief description in the following table −
| Sr.No. | Operator & Description |
|---|---|
| 1 |
Button
The Button widget is used to display the buttons in your application. |
| 2 |
Canvas
The Canvas widget is used to draw shapes, such as lines, ovals, polygons and rectangles, in your application. |
| 3 |
Checkbutton
The Checkbutton widget is used to display a number of options as checkboxes. The user can select multiple options at a time. |
| 4 |
Entry
The Entry widget is used to display a single-line text field for accepting values from a user. |
| 5 |
Frame
The Frame widget is used as a container widget to organize other widgets. |
| 6 |
Label
The Label widget is used to provide a single-line caption for other widgets. It can also contain images. |
| 7 |
Listbox
The Listbox widget is used to provide a list of options to a user. |
| 8 |
Menubutton
The Menubutton widget is used to display menus in your application. |
| 9 |
Menu
The Menu widget is used to provide various commands to a user. These commands are contained inside Menubutton. |
| 10 |
Message
The Message widget is used to display multiline text fields for accepting values from a user. |
| 11 |
Radiobutton
The Radiobutton widget is used to display a number of options as radio buttons. The user can select only one option at a time. |
| 12 |
Scale
The Scale widget is used to provide a slider widget. |
| 13 |
Scrollbar
The Scrollbar widget is used to add scrolling capability to various widgets, such as list boxes. |
| 14 |
Text
The Text widget is used to display text in multiple lines. |
| 15 |
Toplevel
The Toplevel widget is used to provide a separate window container. |
| 16 |
Spinbox
The Spinbox widget is a variant of the standard Tkinter Entry widget, which can be used to select from a fixed number of values. |
| 17 |
PanedWindow
A PanedWindow is a container widget that may contain any number of panes, arranged horizontally or vertically. |
| 18 |
LabelFrame
A labelframe is a simple container widget. Its primary purpose is to act as a spacer or container for complex window layouts. |
| 19 |
tkMessageBox
This module is used to display message boxes in your applications. |
Let us study these widgets in detail.
Standard Attributes
Let us look at how some of the common attributes, such as sizes, colors and fonts are specified.
Let us study them briefly −
Geometry Management
All Tkinter widgets have access to the specific geometry management methods, which have the purpose of organizing widgets throughout the parent widget area. Tkinter exposes the following geometry manager classes: pack, grid, and place.
The pack() Method − This geometry manager organizes widgets in blocks before placing them in the parent widget.
The grid() Method − This geometry manager organizes widgets in a table-like structure in the parent widget.
The place() Method − This geometry manager organizes widgets by placing them in a specific position in the parent widget.
Let us study the geometry management methods briefly −
SimpleDialog
The simpledialog module in tkinter package includes a dialog class and convenience functions for accepting user input through a modal dialog. It consists of a label, an entry widget and two buttons Ok and Cancel. These functions are −
askfloat(title, prompt, **kw) − Accepts a floating point number.
askinteger(title, prompt, **kw) − Accepts an integer input.
askstring(title, prompt, **kw) − Accepts a text input from the user.
The above three functions provide dialogs that prompt the user to enter a value of the desired type. If Ok is pressed, the input is returned, if Cancel is pressed, None is returned.
askinteger
from tkinter.simpledialog import askinteger
from tkinter import *
from tkinter import messagebox
top = Tk()

top.geometry("100x100")
def show():
   num = askinteger("Input", "Input an Integer")
   print(num)

B = Button(top, text ="Click", command = show)
B.place(x=50,y=50)

top.mainloop()
It will produce the following output −

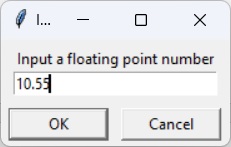
askfloat
from tkinter.simpledialog import askfloat
from tkinter import *
top = Tk()

top.geometry("100x100")
def show():
   num = askfloat("Input", "Input a floating point number")
   print(num)

B = Button(top, text ="Click", command = show)
B.place(x=50,y=50)

top.mainloop()
It will produce the following output −
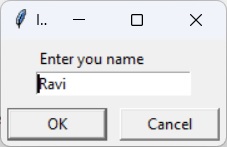
askstring
from tkinter.simpledialog import askstring
from tkinter import *

top = Tk()

top.geometry("100x100")
def show():
   name = askstring("Input", "Enter you name")
   print(name)

B = Button(top, text ="Click", command = show)
B.place(x=50,y=50)

top.mainloop()
It will produce the following output −
The FileDialog Module
The filedialog module in Tkinter package includes a FileDialog class. It also defines convenience functions that enable the user to perform open file, save file, and open directory activities.
- filedialog.asksaveasfilename()
- filedialog.asksaveasfile()
- filedialog.askopenfilename()
- filedialog.askopenfile()
- filedialog.askdirectory()
- filedialog.askopenfilenames()
- filedialog.askopenfiles()
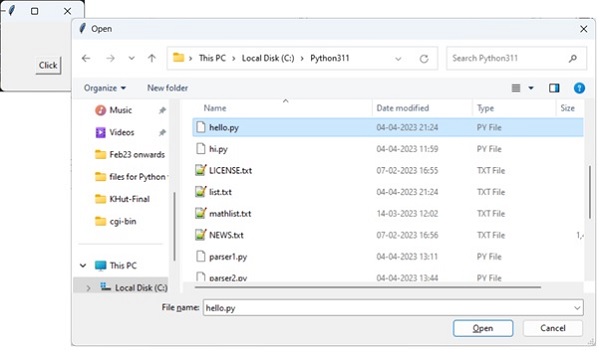
askopenfile
This function lets the user choose a desired file from the filesystem. The file dialog window has Open and Cancel buttons. The file name along with its path is returned when Ok is pressed, None if Cancel is pressed.
from tkinter.filedialog import askopenfile
from tkinter import *

top = Tk()

top.geometry("100x100")
def show():
   filename = askopenfile()
   print(filename)

B = Button(top, text ="Click", command = show)
B.place(x=50,y=50)

top.mainloop()
It will produce the following output −
ColorChooser
The colorchooser module included in tkinter package has the feature of letting the user choose a desired color object through the color dialog. The askcolor() function presents with the color dialog with predefined color swatches and facility to choose custome color by setting RGB values. The dialog returns a tuple of RGB values of chosen color as well as its hex value.
from tkinter.colorchooser import askcolor
from tkinter import *

top = Tk()

top.geometry("100x100")
def show():
   color = askcolor()
   print(color)

B = Button(top, text ="Click", command = show)
B.place(x=50,y=50)

top.mainloop()
It will produce the following output −
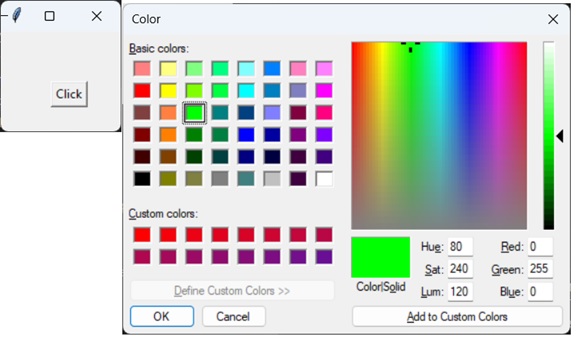
((0, 255, 0), '#00ff00')
ttk module
The term ttk stands from Tk Themed widgets. The ttk module was introduced with Tk 8.5 onwards. It provides additional benefits including anti-aliased font rendering under X11 and window transparency. It provides theming and styling support for Tkinter.
The ttk module comes bundled with 18 widgets, out of which 12 are already present in Tkinter. Importing ttk over-writes these widgets with new ones which are designed to have a better and more modern look across all platforms.
The 6 new widgets in ttk are, the Combobox, Separator, Sizegrip, Treeview, Notebook and ProgressBar.
To override the basic Tk widgets, the import should follow the Tk import −
from tkinter import *
from tkinter.ttk import *
The original Tk widgets are automatically replaced by tkinter.ttk widgets. They are Button, Checkbutton, Entry, Frame, Label, LabelFrame, Menubutton, PanedWindow, Radiobutton, Scale and Scrollbar.
New widgets which gives a better look and feel across platforms; however, the replacement widgets are not completely compatible. The main difference is that widget options such as "fg", "bg" and others related to widget styling are no longer present in Ttk widgets. Instead, use the ttk.Style class for improved styling effects.
The new widgets in ttk module are −
Notebook − This widget manages a collection of "tabs" between which you can swap, changing the currently displayed window.
ProgressBar − This widget is used to show progress or the loading process through the use of animations.
Separator − Used to separate different widgets using a separator line.
Treeview − This widget is used to group together items in a tree-like hierarchy. Each item has a textual label, an optional image, and an optional list of data values.
ComboBox − Used to create a dropdown list of options from which the user can select one.
Sizegrip − Creates a little handle near the bottom-right of the screen, which can be used to resize the window.
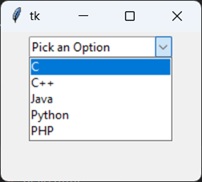
Combobox Widget
The Python ttk Combobox presents a drop down list of options and displays them one at a time. It is a sub class of the widget Entry. Hence it inherits many options and methods from the Entry class.
Syntax
from tkinter import ttk

Combo = ttk.Combobox(master, values.......)
The get() function to retrieve the current value of the Combobox.
Example
from tkinter import *
from tkinter import ttk

top = Tk()
top.geometry("200x150")

frame = Frame(top)
frame.pack()

langs = ["C", "C++", "Java",
   "Python", "PHP"]

Combo = ttk.Combobox(frame, values = langs)
Combo.set("Pick an Option")
Combo.pack(padx = 5, pady = 5)
top.mainloop()
It will produce the following output −
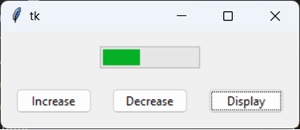
Progressbar
The ttk ProgressBar widget, and how it can be used to create loading screens or show the progress of a current task.
Syntax
ttk.Progressbar(parent, orient, length, mode)
Parameters
Parent − The container in which the ProgressBar is to be placed, such as root or a Tkinter frame.
Orient − Defines the orientation of the ProgressBar, which can be either vertical of horizontal.
Length − Defines the width of the ProgressBar by taking in an integer value.
Mode − There are two options for this parameter, determinate and indeterminate.
Example
The code given below creates a progressbar with three buttons which are linked to three different functions.
The first function increments the "value" or "progress" in the progressbar by 20. This is done with the step() function which takes an integer value to change progress amount. (Default is 1.0)
The second function decrements the "value" or "progress" in the progressbar by 20.
The third function prints out the current progress level in the progressbar.
import tkinter as tk
from tkinter import ttk

root = tk.Tk()
frame= ttk.Frame(root)
def increment():
   progressBar.step(20)

def decrement():
   progressBar.step(-20)

def display():
   print(progressBar["value"])

progressBar= ttk.Progressbar(frame, mode='determinate')
progressBar.pack(padx = 10, pady = 10)

button= ttk.Button(frame, text= "Increase", command= increment)
button.pack(padx = 10, pady = 10, side = tk.LEFT)

button= ttk.Button(frame, text= "Decrease", command= decrement)
button.pack(padx = 10, pady = 10, side = tk.LEFT)
button= ttk.Button(frame, text= "Display", command= display)
button.pack(padx = 10, pady = 10, side = tk.LEFT)

frame.pack(padx = 5, pady = 5)
root.mainloop()
It will produce the following output −
Notebook
Tkinter ttk module has a new useful widget called Notebook. It is a of collection of of containers (e.g frames) which have many widgets as children inside.
Each "tab" or "window" has a tab ID associated with it, which is used to determine which tab to swap to.
You can swap between these containers like you would on a regular text editor.
Syntax
notebook = ttk.Notebook(master, *options)
Example
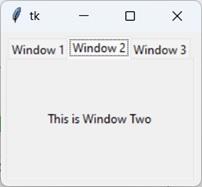
In this example, add 3 windows to our Notebook widget in two different ways. The first method involves the add() function, which simply appends a new tab to the end. The other method is the insert() function which can be used to add a tab to a specific position.
The add() function takes one mandatory parameter which is the container widget to be added, and the rest are optional parameters such as text (text to be displayed as tab title), image and compound.
The insert() function requires a tab_id, which defines the location where it should be inserted. The tab_id can be either an index value or it can be string literal like "end", which will append it to the end.
import tkinter as tk
from tkinter import ttk

root = tk.Tk()
nb = ttk.Notebook(root)

# Frame 1 and 2
frame1 = ttk.Frame(nb)
frame2 = ttk.Frame(nb)

label1 = ttk.Label(frame1, text = "This is Window One")
label1.pack(pady = 50, padx = 20)
label2 = ttk.Label(frame2, text = "This is Window Two")
label2.pack(pady = 50, padx = 20)

frame1.pack(fill= tk.BOTH, expand=True)
frame2.pack(fill= tk.BOTH, expand=True)
nb.add(frame1, text = "Window 1")
nb.add(frame2, text = "Window 2")

frame3 = ttk.Frame(nb)
label3 = ttk.Label(frame3, text = "This is Window Three")
label3.pack(pady = 50, padx = 20)
frame3.pack(fill= tk.BOTH, expand=True)
nb.insert("end", frame3, text = "Window 3")
nb.pack(padx = 5, pady = 5, expand = True)

root.mainloop()
It will produce the following output −
Treeview
The Treeview widget is used to display items in a tabular or hierarchical manner. It has support for features like creating rows and columns for items, as well as allowing items to have children as well, leading to a hierarchical format.
Syntax
tree = ttk.Treeview(container, **options)
Options
| Sr.No. | Option & Description |
|---|---|
| 1 | columns A list of column names |
| 2 | displaycolumns A list of column identifiers (either symbolic or integer indices) specifying which data columns are displayed and the order in which they appear, or the string "#all". |
| 3 | height The number of rows visible. |
| 4 | padding Specifies the internal padding for the widget. Can be either an integer or a list of 4 values. |
| 5 | selectmode One of "extended", "browse" or "none". If set to "extended" (default), multiple items can be selected. If "browse", only a single item can be selected at a time. If "none", the selection cannot be changed by the user. |
| 6 | show A list containing zero or more of the following values, specifying which elements of the tree to display. The default is "tree headings", i.e., show all elements. |
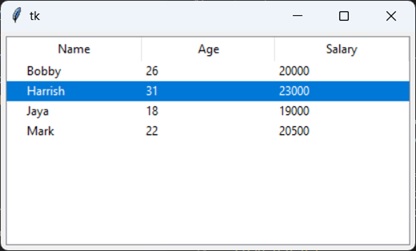
Example
In this example we will create a simple Treeview ttk Widget and fill in some data into it. We have some data already stored in a list which will be reading and adding to the Treeview widget in our read_data() function.
We first need to define a list/tuple of column names. We have left out the column "Name" because there already exists a (default) column with a blank name.
We then assign that list/tuple to the columns option in Treeview, followed by defining the "headings", where the column is the actual column, whereas the heading is just the title of the column that appears when the widget is displayed. We give each a column a name. "#0" is the name of the default column.
The tree.insert() function has the following parameters −
Parent − which is left as an empty string if there is none.
Position − where we want to add the new item. To append, use tk.END
Iid − which is the item ID used to later track the item in question.
Text − to which we will assign the first value in the list (the name).
Value we will pass the the other 2 values we obtained from the list.
The Complete Code
import tkinter as tk
import tkinter.ttk as ttk
from tkinter import simpledialog

root = tk.Tk()
data = [
   ["Bobby",26,20000],
   ["Harrish",31,23000],
   ["Jaya",18,19000],
   ["Mark",22, 20500],
]
index=0
def read_data():
   for index, line in enumerate(data):
      tree.insert('', tk.END, iid = index,
         text = line[0], values = line[1:])
columns = ("age", "salary")

tree= ttk.Treeview(root, columns=columns ,height = 20)
tree.pack(padx = 5, pady = 5)

tree.heading('#0', text='Name')
tree.heading('age', text='Age')
tree.heading('salary', text='Salary')

read_data()
root.mainloop()
It will produce the following output −
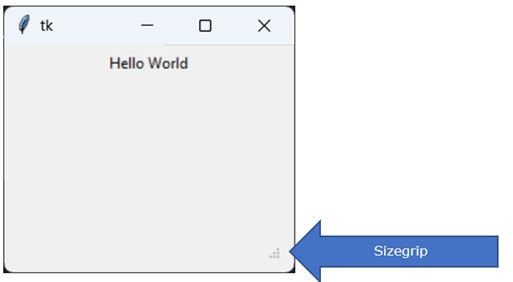
Sizegrip
The Sizegrip widget is basically a small arrow-like grip that is typically placed at the bottom-right corner of the screen. Dragging the Sizegrip across the screen also resizes the container to which it is attached to.
Syntax
sizegrip = ttk.Sizegrip(parent, **options)
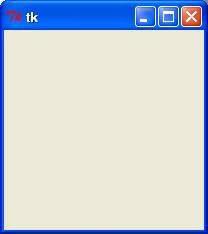
Example
import tkinter as tk
import tkinter.ttk as ttk

root = tk.Tk()
root.geometry("100x100")

frame = ttk.Frame(root)
label = ttk.Label(root, text = "Hello World")
label.pack(padx = 5, pady = 5)
sizegrip = ttk.Sizegrip(frame)
sizegrip.pack(expand = True, fill = tk.BOTH, anchor = tk.SE)
frame.pack(padx = 10, pady = 10, expand = True, fill = tk.BOTH)

root.mainloop()
It will produce the following output −
Separator
The ttk Separator widget is a very simple widget, that has just one purpose and that is to help "separate" widgets into groups/partitions by drawing a line between them. We can change the orientation of this line (separator) to either horizontal or vertical, and change its length/height.
Syntax
separator = ttk.Separator(parent, **options)
The "orient", which can either be tk.VERTICAL or tk.HORIZTONAL, for a vertical and horizontal separator respectively.
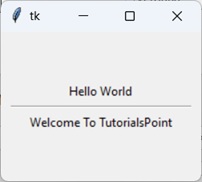
Example
Here we have created two Label widgets, and then created a Horizontal Separator between them.
import tkinter as tk
import tkinter.ttk as ttk

root = tk.Tk()
root.geometry("200x150")

frame = ttk.Frame(root)

label = ttk.Label(frame, text = "Hello World")
label.pack(padx = 5)

separator = ttk.Separator(frame,orient= tk.HORIZONTAL)
separator.pack(expand = True, fill = tk.X)

label = ttk.Label(frame, text = "Welcome To TutorialsPoint")
label.pack(padx = 5)

frame.pack(padx = 10, pady = 50, expand = True, fill = tk.BOTH)

root.mainloop()
It will produce the following output −