
- Android Basics
- Android - Home
- Android - Overview
- Android - Environment Setup
- Android - Architecture
- Android - Application Components
- Android - Hello World Example
- Android - Resources
- Android - Activities
- Android - Services
- Android - Broadcast Receivers
- Android - Content Providers
- Android - Fragments
- Android - Intents/Filters
- Android - User Interface
- Android - UI Layouts
- Android - UI Controls
- Android - Event Handling
- Android - Styles and Themes
- Android - Custom Components
- Android Advanced Concepts
- Android - Drag and Drop
- Android - Notifications
- Location Based Services
- Android - Sending Email
- Android - Sending SMS
- Android - Phone Calls
- Publishing Android Application
- Android Useful Examples
- Android - Alert Dialoges
- Android - Animations
- Android - Audio Capture
- Android - AudioManager
- Android - Auto Complete
- Android - Best Practices
- Android - Bluetooth
- Android - Camera
- Android - Clipboard
- Android - Custom Fonts
- Android - Data Backup
- Android - Developer Tools
- Android - Emulator
- Android - Facebook Integration
- Android - Gestures
- Android - Google Maps
- Android - Image Effects
- Android - ImageSwitcher
- Android - Internal Storage
- Android - JetPlayer
- Android - JSON Parser
- Android - Linkedin Integration
- Android - Loading Spinner
- Android - Localization
- Android - Login Screen
- Android - MediaPlayer
- Android - Multitouch
- Android - Navigation
- Android - Network Connection
- Android - NFC Guide
- Android - PHP/MySQL
- Android - Progress Circle
- Android - ProgressBar
- Android - Push Notification
- Android - RenderScript
- Android - RSS Reader
- Android - Screen Cast
- Android - SDK Manager
- Android - Sensors
- Android - Session Management
- Android - Shared Preferences
- Android - SIP Protocol
- Android - Spelling Checker
- Android - SQLite Database
- Android - Support Library
- Android - Testing
- Android - Text to Speech
- Android - TextureView
- Android - Twitter Integration
- Android - UI Design
- Android - UI Patterns
- Android - UI Testing
- Android - WebView Layout
- Android - Wi-Fi
- Android - Widgets
- Android - XML Parsers
- Android Useful Resources
- Android - Questions and Answers
- Android - Useful Resources
- Android - Discussion
Android - Spinner
Spinner allows you to select an item from a drop down menu
For example. When you are using Gmail application you would get drop down menu as shown below, you need to select an item from a drop down menu.

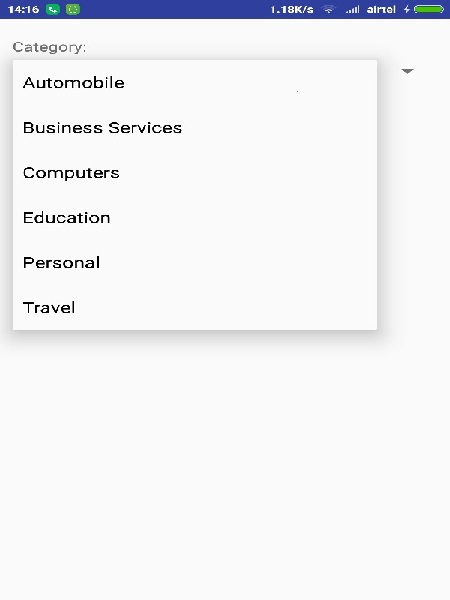
Spinner Example
Example
This example demonstrates the category of computers, you need to select a category from the category.
To experiment with this example, you need to run this on an actual device on after developing the application according to the steps below.
| Steps | Description |
|---|---|
| 1 | You will use Android studio to create an Android application and name it as AndroidSpinnerExample under a package com.example.spinner. |
| 2 | Modify src/AndroidSpinnerExampleActivity.java file to create a simple list view with items which are showing as spinner items |
| 3 | Modify res/layout/activity_main.xml file to add respective XML code. |
| 4 | No need to define default string constants. Android studio takes care of default string constants at string.xml |
| 5 | Run the application and choose a running android device and install the application on it and verify the results. |
Following is the content of the modified main activity file src/com.example.spinner/AndroidSpinnerExampleActivity.java.
package com.example.spinner;

import java.util.ArrayList;
import java.util.List;
import android.app.Activity;
import android.os.Bundle;
import android.view.View;
import android.widget.AdapterView;
import android.widget.ArrayAdapter;
import android.widget.Spinner;
import android.widget.Toast;
import android.widget.AdapterView.OnItemSelectedListener;

class AndroidSpinnerExampleActivity extends Activity implements OnItemSelectedListener{
   @Override
   public void onCreate(Bundle savedInstanceState) {
      super.onCreate(savedInstanceState);
      setContentView(R.layout.main);

      // Spinner element
      Spinner spinner = (Spinner) findViewById(R.id.spinner);

      // Spinner click listener
      spinner.setOnItemSelectedListener(this);

      // Spinner Drop down elements
      List<String> categories = new ArrayList<String>();
      categories.add("Automobile");
      categories.add("Business Services");
      categories.add("Computers");
      categories.add("Education");
      categories.add("Personal");
      categories.add("Travel");

      // Creating adapter for spinner
      ArrayAdapter<String> dataAdapter = new ArrayAdapter<String>(this, android.R.layout.simple_spinner_item, categories);

      // Drop down layout style - list view with radio button
      dataAdapter.setDropDownViewResource(android.R.layout.simple_spinner_dropdown_item);

      // attaching data adapter to spinner
      spinner.setAdapter(dataAdapter);
   }

   @Override
   public void onItemSelected(AdapterView<?> parent, View view, int position, long id) {
      // On selecting a spinner item
      String item = parent.getItemAtPosition(position).toString();

      // Showing selected spinner item
      Toast.makeText(parent.getContext(), "Selected: " + item, Toast.LENGTH_LONG).show();
   }
   public void onNothingSelected(AdapterView<?> arg0) {
      // TODO Auto-generated method stub
   }
}
Modify the content of res/layout/activity_main.xml to the following
<?xml version="1.0" encoding="utf-8"?>
<LinearLayout xmlns:android="http://schemas.android.com/apk/res/android"
   android:orientation="vertical"
   android:padding="10dip"
   android:layout_width="fill_parent"
   android:layout_height="wrap_content">

   <TextView
      android:layout_width="fill_parent"
      android:layout_height="wrap_content"
      android:layout_marginTop="10dip"
      android:text="Category:"
      android:layout_marginBottom="5dp"/>

   <Spinner
      android:id="@+id/spinner"
      android:layout_width="fill_parent"
      android:layout_height="wrap_content"
      android:prompt="@string/spinner_title"/>

</LinearLayout>
Modify the res/values/string.xml to the following
<?xml version="1.0" encoding="utf-8"?>
<resources>
   <string name="app_name">AndroidSpinnerExample</string>
</resources>
This is the default AndroidManifest.xml
<?xml version="1.0" encoding="utf-8"?>
<manifest xmlns:android="http://schemas.android.com/apk/res/android"
   package="com.example.spinner" >

   <application
      android:allowBackup="true"
      android:icon="@drawable/ic_launcher"
      android:label="@string/app_name"
      android:theme="@style/AppTheme" >

      <activity
         android:name="com.example.spinner.AndroidSpinnerExampleActivity"
         android:label="@string/app_name" >

         <intent-filter>
            <action android:name="android.intent.action.MAIN" />
            <category android:name="android.intent.category.LAUNCHER" />
         </intent-filter>

      </activity>

   </application>
</manifest>
Let's try to run your AndroidSpinnerExample application. I assume you have connected your actual Android Mobile device with your computer. To run the app from Android studio, open one of your project's activity files and click Run  icon from the toolbar. Before starting your application,Android studio will display following window to select an option where you want to run your Android application.

If you click on spinner button, It will a drop down menu as shown below
To Continue Learning Please Login