- WebdriverIO - Home
- WebdriverIO - Introduction
- WebdriverIO - Prerequisite
- WebdriverIO - Architecture
- WebdriverIO - Getting Started with NodeJS
- WebdriverIO - Installation of NPM
- WebdriverIO - VS Code Installation
- WebdriverIO - Package.json
- WebdriverIO - Mocha Installation
- Selenium Standalone Server Installation
- WebdriverIO - Configuration File generation
- WebdriverIO - VS Code Intellisense
- WebdriverIO - Wdio.conf.js file
- WebdriverIO - Xpath Locator
- WebdriverIO - CSS Locator
- WebdriverIO - Link Text Locator
- WebdriverIO - ID Locator
- WebdriverIO - Tag Name Locator
- WebdriverIO - Class Name Locator
- WebdriverIO - Name Locator
- Expect Statement for Assertions
- WebdriverIO - Happy Path Flow
- WebdriverIO - General Browser Commands
- WebdriverIO - Handling Browser Size
- WebdriverIO - Browser Navigation Commands
- Handling Checkboxes & Dropdowns
- WebdriverIO - Mouse Operations
- Handling Child Windows/Pop ups
- WebdriverIO - Hidden Elements
- WebdriverIO - Frames
- WebdriverIO - Drag & Drop
- WebdriverIO - Double Click
- WebdriverIO - Cookies
- WebdriverIO - Handling Radio Buttons
- Chai Assertions on webelements
- WebdriverIO - Multiple Windows/Tabs
- WebdriverIO - Scrolling Operations
- WebdriverIO - Alerts
- WebdriverIO - Debugging Code
- WebdriverIO - Capturing Screenshots
- WebdriverIO - JavaScript Executor
- WebdriverIO - Waits
- WebdriverIO - Running Tests in Parallel
- WebdriverIO - Data Driven Testing
- Running Tests from command-line parameters
- Execute Tests with Mocha Options
- Generate HTML reports from Allure
- WebdriverIO Useful Resources
- WebdriverIO - Quick Guide
- WebdriverIO - Useful Resources
- WebdriverIO - Discussion
WebdriverIO - Quick Guide
WebdriverIO - Introduction
WebdriverIO helps to automate any tests designed for a present-day application developed in React, Angular, Polymerer Vue.js, and so on. Besides, it can also be used in Android and iOS platforms.
WebdriverIO is implemented in Node.js and the automation code is written in JavaScript. It comes under the umbrella of Selenium. All the capabilities of Selenium are also available in WebdriverIO, along with certain accessory assertions available for validations.
Now-a-days, the front end of the majority of applications is developed with the JavaScript frameworks like React, Angular, and so on. WebdriverIO is really useful for testing these applications.
This is because WebdriverIO coding is also done in JavaScript. This tool falls under the roof of Selenium and also there are some additional APIs. If we are aware of Selenium, then gaining knowledge in WebdriverIO is a simple task.
WebdriverIO can also be used for testing normal applications but if we are using WebdriverIO for verifying any application implemented in React, Angular, Polymerer Vue.js, and so on, we can enjoy an additional edge in building a robust framework.
If we are creating Selenium tests in JavaScript, then WebdriverIO should be the choice. There are other tools like Cypress which is based on the JavaScript framework but it does not fall under the umbrella of Selenium.
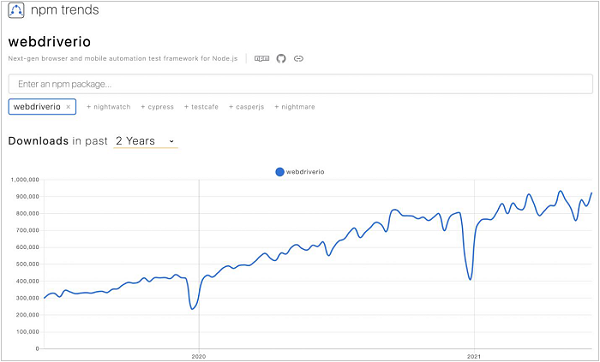
If we follow the npm trends for WebdriverIO downloads for the last few years, we shall observe an upward trend towards the use of WebdriverIO available from the link mentioned below −
https://www.npmtrends.com/webdriverio
The following screen will appear on your computer −
Reports
Some of the reports generated in WebdriverIO are as follows −
Allure
Spec
JUnit
HTML
JSON
Cucumber JSON
Services
Some of the services offered by WebdriverIO are as follows −
Appium
Docker
Selenium Standalone
ChromeDriver
Firefox Profile
DevTools
Testing Frameworks
Some of the testing frameworks supported by WebdriverIO are as follows −
Cucumber
Jasmine
Mocha
WebdriverIO - Prerequisite
As a prerequisite for WebdriverIO, we need to have an editor to write the JavaScript code. For this, we can use the Visual Studio Code. We can download it from the below link −
Step 1 − Based on the local operating system we have for example - macOS, Linux or Windows, we need to select the link for download.
The following screen will appear on your computer −

Step 2 − A zip file gets downloaded after clicking the Download button. Click on this zip file and the Visual Studio Code application should be available on the machine.
The following screen will appear on your computer −

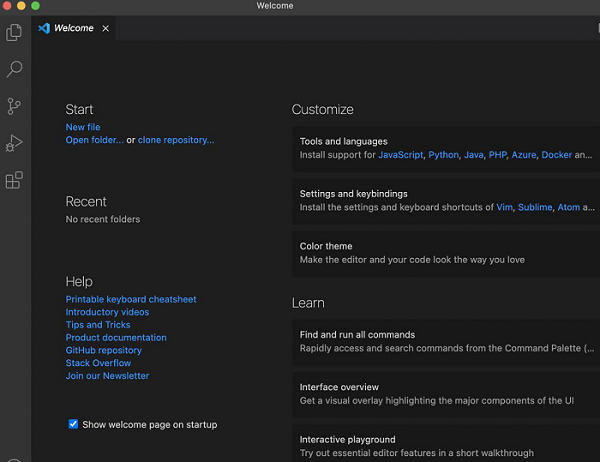
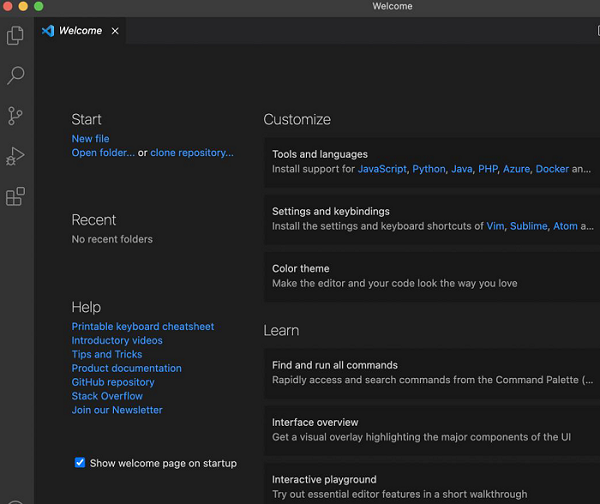
Step 3 − Double-click on Visual Studio Code and it gets launched along with the welcome page. The following screen will appear on your computer −
WebdriverIO - Architecture
WebdriverIO architecture consists of the following components −
NodeJS
WebdriverIO
JavaScript
JSON Wire Protocol
Services
Browsers
Application
Nodejs is enabled to execute the JavaScript runtime environment. It is actually an open-source project. WebdriverIO is developed on Nodejs and JavaScript is the script implemented by the end-user using the WebdriverIO library.
Thus the JavaScript implemented by the end-user passes a request using the WebdriverIO via Nodejs to the Services (in the format of an HTTP command). The entire process is done following the JSON Wire Protocol.
Services send the request to the browsers like Chrome, Firefox, and so on to execute a test against the application under test. Thus the Services can be termed as a middle-layer between the browser and the automation framework.
WebdriverIO - Getting Started with NodeJS
WebdriverIO coding is done using JavaScript. For this, NodeJS has to be installed since it is a JavaScript engine. Only after its installation, we can execute WebdriverIO tests. The steps to configure NodeJS are listed below −
Step 1 − Launch the application using the below link −
https://nodejs.org/en/download/
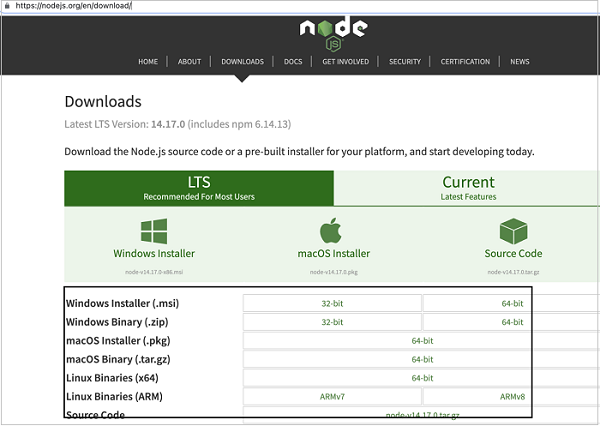
Step 2 − As per the local operating system (Windows, Mac or Linux) we are using, click on the link to download the Installer. The following screen will appear on your computer −
Step 3 − Once the installer is downloaded, click on it. Navigate to the Node.js Installer welcome screen. Click on Continue. The following screen will appear on your computer −

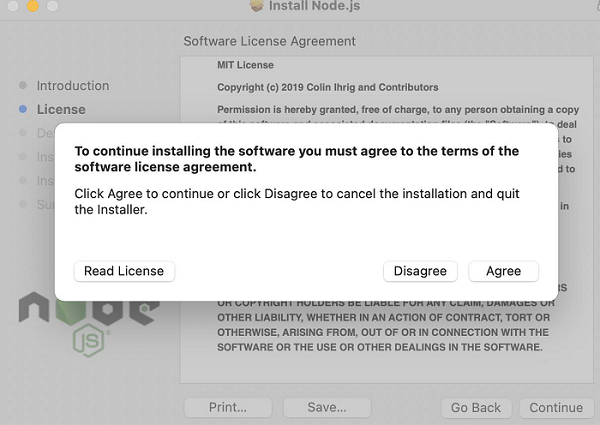
Step 4 − Agree to the terms of agreement of Nodejs. The following screen will appear on your computer −
Step 5 − Click on Install.
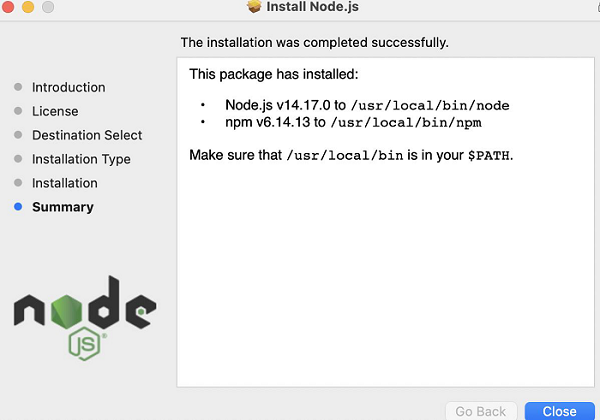
Step 6 − Once the success message of Nodejs installation is displayed, click on Close. The following screen will appear on your computer −
Step 7 − To check if Nodejs is installed successfully, open the terminal and run the command −
node
The following screen will appear on your computer −

The version of the Nodejs installed in the machine should be displayed.
WebdriverIO - Installation of NPM
Once Nodejs has been installed, we have to create a NPM folder. NPM is actually the package manager for writing tests in JavaScript. The official page for NPM is available in the below link −
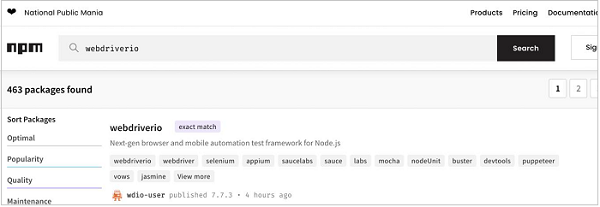
https://www.npmjs.com/search?q=webdriverio
Once we launch this page, enter WebdriverIO in the search box and click on Search, to get the npm packages for WebdriverIO. The following screen will appear on your computer −
Create NPM Project
The steps to create a NPM project are listed below −
Step 1 − Create an empty folder, say webdriverIO in a location.
Step 2 − Open the terminal and move from the current directory to the directory of the empty folder that we have created.
Step 3 − Run the following command −
npm init -y
The y parameter is given to set the default values. The following screen will appear on your computer −

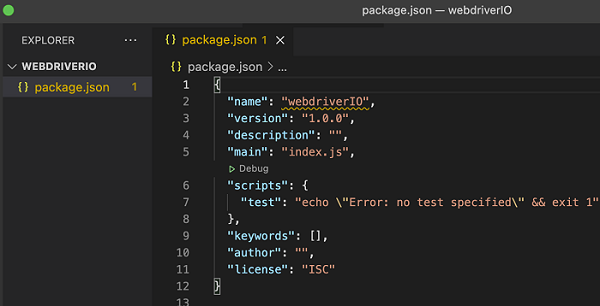
Step 4 − The output obtained on running the command in Step 3 says that all the default configurations have been captured within the package.json file. It is generated within the folder we have created (named webdriverIO) in Step 1.
The following screen will appear on your computer −

This package.json contains all the dependencies which we need to work with the WebdriverIO project. To get any package under NPM, we can refer to the link −
WebdriverIO - VS Code Installation
In this chapter, let us understand how to install the Visual Studio (VS) Code in WebdriverIO.
The steps to install the Visual Studio Code are listed below −
Step 1 − Navigate to the below link −
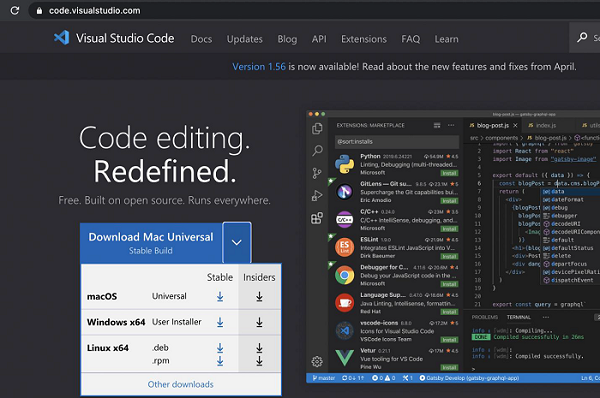
https://code.visualstudio.com/
Step 2 − Depending on the local operating system we have for example - macOS, Linux or Windows, we need to choose the link for download.
The following screen will appear on your computer −
Step 3 − A zip file gets downloaded after clicking the Download button. After downloading this file has completed, click on it and the Visual Studio Code application should become available for use.
The following screen will appear on your computer −

Step 4 − Double-click it and the Visual Studio Code application should launch along with the welcome page.
The following screen will appear on your computer −
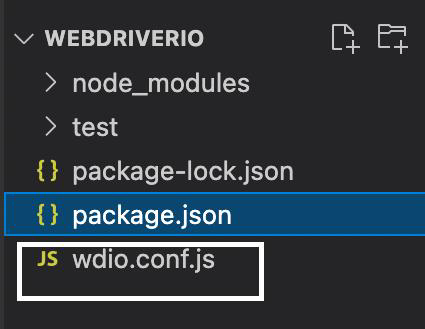
Step 5 − Click on the Open folder link and import the folder that contains the package.json file. The details of how the package.json file got created are discussed in detail in the Chapter titled Installation of NPM.
The following screen will appear on your computer −
WebdriverIO - Package.json
Once the package.json file gets generated, we need to install other npm packages for WebdriverIO. The details of how the package.json file got created are discussed in detail in the Chapter titled Installation of NPM.
The necessary packages for WebdriverIO in the NPM registry can be found in the below link −
https://www.npmjs.com/package/webdriverio
The following screen will appear on your computer −

For installation of WebdriverIO, we have to run the below command from the terminal −
npm i webdriverio
or
npm install webdriverio.
The following screen will appear on your computer −
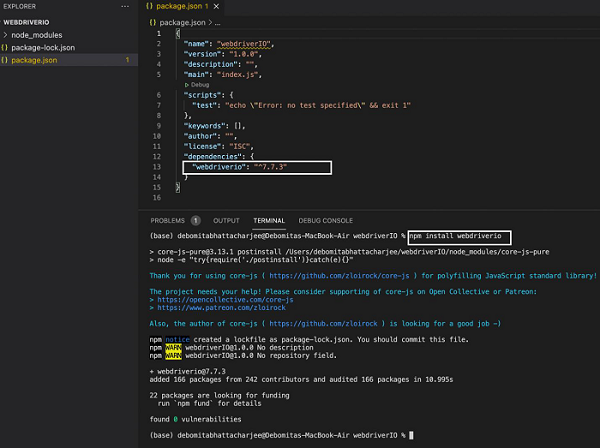
After the command gets executed successfully, the package.json now displays the WebdriverIO version installed.
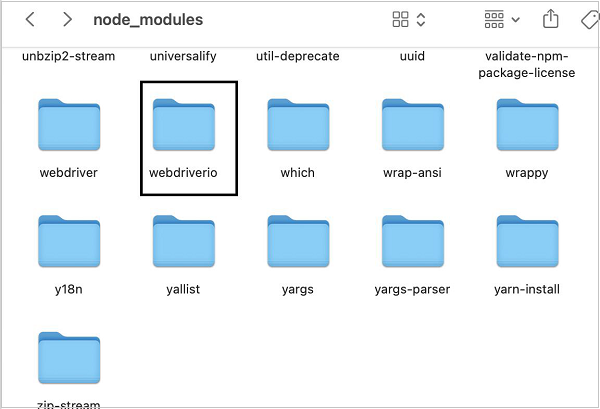
We can verify if the WebdriverIO has installed successfully, if the folder node_modules created within the project contains the webdriverio folder.
The following screen will appear on your computer −
WebdriverIO - Mocha Installation
Mocha is a testing framework based on JavaScript which is built on Nodejs. It makes asynchronous test execution flow interesting and simple. Mocha tests can be run serially.
It is capable of producing accurate and customizable reports. Also, the uncaught exceptions can be easily tagged with the proper test cases. The details of Mocha can be found in the below link −
https://www.tutorialspoint.com/tesults/tesults_integrating_your_automated_tests.htm
To install Mocha packages in the NPM registry, the command is as follows −
npm install mocha
The following screen will appear on your computer −
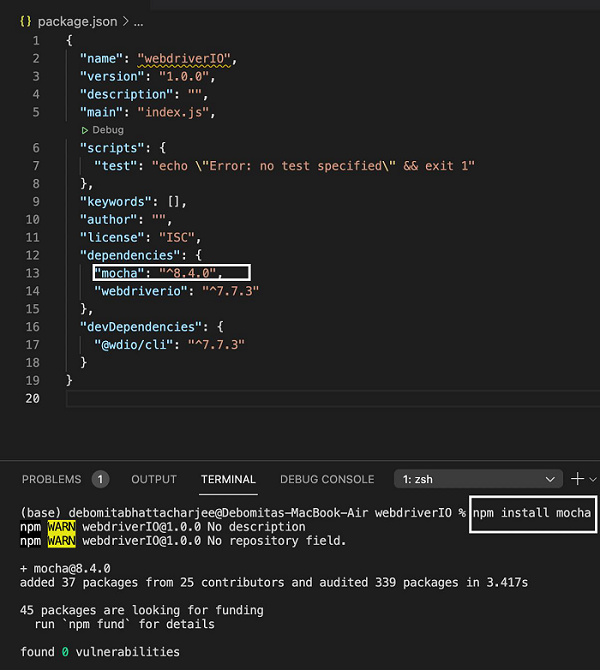
After the command has been executed successfully, the Mocha version installed gets reflected within the package.json file.
Selenium Standalone Server Installation
WebdriverIO works under the roof of Selenium. To establish communication with the browser, we are required to install the Selenium standalone server.
To install Selenium standalone server, we have to run the following command −
npm install selenium-standalone
Or,
npm i selenium-standalone.
The following screen will appear on your computer −
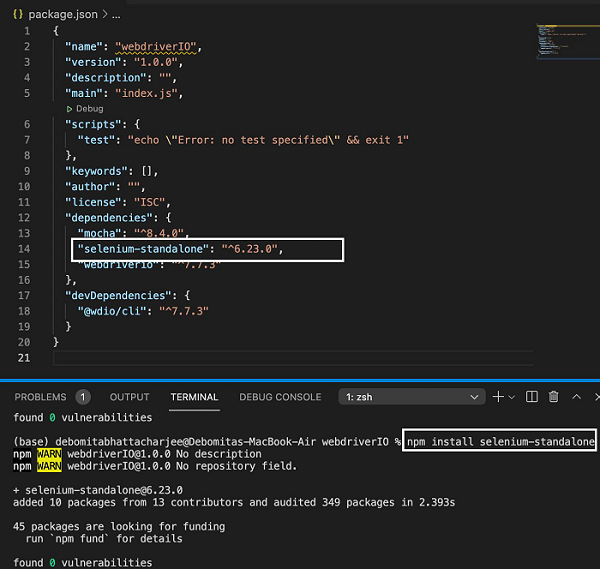
After the command has been executed successfully, the Selenium standalone server package version installed gets reflected within the package.json file.
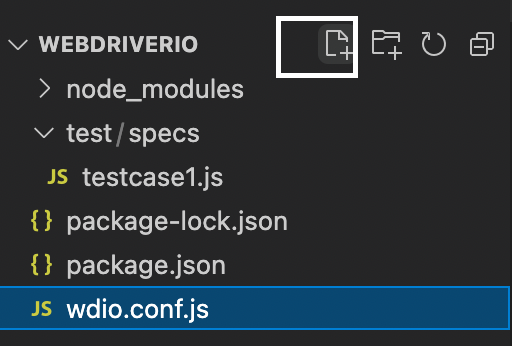
WebdriverIO - Configuration File generation
WebdriverIO tests are controlled from a Configuration file. It is often considered the heart of WebdriverIO. It contains details on what test cases to be executed, browser on which the tests should run, global information - timeout, reports, screenshots and so on.
In WebdriverIO we do not execute a single test. We are required to trigger the Configuration file with the help of the Test Runner. Test Runner scans the information provided in the Configuration file and then triggers the tests accordingly.
To get the Test Runner, we have to install the WebdriverIO CLI dependencies. To install this and save it in the package.json file, we have to run the below mentioned command −
npm i --save-dev @wdio/cli
After this command has been executed successfully, the version of CLI dependency shall be reflected within the package.json file. The following screen will appear on your computer −

To create a Configuration file, we have to run the below mentioned command −
npx wdio config -y
After this command has been executed successfully, the configuration file called the wdio.conf.js gets created within our project. Also, the package.json file should now contain some more dependencies under the devDependencies field.
The following screen will appear on your computer −
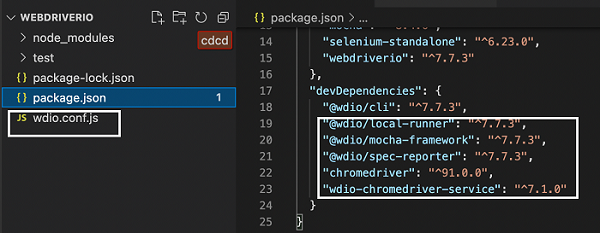
Apart from the dependencies marked in the above image, we have to add one more dependency so that the WebdriverIO commands can execute synchronously.
We have to add the dependency - "@wdio/sync": "<version number>" under the devDependencies field. Then run the following command −
npm install
To run a Configuration file from the test runner, we have to run the below given command −
npx wdio run wdio.conf.js
Create Mocha Spec File
After a Configuration file is created, we shall find a test folder generated within the WebdriverIO project. The details on how to create a Configuration file are described in the Chapter titledConfiguration File generation.
The following screen will appear on your computer −
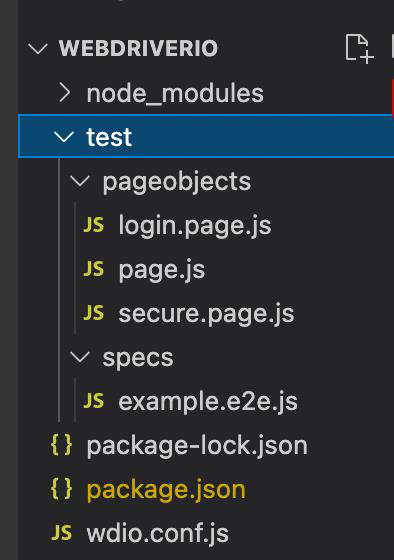
If we expand this folder, we shall find two sub-folders - pageobjects and specs containing JavaScript files created by default. These are basically sample tests provided to guide the first time users to get accustomed with the Mocha framework.
Mocha is a testing framework based on JavaScript which is built on Nodejs. It makes asynchronous test execution flow interesting and simple. Mocha tests can be run serially.
It is capable of producing accurate and customizable reports. Also, the uncaught exceptions can be easily tagged with the proper test cases. The details of Mocha can be found in the below link −
www.tutorialspoint.com/tesults/tesults_integrating_your_automated_tests.htm
As per the Mocha testing framework, all the test files are known as the spec files and they should reside within the specs folder.
Blocks in Test File
A test file should have the following blocks −
describe − This is higher in hierarchy than the it block. A test file can have multiple describe blocks. A describe block represents a test suite. It has two arguments - description of the test suite and an anonymous function.
it − This is lower in hierarchy than the describe block. A describe can have multiple it blocks. An it block represents a test case and should be mandatory within a describe block It has two arguments - description of the test case and an anonymous function. The actual WebdriverIO code is implemented within the it block.Steps to Create Mocha File
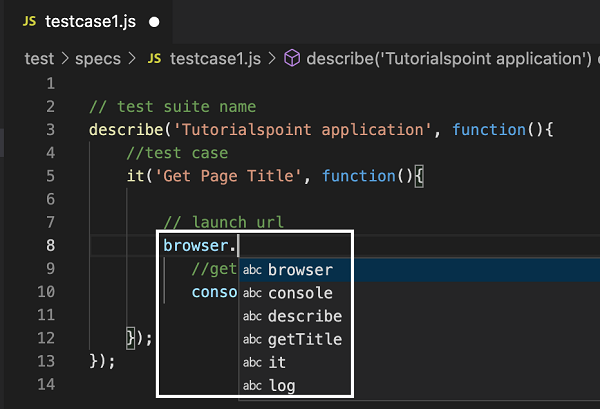
To create a Mocha file, let us follow the below steps −
Step 1 − Right-click on the specs folder (which is within the test folder), then select New File. The following screen will appear on your computer −

Step 2 − Enter a filename, say testcase1.js.
The following screen will appear on your computer −
Step 3 − Add the below code in this file −
// test suite name
describe('Tutorialspoint Application', function () {
   // test case name
   it('Get Page Title', function (){
   // URL launching
      browser.url("https://www.tutorialspoint.com/about/about_careers.htm")
      //print page title in console
      console.log(browser.getTitle())
   });
});
In the above code, the browser is the global object exposed by the WebdriverIO.
Please note − We cannot run this individual file directly. We shall take the help of the Configuration file in order to execute it.
WebdriverIO - VS Code Intellisense
Once we have completed installation of the Visual Studio Code, we should add the intellisense in the editor so that once we begin writing the WebdriverIO commands, the auto-suggestions of the WebdriverIO methods are displayed.
The details on how to do a VS Code installation are discussed in detail in the Chapter titled VS Code Installation.
This is a very important feature that should be added so that the end-users do not need to memorize the raw code for the WebdriverIO.
Add intellisense to VS Code
The steps to add intellisense to the VS Code for the WebdriverIO are listed below −
Step 1 − Click on the New File button appearing to the right of the WebdriverIO project.
The following screen will appear on your computer −
Step 2 − Enter the file name as jsconfig.json. Here, we have to specify the path of the spec files where we are implementing our test.
If we want to apply intellisense feature to all the spec files within the test folder, we can specify the relative path as test/spec/*.js.
The following screen will appear on your computer −

Step 3 − Add the below code inside the file.
{
   "include": [
      //relative path of all spec files
      "test/specs/*.js",
      "**/*.json",
      "node_modules/@wdio/sync",
      "node_modules/@wdio/mocha-framework"
   ]
}
Step 4 − In the spec file, start writing a WebdriverIO object or a method and we shall obtain the entire auto - suggestions.
The following screen will appear on your computer −
WebdriverIO - Wdio.conf.js file
WebdriverIO tests are controlled from the Configuration file. It is often considered the heart of WebdriverIO. It contains details on which spec files to be executed, browser on which the tests should run, global information - base URL, timeout, reports, screenshots and so on.
In WebdriverIO we do not execute a single test. We are required to trigger the Configuration file with the help of the Test Runner. Test Runner scans the information provided in the Configuration file and then triggers the tests accordingly.
To create a Configuration file, we have to run the below command −
npx wdio config -y
After this command has been executed successfully, the Configuration file called the wdio.conf.js gets created within our project.
The following screen will appear on your computer −
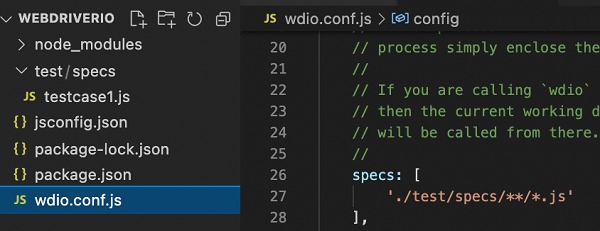
Within this file, we have to specify the path of the spec file that we want to execute within the specs parameter.
By default, the path provided is: ./test/specs/**/*.js. This means any .js file under the sub-folder specs (which is under the folder test) should be picked for execution.
The following screen will appear on your computer −
To execute the test with the help of the wdio.conf.js file, we have to run the command −
npx wdio run wdio.conf.js
The following screen will appear on your computer −

After the command has been executed successfully, the page title of the application launched is obtained in the console.
However, a lot of the logs got captured in the console. This is because the parameter logLevel is set to info by default in the wdio.conf.js file.
The following screen will appear on your computer −
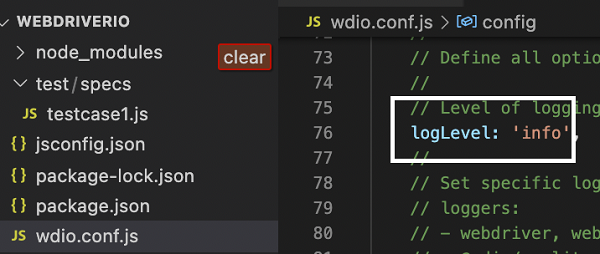
In order to get rid of some of the logs and to obtain only those which the test case directs, we can set this parameter to silent.
The following screen will appear on your computer −

Again run the Configuration file with the following command −
npx wdio run wdio.conf.js
The following screen will appear on your computer −
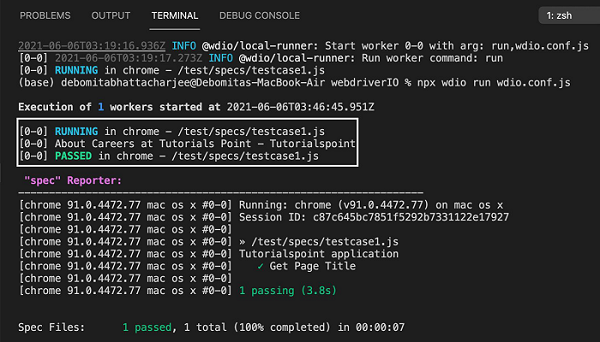
After the command has been executed successfully, we find lesser logs and the page title of the application launched - About Careers at Tutorials Point - Tutorialspoint is obtained in the console.
WebdriverIO - Xpath Locator
Once we navigate to a webpage, we have to interact with the webelements available on the page like clicking a link/button, entering text within an edit box, and so on to complete our automation test case.
For this, our first job is to identify the element. We can create an xpath for an element for its identification. The rules to create a xpath expression are discussed below −
The syntax of xpath is
//tagname[@attribute='value']
Here, the tagname is optional.
For example,
//img[@alt='tutorialspoint']
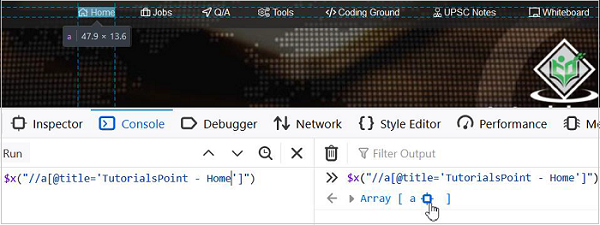
Let us see the html code of the highlighted link - Home. The following screen will appear on your computer −
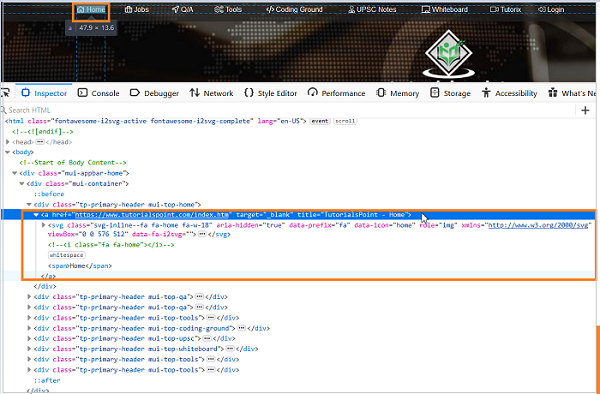
The xpath for element Home shall be as follows −
//a[@title='TutorialsPoint - Home'].
The following screen will appear on your computer −
In the WebdriverIO code, we can specify the xpath expression of an element in the below format −
$('value of the xpath expression')
Or, we can store this expression in a variable −
const p = $('value of the xpath expression')
Let us identify the text highlighted in the below image and obtain its text −
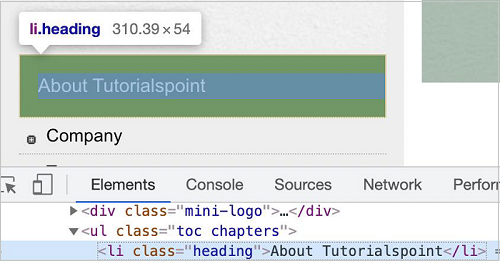
The xpath of the above highlighted element should be as follows −
//li[@class='heading']
To begin, follow Steps 1 to 5 from the Chapter titled Happy path flow with WebdriverIO which are as follows −
Step 1 − Install NodeJS. The details on how to perform this installation are given in detail in the Chapter titled Getting Started with NodeJS.
Step 2 − Install NPM. The details on how to perform this installation are given in detail in the Chapter titled Installation of NPM.
Step 3 − Install VS Code. The details on how to perform this installation are given in detail in the Chapter titled VS Code Installation.
Step 4 − Create the Configuration file. The details on how to perform this installation are given in detail in the Chapter titled Configuration File generation.
Step 5 − Create a spec file. The details on how to perform this installation are given in the Chapter titled Mocha Installation.
Step 6 − Add the below code within the Mocha spec file created.
// test suite name
describe('Tutorialspoint application', function(){
   //test case
   it('Identify element with Xpath', function(){
      // launch url
      browser.url('https://www.tutorialspoint.com/about/about_careers.htm')
      //identify element with xpath then obtain text
      console.log($("//li[@class='heading']").getText() + " - is the text.")
   });
});
Run the Configuration file - wdio.conf.js file with the following command −
npx wdio run wdio.conf.js.
The details on how to create a Configuration file are discussed in detail in the Chapter titled Wdio.conf.js file and Chapter titled Configuration File generation
The following screen will appear on your computer −
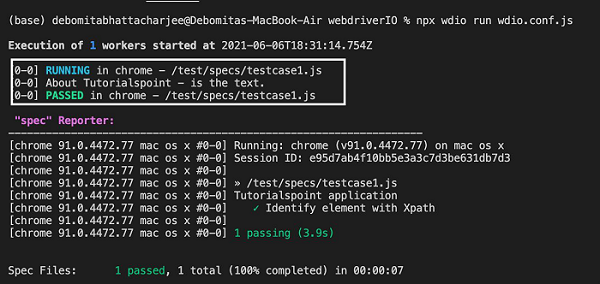
After the command has been executed successfully, the text of the element - About Tutorialspoint is printed in the console.
Xpath Locator with Text
Once we navigate to a webpage, we have to interact with the webelements available on the page like clicking a link/button, entering text within an edit box, and so on to complete our automation test case.
We can create an xpath for an element for its identification. However, there are scenarios where there are no HTML attributes or tagname available to uniquely identify an element.
In such a situation, we can create an xpath for an element with the help of the text visible on the page by using the text function. The text function is case-sensitive.
The rule to create a xpath expression with visible text is discussed below −
The syntax of xpath is as follows −
//tagname[text()='displayed text'].
For example,
//li[text()='WebdriverIO']
Let us identify the element highlighted in the below image with the help of the visible text in xpath −

The xpath of the above highlighted element using the text() function shall be as follows −
//li[text()='About Tutorialspoint']
To begin, follow Steps 1 to 5 from the Chapter - Happy path flow with WebdriverIO which are as follows −
Step 1 − Install NodeJS. The details on how to perform this installation are given in detail in the Chapter titled Getting Started with NodeJS.
Step 2 − Install NPM. The details on how to perform this installation are given in detail in the Chapter titled Installation of NPM.
Step 3 − Install VS Code. The details on how to perform this installation are given in detail in the Chapter titled VS Code Installation.
Step 4 − Create the Configuration file. The details on how to perform this installation are given in detail in the Chapter titled Configuration File generation.
Step 5 − Create a spec file. The details on how to perform this installation are given in the Chapter titled Mocha Installation.
Step 6 − Add the below code within the Mocha spec file created.
// test suite name
describe('Tutorialspoint application', function(){
   //test case
   it('Identify element with Xpath - text()', function(){
      // launch url
      browser.url('https://www.tutorialspoint.com/about/about_careers.htm')
      //identify element with xpath - visible text then obtain text
      console.log($("//li[text()='About Tutorialspoint']").getText() + " - is the text.")
   });
});
Run the Configuration file - wdio.conf.js file with the command −
npx wdio run wdio.conf.js.
The details on how to create a Configuration file are discussed in detail in the Chapter titledWdio.conf.js file and Chapter titled Configuration File generation.
The following screen will appear on your computer −

After the command has been executed successfully, the text of the element - About Tutorialspoint is printed in the console.
WebdriverIO - CSS Locator
Once we navigate to a webpage, we have to interact with the webelements available on the page like clicking a link/button, entering text within an edit box, and so on to complete our automation test case.
For this, our first job is to identify the element. We can create a css for an element for its identification. The rules to create a css expression are discussed below −
The syntax of css is as follows −
tagname[attribute='value']
Here, the tagname is optional. We can also specifically use the id and class attribute to create a css expression.
With id, the format of a css expression should be tagname#id. For example, input#txt [here input is the tagname and the txt is the value of the id attribute].
With class, the format of the css expression should be tagname.class.
For example,
input.cls-txt
Here, input is the tagname and the cls-txt is the value of the class attribute.
In the WebdriverIO code, we can specify the css expression of an element in the below format −
$('value of the css expression')
Or, we can store this expression in a variable as follows −
const p = $('value of the css expression')
Let us identify the text highlighted in the below image and obtain its text −

The css of the above highlighted element should be li.heading.
To begin, follow Steps 1 to 5 from the Chapter titled Happy path flow with WebdriverIO which are as follows −
Step 1 − Install NodeJS. The details on how to perform this installation are given in detail in the Chapter titled Getting Started with NodeJS.
Step 2 − Install NPM. The details on how to perform this installation are given in detail in the Chapter titled Installation of NPM.
Step 3 − Install VS Code. The details on how to perform this installation are given in detail in the Chapter titled VS Code Installation.
Step 4 − Create the Configuration file. The details on how to perform this installation are given in detail in the Chapter titled Configuration File generation.
Step 5 − Create a spec file. The details on how to perform this installation are given in the Chapter titled Mocha Installation.
Step 6 − Add the below code within the Mocha spec file created.
// test suite name
describe('Tutorialspoint application', function(){
   //test case
   it('Identify element with CSS', function(){
      // launch url
      browser.url('https://www.tutorialspoint.com/about/about_careers.htm')
      //identify element with CSS then obtain text
      console.log($("li.heading").getText() + " - is the text.")
   });
});
Run the Configuration file - wdio.conf.js file with the following command −
npx wdio run wdio.conf.js
The details on how to create a Configuration file are discussed in detail in the Chapter titledWdio.conf.js file and Chapter titled Configuration File generation.
The following screen will appear on your computer −
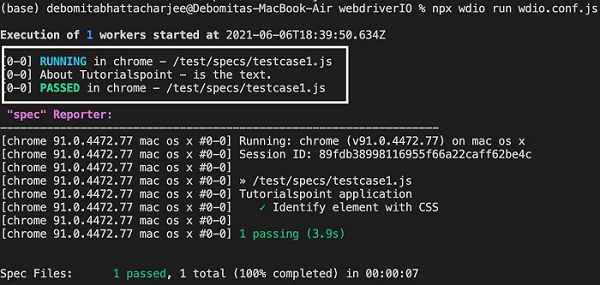
After the command has been executed successfully, the text of the element - About Tutorialspoint is printed in the console.
WebdriverIO - Link Text Locator
Once we navigate to a webpage, we may interact with a webelement by clicking a link to complete our automation test case. The locator link text is used for an element having the anchor tag.
We can identify an anchor element with a matching text. In the WebdriverIO code, we have the option to specify the link of an element in the below format −
$('=value of the anchor text')
Or, we can store this expression in a variable as follows −
const p = $('=value of the anchor text')
Let us identify the link highlighted in the below image and click on it −

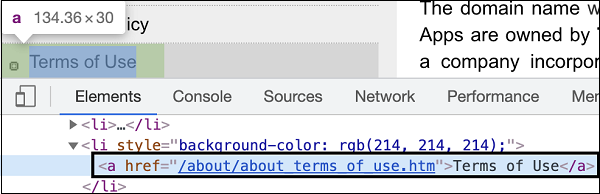
The link highlighted in the above image has a tagname - a and the anchor text - Terms of Use.
To begin, follow Steps 1 to 5 from the Chapter titled Happy path flow with WebdriverIO which are as follows −
Step 1 − Install NodeJS. The details on how to perform this installation are given in detail in the Chapter titled Getting Started with NodeJS.
Step 2 − Install NPM. The details on how to perform this installation are given in detail in the Chapter titled Installation of NPM.
Step 3 − Install VS Code. The details on how to perform this installation are given in detail in the Chapter titled VS Code Installation.
Step 4 − Create the Configuration file. The details on how to perform this installation are given in detail in the Chapter titled Configuration File generation.
Step 5 − Create a spec file. The details on how to perform this installation are given in the Chapter titled Mocha Installation.
Step 6 − Add the below code within the Mocha spec file created.
/ test suite name
describe('Tutorialspoint application', function(){
//test case
it('Identify element with Link Text', function(){
// launch url
browser.url('https://www.tutorialspoint.com/about/about_careers.htm')
//identify element with link text then click
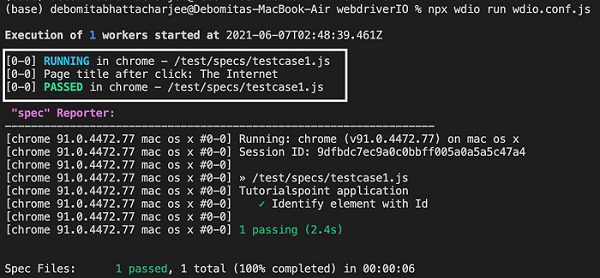
$("=Terms of Use").click()
console.log('Page title after click: ' + browser.getTitle())
});
});
Run the Configuration file - wdio.conf.js file with the following command −
npx wdio run wdio.conf.js.
The details on how to create a Configuration file are discussed in detail in the Chapter titled Wdio.conf.js file and Chapter titled Configuration File generation.
The following screen will appear on your computer −
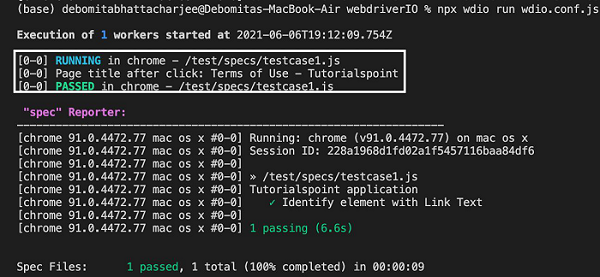
After the command has been executed successfully, the title of the page after clicking - Terms of Use - Tutorialspoint is printed in the console.
Partial Link Text Locator
Once we navigate to a webpage, we may interact with a webelement by clicking a link to complete our automation test case. The locator partial link text is used for an element having the anchor tag.
We can identify an anchor element with a matching text. In the WebdriverIO code, we have the option to specify the partial link of an element in the below format −
$('*=value of the anchor text which is matching')
Or, we can store this expression in a variable as follows −
const p = $('*=value of the anchor text which is matching')
The partial link text is similar to link text with the only difference being that it assists in scenarios where a few characters of an anchor element are fixed and the remaining ones are dynamic.
Let us identify the link highlighted in the below image and click on it −
The link highlighted in the above image has a tagname - a and the anchor text - Terms of Use.
To begin, follow Steps 1 to 5 from the Chapter titled Happy path flow with WebdriverIO which are as follows −
Step 1 − Install NodeJS. The details on how to perform this installation are given in detail in the Chapter titled Getting Started with NodeJS.
Step 2 − Install NPM. The details on how to perform this installation are given in detail in the Chapter titled Installation of NPM.
Step 3 − Install VS Code. The details on how to perform this installation are given in detail in the Chapter titled VS Code Installation.
Step 4 − Create the Configuration file. The details on how to perform this installation are given in detail in the Chapter titled Configuration File generation.
Step 5 − Create a spec file. The details on how to perform this installation are given in the Chapter titled Mocha Installation.
Step 6 − Add the below code within the Mocha spec file created.
// test suite name
describe('Tutorialspoint application', function(){
   //test case
   it('Identify element with Partial Link Text', function(){
      // launch url
      browser.url('https://www.tutorialspoint.com/about/about_careers.htm')
      //identify element with partial link text then click
      $("*=Terms of").click()
      console.log('Page title after click: ' + browser.getTitle())
   });
});
Run the Configuration file - wdio.conf.js file with the following command −
npx wdio run wdio.conf.js
The details on how to create a Configuration file are discussed in detail in the Chapter titled Wdio.conf.js file and Chapter titled Configuration File generation.
The following screen will appear on your computer −
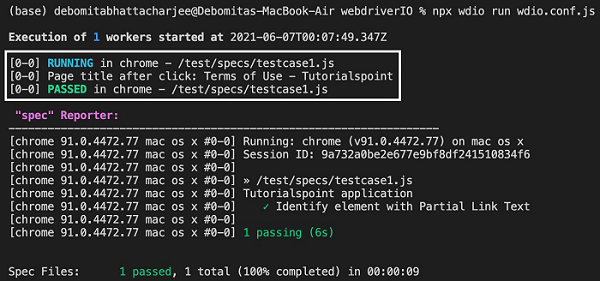
After the command has been executed successfully, the title of the page after clicking - Terms of Use - Tutorialspoint is printed in the console.
WebdriverIO - ID Locator
Once we navigate to a webpage, we have to interact with the webelements available on the page like clicking a link/button, entering text within an edit box, and so on to complete our automation test case.
For this, our first job is to identify the element. We can use the id attribute for an element for its identification. It is a very useful locator and speeds up the execution of automation tests in comparison to all the locators.
In the WebdriverIO code, we have the option to specify the value of the id attribute of an element in the below format −
$('=#value of id attribute')
Or, we can store this expression in a variable as follows −
const p = $('=#value of id attribute')
Let us identify the element highlighted in the below image and click on it −
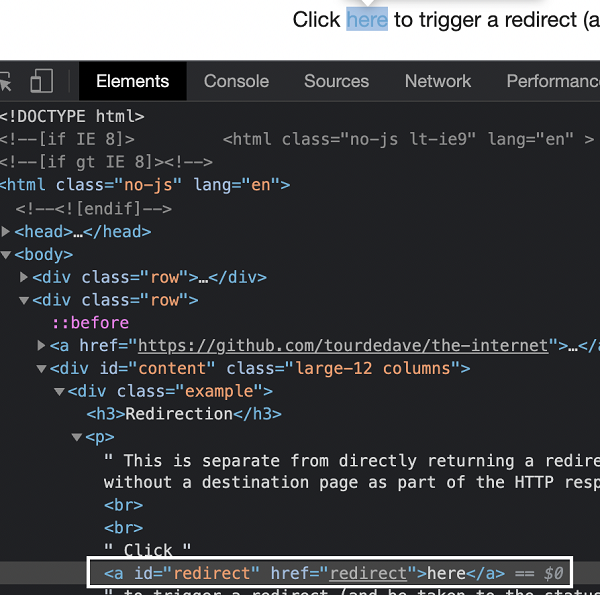
The link highlighted in the above image has a tagname - a and the id attribute value - redirect.
To begin, follow Steps 1 to 5 from the Chapter titled Happy path flow with WebdriverIO which are as follows −
Step 1 − Install NodeJS. The details on how to perform this installation are given in detail in the Chapter titled Getting Started with NodeJS.
Step 2 − Install NPM. The details on how to perform this installation are given in detail in the Chapter titled Installation of NPM.
Step 3 − Install VS Code. The details on how to perform this installation are given in detail in the Chapter titled VS Code Installation.
Step 4 − Create the Configuration file. The details on how to perform this installation are given in detail in the Chapter titled Configuration File generation.
Step 5 − Create a spec file. The details on how to perform this installation are given in the Chapter titled Mocha Installation.
Step 6 − Add the below code within the Mocha spec file created.
// test suite name
describe('Tutorialspoint application', function(){
   //test case
   it('Identify element with Id', function(){
      // launch url
      browser.url('https://the-internet.herokuapp.com/redirector')
      //identify element with id then click
      $("#redirect").click()
      //obtain page title
      console.log('Page title after click: ' + browser.getTitle())
   });
});
Run the Configuration file - wdio.conf.js file with the command −
npx wdio run wdio.conf.js
The details on how to create a Configuration file are discussed in detail in the Chapter titled Wdio.conf.js file and Chapter titled Configuration File generation.
The following screen will appear on your computer −
After the command has been executed successfully, the title of the page after clicking - The Internet is printed in the console.
WebdriverIO - Tag Name Locator
Once we navigate to a webpage, we have to interact with the webelements available on the page like clicking a link/button, entering text within an edit box, and so on to complete our automation test case.
For this, our first job is to identify the element. We can use the HTML tagname for an element for its identification. In the WebdriverIO code, we have the option to specify the tagname of an element in the below format −
$('<element tagname>')
Or, we can store this expression in a variable as follows −
const p = $('element tagname')
Let us identify the element highlighted in the below image and obtain its text −

The element highlighted in the above image has a tagname - h1.
To begin, follow Steps 1 to 5 from the Chapter titled Happy path flow with WebdriverIO which are as follows −
Step 1 − Install NodeJS. The details on how to perform this installation are given in detail in the Chapter titled Getting Started with NodeJS.
Step 2 − Install NPM. The details on how to perform this installation are given in detail in the Chapter titled Installation of NPM.
Step 3 − Install VS Code. The details on how to perform this installation are given in detail in the Chapter titled VS Code Installation.
Step 4 − Create the Configuration file. The details on how to perform this installation are given in detail in the Chapter titled Configuration File generation.
Step 5 − Create a spec file. The details on how to perform this installation are given in the Chapter titled Mocha Installation.
Step 6 − Add the below code within the Mocha spec file created.
// test suite name
describe('Tutorialspoint application', function(){
   //test case
   it('Identify element with Tagname', function(){
      // launch url
      browser.url('https://www.tutorialspoint.com/about/about_careers.htm')
      //identify element with tagname then obtain text
      console.log($("<h1>").getText() + " - is the text.")
   });
});
Run the Configuration file - wdio.conf.js file with the command −
npx wdio run wdio.conf.js
The details on how to create a Configuration file are discussed in detail in the Chapter titled Wdio.conf.js file and Chapter titled Configuration File generation.
The following screen will appear on your computer −
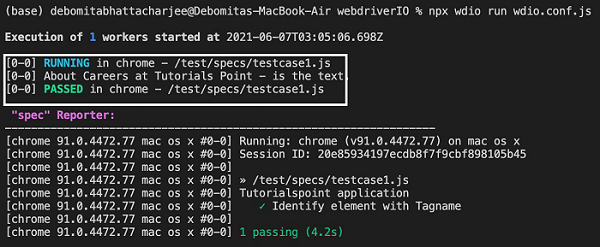
After the command has been executed successfully, the text of the element - About Careers at Tutorials Point is printed in the console.
WebdriverIO - Class Name Locator
Once we navigate to a webpage, we have to interact with the webelements available on the page like clicking a link/button, entering text within an edit box, and so on to complete our automation test case.
For this, our first job is to identify the element. We can use the class name attribute for an element for its identification. It is a very useful locator and speeds up the execution of automation tests in comparison to xpath.
In the WebdriverIO code, we have the option to specify the value of the class name attribute of an element in the below format −
$('=.value of class attribute')
Or, we can store this expression in a variable as follows −
const p = $('=.value of class attribute')
Let us identify the text highlighted in the below image and obtain its text −

The element highlighted in the above image has the class attribute value as heading.
The Code Implementation is as follows −
// test suite name
describe('Tutorialspoint application', function(){
   //test case
   it('Identify element with Class Name', function(){
      // launch url
      browser.url('https://www.tutorialspoint.com/about/about_careers.htm')
      //identify element with Class Name then obtain text
      console.log($(".heading").getText() + " - is the text.")
   });
});
Run the Configuration file - wdio.conf.js file with the following command −
npx wdio run wdio.conf.js
The details on how to create a Configuration file are discussed in detail in the Chapter titled Wdio.conf.js file and Chapter titled Configuration File generation. The following screen will appear on your computer −

After the command has been executed successfully, the text of the element - About Tutorialspoint is printed in the console.
WebdriverIO - Name Locator
Once we navigate to a webpage, we have to interact with the webelements available on the page like clicking a link/button, entering text within an edit box, and so on to complete our automation test case.
For this, our first job is to identify the element. We can use the name attribute for an element for its identification. This locator is deprecated now and is only compatible with old browsers that are based on JSONWireProtocol or Appium.
In the WebdriverIO code, we have the option to specify the value of the name attribute of an element in the below format −
$('[name attribute=''value'']')
Or, we can store this expression in a variable as follows −
const p = $('[name attribute=''value'']')
Let us identify the edit box highlighted in the below image and enter text −
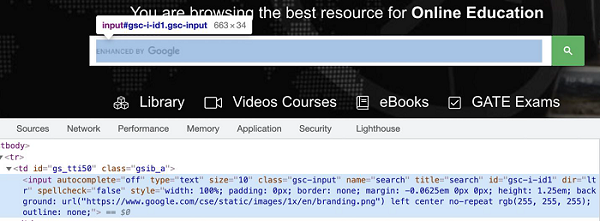
The element highlighted in the above image has the name attribute value as search.
To begin, follow Steps 1 to 5 from the Chapter titled Happy path flow with WebdriverIO which are as follows −
Step 1 − Install NodeJS. The details on how to perform this installation are given in detail in the Chapter titled Getting Started with NodeJS.
Step 2 − Install NPM. The details on how to perform this installation are given in detail in the Chapter titled Installation of NPM.
Step 3 − Install VS Code. The details on how to perform this installation are given in detail in the Chapter titled VS Code Installation.
Step 4 − Create the Configuration file. The details on how to perform this installation are given in detail in the Chapter titled Configuration File generation.
Step 5 − Create a spec file. The details on how to perform this installation are given in the Chapter titled Mocha Installation.
Step 6 − Add the below code within the Mocha spec file created.
// test suite name
describe('Tutorialspoint application', function(){
   //test case
   it('Identify element with Name', function(){
      // launch url
      browser.url('https://www.tutorialspoint.com/index.htm')
      //identify element with Name then input text
      $('[name="search"]').setValue('Selenium')
   });
});
Run the Configuration file - wdio.conf.js file with the following command −
npx wdio run wdio.conf.js
The details on how to create a Configuration file are discussed in detail in the Chapter titled Wdio.conf.js file and Chapter titled Configuration File generation.
WebdriverIO - Expect Statement for Assertions
To use WebdriverIO as an automation testing tool, we need to have checkpoints which will help us to conclude if our test has passed or failed. There are various assertions available in WebdriverIO with which we can verify if the test has successfully validated a step.
In assertion, we can compare an expected result of a test with an actual. If both are similar, a test should pass, else it should fail. The expect statement in WebdriverIO can be applied on the browser, a mock object, or an element.
We have to add a NodeJS library called Chai. Chai library contains the expect statement that is used for the Assertion.
We have to add the below statement in our code to implement the Chai Assertion −
const e = require('chai').expect
Assertions applied to browsers
These assertions are listed below −
toHaveUrl
It checks whether the browser has opened a particular page.The syntax is as follows −
expect(browser).toHaveUrl('https://www.tutorialspoint.com/index.htm')
toHaveUrlContaining
It checks whether the URL of a page has a particular value.
Syntax
The syntax is as follows −
expect(browser).toHaveUrlContaining('tutorialspoint')
toHaveUrl
It checks whether the page has a particular title.
Syntax
The syntax is as follows −
expect(browser).toHaveTitle('Terms of Use - Tutorialspoint')
Assertions applied on elements
These assertions are listed below −
toBeDisplayed
It checks whether an element is displayed.
Syntax
The syntax is as follows −
const e = $('#loc')
expect(e).toBeDisplayed()
toExist
It checks whether an element exists.
Syntax
The syntax is as follows −
const e = $('#loc')
expect(e).toExist()
toBePresent
It checks whether an element is present.
Syntax
The syntax is as follows −
const e = $('#loc')
expect(e).toBePresent()
toBeExisting
It is similar to toExist.
toBeFocussed
It checks whether an element is focused or not.
Syntax
The syntax is as follows −
const e = $('#loc')
expect(e).toBeFocussed()
toHaveAttribute
It checks whether an element attribute has a particular value.
Syntax
The syntax is as follows −
const e = $('#loc')
expect(e).toHaveAttribute('name', 'search')
toHaveAttr
It is similar to toExist.
toHaveAttributeContaining
It checks whether an element attribute contains a particular value.
Syntax
The syntax is as follows −
const e = $('#loc')
expect(e).toHaveAttributeContaining('name', 'srch')
toHaveElementClass
It checks whether an element has a particular class name.
Syntax
The syntax is as follows −
const e = $('#loc')
expect(e).toHaveElementClass('name', { message: 'Not available!', })
toHaveElementClassContaining
It checks whether an element class name contains a particular value.
Syntax
The syntax is as follows −
const e = $('#loc')
expect(e).toHaveElementClassContaining('nam')
toHaveElementProperty
It checks whether an element has a particular property.
Syntax
The syntax is as follows −
const e = $('#loc')
expect(e).toHaveElementProperty('width', 15)
//verify negative scenario
expect(e).not.toHaveElementProperty('width', 20)
toHaveValue
It checks whether an input element has a particular value.
Syntax
The syntax is as follows −
const e = $('#loc')
expect(e).toHaveValue('Selenium', { ignoreCase: false})
toHaveValueContaining
It checks whether an input element contains a particular value
Syntax
The syntax is as follows −
const e = $('#loc')
expect(e).toHaveValueContaining('srch')
toBeClickable
It checks whether an element is clickable.
Syntax
The syntax is as follows −
const e = $('#loc')
expect(e).toBeClickable()
toBeDisabled
It checks whether an element is disabled.
Syntax
The syntax is as follows −
const e = $('#loc')
expect(e).toBeDisabled()
//verify negative scenario
expect(e).not.toBeEnabled()
toBeEnabled
It checks whether an element is enabled.
Syntax
The syntax is as follows −
const e = $('#loc')
expect(e).toBeEnabled()
toBeSelected
It is the same as toBeEnabled.
toBeChecked
It is the same as toBeEnabled.
toHaveHref
It checks whether a link element has a particular link target.
Syntax
The syntax is as follows −
const e = $('<a>')
expect(e).toHaveHref('https://www.tutorialspoint.com/index.htm')
toHaveLink
It is same as toHaveHref.
toHaveHrefContaining
It checks whether a link element contains a particular link target.
Syntax
The syntax is as follows −
const e = $('<a>')
expect(e).toHaveHrefContaining('tutorialspoint.com')
toHaveLinkContaining
It is the same as HaveHrefContaining.
toHaveId
It checks whether an element has a particular id attribute value.
Syntax
The syntax is as follows −
const e = $('#loc')
expect(e).toHaveId('loc')
toHaveText
It checks whether an element has a particular text.
Syntax
The syntax is as follows −
const e = $('#loc')
expect(e).toHaveText('Learning WebdriverIO')
toHaveTextContaining
It checks whether an element contains a particular text.
Syntax
The syntax is as follows −
const e = $('#loc')
expect(e).toHaveTextContaining('Learning WebdriverIO')
toBeDisplayedInViewpoint
It checks whether an element is within the viewpoint.
Syntax
The syntax is as follows −
const e = $('#loc')
expect(e).toBeDisplayedInViewpoint()
Assertions applied to mock objects
The assertions are listed below −
toBeRequested
It checks whether a mock was called.
Syntax
The syntax is as follows −
const m = browser.mock('**/api/list*')
expect(m).toBeRequested()
toBeRequestedTimes
It checks whether a mock was called for an expected number of times.
Syntax
The syntax is as follows −
const m = browser.mock('**/api/list*')
expect(m).toBeRequestedTimes(2)
To begin, follow the steps 1 to 5 from the Chapter titled Happy path flow with webdriverIO which are as follows −
Step 1 − Install NodeJS. The details on how to perform this installation are given in detail in the Chapter titled Getting Started with NodeJS.
Step 2 − Install NPM. The details on how to perform this installation are given in detail in the Chapter titled Installation of NPM.
Step 3 − Install VS Code. The details on how to perform this installation are given in detail in the Chapter titled VS Code Installation.
Step 4 − Create the Configuration file. The details on how to perform this installation are given in detail in the Chapter titled Configuration File generation.
Step 5 − Create a spec file. The details on how to perform this installation are given in the Chapter titled Mocha Installation.
Step 6 − Add the below code within the Mocha spec file created.
// test suite name
describe('Tutorialspoint application', function(){
   //test case
   it('Assertion with expect', function(){
      // launch url
      browser.url('https://www.tutorialspoint.com/about/about_careers.htm')
      //identify element with link text then click
      $("=Terms of Use").click()
      browser.pause(1000)
      //verify page title with assertion
      expect(browser).toHaveTitleContaining('Terms of Use - Tuter')
   });
});
Run the Configuration file - wdio.conf.js file with the command −
npx wdio run wdio.conf.js
The details on how to create a Configuration file are discussed in detail in the Chapter titled Wdio.conf.js file and Chapter titled Configuration File generation.
The following screen will appear on your computer −

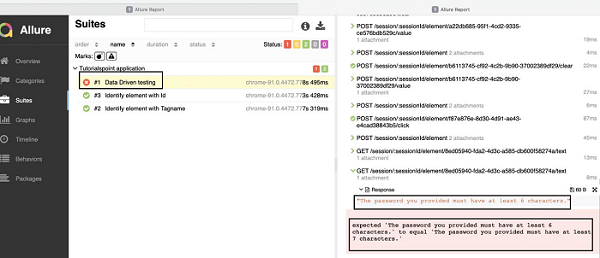
After the command has been executed successfully, we find the result as 1 failed. Since the Expected: is Terms of Use - Tuter and the Received: output is Terms of Use - Tutorialspoint.
Also, the WebdriverIO expect statement has highlighted the part of the text where the Expected: and the Received: texts are not matching.
WebdriverIO - Happy path flow
Let us create a simple happy flow to demonstrate how to create a basic WebdriverIO test −
Step 1 − Install NodeJS. The details on how to perform this installation are given in detail in the Chapter titled Getting Started with NodeJS.
Step 2 − Install NPM. The details on how to perform this installation are given in detail in the Chapter titled Installation of NPM.
Step 3 − Install VS Code. The details on how to perform this installation are given in detail in the Chapter titled VS Code Installation.
Step 4 − Create the Configuration file. The details on how to perform this installation are given in detail in the Chapter titled Configuration File generation.
Step 5 − Create a spec file. The details on how to perform this installation are given in the Chapter titled Mocha Installation
Step 6 − Add the below code within the Mocha spec file created.
// test suite name
describe('Tutorialspoint application', function(){
   //test case
   it('Happy Flow', function(){
      // launch url
      browser.url('https://www.tutorialspoint.com/about/about_careers.htm')
      //identify element with link text then click
      $("=Team").click()
      //verify URL of next page with assertion
      expect(browser).toHaveUrlContaining('team')
   });
});
Step 7 − Run the Configuration file - wdio.conf.js file with the following command −
npx wdio run wdio.conf.js
The details on how to create a Configuration file are discussed in detail in the Chapter titled Wdio.conf.js file and Chapter titled Configuration File generation.
The following screen will appear on your computer −
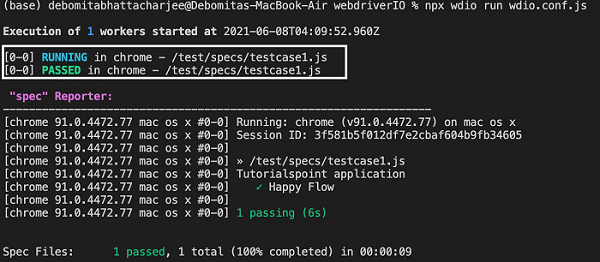
Step 8 − On investigating further on the output, we shall see the test within the spec file testcase1.js is marked as PASSED.
The browser version and operating system on which the test has been executed, session id, name of the spec file, test suite name - Tutorialspoint Application, test case name - Happy Flow, duration of test execution, and so on, have also been captured in the console.
WebdriverIO - General Browser Commands
Some of the general browser commands used in WebdriverIO are listed below −
browser.url(URL)
This command is used to launch an application whose URL is passed as a parameter.
Syntax
The syntax is as follows −
browser.url('https://the-internet.herokuapp.com/redirector')
To begin, follow Steps 1 to 5 from the Chapter titled Happy path flow with webdriverIO which are as follows −
Step 1 − Install NodeJS. The details on how to perform this installation are given in detail in the Chapter titled Getting Started with NodeJS.
Step 2 − Install NPM. The details on how to perform this installation are given in detail in the Chapter titled Installation of NPM.
Step 3 − Install VS Code. The details on how to perform this installation are given in detail in the Chapter titled VS Code Installation.
Step 4 − Create the Configuration file. The details on how to perform this installation are given in detail in the Chapter titled Configuration File generation.
Step 5 − Create a spec file. The details on how to perform this installation are given in the Chapter titled Mocha Installation.
Step 6 − Add the below code within the Mocha spec file created.
// test suite name
describe('Tutorialspoint application', function(){
   //test case
   it('Identify element with Id', function(){
      // launch url
      browser.url('https://the-internet.herokuapp.com/redirector')
      //identify element with id then click
      $("#redirect").click()
      //obtain page title
      console.log('Page title after click: ' + browser.getTitle())
   });
});
browser.getTitle()
This command is used to get the title of a page presently launched in the browser. The value is returned in the form of a string. This command does not accept any parameters. If the page has no title, a null string is returned.
Syntax
The syntax is as follows −
browser.getTitle()
To begin, follow Steps 1 to 5 from the Chapter titledHappy path flow with WebdriverIO which are as follows −
Step 1 − Install NodeJS. The details on how to perform this installation are given in detail in the Chapter titled Getting Started with NodeJS.
Step 2 − Install NPM. The details on how to perform this installation are given in detail in the Chapter titled Installation of NPM.
Step 3 − Install VS Code. The details on how to perform this installation are given in detail in the Chapter titled VS Code Installation.
Step 4 − Create the Configuration file. The details on how to perform this installation are given in detail in the Chapter titled Configuration File generation.
Step 5 − Create a spec file. The details on how to perform this installation are given in the Chapter titled Mocha Installation.
Step 6 − Add the below code within the Mocha spec file created.
// test suite name
describe('Tutorialspoint Application', function () {
   // test case name
   it('Get Page Title', function (){
      // URL launching
      browser.url("https://www.tutorialspoint.com/about/about_careers.htm")
      //print page title in console
      console.log(browser.getTitle())
   });
});
browser.getUrl()
This command is used to get the URL of a page presently launched in the browser. The value is returned in the form of a string. This command does not accept any parameters.
Syntax
The syntax is as follows −
browser.getUrl()
To begin, follow Steps 1 to 5 from the Chapter titled Happy path flow with WebdriverIO which are as follows −
Step 1 − Install NodeJS. The details on how to perform this installation are given in detail in the Chapter titled Getting Started with NodeJS.
Step 2 − Install NPM. The details on how to perform this installation are given in detail in the Chapter titled Installation of NPM.
Step 3 − Install VS Code. The details on how to perform this installation are given in detail in the Chapter titled VS Code Installation.
Step 4 − Create the Configuration file. The details on how to perform this installation are given in detail in the Chapter titled Configuration File generation.
Step 5 − Create a spec file. The details on how to perform this installation are given in the Chapter titled Mocha Installation.
Step 6 − Add the below code within the Mocha spec file created.
// test suite name
describe('Tutorialspoint Application', function () {
   // test case name
   it('Get Url', function (){
      // URL launching
      browser.url("https://www.tutorialspoint.com/index.htm")
      //print URL in console
      console.log(browser.getUrl())
   });
});
browser.getPageSource()
This command is used to get the page source of a page presently launched in the browser. The value is returned in the form of a string. This command does not accept any parameters.
Syntax
The syntax is as follows −
browser.getPageSource()
To begin, follow Steps 1 to 5 from the Chapter titled Happy path flow with WebdriverIO which are as follows −
Step 1 − Install NodeJS. The details on how to perform this installation are given in detail in the Chapter titled Getting Started with NodeJS.
Step 2 − Install NPM. The details on how to perform this installation are given in detail in the Chapter titled Installation of NPM.
Step 3 − Install VS Code. The details on how to perform this installation are given in detail in the Chapter titled VS Code Installation.
Step 4 − Create the Configuration file. The details on how to perform this installation are given in detail in the Chapter titled Configuration File generation.
Step 5 − Create a spec file. The details on how to perform this installation are given in the Chapter titled Mocha Installation.
Step 6 − Add the below code within the Mocha spec file created.
// test suite name
describe('Tutorialspoint Application', function () {
   // test case name
   it('Get Page Source', function (){
      // URL launching
      browser.url("https://www.tutorialspoint.com/index.htm")
      //print URL in console
      console.log(browser.getPageSource())
   });
});
browser.maximizeWindow()
This command is used to maximise the present browser window.
Syntax
The syntax is as follows −
browser.maximizeWindow()
To begin, follow Steps 1 to 5 from the Chapter titled Happy path flow with WebdriverIO which are as follows −
Step 1 − Install NodeJS. The details on how to perform this installation are given in detail in the Chapter titled Getting Started with NodeJS.
Step 2 − Install NPM. The details on how to perform this installation are given in detail in the Chapter titled Installation of NPM.
Step 3 − Install VS Code. The details on how to perform this installation are given in detail in the Chapter titled VS Code Installation.
Step 4 − Create the Configuration file. The details on how to perform this installation are given in detail in the Chapter titled Configuration File generation.
Step 5 − Create a spec file. The details on how to perform this installation are given in the Chapter titled Mocha Installation.
Step 6 − Add the below code within the Mocha spec file created.
// test suite name
describe('Tutorialspoint Application', function () {
   // test case name
   it('Maximise Browser', function (){
      // URL launching
      browser.url("https://www.tutorialspoint.com/questions/index.php")
      //maximize browser
      browser.maximizeWindow()
   });
});
WebdriverIO - Handling Browser Size
While working on automation tests in WebdriverIO, we may be required to set the size of the window and obtain the size of the window. The window size refers to the window height and width.
browser.setWindowSize(250, 450)
This command is used to set the window size. Here, the window size shall be set to width - 250 and height - 450.
Syntax
The syntax is as follows −
browser.setWindowSize(250, 450)
browser.getWindowSize()
This command is used to get the window dimension.
Syntax
The syntax is as follows −
browser.getWindowSize()
To begin, follow Steps 1 to 5 from the Chapter titled Happy path flow with WebdriverIO which are as follows −
Step 1 − Install NodeJS. The details on how to perform this installation are given in detail in the Chapter titled Getting Started with NodeJS.
Step 2 − Install NPM. The details on how to perform this installation are given in detail in the Chapter titled Installation of NPM.
Step 3 − Install VS Code. The details on how to perform this installation are given in detail in the Chapter titled VS Code Installation.
Step 4 − Create the Configuration file. The details on how to perform this installation are given in detail in the Chapter titled Configuration File generation.
Step 5 − Create a spec file. The details on how to perform this installation are given in the Chapter titled Mocha Installation.
Step 6 − Add the below code within the Mocha spec file created.
// test suite name
describe('Tutorialspoint application', function(){
   //test case
   it('Dimension', function(){
      // launch url
      browser.url('https://www.tutorialspoint.com/index.htm')
      //set window size
      browser.setWindowSize(500, 450)
      //get window size
      console.log(browser.getWindowSize())
   });
});
Run the Configuration file - wdio.conf.js file with the following command −
npx wdio run wdio.conf.js
The details on how to create a Configuration file are discussed in detail in the Chapter titled Wdio.conf.js file and Chapter titled Configuration File generation.
The following screen will appear on your computer −
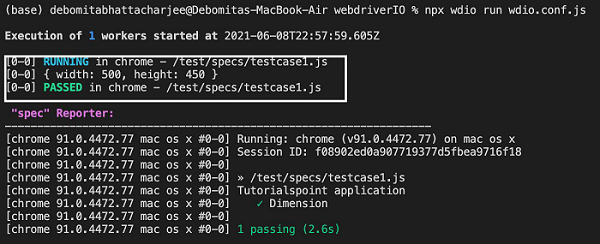
After the command has been executed successfully, the dimension of the browser window- {width: 500, height: 450} is printed in the console.
WebdriverIO - Browser Navigation Commands
Some of the browser navigation commands used in WebdriverIO are listed below −
browser.navigateTo(URL)
This command is used to navigate to an application whose URL is passed as a parameter.
Syntax
The syntax is as follows −
browser.navigateTo('https://the-internet.herokuapp.com/redirector')
browser.back()
This command is used to navigate back in browser history.
Syntax
The syntax is as follows −
browser.back()
browser.forward()
This command is used to navigate forward in browser history.
Syntax
The syntax is as follows −
browser.forward()
browser.refresh()
This command is used to refresh the present webpage.
Syntax
The syntax is as follows −
browser.refresh()
To begin, follow Steps 1 to 5 from the Chapter titled Happy path flow with WebdriverIO which are as follows −
Step 1 − Install NodeJS. The details on how to perform this installation are given in detail in the Chapter titled Getting Started with NodeJS.
Step 2 − Install NPM. The details on how to perform this installation are given in detail in the Chapter titled Installation of NPM.
Step 3 − Install VS Code. The details on how to perform this installation are given in detail in the Chapter titled VS Code Installation.
Step 4 − Create the Configuration file. The details on how to perform this installation are given in detail in the Chapter titled Configuration File generation.
Step 5 − Create a spec file. The details on how to perform this installation are given in the Chapter titled Mocha Installation.
Step 6 − Add the below code within the Mocha spec file created.
// test suite name
describe('Tutorialspoint application', function(){
   //test case
   it('Navigation', function(){
      // launch url
      browser.url('https://www.tutorialspoint.com/about/about_careers.htm')
      // navigate to another url
      browser.navigateTo("https://www.tutorialspoint.com/codingground.htm")
      //navigate back in history
      browser.back()
      //get title back in browser history
      console.log('Back in Browser history: ' + browser.getTitle())
      //navigate forward in history
      browser.forward()
      //get title forward in browser history
      console.log('Forward in Browser history: ' + browser.getTitle())
      //refresh browser
      browser.refresh()
      //get title after refresh
      console.log('Page Title after refresh: ' + browser.getTitle())
   });
});
Run the Configuration file - wdio.conf.js file with the following command −
npx wdio run wdio.conf.js
The details on how to create a Configuration file are discussed in detail in the Chapter titled Wdio.conf.js file and Chapter titled Configuration File generation.
The following screen will appear on your computer −
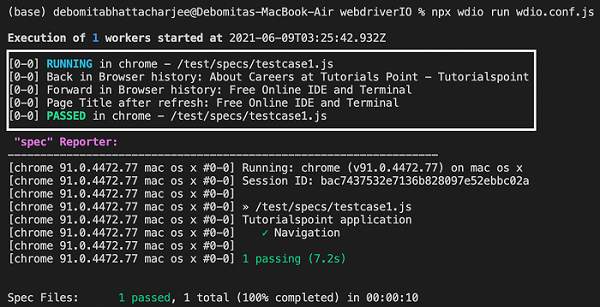
After the command has been executed successfully, the page title obtained on navigating back in browser history - About Careers at Tutorials Point - Tutorialspoint is printed.
Then, the page title obtained on navigating forward in browser history - Free Online IDE and Terminal is printed.
Finally, the page title obtained after page refresh - Free Online IDE and Terminal is printed.
Handling Checkboxes and Dropdowns
We can handle checkboxes in the UI while automating a test using WebdriverIO. The checkboxes are identified in the html code with the tagname as input and type as checkbox.
The following screen will appear on your computer −

Methods to work with Checkboxes
Some methods to work with checkboxes are as follows −
click()
It is used to check a checkbox.
Syntax
The syntax is as follows −
let p = $('#loc')
p.click()
isSelected()
It is used to check if an element of type checkbox is selected or not. It returns a Boolean value (true if checked, false if not).
The syntax is as follows −
let p = $('#loc')
p.isSelected()
To begin, follow Steps 1 to 5 from the Chapter titled Happy path flow with WebdriverIO which are as follows −
Step 1 − Install NodeJS. The details on how to perform this installation are given in detail in the Chapter titled Getting Started with NodeJS.
Step 2 − Install NPM. The details on how to perform this installation are given in detail in the Chapter titled Installation of NPM.
Step 3 − Install VS Code. The details on how to perform this installation are given in detail in the Chapter titled VS Code Installation.
Step 4 − Create the Configuration file. The details on how to perform this installation are given in detail in the Chapter titled Configuration File generation.
Step 5 − Create a spec file. The details on how to perform this installation are given in the Chapter titled Mocha Installation.
Step 6 − Add the below code within the Mocha spec file created.
// test suite name
describe('Tutorialspoint application', function(){
   //test case
   it('Checkbox', function(){
      // launch url
      browser.url('https://the-internet.herokuapp.com/checkboxes')
      //identify checkbox with CSS then click
      const p = $("input[type='checkbox']")
      p.click()
      //verify if checked with assertion
      expect(p).toBeSelected()
      //uncheck checkbox
      p.click()
      //verify if not checked with assertion
      expect(p).not.toBeSelected()
   });
});
Run the Configuration file - wdio.conf.js file with the following command −
npx wdio run wdio.conf.js
The details on how to create a Configuration file are discussed in detail in the Chapter titled Wdio.conf.js file and Chapter titled Configuration File generation.
The following screen will appear on your computer −

After the command has been executed successfully, all the Assertions are executed as per expectation and we have received a passed test.
Handling Dropdowns
We can handle drop downs in the UI while automating a test using WebdriverIO. The static drop downs are identified in the html code with the tagname as select and its options have the tagname as option.
The following screen will appear on your computer −

Methods for Static Dropdowns
Some methods to work with static dropdowns are as follows −
selectByVisibleText
This method is used to select an option which matches with the visible text of an option passed as a parameter to this method.
The syntax is as follows −
let p = $('#loc')
p.selectByVisibleText('By Subject')
selectByAttribute
This method is used to select an option which matches with the value of any attribute passed as a parameter to this method.
The syntax is as follows −
let p = $('#loc')
p.selectByAttribute('value', 'subject')
Here, the option has the attribute with value as subject.
selectByIndex
This method is used to select an option which matches with the index/position of an option passed as a parameter to this method. The index starts with 0.
The syntax is as follows −
let p = $('#loc')
p.selectByIndex(1)
getValue()
This method is used to get the attribute value of an option selected in the dropdown.
The syntax is as follows −
let p = $('#loc')
p.getValue()
To begin, follow Steps 1 to 5 from the Chapter titled Happy path flow with WebdriverIO which are as follows −
Step 1 − Install NodeJS. The details on how to perform this installation are given in detail in the Chapter titled Getting Started with NodeJS.
Step 2 − Install NPM. The details on how to perform this installation are given in detail in the Chapter titled Installation of NPM.
Step 3 − Install VS Code. The details on how to perform this installation are given in detail in the Chapter titled VS Code Installation.
Step 4 − Create the Configuration file. The details on how to perform this installation are given in detail in the Chapter titled Configuration File generation.
Step 5 − Create a spec file. The details on how to perform this installation are given in the Chapter titled Mocha Installation.
Step 6 − Add the below code within the Mocha spec file created.
// test suite name
describe('Tutorialspoint application', function(){
    //test case
    it('Drodowns', function(){
        // launch url
        browser.url('https://www.tutorialspoint.com/tutor_connect/index.php')
        //identify dropdown
        const p = $("select[name='selType']")
        //select by index
        p.selectByIndex(1)
        //get option selected
        console.log(p.getValue() + ' - option selected by index')
        //select by visible text
        p.selectByVisibleText('By Subject')
        //get option selected
        console.log(p.getValue() + ' - option selected by visible text')
         //select by value attribute
         p.selectByAttribute('value', 'name')
         //get option selected
         console.log(p.getValue() + ' - option selected by attribute value')
    });
});
Run the Configuration file - wdio.conf.js file with the following command −
npx wdio run wdio.conf.js
The details on how to create a Configuration file are discussed in detail in the Chapter titled Wdio.conf.js file and Chapter titled Configuration File generation.
The following screen will appear on your computer −
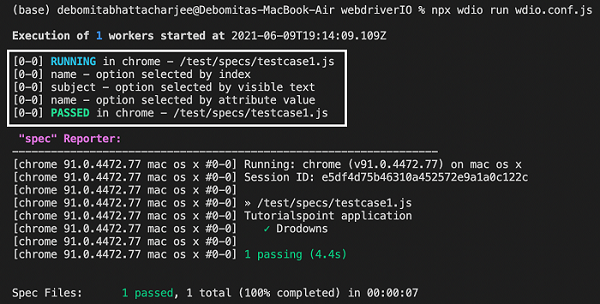
After the command has been executed successfully, first the value of the option selected with the option index - name is printed in the console.
Then, the value of the option selected with the option visible text - subject is printed in the console.
Finally, the value of the option selected with the option attribute value - name is printed in the console.
WebdriverIO - Mouse Operations
WebdriverIO can perform operations like hovering a mouse on an element by using the moveTo method. This method shall move the mouse to the middle of the element.
Syntax
The syntax is as follows −
let p = $('#loc')
p.moveTo()
In the below image, on hovering over the Mouse Hover button, the Top and Reload buttons get displayed.
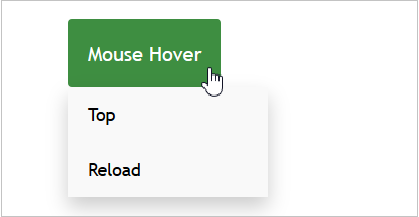
On moving the mouse out of the Mouse Hover button, the Top and Reload buttons get hidden.
To begin, follow Steps 1 to 5 from the Chapter titled Happy path flow with WebdriverIO which are as follows
Step 1 − Install NodeJS. The details on how to perform this installation are given in detail in the Chapter titled Getting Started with NodeJS.
Step 2 − Install NPM. The details on how to perform this installation are given in detail in the Chapter titled Installation of NPM.
Step 3 − Install VS Code. The details on how to perform this installation are given in detail in the Chapter titled VS Code Installation.
Step 4 − Create the Configuration file. The details on how to perform this installation are given in detail in the Chapter titled Configuration File generation.
Step 5 − Create a spec file. The details on how to perform this installation are given in the Chapter titled Mocha Installation.
Step 6 − Add the below code within the Mocha spec file created.
// test suite name
describe('Tutorialspoint application', function(){
   //test case
   it('Mouse Operatio', function(){
      // launch url
      browser.url('https://courses.letskodeit.com/practice')
      //identify element then hover mouse
      const e = $(".dropbtn")
      //scroll to element then mouse hover
      e.scrollIntoView()
      e.moveTo()
      browser.pause(2000)
      //verify if sub-element display on hovering
      console.log($('=Top').isDisplayed())
   });
});
Run the Configuration file - wdio.conf.js file with the following command −
npx wdio run wdio.conf.js
The details on how to create a Configuration file are discussed in detail in the Chapter titled Wdio.conf.js file and Chapter titled Configuration File generation.
The following screen will appear on your computer −
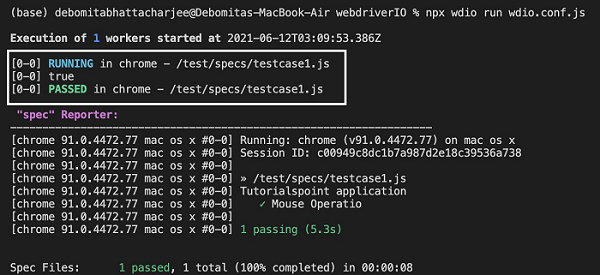
After the command has been executed successfully, the boolean value is printed in the console. This is returned by the isDisplayed() function which returns true if an element is displayed on the page.
WebdriverIO - Handling Child Windows/Pop ups
A new child window can open on clicking a link or a button. WebdriverIO by default has control over the main browser window, in order to access the elements on the child window, the WebdriverIO control has to be switched from the main page to the child window.
Methods for Child Windows
Some of the methods to work with child windows are as follows −
browser.getWindowHandles()
This method yields the window handle ids of all the currently opened browser windows in the form of a list. If there are two opened windows, the zero index of the list has the handle id of the parent window and the first index shall point to the window handle of the child.
Syntax
The syntax is as follows −
var x = browser.getWindowHandles()
browser.getWindowHandle()
This method yields the window handle id of the browser which is in focus.
Syntax
The syntax is as follows −
let l = browser.getWindowHandle()
browser.switchToWindow('<window handle id>')
This method is used to switch focus from one browser window to another opened window whose window handle id is passed as a parameter to this method.
Syntax
The syntax is as follows −
browser.switchToWindow(x)
In the below image, on clicking the Sign in with Apple button, a child window opens having the browser title as Sign in with Apple ID. Let us try to switch to the child window and access elements there.

To begin, follow Steps 1 to 5 from the Chapter titled Happy path flow with WebdriverIO which are as follows −
Step 1 − Install NodeJS. The details on how to perform this installation are given in detail in the Chapter titled Getting Started with NodeJS.
Step 2 − Install NPM. The details on how to perform this installation are given in detail in the Chapter titled Installation of NPM.
Step 3 − Install VS Code. The details on how to perform this installation are given in detail in the Chapter titled VS Code Installation.
Step 4 − Create the Configuration file. The details on how to perform this installation are given in detail in the Chapter titled Configuration File generation.
Step 5 − Create a spec file. The details on how to perform this installation are given in the Chapter titled Mocha Installation.
Step 6 − Add the below code within the Mocha spec file created.
// test suite name
describe('Tutorialspoint application', function(){
   //test case
   it('Child Window', function(){
      // launch url
      browser.url('https://secure.indeed.com/account/login')
      //identify element then click
      $('#apple-signin-button').click()
      //get all window handle ids in list
      var l = browser.getWindowHandles()
      //switch to child window
      browser.switchToWindow(l[1])
      //get page title of child window
      console.log(browser.getTitle() + ' - Page title of child window')
      //close child window
      browser.closeWindow()
      //switch to parent window
      browser.switchToWindow(l[0])
      //get page title of parent window
      console.log(browser.getTitle() + ' - Page title of parent window')
   });
});
Run the Configuration file - wdio.conf.js file with the following command −
npx wdio run wdio.conf.js
The details on how to create a Configuration file are discussed in detail in the Chapter titled Wdio.conf.js file and Chapter titled Configuration File generation.
The following screen will appear on your computer −
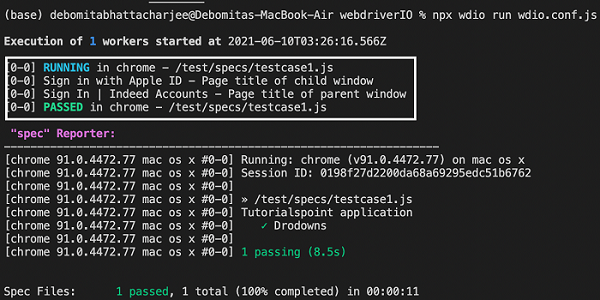
After the command has been executed successfully, first the page title of the child window - Sign in with Apple ID gets printed in the console. Then, the page title of the parent window - Sign In | Indeed Accounts get printed in the console.
WebdriverIO - Hidden Elements
WebdriverIO can handle hidden elements. There are occasions when submenus get displayed only on hovering over the main menu. These submenus are initially hidden with the CSS property - display:none.
In the below image, on hovering over the Sign in menu, the Sign in button gets displayed.
On moving the mouse out of the Sign in menu, the Sign in button gets hidden.
To begin, follow Steps 1 to 5 from the Chapter titled Happy path flow with WebdriverIO which are as follows −
Step 1 − Install NodeJS. The details on how to perform this installation are given in detail in the Chapter titled Getting Started with NodeJS.
Step 2 − Install NPM. The details on how to perform this installation are given in detail in the Chapter titled Installation of NPM.
Step 3 − Install VS Code. The details on how to perform this installation are given in detail in the Chapter titled VS Code Installation.
Step 4 − Create the Configuration file. The details on how to perform this installation are given in detail in the Chapter titled Configuration File generation.
Step 5 − Create a spec file. The details on how to perform this installation are given in the Chapter titled Mocha Installation.
Step 6 − Add the below code within the Mocha spec file created.
// test suite name
describe('Tutorialspoint application', function(){
   //test case
   it('Invisible Element', function(){
      // launch url
      browser.url('https://www.amazon.com/')
      //identify element then hover mouse
      const e = $("#nav-link-accountList")
      e.moveTo()
      browser.pause(2000)
      //click on hidden element
      $('=Sign in').click()
      //get page title
      console.log(browser.getTitle() + ' - Page title after click')
   });
});
Run the Configuration file - wdio.conf.js file with the following command −
npx wdio run wdio.conf.js
The details on how to create a Configuration file are discussed in detail in the Chapter titled Wdio.conf.js file and Chapter titled Configuration File generation.
The following screen will appear on your computer −
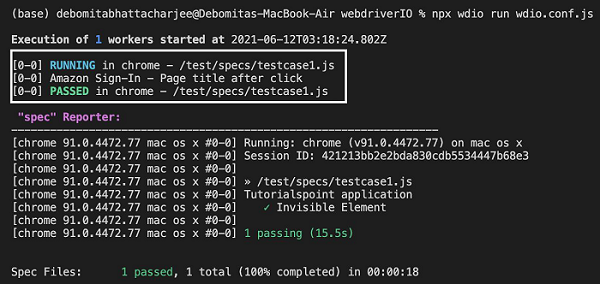
After the command has been executed successfully, the page title obtained by clicking the hidden Sign in button - Amazon Sign-In gets printed in the console.
WebdriverIO - Frames
The frames in an html code are represented by the frames/iframe tag. WebdriverIO can handle frames by switching from the main page to the frame.
Methods for Frames
Some methods to work with frames are as follows −
browser.switchToFrame('<frame id/index/locator>')
This method is used to switch focus from the main page to a frame. The frame id, index or locator is passed as a parameter to this method.
Syntax
The syntax is as follows −
browser.switchToWindow(x)
To switch the focus from the frame to the main page, we have to pass null as a parameter to the browser.switchToFrame method.
Let us see the html code of an element inside a frame and obtain the text - BOTTOM inside it.
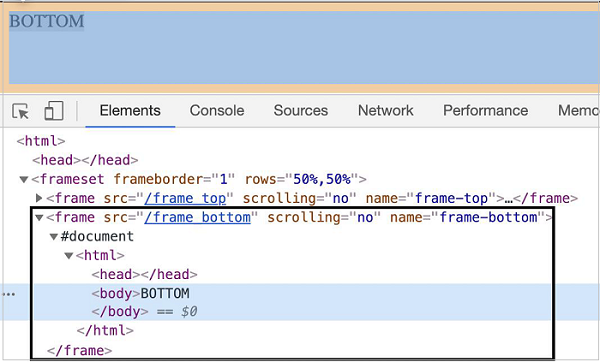
The tagname highlighted in the above image is frame and the value of its name attribute is frame-bottom.
To begin, follow Steps 1 to 5 from the Chapter titled Happy path flow with WebdriverIO which are as follows −
Step 1 − Install NodeJS. The details on how to perform this installation are given in detail in the Chapter titled Getting Started with NodeJS.
Step 2 − Install NPM. The details on how to perform this installation are given in detail in the Chapter titled Installation of NPM.
Step 3 − Install VS Code. The details on how to perform this installation are given in detail in the Chapter titled VS Code Installation.
Step 4 − Create the Configuration file. The details on how to perform this installation are given in detail in the Chapter titled Configuration File generation.
Step 5 − Create a spec file. The details on how to perform this installation are given in the Chapter titled Mocha Installation.
Step 6 − Add the below code within the Mocha spec file created.
// test suite name
describe('Tutorialspoint application', function(){
   //test case
   it('Frames', function(){
      // launch url
      browser.url('https://the-internet.herokuapp.com/nested_frames')
      //switch to frame
      browser.switchToFrame($("frame[name='frame-bottom']"))
      //identify element with tagname
      const p = $('<body>')
      //get text inside frame
      console.log(p.getText() + ' - Text inside frame')
      //switch to main page
      browser.switchToFrame(null)
   });
});
Run the Configuration file - wdio.conf.js file with the command −
npx wdio run wdio.conf.js
The details on how to create a Configuration file are discussed in detail in the Chapter titled Wdio.conf.js file and Chapter titled Configuration File generation
The following screen will appear on your computer −
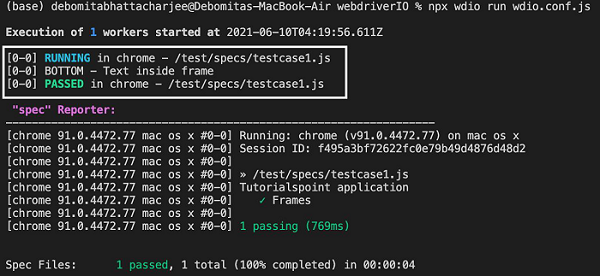
After the command has been executed successfully, the text inside the frame - BOTTOM gets printed in the console.
WebdriverIO - Drag & Drop
WebdriverIO can perform mouse operations like drag and drop using the dragAndDrop method. With this, we execute clicking and holding events on the present object (source), then pass the object to the target element. Finally, release the mouse.
Syntax
The syntax is as follows −
let p = $('#loc')
let t = $('#target')
p.dragAndDrop(t)
Here, p is the source locator and t is the destination locator.
Let us perform the drag and drop functionality for the below elements −
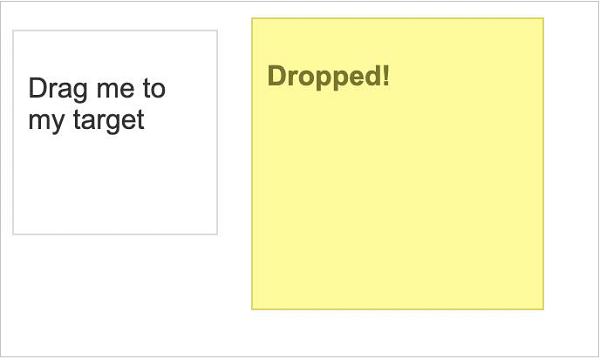
In the above image, the element with the name - Drag me to my target has to be dragged and dropped on the element - Dropped!
To begin, follow Steps 1 to 5 from the Chapter titled Happy path flow with WebdriverIO which is as follows −
Step 1 − Install NodeJS. The details on how to perform this installation are given in detail in the Chapter titled Getting Started with NodeJS.
Step 2 − Install NPM. The details on how to perform this installation are given in detail in the Chapter titled Installation of NPM.
Step 3 − Install VS Code. The details on how to perform this installation are given in detail in the Chapter titled VS Code Installation.
Step 4 − Create the Configuration file. The details on how to perform this installation are given in detail in the Chapter titled Configuration File generation.
Step 5 − Create a spec file. The details on how to perform this installation are given in the Chapter titled Mocha Installation.
Step 6 − Add the below code within the Mocha spec file created.
// test suite name
describe('Tutorialspoint application', function(){
   //test case
   it('Drag and Drop', function(){
      // launch url
      browser.url('https://jqueryui.com/droppable/')
      //maximize browser
      browser.maximizeWindow()
      //switch to frame
      browser.switchToFrame($(".demo-frame"))
      //identify source element
      const src = $('#draggable')
      //identify target element
      const trg = $('#droppable')
      //drag and drop
      src.dragAndDrop(trg)
   });
});
Run the Configuration file - wdio.conf.js file with the following command −
npx wdio run wdio.conf.js
The details on how to create a Configuration file are discussed in detail in the Chapter titled Wdio.conf.js file and Chapter titled Configuration File generation.
The following screen will appear on your computer −
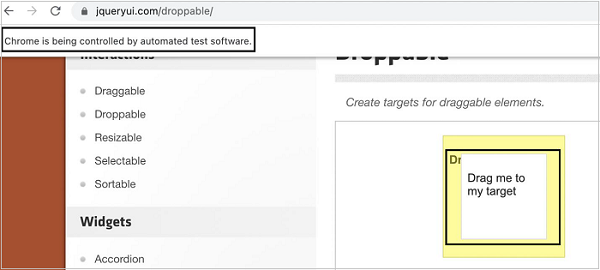
After execution, the element with the name - Drag me to my target has been dragged and dropped on the element - Dropped!
WebdriverIO - Double Click
WebdriverIO can perform mouse operations like double click using the doubleClick method. With this, we can perform double clicking on the given element on the webpage.
Syntax
The syntax is as follows −
let p = $('#loc')
p.doubleClick()
Let us perform the double click on the below element −
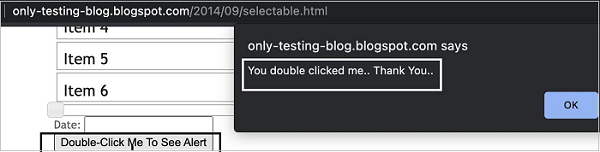
Here, it is seen that on double clicking the Double-Click me To See Alert button, an alert box gets generated.
To begin, follow Steps 1 to 5 from the Chapter titled Happy path flow with WebdriverIO which are as follows −
Step 1 − Install NodeJS. The details on how to perform this installation are given in detail in the Chapter titled Getting Started with NodeJS.
Step 2 − Install NPM. The details on how to perform this installation are given in detail in the Chapter titled Installation of NPM.
Step 3 − Install VS Code. The details on how to perform this installation are given in detail in the Chapter titled VS Code Installation.
Step 4 − Create the Configuration file. The details on how to perform this installation are given in detail in the Chapter titled Configuration File generation.
Step 5 − Create a spec file. The details on how to perform this installation are given in the Chapter titled Mocha Installation.
Step 6 − Add the below code within the Mocha spec file created.
// test suite name
describe('Tutorialspoint application', function(){
   //test case
   it('Double Click', function(){
      // launch url
      browser.url('http://only-testing-blog.blogspot.com/2014/09/selectable.html')
      //identify element then double click
      $("button").doubleClick()
      //get Alert Text
      console.log(browser.getAlertText() + ' - Alert Text')
      //accept Alert
      browser.acceptAlert()
   });
});
Run the Configuration file - wdio.conf.js file with the following command −
npx wdio run wdio.conf.js
The details on how to create a Configuration file are discussed in detail in the Chapter titledWdio.conf.js file and Chapter titled Configuration File generation.
The following screen will appear on your computer −
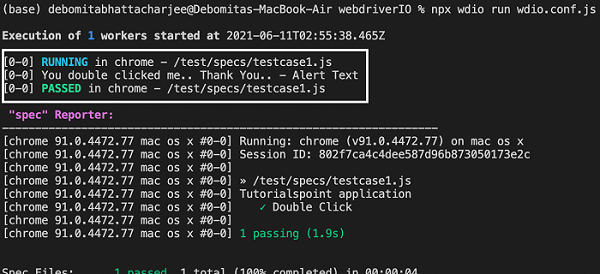
After the command has been executed successfully, the Alert text is generated on double-click - You double clicked me.. Thank You.. gets printed in the console.
WebdriverIO - Cookies
We can handle cookies using WebdriverIO. A cookie helps to identify a user. It is an efficient technique to pass information from one site session to another or in between sessions of two connected websites.
Methods for Cookies
We can add, delete and obtain a cookie with WebdriverIO using the following methods −
browser.setCookies
This is used to set a single cookie or multiple cookies for the present page. To set a cookie for a page, we have to first launch and stay on that page.
Syntax
The syntax is as follows −
browser.setCookies(
   {
      cookie, cookie.name, cookie.value, cookie.path, cookie.domain,
      cookie.secure, cookie.httpOnly, cookie.expiry
   }
)
Here, cookie is the cookie object or object array and can contain the following values −
cookie.name − It is an optional parameter and refers to the cookie name.
cookie.value − It is an optional parameter and refers to the cookie value.
cookie.path − It is an optional parameter and refers to the cookie path. The default value is /(if it is not added while adding a cookie).
cookie.domain − It is an optional parameter and refers to the cookie domain. The default value is the present browsing context’s active document’s URL domain (if it is not added while adding a cookie).
cookie.secure − It is an optional parameter to check if the cookie is secured. The default value is false (if it is not added while adding a cookie).
cookie.httpOnly − It is an optional parameter to check if the cookie is of type HTTP. The default value is false (if it is not added while adding a cookie).
cookie.expiry.
browser.getCookies
This is used to get a cookie from the existing page. If the cookie name is provided as a parameter to this method, then that particular cookie shall be obtained. Else, all the cookies from the present page shall be obtained.
Syntax
The syntax is as follows −
//to get a specific cookie
browser.getCookies(['Topic'])
Or,
//to get all cookies
browser.getCookies()
browser.deleteCookies
This is used to delete a cookie from the existing page. If the cookie name is provided as a parameter to this method, then that particular cookie shall be deleted. Else, all the cookies from the present page shall be deleted.
Syntax
The syntax is as follows −
//to delete a specific cookie
browser.deleteCookies(['Topic'])
Or,
//to delete all cookies
browser.deleteCookies()
To begin, follow Steps 1 to 5 from the Chapter titled Happy path flow with WebdriverIO which are as follows −
Step 1 − Install NodeJS. The details on how to perform this installation are given in detail in the Chapter titled Getting Started with NodeJS.
Step 2 − Install NPM. The details on how to perform this installation are given in detail in the Chapter titled Installation of NPM.
Step 3 − Install VS Code. The details on how to perform this installation are given in detail in the Chapter titled VS Code Installation.
Step 4 − Create the Configuration file. The details on how to perform this installation are given in detail in the Chapter titled Configuration File generation.
Step 5 − Create a spec file. The details on how to perform this installation are given in the Chapter titled Mocha Installation.
Step 6 − Add the below code within the Mocha spec file created.
// test suite name
describe('Tutorialspoint application', function(){
   //test case
   it('Cookies', function(){
      // launch url
      browser.url('https://www.tutorialspoint.com/index.htm')
      //set cookies
      browser.setCookies([
         {name: 'topic1', value: 'WebdriverIO'},
         {name: 'topic2', value: 'Selenium'}
      ])
      //get a particular cookie
	   const t = browser.getCookies(['topic1'])
      console.log(t);
      //get all cookies
      const a = browser.getCookies()
      console.log(a);
      //delete a cookie with name topic2
      browser.deleteCookies(['topic2'])
      d = browser.getCookies()
      console.log(d)
      //delete all cookies
      browser.deleteCookies()
      m = browser.getCookies()
      console.log(m)
   });
});
Run the Configuration file - wdio.conf.js file with the following command −
npx wdio run wdio.conf.js
The details on how to create a Configuration file are discussed in detail in the Chapter titled Wdio.conf.js file and Chapter titled Configuration File generation.
The following screen will appear on your computer −
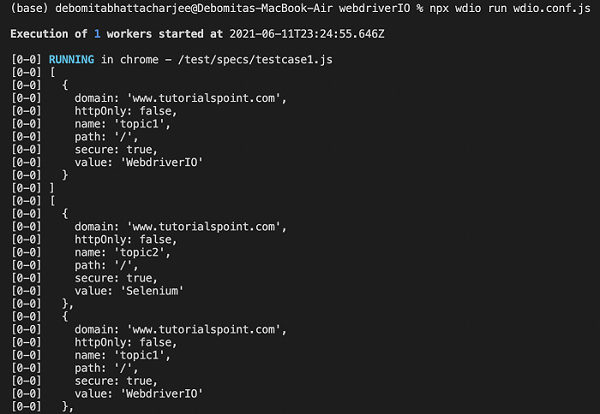
After the command has been executed successfully, first the cookie details having the name as topic1 get printed in the console. Then, both the cookie details having names as topic1 and topic2 get displayed.
The following screen will appear on your computer −
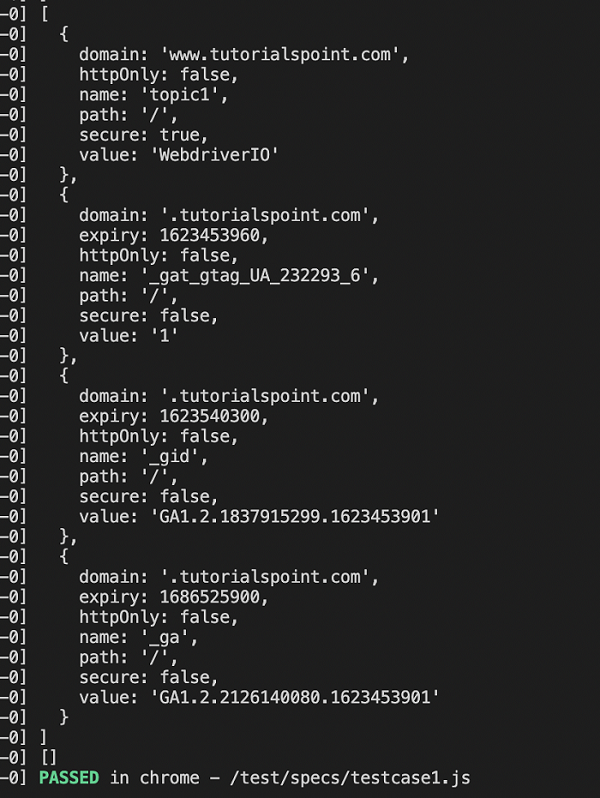
Then, we deleted the cookie with the name topic2, so the other cookies got printed in the console. Finally, on deleting all the cookies, an empty array is printed in the console.
WebdriverIO - Handling Radio Buttons
We can handle radio buttons in the UI while automating a test using WebdriverIO. The radio buttons are identified in the html code with the tagname as input and type as radio.
The following screen will appear on your computer −
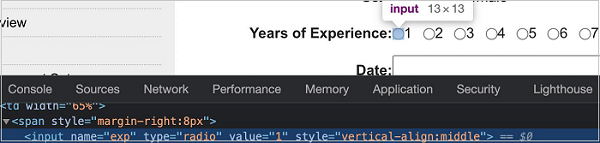
Methods for Radio Buttons
Some methods to work with radio buttons are as follows −
click()
It is used to select a radio button.
Syntax
The syntax is as follows −
const l = $('.rad')
l.click()
isSelected()
It is used to check if an element of type radio is selected or not. It returns a Boolean value (true if selected, false if not).
Syntax
The syntax is as follows −
const l = $('.rad')
l.isSelected()
To begin, follow Steps 1 to 5 from the Chapter titled Happy path flow with WebdriverIO which are as follows −
Step 1 − Install NodeJS. The details on how to perform this installation are given in detail in the Chapter titled Getting Started with NodeJS.
Step 2 − Install NPM. The details on how to perform this installation are given in detail in the Chapter titled Installation of NPM.
Step 3 − Install VS Code. The details on how to perform this installation are given in detail in the Chapter titled VS Code Installation.
Step 4 − Create the Configuration file. The details on how to perform this installation are given in detail in the Chapter titled Configuration File generation.
Step 5 − Create a spec file. The details on how to perform this installation are given in the Chapter titled Mocha Installation.
Step 6 − Add the below code within the Mocha spec file created.
// test suite name
describe('Tutorialspoint application', function(){
   //test case
   it('Radio Button', function(){
   // launch url
   browser.url('https://www.tutorialspoint.com/selenium/selenium_automation_practice.htm')
      //identify radio button with CSS then click
      const p = $("input[value='1']")
      p.click()
      //verify if selected
      console.log(p.isSelected())
   });
});
Run the Configuration file - wdio.conf.js file with the following command −
npx wdio run wdio.conf.js
The details on how to create a Configuration file are discussed in detail in the Chapter titled Wdio.conf.js file and Chapter titled Configuration File generation.
The following screen will appear on your computer −
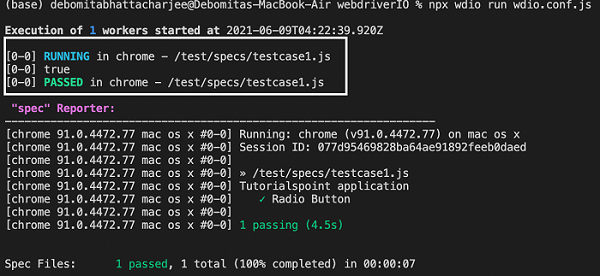
After the command has been executed successfully, the boolean value is printed in the console. This is returned by the isSelected() function which returns true as the radio button is selected in the previous step.
WebdriverIO - Chai Assertions on webelements
Chai is an assertion library for nodes. It is mainly used in the BDD and TDD framework. It can easily be integrated with any JavaScript testing framework. The official documentation of Chai is available in the below link −
For installation of Chai and making its entry in the package.json file, run the following command −
npm install --save-dev chai
The details on the package.json file are discussed in detail in the Chapter titled Package.json.
The following screen will appear on your computer −

After installation we have to add the below statement to add expected style Chai in our code.
require('chai').expect
Syntax
The syntax for Chai assertion is as follows −
const c = require('chai').expect
c(p.getValue()).to.equal('subject')
Let us implement a Chai assertion and verify if the option selected in the below dropdown is as per the expected result.

The details on how to handle a dropdown is discussed in detail in the Chapter - Handling Dropdowns.
To begin, follow Steps 1 to 5 from the Chapter titled Happy path flow with WebdriverIO which are as follows −
Step 1 − Install NodeJS. The details on how to perform this installation are given in detail in the Chapter titled Getting Started with NodeJS.
Step 2 − Install NPM. The details on how to perform this installation are given in detail in the Chapter titled Installation of NPM.
Step 3 − Install VS Code. The details on how to perform this installation are given in detail in the Chapter titled VS Code Installation.
Step 4 − Create the Configuration file. The details on how to perform this installation are given in detail in the Chapter titled Configuration File generation.
Step 5 − Create a spec file. The details on how to perform this installation are given in the Chapter titled Mocha Installation.
Step 6 − Add the below code within the Mocha spec file created.
require('chai').expect
//import chai library
const c = require('chai').expect
describe('Tutorialspoint application', function(){
   //test case
   it('Drodowns with Chai Assertion', function(){
      // launch url
      browser.url('https://www.tutorialspoint.com/tutor_connect/index.php')
      //identify dropdown
      const p = $("select[name='selType']")
      //select by index
      p.selectByIndex(1)
      //get option selected
      console.log(p.getValue() + ' - option selected by index')
      //verify option selected with chai assertion
      c(p.getValue()).to.equal('name')
      //select by visible text
      p.selectByVisibleText('By Subject')
      //get option selected
      console.log(p.getValue() + ' - option selected by visible text')
      //verify option selected with chai assertion
      c(p.getValue()).to.equal('subject')
      //select by value attribute
      p.selectByAttribute('value', 'name')
      //get option selected
      console.log(p.getValue() + ' - option selected by attribute value')
      //verify option selected with chai assertion
      c(p.getValue()).to.equal('name')
   });
});
Run the Configuration file - wdio.conf.js file with the command −
npx wdio run wdio.conf.js
The details on how to create a Configuration file are discussed in detail in the Chapter titled Wdio.conf.js file and Chapter titled Configuration File generation.
The following screen will appear on your computer −
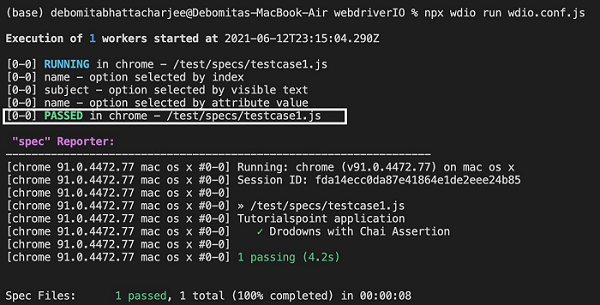
After the command has been executed successfully, first the value of the option selected with the option index - name is printed in the console. Then, the value of the option selected with the option visible text - subject is printed in the console. Finally, the value of the option selected with the option attribute value - name is printed in the console.
Also, we get a PASSED result, pointing to the fact that all the Chai assertions applied on the dropdown have passed.
Let us implement another Chai assertion and verify if the alert text obtained is as per the expected result.
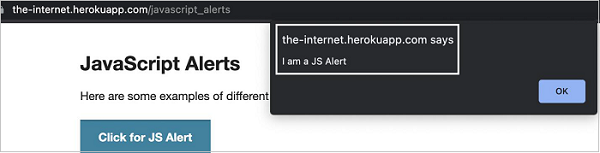
The details on how to handle an alert are discussed in detail in the Chapter titled Alerts.
To begin, follow Steps 1 to 5 from the Chapter titled Happy path flow with WebdriverIO which are as follows −
Step 1 − Install NodeJS. The details on how to perform this installation are given in detail in the Chapter titled Getting Started with NodeJS.
Step 2 − Install NPM. The details on how to perform this installation are given in detail in the Chapter titled Installation of NPM.
Step 3 − Install VS Code. The details on how to perform this installation are given in detail in the Chapter titled VS Code Installation.
Step 4 − Create the Configuration file. The details on how to perform this installation are given in detail in the Chapter titled Configuration File generation.
Step 5 − Create a spec file. The details on how to perform this installation are given in the Chapter titled Mocha Installation.
Step 6 − Add the below code within the Mocha spec file created.
//import chai library
const c = require('chai').expect
// test suite name
describe('Tutorialspoint application', function(){
   //test case
   it('Alerts with Chai Assertion', function(){
      // launch url
      browser.url('https://the-internet.herokuapp.com/javascript_alerts')
      //identify element with xpath then click
      $("//*[text()='Click for JS Prompt']").click()
      //check if Alert is open
      console.log(browser.isAlertOpen())
      //get Alert Text
      console.log(browser.getAlertText() + ' - Alert Text')
      //verify Alert text with Chai assertion
      c(browser.getAlertText()).to.equal("I am a JS prompt")
      //accept Alert
      browser.acceptAlert()
   });
});
Run the Configuration file - wdio.conf.js file with the following command −
npx wdio run wdio.conf.js
The details on how to create a Configuration file are discussed in detail in the Chapter titled Wdio.conf.js file and Chapter titled Configuration File generation.
The following screen will appear on your computer −
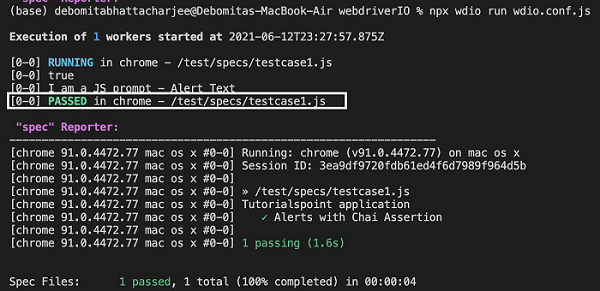
After the command has been executed successfully, at first true is printed in the console as it is returned by the browser.isAlertOpen() method. Then, the Alert text - I am a JS prompt is printed in the console.
Also, we get a PASSED result, pointing to the fact that the Chai assertion applied on the alert text has passed.
WebdriverIO - Multiple Windows/Tabs
Multiple windows/tabs can open on clicking a link or a button. WebdriverIO by default has control over the main browser, in order to access the elements on the other tabs, the WebdriverIO control has to be switched from the main browser window to the opened tab.
Methods for Multiple Windows
Some methods to work with multiple windows or tabs are as follows −
browser.getWindowHandles()
This method yields the window handle ids of all the currently opened browser windows in the form of a list. If there are two opened windows, the zero index of the list has the handle id of the parent window and the first index shall point to the window handle of the tab.
Syntax
The syntax is as follows −
var x = browser.getWindowHandles()
browser.getWindowHandle()
This method yields the window handle id of the browser which is in focus.
The syntax is as follows −
let l = browser.getWindowHandle()
browser.switchToWindow('window handle id')
This method is used to switch focus from the browser window in focus to another opened browser window whose window handle id is passed as a parameter to this method.
Syntax
The syntax is as follows −
browser.switchToWindow(x)
In the below image, on clicking the Click Here link, a new tab opens having the browser title as New Window. Let us switch to the new tab and access elements in there.
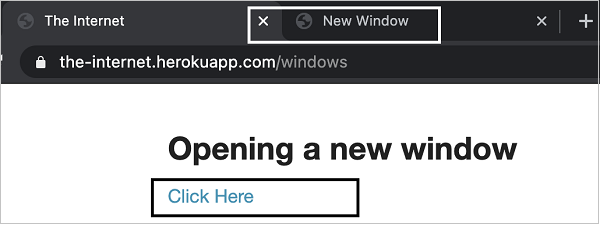
To begin, follow Steps 1 to 5 from the Chapter titled Happy path flow with WebdriverIO which is as follows −
Step 1 − Install NodeJS. The details on how to perform this installation are given in detail in the Chapter titled Getting Started with NodeJS.
Step 2 − Install NPM. The details on how to perform this installation are given in detail in the Chapter titled Installation of NPM.
Step 3 − Install VS Code. The details on how to perform this installation are given in detail in the Chapter titled VS Code Installation.
Step 4 − Create the Configuration file. The details on how to perform this installation are given in detail in the Chapter titled Configuration File generation.
Step 5 − Create a spec file. The details on how to perform this installation are given in the Chapter titled Mocha Installation.
Step 6 − Add the below code within the Mocha spec file created.
// test suite name
describe('Tutorialspoint application', function(){
   //test case
   it('Tab windows', function(){
      // launch url
      browser.url('https://the-internet.herokuapp.com/windows')
      //identify element then click
      $('=Click Here').click()
      //get all window handle ids in list
      let w = browser.getWindowHandles()
      //switch to tab
      browser.switchToWindow(w[1])
      //get page title of tab
      console.log(browser.getTitle() + ' - Page title of tab')
      //close child window
      browser.closeWindow()
      //switch to parent window
      browser.switchToWindow(w[0])
      //get page title of parent
      console.log(browser.getTitle() + ' - Page title of parent window')
   });
});
Run the Configuration file - wdio.conf.js file with the following command −
npx wdio run wdio.conf.js
The details on how to create a Configuration file are discussed in detail in the Chapter titled Wdio.conf.js file and Chapter titled Configuration File generation.
The following screen will appear on your computer −
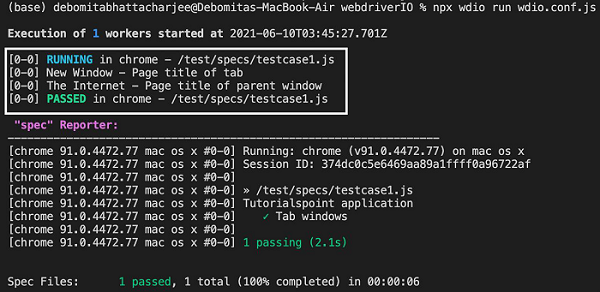
After the command has been executed successfully, the page title of the tab window - New Window gets printed in the console. Then, the page title of the parent window - The Internet gets printed in the console.
WebdriverIO - Scrolling Operations
We can perform scrolling operations with the WebdriverIO by using the scrollIntoView method. This method does not accept any parameter and can be applied to the browser object or on a particular element.
Syntax
The syntax is as follows −
const p = $('#loc')
p.scrollIntoView()
Or,
browser.scrollIntoView()
In the below image, let us scroll to the footer element link - Helping and click on it.

To begin, follow Steps 1 to 5 from the Chapter titled Happy path flow with WebdriverIO.
Step 1 − Install NodeJS. The details on how to perform this installation are given in detail in the Chapter titled Getting Started with NodeJS.
Step 2 − Install NPM. The details on how to perform this installation are given in detail in the Chapter titled Installation of NPM.
Step 3 − Install VS Code. The details on how to perform this installation are given in detail in the Chapter titled VS Code Installation.
Step 4 − Create the Configuration file. The details on how to perform this installation are given in detail in the Chapter titled Configuration File generation.
Step 5 − Create a spec file. The details on how to perform this installation are given in the Chapter titled Mocha Installation.
Step 6 − Add the below code within the Mocha spec file created.
// test suite name
describe('Tutorialspoint application', function(){
   //test case
   it('Scroll', function(){
      // launch url
      browser.url('https://www.tutorialspoint.com/index.htm')
      //identify element
      const e = $("=Helping")
      //scroll to element
      e.scrollIntoView()
      e.click()
      //get page title
      console.log(browser.getTitle() + ' - Page time after click')
   });
});
Run the Configuration file - wdio.conf.js file with the following command −
npx wdio run wdio.conf.js
The details on how to create a Configuration file are discussed in detail in the Chapter titled Wdio.conf.js file and Chapter titled Configuration File generation.
The following screen will appear on your computer −
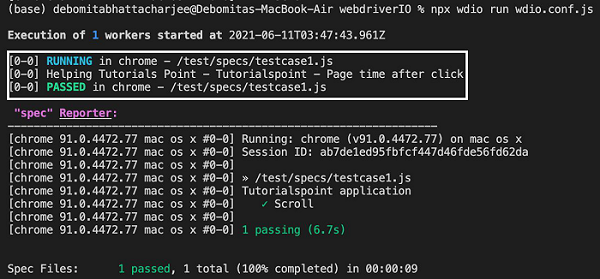
After the command has been executed successfully, the page title of the page obtained on clicking the link after scrolling - Helping Tutorials Point - Tutorialspoint gets printed in the console.
WebdriverIO - Alerts
WebdriverIO is capable of handling Alerts.
Methods for Alerts
Some methods to work with Alerts are listed below −
browser.isAlertopen()
This method is used to verify if there is an alert in the page. It returns true, if the Alert is present, else returns false
Syntax
The syntax is as follows −
browser.isAlertopen()
browser.getAlertText()
This method is used to get the text present in the Alert.
Syntax
The syntax is as follows −
browser.getAlertText()
browser.acceptAlert()
This method is used to accept an Alert.
Syntax
The syntax is as follows −
browser.acceptAlert()
browser.dismissAlert()
This method is used to dismiss an Alert.
Syntax
The syntax is as follows −
browser.dismissAlert()
In the below image, on clicking Click for JS Alert, an Alert is displayed. Let us obtain the text on the Alert.
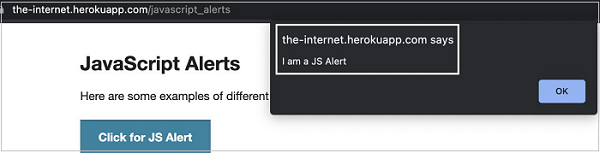
To begin, follow Steps 1 to 5 from the Chapter titled Happy path flow with WebdriverIO which are as follows −
Step 1 − Install NodeJS. The details on how to perform this installation are given in detail in the Chapter titled Getting Started with NodeJS.
Step 2 − Install NPM. The details on how to perform this installation are given in detail in the Chapter titled Installation of NPM.
Step 3 − Install VS Code. The details on how to perform this installation are given in detail in the Chapter titled VS Code Installation.
Step 4 − Create the Configuration file. The details on how to perform this installation are given in detail in the Chapter titled Configuration File generation.
Step 5 − Create a spec file. The details on how to perform this installation are given in the Chapter titled Mocha Installation.
Step 6 − Add the below code within the Mocha spec file created.
// test suite name
describe('Tutorialspoint application', function(){
   //test case
   it('Alerts', function(){
      // launch url
      browser.url('https://the-internet.herokuapp.com/javascript_alerts')
      //identify element with xpath then click
      $("//*[text()='Click for JS Prompt']").click()
      //check if Alert is open
      console.log(browser.isAlertOpen())
      //get Alert Text
      console.log(browser.getAlertText() + ' - Alert Text')
      //accept Alert
      browser.acceptAlert()
   });
});
Run the Configuration file - wdio.conf.js file with the following command −
npx wdio run wdio.conf.js
The details on how to create a Configuration file are discussed in detail in the Chapter titled Wdio.conf.js file and Chapter titled Configuration File generation.
The following screen will appear on your computer −
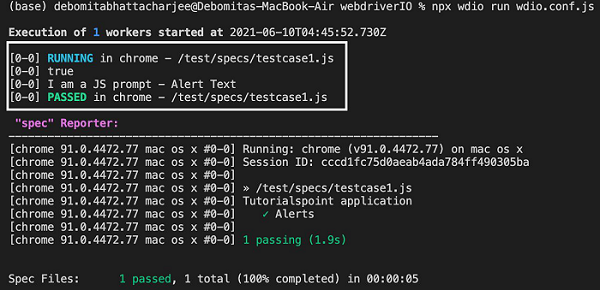
After the command has been executed successfully, the first true is printed in the console as it is returned by the browser.isAlertOpen() method. Then the Alert text - I am a JS prompt is printed in the console.
WebdriverIO - Debugging Code
To debug the WebdriverIO code in the Visual Studio Code editor, we have to enable the nightly version of JavaScript Debugger. Debugging is one of the most important steps for identifying the root cause of an error in code.
It also helps to understand the program flow.
Enable Debugging
The steps to enable debugging are listed below −
Step 1 − Navigate to the link below if you are using Windows or Linux operating system −
https://marketplace.visualstudio.com/items?itemName=ms-vscode.js-debug-nightly
Step 2 − Click on Install. The following screen will appear on your computer −
If we are using a Mac operating system, we can skip Steps 1 and 2.
Step 3 − Create a folder called the .vscode within the project. Then create a file launch.json within this folder. The following screen will appear on your computer −
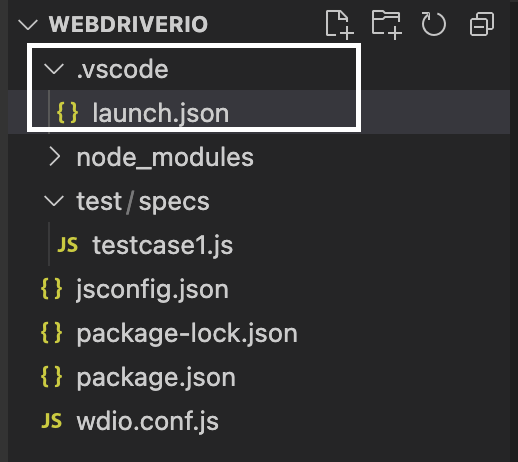
Step 4 − Add the below code in the launch.json file.
{
   "configurations": [
      {
         "name": "Webdriver IO",
         "type": "node",
         "request": "launch",
         "args": ["wdio.conf.js", "--spec", "${file}"],
         "cwd": "${workspaceFolder}",
         "autoAttachChildProcesses": true,
         "program": "${workspaceRoot}/node_modules/@wdio/cli/bin/wdio.js",
         "console": "integratedTerminal",
         "skipFiles": [
            "${workspaceFolder}/node_modules/**/*.js",
            "${workspaceFolder}/lib/**/*.js",
            "<node_internals>/**/*.js"
         ]
      },
   ]
}
Step 5 − Add a breakpoint in the spec file. The following screen will appear on your computer −
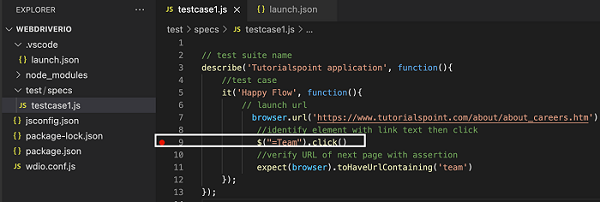
Step 6 − Go to the Run menu and select the option Start Debugging. The following screen will appear on your computer −
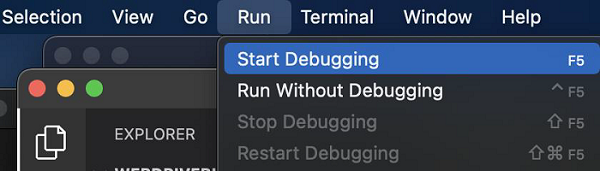
Step 7 − The execution shall get triggered in Debugger mode, with an orange band at the bottom. Debugger attached message should be reflected in the Terminal console. Also, the execution shall halt at the breakpoint. We have to manually resume it again.
The following screen will appear on your computer −

WebdriverIO - Capturing Screenshots
We can capture screenshots while working on automation tests developed in WebdriverIO using the saveScreenshot method. A screenshot is generally captured if we encounter an application error. An Assertion has failed, and so on.
Syntax
The syntax for capturing screenshots is as follows −
browser.saveScreenshot("name along with path to store screenshot")
Here, the name along with the path where the screenshot is to be saved is passed as a parameter to the method. In the WebdriverIO, we don't have the option to capture a screenshot for a particular element.
To begin, follow Steps 1 to 5 from the Chapter titled Happy path flow with WebdriverIO which are as follows −
Step 1 − Install NodeJS. The details on how to perform this installation are given in detail in the Chapter titled Getting Started with NodeJS.
Step 2 − Install NPM. The details on how to perform this installation are given in detail in the Chapter titled Installation of NPM.
Step 3 − Install VS Code. The details on how to perform this installation are given in detail in the Chapter titled VS Code Installation.
Step 4 − Create the Configuration file. The details on how to perform this installation are given in detail in the Chapter titled Configuration File generation.
Step 5 − Create a spec file. The details on how to perform this installation are given in the Chapter titled Mocha Installation.
Step 6 − Add the below code within the Mocha spec file created.
// test suite name
describe('Tutorialspoint application', function(){
   //test case
   it('Screenshot', function(){
      // launch url
      browser.url('https://www.tutorialspoint.com/index.htm')
      //identify element then enter text
      const e = $("#gsc-i-id1")
      e.setValue('WebdriverIO')
      //capture screenshot of page
      browser.saveScreenshot("screenshot.png")
   });
});
Run the Configuration file - wdio.conf.js file with the following command −
npx wdio run wdio.conf.js
The details on how to create a Configuration file are discussed in detail in the Chapter titled Wdio.conf.js file and Chapter titled Configuration File generation. The following screen will appear on your computer −

After the command has been executed successfully, a file named screenshot.png gets generated within the project folder. It contains the captured screenshot of the page.
WebdriverIO - JavaScript Executor
Inside the WebdriverIO, the JavaScript Executor is bundled and called executeScript. The JavaScript Executor is capable of performing all the tasks on a page whenever normal WebdriverIO methods are not working as expected.
Syntax
The syntax for the JavaScript executor is as follows −
browser.executeScript("JavaScript command")
Actions with JavaScript Executor
Some actions performed with JavaScript Executor are as follows −
To enter a text - AB into an edit box having id as txt, use the command given below −
browser.executeScript("document.getElementById('txt').value='AB'")
To click a link, use the command given below −
browser.executeScript("document.querySelector('.lnk').click()")
The command given below is used for refreshing windows −
browser.executeScript("history.go(0)")
var t = js.executeScript("return document.getElementById('bln').innerHTML").toString()
The command to scroll down a page by 350 pixels is as follows −
browser.executeScript("window.scrollBy(0,350)")
browser.executeScript("window.scrollTo(0, document.body.scrollHeight)")
The command given below is used to scroll down upto an element having class as tcl.
browser.executeScript("document.querySelector('.tcl').scrollIntoView()")
browser.executeScript("window.history.back()")
Following command is used to go forward in browser history −
browser.executeScript("window.history.forward()")
browser.executeScript("return document.title")
WebdriverIO - Waits
The waitUnit method in WebdriverIO is a standard method to wait for an action /element on the page. It waits for a criterion to be met (a true value).
For example, we often wait for a text to appear on the page.
Syntax
The syntax for waitUnit method is as follows −
browser.waitUntil(condition, { timeout, timeoutMsg, interval })
Here,
condition = condition for waiting on.
The timeout is in milliseconds. The default value is 5000 and is an optional parameter.
The timeoutMsg is the error message thrown when there is a timeout and it is an optional parameter.
The interval is the interval in between verification. The default value is 500 and it is also an optional parameter.
In the below image, let us click on the link - Team and wait for the text - Team @ Tutorials Point to appear on the page.

On clicking the link Team, the highlighted message is displayed on the page.

To begin, follow Steps 1 to 5 from the Chapter titled Happy path flow with WebdriverIO which are as follows −
Step 1 − Install NodeJS. The details on how to perform this installation are given in detail in the Chapter titled Getting Started with NodeJS.
Step 2 − Install NPM. The details on how to perform this installation are given in detail in the Chapter titled Installation of NPM.
Step 3 − Install VS Code. The details on how to perform this installation are given in detail in the Chapter titled VS Code Installation.
Step 4 − Create the Configuration file. The details on how to perform this installation are given in detail in the Chapter titled Configuration File generation.
Step 5 − Create a spec file. The details on how to perform this installation are given in the Chapter titled Mocha Installation.
Step 6 − Add the below code within the Mocha spec file created.
// test suite name
describe('Tutorialspoint Application', function(){
   //test case
   it('Waits', function(){
      // launch url
      browser.url('https://www.tutorialspoint.com/about/about_careers.htm')
      //identify then click link - Team
      const p = $('=Team')
      p.click()
      //wait for text
      browser.waitUntil(
         () => $('<h1>').getText() === 'Team @ Tutorials Point', {
            timeout: 6000,
            timeoutMsg: 'expected text did not match'
         }
      );
      //identify required text
      const m = $('<h1>')
      console.log(m.getText())
   });
});
Run the Configuration file - wdio.conf.js file with the following command −
npx wdio run wdio.conf.js
The details on how to create a Configuration file are discussed in detail in the Chapter titledWdio.conf.js file and Chapter titled Configuration File generation. The following screen will appear on your computer −
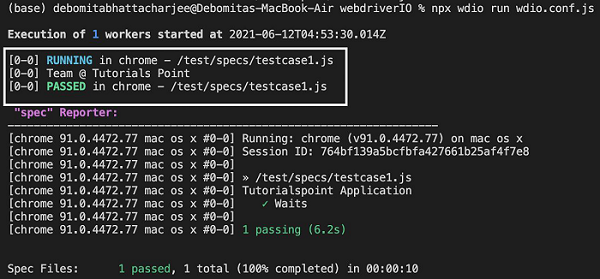
After the command has been executed successfully, the text generated on clicking the Team link - Team @ Tutorials Point gets printed in the console.
WebdriverIO - Running Tests in Parallel
We can run WebdriverIO tests in parallel mode. For this we have to create more than one spec file within the test folder. The numbers of threads in which parallel tests can run are defined by the parameters in the Configuration file - wdio.conf.js file.
The details on how to create a Configuration file are discussed in detail in the Chapter - Wdio.conf.js file and Chapter - Configuration File generation to store WebdriverIO settings.
Let us take a project having three spec files within the test folder. The following screen will appear on your computer −
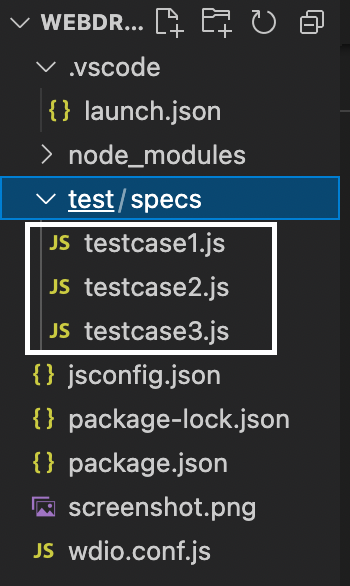
To execute all these files in a parallel mode, we have to first specify './test/specs/**/*.js' under the specs field in the wdio.conf.js file. This means all the spec files within the test folder would get triggered on running the command given below −
npx wdio run wdio.conf.js.
The following screen will appear on your computer −
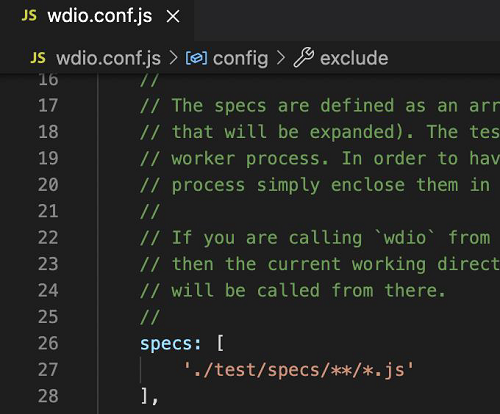
After the command has been executed successfully, we shall see all the three spec files - testcase1.js, testcase2.js and testcase3.js getting triggered for execution simultaneously.
The following screen will appear on your computer −

Also, the maxInstances field in the wdio.conf.js determines the maximum number of threads possible to trigger the parallel execution. By default, the value is set to 10. Here, we have three spec files, so the maxInstances = 10, holds true.
The following screen will appear on your computer −
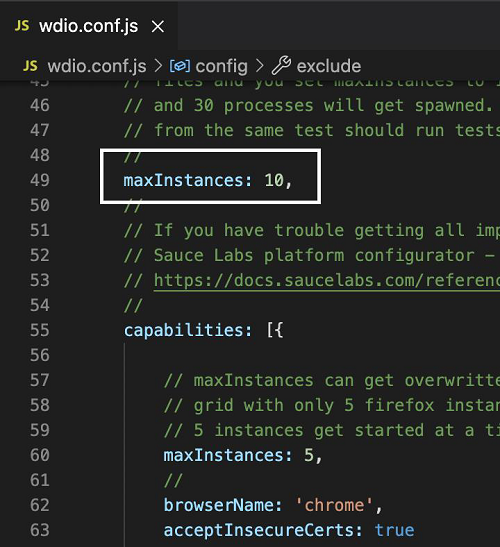
There is another field called capabilities within the wdio.conf.js file. Within this, we have a parameter called the maxInstances. It determines the number of instances that can be opened simultaneously by the Chrome browser during the parallel run.
Let us set the value 3 for the parameter maxInstances outside the capabilities field and then set the value 2 for the field maxInstances inside the capabilities field. The value set for maxInstances within the capabilities overrides the value set for maxInstances outside the capabilities.
Run the following command −
npx wdio run wdio.conf.js
After the command has been executed successfully, we shall see two spec files - testcase1.js and testcase2.js getting triggered for execution simultaneously in Chrome. They are initially in RUNNING status.
Once the status of testcase2.js moved to PASSED, the third spec testcase3.js moved to the status of RUNNING. The following screen will appear on your computer −
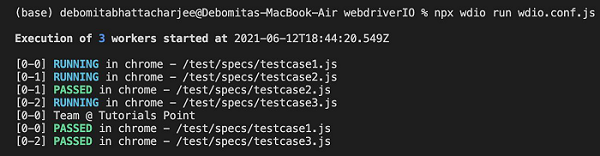
WebdriverIO - Data Driven Testing
We can achieve data driven testing with WebdriverIO. Data driven testing is required when we need to execute the same test case multiple times with different combinations of data. Here, we shall see how to use an external JSON file to hold data.
In the WebdriverIO project all the test files are created within the specs folder. The specs folder resides within the test folder. We shall create another folder, say testData within the test folder.
The testData folder shall contain the JSON files which hold the different sets of data in key-value pairs. Also, if we have three test files within the spec folder and we want to have data driven testing for all these files, we need to create three JSON files.
Each of these JSON files should be used dedicatedly for each test file within the spec folder. We shall create a JSON file, say test1.json within the testData folder.
Now, add the below data within this file −
[
   {
      "email":"test@gmail.com",
      "password":"12"
   },
   {
      "email":"test12@gmail.com",
      "password":"34"
   }
]
The following screen will appear on your computer −

We shall parse this JSON file and convert it in string format. This is done by adding the below library −
const s =require('fs')
Then to parse the JSON file, we shall use the readFileSync method and pass the relative path of the JSON file file as a parameter to this method. Finally, store this in an object, say c. This object shall contain all the data.
let c = JSON.parse(s.readFileSync('test/testData/test1.json'))
Then, we shall iterate the same test case over the two sets of data with the help of the loop. This loop has to be implemented just before the block and it should pass the data keys as declared in the JSON file.
With the above set of data, we shall validate the login page of the LinkedIn application. On clicking on the Sign in button after entering an email and password of less than 6 characters, an error message - The password you provided must have at least 6 characters should be thrown.
The following screen will appear on your computer −
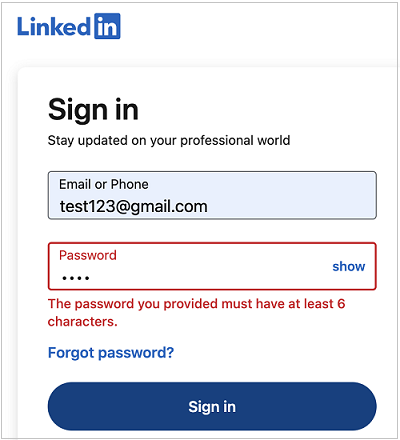
To begin, follow Steps 1 to 5 from the Chapter titled Happy path flow with WebdriverIO which are as follows −
Step 1 − Install NodeJS. The details on how to perform this installation are given in detail in the Chapter titled Getting Started with NodeJS.
Step 2 − Install NPM. The details on how to perform this installation are given in detail in the Chapter titled Installation of NPM.
Step 3 − Install VS Code. The details on how to perform this installation are given in detail in the Chapter titled VS Code Installation.
Step 4 − Create the Configuration file. The details on how to perform this installation are given in detail in the Chapter titled Configuration File generation.
Step 5 − Create a spec file. The details on how to perform this installation are given in the Chapter titled Mocha Installation.
Step 6 − Add the below code within the Mocha spec file created.
//import chai library
const c = require('chai').expect
//library for parsing JSON file
const s =require('fs')
let h = JSON.parse(s.readFileSync('test/testData/test1.json'))
// test suite name
describe('Tutorialspoint application', function(){
   //iterate the test case
   h.forEach(  ({email,password})  =>{
      //test case
      it('Data Driven testing', function(){
         // launch url
         browser.url('https://www.linkedin.com/login')
         //identify the email field then enter key - email
         $("#username").setValue(email)
         //identify password field then enter key - password
         $("#password").setValue(password)
         //identify Sign in button then click
         $("button[type='submit']").click()
         //verify error message
         const e = $('#error-for-password')
         console.log(e.getText() + ' - Error Text')
         //verify Alert text with Chai assertion
         c(e.getText()).to.equal("The password you provided must have at least 6     characters.")
      });
   });
});
Run the Configuration file - wdio.conf.js file with the following command −
npx wdio run wdio.conf.js
The details on how to create a Configuration file are discussed in detail in the Chapter titled Wdio.conf.js file and Chapter titled Configuration File generation.
The following screen will appear on your computer −

After the command has been executed successfully, the error text - The password you provided must have at least 6 characters gets printed in the console twice.
Also, it shows the message 2 passing as the same test case defined in one block has executed two times with two different sets of data.
Running Tests from command-line parameters
We can control running tests using the command-line parameters. Let us take a scenario, where we have four test files within the spec folder in the WebdriverIO project.
The following screen will appear on your computer −
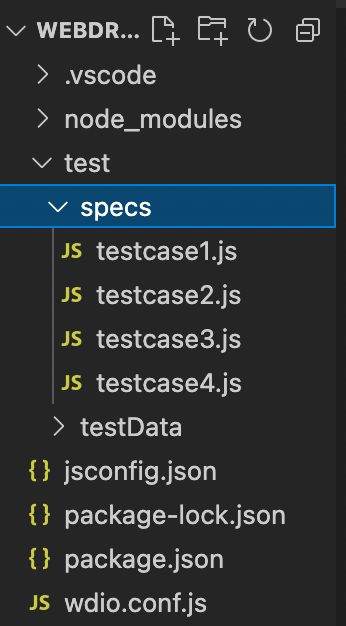
Suppose we want to trigger only the files testcase1.js and testcase2.js using the command-line parameters. To do this we have to add a parameter called suites in the Configuration file wdio.conf.js file.
The details on how to create a Configuration file are discussed in detail in the Chapter titled Wdio.conf.js file and Chapter titled Configuration File generation.
Let us consider that the files testcase1.js and testcase2.js belong to a suite called the group1 and the files testcase3.js and testcase4.js belong to a suite called the group2. We need to add this information to the wdio.conf.js file under the suite parameter as given below.
suites: {
   group1: ['test/specs/testcase1.js', 'test/specs/testcase2.js'],
   group2: ['test/specs/testcase3.js', 'test/specs/testcase4.js']
},
The following screen will appear on your computer −
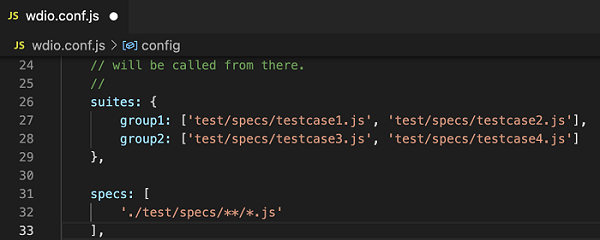
To trigger the test files testcase1.js and testcase2.js belonging to group1, we have to run the command given below −
npx wdio run wdio.conf.js --suite group1
The following screen will appear on your computer −
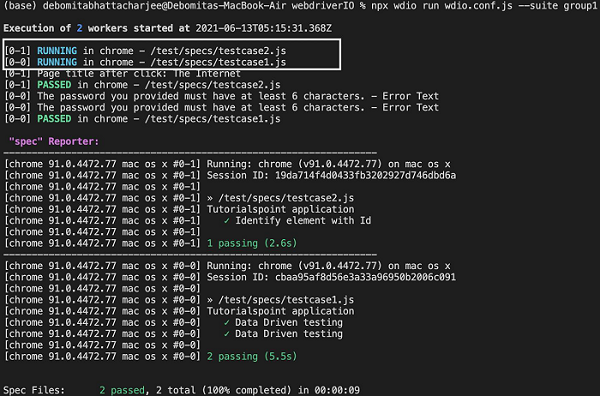
After the command has been executed successfully, we see only the two test files testcase1.js and testcase2.js under the specs folder have been triggered for execution.
Suppose we want to trigger only the file testcase3.js using the command-line parameters. To trigger only the test file testcase3.js, we have to run the following command −
npx wdio run wdio.conf.js --spec test/specs/testcase3.js
The following screen will appear on your computer −
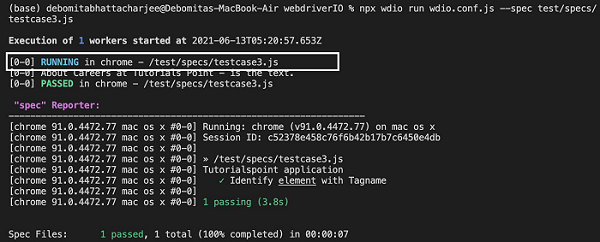
After the command has been executed successfully, we see only the test file testcase3.js under the specs folder has been triggered for execution.
Besides, if we want to trigger multiple test files testcase3.js and testcase4.js, the command should be as follows −
npx wdio run wdio.conf.js --spec test/specs/testcase3.js, test/specs/testcase4.js
Suppose we want to exclude only the file testcase4.js from execution. To do this we have to add a relative path of the file that we want to exclude under the exclude parameter in the Configuration file wdio.conf.js file as given below.
exclude: [
   // 'path/to/excluded/files'
   'test/specs/testcase4.js'
],
The following screen will appear on your computer −
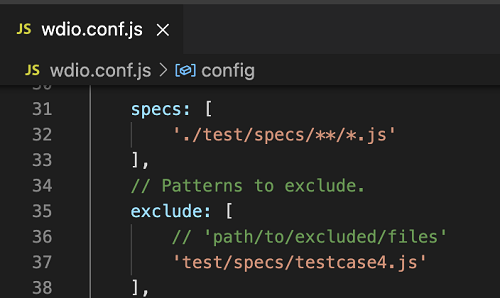
Then, we have to run the below command −
npx wdio run wdio.conf.js
The following screen will appear on your computer −
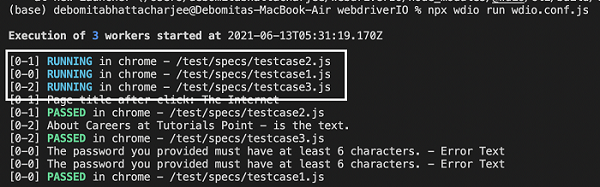
After the command has been executed successfully, we see the test file testcase4.js under the specs folder has been excluded from execution.
Execute Tests with Mocha Options
A test file within the specs folder consists of the describe and it blocks. A describe block refers to the test suite and the it block refers to the test case. A describe block can have multiple blocks.
The details on how to create describe and it blocks are discussed in detail in the Chapter titled Happy path flow with Webdriverio.
To verify if a new build obtained from the development team is a healthy one, we need not execute all the test cases within a suite. A few test cases are identified for smoke/sanity testing and they are executed once we have a new build.
We can use the Mocha option called Grep to group test cases and run them together. For this, we have to add a keyword, say Smoke within the it description. Then at the runtime, we can instruct the WebdriverIO test to only trigger the it blocks which have Smoke in its description.
Let us take a test file having four it blocks. Out of the four it blocks, there are two it blocks having the keyword Smoke in description.
To begin, follow Steps 1 to 5 from the Chapter titled Happy path flow with WebdriverIO which are as follows −
Step 1 − Install NodeJS. The details on how to perform this installation are given in detail in the Chapter titled Getting Started with NodeJS.
Step 2 − Install NPM. The details on how to perform this installation are given in detail in the Chapter titled Installation of NPM.
Step 3 − Install VS Code. The details on how to perform this installation are given in detail in the Chapter titled VS Code Installation.
Step 4 − Create the Configuration file. The details on how to perform this installation are given in detail in the Chapter titled Configuration File generation.
Step 5 − Create a spec file. The details on how to perform this installation are given in the Chapter titled Mocha Installation.
Step 6 − Add the below code within the Mocha spec file created.
//import chai library
const c = require('chai').expect
//library for parsing JSON file
const s =require('fs')
let h = JSON.parse(s.readFileSync('test/testData/test1.json'))
// test suite name
describe('Tutorialspoint application', function(){
   //iterate the test case
   h.forEach(  ({email,password})  =>{
      //test case
      it('Data Driven testing', function(){
         // launch url
         browser.url('https://www.linkedin.com/login')
         //identify the email field then enter key - email
         $("#username").setValue(email)
         //identify password field then enter key - password
         $("#password").setValue(password)
         //identify SSign in button then click
         $("button[type='submit']").click()
         //verify error message
         const e = $('#error-for-password')
         console.log(e.getText() + ' - Error Text')
         //verify Alert text with Chai assertion
         c(e.getText()).to.equal("The password must be provided.")
      });
   });
   // it is blocked with Smoke keyword
   it('Identify element with Id - Smoke', function(){
      // launch url
      browser.url('https://the-internet.herokuapp.com/redirector')
      //identify element with id then click
      $("#redirect").click()
      //obtain page title
      console.log('Page title after click: ' + browser.getTitle())
   });
   // it block with Smoke keyword
   it('Identify element with Tagname - Smoke', function(){
      // launch url
      browser.url('https://www.tutorialspoint.com/about/about_careers.htm')
      //identify element with tagname then obtain text
      console.log($("<h1>").getText() + " - is the text.")
   });
   //test case
   it('Identify element with Class Name', function(){
      // launch url
      browser.url('https://www.tutorialspoint.com/about/about_careers.htm')
      //identify element with Class Name then obtain text
      console.log($(".heading").getText() + " - is the text.")
   });
});
To trigger only the it blocks connected with Smoke, run the Configuration file - wdio.conf.js file with the following command −
npx wdio run wdio.conf.js --mochaOpts.grep Smoke
The details on how to create a Configuration file are discussed in detail in the Chapter titled Wdio.conf.js file and Chapter titled Configuration File generation.
The following screen will appear on your computer −
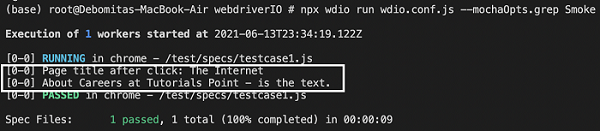
After the command has been executed successfully, we find out of the four it blocks, only two it blocks (having Smoke tag in description) have been executed.
Generate HTML reports from Allure
In WebdriverIO, we have a reporter plugin to generate Allure Test Reports. An Allure is a light-weight test reporter tool that creates a brief and well-documented report based on the test results from an automation run.
For installation of Allure and creating it’s entry in the package.json file, we have to run the below mentioned command −
npm install @wdio/allure-reporter --save-dev
The details on package.json are discussed in the Chapter titled Package.json file.
The following screen will appear on your computer −
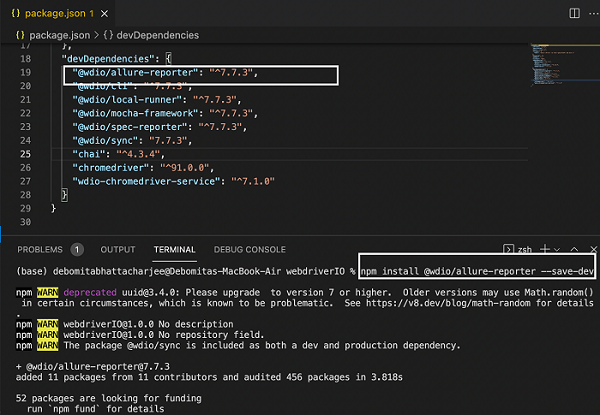
After installation of the Allure, we have to configure the output directory in the Configuration file wdio.conf.js within the reporter options by adding the below code.
The details on how to create a Configuration file are discussed in detail in the Chapter titled Wdio.conf.js file and Chapter titled Configuration File generation.
reporters: [['allure', {
   outputDir: 'allure-results',
   disableWebdriverScreenshotsReporting: false,
}]],
The following screen will appear on your computer −
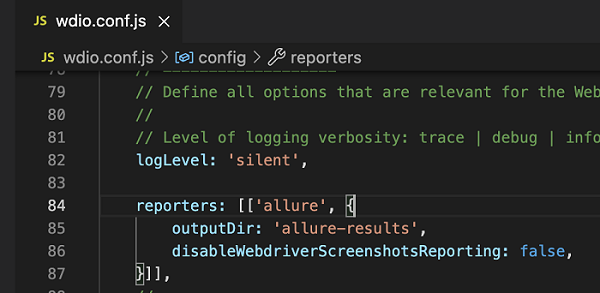
Here, the outputDir has the default directory of /allure-results. After automation is completed, we shall find this directory generated. It shall contain the .xml files for each of the test files within the specs folder included in the run along with .txt, .png and other files.
Also, to attach the screenshot of the failure test, we have set the parameter disableWebdriverScreenshotsReporting to false.
However, we also need to add an afterStep hook in the wdio.conf.js file having the code as shown below −
afterStep: function (test, scenario, { error, duration, passed }) {
   if (error) {
      browser.takeScreenshot();
   }
}
The following screen will appear on your computer −

Run the Configuration file - wdio.conf.js file with the following command −
npx wdio run wdio.conf.js
The details on how to create a Configuration file are discussed in detail in the Chapter titled Wdio.conf.js file and Chapter titled Configuration File generation.
The following screen will appear on your computer −
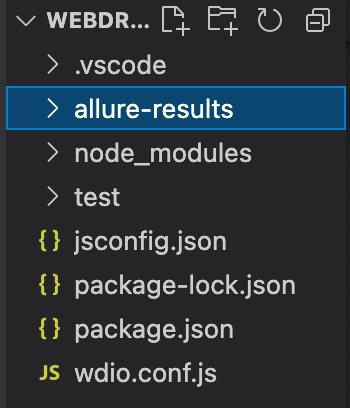
After the command has been executed successfully, a folder called allure-results(as specified in the wdio.conf.js) gets generated within the WebdriverIO project. It contains the reports in xml format.
Next, we have to convert these reports to the HTML format. For this, we shall first install the Allure Commandline tool for generating Allure reports from the test results.
This is done by running the below given command −
npm install -g allure-commandline --save-dev
After the installation, we can generate the results in HTML format with the below mentioned command −
allure generate [allure_output_dir] && allure open
To override an existing result, we have to run the following command −
allure generate [allure_output_dir] --clean && allure open
The following screen will appear on your computer −

After the command has been executed successfully, a browser is opened containing the test result. The following screen will appear on your computer −
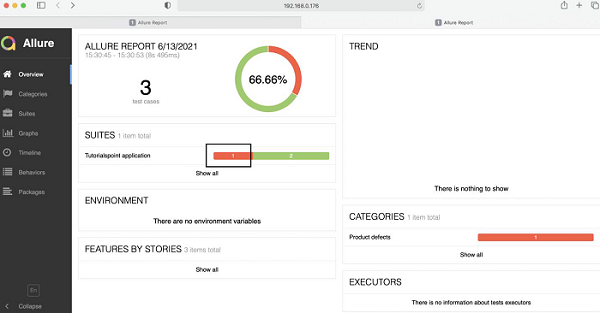
On clicking the failed test(marked with red), we shall get the details of the test along with the expected, actual output and screenshot of the failure(obtained on expanding Response).
The following screen will appear on your computer −