- WebdriverIO - Home
- WebdriverIO - Introduction
- WebdriverIO - Prerequisite
- WebdriverIO - Architecture
- WebdriverIO - Getting Started with NodeJS
- WebdriverIO - Installation of NPM
- WebdriverIO - VS Code Installation
- WebdriverIO - Package.json
- WebdriverIO - Mocha Installation
- Selenium Standalone Server Installation
- WebdriverIO - Configuration File generation
- WebdriverIO - VS Code Intellisense
- WebdriverIO - Wdio.conf.js file
- WebdriverIO - Xpath Locator
- WebdriverIO - CSS Locator
- WebdriverIO - Link Text Locator
- WebdriverIO - ID Locator
- WebdriverIO - Tag Name Locator
- WebdriverIO - Class Name Locator
- WebdriverIO - Name Locator
- Expect Statement for Assertions
- WebdriverIO - Happy Path Flow
- WebdriverIO - General Browser Commands
- WebdriverIO - Handling Browser Size
- WebdriverIO - Browser Navigation Commands
- Handling Checkboxes & Dropdowns
- WebdriverIO - Mouse Operations
- Handling Child Windows/Pop ups
- WebdriverIO - Hidden Elements
- WebdriverIO - Frames
- WebdriverIO - Drag & Drop
- WebdriverIO - Double Click
- WebdriverIO - Cookies
- WebdriverIO - Handling Radio Buttons
- Chai Assertions on webelements
- WebdriverIO - Multiple Windows/Tabs
- WebdriverIO - Scrolling Operations
- WebdriverIO - Alerts
- WebdriverIO - Debugging Code
- WebdriverIO - Capturing Screenshots
- WebdriverIO - JavaScript Executor
- WebdriverIO - Waits
- WebdriverIO - Running Tests in Parallel
- WebdriverIO - Data Driven Testing
- Running Tests from command-line parameters
- Execute Tests with Mocha Options
- Generate HTML reports from Allure
- WebdriverIO Useful Resources
- WebdriverIO - Quick Guide
- WebdriverIO - Useful Resources
- WebdriverIO - Discussion
Generate HTML reports from Allure
In WebdriverIO, we have a reporter plugin to generate Allure Test Reports. An Allure is a light-weight test reporter tool that creates a brief and well-documented report based on the test results from an automation run.
For installation of Allure and creating it’s entry in the package.json file, we have to run the below mentioned command −
npm install @wdio/allure-reporter --save-dev
The details on package.json are discussed in the Chapter titled Package.json file.
The following screen will appear on your computer −

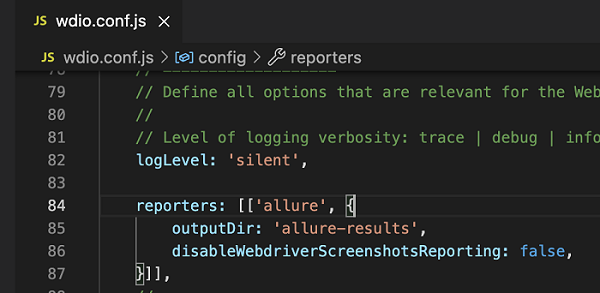
After installation of the Allure, we have to configure the output directory in the Configuration file wdio.conf.js within the reporter options by adding the below code.
The details on how to create a Configuration file are discussed in detail in the Chapter titled Wdio.conf.js file and Chapter titled Configuration File generation.
reporters: [['allure', {
   outputDir: 'allure-results',
   disableWebdriverScreenshotsReporting: false,
}]],
The following screen will appear on your computer −

Here, the outputDir has the default directory of /allure-results. After automation is completed, we shall find this directory generated. It shall contain the .xml files for each of the test files within the specs folder included in the run along with .txt, .png and other files.
Also, to attach the screenshot of the failure test, we have set the parameter disableWebdriverScreenshotsReporting to false.
However, we also need to add an afterStep hook in the wdio.conf.js file having the code as shown below −
afterStep: function (test, scenario, { error, duration, passed }) {
   if (error) {
      browser.takeScreenshot();
   }
}
The following screen will appear on your computer −

Run the Configuration file - wdio.conf.js file with the following command −
npx wdio run wdio.conf.js
The details on how to create a Configuration file are discussed in detail in the Chapter titled Wdio.conf.js file and Chapter titled Configuration File generation.
The following screen will appear on your computer −

After the command has been executed successfully, a folder called allure-results(as specified in the wdio.conf.js) gets generated within the WebdriverIO project. It contains the reports in xml format.
Next, we have to convert these reports to the HTML format. For this, we shall first install the Allure Commandline tool for generating Allure reports from the test results.
This is done by running the below given command −
npm install -g allure-commandline --save-dev
After the installation, we can generate the results in HTML format with the below mentioned command −
allure generate [allure_output_dir] && allure open
To override an existing result, we have to run the following command −
allure generate [allure_output_dir] --clean && allure open
The following screen will appear on your computer −

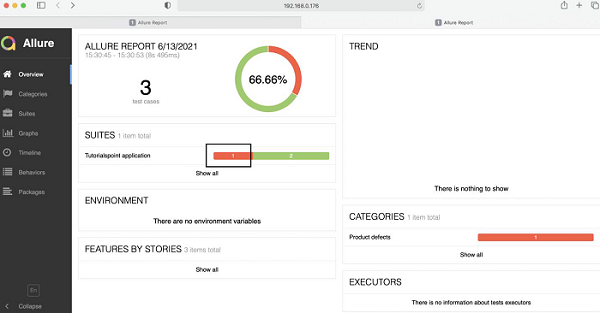
After the command has been executed successfully, a browser is opened containing the test result. The following screen will appear on your computer −

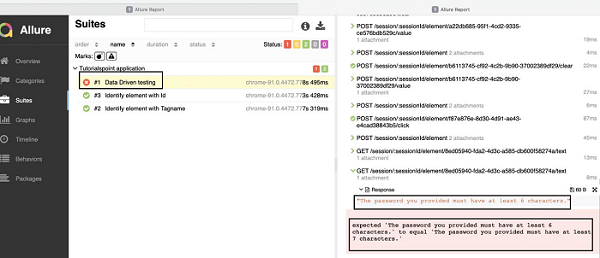
On clicking the failed test(marked with red), we shall get the details of the test along with the expected, actual output and screenshot of the failure(obtained on expanding Response).
The following screen will appear on your computer −
