- WebdriverIO - Home
- WebdriverIO - Introduction
- WebdriverIO - Prerequisite
- WebdriverIO - Architecture
- WebdriverIO - Getting Started with NodeJS
- WebdriverIO - Installation of NPM
- WebdriverIO - VS Code Installation
- WebdriverIO - Package.json
- WebdriverIO - Mocha Installation
- Selenium Standalone Server Installation
- WebdriverIO - Configuration File generation
- WebdriverIO - VS Code Intellisense
- WebdriverIO - Wdio.conf.js file
- WebdriverIO - Xpath Locator
- WebdriverIO - CSS Locator
- WebdriverIO - Link Text Locator
- WebdriverIO - ID Locator
- WebdriverIO - Tag Name Locator
- WebdriverIO - Class Name Locator
- WebdriverIO - Name Locator
- Expect Statement for Assertions
- WebdriverIO - Happy Path Flow
- WebdriverIO - General Browser Commands
- WebdriverIO - Handling Browser Size
- WebdriverIO - Browser Navigation Commands
- Handling Checkboxes & Dropdowns
- WebdriverIO - Mouse Operations
- Handling Child Windows/Pop ups
- WebdriverIO - Hidden Elements
- WebdriverIO - Frames
- WebdriverIO - Drag & Drop
- WebdriverIO - Double Click
- WebdriverIO - Cookies
- WebdriverIO - Handling Radio Buttons
- Chai Assertions on webelements
- WebdriverIO - Multiple Windows/Tabs
- WebdriverIO - Scrolling Operations
- WebdriverIO - Alerts
- WebdriverIO - Debugging Code
- WebdriverIO - Capturing Screenshots
- WebdriverIO - JavaScript Executor
- WebdriverIO - Waits
- WebdriverIO - Running Tests in Parallel
- WebdriverIO - Data Driven Testing
- Running Tests from command-line parameters
- Execute Tests with Mocha Options
- Generate HTML reports from Allure
- WebdriverIO Useful Resources
- WebdriverIO - Quick Guide
- WebdriverIO - Useful Resources
- WebdriverIO - Discussion
WebdriverIO - Data Driven Testing
We can achieve data driven testing with WebdriverIO. Data driven testing is required when we need to execute the same test case multiple times with different combinations of data. Here, we shall see how to use an external JSON file to hold data.
In the WebdriverIO project all the test files are created within the specs folder. The specs folder resides within the test folder. We shall create another folder, say testData within the test folder.
The testData folder shall contain the JSON files which hold the different sets of data in key-value pairs. Also, if we have three test files within the spec folder and we want to have data driven testing for all these files, we need to create three JSON files.
Each of these JSON files should be used dedicatedly for each test file within the spec folder. We shall create a JSON file, say test1.json within the testData folder.
Now, add the below data within this file −
[
   {
      "email":"test@gmail.com",
      "password":"12"
   },
   {
      "email":"test12@gmail.com",
      "password":"34"
   }
]
The following screen will appear on your computer −

We shall parse this JSON file and convert it in string format. This is done by adding the below library −
const s =require('fs')
Then to parse the JSON file, we shall use the readFileSync method and pass the relative path of the JSON file file as a parameter to this method. Finally, store this in an object, say c. This object shall contain all the data.
let c = JSON.parse(s.readFileSync('test/testData/test1.json'))
Then, we shall iterate the same test case over the two sets of data with the help of the loop. This loop has to be implemented just before the block and it should pass the data keys as declared in the JSON file.
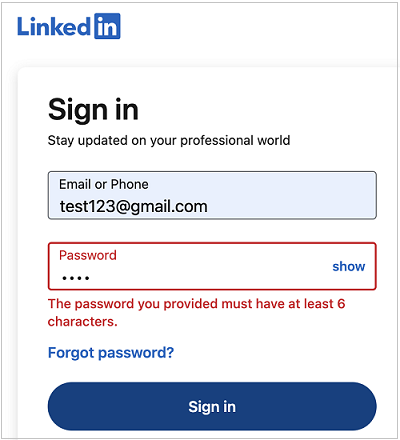
With the above set of data, we shall validate the login page of the LinkedIn application. On clicking on the Sign in button after entering an email and password of less than 6 characters, an error message - The password you provided must have at least 6 characters should be thrown.
The following screen will appear on your computer −

To begin, follow Steps 1 to 5 from the Chapter titled Happy path flow with WebdriverIO which are as follows −
Step 1 − Install NodeJS. The details on how to perform this installation are given in detail in the Chapter titled Getting Started with NodeJS.
Step 2 − Install NPM. The details on how to perform this installation are given in detail in the Chapter titled Installation of NPM.
Step 3 − Install VS Code. The details on how to perform this installation are given in detail in the Chapter titled VS Code Installation.
Step 4 − Create the Configuration file. The details on how to perform this installation are given in detail in the Chapter titled Configuration File generation.
Step 5 − Create a spec file. The details on how to perform this installation are given in the Chapter titled Mocha Installation.
Step 6 − Add the below code within the Mocha spec file created.
//import chai library
const c = require('chai').expect
//library for parsing JSON file
const s =require('fs')
let h = JSON.parse(s.readFileSync('test/testData/test1.json'))
// test suite name
describe('Tutorialspoint application', function(){
   //iterate the test case
   h.forEach(  ({email,password})  =>{
      //test case
      it('Data Driven testing', function(){
         // launch url
         browser.url('https://www.linkedin.com/login')
         //identify the email field then enter key - email
         $("#username").setValue(email)
         //identify password field then enter key - password
         $("#password").setValue(password)
         //identify Sign in button then click
         $("button[type='submit']").click()
         //verify error message
         const e = $('#error-for-password')
         console.log(e.getText() + ' - Error Text')
         //verify Alert text with Chai assertion
         c(e.getText()).to.equal("The password you provided must have at least 6     characters.")
      });
   });
});
Run the Configuration file - wdio.conf.js file with the following command −
npx wdio run wdio.conf.js
The details on how to create a Configuration file are discussed in detail in the Chapter titled Wdio.conf.js file and Chapter titled Configuration File generation.
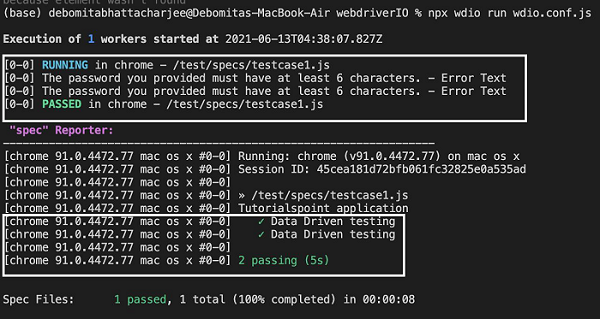
The following screen will appear on your computer −

After the command has been executed successfully, the error text - The password you provided must have at least 6 characters gets printed in the console twice.
Also, it shows the message 2 passing as the same test case defined in one block has executed two times with two different sets of data.