- WebdriverIO - Home
- WebdriverIO - Introduction
- WebdriverIO - Prerequisite
- WebdriverIO - Architecture
- WebdriverIO - Getting Started with NodeJS
- WebdriverIO - Installation of NPM
- WebdriverIO - VS Code Installation
- WebdriverIO - Package.json
- WebdriverIO - Mocha Installation
- Selenium Standalone Server Installation
- WebdriverIO - Configuration File generation
- WebdriverIO - VS Code Intellisense
- WebdriverIO - Wdio.conf.js file
- WebdriverIO - Xpath Locator
- WebdriverIO - CSS Locator
- WebdriverIO - Link Text Locator
- WebdriverIO - ID Locator
- WebdriverIO - Tag Name Locator
- WebdriverIO - Class Name Locator
- WebdriverIO - Name Locator
- Expect Statement for Assertions
- WebdriverIO - Happy Path Flow
- WebdriverIO - General Browser Commands
- WebdriverIO - Handling Browser Size
- WebdriverIO - Browser Navigation Commands
- Handling Checkboxes & Dropdowns
- WebdriverIO - Mouse Operations
- Handling Child Windows/Pop ups
- WebdriverIO - Hidden Elements
- WebdriverIO - Frames
- WebdriverIO - Drag & Drop
- WebdriverIO - Double Click
- WebdriverIO - Cookies
- WebdriverIO - Handling Radio Buttons
- Chai Assertions on webelements
- WebdriverIO - Multiple Windows/Tabs
- WebdriverIO - Scrolling Operations
- WebdriverIO - Alerts
- WebdriverIO - Debugging Code
- WebdriverIO - Capturing Screenshots
- WebdriverIO - JavaScript Executor
- WebdriverIO - Waits
- WebdriverIO - Running Tests in Parallel
- WebdriverIO - Data Driven Testing
- Running Tests from command-line parameters
- Execute Tests with Mocha Options
- Generate HTML reports from Allure
- WebdriverIO Useful Resources
- WebdriverIO - Quick Guide
- WebdriverIO - Useful Resources
- WebdriverIO - Discussion
WebdriverIO - Link Text Locator
Once we navigate to a webpage, we may interact with a webelement by clicking a link to complete our automation test case. The locator link text is used for an element having the anchor tag.
We can identify an anchor element with a matching text. In the WebdriverIO code, we have the option to specify the link of an element in the below format −
$('=value of the anchor text')
Or, we can store this expression in a variable as follows −
const p = $('=value of the anchor text')
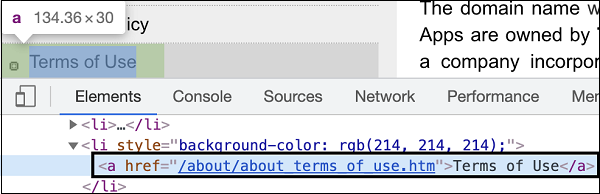
Let us identify the link highlighted in the below image and click on it −

The link highlighted in the above image has a tagname - a and the anchor text - Terms of Use.
To begin, follow Steps 1 to 5 from the Chapter titled Happy path flow with WebdriverIO which are as follows −
Step 1 − Install NodeJS. The details on how to perform this installation are given in detail in the Chapter titled Getting Started with NodeJS.
Step 2 − Install NPM. The details on how to perform this installation are given in detail in the Chapter titled Installation of NPM.
Step 3 − Install VS Code. The details on how to perform this installation are given in detail in the Chapter titled VS Code Installation.
Step 4 − Create the Configuration file. The details on how to perform this installation are given in detail in the Chapter titled Configuration File generation.
Step 5 − Create a spec file. The details on how to perform this installation are given in the Chapter titled Mocha Installation.
Step 6 − Add the below code within the Mocha spec file created.
/ test suite name
describe('Tutorialspoint application', function(){
   //test case
   it('Identify element with Link Text', function(){
      // launch url
      browser.url('https://www.tutorialspoint.com/about/about_careers.htm')
      //identify element with link text then click
      $("=Terms of Use").click()
      console.log('Page title after click: ' + browser.getTitle())
   });
});
Run the Configuration file - wdio.conf.js file with the following command −
npx wdio run wdio.conf.js.
The details on how to create a Configuration file are discussed in detail in the Chapter titled Wdio.conf.js file and Chapter titled Configuration File generation.
The following screen will appear on your computer −
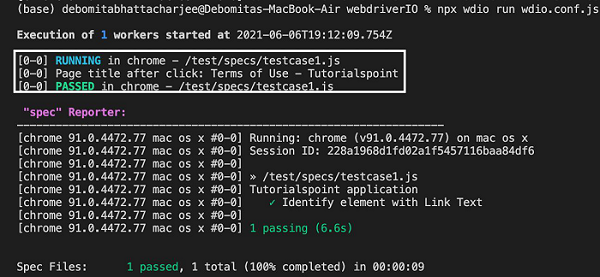
After the command has been executed successfully, the title of the page after clicking - Terms of Use - Tutorialspoint is printed in the console.
Partial Link Text Locator
Once we navigate to a webpage, we may interact with a webelement by clicking a link to complete our automation test case. The locator partial link text is used for an element having the anchor tag.
We can identify an anchor element with a matching text. In the WebdriverIO code, we have the option to specify the partial link of an element in the below format −
$('*=value of the anchor text which is matching')
Or, we can store this expression in a variable as follows −
const p = $('*=value of the anchor text which is matching')
The partial link text is similar to link text with the only difference being that it assists in scenarios where a few characters of an anchor element are fixed and the remaining ones are dynamic.
Let us identify the link highlighted in the below image and click on it −
The link highlighted in the above image has a tagname - a and the anchor text - Terms of Use.
To begin, follow Steps 1 to 5 from the Chapter titled Happy path flow with WebdriverIO which are as follows −
Step 1 − Install NodeJS. The details on how to perform this installation are given in detail in the Chapter titled Getting Started with NodeJS.
Step 2 − Install NPM. The details on how to perform this installation are given in detail in the Chapter titled Installation of NPM.
Step 3 − Install VS Code. The details on how to perform this installation are given in detail in the Chapter titled VS Code Installation.
Step 4 − Create the Configuration file. The details on how to perform this installation are given in detail in the Chapter titled Configuration File generation.
Step 5 − Create a spec file. The details on how to perform this installation are given in the Chapter titled Mocha Installation.
Step 6 − Add the below code within the Mocha spec file created.
// test suite name
describe('Tutorialspoint application', function(){
   //test case
   it('Identify element with Partial Link Text', function(){
      // launch url
      browser.url('https://www.tutorialspoint.com/about/about_careers.htm')
      //identify element with partial link text then click
      $("*=Terms of").click()
      console.log('Page title after click: ' + browser.getTitle())
   });
});
Run the Configuration file - wdio.conf.js file with the following command −
npx wdio run wdio.conf.js
The details on how to create a Configuration file are discussed in detail in the Chapter titled Wdio.conf.js file and Chapter titled Configuration File generation.
The following screen will appear on your computer −
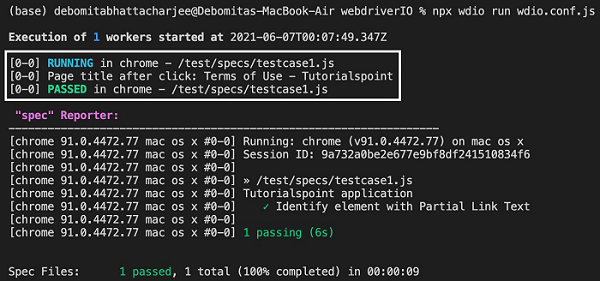
After the command has been executed successfully, the title of the page after clicking - Terms of Use - Tutorialspoint is printed in the console.
