
Article Categories
- All Categories
-
 Data Structure
-
 Networking
-
 RDBMS
RDBMS
-
 Operating System
-
 Java
Java
-
 MS Excel
-
 iOS
iOS
-
 HTML
HTML
-
 CSS
CSS
-
 Android
-
 Python
-
 C Programming
-
 C++
C++
-
 C#
C#
-
 MongoDB
-
 MySQL
MySQL
-
 Javascript
-
 PHP
PHP
-
 Economics & Finance
How to Move to the Beginning or Start of Next Row for Data Entry in Excel?
Excel is a strong programme that is frequently used for data management and analysis. Efficiency and knowledge of numerous keyboard shortcuts are crucial when working with huge datasets since they allow you to move through the spreadsheet more rapidly. Moving to the beginning or start of the next row for data entry is a frequent operation. You can shorten the time it takes to enter data by mastering this method. This lesson will show you how to quickly enter data into Excel by using a mechanism other than the mouse or arrow keys to advance to the beginning of the next row.
Move to the Beginning or Start of Next Row for Data Entry
Here, we will first create a VBA module and then run it to complete the task. So let us see a simple process to know how you can move to the beginning or start of the next row for data entry in Excel.
Step 1
Consider any Excel sheet.
First, right-click on the sheet name and select View code to open the VBA application.
Right Click > View Code.
Step 2
Then click on Insert and select Module, then copy the below code into the text box.
Insert > Module > Copy.
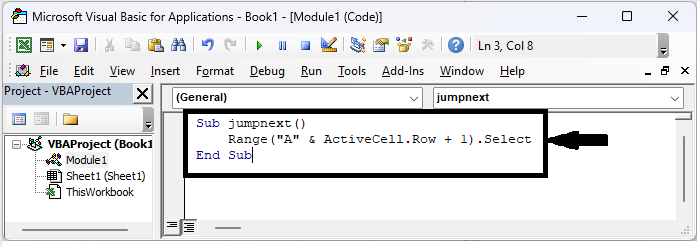
Code
Sub jumpnext()
   Range("A" & ActiveCell.Row + 1).Select
End Sub
In the code, A represents moving the cursor to column A.
Step 3
Then save the sheet as a macro-enabled template and click F5 to run the module. Then you will see that you will be moved to the start of the next row in Excel.
Save > F5.

This is how you can move to the beginning of the next row for data entry in Excel.
Conclusion
In this tutorial, we have used a simple example to demonstrate how you can move to the beginning or start of the next row for data entry in Excel to highlight a particular set of data.

839 Views
