- SAP PS - Home
- SAP PS - Overview
- Integration with ERP Modules
- Organization Structure Elements
- SAP PS - Currencies
- SAP PS - What is a Project?
- SAP PS - Defining Special Characters
- SAP PS - Status Profile
- SAP PS - Selection Profile
- SAP PS - Project Profile
- SAP PS - Settlement Profile
- SAP PS - Network Profile
- SAP PS - Network Type
- Person Responsible for Work Center
- Maintain Activity Control Key
- SAP PS - Access Control List
- SAP PS - Cost Component
- SAP PS - Execution Service Profile
- SAP PS - Budget Management
- Number Ranges for Budgeting
- SAP PS - Revenues and Earnings
- SAP PS - Dates
- WBS Scheduling Parameters
- SAP PS - Material
- SAP PS - Versions
- SAP PS - Project Information System
- SAP PS - Consultant Responsibilities
SAP PS - Quick Guide
SAP PS - Overview
Project System is one of the key modules of SAP to perform project and portfolio management. It helps you to manage the project life cycle starting from structuring to planning, execution, until the project completion. Project system is closely integrated with other SAP modules like logistics, material management, Sales and Distribution, Plant Maintenance, and Production planning module.
It enables organizations to manage all SAP projects- large and small-scale projects efficiently. The Project Manager has a task to ensure that these projects are executed within budget and time and to ensure that resources are allocated to the project as per the requirement.
Before a project is initiated, it is required that project goal is clearly defined and the activities be structured.
The integration between SAP Project System PS with SAP ERP R/3 application modules allows you to design, plan, and execute the projects as part of your normal project procedure. Hence, Project System module has the constant data access to all the departments involved in the project.
Classification of Projects
As per budget, projects can be categorized in the following categories −
External Financed Projects − This includes the projects which are sponsored by clients and are executed to meet the client requirements. These projects are called customer projects and project goal is aligned to meet the customer demand.
Internal Financed Projects − This includes project related to capital investment or overhead cost projects.
You can also categorize projects according to the list of activities and project structure or on the basis of individual activities −
- Using Work breakdown structure WBS.
- Using individual activities as per work packages.
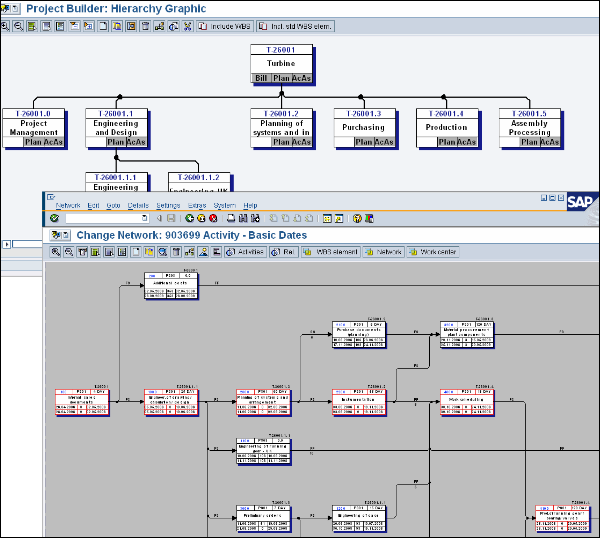
In Project System, Work Breakdown structure and network diagram can be used to structure the project either in hierarchical order or in using network techniques. You can define key milestones and documents that allow you to monitor the progress of project and helps you to define key interest of individuals.
Project Structure can be defined either manually or based on templates. You can also create the Project structures using sales documents automatically.
In the following diagram, you can see the sample project structure that is created hierarchically using Work Breakdown structure.
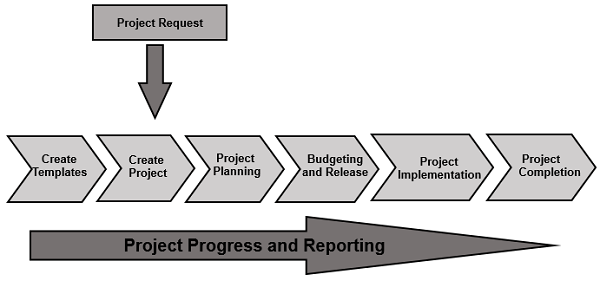
Project System Process Flow
In Project System, each process has a defined set of tasks to be performed. These tasks are known as process flow in Project Lifecycle.
When a project request is received, a project is created and it has to undergo the following steps in project process flow/lifecycle.
Following are the key steps involved in Project process flow −
- Create Templates/WBS
- Create Project
- Project Planning
- Budgeting and Release
- Project Implementation
- Project Completion
Here is a diagrammatic representation of the process flow of SAP PS −
SAP PS - Integration with ERP Modules
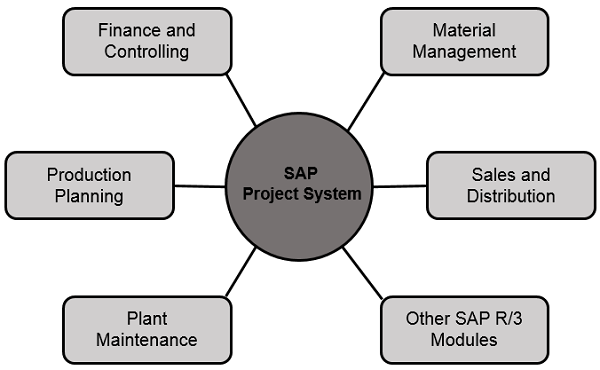
Project system is closely integrated with other SAP modules like logistics, material management, Sales and Distribution, Plant Maintenance, and Production planning module.
The integration between SAP Project System PS with SAP ERP R/3 application modules allows you to design, plan, and execute the projects as part of your normal project procedure. Hence, Project System module has the constant data access to all the departments involved in the project.
SAP PS system is tightly integrated with the following modules −
Finance and Controlling Module − To plan the costs and revenue in the project system as per the financial planning requirements.
Material Management MM − To manage procurement and inventory functions occurring in project lifecycle.
Sales and Distribution Module − To manage the sales process in project lifecycle- includes quotations for customer projects. This includes billing, selling, and shipping of goods and services required in project lifecycle.
Production Planning − To perform activities like material requirement planning MRP, Bills of material BOM, material requisition as per MRP, capacity planning, and other production planning tasks in project lifecycle.
Other R/3 modules − Other modules like plant maintenance, budget management, investment, etc.
In the following diagram, you can see SAP Project System is integrated with SAP R/3 modules during project lifecycle.
Organization Structure and Elements
When a project is initiated, it starts with the definition and classification of the project structure, which is required to align it with the existing enterprise structure in an organization.
Project System has no organizational structures of its own and we have to incorporate the structure to enterprise structure by assigning organization elements in different ERP R/3 modules. These organization elements allow Project system to maintain and get the data correctly.
An Organization structure consists of various elements that have to be created as part of structuring of project. Following are the organization elements −
Company Code
In SAP FI, a company can comprise of multiple codes, however it acts as a single unit for which financial statements are available. Company code is smallest unit in an organization for which financial statements (profit-loss statement, etc.) can be generated.
To create, edit and delete a company code, follow the steps given below −
Step 1 − Expand Enterprise Structure → Definition → Financial Accounting → Edit, Copy, Delete, check company code.
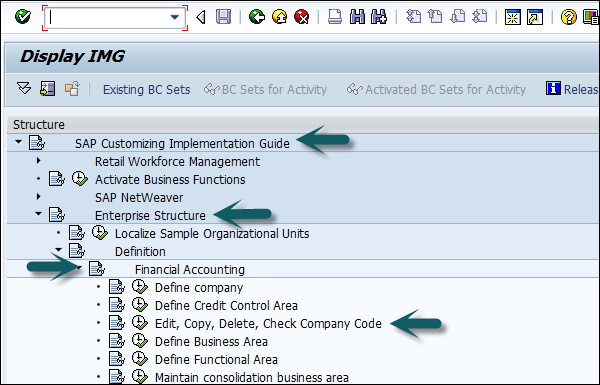
Step 2 − A new window will open. You can create new company code by selecting both the options.
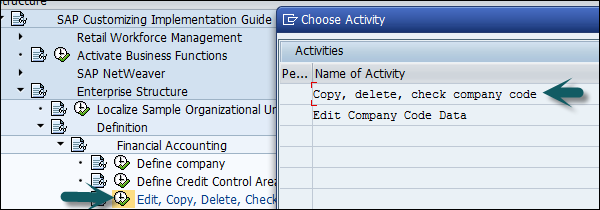
The option Copy, delete, and check company code allows you to copy all configuration and tables automatically.
Step 3 − If you select Edit company code, you will get the following window
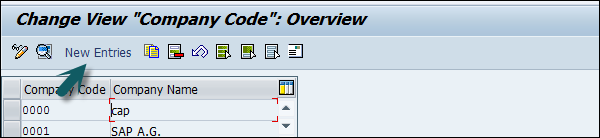
Step 4 − Click New Entries and update the code details.
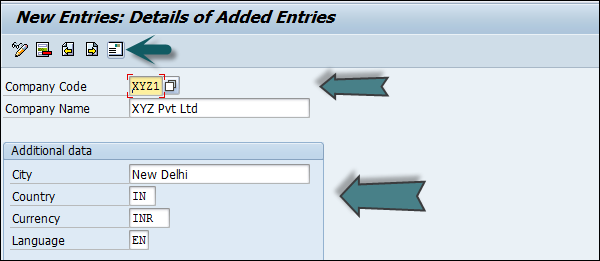
Step 5 − You can click the Address button and update the fields as shown below. Once Address field is updated, click the Save button.

Creating a Business Area
Business Areas are used to differentiate transactions that comes from different line of business in a company.
Example
There is a big company XYZ, which runs multiple business. Let us say it has three different domains like manufacturing, marketing and sales.
Now you have two options −
- First is to create different company codes
- The other option is to create each of these business lines into business areas.
Benefits of using Business Areas in this case −
You can use these business areas if other the company codes require the same areas.
It is easy to configure if you use Business Area because you just need to attach to the company code and the other details in business area will get attach itself.
By using Business areas in controlling, you can create profit and loss statements, balance sheets, etc. for business areas. Therefore, this is used for management accounting in few companies.
Note − Business areas are used in Controlling as compared to Finance Accounting.
Create new Business Area in SAP FI
Step 1 − Expand Enterprise Structure as Definition → Financial Accounting → Define Business Area.
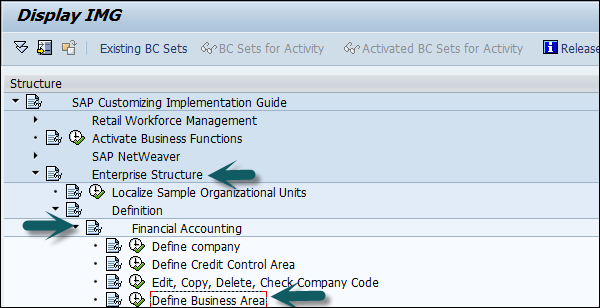
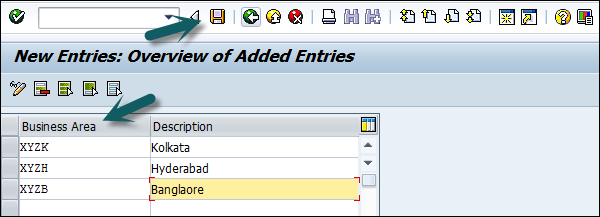
Step 2 − A new window will open. Click New Entries.

Step 3 − Enter the 4-digit Business Area code and save the configuration.
Creating a Controlling Area
Controlling Area in an organization is defined as an organizational structure and is cost accounting, Cost centers, profit centers are used to define the Controlling area.
Step 1 − To maintain a Controlling area, use T-Code: OKKP or go to Controlling → General Controlling → Maintain Controlling Area → Maintain Controlling Area.
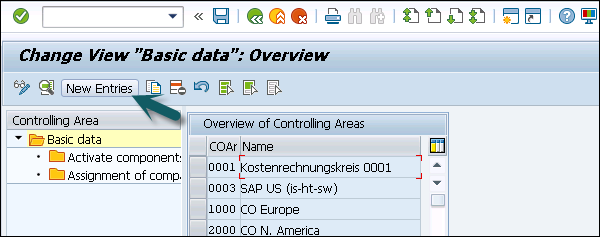
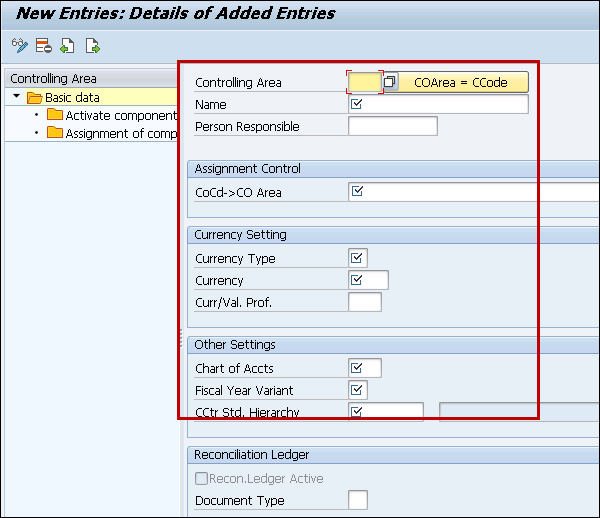
Step 2 − To create a Controlling area, click New Entries. Enter the following details
- Name of Controlling Area
- Company Code
- Currency settings
- Cost Center standard hierarchy
Defining Plant
Plant is an organizational unit within a company where activities take place. A plant will produce goods and makes goods available for the company.
The following steps will take you through the procedure of creating Plant −
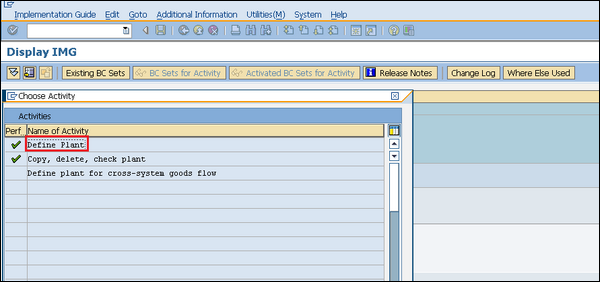
Step 1 − Go to IMG → Enterprise Structure → Definition → Logistic General. Click the Define, Copy, Delete check plant icon or use T-Code: OX10.
Step 2 − Select Define Plant to create a new plant.
Step 3 − Click New Entries.
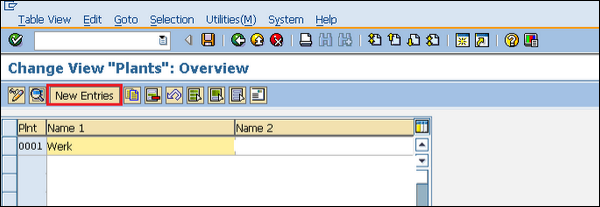
Step 4 − Fill in all necessary details like plant name, along with detailed information like Language, House no., city, country, region, postal code.
Step 5 − Click the save icon. A new plant will be created.
Creating a Storage Location
Storage location is an organizational unit, which actually differentiates between different material stocks in a Plant. Storage location is a place where stock is kept physically. Plant can be consisting of multiple storage location. All data is stored at storage location level for a particular storage location.
The following steps will take you through the procedure of creating Storage location −
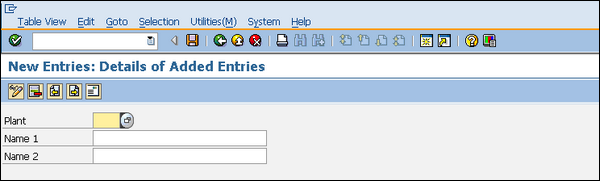
Step 1 − To Create Storage Location, IMG → Enterprise Structure → Definition → Materials Management. Click the Maintain Storage Location option or use the T-Code: OX09
Step 2 − Enter the name of plant for which you want to create storage location.
Step 3 − Click New Entries.

Enter the name of storage location along with the description of storage location.
Click the save icon after filling required information. A new Storage Location will be created.
SAP PS - Currencies
In SAP PS system, you can manage all the currency dependent data in the Project System using the following different currencies.
Controlling Area Currency
In this currency type, you define work breakdown structure (WBS), networks, activities, and orders in one controlling area. As the same controlling area is used, currency in a project system is also uniform.
Object currency
In Project System, it is possible to assign any object currency to different objects in the system.
- WBS element
- Project definition
- Network header
- Network activity
Note − When a company code is assigned to a controlling area and company code contains multiple currencies, you cannot allocate object currency in PS. In such a case, system automatically takes the local currency of company code.
Transaction currency
In this case, the costs and revenues from different business transactions are recorded as per currency of the business transaction.
Example
You can take the currency of PO in which it is raised in the system. In PS system, each amount is recorded in the database in all three currencies and you use the currency translation rates in the PS implementation.
Note − You can use Information system to view the reports in any currency including the above mentioned currency types and Project System translates the values in report as per the latest conversion values.
SAP PS - What is a Project?
A Project is defined as a temporary endeavor to create a product or to provide a service.
Projects have the following characteristics −
- Projects have a defined goal, which is agreed between the company and customer and is defined in Project Charter.
- Projects are complex, unique, and definitive in scope and involves a high certain risk to execute and complete on time.
- Projects have a defined quality requirements.
- Projects have definitive cost, duration and resources to work on the project.
Projects are defined as a part of the internal processes of a company. To execute the tasks in a project, you have to get an organizational form that is specific to the project and which is shared by all the departments involved.
You should define the project goal clearly to carry out project in its entirety and the activities to be carried out must be structured.
You can define project structure −
- As per the organization structure.
- As per the defined processes.
Work Breakdown Structure
This is the first step in project planning to define work breakdown structure to divide the activities into tasks. The type of tasks and activities to be defined vary as per project complexity and type of project- customer based or internal project.
In SAP Project system, you define the activities and people in the project in form of Work breakdown structure WBS.
Project Planning also involves the sequence of tasks to be performed and which tasks are dependent on each other and which tasks can be further divided in to smaller tasks. In SAP Project system, sequence of tasks are defined in the form of Network in project planning.
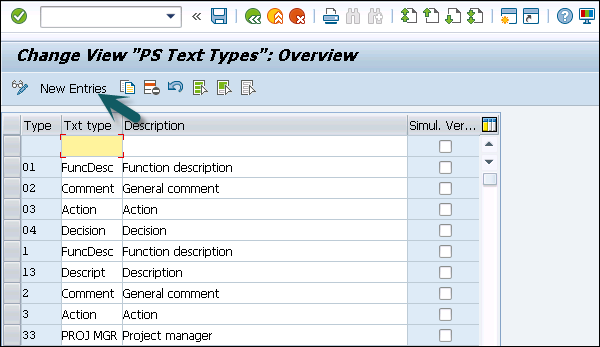
Maintain PS Types
A Project type is used to group or classify the projects as required. For example, banking projects capital projects or IT development projects.
A Project type is also used for reporting, building authorization and for creating hierarchies and network in project planning. It can also be used for developing customer requirements, i.e., use of BADI for WBS settlement rule determination based on project type as a parameter.
By defining PS type for PS texts in SAP system, this helps you to attach the text in project builder and this text can be used in projects.
Defining PS type in PS Texts
To define PS type in PS texts, follow the steps given below −
Step 1 − Go to SPRO → IMG → Project System → Documents → Define PS types for PS texts or use T-code: OPS3
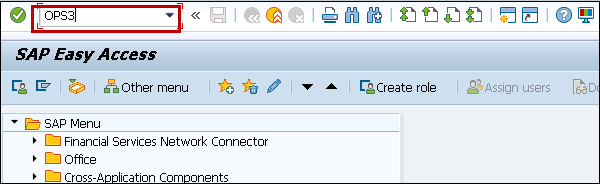
Step 2 − The PS Text Type screen appears. Click New Entries to define new text types as per the business requirement.
Step 3 − In the next window, enter the following fields −
Type − Enter the 2-digit unique ID to define PS type in system.
Text Type − Enter the text that defines PS text type in system.
Description − Enter the text of PS type.
Simulation version − You can select checkbox to define changes in simulation version

Step 4 − Once you enter the details, click the save button at the top.

SAP PS - Defining Special Characters
You can define various special characters in the project. These characters define how a project is coded for editing.
You can define different parameters for −
- Editing the project number.
- Length of key for project coding and an indicator to specify if a project should have this length or it can be shorter.
- Structure length to specify length must be equal to no of characters.
- Entry tool field for fast entry of WBS element.
- Special character helps WBS number to be separated with special charterers.
Automatic Number assignment − This is used to update symbol that you want to assign automatically to project object and WBS.
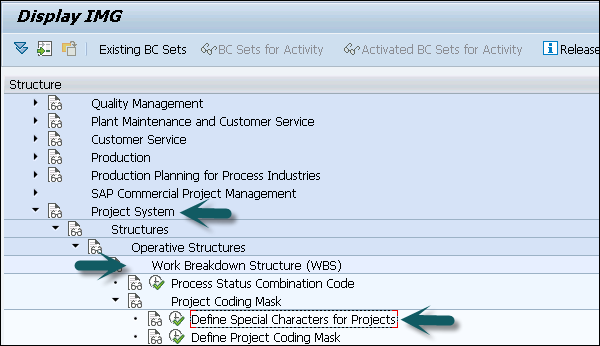
To define special characters, use T-Code: OPSK
Step 1 − Go to SPRO → IMG → Project System → Structure → Operative Structure → work breakdown structure → Project coding mask → Define special characters for project.
Step 2 − On special characters overview screen, enter the following details −
PL − Project Length
SL − Structure Length
Entry Tool − To fast enter WBS element
Special Character − WBS to be separated with special characters
EDIT − To create project with coding rules
ANO − To assign symbol automatically to project
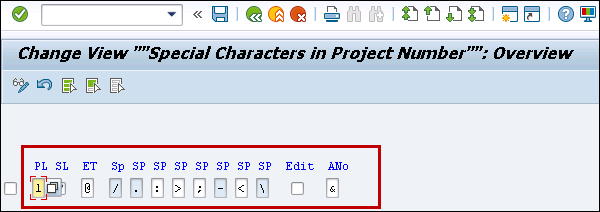
Note − SAP recommends avoiding these special characters − *, +, ? and % as these special characters are used for specific functions in the system.
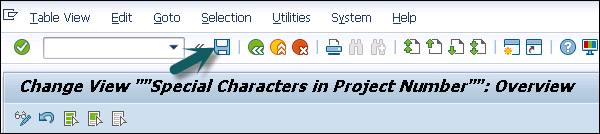
Step 3 − To save the configuration, click the save button at the top.
SAP PS - Status Profile
A status profile contains the individual user statuses and the business transaction rules defined for those statuses. You can define multiple limit number of user status profiles that can be maintained in SAP system.
To create a status profile in SAP system −
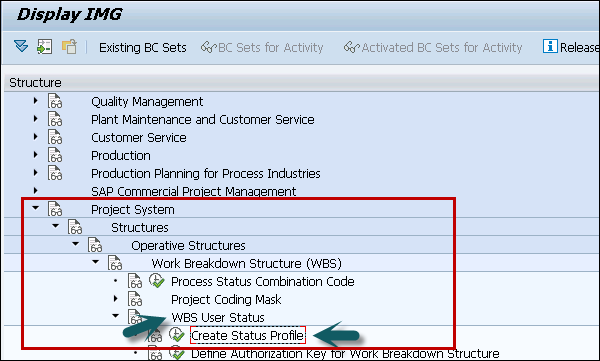
Step 1 − You can use T-code: OK02 or go to SPRO → IMG → Project Systems → Structure → Operative Structure → Work breakdown structure → WBS user status → Create Status profile.
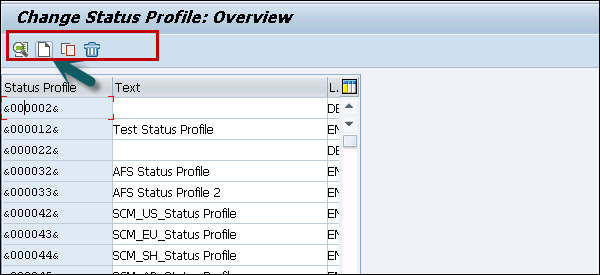
Step 2 − A new screen Change status profile overview will open. You can use other options to copy an existing profile, to delete a profile or to view details.
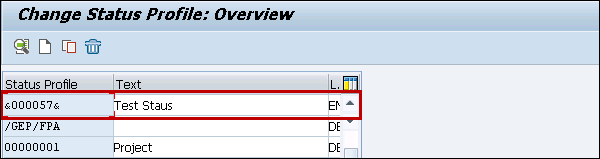
Step 3 − In the next window, enter status profile Id to identify the profile in SAP system.
Enter the text of profile, Maintenance Language: Enter language key like EN. Press ENTER to continue.

Step 4 − Once you press ENTER, status profile you have created will be shown in the list of status profile. Double-click on status profile.
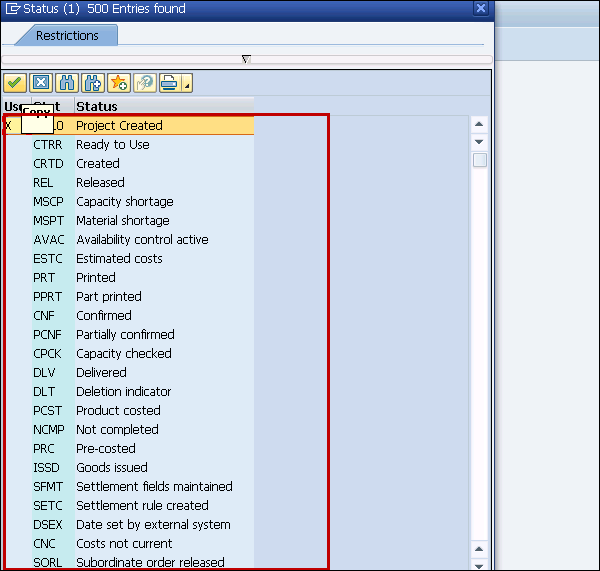
Step 5 − In the next window, enter the following details −
Stat − Status number form lowest to highest
Status − Update unique status id
Short text − description text
Initial Status − To set the status of profile for project
Lowest − Update the lowest status number
Highest − Update highest status number
Position − To determine status to be displayed
Step 6 − After entering these details, click Object types at the top.
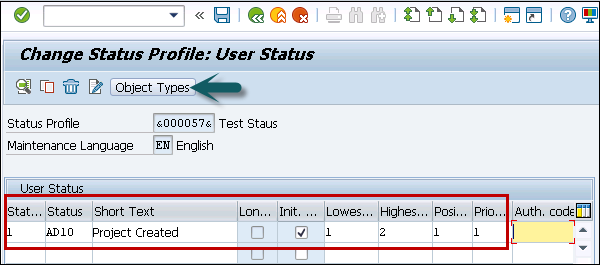
The Allowed Object types screen appears with various options.
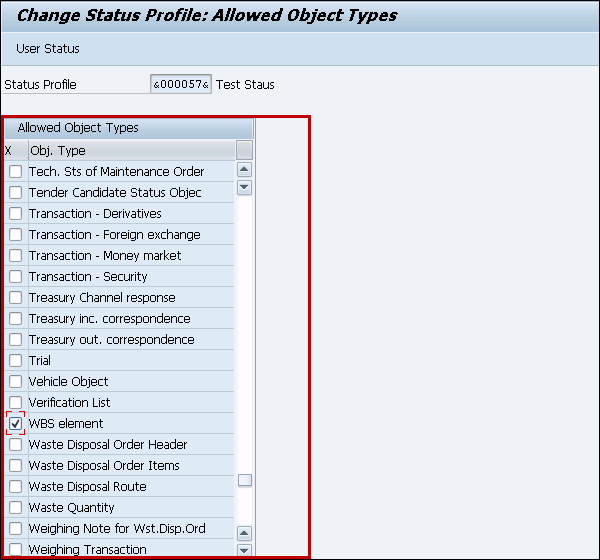
Step 7 − Once you enter all the details, click the save button at the top.


SAP PS - Selection Profile
A Selection profile in SAP Project system is used when you have large number of selection objects repeatedly with same selection condition. Selection conditions are used using topdown approach.
To configure selection profile, follow the given steps −
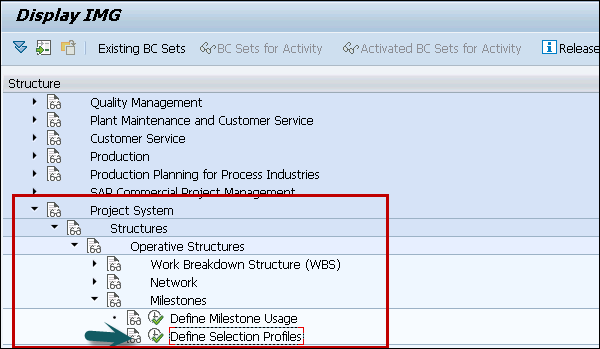
Step 1 − Go to SAP Easy access SPRO → IMG → Project Systems → Structure → Operative Structure → Milestones → Define Selection profiles or use T-code: BS42.
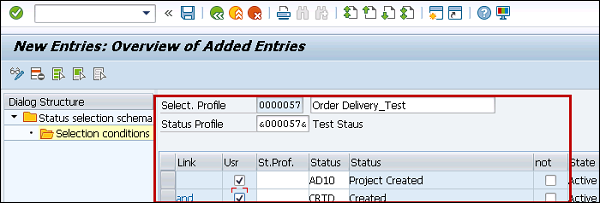
Step 2 − To create new selection profile, click New Entries on Status Selection Overview screen.
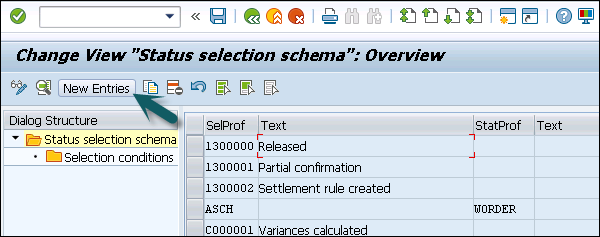
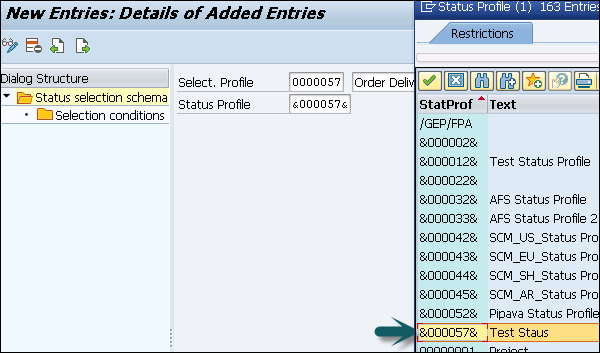
Step 3 − In the next window, you have to enter 7-digit alphanumeric id that identifies the selection profile and text description of selection profile. Enter the status profile Id that you have created.
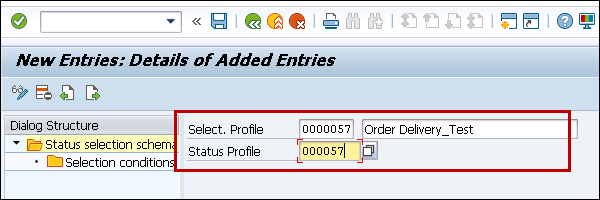
Step 4 − You can also perform Search option to select the Status profile.
Step 5 − Next, go to Selection conditions screen on the left side.
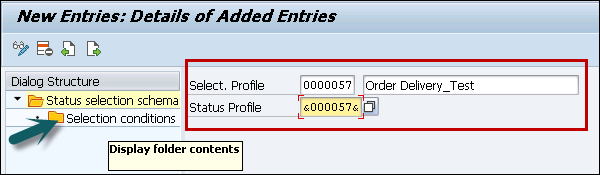
Step 6 − Once you double-click, click the New Entries button at the top.
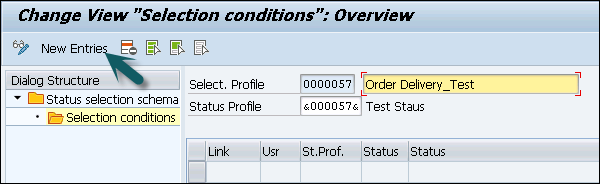
Step 7 − In the next window, enter the following details −
Usr − For user status
StatusProf − This is optional field to update user status profile.
Status − Update status from drop down, If status is user status, you can select X from the drop down.
Step 8 − To exclude selected condition in the report, enter −
State − To show if profile is active
Step 9 − Once you enter all the details, click the save button at the top.
SAP PS - Project Profile
A Project profile is defined to maintain default values and control parameters like planning methods for costs. The information entered in project profile is copied to project in project definition or also in the project elements. This information can be changed at later stage.
Note that the values in the project profile is used to maintain the functions of certain areas of the Project System and should only be changed without considering all the factors. You should not change the keys related to costing sheet or the results analysis key as these can change existing system.
You must maintain the following information under project profile section −
- Basic data
- Time scheduling
- Costs/revenues/finances
- Organizational data
A standard R/3 System contains the predefined project profile that has the most important control parameters.
To create a Project profile −
Step 1 − Use T-code: OPSA or go to SPRO → IMG → Project Systems → Structure → Operative Structures → Work Breakdown structure → Create Project Profile.

Step 2 − To create a new profile, click New Entries on Project Profile Overview screen.

On the New Entries screen, enter the following details −
Proj.prof. − Enter the unique ID that identifies project profile in SAP system.
Project Type − Category to which project belongs.
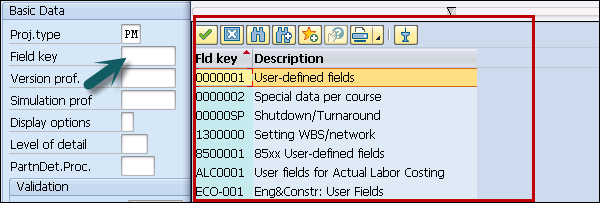
Field Key − Select field key from the drop-down list. You can select different field keys for different projects as shown below −
In the new window, select the following −
Display Options − This determined how the project will be identified in project builder.
All account assessment element − This has to be selected if all WBS has to be created using this profile.
Project summarize master data − Select this field to summarize the master data in project. This is used to perform any reports.
Project Stock − Default is no stock option.

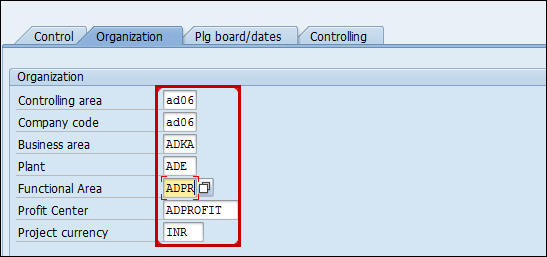
Next, go to Organization tab. You have to enter the following details under the Organization tab −
Controlling Area − Enter Controlling area belongs to project profile
Company Code − Enter the company code that belongs to Control area
Business area − Enter business area belongs to company code and controlling area
Plant − Enter plant code belongs to company code
Functional area − Enter functional area key
Profit Center − Enter profit center belongs to controlling area
Project Currency − Enter project currency
Click the save button at the top to save the project profile.
SAP PS - Settlement Profile
In a project, you collect cost and revenues temporarily and they have to settle as part of period end processing. You need a settlement profile stored in project profile or network type, which determines whether settlement is required, allowed, or blocked.
You can use the settlement profile to define the following for actual costs −
- Full Settlement
- Can be settled
- Not to be settled
As per the settings in the settlement profile, there is a need to settle the costs of an object in full before that object is achieved in the system.
You can maintain a settlement profile in system.
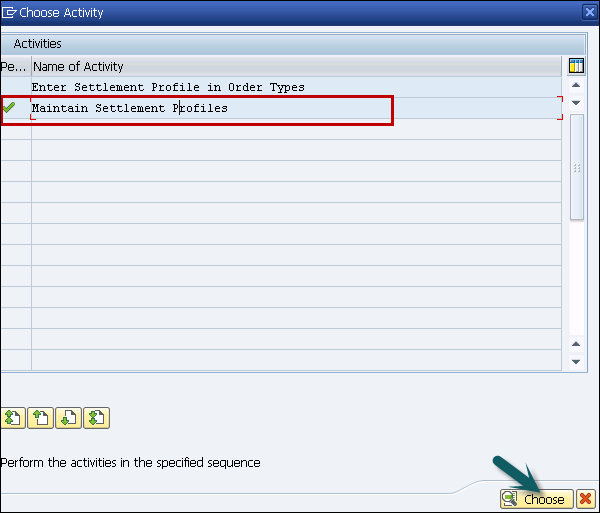
Step 1 − Use the T-code: OKO7 or navigate to SPRO → IMG → Controlling → Internal Orders → Actual Postings → Settlement → Maintain settlement profiles.

Step 2 − In the next window, select maintain settlement profiles and click Choose.
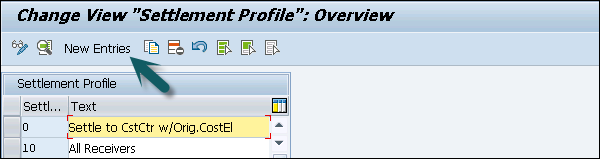
Step 3 − To create a new settlement profile, click New Entries in the Settlement profile overview window.
Step 4 − In the next window, you have to enter the following details −
Settlement profile − Enter unique ID that identifies the settlement profile in system and description.
Actual Cost/Cost of sales − To find the settlement value
Default values − Enter allocation structure and default object type field
Indicator − Select % settlement and amount settlement
Enter Receivers
Other parameters − Document type, maximum number of dist rls, residence time
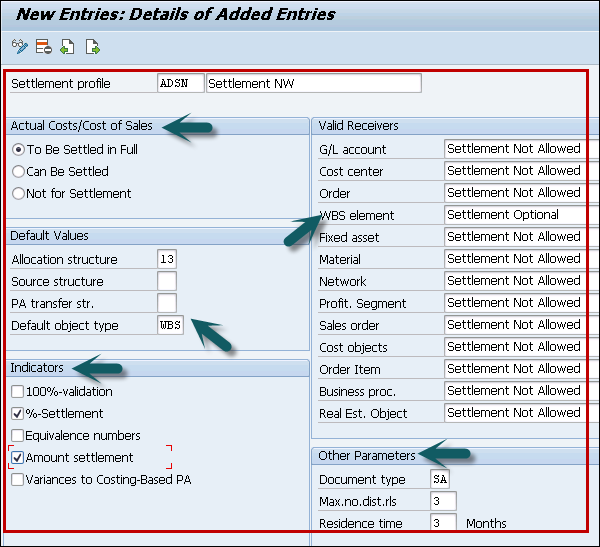
Step 5 − Once you enter all the fields, click the save button at the top.
SAP PS - Network Profile
You can create network profile in SAP PS to maintain Network and WBS structure and to define rules for linking networks.
To create network profile, follow the steps given below −
Step 1 − Use T-Code: OPUU or go to SAP Easy access, SPRO → IMG → Project System → Structures → Operative structure → Network → Setting for Network
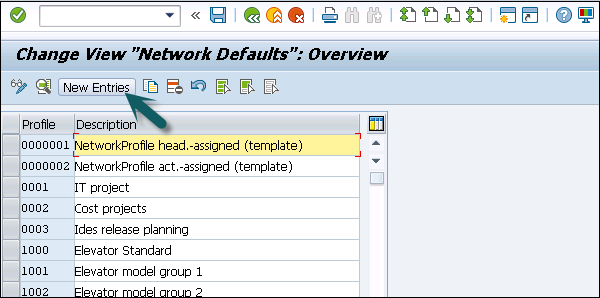
Step 2 − In next screen, enter the following details −
Network Profile − This is unique Id to identify network profile in the system.
Plant − Enter plant code and it is default for all activities
Network Type − Enter the network type from drop down list
MRP Control group − Enter the MRP control group associated with planner group
Relationship view − Enter the relationship view used for defining rules for linking network
Comp increment − Enter the comp increment
Check WBS account − Enter WBS account system determines the WBS.
Reservation Purchase requisition − Enter Reservation purchase requisition
Capacity Requirement − Select this to calculate capacity requirement once network is saved.
Project summary Master data − To summarize master data
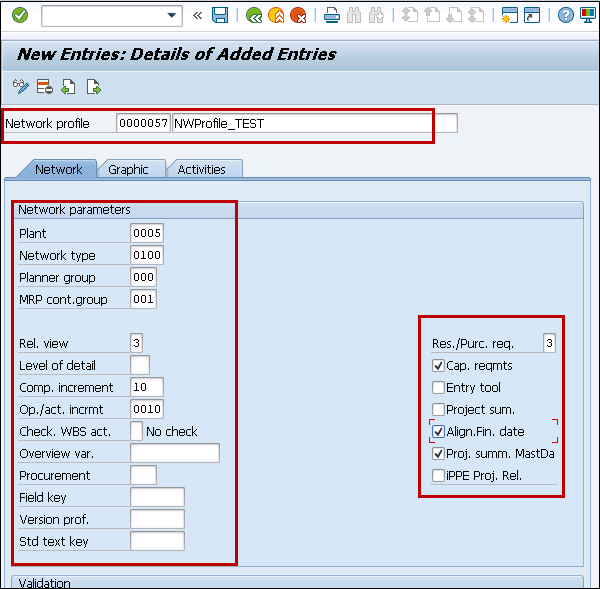
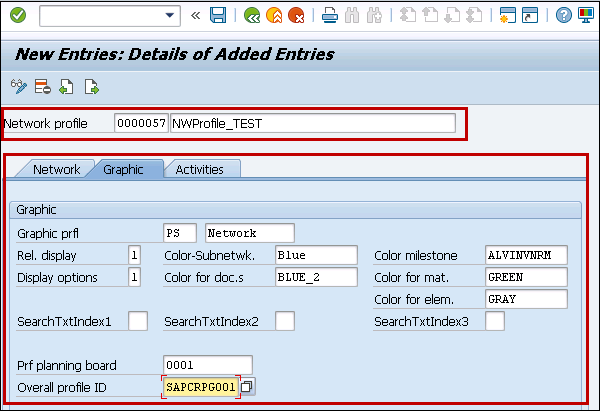
Step 3 − Next, go to the Graphic tab to select the details for network graphics like color, display option, etc.
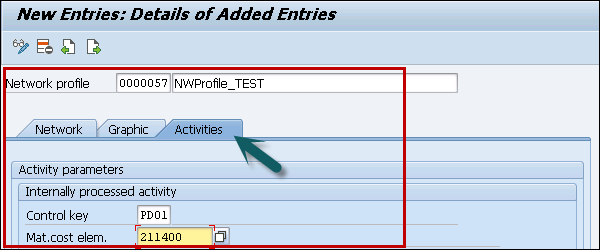
Step 4 − Similarly, go to the Activity tab and enter the details.
Click the save button at the top.
SAP PS - Network Type
Network type is defined as an order type with different order categories- Production order, network order, etc.
These orders represent different business transactions- CO01 / CO11N, IW31, KO01, OPSC and these order parameters are defined by order categories. All these order types are relevant for specific applications.
In SAP PS system, a network type is used to contain the information for controlling and managing networks. Network is defined as work order that has a structure in common with production, maintenance, and inspection orders.
In SAP system, when you define a network, it should also contain a network type maintained with it.
Network type in PS system determines −
- Order category
- CO Partner update
To maintain a Network type, follow the steps given below −
Step 1 − Use T-Code: OPSC or go to SPRO → IMG → Project System → Structures → Operative structure → Network → Setting for Network → Maintain Network Type.
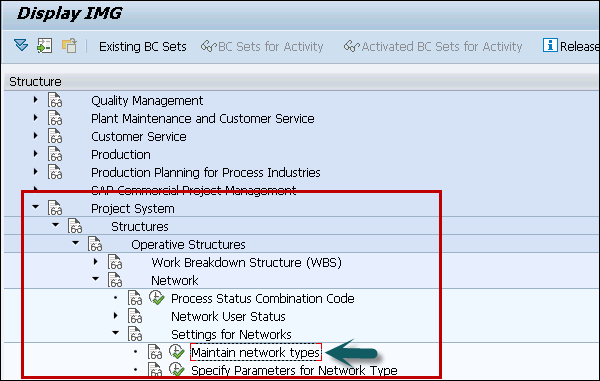
Step 2 − In the next screen, click New Entries to create a network type.
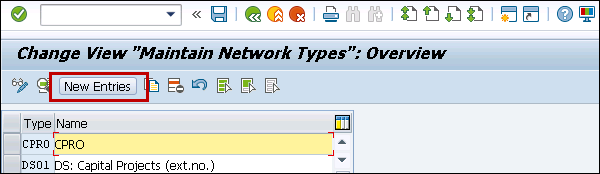
Step 3 − In the next screen, enter the following details −
Order Type − Enter unique id that identifies the order type in SAP system
Control Indicator − to select classification and to copy data to Controlling
Residence Time 1
Residence Time 2
Functional Area − To create Profit and Loss account in FI
Settlement profile and other fields as shown below.
Step 4 − Click the save button at the top.
SAP PS - Person Responsible for Work Center
In SAP Project System, you can define the person responsible for Work Center. To define a responsible person, you need to enter person responsible Id and descriptive name of the person responsible for managing the work center.
To specify a person responsible for work center, navigate to the following path in SAP Easy access.
Step 1 − SPRO → IMG → Project System → Structures → Operative structure → Network → Work Center → Specify person responsible for work center
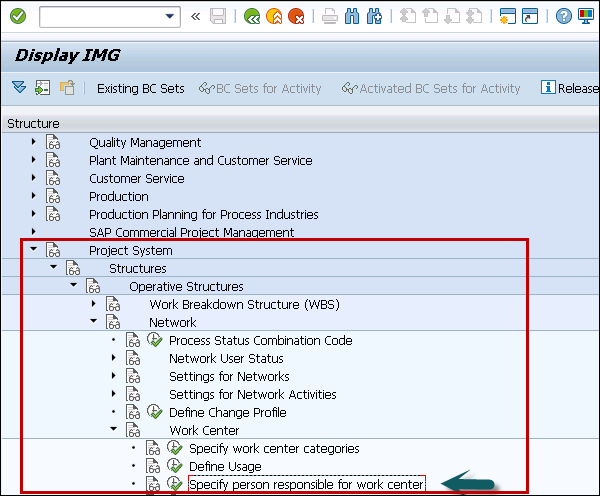
Step 2 − In the next window for Person Responsible for Work center, click New Entries.

Step 3 − In the next screen, you have to enter the following details −
Plnt − Enter the plant key that you want to assign person for work center.
Pers. Respons − In this field, enter the person responsible for work center ID
Person responsible for work center − Descriptive name of person responsible for managing work center.
Step 4 − Once you enter all the details, click the save button at the top.
SAP PS - Maintain Activity Control Key
In SAP Project system, you can create control key to perform the different activities and activity elements.
Using Control key in SAP PS system, you can determine the business transactions to be performed when you perform an activity. An activity can be an internal activity, external activity or both.
While defining the control key, you have to specify the indicators and keys for different functions in the control key. You can use SAP standard control keys PS01, PS02 and PS05 for networks.
To maintain control key, follow the steps given below −
Step 1 − Use T-code: OPSU or navigate to SPRO → IMG → Project System → Structures → Operative structure → Network → Setting for network activities → Define Control Key.
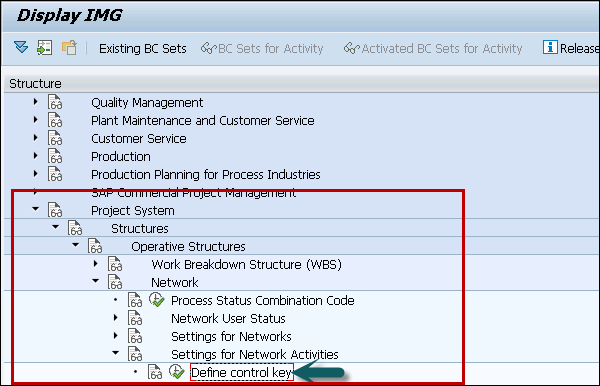
Step 2 − In the next screen, click Activity Control screen → New Entries.
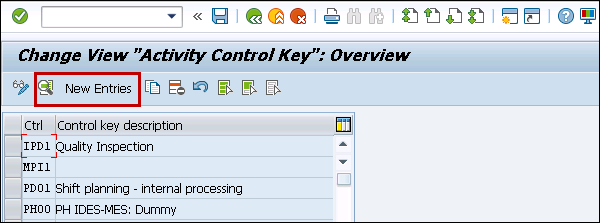
Step 3 − In the new window, maintain the following fields −
Crtl − four digit alphanumeric ID identifies control key
Description − Enter the detailed text of control key
Step 4 − Under the Indicator tab, select the following fields −
Indicator − You can update the following option under Indicator field.
Scheduling − You can select this option to perform the activity elements according to scheduling parameters.
Det. Capacity requirements − To determine which activity elements have capacity requirement.
General Costs account − To use control key by general costs.
Cost − To determine cost with activities.
Check the option, Print time ticket and enter value 2 to enter confirmation.

Step 5 − Click the save button to save configured activity control details.
SAP PS - Access Control List
In SAP Project system, you use access control list to assign authorizations for specific Project system objects. The Access control list function should be activated in project profile or network profile.
Authorization can be assigned for the following PS objects −
- Project
- Work Breakdown structure
- Network
- Activity
- Activity Element
You have the following different authorization types available −
- Single User
- User group
- Organizational Group
In SAP PS system, you can assign different types of authorizations.
| Authorization | Allowed activity |
|---|---|
Read |
Display PS Object |
Write |
Display PS Object Change PS Object |
Administration |
Display PS Object Change PS Object Create PS Object Delete PS Object Create access control lists Edit access control lists Delete access control lists |
No Authorization |
No activity allowed |
In SAP system, highest possible authorization always applies to a user. If a higher authorization applies for a user or PS object, the system overwrites the inherited authorization.
Example
Consider user A is assigned to user group 1 that has read authorization for a PS object and the user has change authorization for PS object. The user gets change authorization in this scenario.
Creating Access Control List
To create an access control list, navigate to the PS object for which you want to assign authorizations.
Step 1 − Go to the ACL tab page. Select insert line button to enter the new data.
Step 2 − Click Save to save the entry.
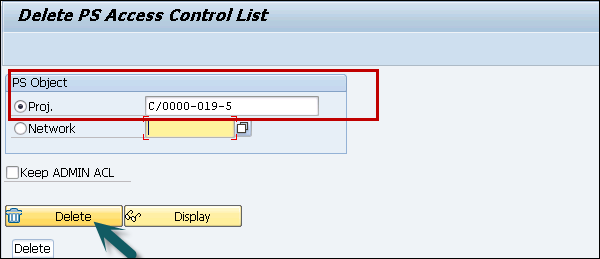
Deleting Access control list for a project or a network
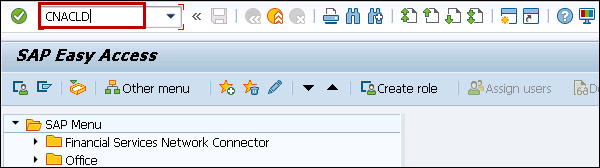
Step 1 − To delete access control list for a project, use T-code: CNACLD
Step 2 − In next screen, you have to select the project/network for which you want to delete the ACL.
Step 3 − To display the access control lists, click the Display button.
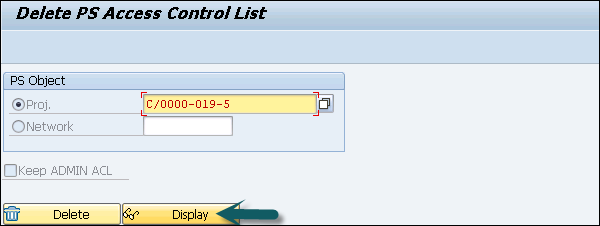
Step 4 − To delete the access control lists, click the Delete button.
SAP PS - Cost Component
In SAP PS, you can use the Cost component to plan, monitor, and control project cost for projects. This component is integrated with different components in SAP ERP system −
- Finance Accounting and Controlling
- Production Planning
- Material Management
Using cost function, you can perform fund management and budget allocation. In addition, you can perform cost planning using the cost function of SAP PS.
Cost planning
Cost planning means the costs that is expected to incur in connection with your project as it is executed. Cost planning is used for different goals as per the project stages −
- At the Initial Planning Stage, you define cost planning as the base for an initial cost estimate.
- At the Approval stage, you define it for the budget allocation.
- At the time of project execution, it is used to control cost variances and monitor costing.
In addition, you can perform automatic cost planning to integrate project costs with enterprise controlling.
SAP PS Create Costing Variant
In SAP PS system, you use Costing variants to manage the criteria for the costing. Costing variants are used to define the pricing strategy in the system for costing and how overhead should be determined.
A Costing variant contains the following components −
Costing type − Costing type is used to define the object - like a network, or a project for which you have to create the costing.
Valuation variant − In SAP system, you use valuation variant to maintain valuation bases for materials and activity types managed in the costing.
Example
You determine the price to be considered in accounting view in material master record.
Costing variants are used to maintain unit costing in the general costs activity. To create costing variant in SAP system, follow the steps given below −
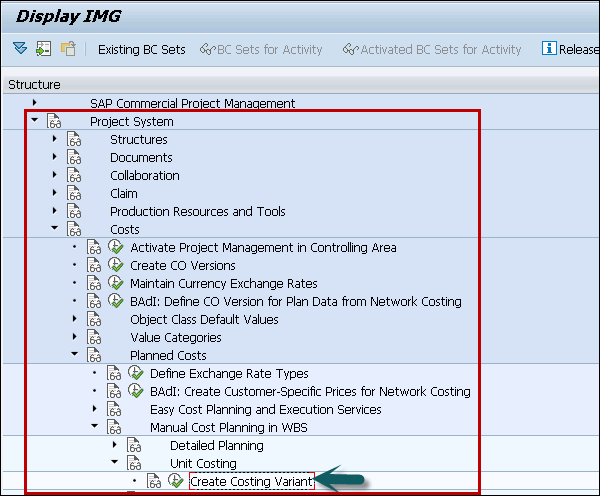
Step 1 − Navigate to SPRO → IMG → Project System → Costs → Planned Costs → Manual cost planning in WBS → Unit Costing → Create Costing Variant or use T-Code: OKKT.
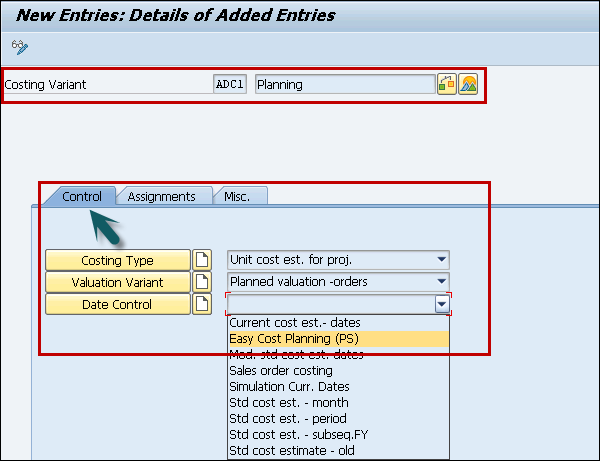
Step 2 − To create new costing variants, click New Entries on costing variant screen.

Step 3 − In the next screen, enter the following details.
Costing Variant − Enter four-digit alphanumeric unique ID to identify costing variant in SAP.
Control − Under control tab, enter appropriate options for costing variants.
Step 4 − Go to the Misc tab and enter the appropriate option for cost element for unit accounting.
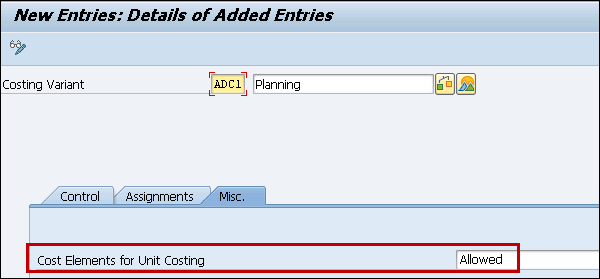
Click the save button to save the configured cost variant.
SAP PS - Execution Service Profile
In SAP PS system, you can define execution service profile. Follow the steps given below to navigate −
Step 1 − Go to SPRO → IMG → Project System → Costs → Planned Costs → Easy Cost Planning and Execution Services → Execution Services → Define Execution Service.
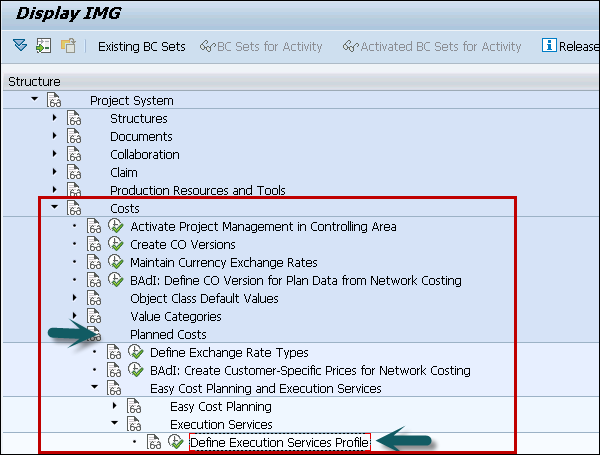
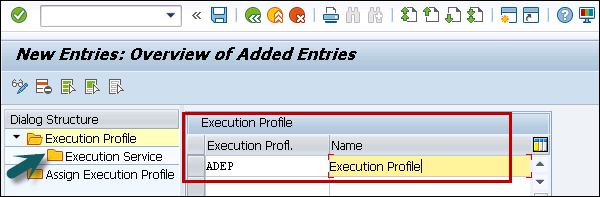
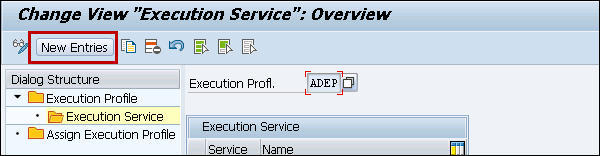
Step 2 − In the next window, click New Entries in the Execution Profile overview.
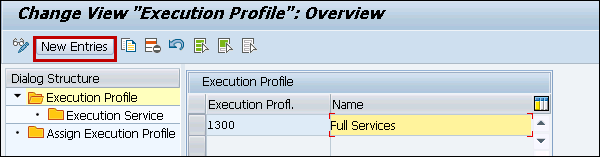
Step 3 − In the new window, enter the following details −
- Execution Profile − Enter 4-digit alphanumeric code to identify execution profile in SAP system.
- Name − Text of execution profile.
To save the data, click the save button at the top.
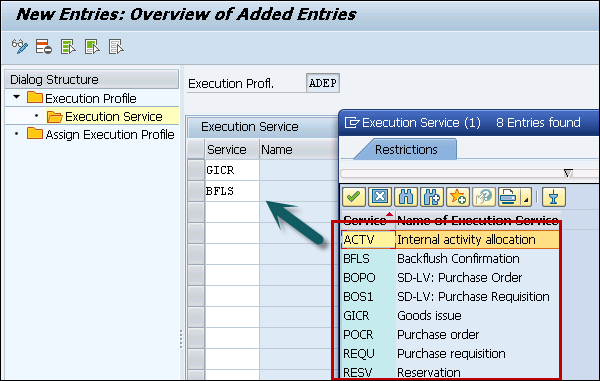
Step 4 − Next go to Execution Service on the left pane. Select execution profile and double-click on Execution Service icon in the left pane.
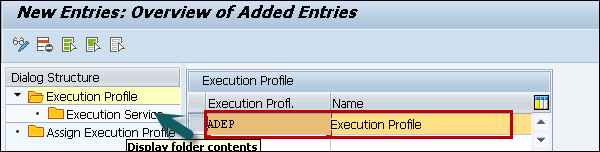
Step 5 − On the Execution overview screen, click the New Entries button.
Step 6 − In the next screen, enter the services from the drop-down list as per the business requirements. Press ENTER.
Step 7 − The next step is to assign Execution profile to project option to update execution profile to project profile.
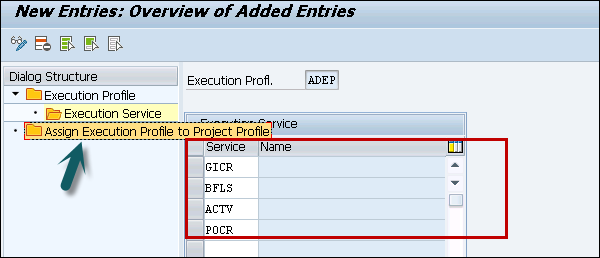
To save the Execution service profile, click the save button at the top.
SAP PS - Budget Management
Budget is defined as the approved cost for a project and it is different from the cost plan. The Budget is the approved cost from management for expected development of order cost for a given time period. Different budget types exist in a Project system.
Original Budget
In Project system, original budget is defined as the allocated cost assigned for a development order. You can update the budget using the budget update options.
Budget update is known as the unexpected events that occur. Current budget is calculated from the following factors −
- Original Budget
- Supplements (added)
- Transfers (addition/subtraction)
- Returns (Subtraction)
SAP PS Budget Profile
You can define the budget profile for projects in SAP system.
To create a budget profile −
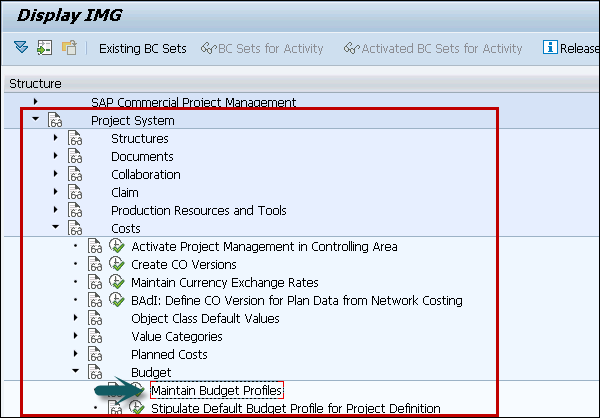
Step 1 − Use T-code: OPS9 or navigate to SPRO → IMG → Project System → Cost → Budget → Maintain budget profiles in SAP
Step 2 − A new screen Budget Profile for Projects overview will appear. Click New Entries.

Step 3 − In the new window, enter the following details −
Profile − Enter the unique ID that identify the budget profile
Text − Enter the text description
Time Frame − Enter the number of years for budget. It has three options: Past, Future and Start
Total Values − This is used to select budget as over value
Annual Values − Maintaining budget for yearly basis
Investment Management − Program type budget for an investment program
Other fields like Availability Control, Currency translation and budgeting currency.
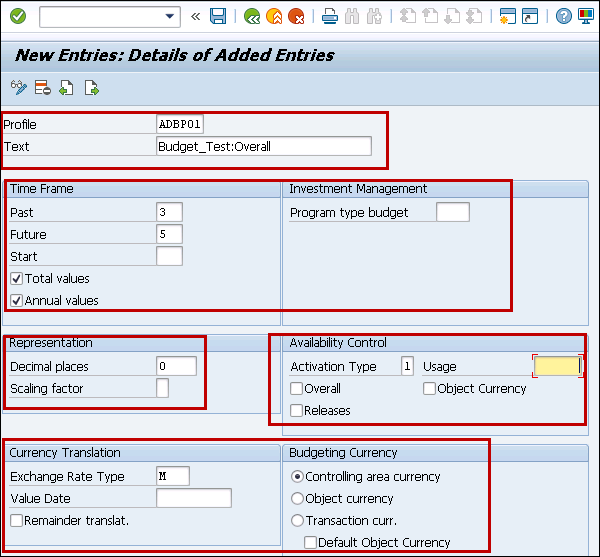
Once you enter all the fields, click the save button at the top.
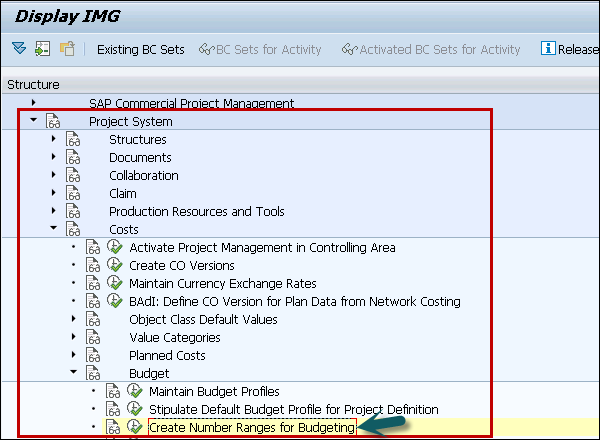
SAP PS - Number Ranges for Budgeting
Number range is defined for all budget documents that the system creates when there is a change in budget. You define your own number range for all budget documents created for allocation, supplement, transfer, release, etc.
You can maintain the number range for budgeting in SAP system using T-code: OK11
Step 1 − You can navigate to SPRO → IMG → Project System → Cost → Budget → Create number ranges for budgeting.
Step 2 − On number range budgeting screen, you have the following options −
Intervals − to display all budgeting number range that has been created earlier
Status − To modify the number range
Intervals − To maintain new number range for budgeting as per business requirement

Step 3 − Click the Intervals button and click insert interval button.

Step 4 − In the next window, enter the following details.
No − 2 digit unique ID for number ranges
From Number − Starting number of interval
To Number − Last number of intervals
Current number − Default number will be 0
Ext − To assign the number manually

Once you create the number range, click the Save button.
Defining Tolerance Limit
You can define the tolerance limit for a budget in SAP system.
Step 1 − SPRO → IMG → Project System → Cost → Budget → Define Tolerance Limits
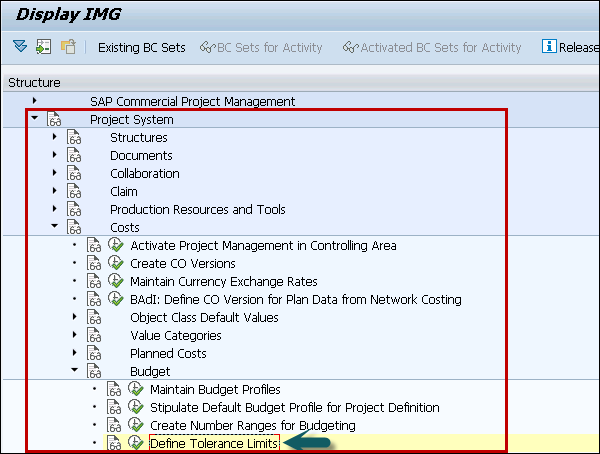
Click New Entries to define Tolerance limits.
Step 2 − In the next window, enter the following details. Once you define the tolerance limit, click the save button at the top.

SAP PS - Revenues and Earnings
In SAP custom projects, you need to compare costs and revenues to get details on project results.
The following points should be considered −
- You copy plan values from the sales order to the relevant WBS element.
- In SAP system, project values are copied to Controlling automatically.
- For period end closing, you copy the results analysis to Profitability Analysis.
Revenue Planning is one of the key aspects of Revenue and earnings. Revenue planning defines the revenue you expect when a project is executed.
In SAP Project system, you can use the following planning methods −
Manual Revenue Planning − You can perform manual revenue planning based on Work breakdown structure or by revenue element.
Automatic update Revenue plan − You can perform automatic update of revenue planning based on Work breakdown structure or in sales order.
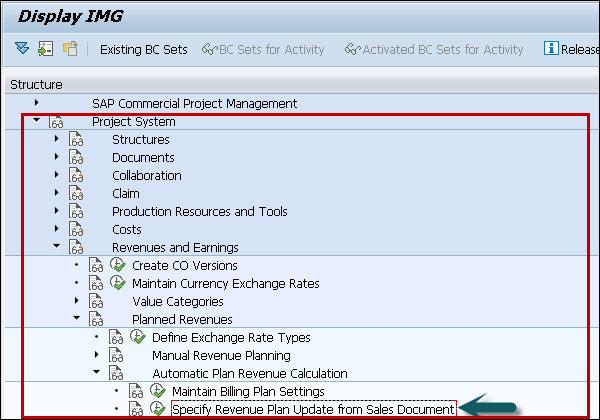
To update revenue plan data from sales order −
Step 1 − Navigate to Project System → Revenues and Earnings → Planned Revenues → Automatic Plan Revenue Calculation → Specify Revenue Plan Update from Sales Document.
You record the data using the following −
- Value and revenue element from the condition.
- Expected billing date from the billing plan or schedule line.
SAP PS - Dates
The Dates component in Project System is used to plan and check the dates in project. The use of date scheduling is to determine phases in a project and duration of the phases, critical paths, and events in project schedule.
In Work breakdown structures WBS and Network, you enter the dates and these dates can be changed during full project lifecycle.
Maintaining Dates in Projects
When you define a project in system, you enter the start and the finish dates of the projects. When you create Work Breakdown structure, you start planning dates for WBS. The dates are calculated for full part of part of project for activities using the scheduling function.
SAP PS - WBS Scheduling Parameters
In SAP Project system, you can schedule a project or part of the project with all the activities that are assigned to project. You can use WBS element basic dates as basic dates to schedule the activities.
When a network contains few activities that are not assigned to same WBS, they are treated as external networks in system in project scheduling.
Step 1 − To define parameters for WBS scheduling, you can use T-code: OPTQ or you can navigate to SPRO → IMG → Project System → Dates → Data Planning in WBS → Define Parameter for WBS Scheduling.
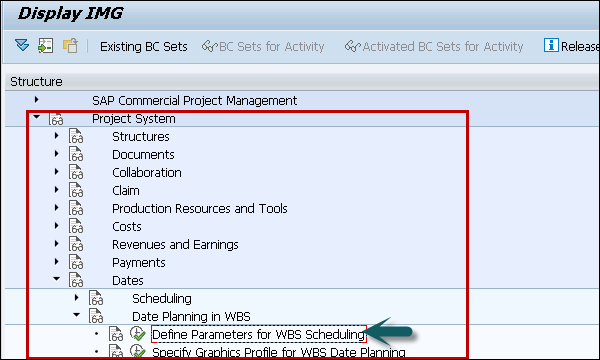
Step 2 − In the next screen, click New Entries.

Step 3 − In the next window, you have to enter the following field −
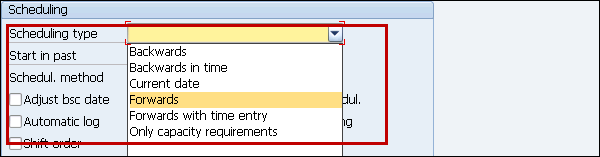
Scheduling Type − To define type of scheduling.
Possible options are as shown in the screenshot given below.
Step 4 − In the new screenshot, enter the following details as
Start in Past − Enter number of past days when scheduling starts in past.
Scheduling Method − Select the scheduling method.
Reduction − To enter reduction lead time and reduction type and
Other fields as per business requirement.

Step 5 − When you enter all the details, next is to save the configuration.
SAP PS - Material
This component is used to plan and manage material requirement in project and to manage the material flow in the project. Material requirement planning in project comes from Material management and Production Planning and Control.
Procurement of Material using MRP
MRP run or planning run is an engine, which is used to fill the demand and supply gap. Issues & Receipts are called MRP elements. Issues include PIRs, Dependent Requirements, Order Reservations, Sales Orders, Issuing Stock Transfer Orders, etc. Receipts include Production Orders, Purchase Requisitions, Purchase Orders, Open Production Orders, Receiving Stock Transfer Order, Schedule lines, etc.
MRP Parameters
MRP parameters are required to run material requirement planning to meet Planned Independent Requirement (PIR) and to use the Routing information.
Different MRP parameters can be used.
Processing Key
NetChange − In this run system consider those material which has undergone some changes from the previous MRP run.
NetChange in planning horizon − This run considers the requirement in predefined planning horizon and not like net change, which check the future requirements. In this run, the system considers only those material, which have undergone some changes from their last MRP run.
Regenerative Planning − In this run, the system considers all the material irrespective of changes. It is time consuming and not common in Production planning.
Scheduling
Basic Scheduling − It only calculates the basic dates for orders in MRP run and in house production time for material master in use.
Lead time Scheduling − In this MRP, production dates are defined by lead-time scheduling for planned orders.
Running Material Requirement Planning for all Products
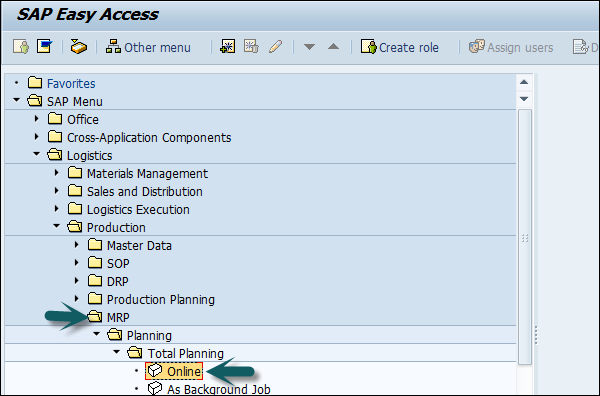
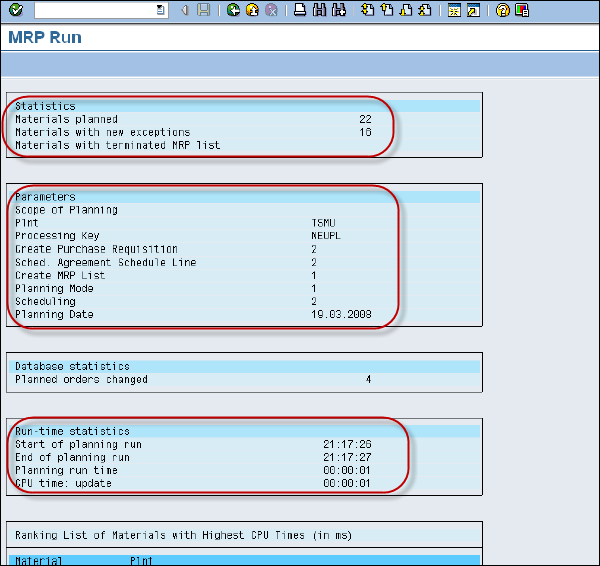
Step 1 − Use T-code: MD01 or go to Logistics → Production → MRP → Planning → Total Planning → Online
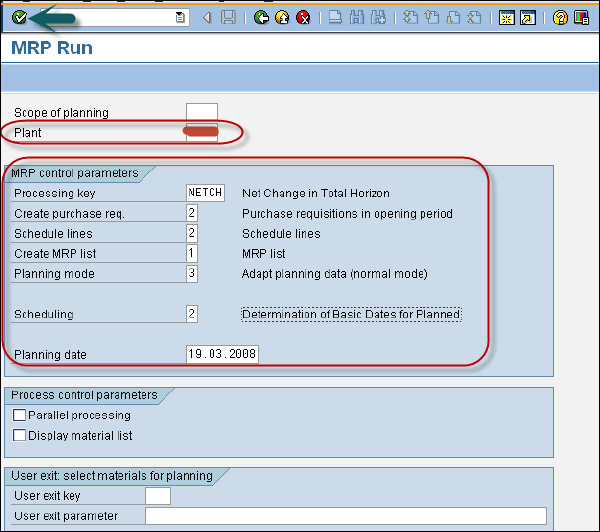
Step 2 − To run MRP with Net Change in planning horizon, enter the following details.
Enter the manufacturing Plant for which you want to take MRP run.
Enter Processing key as NETCH.
Enter Input 2 in Create Purchase req. shows purchase requisition in opening period.
Enter 2 for schedule lines shows.
Enter 1 in MRP List and system will create MRP list similar to stock /requirement list for later analysis of previous MRP run.
Enter Planning mode 3 as we will delete and recreate all planning data for all materials.
Enter Scheduling indicator 2 shows MRP will do lead time scheduling and consider routing times to calculate planned order dates.
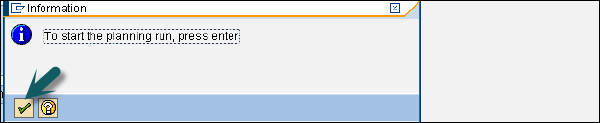
Step 3 − Click the tick mark at the top as shown in the screen shot given below.
Step 4 − If you are sure on MRP run, click the tick mark.
System will take some time to run the MRP and do the calculations. You can see material requirement and what parameters have been considered during the run.
MRP run for a single material
To perform MRP run for a single material −
Step 1 − Use T-Code: MD02 or go to Logistics → Production → MRP → Planning → Single item Multilevel.
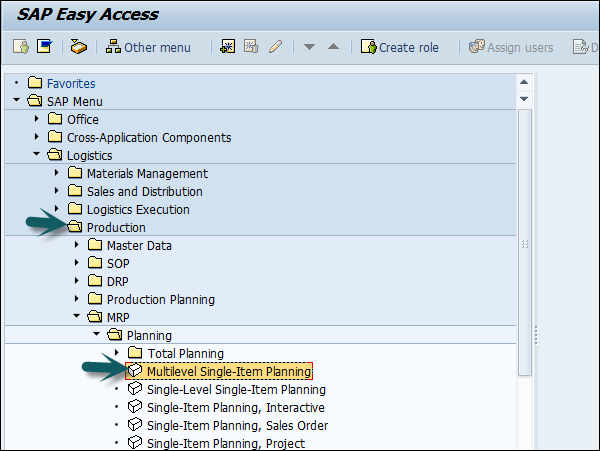
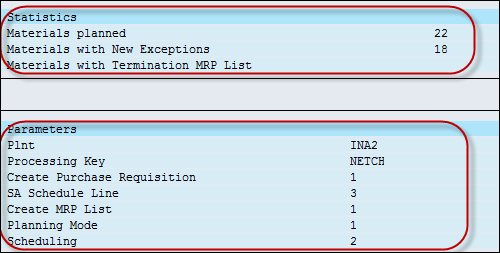
This is used to plan individual item planning. Enter material number and Plant.
- Processing key, NETCH (Net Change for total horizon)
- Create purchase req. 2
- Delivery schedules 2
- Create MRP list 1
- Planning mode 3
- Scheduling 2
Click the Tick mark.
SAP PS - Versions
In SAP system, version is defined as state of a project at certain point in time. Project versions are used in Earned value analysis and for project evaluation.
Functions
A Project version can be used for the following purpose −
- To perform the statistical evaluation.
- To document the state of project.
- To perform comparison and analysis of project progress.
- To perform milestone trend analysis to analyze the dates in a project and comparing them with planned data in the project.
Types of Versions
There are different project version-types available in Project System. They are −
Project Versions − To compare project status at specific time period.
Plan Versions − This is sued to store different cost plans for a project.
Selection Versions − This is used to perform background processing and to save the project data matching certain selection criteria.
In the table given below, you can see the different features in a project that the above versions support in a SAP system.
| Function | Plan Version | Project Version | Select Version | Simulation Version |
|---|---|---|---|---|
| Add to version | Yes | Yes | No | Yes |
| Compare versions | Yes | Yes | No | Yes |
| Limit selection | Yes | Yes | No | |
| Contains Summarized cost data | Yes | Yes | Yes | Yes |
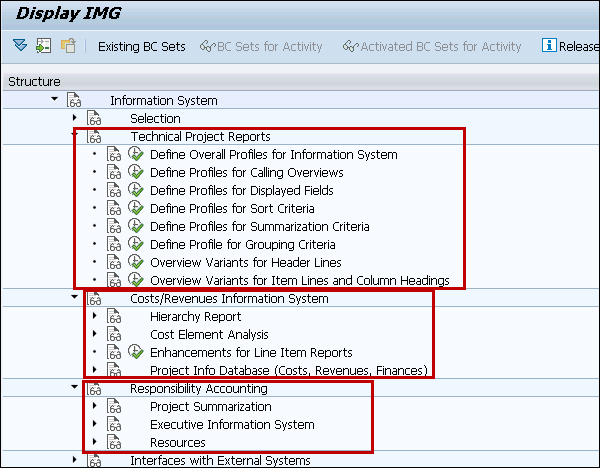
SAP PS - Project Information System
In SAP system, a Project Information System is used to monitor and control the project master data. It allows you to analyze each project, part of projects, or multiple projects.
Analyzing includes creating different overview reports and advance level reports with various degrees of detail. These reports meet the metrics required as part of project management data.
Key functions
The key functions are −
The data from Project Information System can be transferred to Business warehouse in SAP system.
A BW system in SAP gathers information from the various areas in your business and changes them to usable reports for Project Managers.
Using Project Information system, you can run standard reports in system or can create own reports to meet specific tasks and information.
These reports can be displayed directly and available in Project Information system or you can run them as background jobs.
Analyzing report includes considering various fields and functions of project.
Example
You can send the reports via email, put them on shared drive or take a print out of the reports to distribute the hard copy.
You can use the report templates to provide different degree of details, summarize data and historical data with key values. Historical data includes information from the following processes −
- Controlling
- Project Progress
- Project Resource
- Material Requirement and planning
Types of Reports
You can use following type of reports using Project Information System.
Technical Reports
Project Information System in SAP PS allows you to manage and control your project technically.
This allows you to select all the objects or particular objects in the system- WBS, Networks, PS texts and material etc. to check their present status and their use in project network hierarchy. This allows you to see the status of project based on different objects.
Using Project Information System, you can monitor the data elated to current project as well as data in archive to see historical data and lesson learnt.
You can enter the values in filters to create structure list which can be used to view graphics or to move data to different project management tools.
Commercial Reports
You can view various commercial reports related to project progress in SAP PS system.
Cost Element Report to view cost and revenues to summarize line items.
To monitor full value flow in the project, you can use Cost/Revenue and Payment hierarchy reports. Payment hierarchy reports contains data related to drill down.
To display actual, plan, commitment, and budget values you can use Line Item Reports.
In the following table, you can see few cost element and hierarchical reports under Project Information System and their respective information.
| Information | Report Type |
|---|---|
| Debits and credits by object | Cost Elements |
| Credit from settlement | Cost Elements |
| Statistical key figures | Cost Elements |
| Detailed actual, plan, and commitment values by object | Cost Elements |
| Budgeting and cost planning | Hierarchy Report |
| Incoming Orders | Hierarchy Report |
| Open Orders | Hierarchy Report |
Resource Reports
Project Information System provides you various reports on resource utilization and capacity management.
- Capacity Requirements
- Capacity Load with Variable View
- Workforce Planning
- Capacity Load with Work Center View
To view these reports, SPRO → IMG → Project System → Information System → Resources

To access all the reports, you can scroll to Project System in SAP Easy access menu. Under Project System you have Information System.
To view these reports, go to SPRO → IMG → Project System → Information System
You can also access various inventory and material management reports in Project Information System.
- Purchase orders
- Outline agreements
- Missing parts
- Pegged requirements
- Stock/Requirements list
SAP PS - Consultant Responsibilities
A SAP PS Consultant must have all required Project System functional and Configuration knowledge in SAP ECC system.
The Consultant should have relevant experience in the following areas −
SAP PS Implementation Experience: End-to-end Implementation experience in different domains - Banking, Manufacture, Civil or any other Industry.
Good configuration knowledge of PS structures: WBS, Network, Milestones, Cost Planning, Budgeting, Material Requirement planning, Project quotation, Time sheets, Goods issues, and other project management activities in SAP PS.
Must have completed at least two end-to-end implementations.
Experience on complete PS module cycle from project creation to settlement.
Integration knowledge with CO, FI and MM, SD and PP.
Must be proficient in handling Issues/support functions.
Conducts user requirements gathering, blueprinting and documentation designs. Follow best practices and SAP functionality in system.
