- SAP ABAP - Home
- SAP ABAP - Overview
- SAP ABAP - Environment
- SAP ABAP - Screen Navigation
- SAP ABAP - Basic Syntax
- SAP ABAP - Data Types
- SAP ABAP - Variables
- SAP ABAP - Constants & Literals
- SAP ABAP - Operators
- SAP ABAP - Loop Control
- SAP ABAP - Decisions
- SAP ABAP - Strings
- SAP ABAP - Date & Time
- SAP ABAP - Formatting Data
- SAP ABAP - Exception Handling
- SAP ABAP - Dictionary
- SAP ABAP - Domains
- SAP ABAP - Data Elements
- SAP ABAP - Tables
- SAP ABAP - Structures
- SAP ABAP - Views
- SAP ABAP - Search Help
- SAP ABAP - Lock Objects
- SAP ABAP - Modularization
- SAP ABAP - Subroutines
- SAP ABAP - Macros
- SAP ABAP - Function Modules
- SAP ABAP - Include Programs
- SAP ABAP - Open SQL Overview
- SAP ABAP - Native SQL Overview
- SAP ABAP - Internal Tables
- SAP ABAP - Creating Internal Tables
- ABAP - Populating Internal Tables
- SAP ABAP - Copying Internal Tables
- SAP ABAP - Reading Internal Tables
- SAP ABAP - Deleting Internal Tables
- SAP ABAP - Object Orientation
- SAP ABAP - Objects
- SAP ABAP - Classes
- SAP ABAP - Inheritance
- SAP ABAP - Polymorphism
- SAP ABAP - Encapsulation
- SAP ABAP - Interfaces
- SAP ABAP - Object Events
- SAP ABAP - Report Programming
- SAP ABAP - Dialog Programming
- SAP ABAP - Smart Forms
- SAP ABAP - SAPscripts
- SAP ABAP - Customer Exits
- SAP ABAP - User Exits
- SAP ABAP - Business Add-Ins
- SAP ABAP - Web Dynpro
- SAP ABAP - Questions Answers
- SAP ABAP - Quick Guide
- SAP ABAP - Useful Resources
- SAP ABAP - Discussion
SAP ABAP - Views
A View acts like a database table only. But it will not occupy storage space. A view acts similar to a virtual table - a table that does not have any physical existence. A view is created by combining the data of one or more tables containing information about an application object. Using views, you can represent a subset of the data contained in a table or you can join multiple tables into a single virtual table.
Data related to an application object is distributed among multiple tables by using database views. They use the inner join condition to join the data of different tables. A maintenance view is used to display and modify the data stored in an application object. Every maintenance view has a maintenance status associated with it.
We use projection view to mask unwanted fields and display only relevant fields in a table. Projection views must be defined over a single transparent table. A projection view contains exactly one table. We can't define selection conditions for projection views.
Creating a View
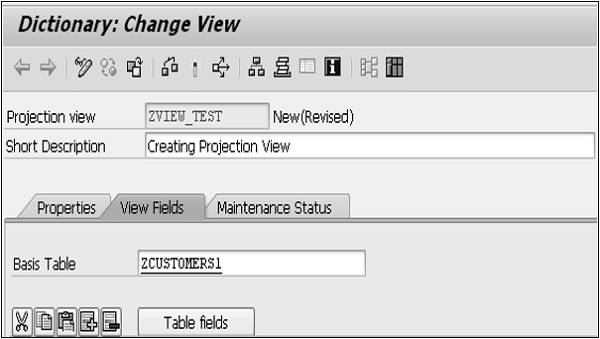
Step 1 − Select the View radio button on the initial screen of ABAP Dictionary. Enter the name of the view to be created and then click Create button. We entered the name of the view as ZVIEW_TEST.
Step 2 − Select the projection view radio button while choosing view type and click Copy button. The Dictionary: Change View screen appears.
Step 3 − Enter a short description in the Short Description field and the name of the table to be used in the Basis Table field as shown in the following snapshot.
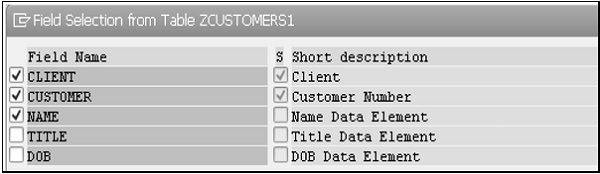
Step 4 − Click the Table fields button to include the fields of ZCUSTOMERS1 table in the projection view.
Step 5 − The Field Selection from Table ZCUSTOMERS1 screen appears. Select the fields that you wish to include in the projection view as shown in the following snapshot.
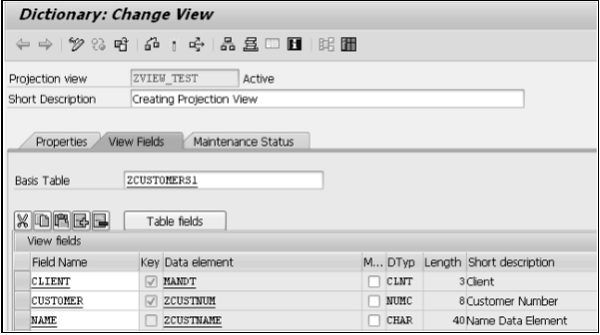
Step 6 − After clicking the Copy button, all the selected fields for the projection view are displayed on the Dictionary: Change View screen.
Step 7 − Select Maintenance Status tab to define an access method. Choose read-only radio button and Display/Maintenance Allowed with Restrictions option from the dropdown menu of Data Browser/Table View Maintenance.
Step 8 − Save and Activate it. In the Dictionary: Change View screen select Utilities(M) > Contents to display the selection screen for ZVIEW_TEST.
Step 9 − Click the Execute icon. The output of the projection view appears as shown in the following screenshot.
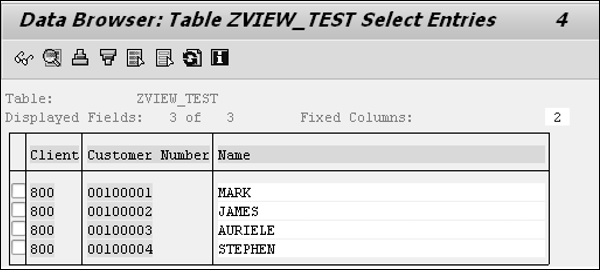
The table ZCUSTOMERS1 consists of 5 fields. Here the displayed fields are 3 (Client, Customer Number and Name) with 4 entries. Customer numbers are from 100001 to 100004 with appropriate names.
