- SAP ABAP - Home
- SAP ABAP - Overview
- SAP ABAP - Environment
- SAP ABAP - Screen Navigation
- SAP ABAP - Basic Syntax
- SAP ABAP - Data Types
- SAP ABAP - Variables
- SAP ABAP - Constants & Literals
- SAP ABAP - Operators
- SAP ABAP - Loop Control
- SAP ABAP - Decisions
- SAP ABAP - Strings
- SAP ABAP - Date & Time
- SAP ABAP - Formatting Data
- SAP ABAP - Exception Handling
- SAP ABAP - Dictionary
- SAP ABAP - Domains
- SAP ABAP - Data Elements
- SAP ABAP - Tables
- SAP ABAP - Structures
- SAP ABAP - Views
- SAP ABAP - Search Help
- SAP ABAP - Lock Objects
- SAP ABAP - Modularization
- SAP ABAP - Subroutines
- SAP ABAP - Macros
- SAP ABAP - Function Modules
- SAP ABAP - Include Programs
- SAP ABAP - Open SQL Overview
- SAP ABAP - Native SQL Overview
- SAP ABAP - Internal Tables
- SAP ABAP - Creating Internal Tables
- ABAP - Populating Internal Tables
- SAP ABAP - Copying Internal Tables
- SAP ABAP - Reading Internal Tables
- SAP ABAP - Deleting Internal Tables
- SAP ABAP - Object Orientation
- SAP ABAP - Objects
- SAP ABAP - Classes
- SAP ABAP - Inheritance
- SAP ABAP - Polymorphism
- SAP ABAP - Encapsulation
- SAP ABAP - Interfaces
- SAP ABAP - Object Events
- SAP ABAP - Report Programming
- SAP ABAP - Dialog Programming
- SAP ABAP - Smart Forms
- SAP ABAP - SAPscripts
- SAP ABAP - Customer Exits
- SAP ABAP - User Exits
- SAP ABAP - Business Add-Ins
- SAP ABAP - Web Dynpro
- SAP ABAP - Questions Answers
- SAP ABAP - Quick Guide
- SAP ABAP - Useful Resources
- SAP ABAP - Discussion
SAP ABAP - Smart Forms
SAP Smart Forms tool can be used to print and send documents. This tool is useful in developing forms, PDF files, e-mails and documents for the Internet. The tool provides an interface to build and maintain the layout and logic of a form. SAP also delivers a selection of forms for business processes such as those used in Customer Relationship Management (CRM), Sales and Distribution (SD), Financial Accounting (FI) and Human Resources (HR).
The tool allows you to modify forms by using simple graphical tools instead of using any programming tool. It means that a user with no programming knowledge can configure these forms with data for a business process effortlessly.
In a Smart Form, data is retrieved from static and dynamic tables. The table heading and subtotal are specified by the triggered events and the data is then sorted before the final output. A Smart Form allows you to incorporate graphics that can be displayed either as part of the form or as the background. You can also suppress a background graphic if required while taking a printout of a form.
Some examples of standard Smart Forms available in SAP system are as follows −
SF_EXAMPLE_01 represents an invoice with a table output for flight booking for a customer.
SF_EXAMPLE_02 represents an invoice similar to SF_EXAMPLE_01, but with subtotals.
SF_EXAMPLE_03 specifies an invoice similar to SF_EXAMPLE_02, but one in which several customers can be selected in an application program.
Creating a Form
Lets create a form by using the SAP Smart Forms tool. You will also learn how to add a node in the Smart Form and test the form in this tutorial. Here we begin with creating a copy of the SF_EXAMPLE_01 form. The SF_EXAMPLE_01 form is a standard Smart Form available in the SAP system.
Step 1 − Smart Form Builder is the main interface used to build a Smart Form. It is available on the initial screen of SAP Smart Forms. We need to type the 'SMARTFORMS' transaction code in the Command field to open the initial screen of SAP Smart Forms. In this screen, enter the form name, SF_EXAMPLE_01, in the Form field.
Step 2 − Select Smart Forms → Copy or click the Copy icon to open the Copy Form or Text dialog box.
Step 3 − In the Target Object field, enter a name for the new form. The name must begin with the Y or Z letter. In this case, the name of the form is 'ZSMM1'.
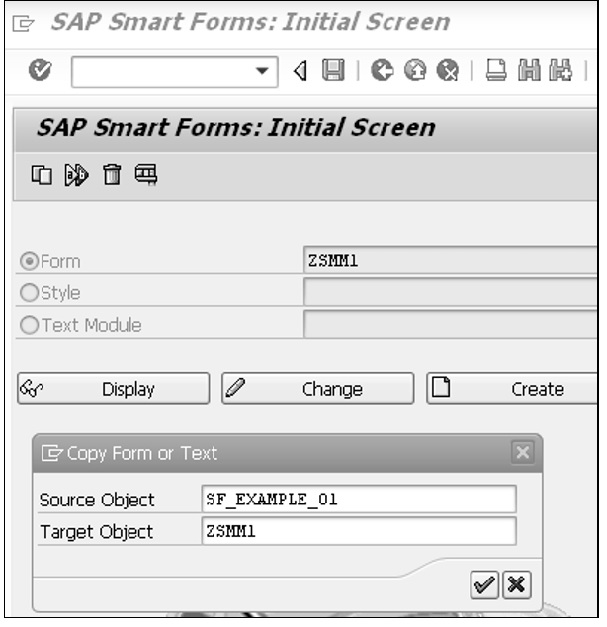
Step 4 − Click the Continue icon or press the ENTER key in the Copy Form or Text dialog box so that the ZSMM1 form is created as a copy of the predefined form SF_EXAMPLE_01.
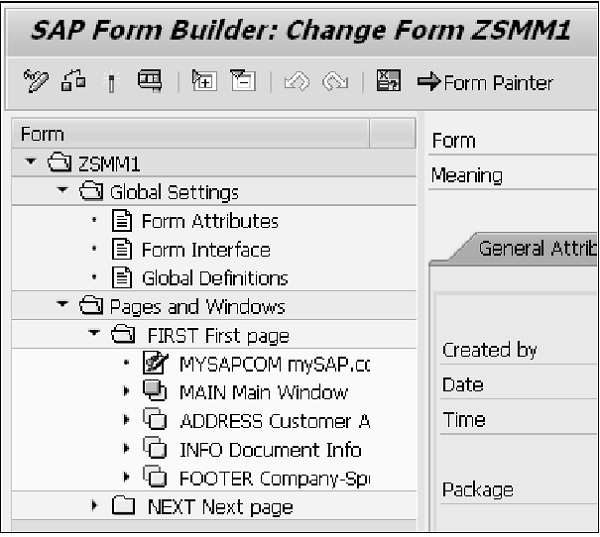
Step 5 − Click the Save icon. The name of the form is displayed in the Form field on the initial screen of SAP Smart Forms.
Step 6 − Click the Create button on the initial screen of SAP Smart Forms. The ZSMM1 form appears in Form Builder.
Step 7 − The first draft page is created with a MAIN window. All the components of the new form are based on the SF_EXAMPLE_01 predefined form. You can just click a node in the Navigation menu to view its content.
Creating a Text Node in the Form
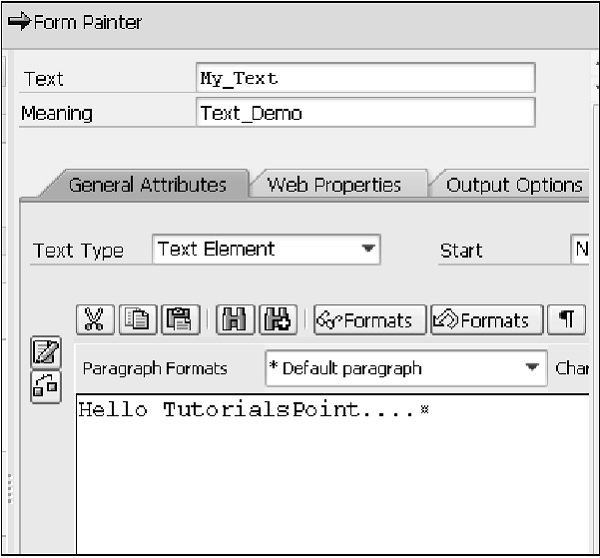
Step 1 − Open a form in the change mode of the SAP Form Builder screen and right-click the Main Window option in the First Page node and select Create → Text from the context menu.
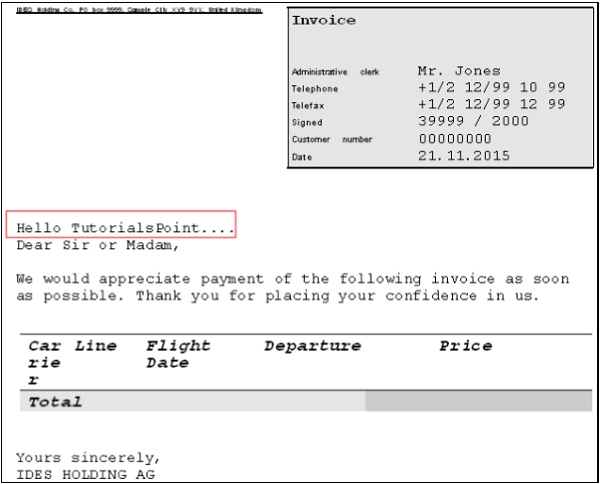
Step 2 − Modify the text in the Text field to 'My_Text' and the text in the Meaning field to 'Text_Demo'. Enter the text 'Hello TutorialsPoint.....' in the text-editing box in the center frame of Form Builder as shown in the following snapshot −
Step 3 − Click the Save button to save the node.
Step 4 − Activate and test the node by clicking the Activate and Test icons, respectively. The initial screen of Function Builder appears.
Step 5 − Activate and test the function module by clicking the Activate and Execute icons. The parameters of the function module are displayed in the initial screen of Function Builder.
Step 6 − Execute the function module by clicking the Execute icon. The Print dialog box appears.
Step 7 − Specify the output device as 'LP01' and click the Print preview button.
The above steps will produce the following output −