- SAP ABAP - Home
- SAP ABAP - Overview
- SAP ABAP - Environment
- SAP ABAP - Screen Navigation
- SAP ABAP - Basic Syntax
- SAP ABAP - Data Types
- SAP ABAP - Variables
- SAP ABAP - Constants & Literals
- SAP ABAP - Operators
- SAP ABAP - Loop Control
- SAP ABAP - Decisions
- SAP ABAP - Strings
- SAP ABAP - Date & Time
- SAP ABAP - Formatting Data
- SAP ABAP - Exception Handling
- SAP ABAP - Dictionary
- SAP ABAP - Domains
- SAP ABAP - Data Elements
- SAP ABAP - Tables
- SAP ABAP - Structures
- SAP ABAP - Views
- SAP ABAP - Search Help
- SAP ABAP - Lock Objects
- SAP ABAP - Modularization
- SAP ABAP - Subroutines
- SAP ABAP - Macros
- SAP ABAP - Function Modules
- SAP ABAP - Include Programs
- SAP ABAP - Open SQL Overview
- SAP ABAP - Native SQL Overview
- SAP ABAP - Internal Tables
- SAP ABAP - Creating Internal Tables
- ABAP - Populating Internal Tables
- SAP ABAP - Copying Internal Tables
- SAP ABAP - Reading Internal Tables
- SAP ABAP - Deleting Internal Tables
- SAP ABAP - Object Orientation
- SAP ABAP - Objects
- SAP ABAP - Classes
- SAP ABAP - Inheritance
- SAP ABAP - Polymorphism
- SAP ABAP - Encapsulation
- SAP ABAP - Interfaces
- SAP ABAP - Object Events
- SAP ABAP - Report Programming
- SAP ABAP - Dialog Programming
- SAP ABAP - Smart Forms
- SAP ABAP - SAPscripts
- SAP ABAP - Customer Exits
- SAP ABAP - User Exits
- SAP ABAP - Business Add-Ins
- SAP ABAP - Web Dynpro
- SAP ABAP - Questions Answers
- SAP ABAP - Quick Guide
- SAP ABAP - Useful Resources
- SAP ABAP - Discussion
SAP ABAP - Tables
Tables can be defined independent of the database in ABAP Dictionary. When a table is activated in ABAP Dictionary, similar copy of its fields is created in the database as well. The tables defined in ABAP Dictionary are translated automatically into the format that is compatible with the database because the definition of the table depends on the database used by the SAP system.
A table can contain one or more fields, each defined with its data type and length. The large amount of data stored in a table is distributed among the several fields defined in the table.
Types of Table Fields
A table consists of many fields, and each field contains many elements. The following table lists the different elements of table fields −
| S.No. | Elements & Description |
|---|---|
| 1 | Field name This is the name given to a field that can contain a maximum of 16 characters. The field name may be composed of digits, letters, and underscores. It must begin with a letter. |
| 2 | Key flag Determines whether or not a field belongs to a key field. |
| 3 | Field type Assigns a data type to a field. |
| 4 | Field length The number of characters that can be entered in a field. |
| 5 | Decimal places Defines the number of digits permissible after the decimal point. This element is used only for numeric data types. |
| 6 | Short text Describes the meaning of the corresponding field. |
Creating Tables in ABAP Dictionary
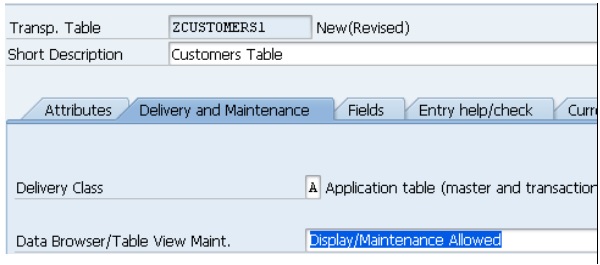
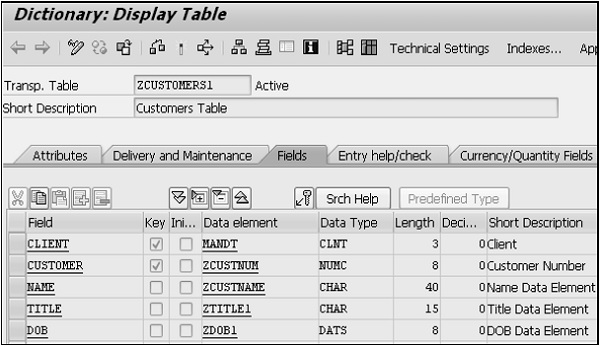
Step 1 − Go to transaction SE11, select the Database table radio button, and enter a name for the table to be created. In our case, we have entered the name ZCUSTOMERS1. Click the Create button. The Dictionary: Maintain Table screen appears. Here the Delivery and Maintenance tab is selected by default.
Step 2 − Enter an explanatory short text in the Short Description field.
Step 3 − Click the Search Help icon beside the Delivery Class field. Select A [Application table (master and transaction data)] option.
Step 4 − Select the Display/Maintenance Allowed option from the Data Browser/Table view Maintenance drop-down menu. The Dictionary: Maintenance Table screen appears.
Step 5 − Select the Fields tab. The screen containing the options related to the Fields tab appears.
Step 6 − Enter the names of table fields in the Field column. A field name may contain letters, digits, and underscores, but it must always begin with a letter and must not be longer than 16 characters.
The fields that are to be created must also have data elements because they take the attributes, such as data type, length, decimal places, and short text, from the defined data element.
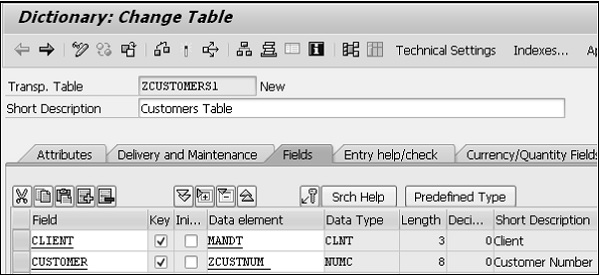
Step 7 − Select the Key column if you want the field to be a part of the table key. Lets create fields such as CLIENT, CUSTOMER, NAME, TITLE and DOB.
Step 8 − The first field is an important one and it identifies the client which the records are associated with. Enter Client as the Field and MANDT as the Data Element. The system automatically fills in the Data Type, Length, Decimals and Short Description. The Client field is made a key field by checking the Key box.
Step 9 − The next field is Customer. Check the box to make it a key field and enter the new Data Element ZCUSTNUM. Click the Save button.
Step 10 − As the Data Element ZCUSTNUM doesnt yet exist, it has to be created. Doubleclick the new Data Element and the Create Data Element window appears. Answer Yes to this and a Maintain Data Element window appears.
Step 11 − Enter Customer Number in the Short Description area. The Elementary data type called Domain should be defined for the new Data element. So enter ZCUSTD1, double-click it and agree to save the changes made. Choose Yes to create the domain and type into the Short Description box a description of the domain.
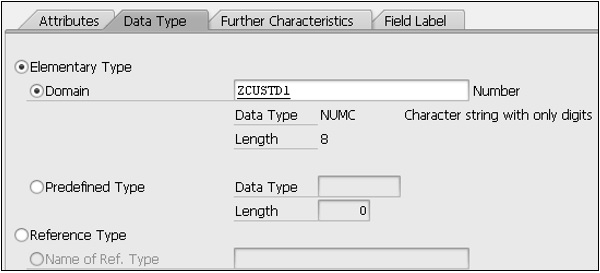
The Definition tab opens automatically. The first field is Data Type.
Step 12 − Click inside the box and select NUMC type from the drop-down menu. Enter the number 8 in the No. of characters field (a maximum of 8 characters) and enter 0 in Decimal places area. The Output length of 8 must be selected and then press Enter. The NUMC fields description must re-appear, confirming that this is a valid entry.
Step 13 − Click Save button and Activate the object.
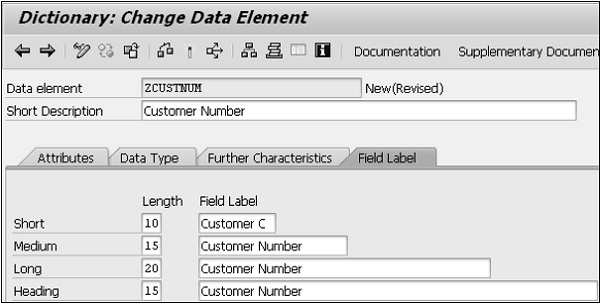
Step 14 − Press F3 to return to the Maintain/Change Data Element screen. Create four Field labels as shown in the following snapshot. After this, Save and Activate the element.
Step 15 − Press the back button to return to the table maintenance screen. The Customer column has the correct Data Type, Length, Decimals and Short Description. This indicates the successful creation of a Data element and also the Domain used.
Similarly, we need to create three additional fields such as NAME, TITLE and DOB.
Step 16 − Select Technical settings from the toolbar. Choose APPL0 for the Data class and the first size category 0 for the Size category field. In case of buffering options, Buffering not allowed has to be selected.
Step 17 − Click Save. Go back to the table and Activate it. The following screen appears.
The table ZCUSTOMERS1 is activated.
