
Article Categories
- All Categories
-
 Data Structure
-
 Networking
-
 RDBMS
RDBMS
-
 Operating System
-
 Java
Java
-
 MS Excel
-
 iOS
iOS
-
 HTML
HTML
-
 CSS
CSS
-
 Android
-
 Python
-
 C Programming
-
 C++
C++
-
 C#
C#
-
 MongoDB
-
 MySQL
MySQL
-
 Javascript
-
 PHP
PHP
-
 Economics & Finance
How to Exclude Certain Cell or Area from Printing in Excel
Excel is a powerful tool that offers a variety of functions for data manipulation and analysis. Here we will first create a formula using the VBA application and then use it to complete the task. So, let us see a simple process to exclude certain cell or area from printing in Excel.
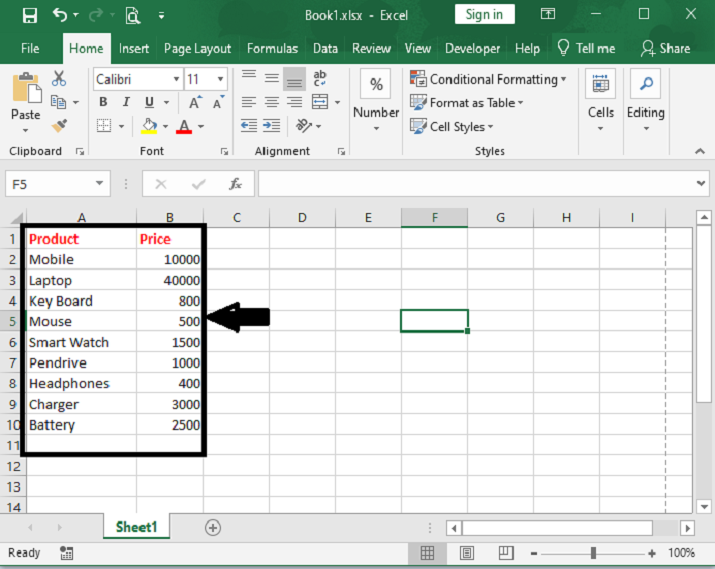
Step 1
Consider an Excel sheet where you have a list of sentences as shown in the below image.
On current visible worksheet, right click on sheet name tab to load Sheet management menu. Select View Code, Microsoft Visual Basic for Applications window pops up.
Or you can enter Microsoft Visual Basic for Applications window via Developer?>Visual Basic. You can also press Alt + F11 keys simultaneously to open it.
Step 2
In Microsoft Visual Basic for Applications window, click Insert?>Module, enter below code in Module1.
Right click > View code > Insert > Module > Copy code
Private Sub Workbook_BeforePrint(Cancel As Boolean)
    Dim xIndex As Long
    If ActiveSheet.Name = "Sheet1" Then
        Cancel = True
        Application.EnableEvents = False
        Application.ScreenUpdating = False
        With ActiveSheet
            xIndex = .Range("A6:B6,A10:B10").Font.ColorIndex
            .Range("A6:B6,A10:B10").Font.Color = vbWhite
            .PrintOut
            .Range("A6:B6,A10:B10").Font.ColorIndex = xIndex
        End With
        Application.EnableEvents = True
        Application.ScreenUpdating = True
    End If
    MsgBox "Print completed?", vbInformation, "Kutools for Excel"
End Sub
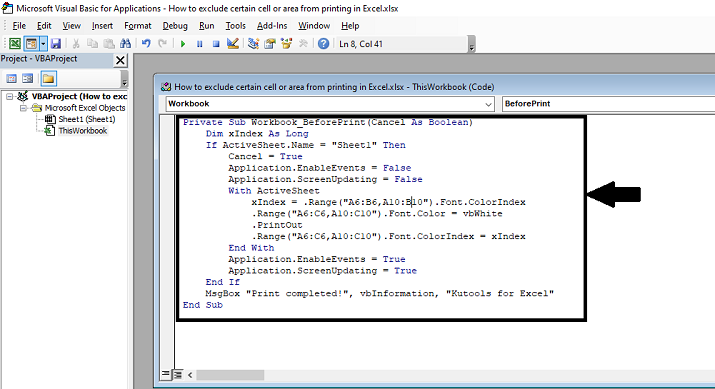
In the code, Sheet1 is the active sheet name you need to print, and A6:B6, A10:B10 are the ranges you will exclude from the printing. Please change them based on your needs.
Save the macro. And then quit Microsoft Visual Basic for Applications.
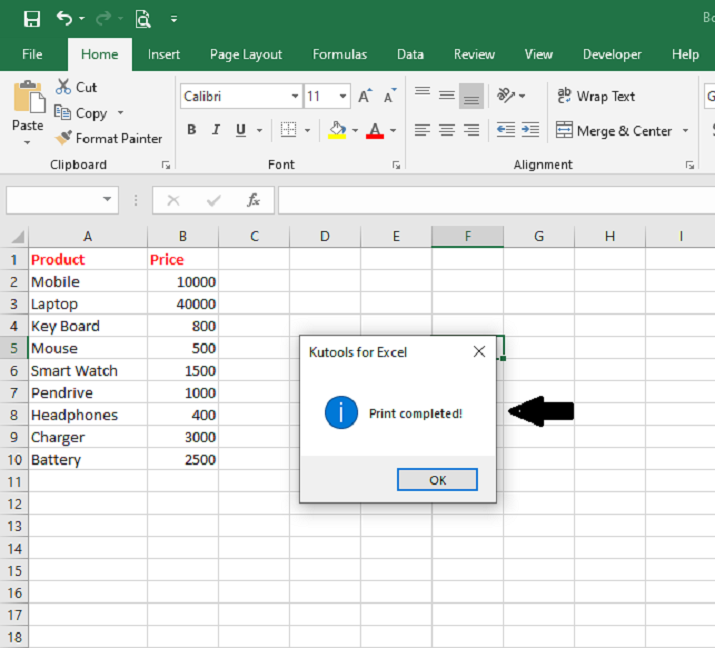
Step 3
Now you can start printing your worksheet. After finishing printing, you will get a Kutools for Excel dialog box as below screenshot shown.
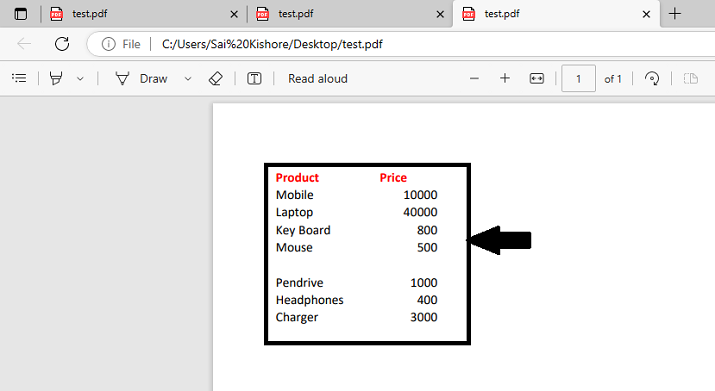
Step 4
You can see the specified ranges are blanks in the printout.
Conclusion
In conclusion, the provided VBA code sets up a Workbook event handler (Workbook_BeforePrint) that executes before the workbook is printed. It is designed to exclude a specific cell or area from being printed in Excel. The code checks if the active sheet is named "Sheet1" and cancels the default printing behavior. It temporarily disables certain application properties to improve performance.
Before printing, the font color of the excluded range is changed to white, making it appear invisible when printed. The PrintOut method is then called to print the sheet. After printing, the original font color is restored for the excluded range. Finally, the application properties are re?enabled, and a message box is displayed to indicate that the print operation is completed.

748 Views
