
- Excel - Home
- Excel - Getting Started
- Excel - Explore Window
- Excel - Backstage
- Excel - Entering Values
- Excel - Move Around
- Excel - Save Workbook
- Excel - Create Worksheet
- Excel - Copy Worksheet
- Excel - Hiding Worksheet
- Excel - Delete Worksheet
- Excel - Close Workbook
- Excel - Open Workbook
- Excel - Merge Workbooks
- Excel - File Password
- Excel - File Share
- Excel - Emoji & Symbols
- Excel - Context Help
- Excel - Insert Data
- Excel - Select Data
- Excel - Delete Data
- Excel - Move Data
- Excel - Rows & Columns
- Excel - Copy & Paste
- Excel - Find & Replace
- Excel - Spell Check
- Excel - Zoom In-Out
- Excel - Special Symbols
- Excel - Insert Comments
- Excel - Add Text Box
- Excel - Shapes
- Excel - 3D Models
- Excel - CheckBox
- Excel - Add Sketch
- Excel - Scan Documents
- Excel - Auto Fill
- Excel - SmartArt
- Excel - Insert WordArt
- Excel - Undo Changes
- Formatting Cells
- Excel - Setting Cell Type
- Excel - Move or Copy Cells
- Excel - Add Cells
- Excel - Delete Cells
- Excel - Setting Fonts
- Excel - Text Decoration
- Excel - Rotate Cells
- Excel - Setting Colors
- Excel - Text Alignments
- Excel - Merge & Wrap
- Excel - Borders and Shades
- Excel - Apply Formatting
- Formatting Worksheets
- Excel - Sheet Options
- Excel - Adjust Margins
- Excel - Page Orientation
- Excel - Header and Footer
- Excel - Insert Page Breaks
- Excel - Set Background
- Excel - Freeze Panes
- Excel - Conditional Format
- Excel - Highlight Cell Rules
- Excel - Top/Bottom Rules
- Excel - Data Bars
- Excel - Color Scales
- Excel - Icon Sets
- Excel - Clear Rules
- Excel - Manage Rules
- Working with Formula
- Excel - Formulas
- Excel - Creating Formulas
- Excel - Copying Formulas
- Excel - Formula Reference
- Excel - Relative References
- Excel - Absolute References
- Excel - Arithmetic Operators
- Excel - Parentheses
- Excel - Using Functions
- Excel - Builtin Functions
- Excel Formatting
- Excel - Formatting
- Excel - Format Painter
- Excel - Format Fonts
- Excel - Format Borders
- Excel - Format Numbers
- Excel - Format Grids
- Excel - Format Settings
- Advanced Operations
- Excel - Data Filtering
- Excel - Data Sorting
- Excel - Using Ranges
- Excel - Data Validation
- Excel - Using Styles
- Excel - Using Themes
- Excel - Using Templates
- Excel - Using Macros
- Excel - Adding Graphics
- Excel - Cross Referencing
- Excel - Printing Worksheets
- Excel - Email Workbooks
- Excel- Translate Worksheet
- Excel - Workbook Security
- Excel - Data Tables
- Excel - Pivot Tables
- Excel - Simple Charts
- Excel - Pivot Charts
- Excel - Sparklines
- Excel - Ads-ins
- Excel - Protection and Security
- Excel - Formula Auditing
- Excel - Remove Duplicates
- Excel - Services
- Excel Useful Resources
- Excel - Keyboard Shortcuts
- Excel - Quick Guide
- Excel - Functions
- Excel - Useful Resources
- Excel - Discussion
Protection and Security in Excel
It has become vital to ensure the security of powerful Microsoft Excel workbooks to prevent hackers from maliciously attacking crucial Excel files. Data breaches and other security challenges are encountered while sharing Excel sheets with others through the Internet. Sharing files to authorized persons and restricting permission like View or Read-only can permit you to secure the Excel file.
Three ways to protect the Excel worksheets −
- Password Protection while Opening a File
- Protecting Independent Worksheets
- Restricting Cell Editing by Locking Cells in Excel Sheet
Compatibility
You may protect and secure Excel files in the following version.
- Excel for Microsoft 365
- Excel for Microsoft 365 for Mac
- Excel 2024
- Excel 2024 for Mac
- Excel 2021
- Excel 2021 for Mac
- Excel 2019
- Excel 2016
Best Practices
Several best practices to enhance the security of your Excel files −
- Update your Excel software regularly by leveraging the latest security patches.
- Restrict users' access and set permissions, such as read-only, to view sensitive information for those who require it.
- Encrypt the strong, confidential passwords to safeguard your files.
- Frequently back up your spreadsheets to safeguard against data loss.
- Utilize encryption to protect your data both during transmission and when stored.
- You can employ digital signatures to Excel worksheets.
Securing Individual Worksheets
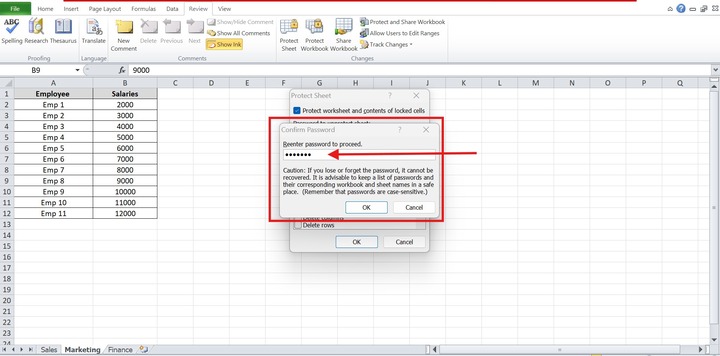
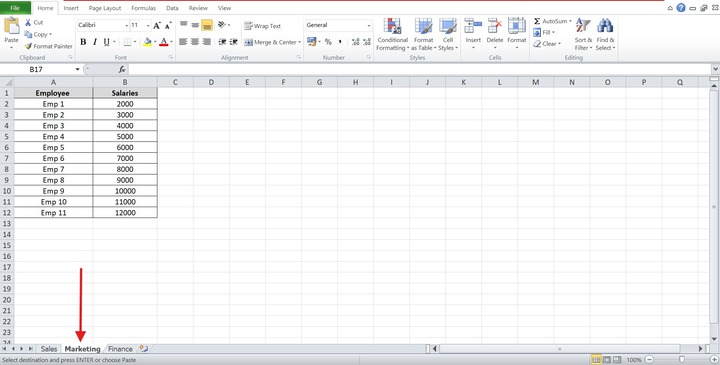
In an FMCG companys salary data, you have a shared Excel workbook with three independent worksheets: Sales, Marketing, and Finance. To protect the confidentiality of each departments salary information, you set a unique password for each worksheet.
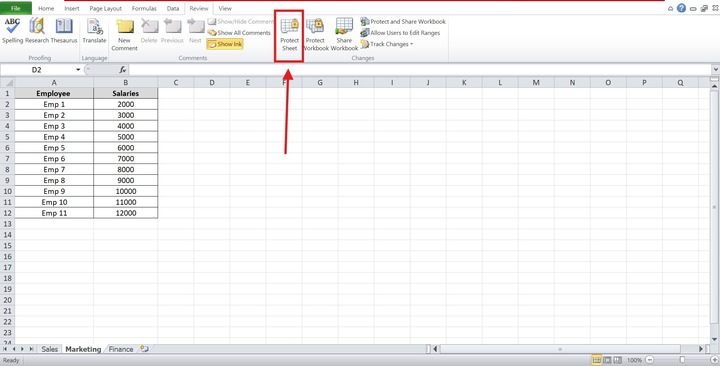
Step 1 − Open your workbook and navigate to the worksheet you wish to secure.
Step 2 − Select the "Review" tab. In the "Protect" group, choose the "Protect Sheet" option.
Step 3 − Optionally, enter a password and specify the permissions you want to grant users.
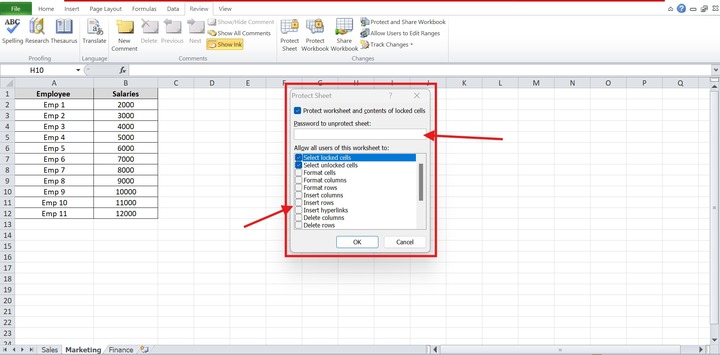
Step 4 − Click "OK", and if prompted, enter the password again to confirm.