- Google AMP - Home
- Google AMP - Overview
- Google AMP - Introduction
- Google AMP - Images
- Google AMP - Form
- Google AMP - Iframes
- Google AMP - Video
- Google AMP - Button
- Google AMP - Timeago
- Google AMP - Mathml
- Google AMP - Fit Text
- Google AMP - Date Countdown
- Google AMP - Date Picker
- Google AMP - Story
- Google AMP - Selector
- Google AMP - Link
- Google AMP - Font
- Google AMP - List
- Google AMP - User Notification
- Google AMP - Next Page
- Google AMP - Attributes
- Styles And Custom CSS
- Google AMP - Dynamic CSS Classes
- Google AMP - Actions And Events
- Google AMP - Animations
- Google AMP - Data Binding
- Google AMP - Layout
- Google AMP - ADS
- Google AMP - Analytics
- Google AMP - Social Widgets
- Google AMP - Media
- Html Page To Amp Page
- Google AMP - Basic Syntax
- Google AMP - Validation
- Google AMP - Caching
- Google AMP - Custom Javascript
- Google AMP - Cors
- Google AMP Useful Resources
- Google AMP - Quick Guide
- Google AMP - Useful Resources
- Google AMP - Discussion
Google AMP - Validation
Google AMP is a way to get the web pages to load faster on the devices. To work with amp we can make use of HTML5, CSS and amp-components.
Google Amp provides many ways to validate an amp page. Some of the important ones that we are going to discuss in this chapter are −
Using #development=1
Using Amp Validator
Using command line
Let us discuss each of them in detail.
Using #development =1
Once you know your page is ready to be validated, just add #development=1 to the end of the page-url and test the same in chrome developer tools.
You can add #development=1 to your html page url at the end as shown in the example given below −
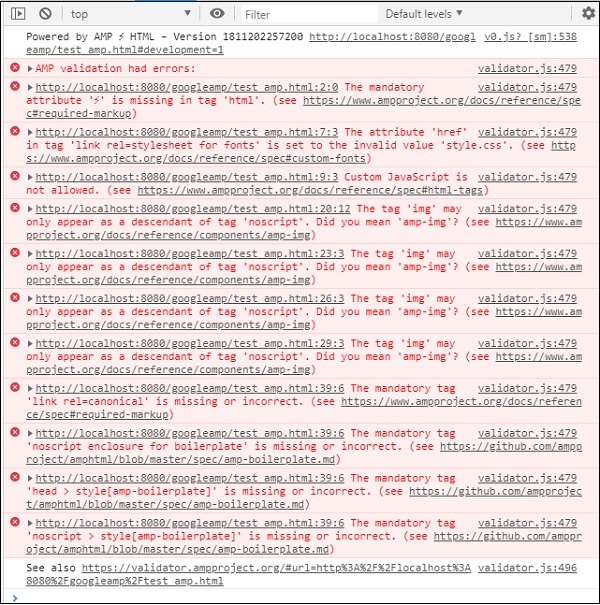
http://localhost:8080/googleamp/test_amp.html#development=1
Hit the above url in the browser and in the Google Chrome console. It will list the errors which amp thinks are invalid from amp specification point of view.
Here are the errors we have got for test_amp.html.
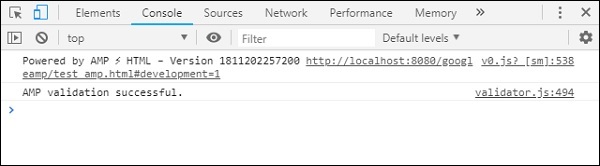
You can fix the errors displayed and once all the errors are fixed it will display as follows −
Using Amp Validator
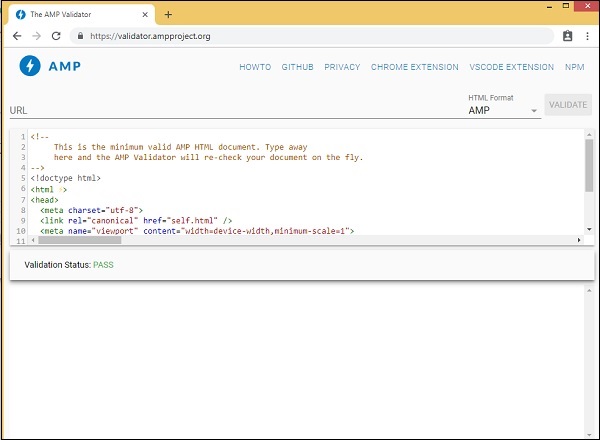
Amp has a validator tool wherein we can enter the HTML content and it displays the status as PASS or ERROR and also shows the error on the page. The link is − https://validator.ampproject.org/
The display for amp validator tool is as shown below −
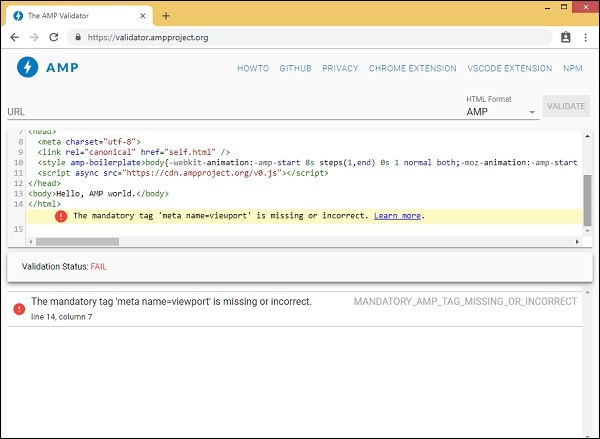
The example of error in the page content is shown below −
Using Command Line
You can install the npm package using the following command −
npm install -g amphtml-validator
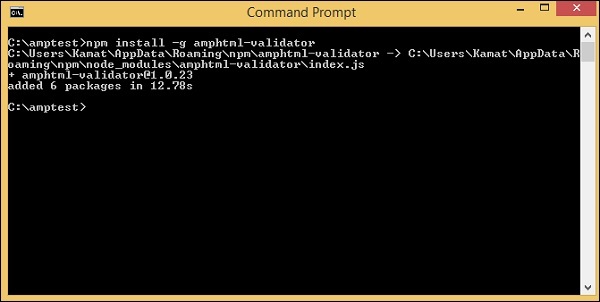
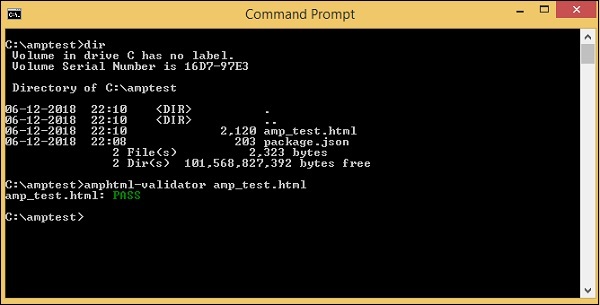
We have created a folder amptest/ and saved amp_test.html file in that folder. Let us validate amp_test.html using the following command in the command line.
amphtml-validator youramppage.html
Let us remove some tags from the page to see if it displays the error.
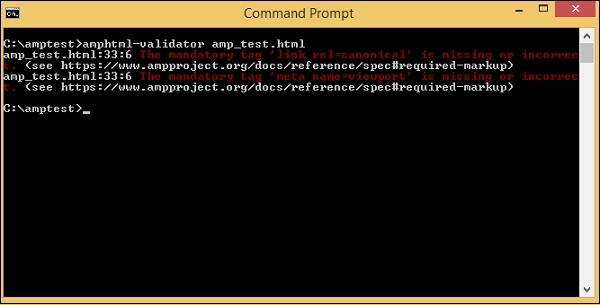
The displayed error can be fixed till we get the status as PASS.
