- Google AMP - Home
- Google AMP - Overview
- Google AMP - Introduction
- Google AMP - Images
- Google AMP - Form
- Google AMP - Iframes
- Google AMP - Video
- Google AMP - Button
- Google AMP - Timeago
- Google AMP - Mathml
- Google AMP - Fit Text
- Google AMP - Date Countdown
- Google AMP - Date Picker
- Google AMP - Story
- Google AMP - Selector
- Google AMP - Link
- Google AMP - Font
- Google AMP - List
- Google AMP - User Notification
- Google AMP - Next Page
- Google AMP - Attributes
- Styles And Custom CSS
- Google AMP - Dynamic CSS Classes
- Google AMP - Actions And Events
- Google AMP - Animations
- Google AMP - Data Binding
- Google AMP - Layout
- Google AMP - ADS
- Google AMP - Analytics
- Google AMP - Social Widgets
- Google AMP - Media
- Html Page To Amp Page
- Google AMP - Basic Syntax
- Google AMP - Validation
- Google AMP - Caching
- Google AMP - Custom Javascript
- Google AMP - Cors
- Google AMP Useful Resources
- Google AMP - Quick Guide
- Google AMP - Useful Resources
- Google AMP - Discussion
Google AMP - Form
This chapter explains how to work with form in Google AMP.
Note that forms tag remains the same as in standard HTML. AMP has added special restriction on the use of forms due to which we need to add the amp-form JavaScript file to work with forms.
Script for amp-form
<script async custom-element = "amp-form"
   src = "https://cdn.ampproject.org/v0/ampform-0.1.js"></script>
To use forms in a AMP page, we need to include the above script in the .html file. The amp-form JavaScript file supports http and xmlhttprequest for form submission. Using HTTP request the page is reloaded and with xmlhttprequest it does not reload the page acts like ajax request.
Form tag in AMP
For xmlhttprequest :
<form method = "post" class = "p2" action-xhr = "submitform.php" target = "_top">
   //Input fields here
</form>

For http :
<form method = "post" class = "p2" action = "submitform.php" target = "_top">
   //Input fields here
</form>
Amp-form provides special attributes i.e, submit-error and submit-success to handle error and success when form is submitted.
Example
An example for amp-form is shown below −
<!doctype html>
<html amp lang = "en">
   <head>
      <meta charset = "utf-8">
      <script async src = "https://cdn.ampproject.org/v0.js"></script>
      <title>Google AMP - Form</title>
      <link rel = "canonical" href = "ampform.html">
      <meta name = "viewport" conten t = "width = device-width,
         minimum-scale = 1,initialscale = 1">

      <style amp-boilerplate>
         body{
            -webkit-animation:
            -amp-start 8s steps(1,end) 0s1 normal both;-moz-animation:
            -amp-start 8s steps(1,end) 0s 1 normal both;-msanimation:
            -amp-start 8s steps(1,end) 0s 1 normal both;animation:
            -amp-start 8s steps(1,end) 0s 1 normal both
         }
         @-webkit-keyframes
         -ampstart{from{visibility:hidden}to{visibility:visible}}@-moz-keyframes
         -ampstart{from{visibility:hidden}to{visibility:visible}}@-ms-keyframes
         -ampstart{from{visibility:hidden}to{visibility:visible}}@-o-keyframes
         -ampstart{from{visibility:hidden}to{visibility:visible}}@keyframes
         -ampstart{from{visibility:hidden}to{visibility:visible}}
      </style>
         <noscript>
            <style amp-boilerplate>
               body{
                  -webkit-animation:none;
                  -moz-animation:none;
                  -msanimation:none;
                  animation:none
               }
            </style>
         </noscript>
      <script async custom-element = "amp-form"
         src = "https://cdn.ampproject.org/v0/amp-form-0.1.js">
      </script>
      <script async custom-template = "amp-mustache"
         src = "https://cdn.ampproject.org/v0/amp-mustache-0.2.js">
      </script>
      <style amp-custom>
         form.amp-form-submit-success [submit-success],
         form.amp-form-submit-error [submit-error]{
            margin-top: 16px;
         }
         form.amp-form-submit-success [submit-success] {
            color: white;
            background-color:gray;
         }
         form.amp-form-submit-error [submit-error] {
            color: red;
         }
         form.amp-form-submit-success.hide-inputs > input {
            display: none;
         }
      </style>
   </head>
   <body>
      <h3>Google AMP - Form</h3>
      <form method = "post"
         class = "p2"
         action-xhr = "submitform.php"
         target = "_top">
         <p>AMP - Form Example</p>
         <div>
            <input type = "text" name = "name" placeholder = "Enter
               Name" required><br/><br/>
            <input type = "email" name = "email"
            placeholder = "Enter Email" required>
            <br/>
            <br/>
         </div>

         <input type = "submit" value = "Submit">
         <div submit-success>
            <template type = "amp-mustache">
               Form Submitted! Thanks {{name}}.
            </template>
         </div>

         <div submit-error>
            <template type = "amp-mustache">
               Error! {{name}}, please try again.
            </template>
         </div>
      </form>
   </body>
</html>
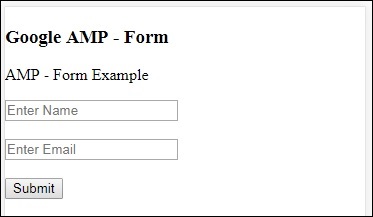
Output
When you executed the code shown above, you will find the result as shown below −
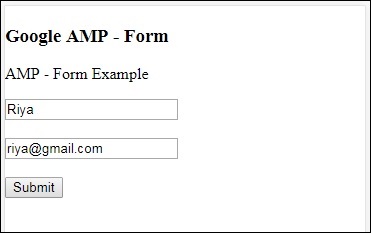
Now, enter the details and click the Submit button. The output screen displayed is as follows −
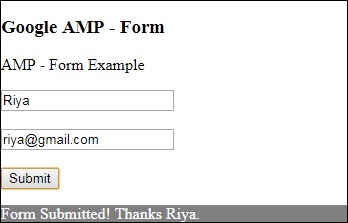
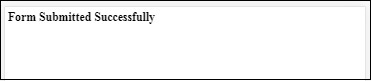
Observe that we have used amp-mustache for data-binding. The form is using action-xhr ie xmlhttprequest to submit form. We have used submitform.php file which returns the data in json format.
<form method = "post" class = "p2" action-xhr = "submitform.php"
   target = "_top">
</form>
submitform.php
<?php
   if(!empty($_POST)){
      $domain_url = (isset($_SERVER['HTTPS']) ? "https" : "http") .      "://$_SERVER[HTTP_HOST]";
      header("Content-type: application/json");
      header("AMP-Access-Control-Allow-Source-Origin: " . $domain_url);
      header("Access-Control-Expose-Headers: AMP-Access-Control-Allow-Source-Origin");
      $myJSON = json_encode($_POST);
      echo $myJSON;
   }
?>
For the form to work using xmlhttprequest, we need to add headers as per the CORS specification. Details of response headers added to submitform.php are shown below −
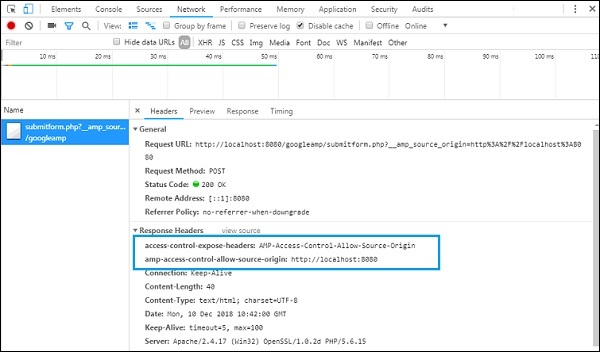
For the form to work, we need to add headers such as access-control-expose-headers with value AMP-Access-Control-Allow-Source-Origin and amp-access-controlallow- source-origin −http://localhost:8080.
Note that we are using a php file and apache server. In php file, we have added the required headers as shown below −
<?php

   if(!empty($_POST)){
      $domain_url = (isset($_SERVER['HTTPS']) ? "https" : "http") .  "://$_SERVER[HTTP_HOST]";
      header("Content-type: application/json");
      header("AMP-Access-Control-Allow-Source-Origin: " . $domain_url);
      header("Access-Control-Expose-Headers: AMP-Access-Control-Allow-Source-Origin");
      $myJSON = json_encode($_POST);
      echo $myJSON;
   }
   ?
?>
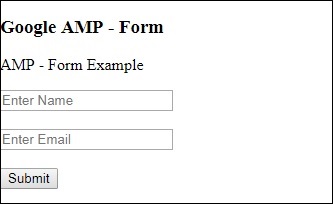
In case we use a normal http request the page will get reloaded as shown below −
For http request we have used form as follows −
<form method = "GET" class = "p2" action = "submitform.php"
   target = "_top">
</form>
Example
Observe the following code for a better understanding −
<!doctype html>
<html amp lang = "en">
   <head>
      <meta charset = "utf-8">
      <script async src = "https://cdn.ampproject.org/v0.js"></script>
      <title>Google AMP - Form</title>
      <link rel = "canonical" href = "ampform.html">
      <meta name = "viewport" content = "width = device-width,minimum-scale = 1,initialscale = 1">

      <style amp-boilerplate>
         body{
            -webkit-animation:
            -amp-start 8s steps(1,end) 0s1 normal both;-moz-animation:
            -amp-start 8s steps(1,end) 0s 1 normal both;-msanimation:
            -amp-start 8s steps(1,end) 0s 1 normal both;animation:
            -amp-start 8s steps(1,end) 0s 1 normal both
         }
         @-webkit-keyframes
         -ampstart{from{visibility:hidden}to{visibility:visible}}@-moz-keyframes
         -ampstart{from{visibility:hidden}to{visibility:visible}}@-ms-keyframes
         -ampstart{from{visibility:hidden}to{visibility:visible}}@-o-keyframes
         -ampstart{from{visibility:hidden}to{visibility:visible}}@keyframes
         -ampstart{from{visibility:hidden}to{visibility:visible}}
      </style>
      <noscript>
         <style amp-boilerplate>
            body {
               -webkit-animation:none;
               -moz-animation:none;
               -msanimation:none;
               animation:none}
         >/style>
      </noscript>

      <script async custom-element = "amp-form"
         src = "https://cdn.ampproject.org/v0/amp-form-0.1.js">
      </script>
      <script async custom-template = "amp-mustache"
         src = "https://cdn.ampproject.org/v0/amp-mustache-0.2.js">
      </script>

      <style amp-custom>
         form.amp-form-submit-success [submit-success],
         form.amp-form-submit-error [submit-error]{
            margin-top: 16px;
         }
         form.amp-form-submit-success [submit-success] {
            color: white;
            background-color:gray;
         }
         form.amp-form-submit-error [submit-error] {
            color: red;
         }
         form.amp-form-submit-success.hide-inputs >
            input {
            display: none;
         }
      </style>
   </head>
   <body>
      <h3>Google AMP - Form</h3>
      <form method = "GET" class = "p2" action = "submitform.php" target = "_top">
         <p>AMP - Form Example</p>
         <div>
            <input type = "text" name = "name" placeholder = "Enter Name" required>
            <br/>
            <br/>
            <input type = "email" name = "email" placeholder = "Enter Email" required>
            <br/>
            <br/>
         <div>

         <input type = "submit" value = "Submit">
         <div submit-success>
            <template type = "amp-mustache">
               Form Submitted! Thanks {{name}}.
            </template>
         </div>
         <div submit-error>
            <template type = "amp-mustache">
               Error! {{name}}, please try again.
            </template>
         </div>
      </form>
   </body>
</html>
Output
When you executed the code shown above, you will find the result as shown below −