- CoffeeScript - Home
- CoffeeScript - Overview
- CoffeeScript - Environment
- CoffeeScript - command-line utility
- CoffeeScript - Syntax
- CoffeeScript - Data Types
- CoffeeScript - Variables
- CoffeeScript - Operators and Aliases
- CoffeeScript - Conditionals
- CoffeeScript - Loops
- CoffeeScript - Comprehensions
- CoffeeScript - Functions
- CoffeeScript Object Oriented
- CoffeeScript - Strings
- CoffeeScript - Arrays
- CoffeeScript - Objects
- CoffeeScript - Ranges
- CoffeeScript - Splat
- CoffeeScript - Date
- CoffeeScript - Math
- CoffeeScript - Exception Handling
- CoffeeScript - Regular Expressions
- CoffeeScript - Classes and Inheritance
- CoffeeScript Advanced
- CoffeeScript - Ajax
- CoffeeScript - jQuery
- CoffeeScript - MongoDB
- CoffeeScript - SQLite
CoffeeScript - Quick Guide
CoffeeScript - Overview
At present, JavaScript is the fastest mainstream dynamic language available, and it is known as the lingua franca of the web. It is developed by Brendan Eich in the year of 1995 in 10 days.
Because of its effective features, JavaScript became popular and went global quickly. It was there in lab for a very less time, which was not enough to polish the language. May be for this reason, inspite of its good parts, JavaScript has a bunch of design errors and it bagged a bad reputation of being a quirky language.
What is CoffeeScript ?
CoffeeScript is a lightweight language based on Ruby and Python which transcompiles (compiles from one source language to another) into JavaScript. It provides better syntax avoiding the quirky parts of JavaScript, still retaining the flexibility and beauty of the language.
Advantages of CoffeeScript
Following are the advantages of CoffeeScript −
Easily understandable − CoffeeScript is a shorthand form of JavaScript, its syntax is pretty simple compared to JavaScript. Using CoffeeScript, we can write clean, clear, and easily understandable codes.
Write less do more − For a huge code in JavaScript, we need comparatively very less number of lines of CoffeeScript.
Reliable − CoffeeScript is a safe and reliable programming language to write dynamic programs.
Readable and maintainable − CoffeeScript provides aliases for most of the operators which makes the code readable. It is also easy to maintain the programs written in CoffeeScript.
Class-based inheritance − JavaScript does not have classes. Instead of them, it provides powerful but confusing prototypes. Unlike JavaScript, we can create classes and inherit them in CoffeeScript. In addition to this, it also provides instance and static properties as well as mixins. It uses JavaScript's native prototype to create classes.
No var keyword − There is no need to use the var keyword to create a variable in CoffeeScript, thus we can avoid the accidental or unwanted scope deceleration.
Avoids problematic symbols − There is no need to use the problematic semicolons and parenthesis in CoffeeScript. Instead of curly braces, we can use whitespaces to differentiate the block codes like functions, loops, etc.
Extensive library support − In CoffeeScript, we can use the libraries of JavaScript and vice versa. Therefore, we have access to a rich set of libraries while working with CoffeeScript.
History of CoffeeScript
CoffeeScript is developed by Jeremy Ashkenas. It was first committed in Git On December 13, 2009.
Originally the compiler of the CoffeeScript was written in Ruby language.
In March 2010, the CoffeeScript compiler was replaced; this time instead of Ruby, they used CoffeeScript itself.
And in the same year, CoffeeScript 1.0 was released and at the time of release, it was one of the most wanted projects of the Git hub.
Limitations of CoffeeScript
Sensitive to whitespaces − CoffeeScript is very sensitive to whitespaces, so programmers need to be very careful while providing indentations. If we do not maintain proper indentation, the entire code may go wrong.
TutorialsPoint's CoffeeScript IDE
You can compile CoffeeScript files using TutorialsPoint's CoffeeScript compiler provided in our Coding Ground section https://www.tutorialspoint.com/codingground.htm. Follow the steps given below to use our CoffeeScript compiler.
Step 1
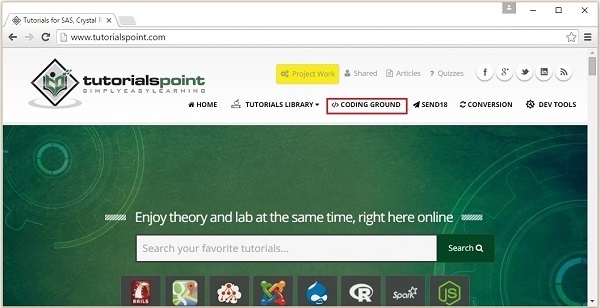
Visit the home page of our website by clicking the following link www.tutorialspoint.com.
Step 2
Click on the button named CODING GROUND that is located at the top right corner of the homepage as highlighted in the snapshot given below.
Step 3
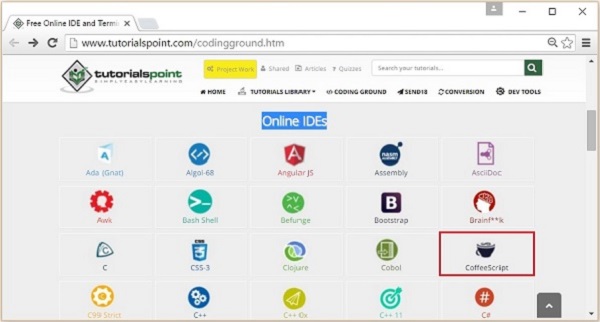
This will lead to our CODING GROUND section which provides online terminals and IDEs for about 135 programming languages. Open CoffeeScript IDE in the Online IDEs section which is shown in the following snapshot.
Step 4
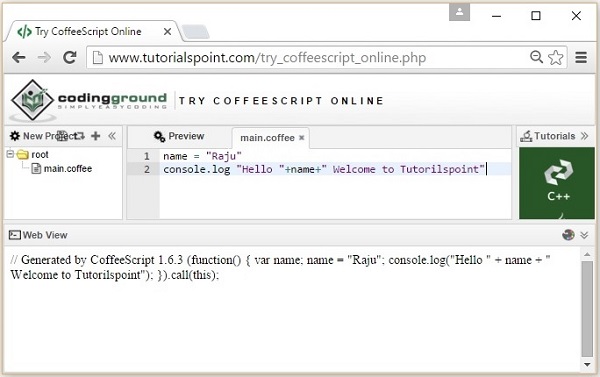
If you paste your CoffeeScript code in main.coffee (You can change the file name) and click the Preview button, then you can see the compiled JavaScript in the console as shown in the following snapshot.
CoffeeScript - Environment
The Compiler of the latest versions of CoffeeScript is written in CoffeeScript itself. To run CoffeeScript files in your system without a browser, you need a JavaScript runtime.
Node.js
Node.js is a JavaScript framework which is used to develop network server applications. It also acts as a bridge between JavaScript and the Operating System.
The command-line version of CoffeeScript is distributed as a Node.js package. Therefore, to install CoffeeScript (command-line) in your system, you first need to install node.js.
Installing Node.js
Here are the steps to download and install Node.js in your system.
Step 1
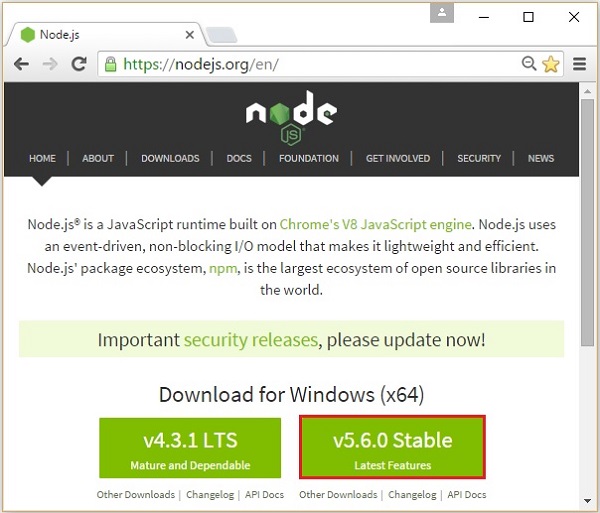
Visit the nodejs homepage and download its stable version for windows by clicking on the button hilighted in the snapshot given below.
Step 2
On clicking, a .msc file named node-v5.50-x64 will be downloaded into your system, run the downloaded file to start the Node.js set-up. Here is the snapshot of the Welcome page of Node.js set-up wizard.
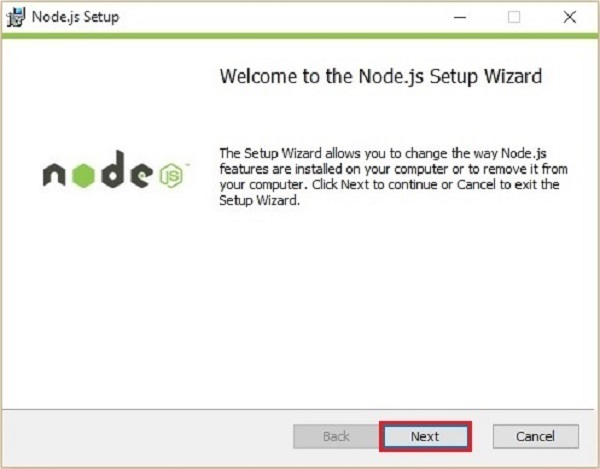
Step 3
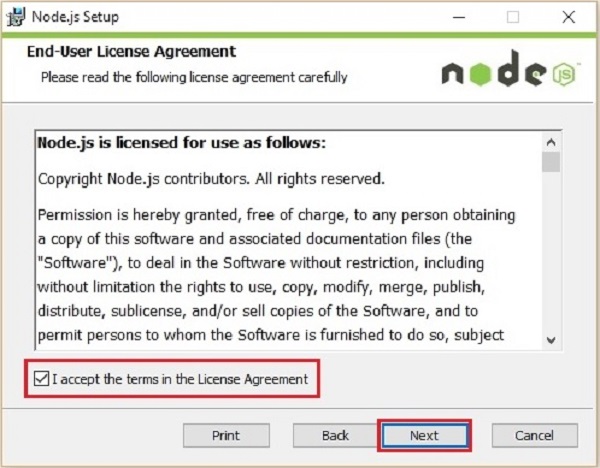
Click on the Next button in the Welcome page of the Node.js set-up wizard which will lead you to the End-user License Agreement page. Accept the license agreement and click on the Next button as shown below.
Step 4
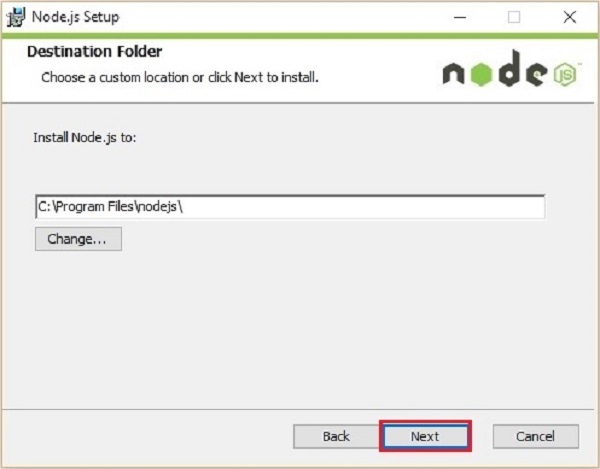
On the next page, you need to set the destination folder to the path where you want to install Node.js. Change the path to the required folder and click on the Next button.
Step 5
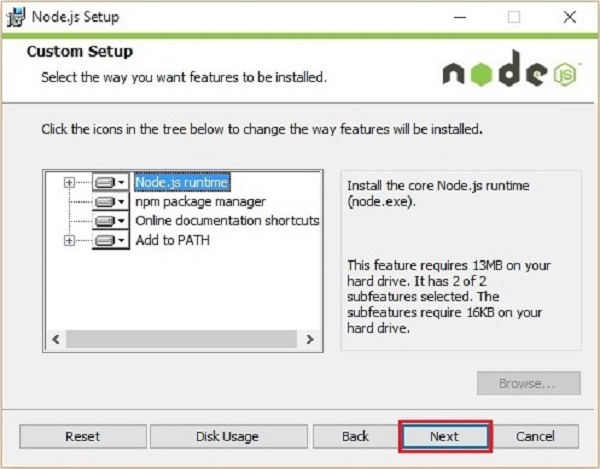
In the Custom setup page, select the Node.js runtime to install node.exe file and click Next.
Step 6
Finally, click on the Install button which will start the Node.js installation.
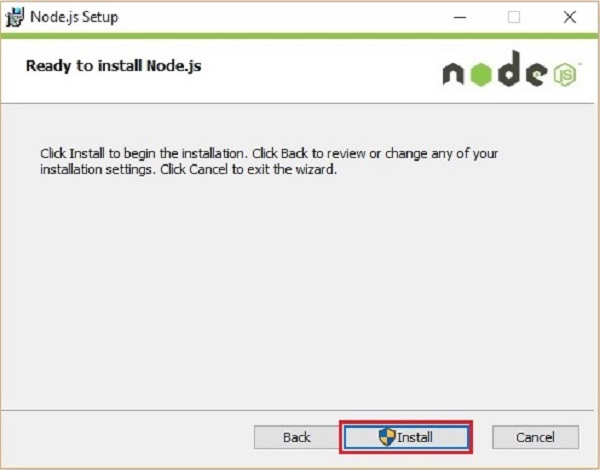
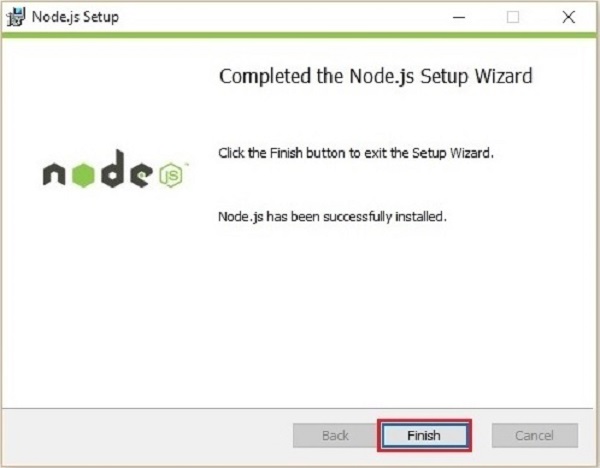
Click on the Finish button of the Node.js set-up wizard as shown below to complete the Node.js installation.
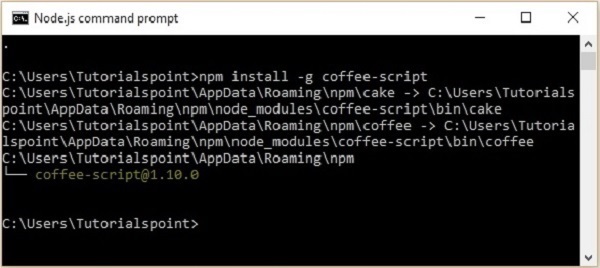
Installing CoffeeScript
Node.js provides you a command prompt (Node.js command prompt). You can install CoffeeScript globally by entering the following command in it.
c:\> npm install -g coffeescript
On executing the the above command, CoffeeScript will be installed in your system by producing the following output.
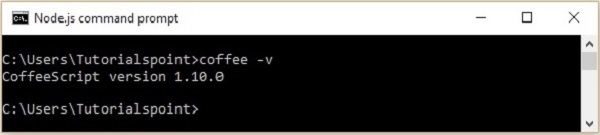
Verification
You can verify the installation of the CoffeeScript by typing the following command.
c:\> coffee -v
On successful installation, this command gives you the version of CoffeeScript as shown below.
CoffeeScript - Command-line utility
On installing CoffeeScript on Node.js, we can access the coffee-command line utility. In here, the coffee command is the key command. Using various options of this command, we can compile and execute the CoffeeScript files.
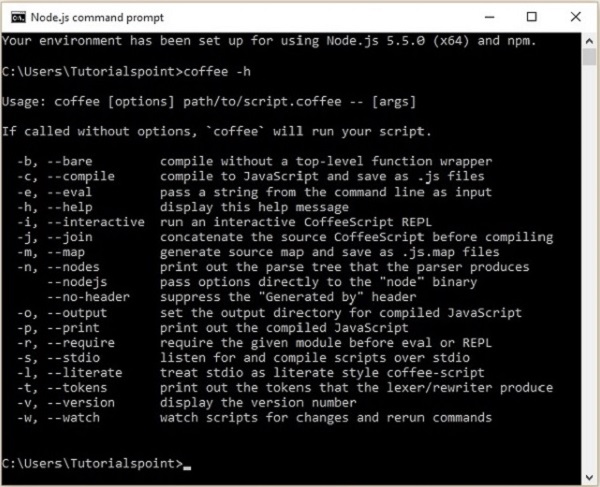
You can see the list of options of the coffee command using its -h or --help option. Open the Node.js command prompt and execute the following command in it.
c:\>coffee -help
This command gives you the list of various options of the coffee, along with the description of the operation performed by each of them as shown below.
Compiling the CoffeeScript Code
The CoffeeScript files are saved with the extension .coffee. You can compile these files using the -c or --compile option of the coffee command as shown below.
c:\>coffee -c filename.coffee
Example
Suppose there is a file in your system with the following CoffeeScript code which prints a message on the console.
name = "Raju"
console.log "Hello"+name+" Welcome to Tutorialspoint"
Note − The console.log() function prints the given string on the console.
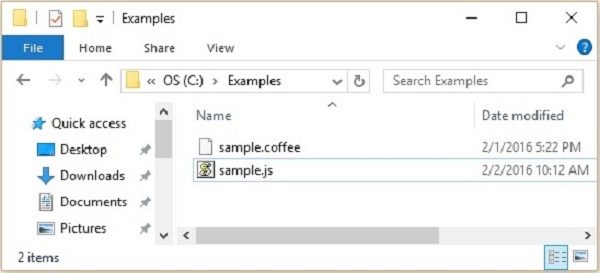
To compile the above code, save it in a file with the name sample.coffee. Open the Node.js command prompt. Browse through the path where you have saved the file and compile it using the -c option of the coffee command of the coffee command-line utility as shown below.
c:\> coffee -c sample.coffee
On executing the above command, the CoffeeScript compiler compiles the given file (sample.coffee) and saves it in the current location with a name sample.js as shown below.
If you open the sample.js file, you can observe the generated JavaScript as shown below.
// Generated by CoffeeScript 1.10.0
(function() {
  var name;
  name = "Raju";
  console.log("Hello " + name + " Welcome to Tutorialspoint");

}).call(this);
Executing the CoffeeScript code
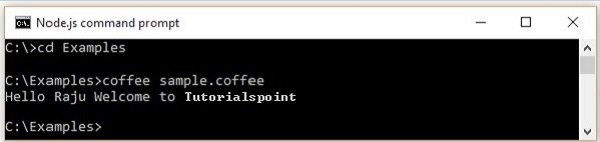
You can execute a CoffeeScript file by simply passing the file name to the coffee command in the Node.js command prompt as follows.
c:\> coffee sample.coffee
Example
For example, let us execute the sample.coffee file. For this, open the Node.js command prompt. Browse through the path where you have saved the file and execute the file by directly passing its name to the coffee command as shown below.
Watch and Compile
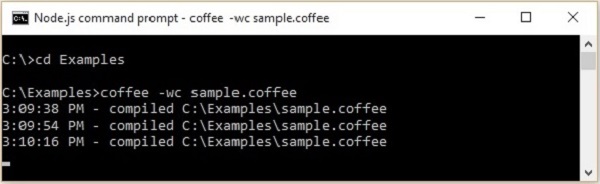
In some scenarios, there is a chance that we do a lot of changes to our scripts. Using the w option of the coffee command, you watch your scripts for changes.
You can watch and compile a file simultaneously using the -wc option as shown below. When we use this option, the file will be recompiled each time you make changes in your script.
c:\>coffee -wc file_name
Example
Suppose we have compiled a file named sample.coffee using the -wc option and we modified the script thrice. Each time we change the script, the .coffee file is recompiled leaving the Node.js command prompt as shown below.
Setting the Output Directory
Using the -o option, we can set the output directory to place the compiled JavaScript files as shown below.
c:\>coffee -o "Required path where we want our .js files" file_name
Example
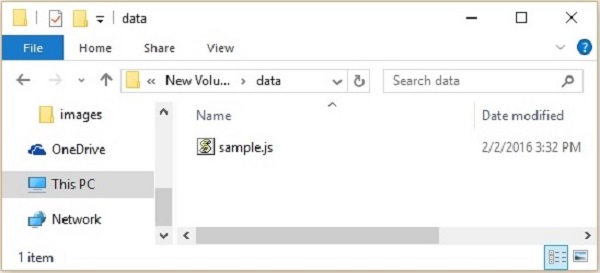
Let us save the JavaScript code of the sample.coffee file in a folder named data in the E drive using the -o option by executing the following command in the command prompt.
c:\>coffee -o E://data sample.coffee
Following is the snapshot of the given folder after executing the above command. Here you can observe the JavaScript file of the sample.coffee
Print the Compiled JavaScript
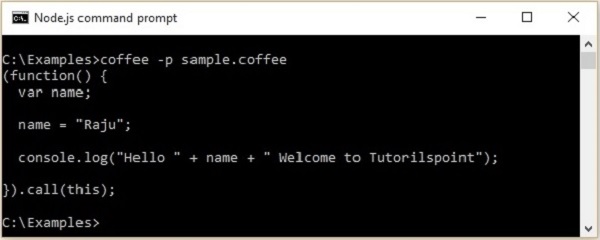
If we want to print the compiled javascript on the console itself, we have to use the -p option of the coffee command as shown below.
c:\>coffee -p file_name
Example
For example, you can print the compiled JavaScript code of the sample.coffee file on the console using the -p option as shown below.
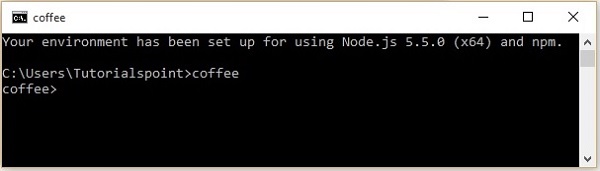
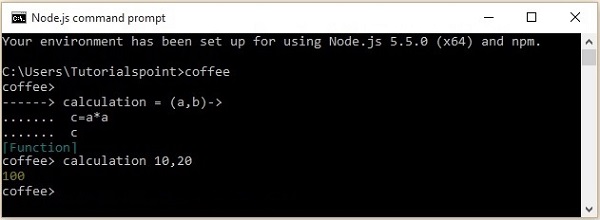
The REPL (Read Evaluate Print Loop)
CoffeeScript provides you an REPL-interactive shell. This shell is used to evaluate the CoffeeScript expressions. You can type any CoffeeScript code in this shell and get the result immediately. You can open REPL by executing the coffee command without any options as shown below.
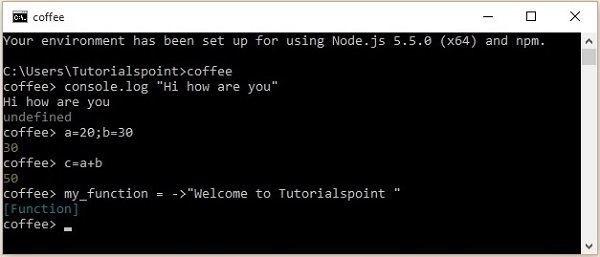
Using this shell, we can assign values to variables, create functions, and evaluate results. As shown in the following screenshot, if we call functions in REPL, it prints the value of the function. If we give an expression to it, it evaluates and prints the result of the expression. And if we simply type the statements in it, it prints the value of the last statement.
In REPL, you can access multiple line mode by pressing ctrl+v where you can evaluate the code with multiple lines (like functions) and you can get back to REPL mode from it by pressing ctrl+v again. Here is an example usage of the multi line mode.
Running CoffeeScript through Browser
We can run CoffeeScript using the <script> tag of the HTML just like JavaScript as shown below.
<script src="http://jashkenas.github.com/coffee-script/extras/coffee-script.js"
   type="text/javascript" charset="utf-8"></script>
<script type="text/coffeescript">
  # Some CoffeeScript
</script>
But for this, we have to import the library in each application and the CoffeeScript code will be interpreted line by line before the output is shown. This will slow down your applications, therefore this approach is not recommended.
Therefore, to use CoffeeScript in your applications, you need to pre-compile them using the Coffee command-line utility and then you can use the generated JavaScript in your applications.
CoffeeScript - Syntax
In the previous chapter, we have seen how to install CoffeeScript. In this chapter, let us check out the syntax of CoffeeScript.
The syntax of CoffeeScript is more graceful when compared to the syntax of JavaScript. It avoids the troublesome features like curly braces, semicolons, and variable decelerations.
CoffeeScript Statements
Unlike many other programming languages like C, C++, and Java, the statements in CoffeeScript do not end with semicolons (;). Instead of that, every new line is considered as a separate statement by the CoffeeScript compiler.
Example
Here is an example of a CoffeeScript statement.
name = "Javed"
age = 26
In the same way, we can write two statements in a single line by separating them using semicolon as shown below.
name = "Javed";age = 26
CoffeeScript Variables (No var Keyword)
In JavaScript, we declare a variable using the var keyword before creating it, as shown below.
var name = "Javed"
var age = 20
While creating variables in CoffeeScript, there is no need to declare them using the var keyword. We can directly create a variable just by assigning a value to it as shown below.
name = "Javed"
age = 20
No Parentheses
In general, we use parenthesis while declaring the function, calling it, and also to separate the code blocks to avoid ambiguity. In CoffeeScript, there is no need to use parentheses, and while creating functions, we use an arrow mark (->) instead of parentheses as shown below.
myfunction = -> alert "Hello"
Still, we have to use parentheses in certain scenarios. While calling functions without parameters, we will use parentheses. For example, if we have a function named my_function in CoffeeScript, then we have to call it as shown below.
my_function()
In the same way, we can also separate the ambiguous code using parentheses. If you observe the following example, without braces, the result is 2233 and with braces, it will be 45.
alert "The result is "+(22+33)
No Curly Braces
In JavaScript, for the block codes such as functions, loops, and conditional statements, we use curly braces. In CoffeeScript, there is no need to use curly braces. Instead, we have to maintain proper indentations (white spaces) within the body. This is the feature which is inspired from the Python language.
Following is an example of a function in CoffeeScript. Here you can observe that instead of curly braces, we have used three whitespaces as indentation to separate the body of the function.
myfunction = ->
   name = "John"
   alert "Hello"+name
CoffeeScript Comments
In any programming language, we use comments to write description about the code we have written. These comments are not considered as the part of the programs. The comments in CoffeeScript are similar to the comments of Ruby language. CoffeeScript provides two types of comments as follows −
Single-line Comments
Whenever we want to comment a single line in CoffeeScript, we just need to place a hash tag before it as shown below.
# This is the single line comment in CoffeeScript
Every single line that follows a hash tag (#) is considered as a comment by the CoffeeScript compiler and it compiles the rest of the code in the given file except the comments.
Multiline Comments
Whenever we want to comment more than one line in CoffeeScript (multiple lines), we can do that by wrapping those lines within a pair of triple hash tags as shown below.
###
These are the multi line comments in CoffeeScript
We can write as many number of lines as we want
within the pair of triple hash tags.
###
CoffeeScript Reserved keywords
A list of all the reserved words in CoffeeScript are given in the following table. They cannot be used as CoffeeScript variables, functions, methods, loop labels, or any object names.
|
case default function var void with const let enum export import native __hasProp __extends __slice __bind __indexOf implements |
else interface package private protected public static yield true false null this new delete typeof in arguments eval |
instanceof return throw break continue debugger if else switch for while do try catch finally class extends super |
undefined then unless until loop of by when and or is isnt not yes no on off |
CoffeeScript - Data Types
CoffeeScript Data Types
One of the most fundamental characteristics of a programming language is the set of data types it supports. These are the type of values that can be represented and manipulated in a programming language.
As CoffeeScript compiles line by line to JavaScript, the data types provided by CoffeeScript are same as JavaScript. Except for the fact that CoffeeScript adds some additional essence.
CoffeeScript provides the following data types to work with −
Strings − The String data type represents a group of characters in general and we represent a string value with in-between double quotes (" ").
Example: "Raj", "Rahman"
Number − The number data type represents the numerical values.
Example: 12, 212, etc.
Boolean − Boolean data type represents one bit of information. There are only two possible values: true and false.
Arrays − The Array object lets you store multiple values in a single variable. It stores a fixed-size sequential collection of elements of the same type.
Example: student = ["Rahman","Ramu","Ravi","Robert"]
Objects − The Objects in CoffeeScript are similar to those in JavaScript these are collection of the properties. Where a property includes a key and a value separated by a semi colon (:). In short, CoffeeScript objects are a collection of key-value pairs.
Example: student = {name: "Mohammed", age: 24, phone: 9848022338 }
Null − A variable that is defined and does not hold any value is considered and null. This is similar to the null value in JavaScript.
Undefined − A variable which hasnt had any value assigned to it is considered as undefined variable. If you use such variables in your code, then you will get an undefined error.
We will cover the data types Arrays and Objects in detail in separate chapters.
CoffeeScript - Variables
Variables are nothing but named containers. You can place data into these containers and then refer to the data using the name of its container.
CoffeeScript Variables
In JavaScript, before using a variable, we need to declare and initialize it (assign value). Unlike JavaScript, while creating a variable in CoffeeScript, there is no need to declare it using the var keyword. We simply create a variable just by assigning a value to a literal as shown below.
name = variable name
Example
In the following CoffeeScript code, we have defined two variables name and age, of string and number data types respectively. Save it in a file with the name variable_example.coffee.
name = "Javed"
age = 25
Compiling the code
Compile the above CoffeeScript code by executing the following command in the command prompt.
c:\> compile -c variable_example.coffee
On compiling, a JavaScript file named variable_example.js will be generated with the following content. Here you can observe that the compiler declared the variables (age and name) using the var keyword on behalf of us.
// Generated by CoffeeScript 1.10.0
(function() {
  var age, name;
  name = "Javed";
  age = 25;

}).call(this);
Variable Scope
The scope of a variable is the region of your program in which it is defined. JavaScript and CoffeeScript variables have only two scopes.
Global Variables − A global variable has global scope which means it can be used anywhere in your JavaScript code.
Local Variables − A local variable will be visible only within a function where it is defined. Function parameters are always local to that function.
The Problem with Variables in JavaScript
In JavaScript, whenever we define a variable without using the var keyword, it is created with global scope. This causes a lot of problems. Consider the following example −
<script type = "text/javascript">
   var i = 10;
   document.write("The value of global variable i is "+ i);
   document.write("<br>");
   test();
   function test() {
      i = 20;
      document.write("The value of local variable i is "+i);
      document.write("<br>");
   }
   document.write("The value of global variable i is "+i);
</script>
On executing, the above JavaScript gives you the following output −
The value of global variable i is 10

The value of local variable i is 20

The value of global variable i is 20
In the above example, we have created a variable named i in the global space and assigned the value 10 to it. And within the function, on an attempt to create a local variable with the same name, we have declared as i=20; without var keyword. Since we missed the var keyword, the value of global variable i is reassigned to 20.
For this reason, it is recommended to declare variables using the var keyword.
Variable Scope in CoffeeScript
Whenever we compile a CoffeeScript file, the CoffeeScript compiler creates an anonymous function, and within that function, it transcompiles the CoffeeScript code in to JavaScript line by line. (If we want, we can remove the top level function wrapper using the -b or --bare option of the compile command) Every variable that we create is declared using the var keyword within the anonymous function and thus, by default, every variable is local in CoffeeScript.
(function() {
  var age, name;
  name = "javed";
  age = 20;
}).call(this);
Anyway, if we want, we can declare a variable with global namespace. We can do it explicitly as shown below.
obj = this
obj.age = 30
CoffeeScript Variable Names (Literals)
While naming your variables in CoffeeScript, keep the following rules in mind.
You should not use any of the CoffeeScript reserved keywords as a variable name. These keywords are mentioned in the next section. For example, break or Boolean variable names are not valid.
CoffeeScript variable names should not start with a numeral (0-9). They must begin with a letter or an underscore character. For example, 123test is an invalid variable name but _123test is a valid one.
CoffeeScript variable names are case-sensitive. For example, Name and name are two different variables.
CoffeeScript - Operators and Aliases
CoffeeScript Operators
An operator is a symbol that tells the compiler to perform specific mathematical or logical functions. Let us take a simple expression 4 + 5 is equal to 9. Here 4 and 5 are called operands and + is called the operator.
The operators provided by CoffeeScript are same as in JavaScript except a few differences. There are some problematic operators in JavaScript. CoffeeScript either removed them or modified their functionality and it also introduced some new operators.
Following is the list of operators supported by CoffeeScript.
- Arithmetic Operators
- Comparison Operators
- Logical (or Relational) Operators
- Assignment Operators
CoffeeScript Aliases
In addition to operators, CoffeeScript also provides aliases. CoffeeScript provides aliases to various operators and symbols in order to make your CoffeeScript code readable and more user friendly.
Let us have a look at all the operators and aliases of CoffeeScript one by one.
Arithmetic Operators
CoffeeScript supports the following arithmetic operators. Assume variable A holds 10 and variable B holds 20, then −
| S.No | Operator and Description | Example |
|---|---|---|
| 1 | + (Addition) Adds two operands |
A + B = 30 |
| 2 | − (Subtraction) Subtracts the second operand from the first |
A - B = -10 |
| 3 | * (Multiplication) Multiply both operands |
A * B = 200 |
| 4 | / (Division) Divide the numerator by the denominator |
B / A = 2 |
| 5 | % (Modulus) Outputs the remainder of an integer division |
B % A = 0 |
| 6 | ++ (Increment) Increases an integer value by one |
A++ = 11 |
| 7 | -- (Decrement) Decreases an integer value by one |
A-- = 9 |
Comparison Operators
JavaScript supports the following comparison operators. Assume variable A holds 10 and variable B holds 20, then −
| S.No | Operator and Description | Example |
|---|---|---|
| 1 | = = (Equal) Checks if the value of two operands are equal or not, if yes, then the condition becomes true. |
(A == B) is not true. |
| 2 | != (Not Equal) Checks if the value of two operands are equal or not, if the values are not equal, then the condition becomes true. |
(A != B) is true. |
| 3 | > (Greater than) Checks if the value of the left operand is greater than the value of the right operand, if yes, then the condition becomes true. |
(A > B) is not true. |
| 4 | < (Less than) Checks if the value of the left operand is less than the value of the right operand, if yes, then the condition becomes true. |
(A < B) is true. |
| 5 | >= (Greater than or Equal to) Checks if the value of the left operand is greater than or equal to the value of the right operand, if yes, then the condition becomes true. |
(A >= B) is not true. |
| 6 | <= (Less than or Equal to) Checks if the value of the left operand is less than or equal to the value of the right operand, if yes, then the condition becomes true. |
(A <= B) is true. |
Following table shows the aliases for few of the Comparison operators. Suppose A holds 20 and variable B holds 20.
| Operator | Alias | Example |
|---|---|---|
| = = (Equal) | is | A is B gives you true. |
| != = (Not Equal) | isnt | A isnt B gives you false. |
Logical Operators
CoffeeScript supports the following logical operators. Assume variable A holds 10 and variable B holds 20, then −
| S.No | Operator and Description | Example |
|---|---|---|
| 1 | && (Logical AND) If both the operands are non-zero, then the condition becomes true. |
(A && B) is true. |
| 2 | || (Logical OR) If any of the two operands are non-zero, then the condition becomes true. |
(A || B) is true. |
| 3 | ! (Logical NOT) Reverses the logical state of its operand. If a condition is true, then the Logical NOT operator will make it false. |
! (A && B) is false. |
The following table shows the aliases for some of the logical operators. Suppose X holds true and variable Y holds false.
| Operator | Alias | Example |
|---|---|---|
| && (Logical AND) | and | X and Y gives you false |
| || (Logical OR) | or | X or Y gives you true |
| ! (not x) | not | not X gives you false |
Bitwise Operators
CoffeeScript supports the following bitwise operators. Assume variable A holds 2 and variable B holds 3, then −
| S.No | Operator and Description | Example |
|---|---|---|
| 1 | & (Bitwise AND) It performs a Boolean AND operation on each bit of its integer arguments. |
(A & B) is 2. |
| 2 | | (BitWise OR) It performs a Boolean OR operation on each bit of its integer arguments. |
(A | B) is 3. |
| 3 | ^ (Bitwise XOR) It performs a Boolean exclusive OR operation on each bit of its integer arguments. Exclusive OR means that either operand one is true or operand two is true, but not both. |
(A ^ B) is 1. |
| 4 | ~ (Bitwise Not) It is a unary operator and operates by reversing all the bits in the operand. |
(~B) is -4. |
| 5 | << (Left Shift) It moves all the bits in its first operand to the left by the number of places specified in the second operand. New bits are filled with zeros. Shifting a value left by one position is equivalent to multiplying it by 2, shifting two positions is equivalent to multiplying by 4, and so on. |
(A << 1) is 4. |
| 6 | >> (Right Shift) Binary Right Shift Operator. The left operands value is moved right by the number of bits specified by the right operand. |
(A >> 1) is 1. |
Assignment Operators
CoffeeScript supports the following assignment operators −
| S.No | Operator and Description | Example |
|---|---|---|
| 1 | = (Simple Assignment ) Assigns values from the right side operand to the left side operand |
C = A + B will assign the value of A + B into C |
| 2 | += (Add and Assignment) It adds the right operand to the left operand and assigns the result to the left operand. |
C += A is equivalent to C = C + A |
| 3 | -= (Subtract and Assignment) It subtracts the right operand from the left operand and assigns the result to the left operand. |
C -= A is equivalent to C = C - A |
| 4 | *= (Multiply and Assignment) It multiplies the right operand with the left operand and assigns the result to the left operand. |
C *= A is equivalent to C = C * A |
| 5 | /= (Divide and Assignment) It divides the left operand with the right operand and assigns the result to the left operand. |
C /= A is equivalent to C = C / A |
| 6 | %= (Modules and Assignment) It takes modulus using two operands and assigns the result to the left operand. |
C %= A is equivalent to C = C % A |
Note − Same logic applies to Bitwise operators so they will become like <<=, >>=, >>=, &=, |= and ^=.
Equality Operator in CoffeeScript
While working with JavaScript, you will encounter two types of equality operators == and ===.
The == operator in JavaScript is type coercive, i.e., if the types of the two operands in an operation are different, then the data type of one of the operator is converted into other and then both are compared.
CoffeeScript avoids this undesirable coercion, it compiles the == operator in to the strict comparison operator of JavaScript ===.
If we compare two operands using ===, then it returns true, only if both the value and datatypes of them are equal, else it returns false.
Example
Consider the following example. Here we have two variables a and b. a holds the value 21 of integer type and b holds the same value, but it is of string type. In CoffeeScript, when we compare a and b, the result will be false. (Since the == operator of CoffeeScript is converted to === operator of JavaScript)
a=21
b="21"
result = 21=='21'
console.log result
On compiling, the above CoffeeScript produces the following JavaScript
// Generated by CoffeeScript 1.10.0
(function() {
  var a, b, result;

  a = 21;

  b = "21";

  result = a === b;
  console.log(result);
}).call(this);
On executing, it produces the following output.
false
The existential Operator
CoffeeScript provides a new operator known as existential operator to verify the existence of a variable. It is denoted by ?. Unless a variable is null or undefined, the existential operator returns true.
Example
Given below is an example of the existential operator. Here we have three variables, namely name, age, and subject and we are verifying the existence of the variables name and phone using existential operator.
name="Ramu"
age=24
subject="Engineering"
verify_name = name?
verify_phone = phone?
console.log verify_name
console.log verify_phone
On compiling, this will generate the following JavaScript code.
// Generated by CoffeeScript 1.10.0
(function() {
  var age, name, subject, verify_name, verify_phone;
  name = "Ramu";
  age = 24;

  subject = "Engineering";
  verify_name = name != null;
  verify_phone = typeof phone !== "undefined" && phone !== null;
  console.log(verify_name);
  console.log(verify_phone);

}).call(this);
If we execute the above CoffeeScript file, it produces the following output.
true
false
Note − We have an accessor variant of the existential operator ?. We can use it instead of the . operator to find out the null references.
Chained Comparisons
As in Python, we can use a chain of comparison operators in a single expression in CoffeeScript.
Example
Following is an example of using chained comparison.
score = 70
passed = 100 > score > 40

console.log passed
On compiling, the example CoffeeScript gives you the following JavaScript code.
// Generated by CoffeeScript 1.10.0
(function() {
  var passed, score;

  score = 70;

  passed = (100 > score && score > 40);

  console.log(passed);

}).call(this);
If you execute the above CoffeeScript code, it produces the following output.
true
Note − CoffeeScript removes the ternary operator; instead of it, we can use the inline if statement.
CoffeeScript Aliases
In general, CoffeeScript provides aliases to various operators and symbols in order to make your CoffeeScript code readable and more user friendly. Following are the aliases provided by CoffeeScript.
| Name | Operator / symbol | Aliases |
|---|---|---|
| "equals to" operator | == | is |
| "not equals to" operator | !== | isnt |
| "not" operator | ! | not |
| "and" operator | && | and |
| "or" operator | || | or |
| boolean value true | true | true, yes, on |
| boolean value false | false | off, no |
| current object | this | @ |
| new line (or) semi colon | \n or ; | then |
| Inverse of if | ! if | unless |
| To test for array presence | in | |
| To test for object presence | of | |
| Exponentiation | a**b | |
| Integer division | a//b | |
| dividend dependent modulo | a%%b |
Example
The following example shows how to use aliases in CoffeeScript −
a=21; b=21

x = true; y = false

console.log a is b

console.log a isnt b

console.log x and y

console.log x or y

console.log yes or no

console.log on or off

console.log a**b

console.log a//b

console.log a%%b
On compiling the above example, it gives you the following JavaScript code.
// Generated by CoffeeScript 1.10.0
(function() {
  var a, b, x, y,
    modulo = function(a, b) { return (+a % (b = +b) + b) % b; };

  a = 21;

  b = 21;

  x = true;

  y = false;

  console.log(a === b);

  console.log(a !== b);

  console.log(x && y);

  console.log(x || y);

  console.log(true || false);

  console.log(true || false);

  console.log(Math.pow(a, b));

  console.log(Math.floor(a / b));

  console.log(modulo(a, b));

}).call(this);
If you execute the above CoffeeScript file, it produces the following output −
true
false
false
true
true
true
5.842587018385982e+27
1
0
CoffeeScript - Conditionals
While programming, we encounter some scenarios where we have to choose a path from a given set of paths. In such situations, we need conditional statements. Conditional statements help us take decisions and perform right actions.
Following is the general form of a typical decision-making structure found in most of the programming languages.
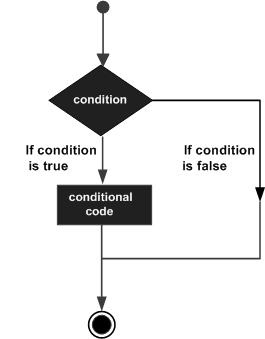
JavaScript supports the if statement (including its variants) and switch statement. In addition to the conditionals available in JavaScript, CoffeeScript includes the unless statement, the negation of if, and even more.
Following are the conditional statements provided by CoffeeScript.
| S.No. | Statement & Description |
|---|---|
| 1 | if statement
An if statement consists of a Boolean expression followed by one or more statements. These statements execute when the given Boolean expression is true. |
| 2 | if...else statement
An if statement can be followed by an optional else statement, which executes when the Boolean expression is false. |
| 3 | unless statement
An unless statement is similar to if with a Boolean expression followed by one or more statements except. These statements execute when a given Boolean expression is false. |
| 4 | unless...else statement
An unless statement can be followed by an optional else statement, which executes when a Boolean expression is true. |
| 5 | switch statement
A switch statement allows a variable to be tested for equality against a list of values. |
The then Keyword in CoffeeScript
The if and unless statements are block statements that are written in multiple lines. CoffeeScript provides the then keyword using which we can write the if and the unless statements in a single line.
Following are the statements in CoffeeScript that are written using then keyword.
| S.No. | Statement & Description |
|---|---|
| 1 | if-then statement
Using the if-then statement we can write the if statement of CoffeeScript in a single line. It consists of a Boolean expression followed by then keyword, which is followed by one or more statements. These statements execute when the given Boolean expression is true. |
| 2 | if-then...else statement
The if-then statement can be followed by an optional else statement, which executes when the Boolean expression is false. Using if-then...else statement, we can write the if...else statement in a single line. |
| 3 | unless-then statement
Using the unless-then statement, we can write the unless statement of CoffeeScript in a single line. It consists of a Boolean expression followed by then keyword, which is followed by one or more statements. These statements execute when the given Boolean expression is false. |
| 4 | unless...then else statement
The unless-then statement can be followed by an optional else statement, which executes when the Boolean expression is true. Using unless-then...else statement, we can write the unless...else statement in a single line. |
postfix if and postfix unless Statements
In CoffeeScript, you can also write the if and unless statements having a code block first followed by if or unless keyword as shown below. This is the postfix form of those statements. It comes handy while writing programs in CoffeeScript.
#Postfix if
Statements to be executed if expression

#Postfix unless
Statements to be executed unless expression
CoffeeScript - Loops
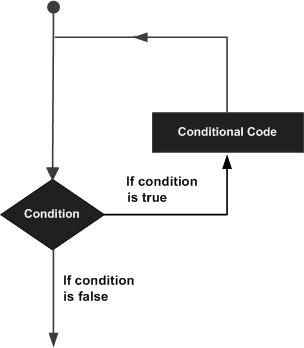
While coding, you may encounter a situation where you need to execute a block of code over and over again. In such situations, you can use loop statements.
In general, statements are executed sequentially: The first statement in a function is executed first, followed by the second, and so on.
A loop statement allows us to execute a statement or group of statements multiple times. Given below is the general form of a loop statement in most of the programming languages
JavaScript provides while, for and for..in loops. The loops in CoffeeScript are similar to those in JavaScript.
while loop and its variants are the only loop constructs in CoffeeScript. Instead of the commonly used for loop, CoffeeScript provides you Comprehensions which are discussed in detail in later chapters.
The while loop in CoffeeScript
The while loop is the only low-level loop that CoffeeScript provides. It contains a Boolean expression and a block of statements. The while loop executes the specified block of statements repeatedly as long as the given Boolean expression is true. Once the expression becomes false, the loop terminates.
Syntax
Following is the syntax of the while loop in CoffeeScript. Here, there is no need of the parenthesis to specify the Boolean expression and we have to indent the body of the loop using (consistent number of) whitespaces instead of wrapping it with curly braces.
while expression
   statements to be executed
Example
The following example demonstrates the usage of while loop in CoffeeScript. Save this code in a file with name while_loop_example.coffee
console.log "Starting Loop "
count = 0
while count < 10
   console.log "Current Count : " + count
   count++;

console.log "Set the variable to different value and then try"
Open the command prompt and compile the .coffee file as shown below.
c:\> coffee -c while_loop_example.coffee
On compiling, it gives you the following JavaScript.
// Generated by CoffeeScript 1.10.0
(function() {
  var count;

  console.log("Starting Loop ");

  count = 0;

  while (count < 10) {
    console.log("Current Count : " + count);
    count++;
  }

  console.log("Set the variable to different value and then try");

}).call(this);
Now, open the command prompt again and run the CoffeeScript file as shown below.
c:\> coffee while_loop_example.coffee
On executing, the CoffeeScript file produces the following output.
Starting Loop
Current Count : 0
Current Count : 1
Current Count : 2
Current Count : 3
Current Count : 4
Current Count : 5
Current Count : 6
Current Count : 7
Current Count : 8
Current Count : 9
Set the variable to different value and then try
Variants of while
The While loop in CoffeeScript have two variants namely the until variant and the loop variant.
| S.No. | Loop Type & Description |
|---|---|
| 1 | until variant of while
The until variant of the while loop contains a Boolean expression and a block of code. The code block of this loop is executed as long as the given Boolean expression is false. |
| 2 | loop variant of while
The loop variant is equivalent to the while loop with true value (while true). The statements in this loop will be executed repeatedly until we exit the loop using the Break statement. |
CoffeeScript - Comprehensions
In the previous chapter, we have learnt various loops provided by CoffeeScript, while and its variants. In addition to those, CoffeeScript provides additional loop structures known as comprehensions.
These comprehensions replace the for loop in other programming languages, if we add the optional guard clauses and the value of the current array index explicitly. Using comprehensions, we can iterate arrays as well as objects and the comprehensions that iterate arrays are expressions, and we can return them in a function or assign to a variable.
| S.No. | Statement & Description |
|---|---|
| 1 | for..in comprehensions
The for..in comprehension is the basic form of comprehension in CoffeeScript using this we can iterate the elements of a list or array. |
| 2 | for..of comprehensions
Just like Arrays CoffeeScriptScript provides a containers to store key-value pairs known as objects. We can iterate objects using the for..of comprehensions provided by CoffeeScript. |
| 3 | list comprehensions
The list comprehensions in CoffeeScript are used to map an array of objects to another array. |
Index of comprehensions
The list/array of elements have an index which can be used in comprehensions. You can use it in comprehensions using a variable as shown below.
for student,i in [element1, element2, element3]
Example
The following example demonstrates the usage of index of the forin comprehension in CoffeeScript. Save this code in a file with name for_in_index.coffee
for student,i in ['Ram', 'Mohammed', 'John']
   console.log "The name of the student with id "+i+" is: "+student
Open the command prompt and compile the .coffee file as shown below.
c:\> coffee -c for_in_index.coffee
On compiling, it gives you the following JavaScript.
// Generated by CoffeeScript 1.10.0
(function() {
  var i, j, len, ref, student;

  ref = ['Ram', 'Mohammed', 'John'];
  for (i = j = 0, len = ref.length; j < len; i = ++j) {
    student = ref[i];
    console.log("The name of the student with id " + i + " is: " + student);
  }
}).call(this);
Now, open the command prompt again and run the CoffeeScript file as shown below.
c:\> coffee for_in_index.coffee
On executing, the CoffeeScript file produces the following output.
The name of the student with id 0 is: Ram
The name of the student with id 1 is: Mohammed
The name of the student with id 2 is: John
Postfix form of comprehensions
Just like postfix if and unless, CoffeeScript provides the postfix form of the Comprehensions which comes handy while writing the code. Using this, we can write the for..in comprehension in a single line as shown below.
#Postfix for..in comprehension
console.log student for student in ['Ram', 'Mohammed', 'John']

#postfix for..of comprehension
console.log key+"::"+value for key,value of { name: "Mohammed", age: 24, phone: 9848022338}
show example
Assigning to a variable
The comprehension we use to iterate arrays can be assigned to a variable and also returned by a function.
Example
Consider the example given below. Here you can observe that we have retrieved the elements of an array using for..in comprehension and assigned this to a variable named names. And we also have a function which returns a comprehension explicitly using the return keyword. Save this code in a file with name example.coffee
my_function =->
   student = ['Ram', 'Mohammed', 'John']

   #Assigning comprehension to a variable
   names = (x for x in student )
   console.log "The contents of the variable names are ::"+names

   #Returning the comprehension
   return x for x in student
console.log "The value returned by the function is "+my_function()
Open the command prompt and compile the .coffee file as shown below.
c:\> coffee -c example.coffee
On compiling, it gives you the following JavaScript.
// Generated by CoffeeScript 1.10.0
(function() {
  var my_function;

  my_function = function() {
    var i, len, names, student, x;
    student = ['Ram', 'Mohammed', 'John'];
    names = (function() {
      var i, len, results;
      results = [];
      for (i = 0, len = student.length; i < len; i++) {
        x = student[i];
        results.push(x);
      }
      return results;
    })();
    console.log("The contents of the variable names are ::" + names);
    for (i = 0, len = student.length; i < len; i++) {
      x = student[i];
      return x;
    }
  };

  console.log("The value returned by the function is " + my_function());

}).call(this);
Now, open the command prompt again and run the CoffeeScript file as shown below.
c:\> coffee example.coffee
On executing, the CoffeeScript file produces the following output.
The contents of the variable names are ::Ram,Mohammed,John
The value returned by the function is Ram
The by keyword
CoffeeScript provides ranges to define a list of elements. For example, the range [1..10] is equivalent to [1, 2, 3, 4, 5, 6, 7, 8, 9, 10] where, every element is incremented by 1. We can also change this increment using the by keyword of comprehensions.
Example
The following example demonstrates the usage of the by keyword of the for..in comprehension provided by CoffeeScript. Save this code in a file with name by_keyword_example.coffee
array = (num for num in [1..10] by 2)
console.log array
Open the command prompt and compile the .coffee file as shown below.
c:\> coffee -c by_keyword_example.coffee
On compiling, it gives you the following JavaScript.
// Generated by CoffeeScript 1.10.0
(function() {
  var array, num;

  array = (function() {
    var i, results;
    results = [];
    for (num = i = 1; i <= 10; num = i += 2) {
      results.push(num);
    }
    return results;
  })();

  console.log(array);

}).call(this);
Now, open the command prompt again and run the CoffeeScript file as shown below.
c:\> coffee by_keyword_example.coffee
On executing, the CoffeeScript file produces the following output.
[ 1, 3, 5, 7, 9 ]
CoffeeScript - Functions
A function is a block of reusable code that can be called anywhere in your program. This eliminates the need of writing the same code again and again. It helps programmers in writing modular codes.
Functions allow a programmer to divide a big program into a number of small and manageable functions.
In general, using JavaScript, we can define two types of functions named functions, the regular functions with function name body and, Function expressions. Using function expressions, we can assign functions to variables.
//named function
function sayHello(){
   return("Hello there");
}

//function expressions
var message = function sayHello(){
   return("Hello there");
}
Functions in CoffeeScript
The syntax of function in CoffeeScript is simpler as compared to JavaScript. In CoffeeScript, we define only function expressions.
The function keyword is eliminated in CoffeeScript. To define a function here, we have to use a thin arrow (->).
Behind the scenes, the CoffeeScript compiler converts the arrow in to the function definition in JavaScript as shown below.
(function() {});
It is not mandatory to use the return keyword in CoffeeScript. Every function in CoffeeScript returns the last statement in the function automatically.
If we want to return to the calling function or return a value before we reach the end of the function, then we can use the return keyword.
In addition to in-line functions (functions that are in single line), we can also define multiline functions in CoffeeScript. Since the curly braces are eliminated, we can do it by maintaining proper indentations.
Defining a Function
Following is the syntax of defining a function in CoffeeScript.
function_name = -> function_body
Example
Given below is an example of a function in CoffeeScript. In here, we have created a function named greet. This function automatically returns the statement in it. Save it in a file with the name function_example.coffee
greet = -> "This is an example of a function"
Compile it by executing the following command in the command prompt.
c:\>coffee -c function_example.coffee
On compiling, it generates the following JavaScript code. Here you can observe that the CoffeeScript compiler automatically returned the string value in the function named greet().
// Generated by CoffeeScript 1.10.0
(function() {
  var greet;

  greet = function() {
    return "This is an example of a function";
  };

}).call(this);
Multi-line Functions
We can also define a function with multiple lines by maintaining indentations instead of curly braces. But we have to be consistent with the indentation we follow for a line throughout a function.
greet =  ->
  console.log "Hello how are you"
On compiling, the above CoffeeScript gives you the following JavaScript code. The CoffeeScript compiler grabs the body of the function that we have separated using indentations and placed within the curly braces.
// Generated by CoffeeScript 1.10.0
(function() {
  var greet;

  greet = function() {
    return console.log("Hello how are you");
  };

}).call(this);
Functions with Arguments
We can also specify arguments in a function using parenthesis as shown below.
add =(a,b) ->
  c=a+b
  console.log "Sum of the two numbers is: "+c
On compiling the above CoffeeScript file, it will generate the following JavaScript.
// Generated by CoffeeScript 1.10.0
(function() {
  var add;

  add = function(a, b) {
    var c;
    c = a + b;
    return console.log("Sum of the two numbers is: " + c);
  };

}).call(this);
Invoking a Function
After defining a function, we need to invoke that function. You can simply invoke a function by placing parenthesis after its name as shown in the following example.
add = ->
  a=20;b=30
  c=a+b
  console.log "Sum of the two numbers is: "+c
add()
On compiling, the above example gives you the following JavaScript
// Generated by CoffeeScript 1.10.0
(function() {
  var add;

  add = function() {
    var a, b, c;
    a = 20;
    b = 30;
    c = a + b;
    return console.log("Sum of the two numbers is: " + c);
  };
  add();
}).call(this);
On executing the above CoffeeScript code, it generates the following output.
Sum of the two numbers is: 50
Invoking Functions with Arguments
In the same way, we can invoke a function with arguments by passing them to it as shown below.
my_function argument_1,argument_2
or
my_function (argument_1,argument_2)
Note − While invoking a function by passing arguments to it, the usage of parenthesis is optional.
In the following example, we have created a function named add() that accepts two parameters and we have invoked it.
add =(a,b) ->
  c=a+b
  console.log "Sum of the two numbers is: "+c
add 10,20
On compiling, the above example gives you the following JavaScript.
// Generated by CoffeeScript 1.10.0
(function() {
  var add;

  add = function(a, b) {
    var c;
    c = a + b;
    return console.log("Sum of the two numbers is: " + c);
  };

  add(10, 20);

}).call(this);
On executing, the above CoffeeScript code it generates the following output.
Sum of the two numbers is: 30
Default Arguments
CoffeeScript supports default arguments too. We can assign default values to the arguments of a function, as shown in the following example.
add =(a = 1, b = 2) ->
  c=a+b
  console.log "Sum of the two numbers is: "+c
add 10,20

#Calling the function with default arguments
add()
On compiling, the above CoffeeScript generates the following JavaScript file.
// Generated by CoffeeScript 1.10.0
(function() {
  var add;

  add = function(a, b) {
    var c;
    if (a == null) {
      a = 1;
    }
    if (b == null) {
      b = 2;
    }
    c = a + b;
    return console.log("Sum of the two numbers is: " + c);
  };

  add(10, 20);
  add()

}).call(this);
On executing the above CoffeeScript code, it generates the following output.
Sum of the two numbers is: 30
Sum of the two numbers is: 3
CoffeeScript - Strings
The String object lets you work with a series of characters. As in most of the programming languages, the Strings in CoffeeScript are declared using quotes as −
my_string = "Hello how are you"
console.log my_string
On compiling, it will generate the following JavaScript code.
// Generated by CoffeeScript 1.10.0
(function() {
  var my_string;

  my_string = "Hello how are you";

  console.log(my_string);

}).call(this);
String Concatenation
We can concatenate two strings using the "+" symbol as shown below.
new_string = "Hello how are you "+"Welcome to Tutorialspoint"
console.log new_String
On compiling, it will generate the following JavaScript code.
// Generated by CoffeeScript 1.10.0
(function() {
  var new_string;

  new_string = "Hello how are you " + "Welcome to Tutorialspoint";

  console.log(new_String);

}).call(this);
If you execute the above example, you can observe the concatenated String as shown below.
Hello how are you Welcome to Tutorialspoint
String Interpolation
CoffeeScript also provides a feature known as String interpolation to include variables in stings. This feature of CoffeeScript was inspired from Ruby language.
String interpolation was done using the double quotes "", a hash tag # and a pair of curly braces { }. The String is declared in double quotes and the variable that is to be interpolated is wrapped within the curly braces which are prefixed by a hash tag as shown below.
name = "Raju"
age = 26
message ="Hello #{name} your age is #{age}"
console.log message
On compiling the above example, it generates the following JavaScript. Here you can observe the String interpolation is converted into normal concatenation using the + symbol.
// Generated by CoffeeScript 1.10.0
(function() {
  var age, message, name;

  name = "Raju";

  age = 26;

  message = "Hello " + name + " your age is " + age;

  console.log(message);

}).call(this);
If you execute the above CoffeeScript code, it gives you the following output.
Hello Raju your age is 26
The variable that is passed as #{variable} is interpolated only if the string is enclosed between double quotes " ". Using single quotes ' ' instead of double quotes produces the line as it is without interpolation. Consider the following example.
name = "Raju"
age = 26
message ='Hello #{name} your age is #{age}'
console.log message
If we use single quotes instead of double quotes in interpolation, you will get the following output.
Hello #{name} your age is #{age}
CoffeeScript allows multiple lines in Strings without concatenating them as shown below.
my_string = "hello how are you
Welcome to tutorialspoint
Have a nice day."
console.log my_string
It generates the following output.
hello how are you Welcome to tutorialspoint Have a nice day.
JavaScript String Object
The String object of JavaScript lets you work with a series of characters. This object provides you a lot of methods to perform various operations on Stings.
Since we can use JavaScript libraries in our CoffeeScript code, we can use all those methods in our CoffeeScript programs.
String Methods
Following is the list of methods of the String object of JavaScript. Click on the name of these methods to get an example demonstrating their usage in CoffeeScript.
| S.No. | Method & Description |
|---|---|
| 1 | charAt()
Returns the character at the specified index. |
| 2 | charCodeAt()
Returns a number indicating the Unicode value of the character at the given index. |
| 3 | concat()
Combines the text of two strings and returns a new string. |
| 4 | indexOf()
Returns the index within the calling String object of the first occurrence of the specified value, or -1 if not found. |
| 5 | lastIndexOf()
Returns the index within the calling String object of the last occurrence of the specified value, or -1 if not found. |
| 6 | localeCompare()
Returns a number indicating whether a reference string comes before or after or is the same as the given string in sort order. |
| 7 | match()
Used to match a regular expression against a string. |
| 8 | search()
Executes the search for a match between a regular expression and a specified string. |
| 9 | slice()
Extracts a section of a string and returns a new string. |
| 10 | split()
Splits a String object into an array of strings by separating the string into substrings. |
| 11 | substr()
Returns the characters in a string beginning at the specified location through the specified number of characters. |
| 12 | toLocaleLowerCase()
The characters within a string are converted to lower case while respecting the current locale. |
| 13 | toLocaleUpperCase()
The characters within a string are converted to upper case while respecting the current locale. |
| 14 | toLowerCase()
Returns the calling string value converted to lower case. |
| 15 | toUpperCase()
Returns the calling string value converted to uppercase. |
CoffeeScript - Arrays
The Array object lets you store multiple values in a single variable. It stores a fixed-size sequential collection of elements of the same type. An array is used to store a collection of data, but it is often more useful to think of an array as a collection of variables of the same type.
Syntax
To create an array, we have to instantiate it using the new operator as shown below.
array = new (element1, element2,....elementN)
The Array() constructor accepts the list of string or integer types. We can also specify the length of the array by passing a single integer to its constructor.
We can also define an array by simply providing the list of its elements in the square braces ([ ]) as shown below.
array = [element1, element2, ......elementN]
Example
Following is an example of defining an array in CoffeeScript. Save this code in a file with name array_example.coffee
student = ["Rahman","Ramu","Ravi","Robert"]
Open the command prompt and compile the .coffee file as shown below.
c:\> coffee -c array_example.coffee
On compiling, it gives you the following JavaScript.
// Generated by CoffeeScript 1.10.0
(function() {
  var student;

  student = ["Rahman", "Ramu", "Ravi", "Robert"];

}).call(this);
New line instead of comma
We can also remove the comma (,) between the elements of an array by creating each element in a new line by maintaining proper indentation as shown below.
student = [
  "Rahman"
  "Ramu"
  "Ravi"
  "Robert"
  ]
Comprehensions over arrays
We can retrieve the values of an array using comprehensions.
Example
The following example demonstrates the retrieval of elements of an array using comprehensions. Save this code in a file with name array_comprehensions.coffee
students = [ "Rahman", "Ramu", "Ravi", "Robert" ]
console.log student for student in students
Open the command prompt and compile the .coffee file as shown below.
c:\> coffee -c array_comprehensions.coffee
On compiling, it gives you the following JavaScript.
// Generated by CoffeeScript 1.10.0
(function() {
  var i, len, student, students;

  students = ["Rahman", "Ramu", "Ravi", "Robert"];

  for (i = 0, len = students.length; i − len; i++) {
    student = students[i];
    console.log(student);
  }

}).call(this);
Now, open the command prompt again and run the CoffeeScript file as shown below.
c:\> coffee array_comprehensions.coffee
On executing, the CoffeeScript file produces the following output.
Rahman
Ramu
Ravi
Robert
Unlike the Arrays in other programming languages the arrays in CoffeeScript can have multiple types of data i.e. both string and numericals.
Example
Here is an example of a CoffeeScript array holding multiple types of data.
students = [ "Rahman", "Ramu", "Ravi", "Robert",21 ]
CoffeeScript - Objects
Objects in CoffeeScript are similar to those in JavaScript. These are a collection of the properties, where a property includes a key and a value separated by a semi colon (;). In short, CoffeeScript objects are a collection of key-value pairs. The objects are defined using curly braces, an empty object is represented as {}.
Syntax
Given below is the syntax of an object in CoffeeScript. In here, we place the key-value pairs of the objects within the curly braces and they are separated using comma (,).
object ={key1: value, key2: value,......keyN: value}
Example
Following is an example of defining an object in CoffeeScript. Save this code in a file with name objects_example.coffee
student = {name: "Mohammed", age: 24, phone: 9848022338 }
Open the command prompt and compile the .coffee file as shown below.
> coffee -c objects_example.coffee
On compiling, it gives you the following JavaScript.
// Generated by CoffeeScript 1.10.0
(function() {
  var student;

  student = {
    name: "Mohammed",
    age: 24,
    phone: 9848022338
  };

}).call(this);
Just as in arrays, we can remove the commas by specifying the key-value pairs in new lines as shown below.
student = {
  name: "Mohammed"
  age: 24
  phone: 9848022338
  }
Indentations instead of curly braces
Just like other block statements in CoffeeScript, we can use indentations instead of curly braces {} as shown in the following example.
Example
We can rewrite the above example without curly braces as shown below.
student =
  name: "Mohammed"
  age: 24
  phone: 9848022338
Nested objects
In CoffeeScript, we can write objects within objects.
Example
The following example demonstrates the nested objects in CoffeeScript. Save this code in a file with name nested_objects.coffee
contact =
  personal:
    email: "personal@gmail.com"
    phone:  9848022338
  professional:
    email: "professional@gmail.com"
    phone:  9848033228
Open the command prompt and compile the .coffee file as shown below.
> coffee -c nested_objects.coffee
On compiling, it gives you the following JavaScript.
// Generated by CoffeeScript 1.10.0
(function() {
  var contact;

  contact = {
    personal: {
      email: "personal@gmail.com",
      phone: 9848022338
    },
    professional: {
      email: "professional@gmail.com",
      phone: 9848033228
    }
  };

}).call(this);
Comprehensions over objects
To iterate over the contents of an object, we can use comprehensions. Iterating the contents of an object is same as iterating the contents of an array. In objects, since we have to retrive two elements keys and values we will use two variables.
Example
The following is an example showing how to iterate the contents of an object using comprehensions. Save this code in a file with name object_comprehensions.coffee
student =
  name: "Mohammed"
  age: 24
  phone: 9848022338

console.log key+"::"+value for key,value of student
Open the command prompt and compile the .coffee file as shown below.
> coffee -c object_comprehensions.coffee
On compiling, it gives you the following JavaScript.
// Generated by CoffeeScript 1.10.0
(function() {
  var key, student, value;

  student = {
    name: "Mohammed",
    age: 24,
    phone: 9848022338
  };

  for (key in student) {
    value = student[key];
    console.log(key(+"::" + value));
  }

}).call(this);
Now, open the command prompt again and run the CoffeeScript file as shown below.
> coffee object_comprehensions.coffee
On executing, the CoffeeScript file produces the following output.
name::Mohammed
age::24
phone::9848022338
Arrays of Objects
In CoffeeScript, an array can also contain objects in as shown below.
  a = [
     object1_key1: value
     object1_key2: value
     object1_key3: value
  ,
     object2_key1: value
     object2_key2: value
     object2_key3: value
]
The following example shows how to define an array of objects. We can just list the key value pairs of the objects we want in an array by separating them using commas (,).
students =[
    name: "Mohammed"
    age: 24
    phone: 9848022338
  ,
    name: "Ram"
    age: 25
    phone: 9800000000
  ,
    name: "Ram"
    age: 25
    phone: 9800000000
 ]
console.log student for student in students
Open the command prompt and compile the .coffee file as shown below.
c:\> coffee -c array_of_objects.coffee
On compiling, it gives you the following JavaScript.
// Generated by CoffeeScript 1.10.0
(function() {
  var i, len, student, students;

  students = [
    {
      name: "Mohammed",
      age: 24,
      phone: 9848022338
    }, {
      name: "Ram",
      age: 25,
      phone: 9800000000
    }, {
      name: "Ram",
      age: 25,
      phone: 9800000000
    }
  ];

  for (i = 0, len = students.length; i < len; i++) {
    student = students[i];
    console.log(student);
  }

}).call(this);
Now, open the command prompt again and run the CoffeeScript file as shown below.
c:\> coffee array_of_objects.coffee
On executing, the CoffeeScript file produces the following output.
{ name: 'Mohammed', age: 24, phone: 9848022338 }
{ name: 'Ram', age: 25, phone: 9800000000 }
{ name: 'Ram', age: 25, phone: 9800000000 }
Reserved Keywords
JavaScript does not allow reserved keywords as property names of an object, if we want use them, we have to wrap them using double quotes " ".
Example
Consider the following example. Here we have created a property with name class, which is a reserved keyword. Save this code in a file with name reserved_keywords.coffee
student ={
  name: "Mohammed"
  age: 24
  phone: 9848022338
  class: "X"
  }
console.log key+"::"+value for key,value of student
Open the command prompt and compile the .coffee file as shown below.
c:\> coffee -c reserved_keywords.coffee
On compiling, it gives you the following JavaScript. Here you can observe that the CoffeeScript compiler wrapped the keyword class with double quotes on behalf of us.
// Generated by CoffeeScript 1.10.0
(function() {
  var key, student, value;

  student = {
    name: "Mohammed",
    age: 24,
    phone: 9848022338,
    "class": "X"
  };

  for (key in student) {
    value = student[key];
    console.log(key + "::" + value);
  }

}).call(this);
Now, open the command prompt again and run the CoffeeScript file as shown below.
c:\> coffee array_of_objects.coffee
On executing, the CoffeeScript file produces the following output.
name::Mohammed
age::24
phone::9848022338
class::X
CoffeeScript - Ranges
In the previous chapter, we have seen Arrays in CoffeeScript, while programming we will face some scenarios where we have to store a sequence of numerical values in an array as shown below.
numbers =[1,2,3,4,5,6,7,8,9,10]
CoffeeScript provides a shorter way of expressing the arrays containing a sequence of numerical values, known as ranges. This feature of CoffeeScript is inspired from Ruby.
Syntax
Ranges are created by two numerical values, the first and last positions in the range, separated by .. or .... With two dots (1..4), the range is inclusive (1, 2, 3, 4); with three dots (1...4), the range excludes the end (1, 2, 3).
Given below is the syntax of ranges in CoffeeScript. We will define the values in a range between square braces [ ] just like arrays. In ranges, while storing a sequence of numerical values, instead of providing the values of the whole sequence, we can just specify its begin and end values separated by two dots (..) as shown below.
range =[Begin..End]
Example
Here is an example of ranges in CoffeeScript. Save this in a file with name ranges_example.coffee.
numbers =[0..9]
console.log "The contents of the range are: "+ numbers
Open the command prompt and compile the .coffee file as shown below.
c:\> coffee -c ranges_example.coffee
On compiling, it gives you the following JavaScript. Here you can observe that the range is converted in to complete CoffeeScript array.
// Generated by CoffeeScript 1.10.0
(function() {
  var numbers;

  numbers = [0, 1, 2, 3, 4, 5, 6, 7, 8, 9];

  console.log("The contents of the range are:: " + numbers);

}).call(this);
Now, open the command prompt again and run the CoffeeScript file as shown below.
c:\> coffee ranges_example.coffee
On executing, the CoffeeScript file produces the following output.
The contents of the range are:: 0,1,2,3,4,5,6,7,8,9
Excluding the end Value
The ranges are compiled into complete arrays containing all numbers. If we want to exclude the end value, then we have to separate the start and end elements of the range using three dots (...) as shown below.
range =[Begin...End]
Example
We can rewrite the above example by excluding the end value as shown below. Save the following contents in a file with name range_excluding_end.coffee
numbers =[0...9]
console.log "The contents of the range are:: "+ numbers
Open the command prompt and compile the .coffee file as shown below.
c:\> coffee -c ranges_example.coffee
On compiling, it gives you the following JavaScript.
// Generated by CoffeeScript 1.10.0
(function() {
  var numbers;

  numbers = [0, 1, 2, 3, 4, 5, 6, 7, 8];

  console.log("The contents of the range are:: " + numbers);

}).call(this);
Now, open the command prompt again and run the CoffeeScript file as shown below.
c:\> coffee ranges_example.coffee
On executing, the CoffeeScript file produces the following output. In here, you can observe that the end value 9 is excluded.
The contents of the range are:: 0,1,2,3,4,5,6,7,8
Using Ranges with Variables
We can also define a range by assigning the start and end values to variables.
Example
Consider the following example. Here we have defined a range using variables. Save this code in a file with name range_variables.coffee
start=0
end=9
numbers =[start..end]
console.log "The contents of the range are: "+ numbers
Open the command prompt and compile the .coffee file as shown below.
c:\> coffee -c range_variables.coffee
On compiling, it gives you the following JavaScript.
// Generated by CoffeeScript 1.10.0
(function() {
  var end, i, numbers, results, start;

  start = 0;

  end = 9;

  numbers = (function() {
    results = [];
    for (var i = start; start <= end ? i <= end : i >= end; start <= end ? i++ : i--) {
      results.push(i);
    }
    return results;
  }).apply(this);

  console.log("The contents of the range are:: " + numbers);

}).call(this);
Now, open the command prompt again and run the CoffeeScript file as shown below.
c:\> coffee range_variables.coffee
On executing, the CoffeeScript file produces the following output. In here, you can observe that the end value 9 is excluded.
The contents of the range are:: 0,1,2,3,4,5,6,7,8,9
Ranges with Arrays
We can slice arrays by using them with ranges. Whenever we specify ranges immediately after arrays (variables), then the CoffeeScript compiler converts it in to a slice() method call of JavaScript.
Assume that we have an array having numerical values, say 0 to 9, then we can retrieve the first 4 elements of it as shown below.
num  = [1, 2, 3, 4, 5, 6, 7, 8, 9]
data = num[0..5]
Negative values represent the elements from the end, for example, -1 indicates 9. If we specify a negative number 3 followed by two dots, the last three elements of the array will be extracted.
data = num[-3..]
If we specify only two dots in the range of an array as num[..], then the complete array will be extracted. We can also replace an array segment with other elements using ranges as shown below.
num[2..6] = [13,14,15,16,17]
Example
The following example demonstrates the use of ranges with arrays. Save this code in a file with name range_arrays.coffee
#slicing an array using ranges
num  = [1, 2, 3, 4, 5, 6, 7, 8, 9]
data = num[0..5]
console.log "The first four elements of the array : "+data


#Using negative values
data = num[-3..]
console.log "The last 3 elements of the array : "+data

#Extracting the whole array
console.log "Total elements of the array : "+num[..]


#Replacing the elements of an array
num[2..6] = [13,14,15,16,17]
console.log "New array : "+num
Open the command prompt and compile the .coffee file as shown below.
c:\> coffee -c range_arrays.coffee
On compiling, it gives you the following JavaScript. Here you can observe that all the ranges are converted in to the slice() method calls of JavaScript.
// Generated by CoffeeScript 1.10.0
(function() {
  var data, num, ref;

  num = [1, 2, 3, 4, 5, 6, 7, 8, 9];

  data = num.slice(0, 6);

  console.log("The first four elements of the array : " + data);

  data = num.slice(-3);

  console.log("The last 3 elements of the array : " + data);

  console.log("Total elements of the array : " + num.slice(0));

  [].splice.apply(num, [2, 5].concat(ref = [13, 14, 15, 16, 17])), ref;

  console.log("New array : " + num);

}).call(this);
Now, open the command prompt again and run the CoffeeScript file as shown below.
c:\> coffee range_arrays.coffee
On executing, the CoffeeScript file produces the following output. In here, you can observe that the end value 9 is excluded.
The first four elements of the array : 1,2,3,4,5,6
The last 3 elements of the array : 7,8,9
Total elements of the array : 1,2,3,4,5,6,7,8,9
New array : 1,2,13,14,15,16,17,8,9
Ranges with Strings
We can also use ranges with Strings. If we specify ranges after Strings, then CoffeeScript slices them and returns a new subset of characters.
Example
The following example demonstrates the use of ranges with Strings. Here we have created a string and extracted a substring from it using ranges. Save this code in a file with name ranges_with_strings.coffee
my_string = "Welcome to tutorialspoint"
new_string = my_string[0..10]
console.log new_string
Open the command prompt and compile the .coffee file as shown below.
c:\> coffee -c ranges_with_strings.coffee
On compiling, it gives you the following JavaScript.
// Generated by CoffeeScript 1.10.0
(function() {
  var my_string, new_string;

  my_string = "Welcome to tutorialspoint";

  new_string = my_string.slice(0, 6);

  console.log(new_string);

}).call(this);
Now, open the command prompt again and run the CoffeeScript file as shown below.
c:\> coffee ranges_with_strings.coffee
On executing, the CoffeeScript file produces the following output. In here, you can observe that the end value 9 is excluded.
Welcome to
Comprehensions over Ranges
As objects and arrays, we can also iterate the elements of a range using comprehensions.
Example
Following is an example of using comprehensions over ranges. Here we have created a range and retrieved the elements in it using comprehensions. Save this code in a file with the name comprehensions_over_ranges.coffee
numbers =[0..9]
console.log "The elements of the range are: "
console.log num for num in numbers
Open the command prompt and compile the .coffee file as shown below.
c:\> coffee -c comprehensions_over_ranges.coffee
On compiling, it gives you the following JavaScript.
// Generated by CoffeeScript 1.10.0
(function() {
  var i, len, num, numbers;

  numbers = [0, 1, 2, 3, 4, 5, 6, 7, 8, 9];

  console.log("The elements of the range are: ");

  for (i = 0, len = numbers.length; i < len; i++) {
    num = numbers[i];
    console.log(num);
  }

}).call(this);
Now, open the command prompt again and run the CoffeeScript file as shown below.
c:\> coffee comprehensions_over_ranges.coffee
On executing, the CoffeeScript file produces the following output. In here, you can observe that the end value 9 is excluded.
The elements of the range are:
0
1
2
3
4
5
6
7
8
In the same way we can also change this increment using the by keyword of comprehensions.
array = (num for num in [1..10] by 2)
console.log array
CoffeeScript - Splat
In the previous chapters, we have seen how to define a function and invoke a function and pass arguments to it. In general, we can pass a fixed number of arguments to a function. While programming, we may face situations where we need to pass variable arguments to these functions. In JavaScript, we use objects to accept variable number of arguments to a function.
CoffeeScript provides a feature called splats to pass multiple arguments to functions. We use splats in functions by placing three dots after the argument name and, it is denoted by ...
Syntax
Given below is the syntax of accepting multiple arguments within a function using splats.
my_function = (arguments...)->
   ............
   ............
   ............
Example
Following is an example of accepting multiple arguments within a function, using splats. Here we have defined a function named indian_team() using splats. We are calling this function thrice and we are passing 4 players, 6 players, and full squad simultaneously, each time we call it. Since we have used splats in the function definition, it accepts variable number of arguments each time we call it. Save this code in a file with name splats_definition.coffee
indian_team = (first, second, others...) ->
  Captain = first
  WiseCaptain = second
  team  = others
  console.log "Captain: " +Captain
  console.log "Wise captain: " +WiseCaptain
  console.log "Other team members: " +team

#Passing 4 arguments
console.log "############## Four Players ############"
indian_team "Mahendra Singh Dhoni", "Virat Kohli", "Shikhar Dhawan", "Rohit Sharma"

#Passing 6 arguments
console.log "############## Six Players ############"
indian_team "Mahendra Singh Dhoni", "Virat Kohli", "Shikhar Dhawan", "Rohit Sharma", "Gurkeerat Singh Mann", "Rishi Dhawan"

#Passing full squad
console.log "############## Full squad #############"
indian_team "Mahendra Singh Dhoni", "Virat Kohli", "Shikhar Dhawan", "Rohit Sharma", "Gurkeerat Singh Mann", "Rishi Dhawan", "Ravindra Jadeja", "Axar Patel", "Jasprit Bumrah", "Umesh Yadav", "Harbhajan Singh", "Ashish Nehra", "Hardik Pandya", "Suresh Raina", "Yuvraj Singh", "Ajinkya Rahane"
Open the command prompt and compile the .coffee file as shown below.
c:\> coffee -c splats_definition.coffee
On compiling, it gives you the following JavaScript.
// Generated by CoffeeScript 1.10.0
(function() {
  var indian_team,
    slice = [].slice;

  indian_team = function() {
    var Captain, WiseCaptain, first, others, second, team;
    first = arguments[0], second = arguments[1], others = 3 <= arguments.length ? slice.call(arguments, 2) : [];
    Captain = first;
    WiseCaptain = second;
    team = others;
    console.log("Captain: " + Captain);
    console.log("Wise captain: " + WiseCaptain);
    return console.log("Other team members: " + team);
  };

  console.log("############## Four Players ############");

  indian_team("Mahendra Singh Dhoni", "Virat Kohli", "Shikhar Dhawan", "Rohit Sharma");

  console.log("############## Six Players ############");

  indian_team("Mahendra Singh Dhoni", "Virat Kohli", "Shikhar Dhawan", "Rohit Sharma", "Gurkeerat Singh Mann", "Rishi Dhawan");

  console.log("############## Full squad #############");

  indian_team("Mahendra Singh Dhoni", "Virat Kohli", "Shikhar Dhawan", "Rohit Sharma", "Gurkeerat Singh Mann", "Rishi Dhawan", "Ravindra Jadeja", "Axar Patel", "Jasprit Bumrah", "Umesh Yadav", "Harbhajan Singh", "Ashish Nehra", "Hardik Pandya", "Suresh Raina", "Yuvraj Singh", "Ajinkya Rahane");

}).call(this);
Now, open the command prompt again and run the CoffeeScript file as shown below.
c:\> coffee splats_definition.coffee
On executing, the CoffeeScript file produces the following output.
############## Four Players ############
Captain: Mahendra Singh Dhoni
Wise captain: Virat Kohli
Other team members: Shikhar Dhawan,Rohit Sharma
############## Six Players ############
Captain: Mahendra Singh Dhoni
Wise captain: Virat Kohli
Other team members: Shikhar Dhawan,Rohit Sharma,Gurkeerat Singh Mann,Rishi Dhawan
############## Full squad #############
Captain: Mahendra Singh Dhoni
Wise captain: Virat Kohli
Other team members: Shikhar Dhawan,Rohit Sharma,Gurkeerat Singh Mann,Rishi Dhawan,Ravindra Jadeja,Axar Patel,Jasprit Bumrah,Umesh Yadav,Harbhajan Singh,Ashish Nehra,Hardik Pandya,Suresh Raina,Yuvraj Singh,Ajinkya Rahane
Calling Functions using Splats
We can also call a function using splats. For that, we have to create an array holding the elements we need to pass to the function, and we have to call the function by passing the array suffixed by three dots as shown below.
my_function values...
Example
Following is an example of calling a function using splats. Save this code in a file with name splats_call.coffee
indian_team = (first, second, others...) ->
  Captain = first
  WiseCaptain = second
  team  = others
  console.log "Captain: " +Captain
  console.log "Wise captain: " +WiseCaptain
  console.log "Other team members: " +team

squad = [
   "Mahendra Singh Dhoni"
   "Virat Kohli"
   "Shikhar Dhawan"
   "Rohit Sharma"
   "Gurkeerat Singh Mann"
   "Rishi Dhawan"
   "R Ashwin"
   "Ravindra Jadeja"
   "Axar Patel"
   "Jasprit Bumrah"
   "Umesh Yadav"
   "Harbhajan Singh"
   "Ashish Nehra"
   "Hardik Pandya"
   "Suresh Raina"
   "Yuvraj Singh"
   "Ajinkya Rahane"
 ]

indian_team squad...
Open the command prompt and compile the .coffee file as shown below.
c:\> coffee -c splats_call.coffee
On compiling, it gives you the following JavaScript.
// Generated by CoffeeScript 1.10.0
(function() {
  var indian_team, squad,
    slice = [].slice;

  indian_team = function() {
    var Captain, WiseCaptain, first, others, second, team;
    first = arguments[0], second = arguments[1], others = 3 <= arguments.length ? slice.call(arguments, 2) : [];
    Captain = first;
    WiseCaptain = second;
    team = others;
    console.log("Captain: " + Captain);
    console.log("Wise captain: " + WiseCaptain);
    return console.log("Other team members: " + team);
  };

  squad = ["Mahendra Singh Dhoni", "Virat Kohli", "Shikhar Dhawan", "Rohit Sharma", "Gurkeerat Singh Mann", "Rishi Dhawan", "R Ashwin", "Ravindra Jadeja", "Axar Patel", "Jasprit Bumrah", "Umesh Yadav", "Harbhajan Singh", "Ashish Nehra", "Hardik Pandya", "Suresh Raina", "Yuvraj Singh", "Ajinkya Rahane"];

  indian_team.apply(null, squad);

}).call(this);
Now, open the command prompt again and run the CoffeeScript file as shown below.
c:\> coffee splats_call.coffee
On executing, the CoffeeScript file produces the following output.
Captain: Mahendra Singh Dhoni
Wise captain: Virat Kohli
Other team members: Shikhar Dhawan,Rohit Sharma,Gurkeerat Singh Mann,Rishi Dhawan,R Ashwin,Ravindra Jadeja,Axar Patel,Jasprit Bumrah,Umesh Yadav,Harbhajan Singh,Ashish Nehra,Hardik Pandya,Suresh Raina,Yuvraj Singh,Ajinkya Rahane
Splats with a Tailing Argument
We can also pass tailing arguments to splats. In the example given below, we have passed a tailing argument named last after the splat. Save this example in a file with the name tailing_arguments.coffee
indian_team = (first, second, others..., last) ->
  Captain = first
  WiseCaptain = second
  team  = others
  Wicketkeeper =last
  console.log "Captain: " +Captain
  console.log "Wise captain: " +WiseCaptain
  console.log "Wicket keeper is:"+last
  console.log "Other team members: " +team

squad = [
   "Mahendra Singh Dhoni"
   "Virat Kohli"
   "Shikhar Dhawan"
   "Rohit Sharma"
   "Gurkeerat Singh Mann"
   "Rishi Dhawan"
   "R Ashwin"
   "Ravindra Jadeja"
   "Axar Patel"
   "Jasprit Bumrah"
   "Umesh Yadav"
   "Harbhajan Singh"
   "Ashish Nehra"
   "Hardik Pandya"
   "Suresh Raina"
   "Yuvraj Singh"
   "Ajinkya Rahane"
 ]

indian_team squad...
Open the command prompt and compile the .coffee file as shown below.
c:\> coffee -c tailing_arguments.coffee
On compiling, it gives you the following JavaScript.
// Generated by CoffeeScript 1.10.0
(function() {
  var indian_team, squad,
    slice = [].slice;

  indian_team = function() {
    var Captain, Wicketkeeper, WiseCaptain, first, i, last, others, second, team;
    first = arguments[0], second = arguments[1], others = 4 <= arguments.length ? slice.call(arguments, 2, i = arguments.length - 1) : (i = 2, []), last = arguments[i++];
    Captain = first;
    WiseCaptain = second;
    team = others;
    Wicketkeeper = last;
    console.log("Captain: " + Captain);
    console.log("Wise captain: " + WiseCaptain);
    console.log("Wicket keeper is:" + last);
    return console.log("Other team members: " + team);
  };

  squad = ["Mahendra Singh Dhoni", "Virat Kohli", "Shikhar Dhawan", "Rohit Sharma", "Gurkeerat Singh Mann", "Rishi Dhawan", "R Ashwin", "Ravindra Jadeja", "Axar Patel", "Jasprit Bumrah", "Umesh Yadav", "Harbhajan Singh", "Ashish Nehra", "Hardik Pandya", "Suresh Raina", "Yuvraj Singh", "Ajinkya Rahane"];

  indian_team.apply(null, squad);

}).call(this);
Now, open the command prompt again and run the CoffeeScript file as shown below.
c:\> coffee tailing_arguments.coffee
On executing, the CoffeeScript file produces the following output.
Captain: Mahendra Singh Dhoni
Wise captain: Virat Kohli
Wicket keeper is:Ajinkya Rahane
Other team members: Shikhar Dhawan,Rohit Sharma,Gurkeerat Singh Mann,Rishi Dhawan,R Ashwin,Ravindra Jadeja,Axar Patel,Jasprit Bumrah,Umesh Yadav,Harbhajan Singh,Ashish Nehra,Hardik Pandya,Suresh Raina,Yuvraj Singh
Comprehensions with Splats
Within the function, we can also iterate the elements of a splat using comprehensions as shown in the following example. Save this code in a file with the name splats_comprehensions.coffee
indian_team = (first, second, others...) ->
  Captain = first
  WiseCaptain = second
  team  = others
  console.log "Captain: " +Captain
  console.log "Wise captain: " +WiseCaptain
  console.log "Other team members:: "
  console.log member for member in others

squad = [
   "Mahendra Singh Dhoni"
   "Virat Kohli"
   "Shikhar Dhawan"
   "Rohit Sharma"
   "Gurkeerat Singh Mann"
   "Rishi Dhawan"
   "R Ashwin"
   "Ravindra Jadeja"
   "Axar Patel"
   "Jasprit Bumrah"
   "Umesh Yadav"
   "Harbhajan Singh"
   "Ashish Nehra"
   "Hardik Pandya"
   "Suresh Raina"
   "Yuvraj Singh"
   "Ajinkya Rahane"
 ]

indian_team squad...
Open the command prompt and compile the .coffee file as shown below.
c:\> coffee -c splats_comprehensions.coffee
On compiling, it gives you the following JavaScript.
// Generated by CoffeeScript 1.10.0
(function() {
  var indian_team, squad,
    slice = [].slice;

  indian_team = function() {
    var Captain, WiseCaptain, first, i, len, member, others, results, second, team;
    first = arguments[0], second = arguments[1], others = 3 <= arguments.length ? slice.call(arguments, 2) : [];
    Captain = first;
    WiseCaptain = second;
    team = others;
    console.log("Captain: " + Captain);
    console.log("Wise captain: " + WiseCaptain);
    console.log("Other team members:: ");
    results = [];
    for (i = 0, len = others.length; i < len; i++) {
      member = others[i];
      results.push(console.log(member));
    }
    return results;
  };

  squad = ["Mahendra Singh Dhoni", "Virat Kohli", "Shikhar Dhawan", "Rohit Sharma", "Gurkeerat Singh Mann", "Rishi Dhawan", "R Ashwin", "Ravindra Jadeja", "Axar Patel", "Jasprit Bumrah", "Umesh Yadav", "Harbhajan Singh", "Ashish Nehra", "Hardik Pandya", "Suresh Raina", "Yuvraj Singh", "Ajinkya Rahane"];

  indian_team.apply(null, squad);

}).call(this);
Now, open the command prompt again and run the CoffeeScript file as shown below.
c:\> coffee splats_comprehensions.coffee
On executing, the CoffeeScript file produces the following output.
Captain: Mahendra Singh Dhoni
Wise captain: Virat Kohli
Other team members::
Shikhar Dhawan
Rohit Sharma
Gurkeerat Singh Mann
Rishi Dhawan
R Ashwin
Ravindra Jadeja
Axar Patel
Jasprit Bumrah
Umesh Yadav
Harbhajan Singh
Ashish Nehra
Hardik Pandya
Suresh Raina
Yuvraj Singh
Ajinkya Rahane
CoffeeScript - Date
The Date object is a data-type built into the JavaScript language. Date objects are created as new Date( ).
Once a Date object is created, a number of methods allow you to operate on it. Most methods simply allow you to get and set the year, month, day, hour, minute, second, and millisecond fields of the object, using either local time or UTC (universal, or GMT) time.
The ECMAScript standard requires the Date object to be able to represent any date and time, to millisecond precision, within 100 million days before or after 1/1/1970. This is a range of plus or minus 273,785 years, so JavaScript can represent date and time till the year 275755.
Similar to other JavaScript objects we can also use the date object in our CoffeeScript code.
Date Methods
Following is the list of methods of the Date object of JavaScript. Click on the name of these methods to get an example demonstrating their usage in CoffeeScript.
| S.No. | Method & Description |
|---|---|
| 1 | getDate()
Returns the day of the month for the specified date according to local time. |
| 2 | getDay()
Returns the day of the week for the specified date according to local time. |
| 3 | getFullYear()
Returns the year of the specified date according to local time. |
| 4 | getHours()
Returns the hour in the specified date according to local time. |
| 5 | getMilliseconds()
Returns the milliseconds in the specified date according to local time. |
| 6 | getMinutes()
Returns the minutes in the specified date according to local time. |
| 7 | getMonth()
Returns the month in the specified date according to local time. |
| 8 | getSeconds()
Returns the seconds in the specified date according to local time. |
| 9 | getTime()
Returns the numeric value of the specified date as the number of milliseconds since January 1, 1970, 00:00:00 UTC. |
| 10 | getTimezoneOffset()
Returns the time-zone offset in minutes for the current locale. |
| 11 | getUTCDate()
Returns the day (date) of the month in the specified date according to universal time. |
| 12 | getUTCDay()
Returns the day of the week in the specified date according to universal time. |
| 13 | getUTCFullYear()
Returns the year in the specified date according to universal time. |
| 14 | getUTCHours()
Returns the hours in the specified date according to universal time. |
| 15 | getUTCMinutes()
Returns the milliseconds in the specified date according to universal time. |
| 16 | getUTCMilliseconds()
Returns the minutes in the specified date according to universal time. |
| 17 | getUTCMonth()
Returns the month in the specified date according to universal time. |
| 18 | getUTCSeconds()
Returns the seconds in the specified date according to universal time. |
| 19 | getYear()
Deprecated - Returns the year in the specified date according to local time. Use getFullYear instead. |
| 20 | setDate()
Sets the day of the month for a specified date according to local time. |
| 21 | setFullYear()
Sets the full year for a specified date according to local time. |
| 22 | setHours()
Sets the hours for a specified date according to local time. |
| 23 | setMilliseconds()
Sets the milliseconds for a specified date according to local time. |
| 24 | setMinutes()
Sets the minutes for a specified date according to local time. |
| 25 | setMonth()
Sets the month for a specified date according to local time. |
| 26 | setSeconds()
Sets the seconds for a specified date according to local time. |
| 27 | setTime()
Sets the Date object to the time represented by a number of milliseconds since January 1, 1970, 00:00:00 UTC. |
| 28 | setUTCDate()
Sets the day of the month for a specified date according to universal time. |
| 29 | setUTCFullYear()
Sets the full year for a specified date according to universal time. |
| 30 | setUTCHours()
Sets the hour for a specified date according to universal time. |
| 31 | setUTCMilliseconds()
Sets the milliseconds for a specified date according to universal time. |
| 32 | setUTCMinutes()
Sets the minutes for a specified date according to universal time. |
| 33 | setUTCMonth()
Sets the month for a specified date according to universal time. |
| 34 | setUTCSeconds()
Sets the seconds for a specified date according to universal time. |
| 35 | setYear()
Deprecated - Sets the year for a specified date according to local time. Use setFullYear instead. |
| 36 | toDateString()
Returns the "date" portion of the Date as a human-readable string. |
| 37 | toLocaleDateString()
Returns the "date" portion of the Date as a string, using the current locale's conventions. |
| 38 | toLocaleString()
Converts a date to a string, using the current locale's conventions. |
| 39 | toLocaleTimeString()
Returns the "time" portion of the Date as a string, using the current locale's conventions. |
| 40 | toTimeString()
Returns the "time" portion of the Date as a human-readable string. |
| 41 | toUTCString()
Converts a date to a string, using the universal time convention. |
CoffeeScript - Math
The Math object of JavaScript provides you properties and methods for mathematical constants and functions. Unlike other global objects, Math is not a constructor. All the properties and methods of Math are static and can be called by using Math as an object without creating it.
Thus, you refer to the constant pi as Math.PI and you call the sine function as Math.sin(x), where x is the method's argument. We can use the JavaScript's Math object in our CoffeeScript code to perform math operations.
Mathematical constants
If we want to use any common mathematical constants like pi or e we can use them using the JavaScript's Math object.
Following is the list of the Math constants provided by the Math object of JavaScript
| S.No. | Property & Description |
|---|---|
| 1 | E Euler's constant and the base of natural logarithms, approximately 2.718. |
| 2 | LN2 Natural logarithm of 2, approximately 0.693. |
| 3 | LN10 Natural logarithm of 10, approximately 2.302. |
| 4 | LOG2E Base 2 logarithm of E, approximately 1.442. |
| 5 | LOG10E Base 10 logarithm of E, approximately 0.434. |
| 6 | PI Ratio of the circumference of a circle to its diameter, approximately 3.14159. |
| 7 | SQRT1_2 Square root of 1/2; equivalently, 1 over the square root of 2, approximately 0.707. |
| 8 | SQRT2
Square root of 2, approximately 1.414. |
Example
The following example demonstrates the usage of the mathematical constants provided by JavaScript in CoffeeScript. Save this code in a file with name math_example.coffee
e_value = Math.E
console.log "The value of the constant E is: " + e_value

LN2_value = Math.LN2
console.log "The value of the constant LN2 is: " + LN2_value

LN10_value = Math.LN10
console.log "The value of the constant LN10 is: " + LN10_value

LOG2E_value = Math.LOG2E
console.log "The value of the constant LOG2E is: " + LOG2E_value

LOG10E_value = Math.LOG10E
console.log "The value of the constant LOG10E is: " + LOG10E_value

PI_value = Math.PI
console.log "The value of the constant PI is: " + PI_value

SQRT1_2_value = Math.SQRT1_2
console.log "The value of the constant SQRT1_2 is: " + SQRT1_2_value

SQRT2_value = Math.SQRT2
console.log "The value of the constant SQRT2 is: " + SQRT2_value
Open the command prompt and compile the .coffee file as shown below.
c:\> coffee -c math_example.coffee
On compiling, it gives you the following JavaScript.
// Generated by CoffeeScript 1.10.0
(function() {
  var LN10_value, LN2_value, LOG10E_value, LOG2E_value, PI_value, SQRT1_2_value, SQRT2_value, e_value;

  e_value = Math.E;

  console.log("The value of the constant E is: " + e_value);

  LN2_value = Math.LN2;

  console.log("The value of the constant LN2 is: " + LN2_value);

  LN10_value = Math.LN10;

  console.log("The value of the constant LN10 is: " + LN10_value);

  LOG2E_value = Math.LOG2E;

  console.log("The value of the constant LOG2E is: " + LOG2E_value);

  LOG10E_value = Math.LOG10E;

  console.log("The value of the constant LOG10E is: " + LOG10E_value);

  PI_value = Math.PI;

  console.log("The value of the constant PI is: " + PI_value);

  SQRT1_2_value = Math.SQRT1_2;

  console.log("The value of the constant SQRT1_2 is: " + SQRT1_2_value);

  SQRT2_value = Math.SQRT2;

  console.log("The value of the constant SQRT2 is: " + SQRT2_value);

}).call(this);
Now, open the command prompt again and run the CoffeeScript file as shown below.
c:\> coffee math_example.coffee
On executing, the CoffeeScript file produces the following output.
The value of the constant E is: 2.718281828459045
The value of the constant LN2 is: 0.6931471805599453
The value of the constant LN10 is: 2.302585092994046
The value of the constant LOG2E is: 1.4426950408889634
The value of the constant LOG10E is: 0.4342944819032518
The value of the constant PI is: 3.141592653589793
The value of the constant SQRT1_2 is: 0.7071067811865476
The value of the constant SQRT2 is: 1.4142135623730951
Math Methods
In addition to properties, the Math object also provides methods. Following is the list of methods of the Math object of JavaScript. Click on the name of these methods to get an example demonstrating their usage in CoffeeScript.
| S.No. | Method & Description |
|---|---|
| 1 | abs()
Returns the absolute value of a number. |
| 2 | acos()
Returns the arccosine (in radians) of a number. |
| 3 | asin()
Returns the arcsine (in radians) of a number. |
| 4 | atan()
Returns the arctangent (in radians) of a number. |
| 5 | atan2()
Returns the arctangent of the quotient of its arguments. |
| 6 | ceil()
Returns the smallest integer greater than or equal to a number. |
| 7 | cos()
Returns the cosine of a number. |
| 8 | exp()
Returns EN, where N is the argument, and E is Euler's constant, the base of the natural logarithm. |
| 9 | floor()
Returns the largest integer less than or equal to a number. |
| 10 | log()
Returns the natural logarithm (base E) of a number. |
| 11 | max()
Returns the largest of zero or more numbers. |
| 12 | min()
Returns the smallest of zero or more numbers. |
| 13 | pow()
Returns base to the exponent power, that is, base exponent. |
| 14 | random()
Returns a pseudo-random number between 0 and 1. |
| 15 | round()
Returns the value of a number rounded to the nearest integer. |
| 16 | sin()
Returns the sine of a number. |
| 17 | sqrt()
Returns the square root of a number. |
| 18 | tan()
Returns the tangent of a number. |
CoffeeScript - Exception Handling
An exception (or exceptional event) is a problem that arises during the execution of a program. When an Exception occurs, the normal flow of the program is disrupted and the program/Application terminates abnormally, which is not recommended, therefore these exceptions are to be handled.
An exception can occur for many different reasons. Here are some scenarios where an exception occurs.
- A user has entered invalid data.
- A file that needs to be opened cannot be found.
Exceptions in CoffeeScript
CoffeeScripts supports exception/error handling using the try catch and finally blocks. The functionalities of these blocks are same as in JavaScript, the try block holds the exceptional statements, the catch block has the action to be performed when an exception occurs, and the finally block is used to execute the statements unconditionally.
Following are the syntaxes of try catch and finally blocks in CoffeeScript.
 try
   // Code to run

 catch ( e )
   // Code to run if an exception occurs

 finally
   // Code that is always executed regardless of
   // an exception occurring
The try block must be followed by either exactly one catch block or one finally block (or one of both). When an exception occurs in the try block, the exception is placed in e and the catch block is executed. The optional finally block executes unconditionally after try/catch.
Example
The following example demonstrates the Exception handling using try and catch blocks in CoffeeScript. In here, we are trying to use an undefined symbol in CoffeeScript operation and we handled the error occurred using the try and catch blocks. Save this code in a file with the name Exception_handling.coffee
try
  x = y+20
  console.log "The value of x is :" +x
catch e
  console.log "exception/error occurred"
  console.log "The STACKTRACE for the exception/error occurred is ::"
  console.log e.stack
Open the command prompt and compile the .coffee file as shown below.
c:\> coffee -c Exception_handling.coffee
On compiling, it gives you the following JavaScript.
// Generated by CoffeeScript 1.10.0
(function() {
  var e, error, x;

  try {
    x = y + 20;
    console.log("The value of x is :" + x);
  } catch (error) {
    e = error;
    console.log("exception/error occurred");
    console.log("The STACKTRACE for the exception/error occurred is ::");
    console.log(e.stack);
  }

}).call(this);
Now, open the command prompt again and run the CoffeeScript file as shown below.
c:\> coffee Exception_handling.coffee
On executing, the CoffeeScript file produces the following output.
exception/error occurred
The STACKTRACE for the exception/error occurred is ::
ReferenceError: y is not defined
  at Object.<anonymous> (C:\Examples\strings_exceptions\Exception_handling.coffee:3:7)
  at Object.<anonymous> (C:\Examples\strings_exceptions\Exception_handling.coffee:2:1)
  at Module._compile (module.js:413:34)
  at Object.exports.run (C:\Users\Tutorialspoint\AppData\Roaming\npm\node_modules\coffee-script\lib\coffee-script\coffee-script.js:134:23)
  at compileScript (C:\Users\Tutorialspoint\AppData\Roaming\npm\node_modules\coffee-script\lib\coffee-script\command.js:224:29)
  at compilePath (C:\Users\Tutorialspoint\AppData\Roaming\npm\node_modules\coffee-script\lib\coffee-script\command.js:174:14)
  at Object.exports.run (C:\Users\Tutorialspoint\AppData\Roaming\npm\node_modules\coffee-script\lib\coffee-script\command.js:98:20)
  at Object.<anonymous> (C:\Users\Tutorialspoint\AppData\Roaming\npm\node_modules\coffee-script\bin\coffee:7:41)
  at Module._compile (module.js:413:34)
  at Object.Module._extensions..js (module.js:422:10)
  at Module.load (module.js:357:32)
  at Function.Module._load (module.js:314:12)
  at Function.Module.runMain (module.js:447:10)
  at startup (node.js:139:18)
  at node.js:999:3
The finally block
We can also rewrite the above example using finally block. If we do so, the contents of this block are executed unconditionally after try and catch. Save this code in a file with the name Exception_handling_finally.coffee
try
  x = y+20
  console.log "The value of x is :" +x
catch e
  console.log "exception/error occurred"
  console.log "The STACKTRACE for the exception/error occurred is ::"
  console.log e.stack

finally
  console.log "This is the statement of finally block"
Open the command prompt and compile the .coffee file as shown below.
c:\> coffee -c Exception_handling_finally.coffee
On compiling, it gives you the following JavaScript.
// Generated by CoffeeScript 1.10.0
(function() {
  var e, error, x;

  try {
    x = y + 20;
    console.log("The value of x is :" + x);
  } catch (error) {
    e = error;
    console.log("exception/error occurred");
    console.log("The STACKTRACE for the exception/error occurred is ::");
    console.log(e.stack);
  } finally {
    console.log("This is the statement of finally block");
  }

}).call(this);
Now, open the command prompt again and run the CoffeeScript file as shown below.
c:\> coffee Exception_handling_finally.coffee
On executing, the CoffeeScript file produces the following output.
exception/error occurred
The STACKTRACE for the exception/error occurred is ::
ReferenceError: y is not defined
  at Object.<anonymous> (C:\Examples\strings_exceptions\Exception_handling.coffee:3:7)
  at Object.<anonymous> (C:\Examples\strings_exceptions\Exception_handling.coffee:2:1)
  at Module._compile (module.js:413:34)
  at Object.exports.run (C:\Users\Tutorialspoint\AppData\Roaming\npm\node_modules\coffee-script\lib\coffee-script\coffee-script.js:134:23)
  at compileScript (C:\Users\Tutorialspoint\AppData\Roaming\npm\node_modules\coffee-script\lib\coffee-script\command.js:224:29)
  at compilePath (C:\Users\Tutorialspoint\AppData\Roaming\npm\node_modules\coffee-script\lib\coffee-script\command.js:174:14)
  at Object.exports.run (C:\Users\Tutorialspoint\AppData\Roaming\npm\node_modules\coffee-script\lib\coffee-script\command.js:98:20)
  at Object.<anonymous> (C:\Users\Tutorialspoint\AppData\Roaming\npm\node_modules\coffee-script\bin\coffee:7:41)
  at Module._compile (module.js:413:34)
  at Object.Module._extensions..js (module.js:422:10)
  at Module.load (module.js:357:32)
  at Function.Module._load (module.js:314:12)
  at Function.Module.runMain (module.js:447:10)
  at startup (node.js:139:18)
  at node.js:999:3

This is the statement of finally block
The throw Statement
CoffeeScript also supports the throw statement. You can use throw statement to raise your builtin exceptions or your customized exceptions. Later these exceptions can be captured and you can take an appropriate action.
Example
The following example demonstrates the usage of the throw statement in CoffeeScript. Save this code in a file with name throw_example.coffee
myFunc = ->
  a = 100
  b = 0
  try
    if b == 0
      throw ("Divided by zero error.")
    else
      c = a / b
  catch e
    console.log "Error: " + e

myFunc()
Open the command prompt and compile the .coffee file as shown below.
c:\> coffee -c throw_example.coffee
On compiling, it gives you the following JavaScript.
// Generated by CoffeeScript 1.10.0
(function() {
  var myFunc;

  myFunc = function() {
    var a, b, c, e, error;
    a = 100;
    b = 0;
    try {
      if (b === 0) {
        throw "Divided by zero error.";
      } else {
        return c = a / b;
      }
    } catch (error) {
      e = error;
      return console.log("Error: " + e);
    }
  };

  myFunc();

}).call(this);
Now, open the command prompt again and run the CoffeeScript file as shown below.
c:\> coffee throw_example.coffee
On executing, the CoffeeScript file produces the following output.
Divided by zero error.
CoffeeScript - Regular Expressions
A regular expression is an object that describes a pattern of characters JavaScript supports. In JavaScript, RegExp class represents regular expressions, and both String and RegExp define methods that use regular expressions to perform powerful pattern-matching and search-and-replace functions on text.
Regular Expressions in CoffeeScript
The regular expressions in CoffeeScript are same as JavaScript. Visit the following link to see the regular expressions in JavaScript − javascript_regular_expressions
Syntax
A regular expression in CoffeeScript is defined by placing the RegExp pattern between the forward slashes as shown below.
pattern =/pattern/
Example
Following is an example of regular expressions in CoffeeScript. In here, we have created an expression that finds out the data that is in bold (data between <b> and </b> tags). Save this code in a file with name regex_example.coffee
input_data ="hello how are you welcome to <b>Tutorials Point.</b>"
regex = /<b>(.*)<\/b>/
result = regex.exec(input_data)
console.log result
Open the command prompt and compile the .coffee file as shown below.
c:\> coffee -c regex_example.coffee
On compiling, it gives you the following JavaScript.
// Generated by CoffeeScript 1.10.0
(function() {
  var input_data, regex, result;

  input_data = "hello how are you welcome to <b>Tutorials Point.</b>";

  regex = /<b>(.*)<\/b>/;

  result = regex.exec(input_data);

  console.log(result);

}).call(this);
Now, open the command prompt again and run the CoffeeScript file as shown below.
c:\> coffee regex_example.coffee
On executing, the CoffeeScript file produces the following output.
[ '<b>Tutorials Point.</b>',
  'Tutorials Point.',
  index: 29,
  input: 'hello how are you welcome to <b> Tutorials Point.</b>' ]
heregex
The complex regular expressions we write using the syntax provided by JavaScript are unreadable, therefore to make Regular expressions more readable, CoffeeScript provides an extended syntax for regular expressions known as heregex. Using this syntax, we can break the normal regular expressions using whitespaces and we can also use comments in these extended regular expressions, thus making them more user friendly.
Example
The following example demonstrates the usage of the advanced regular expressions in CoffeeScript heregex. In here, we are rewriting the above example using the advanced regular expressions. Save this code in a file with name heregex_example.coffee
input_data ="hello how are you welcome to Tutorials Point."
heregex = ///
<b>  #bold opening tag
(.*) #the tag value
</b>  #bold closing tag
///
result = heregex.exec(input_data)
console.log result
Open the command prompt and compile the .coffee file as shown below.
c:\> coffee -c heregex_example.coffee
On compiling, it gives you the following JavaScript.
// Generated by CoffeeScript 1.10.0
(function() {
  var heregex, input_data, result;

  input_data = "hello how are you welcome to <b> Tutorials Point.</b>";

  heregex = /<b>(.*) <\/b>/;

  result = heregex.exec(input_data);

  console.log(result);

}).call(this);
Now, open the command prompt again and run the CoffeeScript file as shown below.
c:\> coffee heregex_example.coffee
On executing, the CoffeeScript file produces the following output.
[ '<b>Tutorials Point.</b>',
  'Tutorials Point.',
  index: 29,
  input: 'hello how are you welcome to <b>Tutorials Point.</b>' ]
CoffeeScript - Classes and Inheritance
JavaScript does not provide the class keyword. We can achieve inheritance in JavaScript using objects and their prototypes. Every object have their own prototype and they inherit functions and properties from their prototypes. Since the prototype is also an object, it also has its own prototype.
Though the prototypal inheritance is far more powerful than classic inheritance, it is difficult and confusing for novice users.
Classes in CoffeeScript
Addressing to this problem, CoffeeScript provides a basic structure known as class which is built using the JavaScript's prototypes. You can define a class in CoffeeScript using the class keyword as shown below.
class Class_Name
Example
Consider the following example, here we have created a class named Student using the keyword class.
class Student
If you compile the above code, it will generate the following JavaScript.
var Student;

Student = (function() {
  function Student() {}

  return Student;

})();
Instantiating a class
We can instantiate a class using the new operator just like other object oriented programming languages as shown below.
new Class_Name
You can instantiate the above created (Student) class using the new operator as shown below.
class Student
new  Student
If you compile the above code, it will generate the following JavaScript.
var Student;

Student = (function() {
  function Student() {}

  return Student;

})();

new Student;
Defining a Constructor
A constructor is a function that is invoked when we instantiate a class, its main purpose is to initialize the instance variables. In CoffeeScript, you can define a constructor just by creating a function with name constructor as shown below.
class Student
  constructor: (name)->
  @name = name
In here, we have defined a constructor and assigned the local variable name to the instance variable.
The @ operator is an alias to the this keyword, it is used to point the instance variables of a class.
If we place @ before an argument of the constructor, then it will be set as an instance variable automatically. Therefore, the above code can be written simply as shown below −
class Student
  constructor: (@name)->
Example
Here is an example of a constructor in CoffeeScript. Save it in a file with the name constructor_example.coffee
#Defining a class
class Student
  constructor: (@name)->

#instantiating a class by passing a string to constructor
student = new Student("Mohammed");
console.log "the name of the student is :"+student.name
Compiling the code
Open command prompt and compile the above example as shown below.
c:\>coffee -c constructor_example.coffee
On executing the above command it will produce the following JavaScript.
// Generated by CoffeeScript 1.10.0
(function() {
  var Student, student;

  Student = (function() {
    function Student(name) {
      this.name = name;
    }

    return Student;

  })();

  student = new Student("Mohammed");

  console.log("The name of the student is :"+student.name);

}).call(this);
Executing the Code
Run the above example by executing the following command on the command prompt.
coffee constructor_example.coffee
On running, the above example gives you the following output.
The name of the student is :Mohammed
Instance Properties
Same as in objects, we can also have properties within a class. And these are known as instance properties.
Example
Consider the following example. In here, we have created variables (name, age) and a function (message()) within the class and accessed them using its object. Save this example in a file named instance_properties_example.coffee
#Defining a class
class Student
  name="Ravi"
  age=24
  message: ->
    "Hello "+name+" how are you"

#instantiating a class by passing a string to constructor
student = new Student();
console.log student.message()
On compiling, the above code generates the following output.
// Generated by CoffeeScript 1.10.0
(function() {
  var Student, student;

  Student = (function() {
    var age, name;

    function Student() {}

    name = "Ravi";

    age = 24;

    Student.prototype.message = function() {
      return "Hello " + name + " how are you";
    };

    return Student;

  })();

  student = new Student();

  console.log(student.message());

}).call(this);
Static Properties
We can define static properties in the class. The scope of the static properties is restricted within the class and we create static functions using the this keyword or its alias @ symbol and we have to access these properties using the class name as Class_Name.property.
Example
In the following example, we have created a static function named message. and accessed it. Save it in a file with the name static_properties_example.coffee.
#Defining a class
class Student
  @message:(name) ->
    "Hello "+name+" how are you"
console.log Student.message("Raju")
Open the command prompt and compile the above CoffeeScript file using the following command.
c:\>coffee -c static_properties_example.coffee
On compiling, it gives you the following JavaScript.
// Generated by CoffeeScript 1.10.0
(function() {
  var Student;

  Student = (function() {
    function Student() {}

    Student.message = function(name) {
      return "Hello " + name + " how are you";
    };

    return Student;

  })();

  console.log(Student.message("Raju"));

}).call(this);
Execute the above coffeeScript in command prompt as shown below.
c:\>coffee static_properties_example.coffee
On executing, the above example gives you the following output.
Hello Raju how are you
Inheritance
In CoffeeScript, we can inherit the properties of one class in another class using extends keyword.
Example
Following is an Example of inheritance in CoffeeScript. In here, we have two classes namely Add and My_class. We inherited the properties of class named Add in the class My_class, and accessed them using the extends keyword.
#Defining a class
class Add
   a=20;b=30

   addition:->
     console.log "Sum of the two numbers is :"+(a+b)

class My_class extends Add

my_class = new My_class()
my_class.addition()
CoffeeScript uses prototypal inheritance behind the scenes. In CoffeeScript, whenever we create instances, the parent class's constructor is invoked until we override it.
We can invoke the constructor of the parent class from the subclass, using the super() keyword as shown in the example given below.
#Defining a class
class Add
   constructor:(@a,@b) ->

   addition:=>
     console.log "Sum of the two numbers is :"+(@a+@b)

class Mul extends Add
   constructor:(@a,@b) ->
     super(@a,@b)

   multiplication:->
     console.log "Product of the two numbers is :"+(@a*@b)

mul = new Mul(10,20)
mul.addition()
mul.multiplication()
Dynamic Classes
CoffeeScript uses prototypal inheritance to automatically inherit all the instance properties of a class. This ensures that classes are dynamic; even if you add properties to a parent class after a child has been created, the property will still be propagated to all of its inherited children.
class Animal
  constructor: (@name) ->

class Parrot extends Animal

Animal::rip = true

parrot = new Parrot("Macaw")
console.log "This parrot is no more" if parrot.rip
On executing, the above CoffeeScript generates the following JavaScript code.
// Generated by CoffeeScript 1.10.0
(function() {
  var Animal, Parrot, parrot,
    extend = function(child, parent) { for (var key in parent) {
      if (hasProp.call(parent, key)) child[key] = parent[key]; } function ctor() {
      this.constructor = child; } ctor.prototype = parent.prototype;
      child.prototype = new ctor(); child.__super__ = parent.prototype; return child; },
    hasProp = {}.hasOwnProperty;

  Animal = (function() {
    function Animal(name) {
      this.name = name;
    }

    return Animal;

  })();

  Parrot = (function(superClass) {
    extend(Parrot, superClass);

    function Parrot() {
      return Parrot.__super__.constructor.apply(this, arguments);
    }

    return Parrot;

  })(Animal);

  Animal.prototype.rip = true;

  parrot = new Parrot("Macaw");

  if (parrot.rip) {
    console.log("This parrot is no more");
  }

}).call(this);
CoffeeScript - Ajax
AJAX is a web development technique for creating interactive web applications.
AJAX stands for Asynchronous JavaScript and XML. It is a new technique for creating better, faster, and more interactive web applications with the help of XML, HTML, CSS, and Java Script.
Ajax uses XHTML for content, CSS for presentation, along with Document Object Model and JavaScript for dynamic content display.
Conventional web applications transmit information to and from the server using synchronous requests. It means you fill out a form, hit submit, and get directed to a new page with new information from the server.
With AJAX, when you hit submit, JavaScript will make a request to the server, interpret the results, and update the current screen. In the purest sense, the user would never know that anything was even transmitted to the server.
XML is commonly used as the format for receiving server data, although any format, including plain text, can be used.
AJAX is a web browser technology independent of web server software.
A user can continue to use the application while the client program requests information from the server in the background.
In general, we use jQuery to work with Ajax. Following is an example of Ajax and jQuery
<html>

   <head>
      <title>The jQuery Example</title>
      <script type = "text/javascript"
         src = "https://ajax.googleapis.com/ajax/libs/jquery/2.1.3/jquery.min.js"></script>

      <script type = "text/javascript" language = "javascript">
         $(document).ready(function() {
            $("#driver").click(function(event){
               $('#stage').load('/jquery/result.html');
            });
         });
      </script>
   </head>

   <body>

      <p>Click on the button to load /jquery/result.html file −</p>

      <div id = "stage" style = "background-color:cc0;">
         STAGE
      </div>

      <input type = "button" id = "driver" value = "Load Data" />

   </body>

</html>
Here load() initiates an Ajax request to the specified URL /coffeescript/result.html file. After loading this file, all the content would be populated inside <div> tagged with ID stage. Assuming that our /jquery/result.html file has just one HTML line −
<h1>THIS IS RESULT...</h1>
When you click the given button, then result.html file gets loaded.
CoffeeScript with Ajax
We can rewrite the above example using CoffeeScript as shown below.
<html>

   <head>
      <title>The jQuery Example</title>
      <script type = "text/javascript"
         src = "https://ajax.googleapis.com/ajax/libs/jquery/2.1.3/jquery.min.js"></script>
      <script src="http://coffeescript.org/extras/coffee-script.js"></script>

      <script type="text/coffeescript">
        $(document).ready ->
          $('#driver').click (event) ->
            $('#stage').load '/jquery/result.html'
            return
          return
      </script>
   </head>

   <body>

      <p>Click on the button to load /jquery/result.html file -</p>

      <div id = "stage" style = "background-color:cc0;">
         STAGE
      </div>

      <input type = "button" id = "driver" value = "Load Data" />

   </body>

</html>
CoffeeScript - jQuery
jQuery is a fast and concise library/framework built using JavaScript created by John Resig in 2006 with a nice motto Write less, do more.
jQuery simplifies HTML document traversing, event handling, animating, and Ajax interactions for rapid web development. Visit our jQuery tutorial to know about jQuery.
We can also use CoffeeScript to work with jQuery. This chapter teaches you how to use CoffeeScript to work with jQuery.
Using CoffeeScript with jQuery
Though jQuery solves the browser issues, using it with JavaScript which have some bad parts is a bit problematic. Using CoffeeScript instead of JavaScript is a better idea.
Keep the following points in mind while converting the to be while using jQuery with CoffeeScript.
The $ symbol indicates the jQuery code in our application. Use this to separate the jQuery code from the scripting language as shown below.
$(document).ready
There is no need of using braces in in CoffeeScript except while calling the functions with parameters and dealing with the ambiguous code and we have to replace the function definition function() with an arrow mark as shown below.
$(document).ready ->
Remove the unnecessary return statements, since CoffeeScript implicitly returns the tailing statements of a function.
Example
Following is an JavaScript code where <div> elements are being inserted just before the clicked element −
<html>

   <head>
      <title>The jQuery Example</title>
      <script type = "text/javascript"
         src = "https://ajax.googleapis.com/ajax/libs/jquery/2.1.3/jquery.min.js"></script>

      <script type = "text/javascript" language = "javascript">
         $(document).ready(function() {
            $("div").click(function () {
               $(this).before('<div class="div"></div>' );
            });
         });
      </script>

      <style>
         .div{ margin:10px;padding:12px; border:2px solid #666; width:60px;}
      </style>
   </head>

   <body>

      <p>Click on any square below:</p>
      <span id = "result"> </span>

      <div class = "div" style = "background-color:blue;"></div>
      <div class = "div" style = "background-color:green;"></div>
      <div class = "div" style = "background-color:red;"></div>

   </body>

</html>
Now, we can convert the above code into CoffeeScript code as shown below
 <html>

   <head>
      <title>The jQuery Example</title>
      <script type = "text/javascript"
         src = "https://ajax.googleapis.com/ajax/libs/jquery/2.1.3/jquery.min.js"></script>
      <script src="http://coffeescript.org/extras/coffee-script.js"></script>

      <script type="text/coffeescript">
        $(document).ready ->
          $('div').click ->
            $(this).before '<div class="div"></div>'
            return
          return
      </script>

      <style>
         .div{ margin:10px;padding:12px; border:2px solid #666; width:60px;}
      </style>
   </head>

   <body>

      <p>Click on any square below:</p>
      <span id = "result"> </span>

      <div class = "div" style = "background-color:blue;"></div>
      <div class = "div" style = "background-color:green;"></div>
      <div class = "div" style = "background-color:red;"></div>

   </body>

</html>
On executing, this gives you the following output.
What is Callback?
Callback is an asynchronous equivalent for a function. A callback function is called at the completion of a given task. Node makes heavy use of callbacks. All APIs of Node are written is such a way that they supports callbacks.
For example, a function to read a file may start reading file and return the control to execution environment immidiately so that next instruction can be executed. Once file I/O is complete, it will call the callback function while passing the callback function, the content of the file as parameter. So there is no blocking or wait for File I/O. This makes Node.js highly scalable, as it can process high number of request without waiting for any function to return result.
Blocking Code Example
Create a text file named input.txt having following content
Tutorials Point is giving self learning content
to teach the world in simple and easy way!!!!!
Create a js file named main.js which has the following code −
var fs = require("fs");
var data = fs.readFileSync('input.txt');
console.log(data.toString());
console.log("Program Ended");
Now run the main.js to see the result −
$ node main.js
Verify the Output.
Tutorials Point is giving self learning content
to teach the world in simple and easy way!!!!!
Program Ended
Non-Blocking Code Example
Create a text file named input.txt having following content
Tutorials Point is giving self learning content
to teach the world in simple and easy way!!!!!
Update main.js file to have following code −
var fs = require("fs");
fs.readFile('input.txt', function (err, data) {
  if (err) return console.error(err);
    console.log(data.toString());
});
console.log("Program Ended");
Now run the main.js to see the result −
$ node main.js
Verify the Output.
Program Ended
Tutorials Point is giving self learning content
to teach the world in simple and easy way!!!!!
These two examples explain the concept of blocking and non-blocking calls. The first example shows that the program blocks until it reads the file and then only, it proceeds to end the program, whereas in the second example, the program does not wait for file reading but it just proceeded to print "Program Ended".
Thus, a blocking program executes very much in sequence. From programming point of view, its easier to implement the logic but non-blocking programs do not execute in sequence. In case a program needs to use any data to be processed, it should be kept within the same block to make it sequential execution.
CoffeeScript - MongoDB
MongoDB is a cross-platform, document oriented database that provides, high performance, high availability, and easy scalability. MongoDB works on concept of collection and document. For more information read our MongoDB Tutorial.
In this chapter you will learn how to communicate with MongoDB database using CoffeeScript.
Installation
The MongoDB database can be integrated with CoffeeScript using Node.js 2.0 driver of MongoDB. First of all you need to install MongoDB in your system, by referring the environment chapter of our MongoDB tutorial.
After installing MongoDB successfully browse through its bin folder (if you haven't set the path) and start the MongoDB service as shown below.
C:\Program Files\MongoDB\Server\3.2\bin> mongod
Finally install MongoDB driver and it's dependencies by executing the following NPM command in the command prompt.
npm install mongodb --save
Connecting to MongoDB
In order to connect to MongoDB, first of all create MongoClient using this, invoke the connect() function. This function accepts url, and a callback function as parameters.
Following CoffeeScript code shows how to connect to MongoDB server. If the MongoDB server is running in your system this program establishes a connection to the server.
#Requiring the Mongodb package
mongo = require 'mongodb'

#Creating a MongoClient object
MongoClient = mongo.MongoClient

#Preparing the URL
url = 'mongodb://localhost:27017/testdb'

#Connecting to the server
MongoClient.connect url, (err, db) ->
  if err
    console.log 'Unable to connect . Error:', err
  else
    console.log 'Connection established to', url
    #Close connection
    db.close()
  return
Save the above code in a file with name connect_db.coffee and execute it as shown below. If database is successfully created then it will give following message
c:\> coffee connect_db.coffee
coffee connect_db.collection
Connection established to mongodb://localhost:27017/testdb
Creating a Collection
A collection in MongoDB holds the documents we store in it. You can create a collection by using the collection() function. This function accepts a string argument that represents the name of the collection we want to create.
Following CoffeeScript code shows how to create a collection in MongoDB. In case of any errors, they will be displayed on the console.
#Requiring the Mongodb package
mongo = require 'mongodb'

#Creating a MongoClient object
MongoClient = mongo.MongoClient

#Preparing the URL
url = 'mongodb://localhost:27017/testdb'

#Connecting to the server
MongoClient.connect url, (err, db) ->
  if err
    console.log 'Unable to connect . Error:', err
  else
    console.log 'Connection established to', url

    #Create collection
    col = db.collection('My_collection')
    console.log "Collection created successfully."

    #Close connection
    db.close()
  return
Save the above code in a file with name create_collection.coffee and execute it as shown below. If the collection is created successfully then it will give following message
c:/> coffee create_collection.coffee
Connection established to mongodb://localhost:27017/testdb
Collection created successfully.
Inserting Documents
You can inset documents in to a collection in MongoDB you need to invoke a function named insert() by passing the list of documents that are needed to be inserted, as parameters.
Following CoffeeScript code shows how to insert documents in to a collection named My_collection. In case of any errors, they will be displayed on the console.
#Sample JSON Documents
doc1 = {name: 'Ram', age: 26, city: 'Hyderabad'}
doc2 = {name: 'Rahim', age: 27, city: 'Banglore'}
doc3 = {name: 'Robert', age: 28, city: 'Mumbai'}

#Requiring the Mongodb package
mongo = require 'mongodb'

#Creating a MongoClient object
MongoClient = mongo.MongoClient

#Preparing the URL
url = 'mongodb://localhost:27017/testdb'

#Connecting to the server
MongoClient.connect url, (err, db) ->
  if err
    console.log 'Unable to connect . Error:', err
  else
    console.log 'Connection established to', url
  #Creating collection
  col = db.collection('My_collection')

  #Inserting documents
  col.insert [doc1,doc2,doc3], (err, result) ->
    if err
      console.log err
    else
      console.log "Documents inserted successfully"
    #Close connection
    db.close()
    return
  return
Save the above code in a file with name insert_documents.coffee and execute it as shown below. If the documents are inserted successfully then it gives following message
c:/> coffee insert_documents.coffee
Connection established to mongodb://localhost:27017/testdb
Documents inserted successfully
Reading Documents
You can retrieve the documents that are stored in MongoDB using a function named find(). The following CoffeeScript code shows how to retrieve the records that are stored in MongoDB.
#Requiring the Mongodb package
mongo = require 'mongodb'

#Creating a MongoClient object
MongoClient = mongo.MongoClient

#Preparing the URL
url = 'mongodb://localhost:27017/testdb'

#Connecting to the server
MongoClient.connect url, (err, db) ->
  if err
    console.log 'Unable to connect . Error:', err
  else
    console.log 'Connection established to', url
	#Creating collection object
    col = db.collection('My_collection')
    #Inserting Documents
    col.find({name: 'Ram'}).toArray (err, result)->
      if err
        console.log err
      else
      console.log 'Found:', result
      #Closing connection
      db.close()
      return
  return
Save the above code in a file with name read_documents.coffee and execute it as shown below. This programs retrieves the required document in the specified collection and displays it as shown below.
C:\> coffee read_documents.coffee
Connection established to mongodb://localhost:27017/testdb
Found: [ { _id: 56e269c10478809c3009ad1e,
    name: 'Ram',
    age: 26,
    city: 'Hyderabad' } ]
You can also read all the documents existing in a particular collection by executing the find() function with out passing any arguments to it as shown below.
#Requiring the Mongodb package
mongo = require 'mongodb'

#Creating a MongoClient object
MongoClient = mongo.MongoClient

#Preparing the URL
url = 'mongodb://localhost:27017/testdb'

#Connecting to the server
MongoClient.connect url, (err, db) ->
  if err
    console.log 'Unable to connect . Error:', err
  else
    console.log 'Connection established to', url
	#Creating collection object
    col = db.collection('My_collection')
    #Reading all Documents
    col.find().toArray (err, result)->
      if err
        console.log err
      else
      console.log 'Found:', result
      #Closing connection
      db.close()
      return
  return
Save the above code in a file with name read_all_documents.coffee and execute it as shown below. this programs retrieves all the documents in the specified collection and displays it as shown below.
C:\> coffee read_all_documents.coffee
Connection established to mongodb://localhost:27017/testdb
Found: [ { _id: 56e2c5e27e0bad741a68c03e,
    name: 'Ram',
    age: 26,
    city: 'Hyderabad' },
  { _id: 56e2c5e27e0bad741a68c03f,
    name: 'Rahim',
    age: 27,
    city: 'Banglore' },
  { _id: 56e2c5e27e0bad741a68c040,
    name: 'Robert',
    age: 28,
    city: 'Mumbai' } ]
Updating Documents
You can update the documents that are stored in MongoDB using a function named update(). Following CoffeeScript code shows how to update the records that are stored in MongoDB.
#Get mongo client object
MongoClient = require('mongodb').MongoClient
#Connecting to mongodb
url = 'mongodb://localhost:27017/testdb'
MongoClient.connect url, (err, db) ->
  if err
    console.log 'Unable to connect . Error:', err
  else
    console.log 'Connection established to', url
	#Creating collection
    col = db.collection('My_collection')
    #Reading Data
    col.update {name:'Ram'},{$set:{city:'Delhi'}},(err, result)->
      if err
        console.log err
      else
      console.log "Document updated"

      #Closing connection
      db.close()
	  return
  return
This program updates the city of the employee named Ram from Hyderabad to Delhi.
Save the above code in a file with name update_documents.coffee and execute it as shown below. this programs retrieves the documents in the specified collection and displays it as shown below.
C:\> coffee update_documents.coffee
Connection established to mongodb://localhost:27017/testdb
Document updated
After updating, if you execute the read_documents.coffee program, then you will observe that the city name of the person named Ram is updated from Hyderabad to Delhi.
C:\> coffee Read_all_documents.coffee
Connection established to mongodb://localhost:27017/testdb
Found: [ { _id: 56e2c5e27e0bad741a68c03e,
    name: 'Ram',
    age: 26,
    city: 'Delhi' },
  { _id: 56e2c5e27e0bad741a68c03f,
    name: 'Rahim',
    age: 27,
    city: 'Banglore' },
  { _id: 56e2c5e27e0bad741a68c040,
    name: 'Robert',
    age: 28,
    city: 'Mumbai' } ]
Deleting Documents
You can delete all the documents from the collection using the remove() function. Following CoffeeScript code shows how to delete all the records that are stored in MongoDB.
#Get mongo client object
MongoClient = require('mongodb').MongoClient
#Connecting to mongodb
url = 'mongodb://localhost:27017/testdb'
MongoClient.connect url, (err, db) ->
  if err
    console.log 'Unable to connect . Error:', err
  else
    console.log 'Connection established to', url
	#Creating collection
    col = db.collection('My_collection')
    #Deleting Data
    col.remove()
    console.log "Document deleted"

    #Closing connection
    db.close()
  return
Save the above code in a file with name delete_documents.coffee and execute it as shown below. this programs removes all the documents in the specified collection displaying the following messages.
C:\> coffee delete_documents.coffee
Connection established to mongodb://localhost:27017/testdb
Document deleted
After deleting, if you execute the read_documents.coffee program, then you will get an empty collection as shown below.
C:\> coffee Read_all_documents.coffee
Connection established to mongodb://localhost:27017/testdb
Found: [ ]
CoffeeScript - SQLite
SQLite is a lightweight, schema-based relational database engine. It is a popular choice as embedded database software for local storage in web browsers.
Unlike many other database management systems, SQLite is not a clientserver database engine. For more information read our SQLite Tutorial
In this chapter you will learn how to communicate with SQLite database using CoffeeScript.
Installation
The SQLite3 database can be integrated with CoffeeScript using node-sqlite3 module. This module works with Node.js v0.10.x, v0.12.x, v4.x, and v5.x. This module caters various functions to communicate with SQLite3 using CoffeeScript, in addition to this it also provides an Straightforward query and parameter binding interface, and an Query serialization API.
You can install the node-sqlite3 module using npm as shown below.
npm install sqlite3
To use sqlite3 module, you must first create a connection object that represents the database and this object will help you in executing all the SQL statements.
Connecting to Database
In order to connect to SQLite database first of all create its package by invoking the require() function of the node-sqlite3 module and pass the string sqlite3 as a parameter to it. Then connect to a database by passing the name of the database to sqlite3.Database() construct.
Following CoffeeScript code shows how to connect to an existing database. If database does not exist, then it will be created with the given name test.db, opened and finally the database object will be returned.
#Creating sqlite3 package
sqlite3 = require('sqlite3')

#Creating a Database instance
db = new (sqlite3.Database)('test.db')
console.log "Database opened successfully."
We can also supply :memory: to create an anonymous in-memory database and, an empty string to create anonymous disk-based database, instead of test.db. Save the above code in a file with name create_db.coffee and execute it as shown below. If the database is successfully created, then it will produce the following message −
c:\> coffee create_db.coffee
Successfully connected
Creating a Table
You can create a table in SQLite database through CoffeeScript using the run() function. Pass the query to create a table to this function in String format.
The following CoffeeScript program will be used to create a table in previously test.db database −
#Creating sqlite3 package
sqlite3 = require('sqlite3')

#Creating a Database instance
db = new (sqlite3.Database)('test.db')
console.log "Successfully connected"

db.serialize ->
  db.run 'CREATE TABLE STUDENT (name TEXT, age INTEGER, city TEXT)'
  console.log "Table created successfully"
  return
db.close()
The serialize() function sets the database in serialized mode. In this mode when ever a callback encounters, it will be called immediately. The queries in that callback are executes serially. Soon the function returns The database will be set to normal mode again. After completing the transaction we need to close the connection using close() function.
Save the above code in a file with name create_table.coffee and execute it as shown below. This will create a table named STUDENT in the database test.db displaying the following messages.
C:\> coffee create_table.coffee
Successfully connected
Table created successfully
Inserting / Creating Data
You can insert data into SQLite database through CoffeeScript code by executing the insert statement. To do so we can use the prepare() function which prepares SQL statements.
It also accepts query with bind variables (?), values to these variables can be attached using run() function. You can insert multiple records using prepared statement, and after inserting all the records, you need to finalize the prepared statement using finalize() function.
The following CoffeeScript program shows how to insert records in the table named STUDENT created in previous example.
#Creating sqlite3 package
sqlite3 = require('sqlite3').verbose()

#Creating a Database instance
db = new (sqlite3.Database)('test.db')
console.log "Successfully connected"

db.serialize ->
  stmt = db.prepare('INSERT INTO STUDENT VALUES (?,?,?)')
  stmt.run 'Ram',24,'Hyderabad'
  stmt.run 'Robert',25,'Mumbai'
  stmt.run 'Rahim',26,'Bangalore'
  stmt.finalize()
  console.log "Data inserted successfully"
  return
db.close()
Save the above code in a file with name insert_data.coffee and execute it as shown below. This will populate the table named STUDENT displaying the following messages.
C:\> coffee insert_data.coffee
Successfully connected
Data inserted successfully
Reading / Retrieving Data
You can get the data from an SQLite table using the each() function. This function accepts an optional callback function which will be called on each row.
The following CoffeeScript program shows how we can fetch and display records from the table named STUDENT created in the previous example
#Creating sqlite3 package
sqlite3 = require('sqlite3').verbose()

#Creating a Database instance
db = new (sqlite3.Database)('test.db')
console.log "Successfully connected"

db.serialize ->
  console.log "The contents of the table STUDENT are ::"
  db.each 'SELECT rowid AS id, name,age,city FROM STUDENT', (err, row) ->
    console.log row.id + ': ' +row.name+', '+ row.age+', '+ row.city
    return
  return
db.close()
Save the above code in a file with name retrive_data.coffee and execute it as shown below. This retrieves all the records in the table named STUDENT and displays on the console as follows.
C:\> coffee retrive_data.coffee
Successfully connected
The contents of the table STUDENT are ::
1: Ram, 24, Hyderabad
2: Robert, 25, Mumbai
3: Rahim, 26, Bangalore
Updating Data
The following CoffeeScript code shows how we can use UPDATE statement to update any record and then fetch and display updated records in the table named STUDENT
#Creating sqlite3 package
sqlite3 = require('sqlite3').verbose()

#Creating a Database instance
db = new (sqlite3.Database)('test.db')
console.log "Successfully connected"

db.serialize ->
  #Updating data
  stmt = db.prepare('UPDATE STUDENT SET city = ? where name = ?')
  stmt.run 'Delhi','Ram'
  console.log "Table updated"
  stmt.finalize()

  #Retrieving data after update operation
  console.log "The contents of the table STUDENT after update operation are ::"
  db.each 'SELECT rowid AS id, name, city FROM STUDENT', (err, row) ->
    console.log row.id + ': ' +row.name+', '+ row.city
    return
  return
db.close()
Save the above code in a file with name update_data.coffee and execute it as shown below. This updates the city of the student named Ram and displays all the records in the table after update operation as follows.
C:\> coffee update_data.coffee
Successfully connected
Table updated
The contents of the table STUDENT after update operation are ::
1: Ram, Delhi
2: Robert, Mumbai
3: Rahim, Bangalore
Deleting Data
The following CoffeeScript code shows how we can use DELETE statement to delete any record and then fetch and display remaining records from the table named STUDENT.
#Creating sqlite3 package
sqlite3 = require('sqlite3').verbose()

#Creating a Database instance
db = new (sqlite3.Database)('test.db')
console.log "Successfully connected"

db.serialize ->
  #Deleting data
  stmt = db.prepare('DELETE FROM STUDENT WHERE name = ?')
  stmt.run 'Ram'
  console.log "Record deleted"
  stmt.finalize()

  #Retrieving data after delete operation
  console.log "The contents of the table STUDENT after delete operation are ::"
  db.each 'SELECT rowid AS id, name, city FROM STUDENT', (err, row) ->
    console.log row.id + ': ' +row.name+', '+ row.city
    return
  return
db.close()
Save the above code in a file with name delete_data.coffee and execute it as shown below. It deletes the record of the student named Ram and displays all the remaining in the table after delete operation as follows.
Successfully connected
Record deleted
The contents of the table STUDENT after delete operation are ::
2: Robert, Mumbai
3: Rahim, Bangalore
