- QTP Tutorial
- QTP - Home
- QTP - Introduction
- QTP - Test Automation
- QTP - Environment Setup
- QTP - Record and Play Back
- QTP - Object Repository
- QTP - Actions
- QTP - DataTables
- QTP - Checkpoints
- QTP - Synchronization
- QTP - Smart Identification
- QTP - Debugging
- QTP - Error Handling
- QTP - Recovery Scenarios
- QTP - Environment Variables
- QTP - Library Files
- QTP - Test Results
- QTP - GUI Objects
- QTP - Virtual Objects
- QTP - Accessing Databases
- QTP - Working with XML
- QTP - Descriptive Programming
- QTP - Automation Object Model
- QTP - Frameworks
- QTP - Designing a Framework
- QTP Useful Resources
- QTP - Questions and Answers
- QTP - Quick Guide
- QTP - Useful Resources
- QTP - Discussion
QTP - Quick Guide
QTP - Introduction
QTP stands for QuickTest Professional, a product of Hewlett Packard (HP). This tool helps testers to perform an automated functional testing seamlessly, without monitoring, once script development is complete.
HP QTP uses Visual Basic Scripting (VBScript) for automating the applications. The Scripting Engine need not be installed exclusively, as it is available as a part of the Windows OS. The Current version of VBScript is 5.8, which is available as a part of Win 7. VBScript is NOT an object-oriented language but an object-based language.
Testing Tools
Tools from a software testing context, can be defined as a product that supports one or more test activities right from planning, requirements, creating a build, test execution, defect logging and test analysis.
Classification of Tools
Tools can be classified based on several parameters. It includes −
- The purpose of the tool
- The activities that are supported within the tool
- The type/level of testing it supports.
- The kind of licensing (open source, freeware, commercial)
- The technology used
Types of Tools
| Sr.No. | Tool Type | Used for | Used by |
|---|---|---|---|
| 1 | Test Management Tool | Test Managing, scheduling, defect logging, tracking and analysis. | Testers |
| 2 | Configuration management tool | For Implementation, execution, tracking changes | All Team members |
| 3 | Static Analysis Tools | Static Testing | Developers |
| 4 | Test data Preperation Tools | Analysis and Design, Test data generation | Testers |
| 5 | Test Execution Tools | Implementation, Execution | Testers |
| 6 | Test Comparators | Comparing expected and actual results | All Team members |
| 7 | Coverage measurement tools | Provides structural coverage | Developers |
| 8 | Performance Testing tools | Monitoring the performance, response time | Testers |
| 9 | Project planning and Tracking Tools | For Planning | Project Managers |
| 10 | Incident Management Tools | For managing the tests | Testers |
Where QTP Fits in?
QTP is a Functional testing tool, which is best suited for regression testing of the applications. QTP is a licensed/commercial tool owned by HP, which is one of the most popular tools available in the market. It compares the actual and the expected result and reports the results in the execution summary.
QTP – History and Evolution
HP Quick Test Professional was originally owned by Mercury Interactive and it was acquired by HP. Its original name was Astra Quick Test and later named as Quick Test Professional but the latest version is known as Unified Functional Tester (UFT).
Version History
Now let us take a look at the version history of QTP.
| Versions | Timelines |
|---|---|
| Astra Quick Test v1.0 to v5.5 - Mercury Interactive | May 1998 to Aug 2001 |
| QuickTest Professional v6.5 to v9.0 - Mercury Interactive | Sep 2003 to Apr 2006 |
| Hp-QuickTest Professional v9.1 to v11.0 - Acquired and Released by HP | Feb 2007 to Sep 2010 |
| Hp-Unified Functional Testing v11.5 to v11.53 | 2012 to Nov 2013 |
Advantages
Developing automated tests using VBScript does not require a highly skilled coder and is relatively easy when compared to other object oriented programming languages.
Easy to use, ease of navigation, results validation, and Report generation.
Readily Integrated with Test Management Tool (Hp-Quality Center) which enables easy scheduling and monitoring.
Can also be used for Mobile Application Testing.
Since it is an HP product, full support is provided by HP and by its forums for addressing technical issues.
Disadvantages
Unlike Selenium, QTP works in Windows operating system only.
Not all versions of Browsers are supported and the testers need to wait for the patch to be released for each one of the major versions.
Having said, that it is a commercial tool, the licensing cost is very high.
Even though scripting time is less, the execution time is relatively higher as it puts load on the CPU & RAM.
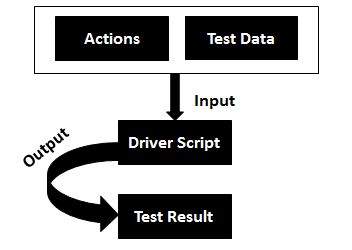
QTP - Automated Testing Process
For any automated tool implementation, the following are the phases/stages of it. Each one of the stages corresponds to a particular activity and each phase has a definite outcome.

Test Automation Feasibility Analysis − First step is to check if the application can be automated or not. Not all applications can be automated due to its limitations.
Appropriate Tool Selection − The next most important step is the selection of tools. It depends on the technology in which the application is built, its features and usage.
Evaluate the suitable framework − Upon selecting the tool, the next activity is to select a suitable framework. There are various kinds of frameworks and each framework has its own significance. We will deal with frameworks in detail later in this tutorial.
Build Proof of Concept − Proof of Concept (POC) is developed with an end-to-end scenario to evaluate if the tool can support the automation of the application. It is performed with an end-to-end scenario, which ensures that the major functionalities can be automated.
Develop Automation Framework − After building the POC, framework development is carried out, which is a crucial step for the success of any test automation project. Framework should be built after diligent analysis of the technology used by the application and also its key features.
Develop Test Script, Execute, and Analyze − Once Script development is completed, the scripts are executed, results are analyzed and defects are logged, if any. The Test Scripts are usually version controlled.
QTP - Environment SetUp
QTP is a commercial tool and the trial version can be downloaded from HP site directly. Only the current version, which is Unified functional testing (11.5x) is available for download. Following is the URL from where the trial version can be downloaded.
The Download URL − QTP
Installation Procedure
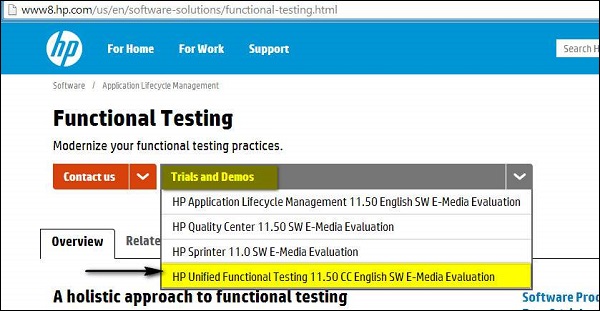
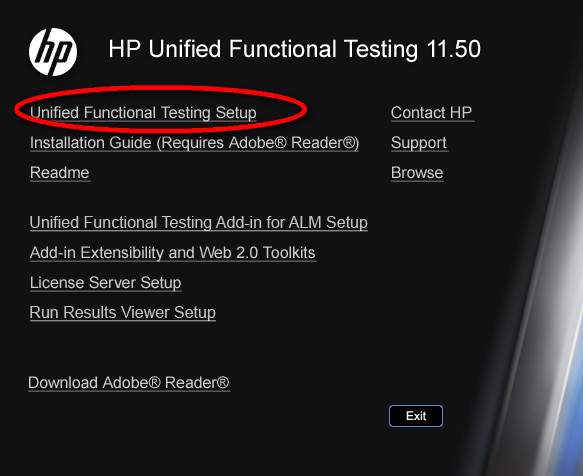
Step 1 − Click the "Trials and Demos" link and select "HP Unified Functional Testing 11.50 CC English SW E-Media Evaluation" as shown below −
Step 2 − After Selecting "HP Unified Functional Testing 11.50", the download wizard opens. Fill in the Personal details and click Next.

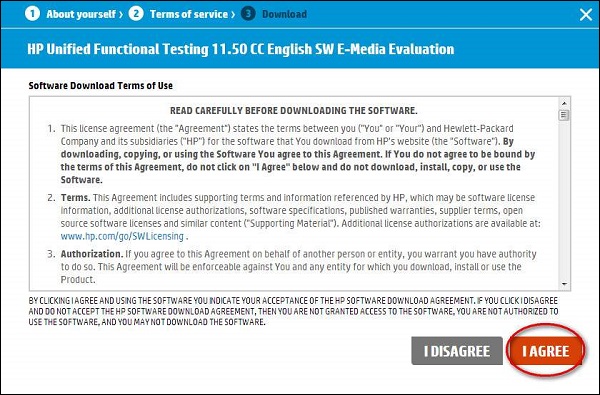
Step 3 − Read the ‘Terms of Use’ and click "NEXT".
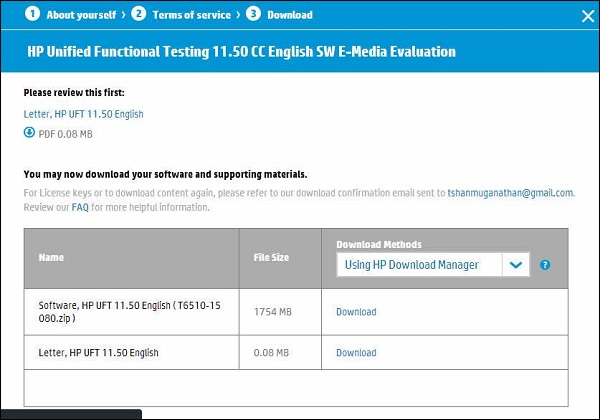
Step 4 − The Download window opens. Now, click the "Download" button.
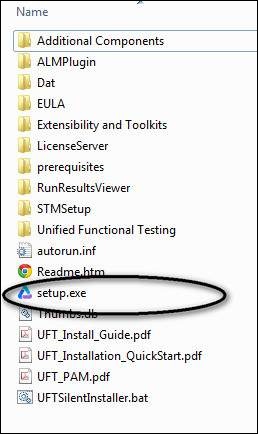
Step 5 − The downloaded file will be of the format .RAR. Now you need to unzip the archive and the folder contents would be as shown below and execute the Setup.exe.
Step 6 − Upon Executing the Setup File, in order to install, select "Unified Functional Testing Set up" from the list as shown below −
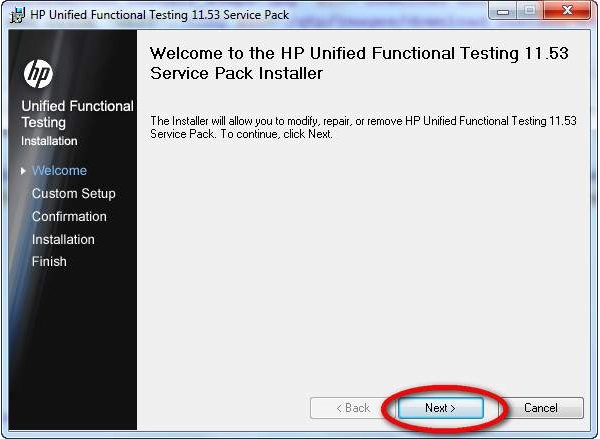
Step 7 − Then click Next to continue.
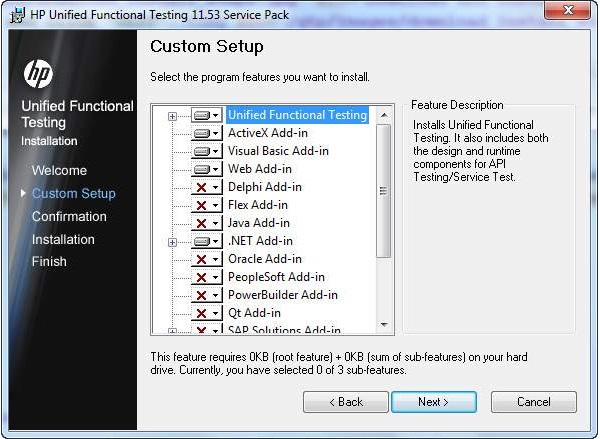
Step 8 − In the Custom Set up Window, select the plugins that are required for your automation i.e. you should select the plugins based on the technology of your application under test. For Example, if your application is based on .NET then you should ensure that you select .NET.
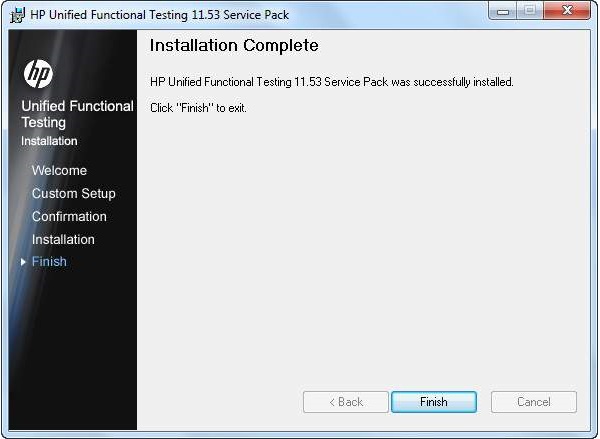
Step 9 − After selecting the required plugins for installation, click Next. After the completion of installation, you will end up with a Finish button Window.
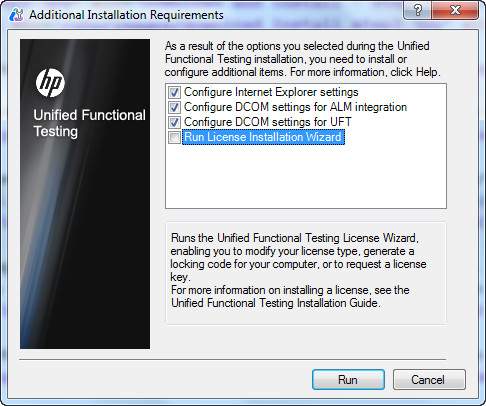
Step 10 − Once you complete your installation, the "Additional Installation Requirements" Dialog box opens. Select everything in the list other than "Run License Installation Wizard" and click "RUN". We Need NOT select "Run License Installation Wizard" because we are installing the trial version, which, by default, gives a license for 30 days.
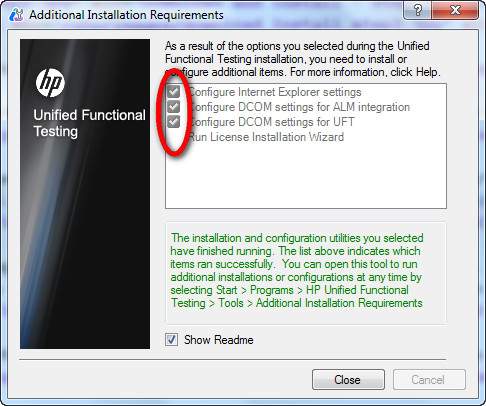
Step 11 − After the completion of Additional Installation Requirements, a tick mark is shown, which in turn states that the components are installed successfully. Now, click Close.
Launching UFT and Add ins Page
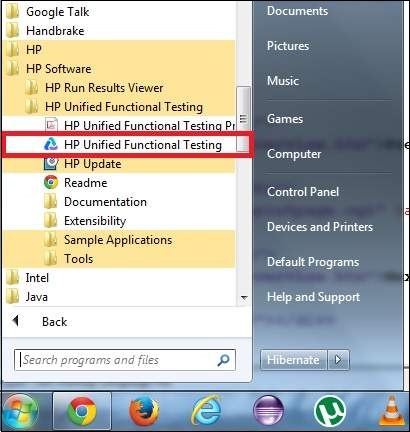
Step 1 − After Installation, application can be launched from the Start Menu as shown in the figure.
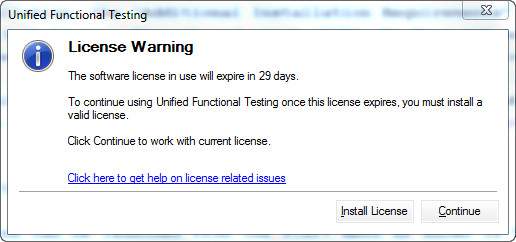
Step 2 − The license page appears. You can click Continue as we have installed the trial license.
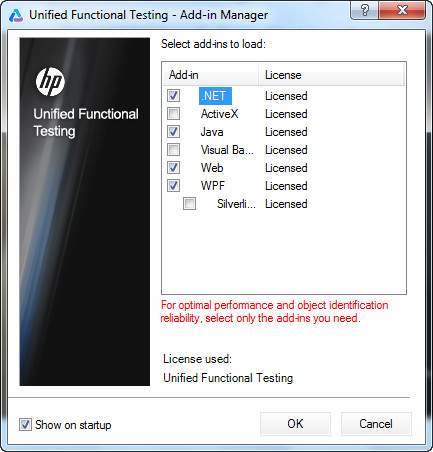
Step 3 − The Add-ins dialog box opens for the user to select the required add-ins.
Note − Do not load all the add-ins but just the required add-ins and click OK.
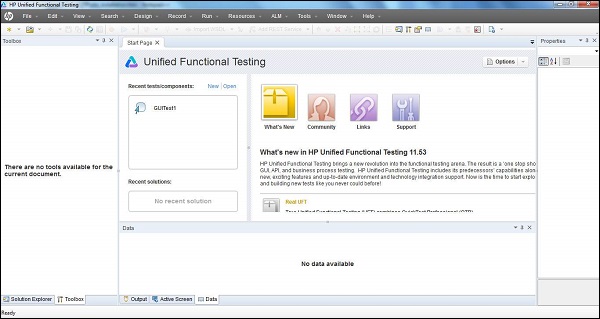
Step 4 − After loading the required add-ins, the UFT 11.5 tool opens for the user and the first glimpse of the UFT looks, as shown below −
QTP - Record and Playback
Recording a test corresponds to recording the user actions of the application under test so that UFT automatically generates the scripts that can be played back. Record and Playback can give us the first impression of the tool, whether it can support the technology or not, if the initial settings are done correctly.
Steps for Record and Playback are as follows −
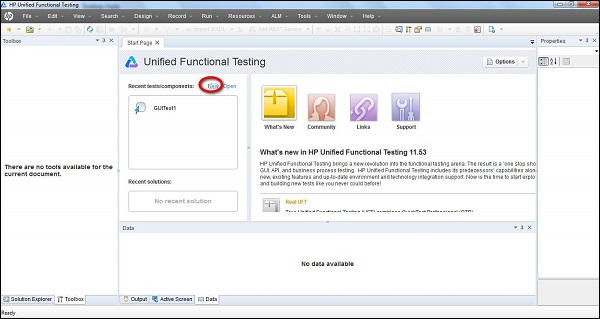
Step 1 − Click "New" test from the Start Page as shown below −
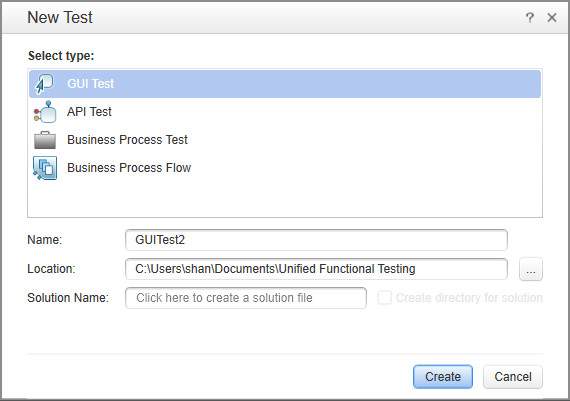
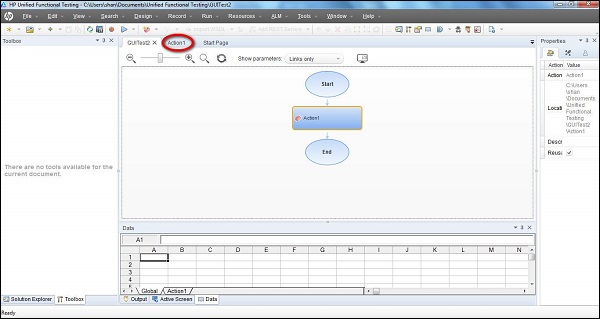
Step 2 − Clicking "New" Link, a new test window opens and the user needs to select the test type. Select "GUI Test", give a name for the test and the location where it needs to be saved.
Step 3 − Once a New test is created, the new test screen opens as shown below. Now, click the "Action1" tab, which is created with 1 action by default.
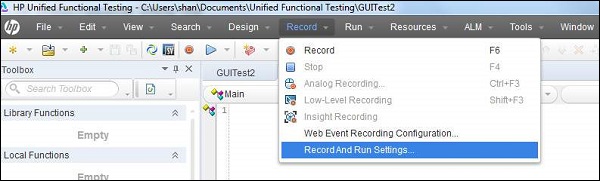
Step 4 − Click the "Record" Menu and select "Record and Run Settings" as shown below −
Step 5 − The Record and Run Settings dialog box opens and based on the type of application, one can select Web, Java, or Windows Applications. For Example, here, we will record a Web Based Application (http://easycalculation.com/).

Step 6 − Click Record. The Internet Explorer opens automatically with the web address https://www.easycalculation.com/ as per the settings. Click the "Numbers" link under "Algebra" and key in a number and hit "Calculate". After completion of the action, click the "Stop" button in the record panel. You will notice that the script is generated as shown below −

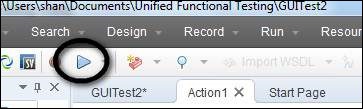
Step 7 − Now playback the script by clicking the playback button. The Script replays and the result is displayed.
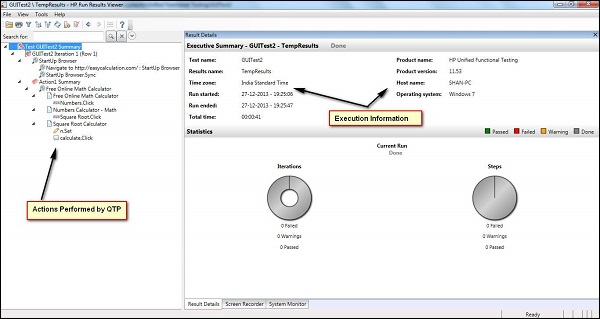
Step 8 − The result window is opened, by default, which exactly shows the timestamp of execution, pass and failed steps.
Significance of Record and Playback
It is used as the preliminary investigation method to verify if UFT can support the technology/application.
Used to create a test a basic functionality of an application or feature that does not require long-term maintenance.
It can be used for recording both mouse movements and keyboard inputs.
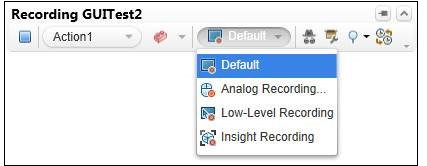
Modes of Recording
Normal Recording − This is the default Recording mode that records the objects and the operations performed on the application under test.
Analog Recording − This records not only the keyboard actions but also the mouse movements relative to the screen or the application window.
Low-Level Recording − This records the exact co-ordinates of the objects independent of the fact whether UFT recognizes the object or NOT. It just records the co-ordinates, hence does NOT record mouse movements.
Insight Recording − UFT records operations, based on its appearance and not based on its native properties.
How to Choose Recording Modes
After clicking the Recording button, the user can choose the recording mode from the recording pane that appears on the screen, once the recording starts. The selection can be made from any of the ones that has been discussed above.
You will see that the following scenario is recorded in all the modes and the same action has been recorded under various circumstances.
- Launch IE - https://www.easycalculation.com/
- Click "Numbers" under "Algebra"
- Click "Square Root" link
- Enter a value to calculate the square root. Let us say 10
- Hit Calculate
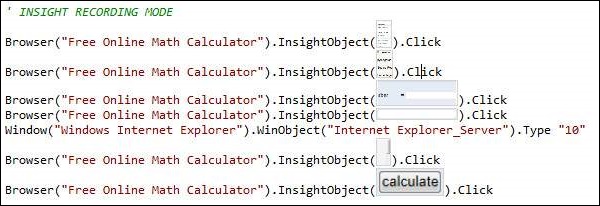
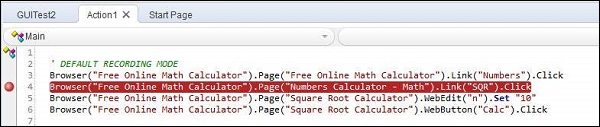
Script Recorded under Default, Analog and Low Level recording mode is given below −
' DEFAULT RECORDING MODE
Browser("Free Online Math Calculator").Page("Free Online Math
Calculator").Link("Numbers").Click

Browser("Free Online Math Calculator").Page("Numbers Calculator -
Math").Link("Square Root").Click

Browser("Free Online Math Calculator").Page("Square Root
Calculator").WebEdit("n").Set "10"

Browser("Free Online Math Calculator").Page("Square Root
Calculator").WebButton("calculate").Click

' ANALOG RECORDING MODE
Desktop.RunAnalog "Track1"

' LOW LEVEL RECORDING MODE
Window("Windows Internet Explorer").WinObject("Internet Explorer_Server").Click
235,395

Window("Windows Internet Explorer").WinObject("Internet Explorer_Server").Click
509,391

Window("Windows Internet Explorer").WinObject("Internet Explorer_Server").Click
780,631

Window("Windows Internet Explorer").WinObject("Internet Explorer_Server").Type
"10"

Window("Windows Internet Explorer").WinObject("Internet Explorer_Server").Click
757,666
The recordings using insight recording mode will be as shown below −
QTP - Object Repository
Object Repository
Object Repository is a collection of object and properties with which QTP will be able to recognize the objects and act on it. When a user records a test, the objects and its properties are captured by default. Without understanding objects and its properties, QTP will NOT be able to play back the scripts.
Click on each one of the following topics to know more about Object Repository and its associated features.
| Sr.No. | Topic & Description |
|---|---|
| 1 | Object Spy and its Features
To understand the usage of object spy and its associated functionalities. |
| 2 | Working with Object Repository
Adding, editing, deleting objects from an Object Repository and its associated functionalities. |
| 3 | Types of Object Repository
Deals with shared Object and local Object Repository and their context with respect to scripting. |
| 4 | User-defined Objects
Deals with the circumstances to use the User-Defined Objects. |
| 5 | Object Repository in XML
Deals with converting OR's to XML and using the object Repository as XML. |
| 6 | Comparing and Merging OR
Operations such as Compare OR', Merge OR's to effectively work with Object Repository. |
| 7 | Ordinal Identifiers
Circumstances where the ordinal identifiers are used and its advantages. |
| 8 | Child Objects
Using Child Objects for effective scripting |
QTP - Actions
Actions helps testers to divide scripts into groups of QTP statements. Actions are similar to functions in VBScript; however, there are a few differences. By default, QTP creates a test with one action.
| Actions | Functions |
|---|---|
| Action is an in-built feature of QTP. | VBScript Functions are supported by both VBScript and QTP. |
| Actions parameters are passed by value only. | Function parameters are passed either by by value or by ref. |
| Actions have extension .mts | Functions are saved as .vbs or .qfl |
| Actions may or may not be reusable. | Functions are always reusable. |
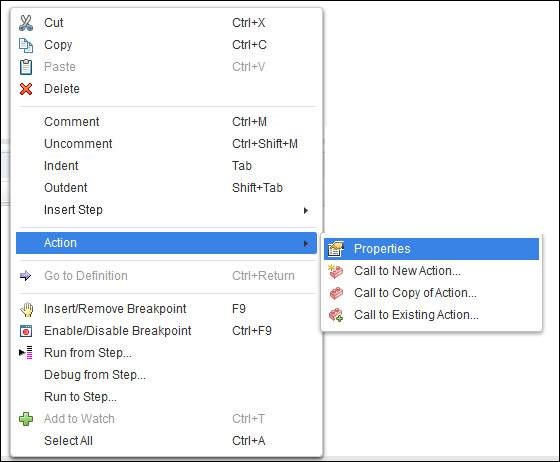
The properties of the action can be accessed by right clicking on the Script Editor Window and selecting "Properties".
Action properties contains the following information −
- Action Name
- Location
- Reusable Flag
- Input Parameters
- Output Parameters
Types of Actions
There are three types of actions −
Non-reusable action − An action that can be called only in that specific test in which it has been designed and can be called only once.
Reusable action − An action that can be called multiple times, any test in which it resides, and can also be used by any other tests.
External Reusable action − It is a reusable action stored in another test. External actions are read-only in the calling test, but it can be used locally with the editable copy of the Data Table information for the external action.
Working with Actions
There are three options to insert an action. Click on each one of those to know more about the selected type of action.
| Sr.No. | Action Type & Description |
|---|---|
| 1 | Insert Call to New Action
Inserts a New Action from the existing action |
| 2 | Insert Call to Copy of Action
Inserts a copy of an existing action |
| 3 | Insert Call to Existing Action
Inserts a call to existing re-usable action |
QTP - Datatables
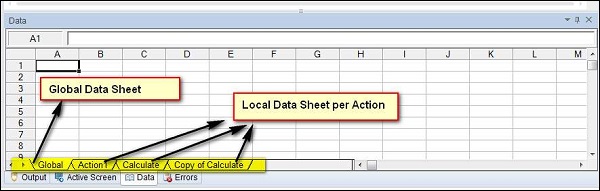
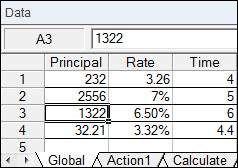
A DataTable, similar to Microsoft Excel, helps the testers to create data-driven test cases that can be used to run an Action multiple times. There are two types of Datatables −
Local DataTable − Each action has its own private datatable, also known as local datatable, which is can also be accessed across actions.
Global DataTable − Each test has one global data sheet that is accessible across actions.
The data sheet can be accessed from the "Data" Tab of QTP as shown below −
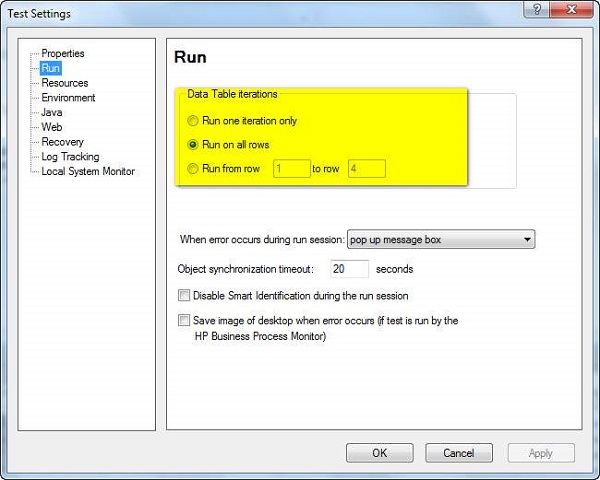
To execute a test case for some specified number of iterations, one can set the iterations of global datatable in the Test Settings dialog, that can be accessed using File → Settings → Run(Tab) as shown below −
Example
For example, if a user wants to parameterize "compound Interest" of http://easycalculation.com/ that can be accessed using http://easycalculation.com/compound-interest.php. The Parameters can be created as shown below. Most of the functionalities of Excel can be used in Data table as well.
DataTable Operations
There are three types of objects to access DataTable. DataTable operations can be well understood by traversing through the following −
| Sr.No. | Object Type & Description |
|---|---|
| 1 | Data Table Methods
Gives detailed information about the data table methods. |
| 2 | DTParameter Object Methods
Gives detailed information about the DTParameter methods. |
| 3 | DTSheet Object Methods
Gives detailed information about the DTSheet methods. |
QTP - CheckPoints
Checkpoints, as the name says it all, refer to a validation point that compares the current value of specified properties or current state of an object with the expected value, which can be inserted at any point of time in the script.
Types of Checkpoints
| Sr.No. | Type & Description |
|---|---|
| 1 | Standard Checkpoint Verifies the property values of an object in application under test and supported by all add-in environments. |
| 2 | Bitmap Checkpoint Verifies an area of your application as a bitmap |
| 3 | File Content Checkpoint Verifies the text in a dynamically generated or accessed file such as .txt,.pdf |
| 4 | Table Checkpoint Verifies the information within a table. Not all environments are supported. |
| 5 | Text Checkpoint Verify if the text that is displayed within a defined area in a Windows-based application, according to specified criteria. |
| 6 | Text Area Checkpoint Verifies if the text string is displayed within a defined area in a Windows-based application, according to specified criteria. |
| 7 | Accessibility Checkpoint Verifies the page and reports the areas of the Web site that may not conform to the World Wide Web Consortium (W3C) Web Content Accessibility Guidelines |
| 8 | Page Checkpoint Verifies the characteristics of a Web page. It can also check for broken links. |
| 9 | Database Checkpoint Verifies the contents of a database accessed by the application under test. |
| 10 | XML Checkpoint Verifies the content of the .xml documents or .xml documents in Web pages and frames. |
Inserting CheckPoint
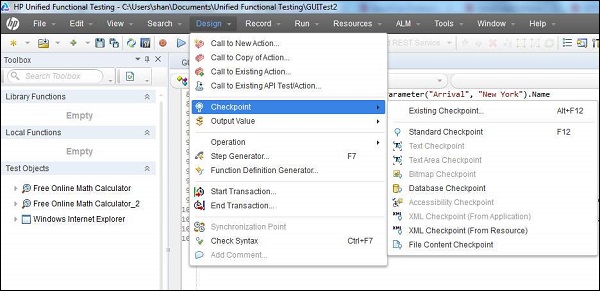
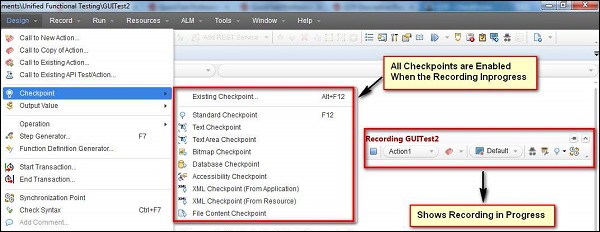
When the user wants to insert a checkpoint, one has to ensure that most of the checkpoints are supported during the recording sessions only. Once the user stops recording, checkpoints are not enabled.
Given below is the checkpoint menu, when the user is NOT in the recording mode.
Given below is the checkpoint menu, when the user is in the recording mode.
Example
The checkpoints are added for the application under test - "http://easycalculation.com/"
' 1. Inserted Standard Checkpoint
Status = Browser("Math Calculator").Page("Math
   Calculator").Link("Numbers").Check CheckPoint("Numbers")

If Status Then
   print "Checkpoint Passed"
Else
   Print "Checkpoint Failed"
End if

' 2. Inserted BitMap Checkpoint
imgchkpoint = Browser("Math Calculator").Page("Math
   Calculator").Image("French").Check CheckPoint("French")

If imgchkpoint Then
   print "Checkpoint Passed"
Else
   Print "Checkpoint Failed"
End if
Viewing Checkpoint Properties
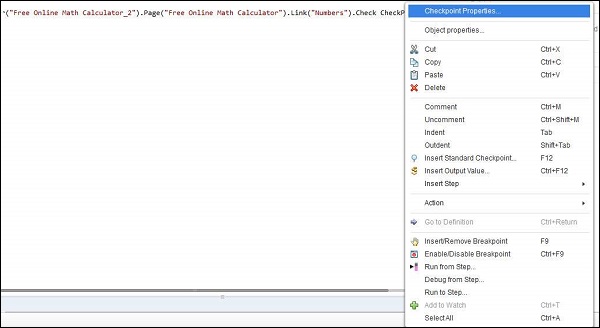
After inserting, in case a tester want to change the values, we can do so by right clicking on the keyword 'checkpoint' of the script and navigating to "Checkpoint Properties" as shown below −
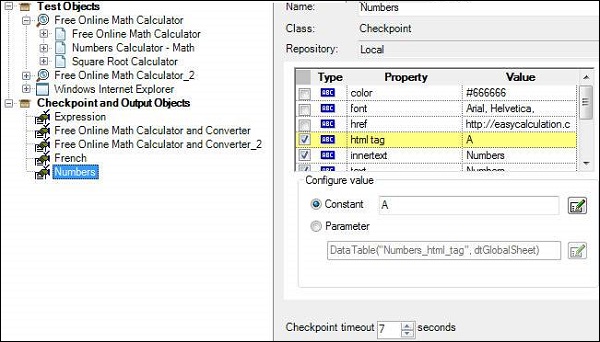
You can locate the same checkpoints in object repository, as well, as shown below. It exactly shows what type of checkpoint is used and what are the expected values, and time out values.
QTP - Synchronization
Synchronization point is the time interface between Tool and Application under test. Synchronization point is a feature to specify the delay time between two steps of the test script.
For example, clicking on a link may load the page is 1 second, sometimes 5 seconds or even it may take 10 seconds to load it completely. It depends on various factors such as the application-server response time, network bandwidth, and client system capabilities.
If the time is varying then the script will fail, unless the tester handles these time differences intelligently.
Ways to Insert Sync Point
- WaitProperty
- Exist
- Wait
- Sync(only for web based apps)
- Inserting QTP Inbuilt Synchronization points.
Let us say, we need to insert a sync point between clicking on "numbers" link and clicking on "simple Interest" calculator in "www.easycalculation.com". We will now take a look at all the five ways to insert sync point for the above scenario.
Method 1 − WaitProperty
WaitProperty is a method that takes the property name, Value and Timeout value as input to perform the sync. It is a dynamic wait and hence, this option is encouraged.
' Method 1 - WaitProperty with 25 seconds
Dim obj
Set obj = Browser("Math Calculator").Page("Math Calculator")
obj.Link("Numbers").Click

obj.Link("Simple Interest").WaitProperty "text", "Simple Interest",25000
obj.Link("Simple Interest").Click
Method 2 − Exist
Exist is a method that takes the Timeout value as input to perform the sync. Again, it is a dynamic wait and hence this option is encouraged.
' Method 2 : Exist Timeout - 30 Seconds
Dim obj
Set obj = Browser("Math Calculator").Page("Math Calculator")
obj.Link("Numbers").Click

If obj.Link("Simple Interest").Exist(30) Then
   obj.Link("Simple Interest").Click

Else
   Print "Link NOT Available"
End IF
Method 3 − Wait
Wait is a hardcoded sync point, which waits independent of the event happened or NOT. Hence, usage of Wait is discouraged and can be used for shorter wait time such as 1 or 2 seconds.
' Method 3 : Wait Timeout - 30 Seconds
Dim obj
Set obj = Browser("Math Calculator").Page("Math Calculator")
obj.Link("Numbers").Click
wait(30)
Browser("Math Calculator").Page("Math Calculator").Link("Simple Interest").Click
Method 4 − Sync Method
Sync Method can be used only for web applications where there is always a lag between page loads.
' Method 4 :
Dim obj
Set obj = Browser("Math Calculator").Page("Math Calculator")
obj.Link("Numbers").Click

Browser("Math Calculator").Sync
Browser("Math Calculator").Page("Math Calculator").Link("Simple Interest").Click
Method 5 − Inserting QTP Inbuilt Synchronization points
Step 1 − Get into Recording Mode. This option would be disabled if the user is NOT in Recording Mode.
Step 2 − Go to "Design" → "Synchronization Point".
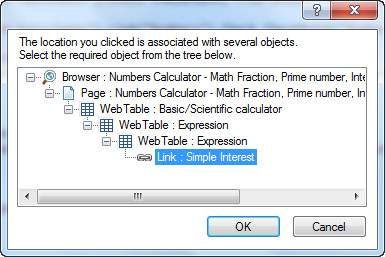
Step 3 − We need to select the object, which we want to be the Sync Point. After selecting the object, object window opens as shown below −
Step 4 − Click OK; the "Add Synchronization Window" opens. Select the Property, Value and Time out value and click OK as shown below −
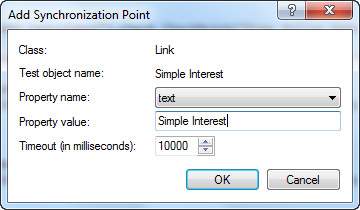
Step 5 − The script would be generated as shown below, which is the same as that of the WaitProperty(Method 1) that we had already discussed −
Browser("Math Calculator").Page("Math Calculator").Link("Numbers").Click

Browser("Math Calculator").Page("Math Calculator").Link("Simple
   Interest").WaitProperty "text", "Simple Interest", 10000
Default Synchronization
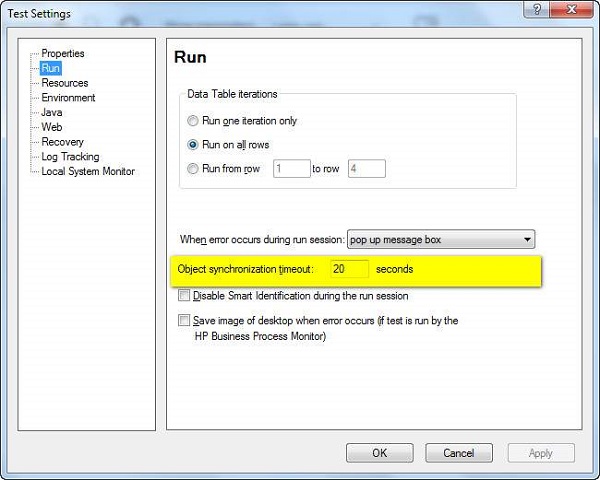
When the user has not used any of the above sync methods, still QTP has an in-built Object synchronization timeout which can be adjusted by the user.
Navigate to "File" >> "Settings" >> Run Tab >> Object Synchronization Time out as shown below.
QTP - Smart Identification
Sometimes, QTP is unable to find any object that matches the recognized object description or it may find more than one object that fits the description, then QTP ignores the recognized description and uses the Smart Identification mechanism to recognize the object.
QTP's Smart Identification uses two types of properties −
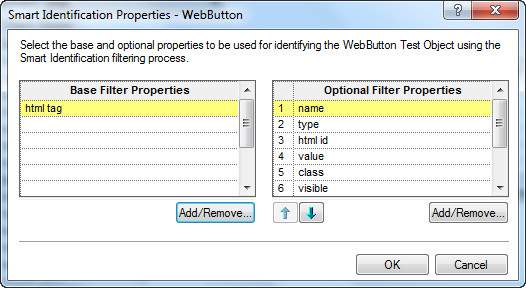
Base Filter Properties − The basic properties of a particular test object class whose values cannot be changed without changing the essence of the original object.
Optional Filter Properties − Other properties also assist in identifying the objects of a particular class whose properties are unlikely to change often but can be ignored if they are no longer applicable.
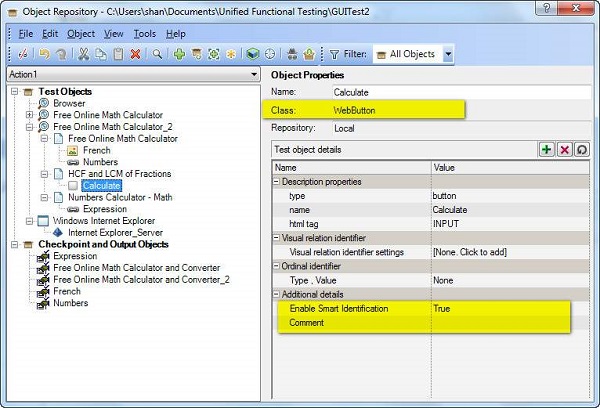
Enabling Smart Identification for an Object
Step 1 − Navigate to "Tools" → "Object Identification". Object Identification dialog opens.
Step 2 − Choose the Environment, Object Class and Turn ON "Enable Smart Identification" as shown below −
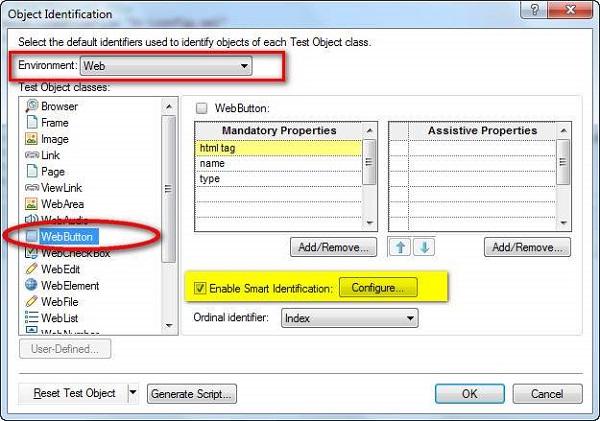
Step 3 − Click Configure and choose the base and Optional Filter Properties.
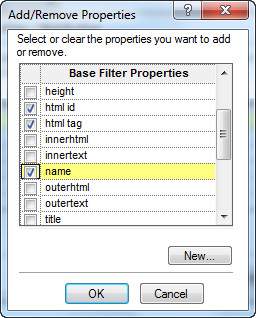
Step 4 − Add Properties in Base Properties apart from the default one and also add/remove Optional Filter Properties. Please note that same properties cannot be a part of both Mandatory and Assistive Properties and click "OK".
Step 5 − Verify if the Smart Identification is enabled after adding object of that type in the Object Repository. Smart Identification is set to TRUE. We can also make it False in case we do not want to enable Smart Identification.
Step 6 − We can even disable a test Level by applying at test script level under "Settings" of "File" Menu as shown below −
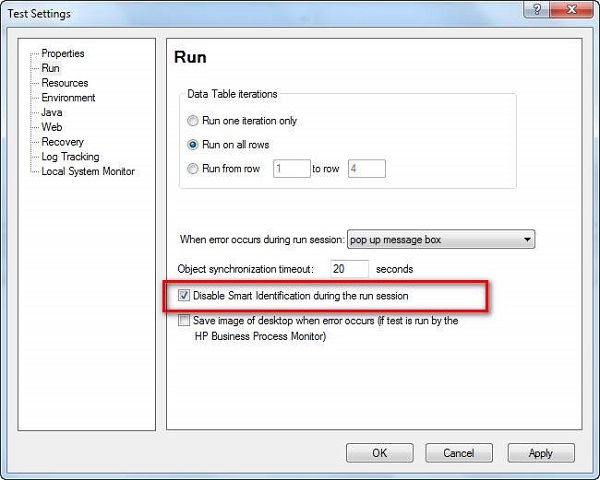
Step 7 − If the Smart Identification is disabled as per Step# 6 then it will not apply smart identification for any object during the script execution.
Step 8 − In case the objects are added with Smart Identification as Off, QTP will not use Smart Identification for recognizing in future, even though we have enabled it later.
QTP - Debugging
Debugging, in automation testing context, is a systematic process of spotting and fixing the coding issues in the automation script so that the script will be more robust and can spot the defects in the application.
There are various ways to perform debugging using break points in QTP. Break points can be inserted just by pressing "F9" or by using the Menu option "Run" → "Inserting/Removing Break Point".
After Inserting the Break point, the "Red Colored" Dot and the line will be highlighted in RED as shown below −
| Method | ShortCut | Description |
|---|---|---|
| Step Into | F11 | Used to execute each and every Step. Steps into the Function/Action and executes line by line. It pauses on each line after execution. |
| Step Over | F10 | Used to Step over the Function. Step Over runs only the current step in the active document. |
| Step Out | Shift+F11 | After Step Into the function, you can use the Step Out command. Step Out continues the run to the end of the function and then pauses the run session at the next line. |
Options in Break Point
Various Options in Break Point can be accessed by Navigating through the 'Run' Menu.
| Sr.No. | ShortCut & Description |
|---|---|
| 1 | F9 Insert/Remove BreakPoint |
| 2 | Ctrl+F9 Enable/Disable BreakPoint |
| 3 | Ctrl+Shift+F9 Clear All BreakPoint |
| 4 | Use Only Menu Enable/Disable All BreakPoints |
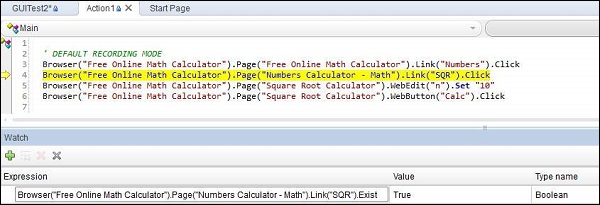
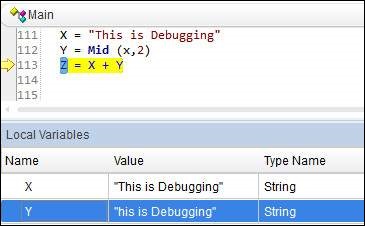
Debugging Pane
The following are the panes in the debugging window −

Output − This Tab displays all the Output of the Print Statements.
Watch − This Tab displays the Boolean output of the Given Expression.
LocalVariables − This Tab displays the Output of the Local Variables.
Example
The Watch Pane shows the output expression as shown below −
The Local Variables Pane shows the values held by the local variables as shown below −
QTP - Error Handling
There are various ways of handling errors in QTP. There are three possible types of errors, one would encounter, while working with QTP. They are −
- Syntax Errors
- Logical Errors
- Run Time Errors
Error Types
Syntax Errors
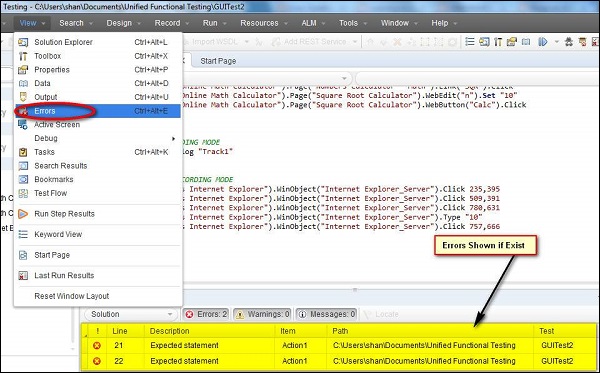
Syntax errors are the typos or a piece of the code that does not confirm with the VBscripting language grammar. Syntax errors occur at the time of compilation of code and cannot be executed until the errors are fixed.
To verify the syntax, use the keyboard shortcut Ctrl+F7 and the result is displayed as shown below. If the window is not displayed one can navigate to "View" → "Errors".
Logical Errors
If the script is syntactically correct but it produces unexpected results, then it is known as a Logical error. Logical error usually does not interrupt the execution but produces incorrect results. Logical errors could occur due to variety of reasons, viz- wrong assumptions or misunderstandings of the requirement and sometimes incorrect program logics (using do-while instead of do-Until) or Infinite Loops.
One of the ways to detect a logical error is to perform peer reviews and also verify the QTP output file/result file to ensure that the tool has performed the way it was supposed to do.
RunTime Errors
As the name states, this kind of error happens during Run Time. The reason for such kind of errors is that the script trying to perform something is unable to do so and the script usually stops, as it is unable to continue with the execution. Classic examples for Run Time Errors are −
- File NOT found but the script trying to read the file
- Object NOT found but the script is trying to act on that particular object
- Dividing a number by Zero
- Array Index out of bounds while accessing array elements
Handling Run-Time Errors
There are various ways to handle errors in the code.
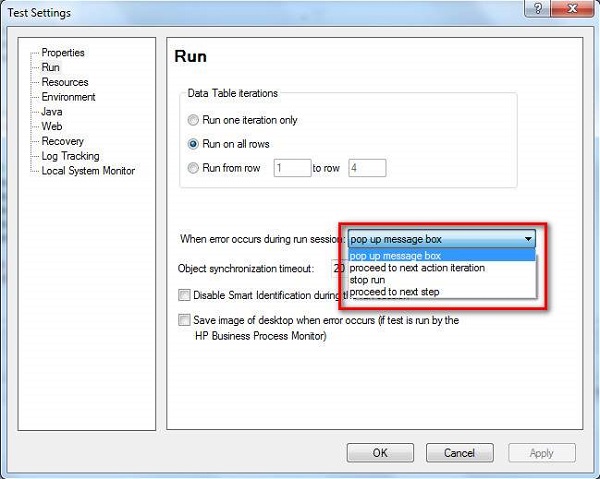
1. Using Test Settings − Error handling can be defined the Test Settings by Navigating to "File" >> "Settings" >> "Run" Tab as shown below. We can select any of the specified settings and click "OK".
2. Using On Error Statement − The ‘On Error’ statement is used to notify the VBScript engine of intentions to handle the run-time errors by a tester, rather than allowing the VBScript engine to display error messages that are not user-friendly.
On Error Resume Next − On Error Resume Next informs the VBScript engine to process executing the next line of code when an error is encountered.
On error Goto 0 − This helps the testers to turn off the error handling.
3. Using Err Object − Error object is an in-built object within VBScript that captures the run-time error number and error description with which we are able to debug the code easily.
Err.Number − The Number property returns or sets a numeric value specifying an error. If Err.Number value is 0 then No error has occurred.
Err.Description − The Description property returns or sets a brief description about an error.
Err.Clear − The Clear method resets the Err object and clears all the previous values associated with it.
Example
'Call  the function to Add two Numbers Call Addition(num1,num2)

Function Addition(a,b)
   On error resume next
      If NOT IsNumeric(a) or IsNumeric(b) Then
         Print "Error number is  " &  err.number & " and description is :
            " &  err.description
         Err.Clear
         Exit Function
      End If
   Addition = a+b

   'disables error handling
   On Error Goto 0
End function
4. Using Exit Statement − Exit Statements can be used along with Err object to exit from a test or action or iteration based on the Err.Number value. Let us see each one of those Exit statements in detail.
ExitTest − Exits from the entire QTP test, no matter what the run-time iteration settings are.
ExitAction − Exits the current action.
ExitActionIteration − Exits the current iteration of the action.
ExitTestIteration − Exits the current iteration of the QTP test and proceeds to the next iteration.
5. Recovery Scenarios − Upon encountering an error, recovery scenarios are triggered based on certain conditions and it is dealt in detail in a separate chapter.
6. Reporter Object − Reporter Object helps us to report an event to the run results. It helps us to identify if the concerned action/step is pass/fail.
'Syntax: Reporter.ReportEventEventStatus, ReportStepName, Details,
[ImageFilePath]

'Example
Reporter.ReportEvent micFail, "Login", "User is unable to Login."
QTP - Recovery Scenarios
Recovery Scenarios
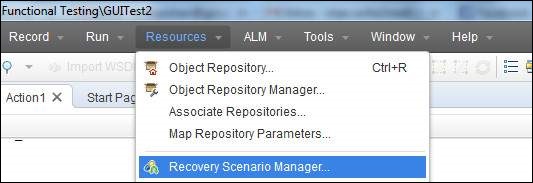
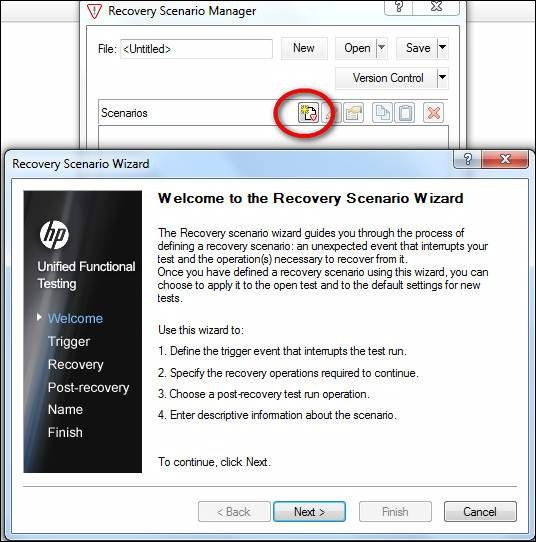
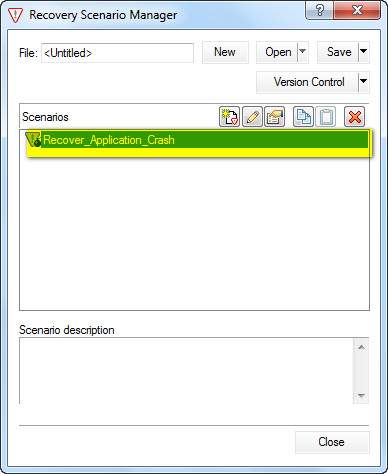
While executing the QTP scripts, we might get some unexpected errors. In order to recover the tests and continue executing the rest of the script from these unexpected errors, Recovery Scenarios are used. The Recovery Scenario Manager can be accessed by Navigating to "Resources" → Recovery Scenario Manager as shown below −
Steps to Create Recovery Scenario
Step 1 − Click "New" Recovery Scenario button; the Recovery Scenario Wizard opens as shown below −
Step 2 − Choose the Trigger Event. It corresponds to event, which can arise in any of the following four events −
- Pop-Up Window
- Object State
- Test Run Error
- Application Crash
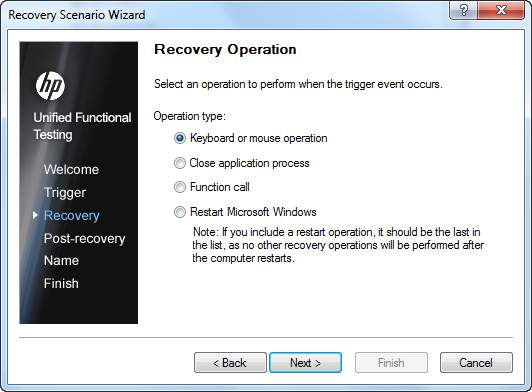
Step 3 − The Recovery Operations Window opens. Recovery Operation can perform any of the following Operation as shown in the screenshot below −
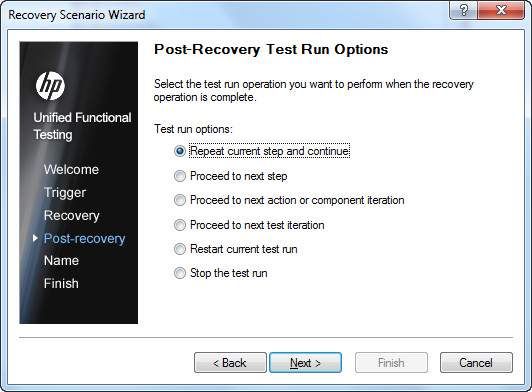
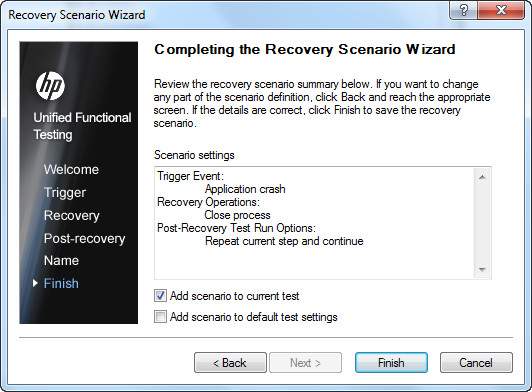
Step 4 − After specifying the appropriate Recovery Operation, we need to specify the Post Recovery Operation as well, as shown below −
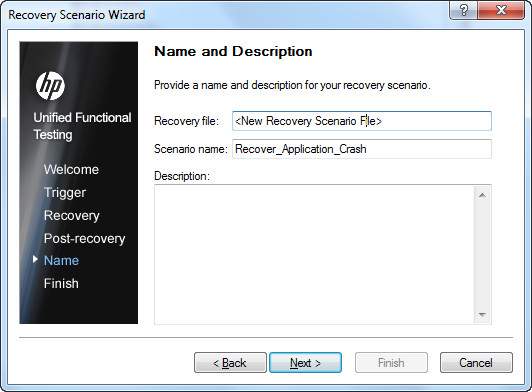
Step 5 − After specifying the Post Recovery Operation, the recovery scenario should be named and added to the Test so that it can be activated.
Step 6 − The Recovery Scenario creation is complete and needs to be mapped to the current Test by checking the option "Add Scenario to the current Test" and click "Finish".
Step 7 − The Added Recovery Scenario will be as shown below and click the "Close" Button to continue.
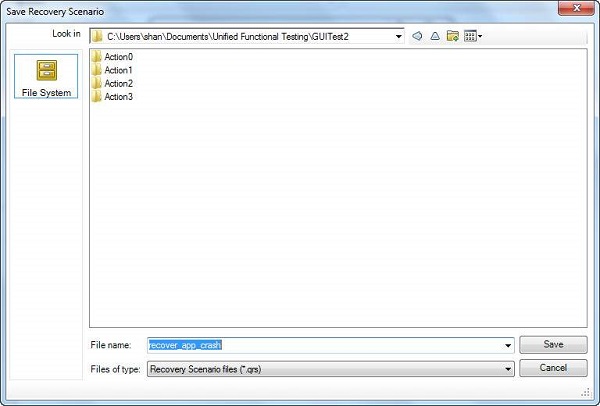
Step 8 − After clicking the Close button, QTP would prompt the user to save the created Recovery scenario. It will be saved with the extension .qrs and the wizard would close.
Verification
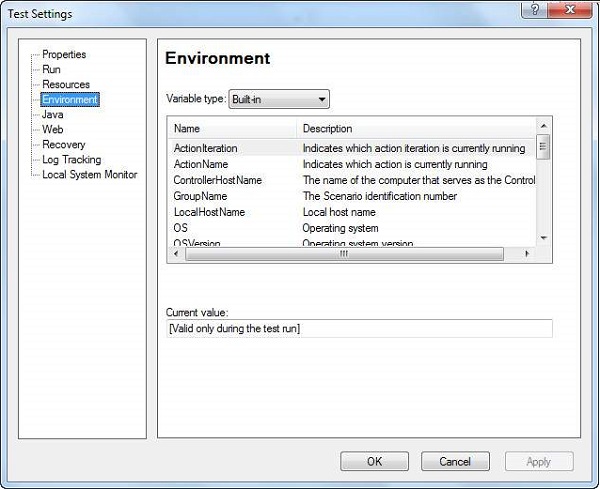
The Created Recovery Scenario should be a part of the test now and can be verified by navigating to "File" → "Settings" → "Recovery" Tab.
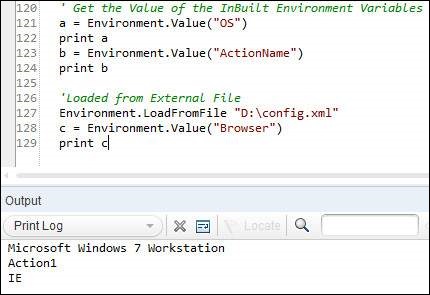
QTP - Environment Variables
QTP environment variables are special types of variables that can be accessed by all actions, function libraries, and recovery scenarios. There are in-built environment variables for Windows that are available to all the applications running on that particular system, but QTP environment variables are only available to that particular test script during run-time.
Types of Environment Variables
Built-in Environment Variables − provides a range of environment parameters that can provide information such as test name, action name, the test path, local host name, the operating system name, type and its version. The Environment Variable names can be accessed by navigating to "File" → "Test Settings" → "Environment" Tab.
User defined Internal − User defined variables can be saved by selecting "User Defined" in the Environment Tab Window. The "+" button is clicked to enter Parameter Name and Value as shown below −
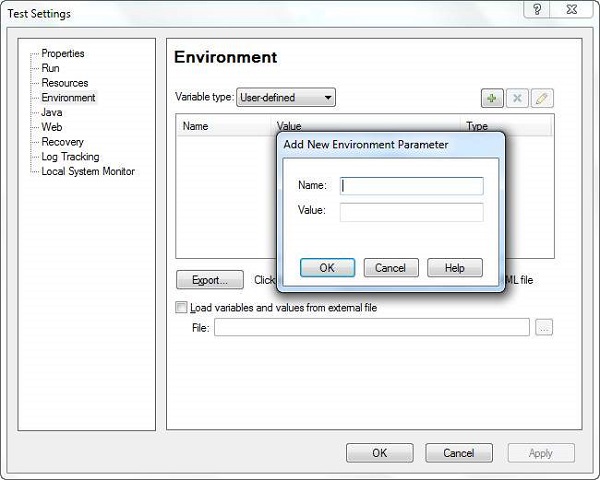
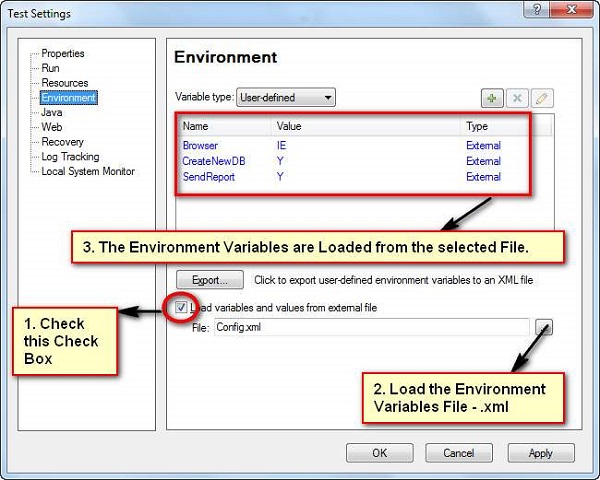
User Defined External − User Defined Variables can be stored in an external file as a .xml file and can be loaded into the test as shown in the figure given below. It can also be loaded dynamically during run-time as explained below in one of the examples.
Environment Variables – Supported Methods
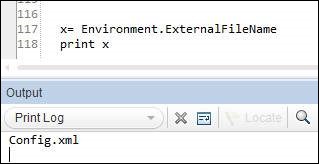
1. ExternalFileName Property − Returns the name of the loaded external environment variable file specified in the Environment tab of the Test Settings dialog box. If no external environment variable file is loaded, this property returns an empty string.
x = Environment.ExternalFileName
print x
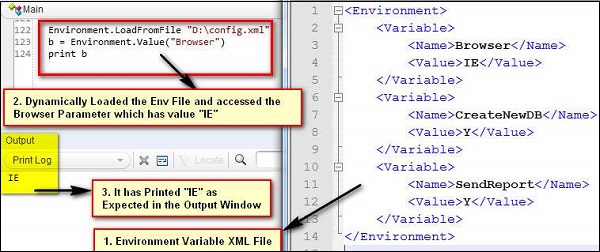
2. LoadFromFile Method − Loads the specified environment variable file (.xml) dynamically during run time. When using this method, the environment variables need not be added manually into the Environment Tab.
Environment.LoadFromFile "D:\config.xml"
b = Environment.Value("Browser")
print b
3. Value Property − Retrieves the value of environment variables. We can also set the value of user-defined internal environment variables using this property.
' Get the Value of the InBuilt Environment Variables
a = Environment.Value("OS")
print a
b = Environment.Value("ActionName")
print b

'Loaded from External File
Environment.LoadFromFile "D:\config.xml"
c = Environment.Value("Browser")
print c
QTP - Library Files
In order to modularize the script, library files are added to the QTP Script. It contains variable declaration, Functions, Classes etc. They enable reusability that can be shared across test scripts. They are saved with an extenstion .vbs or .qfl
A new Library file can be created by navigating to "File" >> "Function Library".
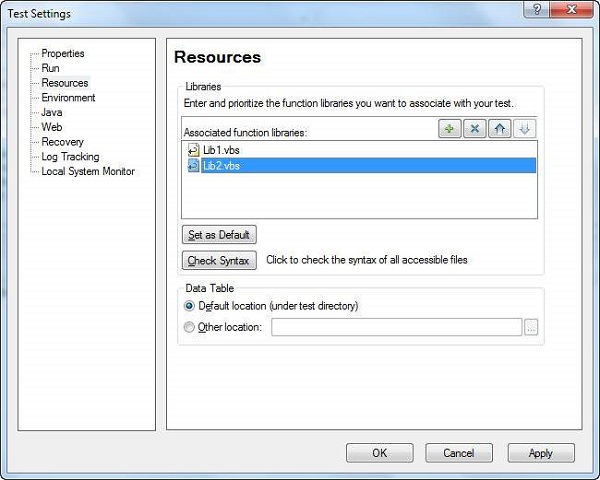
Associating Function Libraries
Method 1 − By using "File" > "Settings" > Resources > Associate Function Library option. Click the "+" button to add Function Library file and add it using the actual path or relative path as shown below −
Method 2 − Using ExecuteFile method.
'Syntax : ExecuteFile(Filepath)
ExecuteFile "C:\lib1.vbs"
ExecuteFile "C:\lib2.vbs"
Method 3 − Using LoadFunctionLibrary Method.
'Syntax : LoadFunctionLibrary(Filepath)
LoadFunctionLibrary "C:\lib1.vbs"
LoadFunctionLibrary "C:\lib2.vbs"
Method 4 − Automation Object Model(AOM) - It is a mechanism, using which, we can control various QTP operations outside QTP. Using AOM, we can launch QTP, Open the Test, Associate Function Libraries etc. The following VbScript should be saved with Extension .vbs and upon executing the same, QTP will be launched and test would start executing. AOM will be discussed in detail in the later chapters.
'Launch QTP
Set objQTP = CreateObject("QuickTest.Application")
objQTP.Launch
objQTP.Visible = True

'Open the test
objQTP.Open "D:\GUITest2", False, False
Set objLib = objQTP.Test.Settings.Resources.Libraries

'Associate Function Library if NOT associated already.
If objLib.Find("C:\lib1.vbs") = -1 Then
  objLib.Add "C:\lib1.vbs", 1
End
QTP - Automated Testing Results
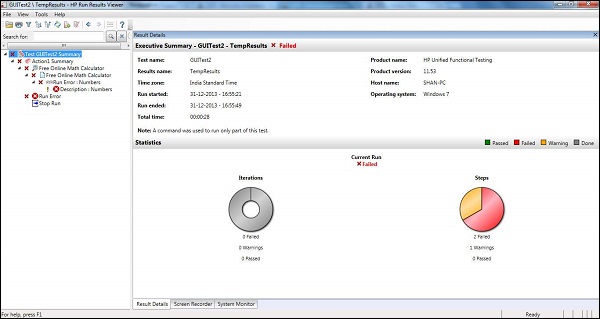
Test Results
The Test Results Window gives us sufficient information to show the steps passed, failed etc. Results window opens automatically after the execution of the test (as per default settings). The following information is displayed −
- Steps Passed
- Steps Failed
- Environment Parameters
- Graphical Statistics
Operations performed in Test Results
Converting Results to HTML
In the Results Viewer window, navigate to "File" → "Export to File". Export Run Results dialog box opens as shown below −
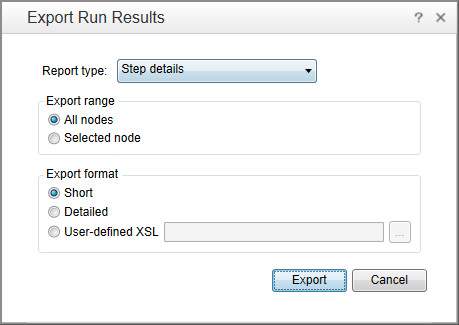
We can choose what type of report is to be exported. It can be short results, detailed results or even, we can select nodes. After selecting the File Name and exporting it, the file is saved as .HTML File
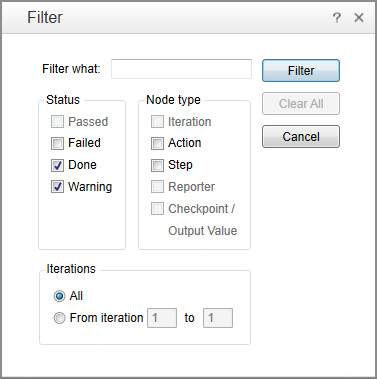
Filtering the Results
Results can be filtered based on Status, Node Type, and Iterations. It can be accessed by using the Filter button in the "Test Results Window".
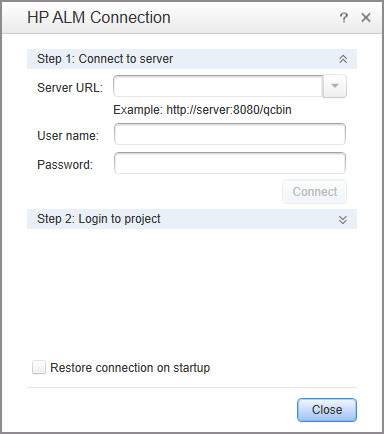
Raising Defects
Defects can be logged into QC directly from the Test Results Window pane by accessing "Tools" → "Add Defect" which open's the connection to ALM as shown below −
Test Results
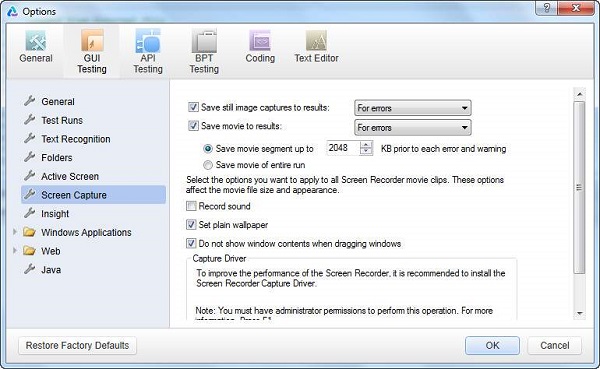
The Automatic Test Results Window can be configured under "Tools" → "Options" → "Run Sessions" Tab. We can turn it OFF, if required, and also, we can switch ON "Automatically Export Results when session Ends".

The screenshot or the movie can be recorded based on the settings. The same can be configured under "Tools" → "Options" → "Screen Capture" Tab. We can save the screenshot or movies based on the following three conditions −
- For Errors
- Always
- For Errors and Warnings
QTP - Working with GUI Objects
There are various GUI objects, with which QTP interacts, during the script execution. Hence, it is important to know the basic methods for the key GUI objects using which we will be able to work on it effectively.
Working with Text Box
Following are the methods using which we access text box during Run Time −
Set − Helps the tester to Set Values into the Text Box
Click − Clicks on the Text Box
SetSecure − Used to set the text in the password boxes securely
WaitProperty − Waits Till the Property value becomes true
Exist − Checks for the existence of the Text Box
GetROProperty("text") − Gets the Value of the Text Box
GetROProperty("Visible") − Returns a Boolean value if visible
Example
Browser("Math Calculator").Sync
Set Obj = Browser("Math Calculator").Page("SQR Calc").WebEdit("n")

'Clicks on the Text Box
Obj.Click

'Verify if the Object Exist - Returns Boolean value
a = obj.Exist
print a

'Set the value
obj.Set "10000" : wait(2)

'Get the Runtime Object Property - Value of the Text Box
val = obj.GetROProperty("value")
print val

'Get the Run Time Object Property - Visiblility - Returns Boolean Value
x = Obj.GetROProperty("visible")
print x
Working with Check Box
Following are some of the key methods with which one can work with Check Box −
Set − Helps the tester to Set the checkbox value "ON" or "OFF"
Click − Clicks on the check Box. Even checks ON or OFF but user will not be sure about the status
WaitProperty − Waits Till the Property value becomes true
Exist − Checks for the existence of the Check Box
GetROProperty("name") − Gets the Name of the check Box
GetROProperty("Visible") − Returns a Boolean value if visible
Example
'To Check the Check Box
Set Obj = Browser("Calculator").Page("Gmail").WebCheckBox("PersistentCookie")
Obj.Set "ON"

'To UnCheck the Check Box
Obj.Set "OFF"

'Verifies the Existance of the Check box and returns Boolean Value
val = Obj.Exist
print val

'Fetches the Name of the CheckBox
a = Obj.GetROProperty("name")
print a

'Verifies the visible property and returns the boolean value.
x = Obj.GetROProperty("visible")
print x
Working with Radio Button
Following are some of the key methods with which one can work with Radio Button −
Select(RadioButtonName) − Helps the tester to Set the Radio Box "ON"
Click − Clicks on the Radio Button. Even Radio Button ON or OFF but tester cannot get the status
WaitProperty − Waits Till the Property value becomes true
Exist − Checks for the existence of the Radio Button
GetROProperty("name") − Gets the Name of the Radio Button
GetROProperty("Visible") − Returns a Boolean value if visible
Example
'Select the Radio Button by name "YES"
Set Obj = Browser("Calculator").Page("Forms").WebRadioGroup("group1")
Obj.Select("Yes")

'Verifies the Existance of the Radio Button and returns Boolean Value
val = Obj.Exist
print val

'Returns the Outerhtml of the Radio Button
txt = Obj.GetROProperty("outerhtml")
print text

'Returns the boolean value if Radio button is Visible.
vis = Obj.GetROProperty("visible")
print vis
Working with Combo Box
Following are some of the key methods with which one can work with Combo Box −
Select(Value) − Helps the tester to Select the value from the ComboBox
Click − Clicks on the object
WaitProperty − Waits Till the Property value becomes true
Exist − Checks for the existence of the Combo Box
GetROProperty("Text") − Gets the Selected Value of the Combo Box
GetROProperty("all items") − Returns all the items in the combo Box
GetROProperty("items count") − Returns the number of items in the combo Box
Example
'Get the List of all the Items from the ComboBox
Set ObjList = Browser("Math Calculator").Page("Statistics").WebList("class")
x = ObjList.GetROProperty("all items")
print x

'Get the Number of Items from the Combo Box
y = ObjList.GetROProperty("items count")
print y

'Get the text value of the Selected Item
z = ObjList.GetROProperty("text")
print z
Working with Buttons
Following are some of the key methods with which one can work with Buttons −
Click − Clicks on the Button
WaitProperty − Waits Till the Property value becomes true
Exist − Checks for the existence of the Button
GetROProperty("Name") − Gets the Name of the Button
GetROProperty("Disabled") − Returns a Boolean value if enabled/disabled
Example
'To Perform a Click on the Button
Set obj_Button = Browser("Math Calculator").Page("SQR").WebButton("Calc")
obj_Button.Click

'To Perform a Middle Click on the Button
obj_Button.MiddleClick

'To check if the button is enabled or disabled.Returns Boolean Value
x = obj_Button.GetROProperty("disabled")
print x

'To fetch the Name of the Button
y = obj_Button.GetROProperty("name")
print y
Working with webTables
In Today's web based application, webTables have become very common and testers need to understand how WebTables work and how to perform an action on webTables. This topic will help you to work with the webTables effectively.
| Sr.No. | Statement & Description |
|---|---|
| 1 | if statement An if statement consists of a boolean expression followed by one or more statements. |
| 2 | if...else statement An if else statement consists of a boolean expression followed by one or more statements. If the condition is True. The statements under if statements are execued. If the condition is false. Else part of the script is Executed |
| 3 | if..elseif...else statement An if statement followed by one or more Elseif statements, that consists of boolean expressions and then followed by an optional else statement, which executes when all the condition becomes false. |
| 4 | nested if statements An if or elseif statement inside another if or elseif statement(s). |
| 5 | switch statement A switch statement allows a variable to be tested for equally aganist a list of values. |
html id − If the table has an id tag then it is best to make use of this property.
innerText − Heading of the Table.
sourceIndex − Fetches the Source Index of the Table
ChildItemCount − Gets the number of ChildItems present in specified Row
RowCount − Gets the number of Rows in the Table
ColumnCount − Gets the number of Columns in the Table
GetcellData − Gets the Value of the Cell based on the column and Row Index
Example
Browser("Tutorials Point").Sync
' WebTable
Obj = Browser("Tutorials Point").Page("VBScript Decisions").WebTable("Statement")
' Fetch RowCount
x = Obj.RowCount
print x

' Fetch ColumnCount
y = Obj.ColumnCount(1)
print y

' Print the Cell Data of the Table
For i = 1 To x Step 1

   For j = 1 To y Step 1
      z = Obj.GetCellData(i,j)
      print "Row ID : " & i & " Column ID : " & j & " Value : " & z
   Next
Next

'Fetch the Child Item count of Type Link in a particular Cell
z = Obj.ChildItemCount(2,1,"Link")
print z
QTP - Virtual Objects
What are Virtual Objects?
Sometimes, an application under test may contain standard window object but are not recognized by QTP. Under these circumstances, objects can be defined as virtual object(VO) of type button, link etc. so that user actions can be simulated on the virtual objects during execution.
Example
Let us say we are automating a scenario in Microsoft Word. I activated MS word application and I click on any icon in the ribbon. For example, on the Ribbon, Insert tab is clicked and then the user clicks the "Picture" button. A button is recognized as WinObject; hence, importance of virtual objects is pronounced.
Window("Microsoft Word").WinObject("Ribbon").Click 145,45
Window("Microsoft Word").WinObject("Ribbon").WinObject("Picture...").Click
170,104
Creating a Virtual Object
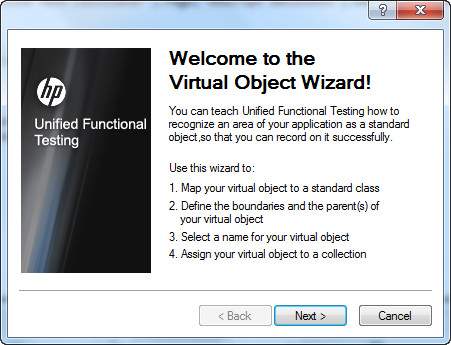
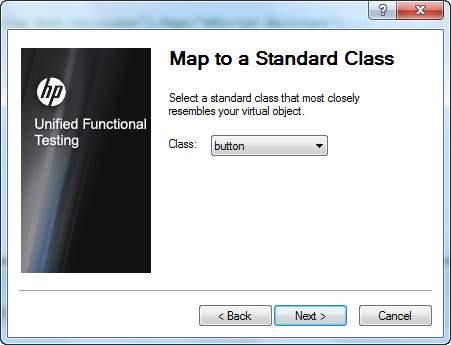
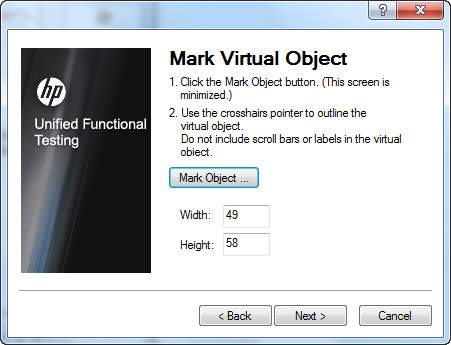
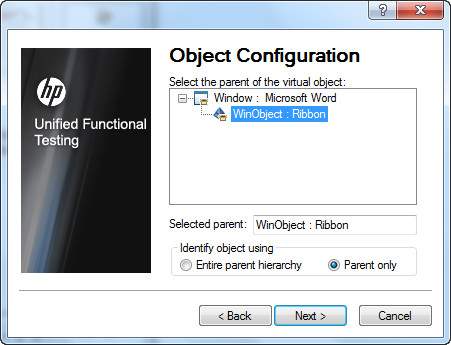
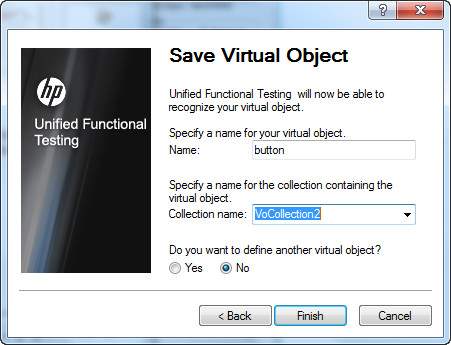
Step 1 − In such scenarios, virtual Objects are created using Virtual Object Manager or New Virtual Object from "Tools" >> "Virtual Object" >> "New Virtual Object" and click the "Next" button.
Step 2 − Map the Object against the Class Type and click "Next".
Step 3 − Click "Mark Object" Button. A cross hair cursor would appear and mark the object that you would like to map and click "Next".
Step 4 − Select the parent of the Virtual object and click "Next".
Step 5 − Name the collection in which you would like to store the virtual object and click "Finish".
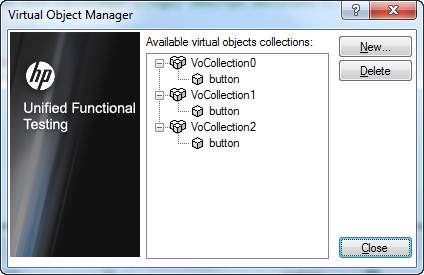
Virtual Object Manager
Virtual object Manager manages the collections of Virtual objects. Testers can add or Delete the Virtual Objects from the Virtual Object manager.
Navigation to Virtual object Manager : "Tools" >> "Virtual Object Manager" as shown below −
Using Virtual Objects
After creating the Virtual Objects, the created object can be used as shown below −
Window("Microsoft Word").WinObject("Ribbon").VirtualButton("button").Click
Virtual Object Limitations
QTP does not support virtual objects for analog or low-level recording.
Checkpoints cannot be added on Virtual Objects.
Virtual Objects are not controlled by Object Repository.
Though we map an object to a particular class (button or List), all the methods of the native objects are not supported by Virtual objects.
Object Spy cannot be used on Virtual Object.
The test execution will fail if the screen resolution changes as the co-ordinates change.
Application Window should be of same screen size so that Virtual objects are captured correctly.
QTP - Accessing Databases
As such, QTP does not provide any built-in support to connect to database, however using VBScript testers will be able to connect and interact with databases using ADODB objects.
ADODB has 4 properties or methods with which we will be able to work with the databases. They are −
ADODB.Connection − Used to establish a connection to the Database
ADODB.Command − Used to execute a SQL command(Queries or Stored Procedures)
ADODB.Fields − Used to fetch a particular column from a record set after executing a query/stored proc
ADODB.Recordset − Used to fetch data from a database
How to connect to Database?
Databases can be connected using Connection strings. Each database differs in the way we connect to them. However, the connection strings can be built with the help of www.connectionstrings.com
Let us see how to connect to the database with the following parameters −
Database Type − MSSQL SERVER
Server Name − SQLEXPRESS
Database Name − Trial
User Id − sa
password − Password123
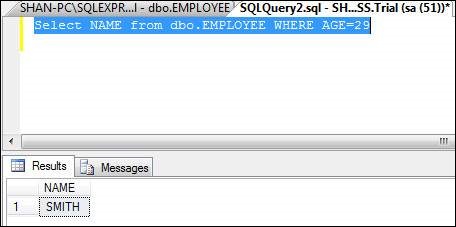
The output of the Query is shown in the SQL Server Management Studio as follows −
Dim objConnection
'Set Adodb Connection Object
Set objConnection = CreateObject("ADODB.Connection")
Dim objRecordSet
'Create RecordSet Object
Set objRecordSet = CreateObject("ADODB.Recordset")
Dim DBQuery 'Query to be Executed
DBQuery = "Select NAME from dbo.EMPLOYEE where AGE = 29"
'Connecting using SQL OLEDB Driver
objConnection.Open "Provider = sqloledb.1;Server =.\SQLEXPRESS;
User Id = sa;Password=Password123;Database = Trial"
'Execute the Query
objRecordSet.Open DBQuery,objConnection
'Return the Result Set
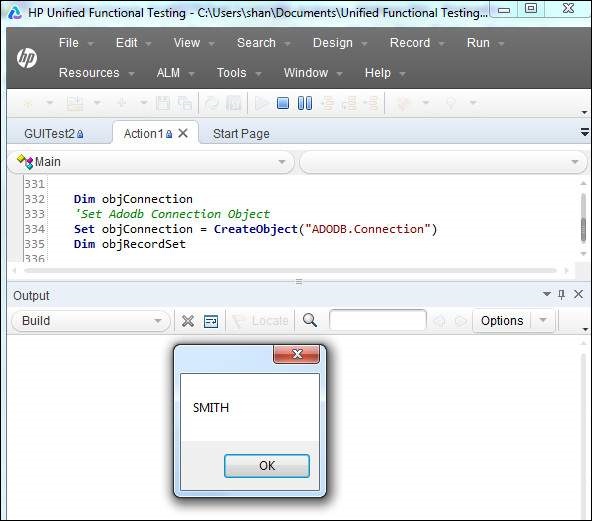
Value = objRecordSet.fields.item(0)
msgbox Value
' Release the Resources
objRecordSet.Close
objConnection.Close
Set objConnection = Nothing
Set objRecordSet = Nothing
Result
On executing the above script, the output is shown in the message box as shown below −
QTP Working with XML
XML is a markup language designed to store data in a format that can be both readable by human and machine. Using XML, data can also be easily exchanged between computer and database systems.
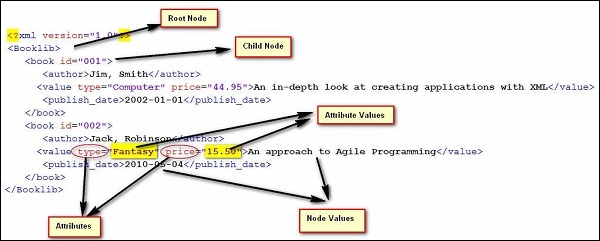
Sample XML and their key elements are represented below −
Accessing XML
Const XMLDataFile = "C:\TestData.xml"
Set xmlDoc = CreateObject("Microsoft.XMLDOM")
xmlDoc.Async = False
xmlDoc.Load(XMLDataFile)

' Getting the number of Nodes (books)
Set nodes = xmlDoc.SelectNodes("/bookstore/book")
Print "Total books: " & nodes.Length    ' Displays 2

' get all titles
Set nodes = xmlDoc.SelectNodes("/Booklib/book/value/text()")

' get their values
For i = 0 To (nodes.Length - 1)
   Title = nodes(i).NodeValue
   Print "Title is" & (i + 1) & ": " & Title
Next
Comparing XML
We can compare two given XMLs −
Dim xmlDoc1
Dim xmlDoc2

' Load the XML Files
Set xmlDoc1 = XMLUtil.CreateXMLFromFile ("C:\File1.xml")
Set xmlDoc2 = XMLUtil.CreateXMLFromFile ("C:\File2.xml")

'Use the compare method of the XML to check if they are equivalent
Comp = xmlDoc1.Compare (xmlDoc1, xmlDoc2)

'Returns 1 if the two files are the same
If Comp = 1 Then
   Msgbox "XML Files are the Same"
Else
   Msgbox "XML Files are Different"
End if
QTP - Descriptive Programming
QTP scripts can execute only if the objects are present in the Object Repository. The descriptions of the Objects are created using Descriptive programming −
When the testers want to perform an operation on an object that is not present in the object repository
When objects in the application are very dynamic in nature.
When the Object Repository grows big, it results in poor Performance as the size of the Object Repository increases.
When the framework is built, such that it has been decided not to use Object Repository at all.
When testers want to perform an action on the application at run-time without having the knowledge of object's unique properties.
Syntax
There are two ways to scripting using Descriptive Programming technique. They are −
- Description Objects
- Description Strings
Description Objects
Script is developed using Description Objects that depend upon the properties used and their corresponding values. Then, these descriptions are used to build the script.
'Creating a description object
Set btncalc = Description.Create()

'Add descriptions and properties
btncalc("type").value = "Button"
btncalc("name").value = "calculate"
btncalc("html tag").value = "INPUT"

' Use the same to script it
Browser("Math Calc").Page("Num Calculator").WebButton(btncalc).Click
Description Strings
The description of the objects is developed using the properties and values as strings as shown below.
Browser("Math Calc").Page("Num Calculator").WebButton("html
tag:=INPUT","type:=Button","name:=calculate").Click
Child Objects
QTP provides the ChildObjects method, which enables us to create a collection of objects. The parent objects precedes ChildObjects.
Dim oDesc
Set oDesc = Description.Create
oDesc("micclass").value = "Link"

'Find all the Links
Set obj = Browser("Math Calc").Page("Math Calc").ChildObjects(oDesc)

Dim i
'obj.Count value has the number of links in the page

For i = 0 to obj.Count - 1
   'get the name of all the links in the page
   x = obj(i).GetROProperty("innerhtml")
   print x
Next
Ordinal Identifiers
Descriptive programming is used to write the script based on ordinal identifiers, which will enable QTP to act on those objects when two or more objects have the same properties.
' Using Location
Dim Obj
Set Obj = Browser("title:=.*google.*").Page("micclass:=Page")
Obj.WebEdit("name:=Test","location:=0").Set "ABC"
Obj.WebEdit("name:=Test","location:=1").Set "123"

' Index
Obj.WebEdit("name:=Test","index:=0").Set "1123"
Obj.WebEdit("name:=Test","index:=1").Set "2222"

' Creation Time
Browser("creationtime:=0").Sync
Browser("creationtime:=1").Sync
Browser("creationtime:=2").Sync
QTP - Automation Object Model
QTP itself can be automated using the COM interface that is provided by HP-QTP. Automation object model is a set of objects, methods, and properties that helps the testers to control the configuration settings and execute the scripts using the QTP interface. The Key Configurations/actions that can be controlled (but not limited to) are listed below −
- Loads all the required add-ins for a test
- Makes QTP visible while execution
- Opens the Test using the specified location
- Associates Function Libraries
- Specifies the Common Object Sync Time out
- Start and End Iteration
- Enable/Disable Smart Identification
- On Error Settings
- Data Table Path
- Recovery Scenario Settings
- Log Tracking Settings
QTP 11.5x provides an exclusive documentation on Automation Object model that can be referred by navigating to "Start" >> "All Programs" >> "HP Software" >> "HP Unified Functional Testing" >> "Documentation" >> "Unified Functional Testing Automation Reference".
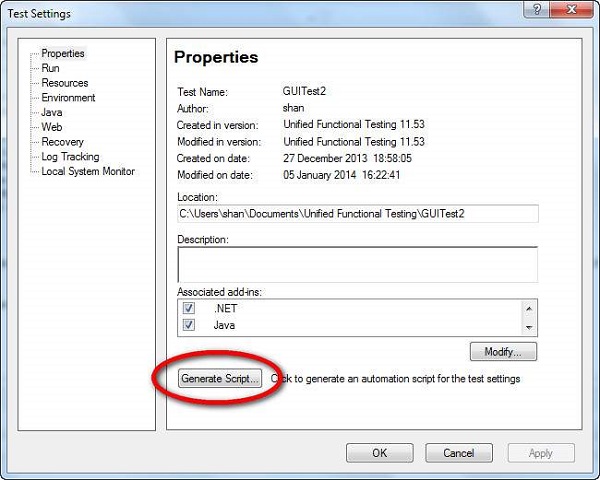
Generate AOM Script
A tester can generate AOM script from QTP itself, using the "Generate Script" option. Navigate to "Run" >> "Settings" >> "Properties" Tab >> "Generate Script" as shown below −
Example
' A Sample Script to Demostrate AOM
Dim App 'As Application
Set App = CreateObject("QuickTest.Application")
App.Launch
App.Visible = True

App.Test.Settings.Launchers("Web").Active = False
App.Test.Settings.Launchers("Web").Browser = "IE"
App.Test.Settings.Launchers("Web").Address = "http://easycalculation.com/"
App.Test.Settings.Launchers("Web").CloseOnExit = True

App.Test.Settings.Launchers("Windows Applications").Active = False
App.Test.Settings.Launchers("Windows Applications").Applications.RemoveAll
App.Test.Settings.Launchers("Windows Applications").RecordOnQTDescendants = True
App.Test.Settings.Launchers("Windows Applications").RecordOnExplorerDescendants = False
App.Test.Settings.Launchers("Windows Applications").RecordOnSpecifiedApplications = True

App.Test.Settings.Run.IterationMode = "rngAll"
App.Test.Settings.Run.StartIteration = 1
App.Test.Settings.Run.EndIteration = 1
App.Test.Settings.Run.ObjectSyncTimeOut = 20000
App.Test.Settings.Run.DisableSmartIdentification = False
App.Test.Settings.Run.OnError = "Dialog"

App.Test.Settings.Resources.DataTablePath = "<Default>"
App.Test.Settings.Resources.Libraries.RemoveAll

App.Test.Settings.Web.BrowserNavigationTimeout = 60000
App.Test.Settings.Web.ActiveScreenAccess.UserName = ""
App.Test.Settings.Web.ActiveScreenAccess.Password = ""

App.Test.Settings.Recovery.Enabled = True
App.Test.Settings.Recovery.SetActivationMode "OnError"
App.Test.Settings.Recovery.Add "D:\GUITest2\recover_app_crash.qrs",
   "Recover_Application_Crash", 1
App.Test.Settings.Recovery.Item(1).Enabled = True

''''''''''''''''''''''''''''''''''''''''''''''''''''''''''''''''''''''''''
' System Local Monitoring settings
''''''''''''''''''''''''''''''''''''''''''''''''''''''''''''''''''''''''''
App.Test.Settings.LocalSystemMonitor.Enable = false
''''''''''''''''''''''''''''''''''''''''''''''''''''''''''''''''''''''''''
' Log Tracking settings
''''''''''''''''''''''''''''''''''''''''''''''''''''''''''''''''''''''''''
With App.Test.Settings.LogTracking
   .IncludeInResults = False
   .Port = 18081
   .IP = "127.0.0.1"
   .MinTriggerLevel = "ERROR"
   .EnableAutoConfig = False
   .RecoverConfigAfterRun = False
   .ConfigFile = ""
   .MinConfigLevel = "WARN"
End With
QTP - Frameworks
A Framework defines a set of guidelines/best practices that enforces a set of standards, which makes it easy to use for the end users to work with. There are different types of automation frameworks and the most common ones are listed below −
- Keyword-Driven Framework
- Data-Driven Framework
- Hybrid Framework
Keyword-Driven Framework
Keyword driven testing is a type of functional automation testing framework which is also known as table-driven testing or action word based testing.
In Keyword-driven testing, we use a table format, usually a spreadsheet, to define keywords or action words for each function that we would like to execute.
Advantages
It is best suited for novice or a non-technical tester.
Enables writing tests in a more abstract manner using this approach.
Keyword driven testing allows automation to be started earlier in the SDLC even before a stable build is delivered for testing.
There is a high degree of reusability.
Disadvantages
Initial investment in developing the keywords and its related functionalities might take longer.
It might act as a restriction to the technically abled testers.
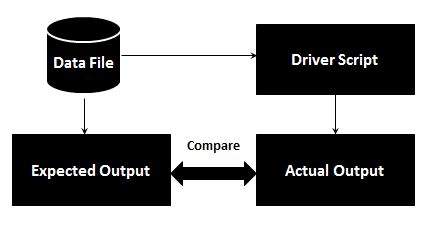
Data Driven Framework
Data-driven testing is creation of test scripts where test data and/or output values are read from data files instead of using the same hard-coded values each time the test runs. This way, the testers can test how the application handles various inputs effectively. It can be any of the following data files −
- datapools
- Excel files
- ADO objects
- CSV files
- ODBC sources
Flow Diagram
Data Driven Testing can be best understood by the following diagram −
Advantages
- Data driven framework results in less amount of code
- Offers greater flexibility for maintaining and fixing the scripting issues
- Test Data can be developed
Disadvantages
- Each script needs to be different to understand different sets of data.
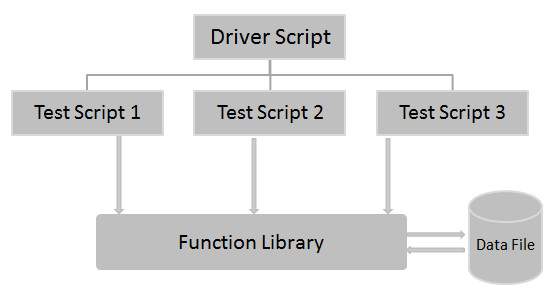
Hybrid Framework
Hybrid Framework is a combination of Keyword driven and data Driven framework that can be best described using the following flow diagram.
Affecting Factors
Following are the parameters one should take into account while developing the framework. The affects factors are listed below −
Framework files should support versioning controlling software such as SVN, CVS, MS Source Control
Framework should support executing the scripts in different environments viz- QA, SAT, DEV
Upon Object changes, scripts should execute with minimal changes.
Framework should configure itself and take care of prerequisite such as creating folders/databases.
Framework should have robust reporting structure so that issues in the script/application can be easily spotted
Framework should have greater flexibility so that it should be easy to use
Framework should follow coding standards so that files, functions, and history of changes are maintained correctly.
In the next chapter, we will learn how to design a simple framework.
QTP - Designing Framework
Let us design a simple framework by taking a sample application. We will automate a few scenarios of the application under test and write reusable functions.
The sample application under test is "Calculator", a default application that is available as a part of Windows. Let us now create different components of a framework. Here, we will develop a hybrid framework and use Object Repository as it is fairly a simple application. However, this framework can be scaled to support a complex application as well.
The folder structure of the Framework is as shown below −
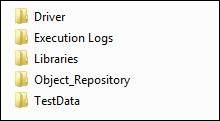
Explanation of the folder structure −
Master Driver Script − The Script that drives the entire execution. It performs prerequisite and initial settings that are required for the execution.
Library Files − The Associated Functions that forms the Function Library.
Data Table − The Test Data that is required for the Execution.
Object Repository − The Objects and its properties that enable QTP to recognize the objects seamlessly.
Execution Logs − The Folder contains the execution log file with user functions and function execution history.
Master Driver Script
'= = = = = = = = = = = = = = = = = = = = = = = = = = = = = = = = = = = = = =
' MASTER DRIVER SCRIPT NAME    : Calculator
' DESCRIPTION                  : Drivers Script to Execute Automated Test for
   the Calculator
' AUTHOR                       : Tutorials Point
' DATE CREATED                 : 30-Dec-2013
' OBJECT REPOSITORY ASSOCIATED : Calc.tsr
' LIBRARY FILES ASSOCIATED     : calculator.qfl, Common.qfl
' MODIFICATION LOG

' ----------------------------------------------------
' First Version       Tutorials point
'= = = = = = = = = = = = = = = = = = = = = = = = = = = = = = = = = = = =
Option Explicit

Public ExecDrive

' Get the Root folder of the Test  so that we can make use of relative paths.
Dim x : x = Instr(Environment.Value("TestDir"),"Driver")-2
ExecDrive = mid(Environment.Value("TestDir"),1,x)

' Get the path of Libraries using relative to the current Drive
Dim LibPath : LibPath = ExecDrive+"\Libraries\"

' Dynamically Load the Function Libraries
LoadFunctionLibrary LibPath + "Calculator.qfl", LibPath + "common_utils.qfl"

' Capturing the Start Time
' clscommon is the class object created in common.qfl library file
clscommon.StartTime = Time()

' Launching the Application
SystemUtil.Run "C:\Windows\System32\Calc.exe" : wait (2)

' Initialize the Data Table Path
Dim FileName : FileName  = ExecDrive+"\TestData\Calculator.xls"
Dim SheetSource : SheetSource  = "Calc_test"
Dim SheetDest : SheetDest = "Global"

' Import the DataTable into the QTP Script
DataTable.ImportSheet  FileName , SheetSource , SheetDest

' Object Repository Path
Dim RepPath : RepPath = ExecDrive+"\Object_Repository\Calc.tsr"
RepositoriesCollection.RemoveAll()
RepositoriesCollection.Add(RepPath)

' To Keep a Count on iteration
Dim InttestIteration
Dim InttestRows : InttestRows = datatable.GetRowCount

'  Fetching Date-TimeStamp which will be unique for Naming the Execution Log File
clscommon.StrDateFormatted = day(date()) & "_" &  MonthName(Month(date()),true) &
 "_" & YEAR(date())& "_"&hour(now)&"_"&minute(now)

 ' Name the LogFile
clscommon.StrLogFile = ExecDrive & "\Execution Logs\" &
clscommon.StrDateFormatted & ".txt"

' Create the Execution LogFile which captures the result
clscommon.Fn_FileCreate(clscommon.StrLogFile)

' Iniitialize the Parameters and all the relevant Test Details
Call Fn_InitializeLogFile()

' Kill all the previous calculator process
Call fn_Kill_Process("calc.exe")

For InttestIteration = 1 to InttestRows
   datatable.SetCurrentRow InttestIteration
   Dim StrExecute : StrExecute = Ucase(Trim(datatable.Value("Run","Global")))
   If StrExecute = "Y" Then
      clscommon.Number1 = Trim(datatable.Value("Number_1","Global"))
      clscommon.Number2 = Trim(datatable.Value("Number_2","Global"))
      clscommon.Number3 = Trim(datatable.Value("Number_3","Global"))

      clscommon.Number4 = Trim(datatable.Value("Number_4","Global"))
      clscommon.Number5 = Trim(datatable.Value("Number_5","Global"))
      clscommon.Number6 = Trim(datatable.Value("Number_6","Global"))

      clscommon.Test_Case_ID  =
         Trim(datatable.Value("Test_Case_ID","Global"))'
            : clscommon.LogWrite "The Test Case Data is Located at :: " & tcDataPath
      clscommon.tcScenario =
         Trim(datatable.Value("Scenario","Global"))'
            : clscommon.LogWrite "The Test Case Data is Located at :: " & tcDataPath
      Dim  Expected_Val :  Expected_Val =
         Trim(datatable.Value("Expected_Val","Global"))'
            :  clscommon.LogWrite "The Test Case Data is Located at :: " & tcDataPath

      Select case clscommon.tcScenario
         Case "Add"
            clscommon.LogWrite "=== Inside the Test Set :: " &
               clscommon.tcScenario & " ==="
                  Call fnCalculate("+",Expected_Val)

         Case "Subtract"
            clscommon.LogWrite "=== Inside the Test Set :: " &
               clscommon.tcScenario & " ==="
                  Call fnCalculate("-",Expected_Val)

         Case "Multiply"
            clscommon.LogWrite "=== Inside the Test Set :: " &
               clscommon.tcScenario & " ==="
                  Call fnCalculate("*",Expected_Val)

         Case "Divide"
            clscommon.LogWrite "=== Inside the Test Set :: " &
               clscommon.tcScenario & " ==="
                  Call fnCalculate("/",Expected_Val)

         Case "Sqrt"
            clscommon.LogWrite "=== Inside the Test Set :: " &
               clscommon.tcScenario & " ==="
                  Call fnCalculate("sqt",Expected_Val)
      End Select
   End If
Next

' Calling the End Test to Add the result Footer in exec log file.
Call fn_End_test()

'  =====================  End of Master Driver Script =====================
Library Files
The Calculator Functions are written in a separate function file saved with the extension .qfl or .vbs. These functions are reusable across actions.
'  Calculator. Qfl File :: Associated Function Library for Calculator Master Driver

'= = = = = = = = = = = = = = = = = = = = = = = = = = = = = = =
' FUNCTION NAME     : Fn_InitializeLogFile
' DESCRIPTION       : Function to Write the Initial Values in the Log File
' INPUT PARAMETERS  : varExecDrive,StrDB,StrUId,Strpwd,StrNewDB
' OUTPUT PARAMETERS : NIL
' RETURN VALUE      : Pass or Fail message
' DATE CREATED      : 30-Dec-2013
'= = = = = = = = = = = = = = = = = = = = = = = = = = = = = = =
Public Function Fn_InitializeLogFile()
   clscommon.LogWrite "********************************************"
   clscommon.LogWrite "Calc Automation Started"
End Function
'= = = = = = = = = = = = = = = = = = = = = = = = = = = = = = = = =
' FUNCTION NAME     : fnCalculate
' DESCRIPTION       : Function to perform Arithmetic Calculations
' INPUT PARAMETERS  : operator,Expected_Val
' OUTPUT PARAMETERS : NIL
' RETURN VALUE      : Pass or Fail message
' DATE CREATED      : 30-Dec-2013
'= = = = = = = = = = = = = = = = = = = = = = = = = = = = = = = = =
Function fnCalculate(operator,Expected_Val)
   clscommon.LogWrite "Executing the Function 'fnCalculate' "

   Window("Calculator").Activate

   If Trim(clscommon.Number1) <> ""  Then
      Window("Calculator").WinButton(clscommon.Number1).Click
   If Trim(clscommon.Number2) <> ""  Then
      Window("Calculator").WinButton(clscommon.Number2).Click
   If Trim(clscommon.Number3) <> ""  Then
      Window("Calculator").WinButton(clscommon.Number3).Click

   Window("Calculator").WinButton(operator).Click
   If Trim(clscommon.Number4) <> ""  Then
      Window("Calculator").WinButton(clscommon.Number4).Click
   If Trim(clscommon.Number5) <> ""  Then
      Window("Calculator").WinButton(clscommon.Number5).Click
   If Trim(clscommon.Number6) <> ""  Then
      Window("Calculator").WinButton(clscommon.Number6).Click

   Window("Calculator").WinButton("=").Click
   Dim ActualVal : ActualVal  =
      Window("Calculator").WinEdit("Edit").GetROProperty("text")
   clscommon.LogWrite "The Actual Value after the Math Operation is "& ActualVal

   If Trim(ActualVal) = Trim(Expected_Val) Then
      clscommon.WriteResult "Pass",  clscommon.Test_Case_ID ,
         clscommon.tcScenario , " Expected Value matches with Actual Value :: "
            & ActualVal

   Else
      clscommon.WriteResult "Fail",  clscommon.Test_Case_ID ,
         clscommon.tcScenario , " Expected Value - " & Expected_Val & " Does NOT matches
            with Actual Value :: " & ActualVal
   End If

   Window("Calculator").WinButton("C").Click

   If Err.Number <> 0  Then
      clscommon.LogWrite  "Execution Error : The Error Number is ::  " &
         Err.Number & " The Error Description is " & Err.Description
      Err.Clear
   End If

   clscommon.LogWrite "Exiting the Function 'fnCalculate' "
End Function

'= = = = = = = = = = = = = = = = = = = = = = = = = = =
' FUNCTION NAME     : fn_Kill_Process
' DESCRIPTION       : Function to Kill the process by name
' INPUT PARAMETERS  : Application name to be killed
' OUTPUT PARAMETERS : NIL
' RETURN VALUE      : NIL
' DATE CREATED      : 30-Dec-2013
'= = = = = = = = = = = = = = = = = = = = = = = = = = =
Function fn_Kill_Process(process)
   Dim strComputer ,  strProcessToKill , objWMIService , colProcessstrComputer = "."
   strProcessToKill = process

   Set objWMIService = GetObject("winmgmts:" _&
      "{impersonationLevel=impersonate}!\\" _& strComputer & "\root\cimv2")

   Set colProcess = objWMIService.ExecQuery _("Select * from Win32_Process
      Where Name = '" & strProcessToKill & "'")

   count = 0
   For Each objProcess in colProcess
      objProcess.Terminate()
      count = count + 1
   Next
End Function

'= = = = = = = = = = = = = = = = = = = = = = = = = = = = = = = = = = = = =
' FUNCTION NAME     : fn_End_test
' DESCRIPTION       : Function to finish the test Execution process
' INPUT PARAMETERS  : Application name to be killed
' OUTPUT PARAMETERS : NIL
' RETURN VALUE      : NIL
' DATE CREATED      : 20/Dec/2013
'= = = = = = = = = = = = = = = = = = = = = = = = = = = = = = = = = = = = =
Function fn_End_test()
   clscommon.LogWrite "Status Message - Executing the Function 'fn_End_test' "

   Window("Calculator").Close
   On Error Resume Next

   clscommon.StopTime = Time()
   clscommon.ElapsedTime = DateDiff("n",clscommon.StartTime,clscommon.StopTime)
   Dim Totaltests
   Totaltests = clscommon.gintPassCount+ clscommon.gintFailCount
   clscommon.LogWrite "## # # # # # # # # # # # # # # # # # # # # # # # # # # # # # # #
   clscommon.LogWrite "##  The Execution Start Time  ::  " & clscommon.StartTime
   clscommon.LogWrite "##  The Execution End Time   ::  " & clscommon.StopTime
   clscommon.LogWrite "##  The Time Elapsed ::   " & clscommon.ElapsedTime & " Minutes "
   clscommon.LogWrite "##  The OS ::  " & Environment.Value("OS")
   clscommon.LogWrite "##  The Total No of Test Cases Executed  ::  " & Totaltests
   clscommon.LogWrite "##  The No. of Test Case Passed ::  " & clscommon.gintPassCount
   clscommon.LogWrite "##  The No. of Test Case Failed ::  " & clscommon.gintFailCount
   clscommon.LogWrite "## # # # # # # # # # # # # # # # # # # # # # # # # # # # # # # #
   SystemUtil.CloseDescendentProcesses
End Function
'  ===============   End of Calculator. Qfl   ============================= '
The other library file, which is 'common_utils.qfl' that contains the functions, which enables us to write the output to a text file.
Set clscommon = New OS_clsUtils

'Creating a class file to handle global variables.
Class OS_clsUtils
   Dim StrLogFile
   Dim StrDateFormatted
   Dim Result

   Dim  Number1, Number2 , Number3
   Dim  Number4, Number5 , Number6
   Dim Test_Case_ID , tcScenario
   Dim StartTime, StopTime, ElapsedTime

   Dim gintPassCount , gintFailCount , gintWarningCount ,  gintdoneCount,
      gintinfoCount

   Function Fn_FileCreate(strFileName)
      Dim objFSO:  Set objFSO = CreateObject("Scripting.FileSystemObject")
      On Error Resume Next

      Dim objTextFile : Set objTextFile = objFSO.CreateTextFile(strFileName)
      objTextFile.Close

      Set objTextFile = Nothing
      Set objFSO = Nothing
   End Function

   Function LogWrite(sMsg)
      Const ForAppending = 8

      Dim objFSO : Set objFSO = CreateObject("scripting.FileSystemObject")

      Dim objTextFile : Set objTextFile = objFSO.OpenTextFile
         (clscommon.StrLogFile, ForAppending, True)

      objTextFile.WriteLine day(date()) & "/" &  MonthName(Month(date()),true)
         &  "/" & YEAR(date()) & " " & time & ": " & sMsg
      objTextFile.Close

      Set objTextFile = Nothing
      Set objFSO = Nothing
   End Function

   Function WriteResult(strStatus,functionName,functionDescription,Result)
      Const ForAppending = 8
      Dim objFSO : Set objFSO = CreateObject("scripting.FileSystemObject")
      Dim objTextFile : Set objTextFile = objFSO.OpenTextFile
         (clscommon.StrLogFile, ForAppending, True)

      objTextFile.WriteLine day(date()) & "/" &  MonthName(Month(date()),true)
         &  "/" & YEAR(date()) & " " & time & ": " & "
            * * * * * * Test Case Exec Details  * * * * * "

      objTextFile.WriteLine day(date()) & "/" &  MonthName(Month(date()),true)
         &  "/" & YEAR(date()) & " " & time & ": " & " Test staus :: " & strStatus
      objTextFile.WriteLine day(date()) & "/" &  MonthName(Month(date()),true)
         &  "/" & YEAR(date()) & " " & time & ": " & " Tese ID ::  " & functionName
      objTextFile.WriteLine day(date()) & "/" &  MonthName(Month(date()),true)
         &  "/" & YEAR(date()) & " " & time & ": " & " Test Description :: "
            & functionDescription
      objTextFile.WriteLine day(date()) & "/" &  MonthName(Month(date()),true)
         &  "/" & YEAR(date()) & " " & time & ": " & " Test Result Details :: " & Result
      objTextFile.WriteLine day(date()) & "/" &  MonthName(Month(date()),true)
         &  "/" & YEAR(date()) & " " & time & ": " & "
            * * * * * * * * * * * * * * * * * * * * * * * *  * * * * * * * * * * * "
      objTextFile.Close

      Set objTextFile = Nothing
      Set objFSO = Nothing

      Select Case Lcase(strStatus)
         Case "pass"
            gintPassCount = gintPassCount + 1

         Case "fail"
            gintFailCount = gintFailCount+1
      End Select
   End Function
End Class
'   =====================   End of common_Utils.qfl =====================
Object Repository
Object Repository has got all the objects that the user would be acting upon. The image given below shows the list of all objects added into the repository with the name calc.tsr
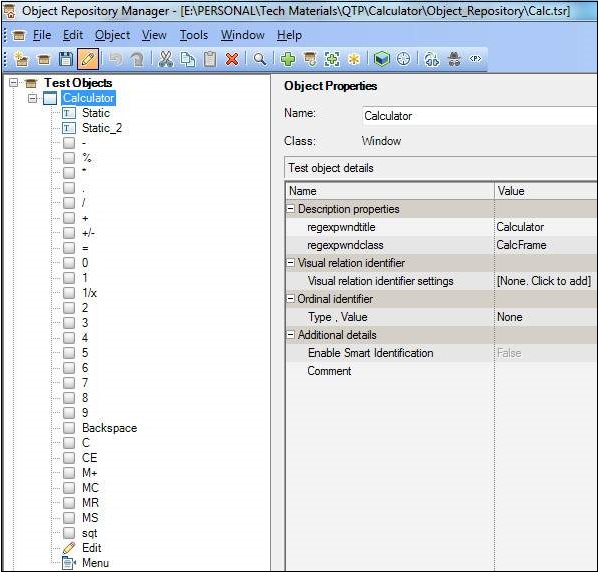
Data Table
DataTable contains the keywords, which drive the tests and also Test the data with which QTP will act on the objects.
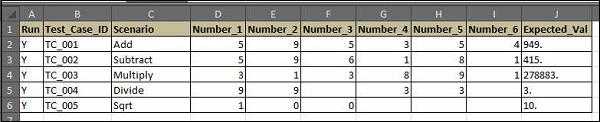
The Execution Log
The Execution log file or output file contains user actions and function log, which will enable the testers to debug upon script failures.
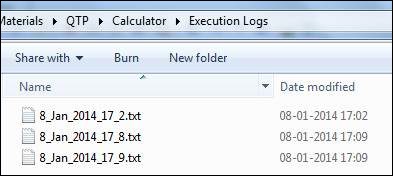
8/Jan/2014 5:09:16 PM: *************************************************
8/Jan/2014 5:09:16 PM: Calc Automation Started
8/Jan/2014 5:09:16 PM: === Inside the Test Set  ::   Add  ===
8/Jan/2014 5:09:16 PM: Executing the Function 'fnCalculate'
8/Jan/2014 5:09:17 PM: The Actual Value after the Math Operation is 949.
8/Jan/2014 5:09:17 PM:  * * * * * * Test Case Exec Details  * * * * *
8/Jan/2014 5:09:17 PM: Test staus :: Pass
8/Jan/2014 5:09:17 PM: Tese ID ::  TC_001
8/Jan/2014 5:09:17 PM: Test Description :: Add
8/Jan/2014 5:09:17 PM: Test Result Details ::  Expected Value matches with Actual
   Value :: 949.
8/Jan/2014 5:09:17 PM: * * * * * * * * * * * * * * * * * * * * * * * *  * *
* * * * * * * * *

8/Jan/2014 5:09:17 PM: Exiting the Function 'fnCalculate'
8/Jan/2014 5:09:17 PM: === Inside the Test Set  ::   Subtract  ===
8/Jan/2014 5:09:17 PM: Executing the Function 'fnCalculate'
8/Jan/2014 5:09:17 PM: The Actual Value after the Math Operation is 415.
8/Jan/2014 5:09:17 PM: * * * * * * Test Case Exec Details  * * * * *
8/Jan/2014 5:09:17 PM: Test staus :: Pass
8/Jan/2014 5:09:17 PM: Tese ID ::  TC_002
8/Jan/2014 5:09:17 PM: Test Description :: Subtract
8/Jan/2014 5:09:17 PM: Test Result Details ::  Expected Value matches with Actual
   Value :: 415.
8/Jan/2014 5:09:17 PM: * * * * * * * * * * * * * * * * * * * * * * * *  * * *
* * * * * * * *

8/Jan/2014 5:09:17 PM: Exiting the Function 'fnCalculate'
8/Jan/2014 5:09:17 PM: === Inside the Test Set  ::   Multiply  ===
8/Jan/2014 5:09:17 PM: Executing the Function 'fnCalculate'
8/Jan/2014 5:09:18 PM: The Actual Value after the Math Operation is 278883.
8/Jan/2014 5:09:18 PM: * * * * * * Test Case Exec Details  * * * * *
8/Jan/2014 5:09:18 PM: Test staus :: Pass
8/Jan/2014 5:09:18 PM: Tese ID ::  TC_003
8/Jan/2014 5:09:18 PM: Test Description :: Multiply
8/Jan/2014 5:09:18 PM:  Test Result Details ::  Expected Value matches with
   Actual Value :: 278883.
8/Jan/2014 5:09:18 PM: * * * * * * * * * * * * * * * * * * * * * * * *  * * *
* * * * * * * *

8/Jan/2014 5:09:18 PM: Exiting the Function 'fnCalculate'
8/Jan/2014 5:09:18 PM: === Inside the Test Set  ::   Divide  ===
8/Jan/2014 5:09:18 PM: Executing the Function 'fnCalculate'
8/Jan/2014 5:09:19 PM: The Actual Value after the Math Operation is 3.
8/Jan/2014 5:09:19 PM: * * * * * * Test Case Exec Details  * * * * *
8/Jan/2014 5:09:19 PM: Test staus :: Pass
8/Jan/2014 5:09:19 PM: Tese ID ::  TC_004
8/Jan/2014 5:09:19 PM: Test Description :: Divide
8/Jan/2014 5:09:19 PM: Test Result Details ::  Expected Value matches with Actual
   Value :: 3.
8/Jan/2014 5:09:19 PM: * * * * * * * * * * * * * * * * * * * * * * * *  * * *
* * * * * * * *

8/Jan/2014 5:09:19 PM: Exiting the Function 'fnCalculate'
8/Jan/2014 5:09:19 PM: === Inside the Test Set  ::   Sqrt  ===
8/Jan/2014 5:09:19 PM: Executing the Function 'fnCalculate'
8/Jan/2014 5:09:20 PM: The Actual Value after the Math Operation is 10.
8/Jan/2014 5:09:20 PM: * * * * * * Test Case Exec Details  * * * * *
8/Jan/2014 5:09:20 PM: Test staus :: Pass
8/Jan/2014 5:09:20 PM: Tese ID ::  TC_005
8/Jan/2014 5:09:20 PM: Test Description :: Sqrt
8/Jan/2014 5:09:20 PM: Test Result Details ::  Expected Value matches with Actual
   Value :: 10.
8/Jan/2014 5:09:20 PM: * * * * * * * * * * * * * * * * * * * * * * * *  * * * *
* * * * * * *

8/Jan/2014 5:09:20 PM: Exiting the Function 'fnCalculate'
8/Jan/2014 5:09:20 PM: Status Message - Executing the Function 'fn_Finish_test'
8/Jan/2014 5:09:20 PM: ## # # # # # # # # # # # # # # # # # # # # # # # # #
# # # # # #
8/Jan/2014 5:09:20 PM: ##  The Execution Start Time  ::  5:09:14 PM
8/Jan/2014 5:09:20 PM: ##  The Execution End Time   ::  5:09:20 PM
8/Jan/2014 5:09:20 PM: ##  The Time Elapsed ::   0 Minutes
8/Jan/2014 5:09:20 PM: ##  The OS ::  Microsoft Windows Vista Server
8/Jan/2014 5:09:20 PM: ##  The Total No of Test Cases Executed  ::  25
8/Jan/2014 5:09:20 PM: ##  The No. of Test Case Passed ::  25
8/Jan/2014 5:09:20 PM: ##  The No. of Test Case Failed ::
8/Jan/2014 5:09:20 PM: ## # # # # # # # # # # # # # # # # # # # # # # # # #
# # # # # #