- Spring Boot - Home
- Spring Boot - Introduction
- Spring Boot - Quick Start using CLI
- Spring Boot - Bootstrapping
- Spring Tool Suite
- Spring Boot - Tomcat Deployment
- Spring Boot - Build Systems
- Spring Boot - Code Structure
- Spring Boot - Beans & Dependency Injection
- Spring Boot - Runners
- Spring Boot - Starters
- Spring Boot - Application Properties
- Spring Boot - Configuration
- Spring Boot - Annotations
- Spring Boot - Logging
- Building RESTful Web Services
- Spring Boot - Exception Handling
- Spring Boot - Interceptor
- Spring Boot - Servlet Filter
- Spring Boot - Tomcat Port Number
- Spring Boot - Rest Template
- Spring Boot - File Handling
- Spring Boot - Service Components
- Spring Boot - Thymeleaf
- Consuming RESTful Web Services
- Spring Boot - CORS Support
- Spring Boot - Internationalization
- Spring Boot - Scheduling
- Spring Boot - Enabling HTTPS
- Spring Boot - Eureka Server
- Service Registration with Eureka
- Gateway Proxy Server and Routing
- Spring Cloud Configuration Server
- Spring Cloud Configuration Client
- Spring Boot - Actuator
- Spring Boot - Admin Server
- Spring Boot - Admin Client
- Spring Boot - Enabling Swagger2
- Spring Boot - Using SpringDoc OpenAPI
- Spring Boot - Creating Docker Image
- Tracing Micro Service Logs
- Spring Boot - Flyway Database
- Spring Boot - Sending Email
- Spring Boot - Hystrix
- Spring Boot - Web Socket
- Spring Boot - Batch Service
- Spring Boot - Apache Kafka
- Spring Boot - Twilio
- Spring Boot - Unit Testing
- Rest Controller Unit Testing
- Spring Boot - Database Handling
- Securing Web Applications
- Spring Boot - OAuth2 with JWT
- Spring Boot - Google Cloud Platform
- Spring Boot - Google OAuth2 Sign-In
Spring Boot Resources
Spring Boot - Quick Guide
Spring Boot - Introduction
Spring Boot is an open source Java-based framework used to create a micro Service. It is developed by Pivotal Team and is used to build stand-alone and production ready spring applications. This chapter will give you an introduction to Spring Boot and familiarizes you with its basic concepts.
What is Micro Service?
Micro Service is an architecture that allows the developers to develop and deploy services independently. Each service running has its own process and this achieves the lightweight model to support business applications.
Microservices are an architectural approach where a single application is composed of many small, loosely coupled, and independently deployable components or services. Microservices are autonomous: Each microservice can be developed, deployed, and operated independently without affecting other services.
In a monolithic architecture, all processes run as a single service, tightly coupled. Microservices break down an application into independent components, each running as a separate service.
Advantages of Microservices
Micro services offers the following advantages to its developers −
- Easy deployment
- Simple scalability
- Compatible with Containers
- Minimum configuration
- Lesser production time
What is Spring Boot?
Spring Boot provides a good platform for Java developers to develop a stand-alone and production-grade spring application that you can just run. You can get started with minimum configurations without the need for an entire Spring configuration setup.
Advantages
Spring Boot offers the following advantages to its developers −
- Easy to understand and develop spring applications
- Increases productivity
- Reduces the development time
Goals
Spring Boot is designed with the following goals −
- To avoid complex XML configuration in Spring
- To develop a production ready Spring applications in an easier way
- To reduce the development time and run the application independently
- Offer an easier way of getting started with the application
Why Spring Boot?
You can choose Spring Boot because of the features and benefits it offers as given here −
It provides a flexible way to configure Java Beans, XML configurations, and Database Transactions.
It provides a powerful batch processing and manages REST endpoints.
In Spring Boot, everything is auto configured; no manual configurations are needed.
It offers annotation-based spring application
Eases dependency management
It includes Embedded Servlet Container
How does Spring Boot work?
Spring Boot automatically configures your application based on the dependencies you have added to the project by using @EnableAutoConfiguration annotation. For example, if MySQL database is on your classpath, but you have not configured any database connection, then Spring Boot auto-configures an in-memory database.
The entry point of the spring boot application is the class contains @SpringBootApplication annotation and the main method.
Spring Boot automatically scans all the components included in the project by using @ComponentScan annotation.
Spring Boot Starters
Handling dependency management is a difficult task for big projects. Spring Boot resolves this problem by providing a set of dependencies for developers convenience.
For example, if you want to use Spring and JPA for database access, it is sufficient if you include spring-boot-starter-data-jpa dependency in your project.
Note that all Spring Boot starters follow the same naming pattern spring-boot-starter- *, where * indicates that it is a type of the application.
Examples
Look at the following Spring Boot starters explained below for a better understanding −
Spring Boot Starter Actuator dependency is used to monitor and manage your application. Its code is shown below −
<dependency>
   <groupId>org.springframework.boot</groupId>
   <artifactId>spring-boot-starter-actuator</artifactId>
</dependency>
Spring Boot Starter Security dependency is used for Spring Security. Its code is shown below −
<dependency>
   <groupId>org.springframework.boot</groupId>
   <artifactId>spring-boot-starter-security</artifactId>
</dependency>
Spring Boot Starter web dependency is used to write a Rest Endpoints. Its code is shown below −
<dependency> <groupId>org.springframework.boot</groupId> <artifactId>spring-boot-starter-web</artifactId> </dependency>
Spring Boot Starter Thyme Leaf dependency is used to create a web application. Its code is shown below −
<dependency>
   <groupId>org.springframework.boot</groupId>
   <artifactId>spring-boot-starter-thymeleaf</artifactId>
</dependency>
Spring Boot Starter Test dependency is used for writing Test cases. Its code is shown below −
<dependency> <groupId>org.springframework.boot</groupId> <artifactId>spring-boot-starter-test</artifactId> </dependency>
Auto Configuration
Spring Boot Auto Configuration automatically configures your Spring application based on the JAR dependencies you added in the project. For example, if MySQL database is on your class path, but you have not configured any database connection, then Spring Boot auto configures an in-memory database.
For this purpose, you need to add @EnableAutoConfiguration annotation or @SpringBootApplication annotation to your main class file. Then, your Spring Boot application will be automatically configured.
Observe the following code for a better understanding −
DemoApplication.java
package com.tutorialspoint;

import org.springframework.boot.SpringApplication;
import org.springframework.boot.autoconfigure.EnableAutoConfiguration;

@EnableAutoConfiguration
public class DemoApplication {
   public static void main(String[] args) {
      SpringApplication.run(DemoApplication.class, args);
   }
}
Spring Boot Application
The entry point of the Spring Boot Application is the class contains @SpringBootApplication annotation. This class should have the main method to run the Spring Boot application. @SpringBootApplication annotation includes Auto- Configuration, Component Scan, and Spring Boot Configuration.
If you added @SpringBootApplication annotation to the class, you do not need to add the @EnableAutoConfiguration, @ComponentScan and @SpringBootConfiguration annotation. The @SpringBootApplication annotation includes all other annotations.
Observe the following code for a better understanding −
DemoApplication.java
package com.tutorialspoint;

import org.springframework.boot.SpringApplication;
import org.springframework.boot.autoconfigure.SpringBootApplication;

@SpringBootApplication
public class DemoApplication {
   public static void main(String[] args) {
      SpringApplication.run(DemoApplication.class, args);
   }
}
Component Scan
Spring Boot application scans all the beans and package declarations when the application initializes. You need to add the @ComponentScan annotation for your class file to scan your components added in your project.
Observe the following code for a better understanding −
DemoApplication.java
package com.tutorialspoint;

import org.springframework.boot.SpringApplication;
import org.springframework.context.annotation.ComponentScan;

@ComponentScan
public class DemoApplication {
   public static void main(String[] args) {
      SpringApplication.run(DemoApplication.class, args);
   }
}
Spring Boot - Quick Start using CLI
This chapter will teach you how to create a Spring Boot application using Maven and Gradle.
Prerequisites
Your system need to have the following minimum requirements to create a Spring Boot application −
- Java 17
- Maven 3.6.3
- Gradle 7.5
Spring Boot CLI
The Spring Boot CLI is a command line tool and it allows us to run the Groovy scripts. This is the easiest way to create a Spring Boot application by using the Spring Boot Command Line Interface. You can create, run and test the application in command prompt itself.
This section explains you the steps involved in manual installation of Spring Boot CLI. For further help, you can use the following link: https://docs.spring.io/spring-boot/installing.html
You can also download the Spring CLI distribution from the Spring Software repository at: https://repo.maven.apache.org/maven2/org/springframework/boot/spring-boot-cli/3.5.6/spring-boot-cli-3.5.6-bin.zip
For manual installation, you need to use one of the following two archives −
spring-boot-cli-3.5.6-bin.zip
spring-boot-cli-3.5.6-bin.tar.gz
After the download, unpack the archive file and follow the steps given in the install.txt file. Note that it does not require any environment setup.
In Windows, go to the Spring Boot CLI bin directory in the command prompt and run the command spring -version to make sure spring CLI is installed correctly. After executing the command, you can see the spring CLI version as shown below −
D:\Projects\spring-3.5.6\bin&t; spring --version
Spring CLI v3.5.6
D:\Projects\spring-3.5.6\bin>
Create Welcome Message Web Application with Spring Boot CLI
D:\Projects\spring-3.5.6\bin> spring init --build maven -a test
Using service at https://start.spring.io
Content saved to 'test.zip'
D:\Projects\spring-3.5.6\bin>
Now you can check that a maven based spring boot project is created with following pom.xml
<?xml version="1.0" encoding="UTF-8"?>
   <project xmlns="http://maven.apache.org/POM/4.0.0" xmlns:xsi="http://www.w3.org/2001/XMLSchema-instance"
   xsi:schemaLocation="http://maven.apache.org/POM/4.0.0 https://maven.apache.org/xsd/maven-4.0.0.xsd">
   <modelVersion>4.0.0</modelVersion>
   <parent>
      <groupId>org.springframework.boot</groupId>
      <artifactId>spring-boot-starter-parent</artifactId>
      <version>3.5.6</version>
      <relativePath/> <!-- lookup parent from repository -->
   </parent>
   <groupId>com.example</groupId>
   <artifactId>test</artifactId>
   <version>0.0.1-SNAPSHOT</version>
   <name>demo</name>
   <description>Demo project for Spring Boot</description>
   <url/>
   <licenses>
      <license/>
   </licenses>
   <developers>
      <developer/>
   </developers>
   <scm>
      <connection/>
      <developerConnection/>
      <tag/>
      <url/>
   </scm>
   <properties>
      <java.version>17</java.version>
   </properties>
   <dependencies>
      <dependency>
         <groupId>org.springframework.boot</groupId>
         <artifactId>spring-boot-starter</artifactId>
      </dependency>
      <dependency>
         <groupId>org.springframework.boot</groupId>
         <artifactId>spring-boot-starter-test</artifactId>
         <scope>test</scope>
      </dependency>
   </dependencies>
   <build>
      <plugins>
         <plugin>
            <groupId>org.springframework.boot</groupId>
            <artifactId>spring-boot-maven-plugin</artifactId>
         </plugin>
      </plugins>
   </build>
</project>
Check the default java class which acts as a main application class. Update the content to the following −
package com.example.test;

import org.springframework.boot.SpringApplication;
import org.springframework.boot.autoconfigure.SpringBootApplication;

@SpringBootApplication
public class DemoApplication {
   public static void main(String[] args) {
      SpringApplication.run(DemoApplication.class, args);
   }
   @RequestMapping("/")
   String home() {
      return "Hello World!";
   }
}
Let's add spring boot starter web dependency in pom.xml
<dependency>
   <groupId>org.springframework.boot</groupId>
   <artifactId>spring-boot-starter-web</artifactId>
</dependency>
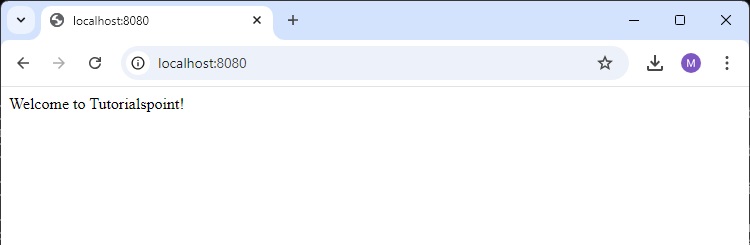
Update DemoApplication.java with an end point to print "Welcome to Tutorialspoint!"
package com.example.test;

import org.springframework.boot.SpringApplication;
import org.springframework.boot.autoconfigure.SpringBootApplication;
import org.springframework.web.bind.annotation.GetMapping;
import org.springframework.web.bind.annotation.RestController;

@RestController
@SpringBootApplication
public class DemoApplication {

   public static void main(String[] args) {
      SpringApplication.run(DemoApplication.class, args);
   }

   @GetMapping("/")
   String home() {
      return "Welcome to Tutorialspoint!";
   }
}
Now run the application by using the maven command mvn spring-boot:run as shown below −
E:\spring-3.5.6\bin\test>mvn spring-boot:run
Once you run the command, required dependencies will download automatically and it will start the application in Tomcat 8080 port as shown in the screenshot given below −
[INFO] Scanning for projects...
[INFO]
[INFO] --------------------------< com.example:test >--------------------------
[INFO] Building demo 0.0.1-SNAPSHOT
[INFO]   from pom.xml
[INFO] --------------------------------[ jar ]---------------------------------
[INFO]
[INFO] >>> spring-boot:3.5.6:run (default-cli) > test-compile @ test >>>
[INFO]
[INFO] --- resources:3.3.1:resources (default-resources) @ test ---
[INFO] Copying 1 resource from src\main\resources to target\classes
[INFO] Copying 0 resource from src\main\resources to target\classes
[INFO]
[INFO] --- compiler:3.14.0:compile (default-compile) @ test ---
[INFO] Recompiling the module because of added or removed source files.
[INFO] Compiling 1 source file with javac [debug parameters release 17] to target\classes
[INFO]
[INFO] --- resources:3.3.1:testResources (default-testResources) @ test ---
[INFO] skip non existing resourceDirectory E:\spring-3.5.6\bin\test\src\test\resources
[INFO]
[INFO] --- compiler:3.14.0:testCompile (default-testCompile) @ test ---
[INFO] Recompiling the module because of changed dependency.
[INFO] Compiling 1 source file with javac [debug parameters release 17] to target\test-classes
[INFO]
[INFO] <<< spring-boot:3.5.6:run (default-cli) < test-compile @ test <<<
[INFO]
[INFO]
[INFO] --- spring-boot:3.5.6:run (default-cli) @ test ---
Downloading from central: https://repo.maven.apache.org/maven2/org/springframework/boot/spring-boot-buildpack-platform/3.5.6/spring-boot-buildpack-platform-3.5.6.pom
...
[INFO] Attaching agents: []

  .   ____          _            __ _ _
 /\\ / ___'_ __ _ _(_)_ __  __ _ \ \ \ \
( ( )\___ | '_ | '_| | '_ \/ _` | \ \ \ \
 \\/  ___)| |_)| | | | | || (_| |  ) ) ) )
  '  |____| .__|_| |_|_| |_\__, | / / / /
 =========|_|==============|___/=/_/_/_/

 :: Spring Boot ::                (v3.5.6)

2025-09-28T13:04:33.672+05:30  INFO 3216 --- [demo] [           main] com.example.test.DemoApplication         : Starting DemoApplication using Java 24.0.1 with PID 3216 (D:\Projects\spring-3.5.6\bin\test\target\classes started by mahes in D:\Projects\spring-3.5.6\bin\test)
2025-09-28T13:04:33.675+05:30  INFO 3216 --- [demo] [           main] com.example.test.DemoApplication         : No active profile set, falling back to 1 default profile: "default"
2025-09-28T13:04:34.231+05:30  INFO 3216 --- [demo] [           main] o.s.b.w.embedded.tomcat.TomcatWebServer  : Tomcat initialized with port 8080 (http)
2025-09-28T13:04:34.246+05:30  INFO 3216 --- [demo] [           main] o.apache.catalina.core.StandardService   : Starting service [Tomcat]
2025-09-28T13:04:34.246+05:30  INFO 3216 --- [demo] [           main] o.apache.catalina.core.StandardEngine    : Starting Servlet engine: [Apache Tomcat/10.1.46]
2025-09-28T13:04:34.303+05:30  INFO 3216 --- [demo] [           main] o.a.c.c.C.[Tomcat].[localhost].[/]       : Initializing Spring embedded WebApplicationContext
2025-09-28T13:04:34.304+05:30  INFO 3216 --- [demo] [           main] w.s.c.ServletWebServerApplicationContext : Root WebApplicationContext: initialization completed in 580 ms
2025-09-28T13:04:34.626+05:30  INFO 3216 --- [demo] [           main] o.s.b.w.embedded.tomcat.TomcatWebServer  : Tomcat started on port 8080 (http) with context path '/'
2025-09-28T13:04:34.632+05:30  INFO 3216 --- [demo] [           main] com.example.test.DemoApplication         : Started DemoApplication in 1.274 seconds (process running for 1.521)
Once Tomcat starts, go to the web browser and hit the URL http://localhost:8080/ and you can see the output as shown.
Spring Boot - Bootstrapping
This chapter will explain you how to perform bootstrapping on a Spring Boot application.
Spring Initializer
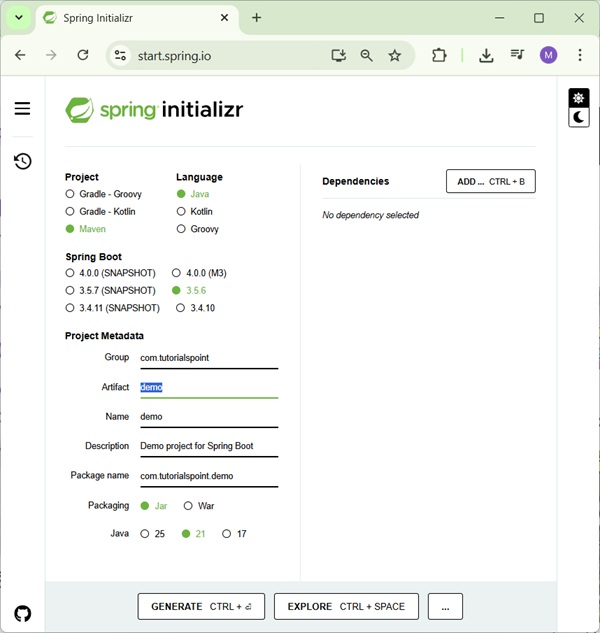
One of the ways to Bootstrapping a Spring Boot application is by using Spring Initializer. To do this, you will have to visit the Spring Initializer web page www.start.spring.io and choose your Build, Spring Boot Version and platform. Also, you need to provide a Group, Artifact and required dependencies to run the application.
Observe the following screenshot that shows an example where we added the spring-boot-starter-web dependency to write REST Endpoints.
Once you provided the Group, Artifact, Dependencies, Build Project, Platform and Version, click Generate Project button. The zip file will download and the files will be extracted.
This section explains you the examples by using both Maven and Gradle.
Maven
After you download the project, unzip the file. Now, your pom.xml file looks as shown below −
pom.xml
<?xml version="1.0" encoding="UTF-8"?>
   <project xmlns="http://maven.apache.org/POM/4.0.0" xmlns:xsi="http://www.w3.org/2001/XMLSchema-instance"
   xsi:schemaLocation="http://maven.apache.org/POM/4.0.0 https://maven.apache.org/xsd/maven-4.0.0.xsd">
   <modelVersion>4.0.0</modelVersion>
   <parent>
      <groupId>org.springframework.boot</groupId>
      <artifactId>spring-boot-starter-parent</artifactId>
      <version>3.5.6</version>
      <relativePath/> <!-- lookup parent from repository -->
   </parent>
   <groupId>com.tutorialspoint</groupId>
   <artifactId>demo</artifactId>
   <version>0.0.1-SNAPSHOT</version>
   <name>demo</name>
   <description>Demo project for Spring Boot</description>
   <url/>
   <licenses>
      <license/>
   </licenses>
   <developers>
      <developer/>
   </developers>
   <scm>
      <connection/>
      <developerConnection/>
      <tag/>
      <url/>
   </scm>
   <properties>
      <java.version>21</java.version>
   </properties>
   <dependencies>
      <dependency>
         <groupId>org.springframework.boot</groupId>
         <artifactId>spring-boot-starter-web</artifactId>
      </dependency>
      <dependency>
         <groupId>org.springframework.boot</groupId>
         <artifactId>spring-boot-starter-test</artifactId>
         <scope>test</scope>
      </dependency>
   </dependencies>
   <build>
      <plugins>
         <plugin>
            <groupId>org.springframework.boot</groupId>
            <artifactId>spring-boot-maven-plugin</artifactId>
         </plugin>
      </plugins>
   </build>
</project>
Gradle
In case of Gradle, you can check the build.gradle as following:
build.gradle
buildscript {
   ext {
      springBootVersion = '3.5.6'
   }
   repositories {
      mavenCentral()
   }
   dependencies {
      classpath("org.springframework.boot:spring-boot-gradle-plugin:${springBootVersion}")
   }
}
apply plugin: 'java'
apply plugin: 'eclipse'
apply plugin: 'org.springframework.boot'

group = 'com.tutorialspoint'
version = '0.0.1-SNAPSHOT'
sourceCompatibility = 21

repositories {
   mavenCentral()
}
dependencies {
   compile('org.springframework.boot:spring-boot-starter-web')
   testCompile('org.springframework.boot:spring-boot-starter-test')
}
Class Path Dependencies
Spring Boot provides a number of Starters to add the jars in our class path. For example, for writing a Rest Endpoint, we need to add the spring-boot-starter-web dependency in our class path. Observe the codes shown below for a better understanding −
Maven dependency
<dependencies>
   <dependency>
      <groupId>org.springframework.boot</groupId>
      <artifactId>spring-boot-starter-web</artifactId>
   </dependency>
</dependencies>
Gradle dependencies
dependencies {
   compile('org.springframework.boot:spring-boot-starter-web')
}
Main Method
The main method should be writing the Spring Boot Application class. This class should be annotated with @SpringBootApplication. This is the entry point of the spring boot application to start. You can find the main class file under src/java/main directories with the default package.
In this example, the main class file is located at the src/java/main directories with the default package com.tutorialspoint.demo. Observe the code shown here for a better understanding −
DemoApplication.java
package com.tutorialspoint.demo;

import org.springframework.boot.SpringApplication;
import org.springframework.boot.autoconfigure.SpringBootApplication;

@SpringBootApplication
public class DemoApplication {
   public static void main(String[] args) {
      SpringApplication.run(DemoApplication.class, args);
   }
}
Write a Rest Endpoint
To write a simple Hello World Rest Endpoint in the Spring Boot Application main class file itself, follow the steps shown below −
Firstly, add the @RestController annotation at the top of the class.
Now, write a Request URI method with @GetMapping annotation.
Then, the Request URI method should return the Hello World string.
Now, your main Spring Boot Application class file will look like as shown in the code given below −
DemoApplication.java
package com.tutorialspoint.demo;

import org.springframework.boot.SpringApplication;
import org.springframework.boot.autoconfigure.SpringBootApplication;
import org.springframework.web.bind.annotation.GetMapping;
import org.springframework.web.bind.annotation.RestController;

@RestController
@SpringBootApplication
public class DemoApplication {

   public static void main(String[] args) {
      SpringApplication.run(DemoApplication.class, args);
   }
   @GetMapping(value = "/")
   public String hello() {
      return "Hello World";
   }
}
Create an Executable JAR
Let us create an executable JAR file to run the Spring Boot application by using Maven commands in the command prompt as shown below −
Use the Maven command mvn clean install as shown below −
D:\Projects\demo>mvn clean install
You'll see the result similar to as below:
[INFO] Scanning for projects...
[INFO]
[INFO] ----------------------< com.tutorialspoint:demo >-----------------------
[INFO] Building demo 0.0.1-SNAPSHOT
[INFO]   from pom.xml
[INFO] --------------------------------[ jar ]---------------------------------
[INFO]
[INFO] --- clean:3.4.1:clean (default-clean) @ demo ---
[INFO] Deleting D:\Projects\demo\target
[INFO]
[INFO] --- resources:3.3.1:resources (default-resources) @ demo ---
[INFO] Copying 1 resource from src\main\resources to target\classes
[INFO] Copying 0 resource from src\main\resources to target\classes
[INFO]
[INFO] --- compiler:3.14.0:compile (default-compile) @ demo ---
[INFO] Recompiling the module because of changed source code.
[INFO] Compiling 1 source file with javac [debug parameters release 21] to target\classes
[INFO]
[INFO] --- resources:3.3.1:testResources (default-testResources) @ demo ---
[INFO] skip non existing resourceDirectory D:\Projects\demo\src\test\resources
[INFO]
[INFO] --- compiler:3.14.0:testCompile (default-testCompile) @ demo ---
[INFO] Recompiling the module because of changed dependency.
[INFO] Compiling 1 source file with javac [debug parameters release 21] to target\test-classes
[INFO]
[INFO] --- surefire:3.5.4:test (default-test) @ demo ---
[INFO] Using auto detected provider org.apache.maven.surefire.junitplatform.JUnitPlatformProvider
[INFO]
[INFO] -------------------------------------------------------
[INFO]  T E S T S
[INFO] -------------------------------------------------------
[INFO] Running com.tutorialspoint.demo.DemoApplicationTests
13:26:53.939 [main] INFO org.springframework.test.context.support.AnnotationConfigContextLoaderUtils -- Could not detect default configuration classes for test class [com.tutorialspoint.demo.DemoApplicationTests]: DemoApplicationTests does not declare any static, non-private, non-final, nested classes annotated with @Configuration.
13:26:54.064 [main] INFO org.springframework.boot.test.context.SpringBootTestContextBootstrapper -- Found @SpringBootConfiguration com.tutorialspoint.demo.DemoApplication for test class com.tutorialspoint.demo.DemoApplicationTests

  .   ____          _            __ _ _
 /\\ / ___'_ __ _ _(_)_ __  __ _ \ \ \ \
( ( )\___ | '_ | '_| | '_ \/ _` | \ \ \ \
 \\/  ___)| |_)| | | | | || (_| |  ) ) ) )
  '  |____| .__|_| |_|_| |_\__, | / / / /
 =========|_|==============|___/=/_/_/_/

 :: Spring Boot ::                (v3.5.6)

2025-09-28T13:26:54.627+05:30  INFO 37592 --- [demo] [           main] c.t.demo.DemoApplicationTests            : Starting DemoApplicationTests using Java 24.0.1 with PID 37592 (started by mahes in D:\Projects\demo)
2025-09-28T13:26:54.629+05:30  INFO 37592 --- [demo] [           main] c.t.demo.DemoApplicationTests            : No active profile set, falling back to 1 default profile: "default"
2025-09-28T13:26:55.910+05:30  INFO 37592 --- [demo] [           main] c.t.demo.DemoApplicationTests            : Started DemoApplicationTests in 1.69 seconds (process running for 2.659)
Mockito is currently self-attaching to enable the inline-mock-maker. This will no longer work in future releases of the JDK. Please add Mockito as an agent to your build as described in Mockito's documentation: https://javadoc.io/doc/org.mockito/mockito-core/latest/org.mockito/org/mockito/Mockito.html#0.3
Java HotSpot(TM) 64-Bit Server VM warning: Sharing is only supported for boot loader classes because bootstrap classpath has been appended
WARNING: A Java agent has been loaded dynamically (C:\Users\mahes\.m2\repository\net\bytebuddy\byte-buddy-agent\1.17.7\byte-buddy-agent-1.17.7.jar)
WARNING: If a serviceability tool is in use, please run with -XX:+EnableDynamicAgentLoading to hide this warning
WARNING: If a serviceability tool is not in use, please run with -Djdk.instrument.traceUsage for more information
WARNING: Dynamic loading of agents will be disallowed by default in a future release
[INFO] Tests run: 1, Failures: 0, Errors: 0, Skipped: 0, Time elapsed: 2.859 s -- in com.tutorialspoint.demo.DemoApplicationTests
[INFO]
[INFO] Results:
[INFO]
[INFO] Tests run: 1, Failures: 0, Errors: 0, Skipped: 0
[INFO]
[INFO]
[INFO] --- jar:3.4.2:jar (default-jar) @ demo ---
[INFO] Building jar: D:\Projects\demo\target\demo-0.0.1-SNAPSHOT.jar
[INFO]
[INFO] --- spring-boot:3.5.6:repackage (repackage) @ demo ---
[INFO] Replacing main artifact D:\Projects\demo\target\demo-0.0.1-SNAPSHOT.jar with repackaged archive, adding nested dependencies in BOOT-INF/.
[INFO] The original artifact has been renamed to D:\Projects\demo\target\demo-0.0.1-SNAPSHOT.jar.original
[INFO]
[INFO] --- install:3.1.4:install (default-install) @ demo ---
[INFO] Installing D:\Projects\demo\pom.xml to C:\Users\mahes\.m2\repository\com\tutorialspoint\demo\0.0.1-SNAPSHOT\demo-0.0.1-SNAPSHOT.pom
[INFO] Installing D:\Projects\demo\target\demo-0.0.1-SNAPSHOT.jar to C:\Users\mahes\.m2\repository\com\tutorialspoint\demo\0.0.1-SNAPSHOT\demo-0.0.1-SNAPSHOT.jar
[INFO] ------------------------------------------------------------------------
[INFO] BUILD SUCCESS
[INFO] ------------------------------------------------------------------------
[INFO] Total time:  10.119 s
[INFO] Finished at: 2025-09-28T13:26:59+05:30
[INFO] ------------------------------------------------------------------------
Similarly for Gradle, you can run the following command to build the jar.
gradle clean build
Run Hello World with Java
Once you have created an executable JAR file, you can find it under the target directory. In our case it is in D: > Projects > demo > target > demo-0.0.1-SNAPSHOT.jar.
Now, run the JAR file by using the command java jar <JARFILE>. Observe that in the above example, the JAR file is named demo-0.0.1-SNAPSHOT.jar
D:\Projects\demo\target>java -jar demo-0.0.1-SNAPSHOT.jar
Once you run the jar file, you can see the output in the console window as shown below −
  .   ____          _            __ _ _
 /\\ / ___'_ __ _ _(_)_ __  __ _ \ \ \ \
( ( )\___ | '_ | '_| | '_ \/ _` | \ \ \ \
 \\/  ___)| |_)| | | | | || (_| |  ) ) ) )
  '  |____| .__|_| |_|_| |_\__, | / / / /
 =========|_|==============|___/=/_/_/_/

 :: Spring Boot ::                (v3.5.6)

2025-09-28T13:28:57.375+05:30  INFO 35152 --- [demo] [           main] c.tutorialspoint.demo.DemoApplication    : Starting DemoApplication v0.0.1-SNAPSHOT using Java 24.0.1 with PID 35152 (D:\Projects\demo\target\demo-0.0.1-SNAPSHOT.jar started by mahes in D:\Projects\demo\target)
2025-09-28T13:28:57.381+05:30  INFO 35152 --- [demo] [           main] c.tutorialspoint.demo.DemoApplication    : No active profile set, falling back to 1 default profile: "default"
2025-09-28T13:28:58.533+05:30  INFO 35152 --- [demo] [           main] o.s.b.w.embedded.tomcat.TomcatWebServer  : Tomcat initialized with port 8080 (http)
2025-09-28T13:28:58.552+05:30  INFO 35152 --- [demo] [           main] o.apache.catalina.core.StandardService   : Starting service [Tomcat]
2025-09-28T13:28:58.552+05:30  INFO 35152 --- [demo] [           main] o.apache.catalina.core.StandardEngine    : Starting Servlet engine: [Apache Tomcat/10.1.46]
2025-09-28T13:28:58.585+05:30  INFO 35152 --- [demo] [           main] o.a.c.c.C.[Tomcat].[localhost].[/]       : Initializing Spring embedded WebApplicationContext
2025-09-28T13:28:58.586+05:30  INFO 35152 --- [demo] [           main] w.s.c.ServletWebServerApplicationContext : Root WebApplicationContext: initialization completed in 1085 ms
2025-09-28T13:28:59.069+05:30  INFO 35152 --- [demo] [           main] o.s.b.w.embedded.tomcat.TomcatWebServer  : Tomcat started on port 8080 (http) with context path '/'
2025-09-28T13:28:59.085+05:30  INFO 35152 --- [demo] [           main] c.tutorialspoint.demo.DemoApplication    : Started DemoApplication in 2.537 seconds (process running for 2.958)
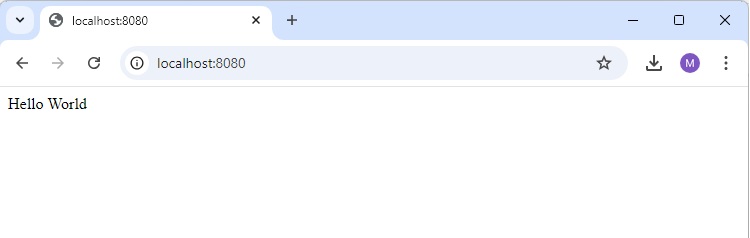
Now, look at the console, Tomcat started on port 8080 (http). Now, go to the web browser and hit the URL http://localhost:8080/ and you can see the output as shown below −
Spring Tool Suite, STS
Spring Tool Suite, STS is an IDE (Integrated Development Environment) and is ideal for developing Spring Boot applications.
Download and install STS
STS can be downloaded from https://spring.io/tools.
Select the Operating System (Windows in this case).
Download the zip file and extract.
Click on the SpringToolSuite4.exe file.
Spring Tool Suite 4 Launcher dialog asks for a workspace location. Enter the location, and press the "Launch" button.
Creating a simple Spring Boot application in STS
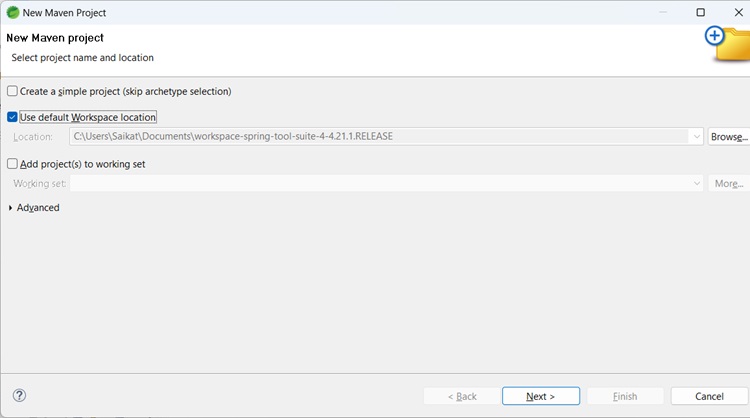
Go to File -> New Maven Project.
Click Next. The following dialog appears:
Select maven-archetype-quickstart
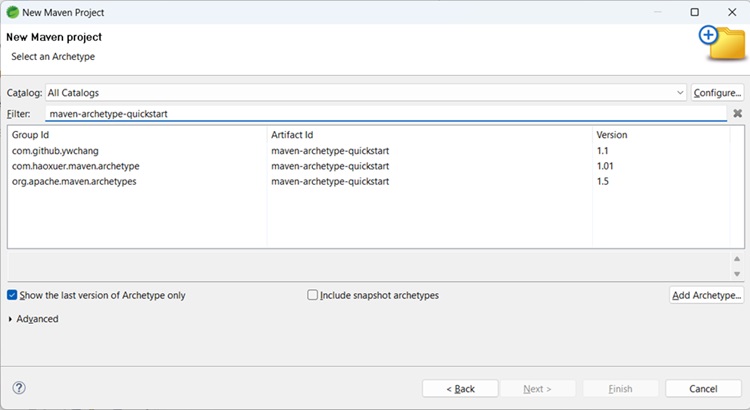
For GroupId, enter com.tutorialspoint, for ArtifactId enter first-spring-boot-example.
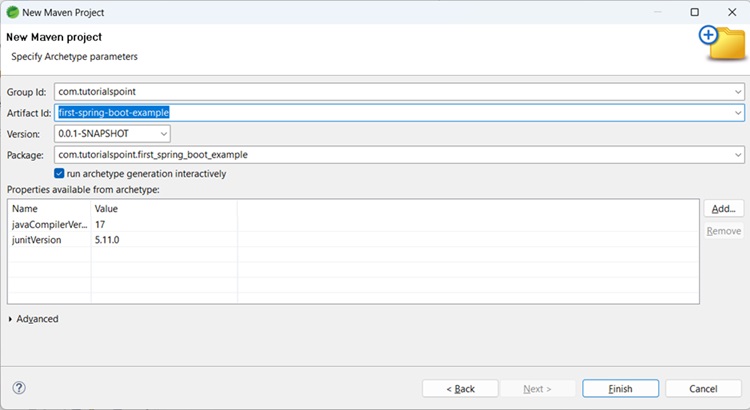
Click Finish.
Upon completion, there will be folder structure created −

Update pom.xml
Open the pom.xml file. Add the following under dependencies.
<dependency>
   <groupId>org.springframework.boot</groupId>
   <artifactId>spring-boot-autoconfigure</artifactId>
   <version>3.3.3</version>
</dependency>
You can add the spring framework core jars to the build path by right-clicking on project -> Build path -> Add external archives if required.
pom.xml
<project xmlns="http://maven.apache.org/POM/4.0.0"
   xmlns:xsi="http://www.w3.org/2001/XMLSchema-instance"
   xsi:schemaLocation="http://maven.apache.org/POM/4.0.0 https://maven.apache.org/xsd/maven-4.0.0.xsd">
   <modelVersion>4.0.0</modelVersion>
   <groupId>com.tutorialspoint</groupId>
   <artifactId>first-spring-boot-example</artifactId>
   <version>0.0.1-SNAPSHOT</version>
   <dependencies>
      <dependency>
         <groupId>org.springframework.boot</groupId>
         <artifactId>spring-boot-autoconfigure</artifactId>
         <version>3.5.6</version>
      </dependency>
   </dependencies>
</project>
Create a new Java class under src/main/java with package name com.tutorialspoint.first_spring_boot_example. Name the class FirstSpringBootTestClass.
FirstSpringBootTest.java
package com.tutorialspoint.first_spring_boot_example;

import org.springframework.boot.SpringApplication;
import org.springframework.boot.autoconfigure.SpringBootApplication;

@SpringBootApplication
public class FirstSpringBootTest {

   public static void main(String[] args) {
      System.out.println("Hello World, this is First Spring Boot Test");
      SpringApplication.run(FirstSpringBootTest.class, args);
   }
}
Output
From project explorer, right-click on the file FirstSpringBootTest, then Run as -> Java application. On the console, you will see −
Hello World, this is First Spring Boot Test

  .   ____          _            __ _ _
 /\\ / ___'_ __ _ _(_)_ __  __ _ \ \ \ \
( ( )\___ | '_ | '_| | '_ \/ _` | \ \ \ \
 \\/  ___)| |_)| | | | | || (_| |  ) ) ) )
  '  |____| .__|_| |_|_| |_\__, | / / / /
 =========|_|==============|___/=/_/_/_/

 :: Spring Boot ::                (v3.5.6)

[2025-09-28 13:45:47.112] - 42364 INFO [main] --- com.tutorialspoint.first_spring_boot_example.FirstSpringBootTest: Starting FirstSpringBootTest using Java 21.0.6 with PID 42364 (D:\workspace\first-spring-boot-example\target\classes started by mahes in D:\workspace\first-spring-boot-example)
[2025-09-28 13:45:47.161] - 42364 INFO [main] --- com.tutorialspoint.first_spring_boot_example.FirstSpringBootTest: No active profile set, falling back to 1 default profile: "default"
[2025-09-28 13:45:47.830] - 42364 INFO [main] --- com.tutorialspoint.first_spring_boot_example.FirstSpringBootTest: Started FirstSpringBootTest in 1.212 seconds (process running for 1.476)
Spring Boot - Tomcat Deployment
By using Spring Boot application, we can create a war file to deploy into the web server. In this chapter, you are going to learn how to create a WAR file and deploy the Spring Boot application in Tomcat web server.
Spring Boot Servlet Initializer
The traditional way of deployment is making the Spring Boot Application @SpringBootApplication class extend the SpringBootServletInitializer class. Spring Boot Servlet Initializer class file allows you to configure the application when it is launched by using Servlet Container.
The code for Spring Boot Application class file for JAR file deployment is given below −
DemoApplication.java
package com.tutorialspoint.demo;

import org.springframework.boot.SpringApplication;
import org.springframework.boot.autoconfigure.SpringBootApplication;

@SpringBootApplication
public class DemoApplication {
   public static void main(String[] args) {
      SpringApplication.run(DemoApplication.class, args);
   }
}
We need to extend the class SpringBootServletInitializer to support WAR file deployment. The code of Spring Boot Application class file is given below −
DemoApplication.java
package com.tutorialspoint.demo;

import org.springframework.boot.SpringApplication;
import org.springframework.boot.autoconfigure.SpringBootApplication;
import org.springframework.boot.builder.SpringApplicationBuilder;
import org.springframework.boot.web.servlet.support.SpringBootServletInitializer;

@SpringBootApplication
public class DemoApplication  extends SpringBootServletInitializer {
   @Override
   protected SpringApplicationBuilder configure(SpringApplicationBuilder application) {
      return application.sources(DemoApplication.class);
   }
   public static void main(String[] args) {
      SpringApplication.run(DemoApplication.class, args);
   }
}
Setting Main Class
In Spring Boot, we need to mention the main class that should start in the build file. For this purpose, you can use the following pieces of code −
For Maven, add the start class in pom.xml properties as shown below −
<properties>
   <java.version>21</java.version>
   <start-class>com.tutorialspoint.demo.DemoApplication</start-class>
</properties>
For Gradle, add the main class name in build.gradle as shown below −
mainClassName="com.tutorialspoint.demo.DemoApplication"
Update packaging JAR into WAR
We have to update the packaging JAR into WAR using the following pieces of code −
For Maven, add the packaging as WAR in pom.xml as shown below −
<packaging>war</packaging>
For Gradle, add the application plugin and war plugin in the build.gradle as shown below −
apply plugin: 'war'
apply plugin: 'application'
Now, let us write a simple Rest Endpoint to return the string Hello World from Tomcat. To write a Rest Endpoint, we need to add the Spring Boot web starter dependency into our build file.
For Maven, add the Spring Boot starter dependency in pom.xml using the code as shown below −
<dependency>
   <groupId>org.springframework.boot</groupId>
   <artifactId>spring-boot-starter-web</artifactId>
</dependency>
For Gradle, add the Spring Boot starter dependency in build.gradle using the code as shown below −
dependencies {
   compile('org.springframework.boot:spring-boot-starter-web')
}
Now, write a simple Rest Endpoint in Spring Boot Application class file using the code as shown below −
DemoApplication.java
package com.tutorialspoint.demo;

import org.springframework.boot.SpringApplication;
import org.springframework.boot.autoconfigure.SpringBootApplication;
import org.springframework.boot.builder.SpringApplicationBuilder;
import org.springframework.boot.web.servlet.support.SpringBootServletInitializer;
import org.springframework.web.bind.annotation.GetMapping;
import org.springframework.web.bind.annotation.RestController;

@SpringBootApplication
@RestController
public class DemoApplication  extends SpringBootServletInitializer {
   @Override
   protected SpringApplicationBuilder configure(SpringApplicationBuilder application) {
      return application.sources(DemoApplication.class);
   }
   public static void main(String[] args) {
      SpringApplication.run(DemoApplication.class, args);
   }

   @GetMapping(value = "/")
   public String hello() {
      return "Hello World from Tomcat";
   }
}
Packaging your Application
Now, create a WAR file to deploy into the Tomcat server by using Maven and Gradle commands for packaging your application as given below −
For Maven, use the command mvn package for packaging your application. Then, the WAR file will be created and you can find it in the target directory −
D:\Projects\demo>mvn package
You'll see the result similar to as below:
[INFO] Scanning for projects...
[INFO]
[INFO] ----------------------< com.tutorialspoint:demo >-----------------------
[INFO] Building demo 0.0.1-SNAPSHOT
[INFO]   from pom.xml
[INFO] --------------------------------[ war ]---------------------------------
[INFO]
[INFO] --- resources:3.3.1:resources (default-resources) @ demo ---
[INFO] Copying 1 resource from src\main\resources to target\classes
[INFO] Copying 0 resource from src\main\resources to target\classes
[INFO]
[INFO] --- compiler:3.14.0:compile (default-compile) @ demo ---
[INFO] Nothing to compile - all classes are up to date.
[INFO]
[INFO] --- resources:3.3.1:testResources (default-testResources) @ demo ---
[INFO] skip non existing resourceDirectory D:\Projects\demo\src\test\resources
[INFO]
[INFO] --- compiler:3.14.0:testCompile (default-testCompile) @ demo ---
[INFO] Nothing to compile - all classes are up to date.
[INFO]
[INFO] --- surefire:3.5.4:test (default-test) @ demo ---
[INFO] Using auto detected provider org.apache.maven.surefire.junitplatform.JUnitPlatformProvider
[INFO]
[INFO] -------------------------------------------------------
[INFO]  T E S T S
[INFO] -------------------------------------------------------
[INFO] Running com.tutorialspoint.demo.DemoApplicationTests
13:58:37.865 [main] INFO org.springframework.test.context.support.AnnotationConfigContextLoaderUtils -- Could not detect default configuration classes for test class [com.tutorialspoint.demo.DemoApplicationTests]: DemoApplicationTests does not declare any static, non-private, non-final, nested classes annotated with @Configuration.
13:58:37.999 [main] INFO org.springframework.boot.test.context.SpringBootTestContextBootstrapper -- Found @SpringBootConfiguration com.tutorialspoint.demo.DemoApplication for test class com.tutorialspoint.demo.DemoApplicationTests

  .   ____          _            __ _ _
 /\\ / ___'_ __ _ _(_)_ __  __ _ \ \ \ \
( ( )\___ | '_ | '_| | '_ \/ _` | \ \ \ \
 \\/  ___)| |_)| | | | | || (_| |  ) ) ) )
  '  |____| .__|_| |_|_| |_\__, | / / / /
 =========|_|==============|___/=/_/_/_/

 :: Spring Boot ::                (v3.5.6)

2025-09-28T13:58:38.533+05:30  INFO 27944 --- [demo] [           main] c.t.demo.DemoApplicationTests            : Starting DemoApplicationTests using Java 24.0.1 with PID 27944 (started by mahes in D:\Projects\demo)
2025-09-28T13:58:38.535+05:30  INFO 27944 --- [demo] [           main] c.t.demo.DemoApplicationTests            : No active profile set, falling back to 1 default profile: "default"
2025-09-28T13:58:39.713+05:30  INFO 27944 --- [demo] [           main] c.t.demo.DemoApplicationTests            : Started DemoApplicationTests in 1.561 seconds (process running for 2.685)
Mockito is currently self-attaching to enable the inline-mock-maker. This will no longer work in future releases of the JDK. Please add Mockito as an agent to your build as described in Mockito's documentation: https://javadoc.io/doc/org.mockito/mockito-core/latest/org.mockito/org/mockito/Mockito.html#0.3
WARNING: A Java agent has been loaded dynamically (C:\Users\mahes\.m2\repository\net\bytebuddy\byte-buddy-agent\1.17.7\byte-buddy-agent-1.17.7.jar)
WARNING: If a serviceability tool is in use, please run with -XX:+EnableDynamicAgentLoading to hide this warning
WARNING: If a serviceability tool is not in use, please run with -Djdk.instrument.traceUsage for more information
WARNING: Dynamic loading of agents will be disallowed by default in a future release
Java HotSpot(TM) 64-Bit Server VM warning: Sharing is only supported for boot loader classes because bootstrap classpath has been appended
[INFO] Tests run: 1, Failures: 0, Errors: 0, Skipped: 0, Time elapsed: 2.972 s -- in com.tutorialspoint.demo.DemoApplicationTests
[INFO]
[INFO] Results:
[INFO]
[INFO] Tests run: 1, Failures: 0, Errors: 0, Skipped: 0
[INFO]
[INFO]
[INFO] --- war:3.4.0:war (default-war) @ demo ---
[INFO] Packaging webapp
[INFO] Assembling webapp [demo] in [D:\Projects\demo\target\demo-0.0.1-SNAPSHOT]
[INFO] Processing war project
[INFO] Copying webapp resources [D:\Projects\demo\src\main\webapp]
[INFO] Building war: D:\Projects\demo\target\demo-0.0.1-SNAPSHOT.war
[INFO]
[INFO] --- spring-boot:3.5.6:repackage (repackage) @ demo ---
[INFO] Replacing main artifact D:\Projects\demo\target\demo-0.0.1-SNAPSHOT.war with repackaged archive, adding nested dependencies in BOOT-INF/.
[INFO] The original artifact has been renamed to D:\Projects\demo\target\demo-0.0.1-SNAPSHOT.war.original
[INFO] ------------------------------------------------------------------------
[INFO] BUILD SUCCESS
[INFO] ------------------------------------------------------------------------
[INFO] Total time:  8.455 s
[INFO] Finished at: 2025-09-28T13:58:43+05:30
[INFO] ------------------------------------------------------------------------
Similarlt For Gradle, you can use the command gradle clean build for packaging your application. Then, your WAR file will be created and you can find it under build/libs directory.
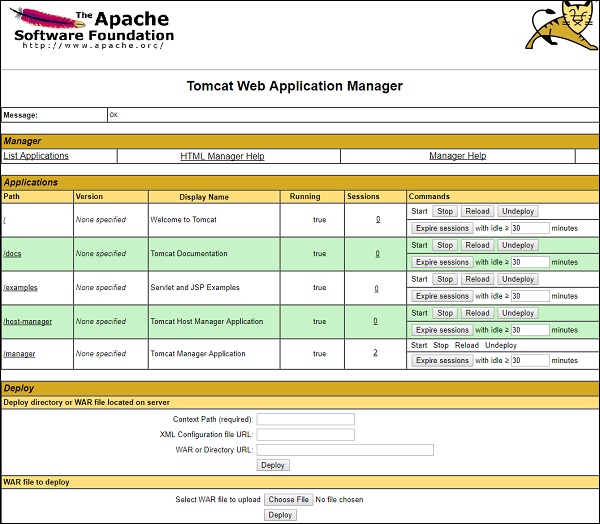
Deploy into Tomcat
Now, run the Tomcat Server, and deploy the WAR file under the webapps directory. Observe the screenshots shown here for a better understanding −

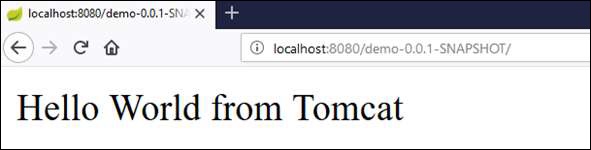
After successful deployment, hit the URL in your web browser http://localhost:8080/demo-0.0.1-SNAPSHOT/ and observe that the output will look as shown in the screenshot given below −
The full code for this purpose is given below.
pom.xml
<?xml version="1.0" encoding="UTF-8"?>
<project xmlns="http://maven.apache.org/POM/4.0.0" xmlns:xsi="http://www.w3.org/2001/XMLSchema-instance"
   xsi:schemaLocation="http://maven.apache.org/POM/4.0.0 https://maven.apache.org/xsd/maven-4.0.0.xsd">
   <modelVersion>4.0.0</modelVersion>
   <parent>
      <groupId>org.springframework.boot</groupId>
      <artifactId>spring-boot-starter-parent</artifactId>
      <version>3.5.6</version>
      <relativePath/> <!-- lookup parent from repository -->
   </parent>
   <groupId>com.tutorialspoint</groupId>
      <artifactId>demo</artifactId>
      <version>0.0.1-SNAPSHOT</version>
      <packaging>war</packaging>
      <name>demo</name>
      <description>Demo project for Spring Boot</description>
      <url/>
      <licenses>
         <license/>
      </licenses>
      <developers>
         <developer/>
      </developers>
      <scm>
         <connection/>
         <developerConnection/>
         <tag/>
         <url/>
      </scm>
      <properties>
         <java.version>21</java.version>
         <start-class>com.tutorialspoint.demo.DemoApplication</start-class>
      </properties>
   <dependencies>
      <dependency>
         <groupId>org.springframework.boot</groupId>
         <artifactId>spring-boot-starter-web</artifactId>
      </dependency>
      <dependency>
         <groupId>org.springframework.boot</groupId>
         <artifactId>spring-boot-starter-test</artifactId>
         <scope>test</scope>
      </dependency>
   </dependencies>
   <build>
      <plugins>
         <plugin>
            <groupId>org.springframework.boot</groupId>
            <artifactId>spring-boot-maven-plugin</artifactId>
         </plugin>
      </plugins>
   </build>
</project>
build.gradle
buildscript {
   ext {
      springBootVersion = '3.5.6'
   }
   repositories {
      mavenCentral()
   }
dependencies {
      classpath("org.springframework.boot:spring-boot-gradle-plugin:${springBootVersion}")
   }
}

apply plugin: 'java'
apply plugin: 'eclipse'
apply plugin: 'org.springframework.boot'
apply plugin: 'war'
apply plugin: 'application'

group = 'com.tutorialspoint'
version = '0.0.1-SNAPSHOT'
sourceCompatibility = 21
mainClassName = "com.tutorialspoint.demo.DemoApplication"

repositories {
   mavenCentral()
}
dependencies {
   compile('org.springframework.boot:spring-boot-starter-web')
   testCompile('org.springframework.boot:spring-boot-starter-test')
}
The code for main Spring Boot application class file is given below −
package com.tutorialspoint.demo;

import org.springframework.boot.SpringApplication;
import org.springframework.boot.autoconfigure.SpringBootApplication;
import org.springframework.boot.builder.SpringApplicationBuilder;
import org.springframework.boot.web.servlet.support.SpringBootServletInitializer;
import org.springframework.web.bind.annotation.GetMapping;
import org.springframework.web.bind.annotation.RestController;

@SpringBootApplication
@RestController
public class DemoApplication  extends SpringBootServletInitializer {
   @Override
   protected SpringApplicationBuilder configure(SpringApplicationBuilder application) {
      return application.sources(DemoApplication.class);
   }
   public static void main(String[] args) {
      SpringApplication.run(DemoApplication.class, args);
   }

   @GetMapping(value = "/")
   public String hello() {
      return "Hello World from Tomcat";
   }
}
Spring Boot - Build Systems
In Spring Boot, choosing a build system is an important task. We recommend Maven or Gradle as they provide a good support for dependency management. Spring does not support well other build systems.
Dependency Management
Spring Boot team provides a list of dependencies to support the Spring Boot version for its every release. You do not need to provide a version for dependencies in the build configuration file. Spring Boot automatically configures the dependencies version based on the release. Remember that when you upgrade the Spring Boot version, dependencies also will upgrade automatically.
Note − If you want to specify the version for dependency, you can specify it in your configuration file. However, the Spring Boot team highly recommends that it is not needed to specify the version for dependency.
Maven Dependency
For Maven configuration, we should inherit the Spring Boot Starter parent project to manage the Spring Boot Starters dependencies. For this, simply we can inherit the starter parent in our pom.xml file as shown below.
<parent>
   <groupId>org.springframework.boot</groupId>
   <artifactId>spring-boot-starter-parent</artifactId>
   <version>3.5.6</version>
</parent>
We should specify the version number for Spring Boot Parent Starter dependency. Then for other starter dependencies, we do not need to specify the Spring Boot version number. Observe the code given below −
<dependencies>
   <dependency>
      <groupId>org.springframework.boot</groupId>
      <artifactId>spring-boot-starter-web</artifactId>
   </dependency>
</dependencies>
Gradle Dependency
We can import the Spring Boot Starters dependencies directly into build.gradle file. We do not need Spring Boot start Parent dependency like Maven for Gradle. Observe the code given below −
buildscript {
   ext {
      springBootVersion = '3.5.6'
   }
   repositories {
      mavenCentral()
   }
   dependencies {
      classpath("org.springframework.boot:spring-boot-gradle-plugin:${springBootVersion}")
   }
}
Similarly, in Gradle, we need not specify the Spring Boot version number for dependencies. Spring Boot automatically configures the dependency based on the version.
dependencies {
   compile('org.springframework.boot:spring-boot-starter-web')
}
Spring Boot - Code Structure
Spring Boot does not have any code layout to work with. However, there are some best practices that will help us. This chapter talks about them in detail.
Default package
A class that does not have any package declaration is considered as a default package. Note that generally a default package declaration is not recommended. Spring Boot will cause issues such as malfunctioning of Auto Configuration or Component Scan, when you use default package.
Note − Java's recommended naming convention for package declaration is reversed domain name. For example − com.tutorialspoint.myproject
Typical Layout
The typical layout of Spring Boot application is shown in the image given below −
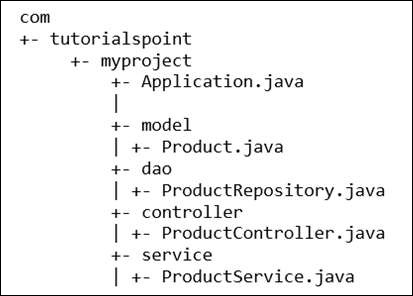
The Application.java file should declare the main method along with @SpringBootApplication. Observe the code given below for a better understanding −
Application.java
package com.tutorialspoint.myproject;

import org.springframework.boot.SpringApplication;
import org.springframework.boot.autoconfigure.SpringBootApplication;

@SpringBootApplication
public class Application {
   public static void main(String[] args) {
      SpringApplication.run(Application.class, args);
   }
}
Spring Boot - Beans and Dependency Injection
In Spring Boot, we can use Spring Framework to define our beans and their dependency injection. The @ComponentScan annotation is used to find beans and the corresponding injected with @Autowired annotation.
If you followed the Spring Boot typical layout, no need to specify any arguments for @ComponentScan annotation. All component class files are automatically registered with Spring Beans.
The following example provides an idea about Auto wiring the Rest Template object and creating a Bean for the same −
@Bean
public RestTemplate getRestTemplate() {
   return new RestTemplate();
}
The following code shows the code for auto wired Rest Template object and Bean creation object in main Spring Boot Application class file −
DemoApplication.java
package com.tutorialspoint.demo;

import org.springframework.beans.factory.annotation.Autowired;
import org.springframework.boot.SpringApplication;
import org.springframework.boot.autoconfigure.SpringBootApplication;
import org.springframework.context.annotation.Bean;
import org.springframework.web.client.RestTemplate;

@SpringBootApplication
public class DemoApplication {
@Autowired
   RestTemplate restTemplate;

   public static void main(String[] args) {
      SpringApplication.run(DemoApplication.class, args);
   }
   @Bean
   public RestTemplate getRestTemplate() {
      return new RestTemplate();
   }
}
Spring Boot - Runners
Application Runner and Command Line Runner interfaces lets you to execute the code after the Spring Boot application is started. You can use these interfaces to perform any actions immediately after the application has started. This chapter talks about them in detail.
Application Runner
Application Runner is an interface used to execute the code after the Spring Boot application started. The example given below shows how to implement the Application Runner interface on the main class file.
DemoApplication.java
package com.tutorialspoint.demo;

import org.springframework.boot.ApplicationArguments;
import org.springframework.boot.ApplicationRunner;
import org.springframework.boot.SpringApplication;
import org.springframework.boot.autoconfigure.SpringBootApplication;

@SpringBootApplication
public class DemoApplication implements ApplicationRunner {
   public static void main(String[] args) {
      SpringApplication.run(DemoApplication.class, args);
   }
   @Override
   public void run(ApplicationArguments arg0) throws Exception {
      System.out.println("Hello World from Application Runner");
   }
}
Console Output
Now, if you observe the console window output below Hello World from Application Runner, the println statement is executed after the Tomcat started.
  .   ____          _            __ _ _
 /\\ / ___'_ __ _ _(_)_ __  __ _ \ \ \ \
( ( )\___ | '_ | '_| | '_ \/ _` | \ \ \ \
 \\/  ___)| |_)| | | | | || (_| |  ) ) ) )
  '  |____| .__|_| |_|_| |_\__, | / / / /
 =========|_|==============|___/=/_/_/_/

 :: Spring Boot ::                (v3.5.6)

2025-09-28T14:24:27.094+05:30  INFO 43596 --- [demo] [           main] c.tutorialspoint.demo.DemoApplication    : Starting DemoApplication using Java 21.0.6 with PID 43596 (D:\Projects\demo\target\classes started by mahes in D:\Projects\demo)
2025-09-28T14:24:27.097+05:30  INFO 43596 --- [demo] [           main] c.tutorialspoint.demo.DemoApplication    : No active profile set, falling back to 1 default profile: "default"
2025-09-28T14:24:28.225+05:30  INFO 43596 --- [demo] [           main] o.s.b.w.embedded.tomcat.TomcatWebServer  : Tomcat initialized with port 8080 (http)
2025-09-28T14:24:28.242+05:30  INFO 43596 --- [demo] [           main] o.apache.catalina.core.StandardService   : Starting service [Tomcat]
2025-09-28T14:24:28.242+05:30  INFO 43596 --- [demo] [           main] o.apache.catalina.core.StandardEngine    : Starting Servlet engine: [Apache Tomcat/10.1.46]
2025-09-28T14:24:28.309+05:30  INFO 43596 --- [demo] [           main] o.a.c.c.C.[Tomcat].[localhost].[/]       : Initializing Spring embedded WebApplicationContext
2025-09-28T14:24:28.310+05:30  INFO 43596 --- [demo] [           main] w.s.c.ServletWebServerApplicationContext : Root WebApplicationContext: initialization completed in 1147 ms
2025-09-28T14:24:28.728+05:30  INFO 43596 --- [demo] [           main] o.s.b.w.embedded.tomcat.TomcatWebServer  : Tomcat started on port 8080 (http) with context path '/'
2025-09-28T14:24:28.740+05:30  INFO 43596 --- [demo] [           main] c.tutorialspoint.demo.DemoApplication    : Started DemoApplication in 2.163 seconds (process running for 2.487)
Hello World from Application Runner
Command Line Runner
Command Line Runner is an interface. It is used to execute the code after the Spring Boot application started. The example given below shows how to implement the Command Line Runner interface on the main class file.
DemoApplication.java
package com.tutorialspoint.demo;

import org.springframework.boot.CommandLineRunner;
import org.springframework.boot.SpringApplication;
import org.springframework.boot.autoconfigure.SpringBootApplication;

@SpringBootApplication
public class DemoApplication implements CommandLineRunner {
   public static void main(String[] args) {
      SpringApplication.run(DemoApplication.class, args);
   }
   @Override
   public void run(String... arg0) throws Exception {
      System.out.println("Hello world from Command Line Runner");
   }
}
Console Output
Look at the console window output below "Hello world from Command Line Runner" println statement is executed after the Tomcat started.
  .   ____          _            __ _ _
 /\\ / ___'_ __ _ _(_)_ __  __ _ \ \ \ \
( ( )\___ | '_ | '_| | '_ \/ _` | \ \ \ \
 \\/  ___)| |_)| | | | | || (_| |  ) ) ) )
  '  |____| .__|_| |_|_| |_\__, | / / / /
 =========|_|==============|___/=/_/_/_/

 :: Spring Boot ::                (v3.5.6)

2025-09-28T14:25:20.792+05:30  INFO 41164 --- [demo] [           main] c.tutorialspoint.demo.DemoApplication    : Starting DemoApplication using Java 21.0.6 with PID 41164 (D:\Projects\demo\target\classes started by mahes in D:\Projects\demo)
2025-09-28T14:25:20.797+05:30  INFO 41164 --- [demo] [           main] c.tutorialspoint.demo.DemoApplication    : No active profile set, falling back to 1 default profile: "default"
2025-09-28T14:25:21.880+05:30  INFO 41164 --- [demo] [           main] o.s.b.w.embedded.tomcat.TomcatWebServer  : Tomcat initialized with port 8080 (http)
2025-09-28T14:25:21.899+05:30  INFO 41164 --- [demo] [           main] o.apache.catalina.core.StandardService   : Starting service [Tomcat]
2025-09-28T14:25:21.900+05:30  INFO 41164 --- [demo] [           main] o.apache.catalina.core.StandardEngine    : Starting Servlet engine: [Apache Tomcat/10.1.46]
2025-09-28T14:25:21.961+05:30  INFO 41164 --- [demo] [           main] o.a.c.c.C.[Tomcat].[localhost].[/]       : Initializing Spring embedded WebApplicationContext
2025-09-28T14:25:21.962+05:30  INFO 41164 --- [demo] [           main] w.s.c.ServletWebServerApplicationContext : Root WebApplicationContext: initialization completed in 1099 ms
2025-09-28T14:25:22.416+05:30  INFO 41164 --- [demo] [           main] o.s.b.w.embedded.tomcat.TomcatWebServer  : Tomcat started on port 8080 (http) with context path '/'
2025-09-28T14:25:22.425+05:30  INFO 41164 --- [demo] [           main] c.tutorialspoint.demo.DemoApplication    : Started DemoApplication in 2.163 seconds (process running for 2.558)
Hello world from Command Line Runner
Spring Boot - Starters
Overview
Spring Boot starters are a set of predefined dependency descriptors which we can include in our Spring Boot project. Each starter focuses on a specific area of functionality (e.g., web, data, security, testing) and provides a curated set of related dependencies. By adding a starter to your project, you automatically get all the required libraries without having to hunt through documentation or sample code. To use a starter, simply add its corresponding dependency to your projects build configuration (Maven or Gradle). For example, in your project's POM.xml (Maven configuration file), you add a starter like:
<dependency>
   <groupId>org.springframework.boot</groupId>
   <artifactId>spring-boot-starter</artifactId>
   <version>3.5.6</version>
</dependency>
Spring Boot Starter Parent
Thespring-boot-starter-parentis a project starter provided by Spring Boot. Its primary purpose is to offer default configurations for your application and set up a complete dependency tree. When you use it as the parent in your project'spom.xml, you inherit a wealth of useful features. Once youve declared the starter parent, you can pull any dependency from it directly. For example, if youre building a web project, addspring-boot-starter-webwithout specifying the version.
Some useful Spring Boot starters
Core Starters
| Sr.No. | Name | Description |
|---|---|---|
| 1 | spring-boot-starter | It is used for core starter, including auto-configuration support, logging, and YAML. |
| 2 | spring-boot-starter-parent | It provides default configurations for the application. Once you include this in your POM.xml, you don't need to specify the version number of an artifact |
WEB/MVC Starters
| Sr.No. | Name | Description |
|---|---|---|
| 1 | spring-boot-starter-tomcat | It is used for Tomcat as the embedded servlet container. Default servlet container starter used by spring-boot-starter-web. |
| 2 | spring-boot-starter-undertow | It is used for Undertow as the embedded servlet container. An alternative to spring-boot-starter-tomcat. |
| 3 | spring-boot-starter-jetty | It is used for Jetty as the embedded servlet container. An alternative to spring-boot-starter-tomcat. |
| 4 | spring-boot-starter-thymeleaf | It is used to build MVC web applications using Thymeleaf views. |
| 5 | spring-boot-starter-web | It is used for building the web application, including RESTful applications using Spring MVC. It uses Tomcat as the default embedded container. |
| 6 | spring-boot-starter-web-services | It is used for Spring Web Services. |
| 7 | spring-boot-starter-jersey | It is used to build RESTful web applications using JAX-RS and Jersey. An alternative to spring-boot-starter-web. |
| 8 | spring-boot-starter-websocket | It is used for building the WebSocket applications. It uses Spring Framework's WebSocket support. |
| 9 | spring-boot-starter-mustache | It is used for building MVC web applications using Mustache views. |
| 10 | spring-boot-starter-groovy-templates | It is used for building MVC web applications using Groovy Template views. |
| 11 | spring-boot-starter-freemarker | It is used for building MVC web applications using FreeMarker views. |
Data Starters
| Sr.No. | Name | Description |
|---|---|---|
| 1 | spring-boot-starter-data-couchbase | It is used for the Couchbase document-oriented database and Spring Data Couchbase. |
| 2 | spring-boot-starter-data-gemfire | It is used to GemFire distributed data store and Spring Data GemFire. |
| 3 | spring-boot-starter-data-cassandra | It is used for Cassandra distributed database and Spring Data Cassandra. |
| 4 | spring-boot-starter-data-redis | It is used for Redis key-value data store with Spring Data Redis and the Jedis client. |
| 5 | spring-boot-starter-data-jpa | It is used for Spring Data JPA with Hibernate. |
| 6 | spring-boot-starter-data-neo4j | It is used for the Neo4j graph database and Spring Data Neo4j. |
| 7 | spring-boot-starter-data-ldap | It is used for Spring Data LDAP. |
| 8 | spring-boot-starter-data-elasticsearch | It is used in Elasticsearch search and analytics engine and Spring Data Elasticsearch. |
| 9 | spring-boot-starter-data-solr | It is used for the Apache Solr search platform with Spring Data Solr. |
| 10 | spring-boot-starter-data-mongodb | It is used for MongoDB document-oriented database and Spring Data MongoDB. |
| 11 | spring-boot-starter-jooq | It is used for jOOQ to access SQL databases. An alternative to spring-boot-starter-data-jpa or spring-boot-starter-jdbc. |
| 12 | spring-boot-starter-data-rest | It is used for exposing Spring Data repositories over REST using Spring Data REST. |
JMS Starters
| Sr.No. | Name | Description |
|---|---|---|
| 1 | spring-boot-starter-artemis | It is used for JMS messaging using Apache Artemis. |
| 2 | spring-boot-starter-amqp | It is used for Spring AMQP and Rabbit MQ. |
| 3 | spring-boot-starter-activemq | It is used in JMS messaging using Apache ActiveMQ. |
AOP Starters
| Sr.No. | Name | Description |
|---|---|---|
| 1 | spring-boot-starter-aop | It is used for aspect-oriented programming with Spring AOP and AspectJ. |
| 2 | spring-boot-starter-jta-atomikos | It is used for JTA transactions using Atomikos. |
JTA Starters
| Sr.No. | Name | Description |
|---|---|---|
| 1 | spring-boot-starter-jta-narayana | It is used for Spring Boot Narayana JTA Starter. |
| 2 | spring-boot-starter-jta-bitronix | It is used for JTA transactions using Bitronix. |
Integration Starters
| Sr.No. | Name | Description |
|---|---|---|
| 1 | spring-boot-starter-integration | It is used for Spring Integration. |
Logging Starters
| Sr.No. | Name | Description |
|---|---|---|
| 1 | spring-boot-starter-logging | It is used for logging using Logback. Default logging starter. |
| 2 | spring-boot-starter-log4j2 | It is used for Log4j2 for logging. An alternative to spring-boot-starter-logging. |
Miscellaneous Starters
| Sr.No. | Name | Description |
|---|---|---|
| 1 | spring-boot-starter-mail | It is used to support Java Mail and Spring Framework's email sending. |
| 2 | spring-boot-starter-social-facebook | It is used for Spring Social Media Facebook. |
| 3 | spring-boot-starter-social-linkedin | It is used for Spring Social Media LinkedIn. |
| 4 | spring-boot-starter-social-twitter | It is used for Spring Social Media Twitter. |
| 5 | spring-boot-starter-batch | It is used for Spring Batch. |
| 6 | spring-boot-starter-cache | It is used for Spring Framework's caching support. |
| 7 | spring-boot-starter-cloud-connectors | It is used for Spring Cloud Connectors that simplifies connecting to services in cloud platforms like Cloud Foundry and Heroku. |
| 8 | spring-boot-starter-security | It is used for Spring Security. |
| 9 | spring-boot-starter-actuator | It is used for Spring Boot's Actuator that provides production-ready features to help you monitor and manage your application. |
Spring Boot - Application Properties
Application Properties support us to work in different environments. In this chapter, you are going to learn how to configure and specify the properties to a Spring Boot application.
Command Line Properties
Spring Boot application converts the command line properties into Spring Boot Environment properties. Command line properties take precedence over the other property sources. By default, Spring Boot uses the 8080 port number to start the Tomcat. Let us learn how change the port number by using command line properties.
Step 1 − After creating an executable JAR file, run it by using the command java jar <JARFILE>.
Step 2 − Use the command given in the screenshot given below to change the port number for Spring Boot application by using command line properties.

Note − You can provide more than one application properties by using the delimiter −.
Properties File
Properties files are used to keep N number of properties in a single file to run the application in a different environment. In Spring Boot, properties are kept in the application.properties file under the classpath.
The application.properties file is located in the src/main/resources directory. The code for sample application.properties file is given below −
server.port = 9090
spring.application.name = demoservice
Note that in the code shown above the Spring Boot application demoservice starts on the port 9090.
YAML File
Spring Boot supports YAML based properties configurations to run the application. Instead of application.properties, we can use application.yml file. This YAML file also should be kept inside the classpath. The sample application.yml file is given below −
spring:
   application:
      name: demoservice
   server:
port: 9090
Externalized Properties
Instead of keeping the properties file under classpath, we can keep the properties in different location or path. While running the JAR file, we can specify the properties file path. You can use the following command to specify the location of properties file while running the JAR −
-Dspring.config.location = C:\application.properties

Use of @Value Annotation
The @Value annotation is used to read the environment or application property value in Java code. The syntax to read the property value is shown below −
@Value("${property_key_name}")
Look at the following example that shows the syntax to read the spring.application.name property value in Java variable by using @Value annotation.
@Value("${spring.application.name}")
Observe the code given below for a better understanding −
import org.springframework.beans.factory.annotation.Value;
import org.springframework.boot.SpringApplication;
import org.springframework.boot.autoconfigure.SpringBootApplication;
import org.springframework.web.bind.annotation.RequestMapping;
import org.springframework.web.bind.annotation.RestController;

@SpringBootApplication
@RestController
public class DemoApplication {
   @Value("${spring.application.name}")
   private String name;
   public static void main(String[] args) {
      SpringApplication.run(DemoApplication.class, args);
   }
   @RequestMapping(value = "/")
   public String name() {
      return name;
   }
}
Note − If the property is not found while running the application, Spring Boot throws the Illegal Argument exception as Could not resolve placeholder 'spring.application.name' in value "${spring.application.name}".
To resolve the placeholder issue, we can set the default value for the property using thr syntax given below −
@Value("${property_key_name:default_value}")

@Value("${spring.application.name:demoservice}")
Spring Boot Active Profile
Spring Boot supports different properties based on the Spring active profile. For example, we can keep two separate files for development and production to run the Spring Boot application.
Spring active profile in application.properties
Let us understand how to have Spring active profile in application.properties. By default, application. properties will be used to run the Spring Boot application. If you want to use profile based properties, we can keep separate properties file for each profile as shown below −
application.properties
server.port = 8080
spring.application.name = demoservice
application-dev.properties
server.port = 9090
spring.application.name = demoservice
application-prod.properties
server.port = 4431
spring.application.name = demoservice
While running the JAR file, we need to specify the spring active profile based on each properties file. By default, Spring Boot application uses the application.properties file. The command to set the spring active profile is shown below −

You can see active profile name on the console log as shown below −
2025-09-28 08:13:16.322  INFO 14028 --- [
   main] com.tutorialspoint.demo.DemoApplication  :
   The following profiles are active: dev
Now, Tomcat has started on the port 9090 (http) as shown below −
2025-09-28 08:13:20.185  INFO 14028 --- [
   main] s.b.c.e.t.TomcatEmbeddedServletContainer :
   Tomcat started on port(s): 9090 (http)
You can set the Production active profile as shown below −

You can see active profile name on the console log as shown below −
2025-09-28 08:13:16.322  INFO 14028 --- [
   main] com.tutorialspoint.demo.DemoApplication  :
   The following profiles are active: prod
Now, Tomcat started on the port 4431 (http) as shown below −
2025-09-28 08:13:20.185  INFO 14028 --- [
   main] s.b.c.e.t.TomcatEmbeddedServletContainer :
   Tomcat started on port(s): 4431 (http)
Spring active profile for application.yml
Let us understand how to keep Spring active profile for application.yml. We can keep the Spring active profile properties in the single application.yml file. No need to use the separate file like application.properties.
The following is an example code to keep the Spring active profiles in application.yml file. Note that the delimiter (---) is used to separate each profile in application.yml file.
spring:
   application:
      name: demoservice
server:
   port: 8080

---
spring:
   profiles: dev
   application:
      name: demoservice
server:
   port: 9090

---
spring:
   profiles: prod
   application:
      name: demoservice
server:
   port: 4431
To command to set development active profile is given below −
You can see active profile name on the console log as shown below −
2025-09-28 08:41:37.202  INFO 14104 --- [
   main] com.tutorialspoint.demo.DemoApplication  :
   The following profiles are active: dev
Now, Tomcat started on the port 9090 (http) as shown below −
2025-09-28 08:41:46.650  INFO 14104 --- [
   main] s.b.c.e.t.TomcatEmbeddedServletContainer :
   Tomcat started on port(s): 9090 (http)
The command to set Production active profile is given below −
You can see active profile name on the console log as shown below −
2025-09-28 08:43:10.743  INFO 13400 --- [
   main] com.tutorialspoint.demo.DemoApplication  :
   The following profiles are active: prod
This will start Tomcat on the port 4431 (http) as shown below:
2025-09-28 08:43:14.473  INFO 13400 --- [
   main] s.b.c.e.t.TomcatEmbeddedServletContainer :
   Tomcat started on port(s): 4431 (http)
Spring Boot - Configuration/Auto-Configuration
This chapter will discuss in detail about Spring Boot configuration and auto-configuration.
Spring Boot Configuration
Although a Spring/Spring Boot application can be configured in an XML document, it is generally recommended to configure Spring Boot applications with a single file with @Configuration annotation.
Different kinds of annotation
@Component Annotation
In Spring Boot, the @Component annotation declares a class as a Spring component. This signals to Spring that the class should be managed by the Spring container, meaning it will be automatically created, initialized, and potentially injected into other components.
Example - Usage of @Component Annotation
import org.springframework.stereotype.Component;

@Component
public class Utility {
...
}
@Configuration Annotation
In Spring Boot, the @Configuration annotation is used to indicate that a class is a source of bean definitions. It's a core annotation from the Spring Framework, not specific to Spring Boot. Classes marked with @Configuration can define beans using the @Bean annotation on methods within the class. These beans are then managed by the Spring container. @Configuration promotes a Java-based configuration approach instead of relying solely on XML configuration files.
Example - Usage of @Configuration Annotation
@Configuration
public class AppConfig {

   @Bean
   public MyService myService() {
      return new MyServiceImpl();
   }
}
@SpringBootApplication Annotation
This is a meta-annotation that combines @EnableAutoConfiguration, @ComponentScan, and @Configuration. It's often the only annotation you need to bootstrap a Spring Boot application.
Example - Usage of @SpringBootApplication Annotation
import org.springframework.boot.SpringApplication;
import org.springframework.boot.autoconfigure.SpringBootApplication;
import org.springframework.context.annotation.ComponentScan;

@SpringBootApplication
public class MyApplication {

    public static void main(String[] args) {
        SpringApplication.run(MyApplication.class, args);
    }
}
@ComponentScan Annotation
In Spring Boot, the @ComponentScan annotation is used to instruct Spring to scan the specified packages and their sub-packages for components (classes annotated with @Component, @Service, @Repository, @Controller, etc.) and register them as beans in the Spring application context. By default, if you don't explicitly use @ComponentScan, Spring Boot automatically scans the package where your main application class resides and its sub-packages. If your components are in a different package structure, you can use basePackages attribute of @ComponentScan to specify the packages to scan. You can specify multiple packages using an array in basePackages, e.g.,
basePackages = {"com.example.package1", "com.example.package2"}
Example - Usage of @ComponentScan Annotation
import org.springframework.boot.SpringApplication;
import org.springframework.boot.autoconfigure.SpringBootApplication;
import org.springframework.context.annotation.ComponentScan;

@SpringBootApplication
@ComponentScan(basePackages = {"com.example.mypackage"})
public class MyApplication {

    public static void main(String[] args) {
        SpringApplication.run(MyApplication.class, args);
    }
}
What is Spring Boot Autoconfiguration?
Spring Boot Autoconfiguration is a feature that automatically configures your Spring application based on the dependencies present on the classpath and various properties settings. This eliminates the need for a lot of manual configuration, making Spring Boot applications easier to set up and maintain.
@SpringBootApplication or @EnableAutoConfiguration Annotation
These annotations trigger the autoconfiguration process. Typically, you annotate your main application class with @SpringBootApplication, which includes @EnableAutoConfiguration. Additional packages can be configured using the @AutoConfigurationPackage annotation.
Scanning the Classpath − Spring Boot scans the classpath for libraries and frameworks.
-
Conditional Configuration − Based on the detected dependencies, Spring Boot applies relevant configurations. This is done using @Conditional annotations, such as:
@ConditionalOnClass− Applies configuration if a specific class is present on the classpath.
@ConditionalOnMissingBean− Applies configuration if a specific bean is not already defined.
@ConditionalOnProperty− Applies configuration based on property values.
-
Bean Creation and Configuration − Spring Boot creates and configures beans based on the applied autoconfigurations.
Example:
If you add the spring-boot-starter-web dependency to your project, Spring Boot automatically configures a Tomcat web server and other necessary components for a web application.
If you add the spring-boot-starter-data-jpa dependency, Spring Boot automatically configures a data source, entity manager, and other components required for JPA-based data access.
Benefits of Spring Boot Autoconfiguration
Following are some of the major benefits of using Spring Boot Autoconfiguration.
Reduced Boilerplate Code− Autoconfiguration eliminates the need for manual configuration of common Spring components.
Faster Development− You can quickly create Spring Boot applications without having to write extensive configuration code.
Improved Productivity− Autoconfiguration allows you to focus on the core business logic of your application.
-
Customization− You can customize the autoconfiguration behavior by following means:
Excluding specific autoconfiguration classes using the exclude attribute of @EnableAutoConfiguration.
Defining your own beans to override the auto-configured ones.
Using property files or environment variables to modify the default configurations.
Spring Boot - Annotations
This chapter will discuss in detail some of the essential annotations in Spring Boot.
Introduction
Annotations are metadata of your code. Metadata means data about data. They are usually placed on top of class, method or variable declaration. Annotations are some alphanumeric value which start with @. Putting annotations in a class does not affect the compilation or running the program. When annotations are used for configuration, an XML file is not needed.
Following annotations have already been discussed on the Spring Boot - Configuration/Autoconfiguration chapter.
@Component
@Configuration
@SpringBootApplication
@EnableAutoConfiguration
@ComponentScan
@AutoConfigurationPackage
@ConditionalOnClass
@ConditionalOnMissingBean
@ConditionalOnProperty
How to turn on Spring annotations?
Turn on Spring annotations, add the following line before beans declaration in your XML configuration file.
<context:annotation-config />
Annotations
@RestController
@RestController marks a class as controller for RESTful web requests. It combines the functionality of@Controllerand@ResponseBody. Here's what it does:
@Controller− Marks the class as a Spring MVC controller, responsible for handling incoming HTTP requests.
@ResponseBody− Tells Spring to serialize the return value of the controller's method directly into the HTTP response body, typically in formats like JSON or XML.
HTTP Related Annotations
@RequestMapping
@RequestMapping annotation is used to map web requests to specific handler methods in a controller class.It acts as a bridge between the incoming HTTP requests and the methods responsible for handling them. You can specify the HTTP method (GET, POST, PUT, DELETE, etc.) that the method handles using themethodattribute.
With latest version of Spring Boot, the preferred way is shortcut annotations instead of @RequestMapping
@GetMapping− Shortcut for @RequestMapping(method = RequestMethod.GET)
@PostMapping− Shortcut for @RequestMapping(method = RequestMethod.POST)
@PutMapping− Shortcut for @RequestMapping(method = RequestMethod.PUT)
@DeleteMapping− Shortcut for @RequestMapping(method = RequestMethod.DELETE)
@PatchMapping− Shortcut for @RequestMapping(method = RequestMethod.PATCH)
Spring currently supports five types of inbuilt annotations for handling different types of incoming HTTP request methods which are GET, POST, PUT, DELETE, and PATCH.
@PathVariable
@PathVariablebinds a method parameter to a URI template variable. A URI template variable isa parameter within a URI that is enclosed by curly brackets and can be substituted before the URI is resolved.
For example, in the URI template
'/users/{id}/{?query1,query2}'
there are three variables:
id −A required path variable
query1 −An optional query variable
query2 −Another optional query variable
@RequestParam
@RequestParambinds a method parameter to a request parameter.
@RequestBody
@RequestBodybinds a method parameter to the body of the HTTP request.
@ModelAttribute
@ModelAttribute binds a method parameter to a model attribute. In Spring Boot, a model variable is an interface that holds data to be passed from a controller to a view.This interface Model is in org.springframework.ui package.
JPA Related Annotations
@Repository
@Repository marks a class as a data access object(DAO). This class is responsible for CRUD operations on your database.
@Entity
@Entitymarks a class as a JPA entity.
@Id
@Idspecifies the primary key of an entity.
@GeneratedValue
@GeneratedValue specifies how the primary key should be generated.
@GeneratedValue(strategy = GenerationType.IDENTITY)
@Column
Column maps a field to a database column.
@Transactional
@Transactional marks a method or class as transactional. It ensures that a method (or a whole class) is executed within the context of a transaction. When you mark a method with@Transactional, Spring automatically handles transaction management for that method. When you annotate a method with@Transactional, Spring starts a transaction before the method begins executing.If the method completes successfully (without exceptions), Spring commits the transaction (i.e., saves changes to the database). If an exception occurs, Spring rolls back the transaction. To use@Transactional, you need to configure transaction management in your Spring Boot application. Add@EnableTransactionManagementto your main application class.
Other Important Annotations
@Value
This annotation is used to assign default values to variables and method arguments.It can also be used to inject a property value from a properties file or environment variable.
@EnableCaching
@EnableCaching enables caching support. When you add@EnableCachingto a configuration class, Spring scans the application for methods annotated with caching - related annotations (such as@Cacheable,@CachePut,@CacheEvict, or @Caching).
@EnableAsync
@EnableAsyncenables support for asynchronous method execution. Methods annotated with@Asyncwill run in separate threads, allowing the caller to proceed without waiting for the method to complete.
Spring Boot - Logging
Spring Boot uses Apache Commons logging for all internal logging. Spring Boots default configurations provides a support for the use of Java Util Logging, Log4j2, and Logback. Using these, we can configure the console logging as well as file logging.
If you are using Spring Boot Starters, Logback will provide a good support for logging. Besides, Logback also provides a use of good support for Common Logging, Util Logging, Log4J, and SLF4J.
Log Format
The default Spring Boot Log format is shown below:
[2025-09-28T15:56:08Z] [org.apache.juli.logging.DirectJDKLog] [main] [168] [INFO ] Starting ProtocolHandler ["http-nio-8080"]
[2025-09-28T15:56:08Z] [org.springframework.boot.web.embedded.tomcat.TomcatWebServer] [main] [243] [INFO ] Tomcat started on port 8080 (http) with context path '/'
[2025-09-28T15:56:08Z] [org.springframework.boot.StartupInfoLogger] [main] [59] [INFO ] Started DemoApplication in 2.077 seconds (process running for 2.568)
which gives you the following information −
Date and Time that gives the date and time of the log
Log level shows INFO, ERROR or WARN
Process ID
The --- which is a separator
Thread name is enclosed within the square brackets []
Logger Name that shows the Source class name
The Log message
Console Log Output
The default log messages will print to the console window. By default, "INFO", "ERROR" and "WARN" log messages will print in the log file.
If you have to enable the debug level log, add the debug flag on starting your application using the command shown below −
java jar demo.jar --debug
You can also add the debug mode to your application.properties file as shown here −
debug = true
File Log Output
By default, all logs will print on the console window and not in the files. If you want to print the logs in a file, you need to set the property logging.file or logging.path in the application.properties file.
You can specify the log file path using the property shown below. Note that the log file name is spring.log.
logging.path = /var/tmp/
You can specify the own log file name using the property shown below −
logging.file = /var/tmp/mylog.log
Note − files will rotate automatically after reaching the size 10 MB.
Log Levels
Spring Boot supports all logger levels such as "TRACE", "DEBUG", "INFO", "WARN", "ERROR", "FATAL", "OFF". You can define Root logger in the application.properties file as shown below −
logging.level.root = WARN
Note − Logback does not support "FATAL" level log. It is mapped to the "ERROR" level log.
Configure Logback
Logback supports XML based configuration to handle Spring Boot Log configurations. Logging configuration details are configured in logback.xml file. The logback.xml file should be placed under the classpath.
You can configure the ROOT level log in Logback.xml file using the code given below −
<?xml version = "1.0" encoding = "UTF-8"?>
<configuration>
   <root level = "INFO">
   </root>
</configuration>
You can configure the console appender in Logback.xml file given below.
<?xml version = "1.0" encoding = "UTF-8"?>
<configuration>
   <appender name = "STDOUT" class = "ch.qos.logback.core.ConsoleAppender"></appender>
   <root level = "INFO">
      <appender-ref ref = "STDOUT"/>
   </root>
</configuration>
You can configure the file appender in Logback.xml file using the code given below. Note that you need to specify the Log file path insider the file appender.
<?xml version = "1.0" encoding = "UTF-8"?>
<configuration>
   <appender name = "FILE" class = "ch.qos.logback.core.FileAppender">
      <File>/var/tmp/mylog.log</File>
   </appender>
   <root level = "INFO">
      <appender-ref ref = "FILE"/>
   </root>
</configuration>
You can define the Log pattern in logback.xml file using the code given below. You can also define the set of supported log patterns inside the console or file log appender using the code given below −
<pattern>[%d{yyyy-MM-dd'T'HH:mm:ss.sss'Z'}] [%C] [%t] [%L] [%-5p] %m%n</pattern>
The code for complete logback.xml file is given below. You have to place this in the class path.
logback.xml
<?xml version = "1.0" encoding = "UTF-8"?>
<configuration>
   <appender name = "STDOUT" class = "ch.qos.logback.core.ConsoleAppender">
      <encoder>
         <pattern>[%d{yyyy-MM-dd'T'HH:mm:ss'Z'}] [%C] [%t] [%L] [%-5p] %m%n</pattern>
      </encoder>
   </appender>

   <appender name = "FILE" class = "ch.qos.logback.core.FileAppender">
      <File>/var/tmp/mylog.log</File>
      <encoder>
         <pattern>[%d{yyyy-MM-dd'T'HH:mm:ss'Z'}] [%C] [%t] [%L] [%-5p] %m%n</pattern>
      </encoder>
   </appender>

   <root level = "INFO">
      <appender-ref ref = "FILE"/>
      <appender-ref ref = "STDOUT"/>
   </root>
</configuration>
The code given below shows how to add the slf4j logger in Spring Boot main class file.
package com.tutorialspoint.demo;

import org.slf4j.Logger;
import org.slf4j.LoggerFactory;
import org.springframework.boot.SpringApplication;
import org.springframework.boot.autoconfigure.SpringBootApplication;

@SpringBootApplication
public class DemoApplication {
   private static final Logger logger = LoggerFactory.getLogger(DemoApplication.class);

   public static void main(String[] args) {
      logger.info("this is a info message");
      logger.warn("this is a warn message");
      logger.error("this is a error message");
      SpringApplication.run(DemoApplication.class, args);
   }
}
The output that you can see in the console window is shown here −
[2025-09-28T15:56:06Z] [com.tutorialspoint.demo.DemoApplication] [main] [13] [INFO ] this is a info message
[2025-09-28T15:56:06Z] [com.tutorialspoint.demo.DemoApplication] [main] [14] [WARN ] this is a warn message
[2025-09-28T15:56:06Z] [com.tutorialspoint.demo.DemoApplication] [main] [15] [ERROR] this is a error message
The output that you can see in the log file is shown here −
[2025-09-28T15:56:06Z] [com.tutorialspoint.demo.DemoApplication] [main] [13] [INFO ] this is a info message
[2025-09-28T15:56:06Z] [com.tutorialspoint.demo.DemoApplication] [main] [14] [WARN ] this is a warn message
[2025-09-28T15:56:06Z] [com.tutorialspoint.demo.DemoApplication] [main] [15] [ERROR] this is a error message
Spring Boot - Building RESTful Web Services
Spring Boot provides a very good support to building RESTful Web Services for enterprise applications. This chapter will explain in detail about building RESTful web services using Spring Boot.
Note − For building a RESTful Web Services, we need to add the Spring Boot Starter Web dependency into the build configuration file.
If you are a Maven user, use the following code to add the below dependency in your pom.xml file −
<dependency>
   <groupId>org.springframework.boot</groupId>
   <artifactId>spring-boot-starter-web</artifactId>
</dependency>
If you are a Gradle user, use the following code to add the below dependency in your build.gradle file.
compile('org.springframework.boot:spring-boot-starter-web')
The code for complete build configuration file Maven build pom.xml is given below −
pom.xml
<?xml version="1.0" encoding="UTF-8"?>
<project xmlns="http://maven.apache.org/POM/4.0.0" xmlns:xsi="http://www.w3.org/2001/XMLSchema-instance"
   xsi:schemaLocation="http://maven.apache.org/POM/4.0.0 https://maven.apache.org/xsd/maven-4.0.0.xsd">
   <modelVersion>4.0.0</modelVersion>
   <parent>
      <groupId>org.springframework.boot</groupId>
      <artifactId>spring-boot-starter-parent</artifactId>
      <version>3.5.6</version>
      <relativePath/> <!-- lookup parent from repository -->
   </parent>
   <groupId>com.tutorialspoint</groupId>
   <artifactId>demo</artifactId>
   <version>0.0.1-SNAPSHOT</version>
   <packaging>jar</packaging>
   <name>demo</name>
   <description>Demo project for Spring Boot</description>
   <url/>
   <licenses>
      <license/>
   </licenses>
   <developers>
      <developer/>
   </developers>
   <scm>
      <connection/>
      <developerConnection/>
      <tag/>
      <url/>
      </scm>
      <properties>
         <java.version>21</java.version>
      </properties>
      <dependencies>
         <dependency>
            <groupId>org.springframework.boot</groupId>
            <artifactId>spring-boot-starter-web</artifactId>
         </dependency>
         <dependency>
            <groupId>org.springframework.boot</groupId>
            <artifactId>spring-boot-starter-test</artifactId>
            <scope>test</scope>
         </dependency>
      </dependencies>
   <build>
      <plugins>
         <plugin>
            <groupId>org.springframework.boot</groupId>
            <artifactId>spring-boot-maven-plugin</artifactId>
         </plugin>
      </plugins>
   </build>
</project>
The code for complete build configuration file Gradle Build build.gradle is given below −
buildscript {
   ext {
      springBootVersion = '3.5.6'
   }
   repositories {
      mavenCentral()
   }
   dependencies {
      classpath("org.springframework.boot:spring-boot-gradle-plugin:${springBootVersion}")
   }
}

apply plugin: 'java'
apply plugin: 'eclipse'
apply plugin: 'org.springframework.boot'

group = 'com.tutorialspoint'
version = '0.0.1-SNAPSHOT'
sourceCompatibility = 21

repositories {
   mavenCentral()
}
dependencies {
   compile('org.springframework.boot:spring-boot-starter-web')
   testCompile('org.springframework.boot:spring-boot-starter-test')
}
Before you proceed to build a RESTful web service, it is suggested that you have knowledge of the following annotations −
Rest Controller
The @RestController annotation is used to define the RESTful web services. It serves JSON, XML and custom response. Its syntax is shown below −
@RestController
public class ProductServiceController {
}
Request Mapping
The @RequestMapping annotation is used to define the Request URI to access the REST Endpoints. We can define Request method to consume and produce object. The default request method is GET.
@RequestMapping(value = "/products")
public ResponseEntity<Object> getProducts() { }
Request Body
The @RequestBody annotation is used to define the request body content type.
public ResponseEntity<Object> createProduct(@RequestBody Product product) {
}
Path Variable
The @PathVariable annotation is used to define the custom or dynamic request URI. The Path variable in request URI is defined as curly braces {} as shown below −
public ResponseEntity<Object> updateProduct(@PathVariable("id") String id) {
}
Request Parameter
The @RequestParam annotation is used to read the request parameters from the Request URL. By default, it is a required parameter. We can also set default value for request parameters as shown here −
public ResponseEntity<Object> getProduct(
   @RequestParam(value = "name", required = false, defaultValue = "honey") String name) {
}
GET API
The default HTTP request method is GET. This method does not require any Request Body. You can send request parameters and path variables to define the custom or dynamic URL.
The sample code to define the HTTP GET request method is shown below. In this example, we used HashMap to store the Product. Note that we used a POJO class as the product to be stored.
Here, the request URI is /products and it will return the list of products from HashMap repository. The controller class file is given below that contains GET method REST Endpoint.
...
@RestController
public class ProductServiceController {
   ...
   @GetMapping(value = "/products")
   public ResponseEntity<Object> getProduct() {
      return new ResponseEntity<>(productRepo.values(), HttpStatus.OK);
   }
}
POST API
The HTTP POST request is used to create a resource. This method contains the Request Body. We can send request parameters and path variables to define the custom or dynamic URL
The following example shows the sample code to define the HTTP POST request method. In this example, we used HashMap to store the Product, where the product is a POJO class.
Here, the request URI is /products, and it will return the String after storing the product into HashMap repository.
...
@RestController
public class ProductServiceController {
   ...
   @PostMapping(value = "/products")
   public ResponseEntity<Object> createProduct(@RequestBody Product product) {
      productRepo.put(product.getId(), product);
      return new ResponseEntity<>("Product is created successfully", HttpStatus.CREATED);
   }
}
PUT API
The HTTP PUT request is used to update the existing resource. This method contains a Request Body. We can send request parameters and path variables to define the custom or dynamic URL.
The example given below shows how to define the HTTP PUT request method. In this example, we used HashMap to update the existing Product, where the product is a POJO class.
Here the request URI is /products/{id} which will return the String after a the product into a HashMap repository. Note that we used the Path variable {id} which defines the products ID that needs to be updated.
...
@RestController
public class ProductServiceController {
   ...
   @PutMapping(value = "/products/{id}")
   public ResponseEntity<Object> updateProduct(@PathVariable("id") String id, @RequestBody Product product) {
      productRepo.remove(id);
      product.setId(id);
      productRepo.put(id, product);
      return new ResponseEntity<>("Product is updated successsfully", HttpStatus.OK);
   }
}
DELETE API
The HTTP Delete request is used to delete the existing resource. This method does not contain any Request Body. We can send request parameters and path variables to define the custom or dynamic URL.
The example given below shows how to define the HTTP DELETE request method. In this example, we used HashMap to remove the existing product, which is a POJO class.
The request URI is /products/{id} and it will return the String after deleting the product from HashMap repository. We used the Path variable {id} which defines the products ID that needs to be deleted.
...
@RestController
public class ProductServiceController {
   ...
   @DeleteMapping(value = "/products/{id}")
   public ResponseEntity<Object> delete(@PathVariable("id") String id) {
      productRepo.remove(id);
      return new ResponseEntity<>("Product is deleted successsfully", HttpStatus.OK);
   }
}
This section gives you the complete set of source code. Observe the following codes for their respective functionalities −
The Spring Boot main application class.
DemoApplication.java
package com.tutorialspoint.demo;

import org.springframework.boot.SpringApplication;
import org.springframework.boot.autoconfigure.SpringBootApplication;

@SpringBootApplication
public class DemoApplication {
   public static void main(String[] args) {
      SpringApplication.run(DemoApplication.class, args);
   }
}
The POJO class
Product.java
package com.tutorialspoint.demo.model;

public class Product {
   private String id;
   private String name;

   public String getId() {
      return id;
   }
   public void setId(String id) {
      this.id = id;
   }
   public String getName() {
      return name;
   }
   public void setName(String name) {
      this.name = name;
   }
}
The Rest Controller class
ProductServiceController.java
package com.tutorialspoint.demo.controller;

import java.util.HashMap;
import java.util.Map;

import org.springframework.http.HttpStatus;
import org.springframework.http.ResponseEntity;
import org.springframework.web.bind.annotation.DeleteMapping;
import org.springframework.web.bind.annotation.GetMapping;
import org.springframework.web.bind.annotation.PathVariable;
import org.springframework.web.bind.annotation.PostMapping;
import org.springframework.web.bind.annotation.PutMapping;
import org.springframework.web.bind.annotation.RequestBody;
import org.springframework.web.bind.annotation.RestController;

import com.tutorialspoint.demo.model.Product;

@RestController
public class ProductServiceController {
   private static Map<String, Product> productRepo = new HashMap<>();
   static {
      Product honey = new Product();
      honey.setId("1");
      honey.setName("Honey");
      productRepo.put(honey.getId(), honey);

      Product almond = new Product();
      almond.setId("2");
      almond.setName("Almond");
      productRepo.put(almond.getId(), almond);
   }

   @DeleteMapping(value = "/products/{id}")
   public ResponseEntity<Object> delete(@PathVariable("id") String id) {
      productRepo.remove(id);
      return new ResponseEntity<>("Product is deleted successsfully", HttpStatus.OK);
   }

   @PutMapping(value = "/products/{id}")
   public ResponseEntity<Object> updateProduct(@PathVariable("id") String id, @RequestBody Product product) {
      productRepo.remove(id);
      product.setId(id);
      productRepo.put(id, product);
      return new ResponseEntity<>("Product is updated successsfully", HttpStatus.OK);
   }

   @PostMapping(value = "/products")
   public ResponseEntity<Object> createProduct(@RequestBody Product product) {
      productRepo.put(product.getId(), product);
      return new ResponseEntity<>("Product is created successfully", HttpStatus.CREATED);
   }

   @GetMapping(value = "/products")
   public ResponseEntity<Object> getProduct() {
      return new ResponseEntity<>(productRepo.values(), HttpStatus.OK);
   }
}
Compilation and Execution
You can create an executable JAR file, and run the spring boot application by using the below Maven or Gradle commands as shown −
For Maven, use the command shown below −
mvn clean install
After "BUILD SUCCESS", you can find the JAR file under the target directory.
For Gradle, use the command shown below −
gradle clean build
After "BUILD SUCCESSFUL", you can find the JAR file under the build/libs directory.
You can run the JAR file by using the command shown below −
java jar <JARFILE>
This will start the application on the Tomcat port 8080 as shown below −
  .   ____          _            __ _ _
 /\\ / ___'_ __ _ _(_)_ __  __ _ \ \ \ \
( ( )\___ | '_ | '_| | '_ \/ _` | \ \ \ \
 \\/  ___)| |_)| | | | | || (_| |  ) ) ) )
  '  |____| .__|_| |_|_| |_\__, | / / / /
 =========|_|==============|___/=/_/_/_/

 :: Spring Boot ::                (v3.5.6)

[2025-09-28T16:07:43Z] [org.springframework.boot.StartupInfoLogger] [main] [53] [INFO ] Starting DemoApplication using Java 21.0.6 with PID 40540 (D:\Projects\demo\target\classes started by mahes in D:\Projects\demo)
[2025-09-28T16:07:43Z] [org.springframework.boot.SpringApplication] [main] [652] [INFO ] No active profile set, falling back to 1 default profile: "default"
[2025-09-28T16:07:44Z] [org.springframework.boot.web.embedded.tomcat.TomcatWebServer] [main] [111] [INFO ] Tomcat initialized with port 8080 (http)
[2025-09-28T16:07:44Z] [org.apache.juli.logging.DirectJDKLog] [main] [168] [INFO ] Initializing ProtocolHandler ["http-nio-8080"]
[2025-09-28T16:07:44Z] [org.apache.juli.logging.DirectJDKLog] [main] [168] [INFO ] Starting service [Tomcat]
[2025-09-28T16:07:44Z] [org.apache.juli.logging.DirectJDKLog] [main] [168] [INFO ] Starting Servlet engine: [Apache Tomcat/10.1.46]
[2025-09-28T16:07:44Z] [org.apache.juli.logging.DirectJDKLog] [main] [168] [INFO ] Initializing Spring embedded WebApplicationContext
[2025-09-28T16:07:44Z] [org.springframework.boot.web.servlet.context.ServletWebServerApplicationContext] [main] [301] [INFO ] Root WebApplicationContext: initialization completed in 1126 ms
[2025-09-28T16:07:45Z] [org.apache.juli.logging.DirectJDKLog] [main] [168] [INFO ] Starting ProtocolHandler ["http-nio-8080"]
[2025-09-28T16:07:45Z] [org.springframework.boot.web.embedded.tomcat.TomcatWebServer] [main] [243] [INFO ] Tomcat started on port 8080 (http) with context path '/'
[2025-09-28T16:07:45Z] [org.springframework.boot.StartupInfoLogger] [main] [59] [INFO ] Started DemoApplication in 2.192 seconds (process running for 2.7)
Output
Now hit the URL shown below in POSTMAN application and see the output.
GET API URL is: http://localhost:8080/products
POST API URL is: http://localhost:8080/products
PUT API URL is: http://localhost:8080/products/3
DELETE API URL is: http://localhost:8080/products/3

Spring Boot - Exception Handling
Handling exceptions and errors in APIs and sending the proper response to the client is good for enterprise applications. In this chapter, we will learn how to handle exceptions in Spring Boot.
Before proceeding with exception handling, let us gain an understanding on the following annotations.
Controller Advice
The @ControllerAdvice is an annotation, to handle the exceptions globally.
You can use the following code to create @ControllerAdvice class to handle the exceptions globally −
ProductExceptionController.java
package com.tutorialspoint.demo.exception;

import org.springframework.web.bind.annotation.ControllerAdvice;

@ControllerAdvice
public class ProductExceptionController {
}
Exception Handler
The @ExceptionHandler is an annotation used to handle the specific exceptions and sending the custom responses to the client.
Define a class that extends the RuntimeException class.
ProductNotfoundException.java
package com.tutorialspoint.demo.exception;

public class ProductNotfoundException extends RuntimeException {
   private static final long serialVersionUID = 1L;
}
You can define the @ExceptionHandler method to handle the exceptions as shown. This method should be used for writing the Controller Advice class file.
@ExceptionHandler(value = ProductNotfoundException.class)
public ResponseEntity<Object> exception(ProductNotfoundException exception) {
}
Now, use the code given below to throw the exception from the API.
@PutMapping(value = "/products/{id}")
public ResponseEntity<Object> updateProduct() {
   throw new ProductNotfoundException();
}
The complete code to handle the exception is given below. In this example, we used the PUT API to update the product. Here, while updating the product, if the product is not found, then return the response error message as Product not found. Note that the ProductNotFoundException exception class should extend the RuntimeException.
ProductNotfoundException.java
package com.tutorialspoint.demo.exception;

public class ProductNotfoundException extends RuntimeException {
   private static final long serialVersionUID = 1L;
}
The Controller Advice class to handle the exception globally is given below. We can define any Exception Handler methods in this class file.
ProductExceptionController
package com.tutorialspoint.demo.exception;

import org.springframework.http.HttpStatus;
import org.springframework.http.ResponseEntity;
import org.springframework.web.bind.annotation.ControllerAdvice;
import org.springframework.web.bind.annotation.ExceptionHandler;

@ControllerAdvice
public class ProductExceptionController {
   @ExceptionHandler(value = ProductNotfoundException.class)
   public ResponseEntity<Object> exception(ProductNotfoundException exception) {
      return new ResponseEntity<>("Product not found", HttpStatus.NOT_FOUND);
   }
}
The Product Service API controller file is given below to update the Product. If the Product is not found, then it throws the ProductNotFoundException class.
ProductServiceController.java
package com.tutorialspoint.demo.controller;

import java.util.HashMap;
import java.util.Map;

import org.springframework.http.HttpStatus;
import org.springframework.http.ResponseEntity;
import org.springframework.web.bind.annotation.PathVariable;
import org.springframework.web.bind.annotation.PutMapping;
import org.springframework.web.bind.annotation.RequestBody;
import org.springframework.web.bind.annotation.RestController;

import com.tutorialspoint.demo.exception.ProductNotfoundException;
import com.tutorialspoint.demo.model.Product;

@RestController
public class ProductServiceController {
   private static Map<String, Product> productRepo = new HashMap<>();
   static {
      Product honey = new Product();
      honey.setId("1");
      honey.setName("Honey");
      productRepo.put(honey.getId(), honey);

      Product almond = new Product();
      almond.setId("2");
      almond.setName("Almond");
      productRepo.put(almond.getId(), almond);
   }

   @PutMapping(value = "/products/{id}")
   public ResponseEntity<Object> updateProduct(@PathVariable("id") String id, @RequestBody Product product) {
      if(!productRepo.containsKey(id))throw new ProductNotfoundException();
      productRepo.remove(id);
      product.setId(id);
      productRepo.put(id, product);
      return new ResponseEntity<>("Product is updated successfully", HttpStatus.OK);
   }
}
The code for main Spring Boot application class file is given below −
DemoApplication.java
package com.tutorialspoint.demo;

import org.springframework.boot.SpringApplication;
import org.springframework.boot.autoconfigure.SpringBootApplication;

@SpringBootApplication
public class DemoApplication {
   public static void main(String[] args) {
      SpringApplication.run(DemoApplication.class, args);
   }
}
The code for POJO class for Product is given below −
Product.java
package com.tutorialspoint.demo.model;

public class Product {
   private String id;
   private String name;

   public String getId() {
      return id;
   }
   public void setId(String id) {
      this.id = id;
   }
   public String getName() {
      return name;
   }
   public void setName(String name) {
      this.name = name;
   }
}
The code for Maven build pom.xml is shown below −
pom.xml
<?xml version="1.0" encoding="UTF-8"?>
   <project xmlns="http://maven.apache.org/POM/4.0.0" xmlns:xsi="http://www.w3.org/2001/XMLSchema-instance"
   xsi:schemaLocation="http://maven.apache.org/POM/4.0.0 https://maven.apache.org/xsd/maven-4.0.0.xsd">
   <modelVersion>4.0.0</modelVersion>
   <parent>
      <groupId>org.springframework.boot</groupId>
      <artifactId>spring-boot-starter-parent</artifactId>
      <version>3.5.6</version>
      <relativePath/> <!-- lookup parent from repository -->
   </parent>
   <groupId>com.tutorialspoint</groupId>
   <artifactId>demo</artifactId>
   <version>0.0.1-SNAPSHOT</version>
   <name>demo</name>
   <description>Demo project for Spring Boot</description>
   <url/>
   <licenses>
      <license/>
   </licenses>
   <developers>
      <developer/>
   </developers>
   <scm>
      <connection/>
      <developerConnection/>
      <tag/>
      <url/>
   </scm>
   <properties>
      <java.version>21</java.version>
   </properties>
   <dependencies>
      <dependency>
         <groupId>org.springframework.boot</groupId>
         <artifactId>spring-boot-starter-web</artifactId>
      </dependency>
      <dependency>
         <groupId>org.springframework.boot</groupId>
         <artifactId>spring-boot-starter-test</artifactId>
         <scope>test</scope>
      </dependency>
   </dependencies>
   <build>
      <plugins>
         <plugin>
            <groupId>org.springframework.boot</groupId>
            <artifactId>spring-boot-maven-plugin</artifactId>
         </plugin>
      </plugins>
   </build>
</project>
The code for Gradle Build build.gradle is given below −
build.gradle
buildscript {
   ext {
      springBootVersion = '3.5.6'
   }
   repositories {
      mavenCentral()
   }
   dependencies {
      classpath("org.springframework.boot:spring-boot-gradle-plugin:${springBootVersion}")
   }
}
apply plugin: 'java'
apply plugin: 'eclipse'
apply plugin: 'org.springframework.boot'

group = 'com.tutorialspoint'
version = '0.0.1-SNAPSHOT'
sourceCompatibility = 21

repositories {
   mavenCentral()
}
dependencies {
   compile('org.springframework.boot:spring-boot-starter-web')
   testCompile('org.springframework.boot:spring-boot-starter-test')
}
You can create an executable JAR file, and run the Spring Boot application by using the Maven or Gradle commands −
For Maven, you can use the following command −
mvn clean install
After BUILD SUCCESS, you can find the JAR file under the target directory.
For Gradle, you can use the following command −
gradle clean build
After BUILD SUCCESSFUL, you can find the JAR file under the build/libs directory.
You can run the JAR file by using the following command −
java jar <JARFILE>
This will start the application on the Tomcat port 8080 as shown below −
  .   ____          _            __ _ _
 /\\ / ___'_ __ _ _(_)_ __  __ _ \ \ \ \
( ( )\___ | '_ | '_| | '_ \/ _` | \ \ \ \
 \\/  ___)| |_)| | | | | || (_| |  ) ) ) )
  '  |____| .__|_| |_|_| |_\__, | / / / /
 =========|_|==============|___/=/_/_/_/

 :: Spring Boot ::                (v3.5.6)

[2025-09-28T16:18:37Z] [org.springframework.boot.StartupInfoLogger] [main] [53] [INFO ] Starting DemoApplication using Java 21.0.6 with PID 15736 (D:\Projects\demo\target\classes started by mahes in D:\Projects\demo)
[2025-09-28T16:18:37Z] [org.springframework.boot.SpringApplication] [main] [652] [INFO ] No active profile set, falling back to 1 default profile: "default"
[2025-09-28T16:18:38Z] [org.springframework.boot.web.embedded.tomcat.TomcatWebServer] [main] [111] [INFO ] Tomcat initialized with port 8080 (http)
[2025-09-28T16:18:38Z] [org.apache.juli.logging.DirectJDKLog] [main] [168] [INFO ] Initializing ProtocolHandler ["http-nio-8080"]
[2025-09-28T16:18:38Z] [org.apache.juli.logging.DirectJDKLog] [main] [168] [INFO ] Starting service [Tomcat]
[2025-09-28T16:18:38Z] [org.apache.juli.logging.DirectJDKLog] [main] [168] [INFO ] Starting Servlet engine: [Apache Tomcat/10.1.46]
[2025-09-28T16:18:38Z] [org.apache.juli.logging.DirectJDKLog] [main] [168] [INFO ] Initializing Spring embedded WebApplicationContext
[2025-09-28T16:18:38Z] [org.springframework.boot.web.servlet.context.ServletWebServerApplicationContext] [main] [301] [INFO ] Root WebApplicationContext: initialization completed in 1102 ms
[2025-09-28T16:18:39Z] [org.apache.juli.logging.DirectJDKLog] [main] [168] [INFO ] Starting ProtocolHandler ["http-nio-8080"]
[2025-09-28T16:18:39Z] [org.springframework.boot.web.embedded.tomcat.TomcatWebServer] [main] [243] [INFO ] Tomcat started on port 8080 (http) with context path '/'
[2025-09-28T16:18:39Z] [org.springframework.boot.StartupInfoLogger] [main] [59] [INFO ] Started DemoApplication in 2.169 seconds (process running for 2.668)
Now hit the below URL in POSTMAN application and you can see the output as shown below −
Update URL: http://localhost:8080/products/3
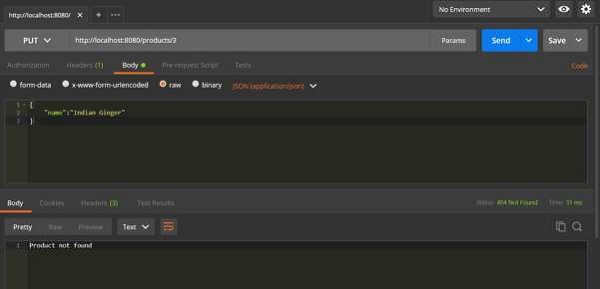
Spring Boot - Interceptor
You can use the Interceptor in Spring Boot to perform operations under the following situations −
Before sending the request to the controller
Before sending the response to the client
For example, you can use an interceptor to add the request header before sending the request to the controller and add the response header before sending the response to the client.
To work with interceptor, you need to create @Component class that supports it and it should implement the HandlerInterceptor interface.
Interceptor Methods
The following are the three methods you should know about while working on Interceptors −
preHandle() method − This is used to perform operations before sending the request to the controller. This method should return true to return the response to the client.
postHandle() method − This is used to perform operations before sending the response to the client.
afterCompletion() method − This is used to perform operations after completing the request and response.
Observe the following code for a better understanding −
@Component
public class ProductServiceInterceptor implements HandlerInterceptor {
   @Override
   public boolean preHandle(
      HttpServletRequest request, HttpServletResponse response, Object handler) throws Exception {

      return true;
   }
   @Override
   public void postHandle(
      HttpServletRequest request, HttpServletResponse response, Object handler,
      ModelAndView modelAndView) throws Exception {}

   @Override
   public void afterCompletion(HttpServletRequest request, HttpServletResponse response,
      Object handler, Exception exception) throws Exception {}
}
You will have to register this Interceptor with InterceptorRegistry by using WebMvcConfigurer as shown below −
@Component
public class ProductServiceInterceptorAppConfig implements WebMvcConfigurer {
   @Autowired
   ProductServiceInterceptor productServiceInterceptor;

   @Override
   public void addInterceptors(InterceptorRegistry registry) {
      registry.addInterceptor(productServiceInterceptor);
   }
}
In the example given below, we are going to hit the GET products API which gives the output as given under −
Example - Usage of Interceptor
The code for the Interceptor class ProductServiceInterceptor.java is given below −
ProductServiceInterceptor.java
package com.tutorialspoint.demo.interceptor;

import jakarta.servlet.http.HttpServletRequest;
import jakarta.servlet.http.HttpServletResponse;

import org.springframework.stereotype.Component;
import org.springframework.web.servlet.HandlerInterceptor;
import org.springframework.web.servlet.ModelAndView;

@Component
public class ProductServiceInterceptor implements HandlerInterceptor {
   @Override
   public boolean preHandle
      (HttpServletRequest request, HttpServletResponse response, Object handler)
      throws Exception {

      System.out.println("Pre Handle method is Calling");
      return true;
   }
   @Override
   public void postHandle(HttpServletRequest request, HttpServletResponse response,
      Object handler, ModelAndView modelAndView) throws Exception {

      System.out.println("Post Handle method is Calling");
   }
   @Override
   public void afterCompletion
      (HttpServletRequest request, HttpServletResponse response, Object
      handler, Exception exception) throws Exception {

      System.out.println("Request and Response is completed");
   }
}
The code for Application Configuration class file to register the Interceptor into Interceptor Registry ProductServiceInterceptorAppConfig.java is given below −
ProductServiceInterceptorAppConfig.java
package com.tutorialspoint.demo.interceptor;

import org.springframework.beans.factory.annotation.Autowired;
import org.springframework.stereotype.Component;
import org.springframework.web.servlet.config.annotation.InterceptorRegistry;
import org.springframework.web.servlet.config.annotation.WebMvcConfigurer;

@Component
public class ProductServiceInterceptorAppConfig implements WebMvcConfigurer {
   @Autowired
   ProductServiceInterceptor productServiceInterceptor;

   @Override
   public void addInterceptors(InterceptorRegistry registry) {
      registry.addInterceptor(productServiceInterceptor);
   }
}
The code for Controller class file ProductServiceController.java is given below −
ProductServiceController.java
package com.tutorialspoint.demo.controller;

import java.util.HashMap;
import java.util.Map;

import org.springframework.http.HttpStatus;
import org.springframework.http.ResponseEntity;
import org.springframework.web.bind.annotation.GetMapping;
import org.springframework.web.bind.annotation.RestController;

import com.tutorialspoint.demo.model.Product;

@RestController
public class ProductServiceController {
   private static Map<String, Product> productRepo = new HashMap<>();
   static {
      Product honey = new Product();
      honey.setId("1");
      honey.setName("Honey");
      productRepo.put(honey.getId(), honey);
      Product almond = new Product();
      almond.setId("2");
      almond.setName("Almond");
      productRepo.put(almond.getId(), almond);
   }
   @GetMapping(value = "/products")
   public ResponseEntity<Object> getProduct() {
      return new ResponseEntity<>(productRepo.values(), HttpStatus.OK);
   }
}
The code for POJO class for Product.java is given below −
Product.java
package com.tutorialspoint.demo.model;

public class Product {
   private String id;
   private String name;

   public String getId() {
      return id;
   }
   public void setId(String id) {
      this.id = id;
   }
   public String getName() {
      return name;
   }
   public void setName(String name) {
      this.name = name;
   }
}
The code for main Spring Boot application class file DemoApplication.java is given below −
DemoApplication.java
package com.tutorialspoint.demo;

import org.springframework.boot.SpringApplication;
import org.springframework.boot.autoconfigure.SpringBootApplication;

@SpringBootApplication
public class DemoApplication {
   public static void main(String[] args) {
      SpringApplication.run(DemoApplication.class, args);
   }
}
The code for Maven build pom.xml is shown here −
pom.xml
<?xml version="1.0" encoding="UTF-8"?>
   <project xmlns="http://maven.apache.org/POM/4.0.0" xmlns:xsi="http://www.w3.org/2001/XMLSchema-instance"
   xsi:schemaLocation="http://maven.apache.org/POM/4.0.0 https://maven.apache.org/xsd/maven-4.0.0.xsd">
   <modelVersion>4.0.0</modelVersion>
   <parent>
      <groupId>org.springframework.boot</groupId>
      <artifactId>spring-boot-starter-parent</artifactId>
      <version>3.5.6</version>
      <relativePath/> <!-- lookup parent from repository -->
   </parent>
   <groupId>com.tutorialspoint</groupId>
   <artifactId>demo</artifactId>
   <version>0.0.1-SNAPSHOT</version>
   <name>demo</name>
   <description>Demo project for Spring Boot</description>
   <url/>
   <licenses>
      <license/>
   </licenses>
   <developers>
      <developer/>
   </developers>
   <scm>
      <connection/>
      <developerConnection/>
      <tag/>
      <url/>
   </scm>
   <properties>
      <java.version>21</java.version>
   </properties>
   <dependencies>
      <dependency>
         <groupId>org.springframework.boot</groupId>
         <artifactId>spring-boot-starter-web</artifactId>
      </dependency>
      <dependency>
         <groupId>org.springframework.boot</groupId>
         <artifactId>spring-boot-starter-test</artifactId>
         <scope>test</scope>
      </dependency>
   </dependencies>
   <build>
      <plugins>
         <plugin>
            <groupId>org.springframework.boot</groupId>
            <artifactId>spring-boot-maven-plugin</artifactId>
         </plugin>
      </plugins>
   </build>
</project>
The code for Gradle Build build.gradle is shown here −
buildscript {
   ext {
      springBootVersion = '3.5.6'
   }
   repositories {
      mavenCentral()
   }
   dependencies {
      classpath("org.springframework.boot:spring-boot-gradle-plugin:${springBootVersion}")
   }
}
apply plugin: 'java'
apply plugin: 'eclipse'
apply plugin: 'org.springframework.boot'
group = 'com.tutorialspoint'
version = '0.0.1-SNAPSHOT'
sourceCompatibility = 21

repositories {
   mavenCentral()
}
dependencies {
   compile('org.springframework.boot:spring-boot-starter-web')
   testCompile('org.springframework.boot:spring-boot-starter-test')
}
Output
You can create an executable JAR file, and run the Spring Boot application by using the below Maven or Gradle commands.
For Maven, use the command as shown below −
mvn clean install
After BUILD SUCCESS, you can find the JAR file under the target directory.
For Gradle, use the command as shown below −
gradle clean build
After BUILD SUCCESSFUL, you can find the JAR file under the build/libs directory.
You can run the JAR file by using the following command −
java jar <JARFILE>
Now, the application has started on the Tomcat port 8080 as shown below −
  .   ____          _            __ _ _
 /\\ / ___'_ __ _ _(_)_ __  __ _ \ \ \ \
( ( )\___ | '_ | '_| | '_ \/ _` | \ \ \ \
 \\/  ___)| |_)| | | | | || (_| |  ) ) ) )
  '  |____| .__|_| |_|_| |_\__, | / / / /
 =========|_|==============|___/=/_/_/_/

 :: Spring Boot ::                (v3.5.6)

[2025-09-28T16:27:25Z] [org.springframework.boot.StartupInfoLogger] [main] [53] [INFO ] Starting DemoApplication using Java 21.0.6 with PID 13652 (D:\Projects\demo\target\classes started by mahes in D:\Projects\demo)
[2025-09-28T16:27:25Z] [org.springframework.boot.SpringApplication] [main] [652] [INFO ] No active profile set, falling back to 1 default profile: "default"
[2025-09-28T16:27:26Z] [org.springframework.boot.web.embedded.tomcat.TomcatWebServer] [main] [111] [INFO ] Tomcat initialized with port 8080 (http)
[2025-09-28T16:27:26Z] [org.apache.juli.logging.DirectJDKLog] [main] [168] [INFO ] Initializing ProtocolHandler ["http-nio-8080"]
[2025-09-28T16:27:26Z] [org.apache.juli.logging.DirectJDKLog] [main] [168] [INFO ] Starting service [Tomcat]
[2025-09-28T16:27:26Z] [org.apache.juli.logging.DirectJDKLog] [main] [168] [INFO ] Starting Servlet engine: [Apache Tomcat/10.1.46]
[2025-09-28T16:27:26Z] [org.apache.juli.logging.DirectJDKLog] [main] [168] [INFO ] Initializing Spring embedded WebApplicationContext
[2025-09-28T16:27:26Z] [org.springframework.boot.web.servlet.context.ServletWebServerApplicationContext] [main] [301] [INFO ] Root WebApplicationContext: initialization completed in 1142 ms
[2025-09-28T16:27:26Z] [org.apache.juli.logging.DirectJDKLog] [main] [168] [INFO ] Starting ProtocolHandler ["http-nio-8080"]
[2025-09-28T16:27:26Z] [org.springframework.boot.web.embedded.tomcat.TomcatWebServer] [main] [243] [INFO ] Tomcat started on port 8080 (http) with context path '/'
[2025-09-28T16:27:27Z] [org.springframework.boot.StartupInfoLogger] [main] [59] [INFO ] Started DemoApplication in 2.123 seconds (process running for 2.618)
Now hit the below URL in POSTMAN application and you can see the output as shown under −
GET API: http://localhost:8080/products
In the console window, you can see the System.out.println statements added in the Interceptor as shown in the screenshot given below −
Pre Handle method is Calling
Post Handle method is Calling
Request and Response is completed
Spring Boot - Servlet Filter
A filter is an object used to filter the HTTP requests and responses of your application. By using filter, we can perform two operations at two instances −
- Before sending the request to the controller
- Before sending a response to the client.
The following code shows the sample code for a Servlet Filter implementation class with @Component annotation.
@Component
public class SimpleFilter implements Filter {
   @Override
   public void destroy() {}

   @Override
   public void doFilter
      (ServletRequest request, ServletResponse response, FilterChain filterchain)
      throws IOException, ServletException {}

   @Override
   public void init(FilterConfig filterconfig) throws ServletException {}
}
Example - Usage of Filter
The following example shows the code for reading the remote host and remote address from the ServletRequest object before sending the request to the controller.
In doFilter() method, we have added the System.out.println statements to print the remote host and remote address.
SimpleFilter.java
package com.tutorialspoint.demo;

import java.io.IOException;

import jakarta.servlet.Filter;
import jakarta.servlet.FilterChain;
import jakarta.servlet.FilterConfig;
import jakarta.servlet.ServletException;
import jakarta.servlet.ServletRequest;
import jakarta.servlet.ServletResponse;

import org.springframework.stereotype.Component;

@Component
public class SimpleFilter implements Filter {
   @Override
   public void destroy() {}

   @Override
   public void doFilter(ServletRequest request, ServletResponse response, FilterChain filterchain)
      throws IOException, ServletException {

      System.out.println("Remote Host:"+request.getRemoteHost());
      System.out.println("Remote Address:"+request.getRemoteAddr());
      filterchain.doFilter(request, response);
   }

   @Override
   public void init(FilterConfig filterconfig) throws ServletException {}
}
In the Spring Boot main application class file, we have added the simple REST endpoint that returns the "Welcome to Tutorialspoint!" string.
DemoApplication.java
package com.tutorialspoint.demo;

import org.springframework.boot.SpringApplication;
import org.springframework.boot.autoconfigure.SpringBootApplication;
import org.springframework.web.bind.annotation.GetMapping;
import org.springframework.web.bind.annotation.RestController;

@SpringBootApplication
@RestController
public class DemoApplication {
   public static void main(String[] args) {
      SpringApplication.run(DemoApplication.class, args);
   }
   @GetMapping(value = "/")
   public String hello() {
      return "Welcome to Tutorialspoint!";
   }
}
The code for Maven build pom.xml is given below −
pom.xml
<?xml version="1.0" encoding="UTF-8"?>
   <project xmlns="http://maven.apache.org/POM/4.0.0" xmlns:xsi="http://www.w3.org/2001/XMLSchema-instance"
   xsi:schemaLocation="http://maven.apache.org/POM/4.0.0 https://maven.apache.org/xsd/maven-4.0.0.xsd">
   <modelVersion>4.0.0</modelVersion>
   <parent>
      <groupId>org.springframework.boot</groupId>
      <artifactId>spring-boot-starter-parent</artifactId>
      <version>3.5.6</version>
      <relativePath/> <!-- lookup parent from repository -->
   </parent>
   <groupId>com.tutorialspoint</groupId>
   <artifactId>demo</artifactId>
   <version>0.0.1-SNAPSHOT</version>
   <name>demo</name>
   <description>Demo project for Spring Boot</description>
   <url/>
   <licenses>
      <license/>
   </licenses>
   <developers>
      <developer/>
   </developers>
   <scm>
      <connection/>
      <developerConnection/>
      <tag/>
      <url/>
   </scm>
   <properties>
      <java.version>21</java.version>
   </properties>
   <dependencies>
      <dependency>
         <groupId>org.springframework.boot</groupId>
         <artifactId>spring-boot-starter-web</artifactId>
      </dependency>
      <dependency>
         <groupId>org.springframework.boot</groupId>
         <artifactId>spring-boot-starter-test</artifactId>
         <scope>test</scope>
      </dependency>
   </dependencies>
   <build>
      <plugins>
         <plugin>
            <groupId>org.springframework.boot</groupId>
            <artifactId>spring-boot-maven-plugin</artifactId>
         </plugin>
      </plugins>
   </build>
</project>
The code for Gradle Build build.gradle is given below −
build.gradle
buildscript {
   ext {
      springBootVersion = '3.5.6'
   }
   repositories {
      mavenCentral()
   }
   dependencies {
      classpath("org.springframework.boot:spring-boot-gradle-plugin:${springBootVersion}")
   }
}

apply plugin: 'java'
apply plugin: 'eclipse'
apply plugin: 'org.springframework.boot'

group = 'com.tutorialspoint'
version = '0.0.1-SNAPSHOT'
sourceCompatibility = 21

repositories {
   mavenCentral()
}
dependencies {
   compile('org.springframework.boot:spring-boot-starter-web')
   testCompile('org.springframework.boot:spring-boot-starter-test')
}
You can create an executable JAR file, and run the Spring Boot application by using the Maven or Gradle commands shown below −
For Maven, use the command as shown below −
mvn clean install
After BUILD SUCCESS, you can find the JAR file under the target directory.
For Gradle, use the command as shown below −
gradle clean build
After BUILD SUCCESSFUL, you can find the JAR file under the build/libs directory.
Now, run the JAR file by using the following command
java jar <JARFILE>
You can see the application has started on the Tomcat port 8080.
  .   ____          _            __ _ _
 /\\ / ___'_ __ _ _(_)_ __  __ _ \ \ \ \
( ( )\___ | '_ | '_| | '_ \/ _` | \ \ \ \
 \\/  ___)| |_)| | | | | || (_| |  ) ) ) )
  '  |____| .__|_| |_|_| |_\__, | / / / /
 =========|_|==============|___/=/_/_/_/

 :: Spring Boot ::                (v3.5.6)

[2025-09-28T16:32:58Z] [org.springframework.boot.StartupInfoLogger] [main] [53] [INFO ] Starting DemoApplication using Java 21.0.6 with PID 41312 (D:\Projects\demo\target\classes started by mahes in D:\Projects\demo)
[2025-09-28T16:32:58Z] [org.springframework.boot.SpringApplication] [main] [652] [INFO ] No active profile set, falling back to 1 default profile: "default"
[2025-09-28T16:32:59Z] [org.springframework.boot.web.embedded.tomcat.TomcatWebServer] [main] [111] [INFO ] Tomcat initialized with port 8080 (http)
[2025-09-28T16:32:59Z] [org.apache.juli.logging.DirectJDKLog] [main] [168] [INFO ] Initializing ProtocolHandler ["http-nio-8080"]
[2025-09-28T16:32:59Z] [org.apache.juli.logging.DirectJDKLog] [main] [168] [INFO ] Starting service [Tomcat]
[2025-09-28T16:32:59Z] [org.apache.juli.logging.DirectJDKLog] [main] [168] [INFO ] Starting Servlet engine: [Apache Tomcat/10.1.46]
[2025-09-28T16:32:59Z] [org.apache.juli.logging.DirectJDKLog] [main] [168] [INFO ] Initializing Spring embedded WebApplicationContext
[2025-09-28T16:32:59Z] [org.springframework.boot.web.servlet.context.ServletWebServerApplicationContext] [main] [301] [INFO ] Root WebApplicationContext: initialization completed in 1162 ms
[2025-09-28T16:33:00Z] [org.apache.juli.logging.DirectJDKLog] [main] [168] [INFO ] Starting ProtocolHandler ["http-nio-8080"]
[2025-09-28T16:33:00Z] [org.springframework.boot.web.embedded.tomcat.TomcatWebServer] [main] [243] [INFO ] Tomcat started on port 8080 (http) with context path '/'
[2025-09-28T16:33:00Z] [org.springframework.boot.StartupInfoLogger] [main] [59] [INFO ] Started DemoApplication in 2.177 seconds (process running for 2.722)
Now hit the URL http://localhost:8080/ and see the output Hello World. It should look as shown below −
Then, you can see the Remote host and Remote address on the console log as shown below −
Remote Host:0:0:0:0:0:0:0:1
Remote Address:0:0:0:0:0:0:0:1
Pre Handle method is Calling
Post Handle method is Calling
Request and Response is completed
Spring Boot - Tomcat Port Number
Spring Boot lets you to run the same application more than once on a different port number. In this chapter, you will learn about this in detail. Note that the default port number 8080.
Custom Port
In the application.properties file, we can set custom port number for the property server.port
server.port = 9090
In the application.yml file, you can find as follows −
server:
   port: 9090
Random Port
In the application.properties file, we can set random port number for the property server.port
server.port = 0
In the application.yml file, you can find as follows −
server:
   port: 0
Note − If the server.port number is 0 while starting the Spring Boot application, Tomcat uses the random port number.
Spring Boot - Rest Template
Rest Template is used to create applications that consume RESTful Web Services. You can use the exchange() method to consume the web services for all HTTP methods. The code given below shows how to create Bean for Rest Template to auto wiring the Rest Template object.
...
public class DemoApplication {
   public static void main(String[] args) {
      SpringApplication.run(DemoApplication.class, args);
   }
   @Bean
   public RestTemplate getRestTemplate() {
      return new RestTemplate();
   }
}
GET
Consuming the GET API by using RestTemplate - exchange() method
Assume this URL http://localhost:8080/products returns the following JSON and we are going to consume this API response by using Rest Template using the following code −
[
   {
      "id": "1",
      "name": "Honey"
   },
   {
      "id": "2",
      "name": "Almond"
   }
]
You will have to follow the given points to consume the API −
Autowired the Rest Template Object.
Use HttpHeaders to set the Request Headers.
Use HttpEntity to wrap the request object.
Provide the URL, HttpMethod, and Return type for Exchange() method.
...
public class ConsumeWebService {
   @Autowired
   RestTemplate restTemplate;

   @GetMapping(value = "/template/products")
   public String getProductList() {
      HttpHeaders headers = new HttpHeaders();
      headers.setAccept(Arrays.asList(MediaType.APPLICATION_JSON));
      HttpEntity <String> entity = new HttpEntity<String>(headers);

      return restTemplate.exchange("
         http://localhost:8080/products", HttpMethod.GET, entity, String.class).getBody();
   }
}
POST
Consuming POST API by using RestTemplate - exchange() method
Assume this URL http://localhost:8080/products returns the response shown below, we are going to consume this API response by using the Rest Template.
The code given below is the Request body −
{
   "id":"3",
   "name":"Ginger"
}
The code given below is the Response body −
Product is created successfully
You will have to follow the points given below to consume the API −
Autowired the Rest Template Object.
Use the HttpHeaders to set the Request Headers.
Use the HttpEntity to wrap the request object. Here, we wrap the Product object to send it to the request body.
Provide the URL, HttpMethod, and Return type for exchange() method.
...
public class ConsumeWebService {
   @Autowired
   RestTemplate restTemplate;

   @PostMapping(value = "/template/products")
   public String createProducts(@RequestBody Product product) {
      HttpHeaders headers = new HttpHeaders();
      headers.setAccept(Arrays.asList(MediaType.APPLICATION_JSON));
      HttpEntity<Product> entity = new HttpEntity<Product>(product,headers);

      return restTemplate.exchange(
         "http://localhost:8080/products", HttpMethod.POST, entity, String.class).getBody();
   }
}
PUT
Consuming PUT API by using RestTemplate - exchange() method
Assume this URL http://localhost:8080/products/3 returns the below response and we are going to consume this API response by using Rest Template.
The code given below is Request body −
{
   "name":"Indian Ginger"
}
The code given below is the Response body −
Product is updated successfully
You will have to follow the points given below to consume the API −
Autowired the Rest Template Object.
Use HttpHeaders to set the Request Headers.
Use HttpEntity to wrap the request object. Here, we wrap the Product object to send it to the request body.
Provide the URL, HttpMethod, and Return type for exchange() method.
...
public class ConsumeWebService {
   @Autowired
   RestTemplate restTemplate;

   @PutMapping(value = "/template/products/{id}")
   public String updateProduct(@PathVariable("id") String id, @RequestBody Product product) {
      HttpHeaders headers = new HttpHeaders();
      headers.setAccept(Arrays.asList(MediaType.APPLICATION_JSON));
      HttpEntity<Product> entity = new HttpEntity<Product>(product,headers);

      return restTemplate.exchange(
         "http://localhost:8080/products/"+id, HttpMethod.PUT, entity, String.class).getBody();
   }
}
DELETE
Consuming DELETE API by using RestTemplate - exchange() method
Assume this URL http://localhost:8080/products/3 returns the response given below and we are going to consume this API response by using Rest Template.
This line of code shown below is the Response body −
Product is deleted successfully
You will have to follow the points shown below to consume the API −
Autowired the Rest Template Object.
Use HttpHeaders to set the Request Headers.
Use HttpEntity to wrap the request object.
Provide the URL, HttpMethod, and Return type for exchange() method.
...
public class ConsumeWebService {
   @Autowired
   RestTemplate restTemplate;

   @DeleteMapping(value = "/template/products/{id}")
   public String deleteProduct(@PathVariable("id") String id) {
      HttpHeaders headers = new HttpHeaders();
      headers.setAccept(Arrays.asList(MediaType.APPLICATION_JSON));
      HttpEntity<Product> entity = new HttpEntity<Product>(headers);

      return restTemplate.exchange(
         "http://localhost:8080/products/"+id, HttpMethod.DELETE, entity, String.class).getBody();
   }
}
Example - Usage of Rest Template
The complete Rest Template Controller class file is given below −
ConsumeWebService.java
package com.tutorialspoint.demo.controller;

import java.util.Arrays;

import org.springframework.beans.factory.annotation.Autowired;
import org.springframework.http.HttpEntity;
import org.springframework.http.HttpHeaders;
import org.springframework.http.HttpMethod;
import org.springframework.http.MediaType;
import org.springframework.web.bind.annotation.DeleteMapping;
import org.springframework.web.bind.annotation.GetMapping;
import org.springframework.web.bind.annotation.PathVariable;
import org.springframework.web.bind.annotation.PostMapping;
import org.springframework.web.bind.annotation.PutMapping;
import org.springframework.web.bind.annotation.RequestBody;
import org.springframework.web.bind.annotation.RestController;
import org.springframework.web.client.RestTemplate;

import com.tutorialspoint.demo.model.Product;

@RestController
public class ConsumeWebService {
   @Autowired
   RestTemplate restTemplate;

   @GetMapping(value = "/template/products")
   public String getProductList() {
      HttpHeaders headers = new HttpHeaders();
      headers.setAccept(Arrays.asList(MediaType.APPLICATION_JSON));
      HttpEntity<String> entity = new HttpEntity<String>(headers);

      return restTemplate.exchange(
         "http://localhost:8080/products", HttpMethod.GET, entity, String.class).getBody();
   }
   @PostMapping(value = "/template/products")
   public String createProducts(@RequestBody Product product) {
      HttpHeaders headers = new HttpHeaders();
      headers.setAccept(Arrays.asList(MediaType.APPLICATION_JSON));
      HttpEntity<Product> entity = new HttpEntity<Product>(product,headers);

      return restTemplate.exchange(
         "http://localhost:8080/products", HttpMethod.POST, entity, String.class).getBody();
   }
   @PutMapping(value = "/template/products/{id}")
   public String updateProduct(@PathVariable("id") String id, @RequestBody Product product) {
      HttpHeaders headers = new HttpHeaders();
      headers.setAccept(Arrays.asList(MediaType.APPLICATION_JSON));
      HttpEntity<Product> entity = new HttpEntity<Product>(product,headers);

      return restTemplate.exchange(
         "http://localhost:8080/products/"+id, HttpMethod.PUT, entity, String.class).getBody();
   }
   @DeleteMapping(value = "/template/products/{id}")
   public String deleteProduct(@PathVariable("id") String id) {
      HttpHeaders headers = new HttpHeaders();
      headers.setAccept(Arrays.asList(MediaType.APPLICATION_JSON));
      HttpEntity<Product> entity = new HttpEntity<Product>(headers);

      return restTemplate.exchange(
         "http://localhost:8080/products/"+id, HttpMethod.DELETE, entity, String.class).getBody();
   }
}
The Rest Controller class which acts a REST service our Web service is calling.
ProductServiceController.java
package com.tutorialspoint.demo.controller;

import java.util.HashMap;
import java.util.Map;

import org.springframework.http.HttpStatus;
import org.springframework.http.ResponseEntity;
import org.springframework.web.bind.annotation.DeleteMapping;
import org.springframework.web.bind.annotation.GetMapping;
import org.springframework.web.bind.annotation.PathVariable;
import org.springframework.web.bind.annotation.PostMapping;
import org.springframework.web.bind.annotation.PutMapping;
import org.springframework.web.bind.annotation.RequestBody;
import org.springframework.web.bind.annotation.RestController;

import com.tutorialspoint.demo.model.Product;

@RestController
public class ProductServiceController {
   private static Map<String, Product> productRepo = new HashMap<>();
   static {
      Product honey = new Product();
      honey.setId("1");
      honey.setName("Honey");
      productRepo.put(honey.getId(), honey);

      Product almond = new Product();
      almond.setId("2");
      almond.setName("Almond");
      productRepo.put(almond.getId(), almond);
   }

   @DeleteMapping(value = "/products/{id}")
   public ResponseEntity<Object> delete(@PathVariable("id") String id) {
      productRepo.remove(id);
      return new ResponseEntity<>("Product is deleted successsfully", HttpStatus.OK);
   }

   @PutMapping(value = "/products/{id}")
   public ResponseEntity<Object> updateProduct(@PathVariable("id") String id, @RequestBody Product product) {
      productRepo.remove(id);
      product.setId(id);
      productRepo.put(id, product);
      return new ResponseEntity<>("Product is updated successsfully", HttpStatus.OK);
   }

   @PostMapping(value = "/products")
   public ResponseEntity<Object> createProduct(@RequestBody Product product) {
      productRepo.put(product.getId(), product);
      return new ResponseEntity<>("Product is created successfully", HttpStatus.CREATED);
   }

   @GetMapping(value = "/products")
   public ResponseEntity<Object> getProduct() {
      return new ResponseEntity<>(productRepo.values(), HttpStatus.OK);
   }
}
The code for Spring Boot Application Class DemoApplication.java is given below −
DemoApplication.java
package com.tutorialspoint.demo;

import org.springframework.boot.SpringApplication;
import org.springframework.boot.autoconfigure.SpringBootApplication;
import org.springframework.context.annotation.Bean;
import org.springframework.web.client.RestTemplate;

@SpringBootApplication
public class DemoApplication {
   public static void main(String[] args) {
      SpringApplication.run(DemoApplication.class, args);
   }
   @Bean
   public RestTemplate getRestTemplate() {
      return new RestTemplate();
   }
}
The code for Maven build pom.xml is given below −
pom.xml
<?xml version="1.0" encoding="UTF-8"?>
   <project xmlns="http://maven.apache.org/POM/4.0.0" xmlns:xsi="http://www.w3.org/2001/XMLSchema-instance"
   xsi:schemaLocation="http://maven.apache.org/POM/4.0.0 https://maven.apache.org/xsd/maven-4.0.0.xsd">
   <modelVersion>4.0.0</modelVersion>
   <parent>
      <groupId>org.springframework.boot</groupId>
      <artifactId>spring-boot-starter-parent</artifactId>
      <version>3.5.6</version>
      <relativePath/> <!-- lookup parent from repository -->
   </parent>
   <groupId>com.tutorialspoint</groupId>
   <artifactId>demo</artifactId>
   <version>0.0.1-SNAPSHOT</version>
   <name>demo</name>
   <description>Demo project for Spring Boot</description>
   <url/>
   <licenses>
      <license/>
   </licenses>
   <developers>
      <developer/>
   </developers>
   <scm>
      <connection/>
      <developerConnection/>
      <tag/>
      <url/>
   </scm>
   <properties>
      <java.version>21</java.version>
   </properties>
   <dependencies>
      <dependency>
         <groupId>org.springframework.boot</groupId>
         <artifactId>spring-boot-starter-web</artifactId>
      </dependency>
      <dependency>
         <groupId>org.springframework.boot</groupId>
         <artifactId>spring-boot-starter-test</artifactId>
         <scope>test</scope>
      </dependency>
   </dependencies>
   <build>
      <plugins>
         <plugin>
            <groupId>org.springframework.boot</groupId>
            <artifactId>spring-boot-maven-plugin</artifactId>
         </plugin>
      </plugins>
   </build>
</project>
The code for Gradle Build build.gradle is given below −
build.gradle
buildscript {
   ext {
      springBootVersion = '3.5.6'
   }
   repositories {
      mavenCentral()
   }
   dependencies {
      classpath("org.springframework.boot:spring-boot-gradle-plugin:${springBootVersion}")
   }
}

apply plugin: 'java'
apply plugin: 'eclipse'
apply plugin: 'org.springframework.boot'

group = 'com.tutorialspoint'
version = '0.0.1-SNAPSHOT'
sourceCompatibility = 21

repositories {
   mavenCentral()
}
dependencies {
   compile('org.springframework.boot:spring-boot-starter-web')
   testCompile('org.springframework.boot:spring-boot-starter-test')
}
You can create an executable JAR file, and run the Spring Boot application by using the following Maven or Gradle commands −
For Maven, you can use the command given below −
mvn clean install
After BUILD SUCCESS, you can find the JAR file under the target directory.
For Gradle, you can use the command shown below −
gradle clean build
After BUILD SUCCESSFUL, you can find the JAR file under build/libs directory.
Now, run the JAR file by using the following command −
java jar <JARFILE>
Now, the application has started on the Tomcat port 8080.
  .   ____          _            __ _ _
 /\\ / ___'_ __ _ _(_)_ __  __ _ \ \ \ \
( ( )\___ | '_ | '_| | '_ \/ _` | \ \ \ \
 \\/  ___)| |_)| | | | | || (_| |  ) ) ) )
  '  |____| .__|_| |_|_| |_\__, | / / / /
 =========|_|==============|___/=/_/_/_/

 :: Spring Boot ::                (v3.5.6)

[2025-09-28T16:41:14Z] [org.springframework.boot.StartupInfoLogger] [main] [53] [INFO ] Starting DemoApplication using Java 21.0.6 with PID 40996 (D:\Projects\demo\target\classes started by mahes in D:\Projects\demo)
[2025-09-28T16:41:14Z] [org.springframework.boot.SpringApplication] [main] [652] [INFO ] No active profile set, falling back to 1 default profile: "default"
[2025-09-28T16:41:16Z] [org.springframework.boot.web.embedded.tomcat.TomcatWebServer] [main] [111] [INFO ] Tomcat initialized with port 8080 (http)
[2025-09-28T16:41:16Z] [org.apache.juli.logging.DirectJDKLog] [main] [168] [INFO ] Initializing ProtocolHandler ["http-nio-8080"]
[2025-09-28T16:41:16Z] [org.apache.juli.logging.DirectJDKLog] [main] [168] [INFO ] Starting service [Tomcat]
[2025-09-28T16:41:16Z] [org.apache.juli.logging.DirectJDKLog] [main] [168] [INFO ] Starting Servlet engine: [Apache Tomcat/10.1.46]
[2025-09-28T16:41:16Z] [org.apache.juli.logging.DirectJDKLog] [main] [168] [INFO ] Initializing Spring embedded WebApplicationContext
[2025-09-28T16:41:16Z] [org.springframework.boot.web.servlet.context.ServletWebServerApplicationContext] [main] [301] [INFO ] Root WebApplicationContext: initialization completed in 1800 ms
[2025-09-28T16:41:16Z] [org.apache.juli.logging.DirectJDKLog] [main] [168] [INFO ] Starting ProtocolHandler ["http-nio-8080"]
[2025-09-28T16:41:16Z] [org.springframework.boot.web.embedded.tomcat.TomcatWebServer] [main] [243] [INFO ] Tomcat started on port 8080 (http) with context path '/'
[2025-09-28T16:41:16Z] [org.springframework.boot.StartupInfoLogger] [main] [59] [INFO ] Started DemoApplication in 3.201 seconds (process running for 3.783)
Now hit the below URLs in POSTMAN application and you can see the output.
GET Products by Rest Template − http://localhost:8080/template/products
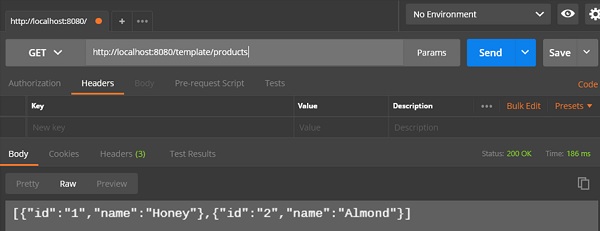
Create Products POST − http://localhost:8080/template/products
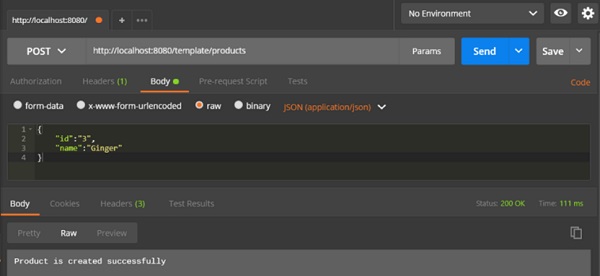
Update Product PUT − http://localhost:8080/template/products/3
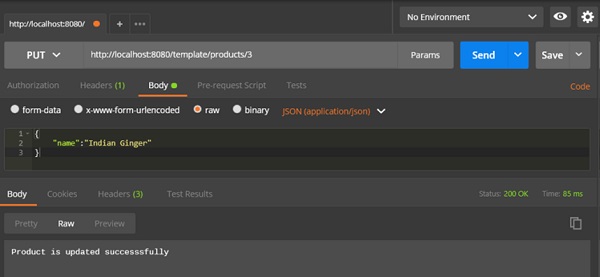
Delete Product − http://localhost:8080/template/products/3

Spring Boot - File Handling
In this chapter, you will learn how to upload and download the file by using web service.
File Upload
For uploading a file, you can use MultipartFile as a Request Parameter and this API should consume Multi-Part form data value. Observe the code given below −
@PostMapping(value = "/upload", consumes = MediaType.MULTIPART_FORM_DATA_VALUE)
public String fileUpload(@RequestParam("file") MultipartFile file) {
   return null;
}
Example - File Handling using Spring Boot
The complete code for the same is given below −
FileUploadController.java
package com.tutorialspoint.demo.controller;

import java.io.File;
import java.io.FileOutputStream;
import java.io.IOException;

import org.springframework.http.MediaType;
import org.springframework.web.bind.annotation.PostMapping;
import org.springframework.web.bind.annotation.RequestParam;
import org.springframework.web.bind.annotation.RestController;
import org.springframework.web.multipart.MultipartFile;

@RestController
public class FileUploadController {
   @PostMapping(value = "/upload", consumes = MediaType.MULTIPART_FORM_DATA_VALUE)
   public String fileUpload(@RequestParam("file") MultipartFile file) throws IOException {
      File convertFile = new File("/var/tmp/"+file.getOriginalFilename());
      convertFile.createNewFile();
      FileOutputStream fout = new FileOutputStream(convertFile);
      fout.write(file.getBytes());
      fout.close();
      return "File is upload successfully";
   }
}
File Download
For file download, you should use InputStreamResource for downloading a File. We need to set the HttpHeader Content-Disposition in Response and need to specify the response Media Type of the application.
Note − In the following example, file should be available on the specified path where the application is running.
@GetMapping(value = "/download")
public ResponseEntity<Object> downloadFile() throws IOException  {
   String filename = "/var/tmp/logo.png";
   File file = new File(filename);
   InputStreamResource resource = new InputStreamResource(new FileInputStream(file));
   HttpHeaders headers = new HttpHeaders();

   headers.add("Content-Disposition", String.format("attachment; filename=\"%s\"", file.getName()));
   headers.add("Cache-Control", "no-cache, no-store, must-revalidate");
   headers.add("Pragma", "no-cache");
   headers.add("Expires", "0");

   ResponseEntity<Object>
   responseEntity = ResponseEntity.ok().headers(headers).contentLength(file.length()).contentType(
      MediaType.parseMediaType("application/txt")).body(resource);

   return responseEntity;
}
The complete code for the same is given below −
FileDownloadController.java
package com.tutorialspoint.demo.controller;

import java.io.File;
import java.io.FileInputStream;
import java.io.IOException;

import org.springframework.core.io.InputStreamResource;
import org.springframework.http.HttpHeaders;
import org.springframework.http.MediaType;
import org.springframework.http.ResponseEntity;
import org.springframework.web.bind.annotation.RequestMapping;
import org.springframework.web.bind.annotation.RequestMethod;
import org.springframework.web.bind.annotation.RestController;

@RestController
public class FileDownloadController {
   @RequestMapping(value = "/download", method = RequestMethod.GET)
   public ResponseEntity<Object> downloadFile() throws IOException  {
      String filename = "/var/tmp/logo.png";
      File file = new File(filename);
      InputStreamResource resource = new InputStreamResource(new FileInputStream(file));
      HttpHeaders headers = new HttpHeaders();

      headers.add("Content-Disposition", String.format("attachment; filename=\"%s\"", file.getName()));
      headers.add("Cache-Control", "no-cache, no-store, must-revalidate");
      headers.add("Pragma", "no-cache");
      headers.add("Expires", "0");

      ResponseEntity<Object>
      responseEntity = ResponseEntity.ok().headers(headers).contentLength(
         file.length()).contentType(MediaType.parseMediaType("application/txt")).body(resource);

      return responseEntity;
   }
}
The main Spring Boot application is given below −
DemoApplication.java
package com.tutorialspoint.demo;

import org.springframework.boot.SpringApplication;
import org.springframework.boot.autoconfigure.SpringBootApplication;

@SpringBootApplication
public class DemoApplication {
   public static void main(String[] args) {
      SpringApplication.run(DemoApplication.class, args);
   }
}
The code for Maven build pom.xml is given below −
pom.xml
<?xml version="1.0" encoding="UTF-8"?>
   <project xmlns="http://maven.apache.org/POM/4.0.0" xmlns:xsi="http://www.w3.org/2001/XMLSchema-instance"
   xsi:schemaLocation="http://maven.apache.org/POM/4.0.0 https://maven.apache.org/xsd/maven-4.0.0.xsd">
   <modelVersion>4.0.0</modelVersion>
   <parent>
      <groupId>org.springframework.boot</groupId>
      <artifactId>spring-boot-starter-parent</artifactId>
      <version>3.5.6</version>
      <relativePath/> <!-- lookup parent from repository -->
   </parent>
   <groupId>com.tutorialspoint</groupId>
   <artifactId>demo</artifactId>
   <version>0.0.1-SNAPSHOT</version>
   <name>demo</name>
   <description>Demo project for Spring Boot</description>
   <url/>
   <licenses>
      <license/>
   </licenses>
   <developers>
      <developer/>
   </developers>
   <scm>
      <connection/>
      <developerConnection/>
      <tag/>
      <url/>
   </scm>
   <properties>
      <java.version>21</java.version>
   </properties>
   <dependencies>
      <dependency>
         <groupId>org.springframework.boot</groupId>
         <artifactId>spring-boot-starter-web</artifactId>
      </dependency>
      <dependency>
         <groupId>org.springframework.boot</groupId>
         <artifactId>spring-boot-starter-test</artifactId>
         <scope>test</scope>
      </dependency>
   </dependencies>
   <build>
      <plugins>
         <plugin>
            <groupId>org.springframework.boot</groupId>
            <artifactId>spring-boot-maven-plugin</artifactId>
         </plugin>
      </plugins>
   </build>
</project>
The code for Gradle Build build.gradle is given below −
build.gradle
buildscript {
   ext {
      springBootVersion = '3.5.6'
   }
   repositories {
      mavenCentral()
   }
   dependencies {
      classpath("org.springframework.boot:spring-boot-gradle-plugin:${springBootVersion}")
   }
}

apply plugin: 'java'
apply plugin: 'eclipse'
apply plugin: 'org.springframework.boot'

group = 'com.tutorialspoint'
version = '0.0.1-SNAPSHOT'
sourceCompatibility = 21

repositories {
   mavenCentral()
}
dependencies {
   compile('org.springframework.boot:spring-boot-starter-web')
   testCompile('org.springframework.boot:spring-boot-starter-test')
}
Now you can create an executable JAR file, and run the Spring Boot application by using the Maven or Gradle commands given below −
For Maven, use the command given below −
mvn clean install
After BUILD SUCCESS, you can find the JAR file under target directory.
For Gradle, you ca use the command shown below −
sgradle clean build
After BUILD SUCCESSFUL, you can find the JAR file under build/libs directory.
Now, run the JAR file by using the following command −
java jar <JARFILE>
This will start the application on the Tomcat port 8080 as shown below −
  .   ____          _            __ _ _
 /\\ / ___'_ __ _ _(_)_ __  __ _ \ \ \ \
( ( )\___ | '_ | '_| | '_ \/ _` | \ \ \ \
 \\/  ___)| |_)| | | | | || (_| |  ) ) ) )
  '  |____| .__|_| |_|_| |_\__, | / / / /
 =========|_|==============|___/=/_/_/_/

 :: Spring Boot ::                (v3.5.6)

[2025-09-28T16:51:35Z] [org.springframework.boot.StartupInfoLogger] [main] [53] [INFO ] Starting DemoApplication using Java 21.0.6 with PID 43928 (D:\Projects\demo\target\classes started by mahes in D:\Projects\demo)
[2025-09-28T16:51:35Z] [org.springframework.boot.SpringApplication] [main] [652] [INFO ] No active profile set, falling back to 1 default profile: "default"
[2025-09-28T16:51:37Z] [org.springframework.boot.web.embedded.tomcat.TomcatWebServer] [main] [111] [INFO ] Tomcat initialized with port 8080 (http)
[2025-09-28T16:51:37Z] [org.apache.juli.logging.DirectJDKLog] [main] [168] [INFO ] Initializing ProtocolHandler ["http-nio-8080"]
[2025-09-28T16:51:37Z] [org.apache.juli.logging.DirectJDKLog] [main] [168] [INFO ] Starting service [Tomcat]
[2025-09-28T16:51:37Z] [org.apache.juli.logging.DirectJDKLog] [main] [168] [INFO ] Starting Servlet engine: [Apache Tomcat/10.1.46]
[2025-09-28T16:51:37Z] [org.apache.juli.logging.DirectJDKLog] [main] [168] [INFO ] Initializing Spring embedded WebApplicationContext
[2025-09-28T16:51:37Z] [org.springframework.boot.web.servlet.context.ServletWebServerApplicationContext] [main] [301] [INFO ] Root WebApplicationContext: initialization completed in 1269 ms
[2025-09-28T16:51:37Z] [org.apache.juli.logging.DirectJDKLog] [main] [168] [INFO ] Starting ProtocolHandler ["http-nio-8080"]
[2025-09-28T16:51:37Z] [org.springframework.boot.web.embedded.tomcat.TomcatWebServer] [main] [243] [INFO ] Tomcat started on port 8080 (http) with context path '/'
[2025-09-28T16:51:37Z] [org.springframework.boot.StartupInfoLogger] [main] [59] [INFO ] Started DemoApplication in 2.271 seconds (process running for 2.796)
Now hit the below URLs in POSTMAN application and you can see the output as shown below −
File download − http://localhost:8080/download
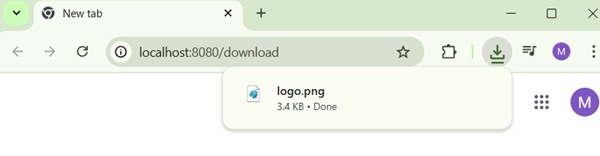
File upload − http://localhost:8080/upload
Spring Boot - Service Components
Service Components are the class file which contains @Service annotation. These class files are used to write business logic in a different layer, separated from @RestController class file. The logic for creating a service component class file is shown here −
public interface ProductService {
}
The class that implements the Interface with @Service annotation is as shown −
@Service
public class ProductServiceImpl implements ProductService {
}
Example - Service Components
Observe that in this tutorial, we are using Product Service API(s) to store, retrieve, update and delete the products. We wrote the business logic in @RestController class file itself. Now, we are going to move the business logic code from controller to service component.
You can create an Interface which contains add, edit, get and delete methods using the code as shown below −
ProductService.java
package com.tutorialspoint.demo.service;

import java.util.Collection;
import com.tutorialspoint.demo.model.Product;

public interface ProductService {
   public abstract void createProduct(Product product);
   public abstract void updateProduct(String id, Product product);
   public abstract void deleteProduct(String id);
   public abstract Collection<Product> getProducts();
}
The following code will let you to create a class which implements the ProductService interface with @Service annotation and write the business logic to store, retrieve, delete and updates the product.
ProductServiceImpl.java
package com.tutorialspoint.demo.service;

import java.util.Collection;
import java.util.HashMap;
import java.util.Map;
import org.springframework.stereotype.Service;
import com.tutorialspoint.demo.model.Product;

@Service
public class ProductServiceImpl implements ProductService {
   private static Map<String, Product> productRepo = new HashMap<>();
   static {
      Product honey = new Product();
      honey.setId("1");
      honey.setName("Honey");
      productRepo.put(honey.getId(), honey);

      Product almond = new Product();
      almond.setId("2");
      almond.setName("Almond");
      productRepo.put(almond.getId(), almond);
   }
   @Override
   public void createProduct(Product product) {
      productRepo.put(product.getId(), product);
   }
   @Override
   public void updateProduct(String id, Product product) {
      productRepo.remove(id);
      product.setId(id);
      productRepo.put(id, product);
   }
   @Override
   public void deleteProduct(String id) {
      productRepo.remove(id);

   }
   @Override
   public Collection<Product> getProducts() {
      return productRepo.values();
   }
}
The code here show the Rest Controller class file, here we @Autowired the ProductService interface and called the methods.
ProductServiceController.java
package com.tutorialspoint.demo.controller;

import org.springframework.beans.factory.annotation.Autowired;
import org.springframework.http.HttpStatus;
import org.springframework.http.ResponseEntity;
import org.springframework.web.bind.annotation.DeleteMapping;
import org.springframework.web.bind.annotation.GetMapping;
import org.springframework.web.bind.annotation.PathVariable;
import org.springframework.web.bind.annotation.PostMapping;
import org.springframework.web.bind.annotation.PutMapping;
import org.springframework.web.bind.annotation.RequestBody;
import org.springframework.web.bind.annotation.RestController;

import com.tutorialspoint.demo.model.Product;
import com.tutorialspoint.demo.service.ProductService;

@RestController
public class ProductServiceController {
   @Autowired
   ProductService productService;

   @GetMapping(value = "/products")
   public ResponseEntity<Object> getProduct() {
      return new ResponseEntity<>(productService.getProducts(), HttpStatus.OK);
   }
   @PutMapping(value = "/products/{id}")
   public ResponseEntity<Object>
      updateProduct(@PathVariable("id") String id, @RequestBody Product product) {

      productService.updateProduct(id, product);
      return new ResponseEntity<>("Product is updated successsfully", HttpStatus.OK);
   }
   @DeleteMapping(value = "/products/{id}")
   public ResponseEntity<Object> delete(@PathVariable("id") String id) {
      productService.deleteProduct(id);
      return new ResponseEntity<>("Product is deleted successsfully", HttpStatus.OK);
   }
   @PostMapping(value = "/products")
   public ResponseEntity<Object> createProduct(@RequestBody Product product) {
      productService.createProduct(product);
      return new ResponseEntity<>("Product is created successfully", HttpStatus.CREATED);
   }
}
The code for POJO class Product.java is shown here −
Product.java
package com.tutorialspoint.demo.model;

public class Product {
   private String id;
   private String name;

   public String getId() {
      return id;
   }
   public void setId(String id) {
      this.id = id;
   }
   public String getName() {
      return name;
   }
   public void setName(String name) {
      this.name = name;
   }
}
A main Spring Boot application is given below −
DemoApplication.java
package com.tutorialspoint.demo;

import org.springframework.boot.SpringApplication;
import org.springframework.boot.autoconfigure.SpringBootApplication;
import org.springframework.context.annotation.Bean;
import org.springframework.web.client.RestTemplate;

@SpringBootApplication
public class DemoApplication {
   public static void main(String[] args) {
      SpringApplication.run(DemoApplication.class, args);
   }
   @Bean
   public RestTemplate getRestTemplate() {
      return new RestTemplate();
   }
}
The code for Maven build pom.xml is shown below −
pom.xml
<?xml version="1.0" encoding="UTF-8"?>
   <project xmlns="http://maven.apache.org/POM/4.0.0" xmlns:xsi="http://www.w3.org/2001/XMLSchema-instance"
   xsi:schemaLocation="http://maven.apache.org/POM/4.0.0 https://maven.apache.org/xsd/maven-4.0.0.xsd">
   <modelVersion>4.0.0</modelVersion>
   <parent>
      <groupId>org.springframework.boot</groupId>
      <artifactId>spring-boot-starter-parent</artifactId>
      <version>3.5.6</version>
      <relativePath/> <!-- lookup parent from repository -->
   </parent>
   <groupId>com.tutorialspoint</groupId>
   <artifactId>demo</artifactId>
   <version>0.0.1-SNAPSHOT</version>
   <name>demo</name>
   <description>Demo project for Spring Boot</description>
   <url/>
   <licenses>
      <license/>
   </licenses>
   <developers>
      <developer/>
   </developers>
   <scm>
      <connection/>
      <developerConnection/>
      <tag/>
      <url/>
   </scm>
   <properties>
      <java.version>21</java.version>
   </properties>
   <dependencies>
      <dependency>
         <groupId>org.springframework.boot</groupId>
         <artifactId>spring-boot-starter-web</artifactId>
      </dependency>
      <dependency>
         <groupId>org.springframework.boot</groupId>
         <artifactId>spring-boot-starter-test</artifactId>
         <scope>test</scope>
      </dependency>
   </dependencies>
   <build>
      <plugins>
         <plugin>
            <groupId>org.springframework.boot</groupId>
            <artifactId>spring-boot-maven-plugin</artifactId>
         </plugin>
      </plugins>
   </build>
</project>
The code for Gradle Build build.gradle is shown below −
build.gradle
buildscript {
   ext {
      springBootVersion = '3.5.6'
   }
   repositories {
      mavenCentral()
   }
   dependencies {
      classpath("org.springframework.boot:spring-boot-gradle-plugin:${springBootVersion}")
   }
}

apply plugin: 'java'
apply plugin: 'eclipse'
apply plugin: 'org.springframework.boot'

group = 'com.tutorialspoint'
version = '0.0.1-SNAPSHOT'
sourceCompatibility = 21

repositories {
   mavenCentral()
}
dependencies {
   compile('org.springframework.boot:spring-boot-starter-web')
   testCompile('org.springframework.boot:spring-boot-starter-test')
}
You can create an executable JAR file, and run the Spring Boot application by using the Maven or Gradle commands given below −
For Maven, use the command as shown below −
mvn clean install
After BUILD SUCCESS, you can find the JAR file under the target directory.
For Gradle, you can use the command as shown below −
gradle clean build
After BUILD SUCCESSFUL, you can find the JAR file under build/libs directory.
Run the JAR file by using the command given below −
java jar <JARFILE>
Now, the application has started on the Tomcat port 8080 as shown below −
  .   ____          _            __ _ _
 /\\ / ___'_ __ _ _(_)_ __  __ _ \ \ \ \
( ( )\___ | '_ | '_| | '_ \/ _` | \ \ \ \
 \\/  ___)| |_)| | | | | || (_| |  ) ) ) )
  '  |____| .__|_| |_|_| |_\__, | / / / /
 =========|_|==============|___/=/_/_/_/

 :: Spring Boot ::                (v3.5.6)

[2025-09-28T17:04:23Z] [org.springframework.boot.StartupInfoLogger] [main] [53] [INFO ] Starting DemoApplication using Java 21.0.6 with PID 31424 (D:\Projects\demo\target\classes started by mahes in D:\Projects\demo)
[2025-09-28T17:04:23Z] [org.springframework.boot.SpringApplication] [main] [652] [INFO ] No active profile set, falling back to 1 default profile: "default"
[2025-09-28T17:04:25Z] [org.springframework.boot.web.embedded.tomcat.TomcatWebServer] [main] [111] [INFO ] Tomcat initialized with port 8080 (http)
[2025-09-28T17:04:25Z] [org.apache.juli.logging.DirectJDKLog] [main] [168] [INFO ] Initializing ProtocolHandler ["http-nio-8080"]
[2025-09-28T17:04:25Z] [org.apache.juli.logging.DirectJDKLog] [main] [168] [INFO ] Starting service [Tomcat]
[2025-09-28T17:04:25Z] [org.apache.juli.logging.DirectJDKLog] [main] [168] [INFO ] Starting Servlet engine: [Apache Tomcat/10.1.46]
[2025-09-28T17:04:25Z] [org.apache.juli.logging.DirectJDKLog] [main] [168] [INFO ] Initializing Spring embedded WebApplicationContext
[2025-09-28T17:04:25Z] [org.springframework.boot.web.servlet.context.ServletWebServerApplicationContext] [main] [301] [INFO ] Root WebApplicationContext: initialization completed in 1498 ms
[2025-09-28T17:04:25Z] [org.apache.juli.logging.DirectJDKLog] [main] [168] [INFO ] Starting ProtocolHandler ["http-nio-8080"]
[2025-09-28T17:04:25Z] [org.springframework.boot.web.embedded.tomcat.TomcatWebServer] [main] [243] [INFO ] Tomcat started on port 8080 (http) with context path '/'
[2025-09-28T17:04:25Z] [org.springframework.boot.StartupInfoLogger] [main] [59] [INFO ] Started DemoApplication in 2.649 seconds (process running for 3.15)
Now hit the below URLs in POSTMAN application and you can see the output as shown below −
GET API URL is − http://localhost:8080/products
POST API URL is − http://localhost:8080/products
PUT API URL is − http://localhost:8080/products/3
DELETE API URL is − http://localhost:8080/products/3
Spring Boot - Thymeleaf
Thymeleaf is a Java-based library used to create a web application. It provides a good support for serving a XHTML/HTML5 in web applications. In this chapter, you will learn in detail about Thymeleaf.
Thymeleaf Templates
Thymeleaf converts your files into well-formed XML files. It contains 6 types of templates as given below −
- XML
- Valid XML
- XHTML
- Valid XHTML
- HTML5
- Legacy HTML5
All templates, except Legacy HTML5, are referring to well-formed valid XML files. Legacy HTML5 allows us to render the HTML5 tags in web page including not closed tags.
Web Application
You can use Thymeleaf templates to create a web application in Spring Boot. You will have to follow the below steps to create a web application in Spring Boot by using Thymeleaf.
Use the following code to create a @Controller class file to redirect the Request URI to HTML file −
WebController.java
package com.tutorialspoint.demo.controller;

import org.springframework.stereotype.Controller;
import org.springframework.web.bind.annotation.GetMapping;

@Controller
public class WebController {
   @GetMapping(value = "/index")
   public String index() {
      return "index";
   }
}
In the above example, the request URI is /index, and the control is redirected into the index.html file. Note that the index.html file should be placed under the templates directory and all JS and CSS files should be placed under the static directory in classpath. In the example shown, we used CSS file to change the color of the text.
You can use the following code and created a CSS file in separate folder src/main/resources/static/css and name the file as styles.css −
styles.css
h4 {
   color: red;
}
The code for index.html (under src/main/resources/static/templates folder) file is given below −
<!DOCTYPE html>
<html>
   <head>
      <meta charset = "ISO-8859-1" />
      <link href = "css/styles.css" rel = "stylesheet"/>
      <title>Spring Boot Application</title>
   </head>
   <body>
      <h4>Welcome to Thymeleaf Spring Boot web application</h4>
   </body>
</html>
The project explorer is shown in the screenshot given below −

Now, we need to add the Spring Boot Starter Thymeleaf dependency in our build configuration file.
Maven users can add the following dependency into the pom.xml file −
<dependency>
   <groupId>org.springframework.boot</groupId>
   <artifactId>spring-boot-starter-thymeleaf</artifactId>
</dependency>
Gradle users can add the following dependency in the build.gradle file −
compile group: 'org.springframework.boot', name: 'spring-boot-starter-thymeleaf'
The code for main Spring Boot application class file is given below −
DemoApplication.java
package com.tutorialspoint.demo;

import org.springframework.boot.SpringApplication;
import org.springframework.boot.autoconfigure.SpringBootApplication;

@SpringBootApplication
public class DemoApplication {
   public static void main(String[] args) {
      SpringApplication.run(DemoApplication.class, args);
   }
}
The code for Maven pom.xml is given below −
pom.xml
<?xml version="1.0" encoding="UTF-8"?>
   <project xmlns="http://maven.apache.org/POM/4.0.0" xmlns:xsi="http://www.w3.org/2001/XMLSchema-instance"
   xsi:schemaLocation="http://maven.apache.org/POM/4.0.0 https://maven.apache.org/xsd/maven-4.0.0.xsd">
   <modelVersion>4.0.0</modelVersion>
   <parent>
      <groupId>org.springframework.boot</groupId>
      <artifactId>spring-boot-starter-parent</artifactId>
      <version>3.5.6</version>
      <relativePath/> <!-- lookup parent from repository -->
   </parent>
   <groupId>com.tutorialspoint</groupId>
   <artifactId>demo</artifactId>
   <version>0.0.1-SNAPSHOT</version>
   <name>demo</name>
   <description>Demo project for Spring Boot</description>
   <url/>
   <licenses>
      <license/>
   </licenses>
   <developers>
      <developer/>
   </developers>
   <scm>
      <connection/>
      <developerConnection/>
      <tag/>
      <url/>
   </scm>
   <properties>
      <java.version>21</java.version>
   </properties>
   <dependencies>
      <dependency>
         <groupId>org.springframework.boot</groupId>
         <artifactId>spring-boot-starter-web</artifactId>
      </dependency>
      <dependency>
         <groupId>org.springframework.boot</groupId>
         <artifactId>spring-boot-starter-test</artifactId>
         <scope>test</scope>
      </dependency>
      <dependency>
         <groupId>org.springframework.boot</groupId>
         <artifactId>spring-boot-starter-thymeleaf</artifactId>
      </dependency>
   </dependencies>
   <build>
      <plugins>
         <plugin>
            <groupId>org.springframework.boot</groupId>
            <artifactId>spring-boot-maven-plugin</artifactId>
         </plugin>
      </plugins>
   </build>
</project>
The code for Gradle build.gradle is given below −
buildscript {
   ext {
      springBootVersion = '3.5.6'
   }
   repositories {
      mavenCentral()
   }
   dependencies {
      classpath("org.springframework.boot:spring-boot-gradle-plugin:${springBootVersion}")
   }
}

apply plugin: 'java'
apply plugin: 'eclipse'
apply plugin: 'org.springframework.boot'

group = 'com.tutorialspoint'
version = '0.0.1-SNAPSHOT'
sourceCompatibility = 21

repositories {
   mavenCentral()
}
dependencies {
   compile('org.springframework.boot:spring-boot-starter-web')
   compile group: 'org.springframework.boot', name: 'spring-boot-starter-thymeleaf'
   testCompile('org.springframework.boot:spring-boot-starter-test')
}
You can create an executable JAR file, and run the spring boot application by using the following Maven or Gradle commands −
For Maven, use the command as shown below −
mvn clean install
After BUILD SUCCESS, you can find the JAR file under the target directory.
For Gradle, use the command as shown below −
gradle clean build
After BUILD SUCCESSFUL, you can find the JAR file under the build/libs directory.
Run the JAR file by using the command given here −
java jar <JARFILE>
Now, the application has started on the Tomcat port 8080 as shown below −
  .   ____          _            __ _ _
 /\\ / ___'_ __ _ _(_)_ __  __ _ \ \ \ \
( ( )\___ | '_ | '_| | '_ \/ _` | \ \ \ \
 \\/  ___)| |_)| | | | | || (_| |  ) ) ) )
  '  |____| .__|_| |_|_| |_\__, | / / / /
 =========|_|==============|___/=/_/_/_/

 :: Spring Boot ::                (v3.5.6)

2025-09-29T10:36:00.325+05:30  INFO 42024 --- [           main] c.tutorialspoint.demo.DemoApplication    : Starting DemoApplication using Java 21.0.6 with PID 42024 (D:\Projects\demo\target\classes started by mahes in D:\Projects\demo)
2025-09-29T10:36:00.331+05:30  INFO 42024 --- [           main] c.tutorialspoint.demo.DemoApplication    : No active profile set, falling back to 1 default profile: "default"
2025-09-29T10:36:01.680+05:30  INFO 42024 --- [           main] o.s.b.w.embedded.tomcat.TomcatWebServer  : Tomcat initialized with port 8080 (http)
2025-09-29T10:36:01.702+05:30  INFO 42024 --- [           main] o.apache.catalina.core.StandardService   : Starting service [Tomcat]
2025-09-29T10:36:01.703+05:30  INFO 42024 --- [           main] o.apache.catalina.core.StandardEngine    : Starting Servlet engine: [Apache Tomcat/10.1.46]
2025-09-29T10:36:01.778+05:30  INFO 42024 --- [           main] o.a.c.c.C.[Tomcat].[localhost].[/]       : Initializing Spring embedded WebApplicationContext
2025-09-29T10:36:01.780+05:30  INFO 42024 --- [           main] w.s.c.ServletWebServerApplicationContext : Root WebApplicationContext: initialization completed in 1385 ms
2025-09-29T10:36:02.196+05:30  WARN 42024 --- [           main] ion$DefaultTemplateResolverConfiguration : Cannot find template location: classpath:/templates/ (please add some templates, check your Thymeleaf configuration, or set spring.thymeleaf.check-template-location=false)
2025-09-29T10:36:02.337+05:30  INFO 42024 --- [           main] o.s.b.w.embedded.tomcat.TomcatWebServer  : Tomcat started on port 8080 (http) with context path '/'
2025-09-29T10:36:02.350+05:30  INFO 42024 --- [           main] c.tutorialspoint.demo.DemoApplication    : Started DemoApplication in 2.579 seconds (process running for 2.916)
Now hit the URL in your web browser and you can see the output as shown −
http://localhost:8080/index

Spring Boot - Consuming RESTful Web Services
This chapter will discuss in detail about consuming a RESTful Web Services by using jQuery AJAX.
Create a simple Spring Boot web application and write a controller class files which is used to redirects into the HTML file to consumes the RESTful web services.
We need to add the Spring Boot starter Thymeleaf and Web dependency in our build configuration file.
For Maven users, add the below dependencies in your pom.xml file.
<dependency>
   <groupId>org.springframework.boot</groupId>
   <artifactId>spring-boot-starter-thymeleaf</artifactId>
</dependency>

<dependency>
   <groupId>org.springframework.boot</groupId>
   <artifactId>spring-boot-starter-web</artifactId>
</dependency>
For Gradle users, add the below dependencies into your build.gradle file −
compile group: org.springframework.boot, name: spring-boot-starter-thymeleaf
compile(org.springframework.boot:spring-boot-starter-web)
The code for @Controller class file is given below −
@Controller
public class ViewController {
}
You can define the Request URI methods to redirects into the HTML file as shown below −
@GetMapping("/view-products")
public String viewProducts() {
   return "view-products";
}
@GetMapping("/add-products")
public String addProducts() {
   return "add-products";
}
This API http://localhost:8080/products should return the below JSON in response as shown below −
[
   {
      "id": "1",
      "name": "Honey"
   },
   {
      "id": "2",
      "name": "Almond"
   }
]
Now, create a view-products.html file under the templates directory in the classpath.
In the HTML file, we added the jQuery library and written the code to consume the RESTful web service on page load.
view-products.html
<script src = "https://ajax.googleapis.com/ajax/libs/jquery/3.2.1/jquery.min.js"></script>

<script>
$(document).ready(function(){
   $.getJSON("http://localhost:8080/products", function(result){
      $.each(result, function(key,value) {
         $("#productsJson").append(value.id+" "+value.name+" ");
      });
   });
});
</script>
The POST method and this URL http://localhost:8080/products should contains the below Request Body and Response body.
The code for Request body is given below −
{
   "id":"3",
   "name":"Ginger"
}
The code for Response body is given below −
Product is created successfully
Now, create the add-products.html file under the templates directory in the classpath.
In the HTML file, we added the jQuery library and written the code that submits the form to RESTful web service on clicking the button.
add-products.html
<script src = "https://ajax.googleapis.com/ajax/libs/jquery/3.2.1/jquery.min.js"></script>
<script>
   $(document).ready(function() {
      $("button").click(function() {
         var productmodel = {
            id : "3",
            name : "Ginger"
         };
         var requestJSON = JSON.stringify(productmodel);
         $.ajax({
            type : "POST",
            url : "http://localhost:8080/products",
            headers : {
               "Content-Type" : "application/json"
            },
            data : requestJSON,
            success : function(data) {
               alert(data);
            },
            error : function(data) {
            }
         });
      });
   });
</script>
Example - Consuming RESTFul web services
The complete code is given below.
pom.xml
<?xml version="1.0" encoding="UTF-8"?>
   <project xmlns="http://maven.apache.org/POM/4.0.0" xmlns:xsi="http://www.w3.org/2001/XMLSchema-instance"
   xsi:schemaLocation="http://maven.apache.org/POM/4.0.0 https://maven.apache.org/xsd/maven-4.0.0.xsd">
   <modelVersion>4.0.0</modelVersion>
   <parent>
      <groupId>org.springframework.boot</groupId>
      <artifactId>spring-boot-starter-parent</artifactId>
      <version>3.5.6</version>
      <relativePath/> <!-- lookup parent from repository -->
   </parent>
   <groupId>com.tutorialspoint</groupId>
   <artifactId>demo</artifactId>
   <version>0.0.1-SNAPSHOT</version>
   <name>demo</name>
   <description>Demo project for Spring Boot</description>
   <url/>
   <licenses>
      <license/>
   </licenses>
   <developers>
      <developer/>
   </developers>
   <scm>
      <connection/>
      <developerConnection/>
      <tag/>
      <url/>
   </scm>
   <properties>
      <java.version>21</java.version>
   </properties>
   <dependencies>
      <dependency>
         <groupId>org.springframework.boot</groupId>
         <artifactId>spring-boot-starter-web</artifactId>
      </dependency>
      <dependency>
         <groupId>org.springframework.boot</groupId>
         <artifactId>spring-boot-starter-test</artifactId>
         <scope>test</scope>
      </dependency>
      <dependency>
         <groupId>org.springframework.boot</groupId>
         <artifactId>spring-boot-starter-thymeleaf</artifactId>
      </dependency>
   </dependencies>
   <build>
      <plugins>
         <plugin>
            <groupId>org.springframework.boot</groupId>
            <artifactId>spring-boot-maven-plugin</artifactId>
         </plugin>
      </plugins>
   </build>
</project>
The code for Gradle build.gradle is given below −
build.gradle
buildscript {
   ext {
      springBootVersion = 3.5.6
   }
   repositories {
      mavenCentral()
   }
   dependencies {
      classpath("org.springframework.boot:spring-boot-gradle-plugin:${springBootVersion}")
   }
}

apply plugin: java
apply plugin: eclipse
apply plugin: org.springframework.boot

group = com.tutorialspoint
version = 0.0.1-SNAPSHOT
sourceCompatibility = 21

repositories {
   mavenCentral()
}

dependencies {
   compile(org.springframework.boot:spring-boot-starter-web)
   compile group: org.springframework.boot, name: spring-boot-starter-thymeleaf
   testCompile(org.springframework.boot:spring-boot-starter-test)
}
The controller class file given below ViewController.java is given below −
ViewController.java
package com.tutorialspoint.demo.controller;

import org.springframework.stereotype.Controller;
import org.springframework.web.bind.annotation.GetMapping;

@Controller
public class ViewController {
   @GetMapping("/view-products")
   public String viewProducts() {
      return "view-products";
   }
   @GetMapping("/add-products")
   public String addProducts() {
      return "add-products";
   }
}
The view-products.html file is given below −
view-products.html
<!DOCTYPE html>
<html>
   <head>
      <meta charset = "ISO-8859-1"/>
      <title>View Products</title>
      <script src = "https://ajax.googleapis.com/ajax/libs/jquery/3.2.1/jquery.min.js"></script>

      <script>
         $(document).ready(function(){
            $.getJSON("http://localhost:8080/products", function(result){
               $.each(result, function(key,value) {
                  $("#productsJson").append(value.id+" "+value.name+" ");
               });
            });
         });
      </script>
   </head>

   <body>
      <div id = "productsJson"> </div>
   </body>
</html>
The add-products.html file is given below −
add-products.html
<!DOCTYPE html>
<html>
   <head>
      <meta charset = "ISO-8859-1" />
      <title>Add Products</title>
      <script src = "https://ajax.googleapis.com/ajax/libs/jquery/3.2.1/jquery.min.js"></script>

      <script>
         $(document).ready(function() {
            $("button").click(function() {
               var productmodel = {
                  id : "3",
                  name : "Ginger"
               };
               var requestJSON = JSON.stringify(productmodel);
               $.ajax({
                  type : "POST",
                  url : "http://localhost:8080/products",
                  headers : {
                     "Content-Type" : "application/json"
                  },
                  data : requestJSON,
                  success : function(data) {
                     alert(data);
                  },
                  error : function(data) {
                  }
               });
            });
         });
      </script>
   </head>

   <body>
      <button>Click here to submit the form</button>
   </body>
</html>
The main Spring Boot Application class file is given below −
DemoApplication.java
package com.tutorialspoint.demo;

import org.springframework.boot.SpringApplication;
import org.springframework.boot.autoconfigure.SpringBootApplication;

@SpringBootApplication
public class DemoApplication {
   public static void main(String[] args) {
      SpringApplication.run(DemoApplication.class, args);
   }
}
Output
Now, you can create an executable JAR file, and run the Spring Boot application by using the following Maven or Gradle commands.
For Maven, use the command as given below −
mvn clean install
After BUILD SUCCESS, you can find the JAR file under the target directory.
For Gradle, use the command as given below −
gradle clean build
After BUILD SUCCESSFUL, you can find the JAR file under the build/libs directory.
Run the JAR file by using the following command −
java jar <JARFILE>
Now, the application has started on the Tomcat port 8080.
  .   ____          _            __ _ _
 /\\ / ___'_ __ _ _(_)_ __  __ _ \ \ \ \
( ( )\___ | '_ | '_| | '_ \/ _` | \ \ \ \
 \\/  ___)| |_)| | | | | || (_| |  ) ) ) )
  '  |____| .__|_| |_|_| |_\__, | / / / /
 =========|_|==============|___/=/_/_/_/

 :: Spring Boot ::                (v3.5.6)

[2025-09-29T10:44:58Z] [org.springframework.boot.StartupInfoLogger] [main] [53] [INFO ] Starting DemoApplication using Java 21.0.6 with PID 16712 (D:\Projects\demo\target\classes started by mahes in D:\Projects\demo)
[2025-09-29T10:44:58Z] [org.springframework.boot.SpringApplication] [main] [652] [INFO ] No active profile set, falling back to 1 default profile: "default"
[2025-09-29T10:45:00Z] [org.springframework.boot.web.embedded.tomcat.TomcatWebServer] [main] [111] [INFO ] Tomcat initialized with port 8080 (http)
[2025-09-29T10:45:00Z] [org.apache.juli.logging.DirectJDKLog] [main] [168] [INFO ] Initializing ProtocolHandler ["http-nio-8080"]
[2025-09-29T10:45:00Z] [org.apache.juli.logging.DirectJDKLog] [main] [168] [INFO ] Starting service [Tomcat]
[2025-09-29T10:45:00Z] [org.apache.juli.logging.DirectJDKLog] [main] [168] [INFO ] Starting Servlet engine: [Apache Tomcat/10.1.46]
[2025-09-29T10:45:00Z] [org.apache.juli.logging.DirectJDKLog] [main] [168] [INFO ] Initializing Spring embedded WebApplicationContext
[2025-09-29T10:45:00Z] [org.springframework.boot.web.servlet.context.ServletWebServerApplicationContext] [main] [301] [INFO ] Root WebApplicationContext: initialization completed in 1330 ms
[2025-09-29T10:45:00Z] [org.springframework.boot.autoconfigure.thymeleaf.ThymeleafAutoConfiguration$DefaultTemplateResolverConfiguration] [main] [102] [WARN ] Cannot find template location: classpath:/templates/ (please add some templates, check your Thymeleaf configuration, or set spring.thymeleaf.check-template-location=false)
[2025-09-29T10:45:00Z] [org.apache.juli.logging.DirectJDKLog] [main] [168] [INFO ] Starting ProtocolHandler ["http-nio-8080"]
[2025-09-29T10:45:00Z] [org.springframework.boot.web.embedded.tomcat.TomcatWebServer] [main] [243] [INFO ] Tomcat started on port 8080 (http) with context path '/'
[2025-09-29T10:45:01Z] [org.springframework.boot.StartupInfoLogger] [main] [59] [INFO ] Started DemoApplication in 2.461 seconds (process running for 3.026)
Now hit the URL in your web browser and you can see the output as shown −
http://localhost:8080/view-products
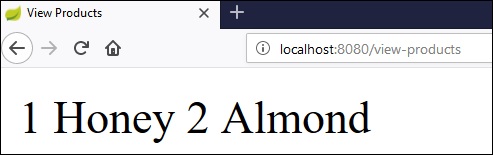
http://localhost:8080/add-products
Now, click the button Click here to submit the form and you can see the result as shown −
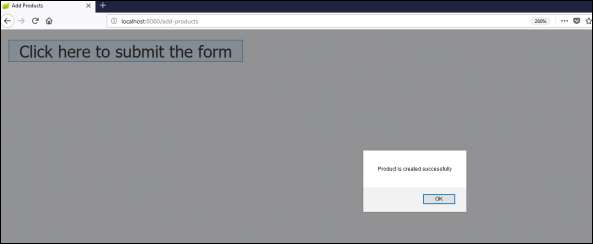
Now, hit the view products URL and see the created product.
http://localhost:8080/view-products
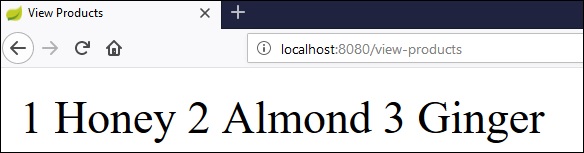
Angular JS
To consume the APIs by using Angular JS, you can use the examples given below −
Use the following code to create the Angular JS Controller to consume the GET API - http://localhost:8080/products −
angular.module('demo', [])
.controller('Hello', function($scope, $http) {
   $http.get('http://localhost:8080/products').
   then(function(response) {
      $scope.products = response.data;
   });
});
Use the following code to create the Angular JS Controller to consume the POST API - http://localhost:8080/products −
angular.module('demo', [])
.controller('Hello', function($scope, $http) {
   $http.post('http://localhost:8080/products',data).
   then(function(response) {
      console.log("Product created successfully");
   });
});
Note − The Post method data represents the Request body in JSON format to create a product.
Spring Boot - CORS Support
Cross-Origin Resource Sharing (CORS) is a security concept that allows restricting the resources implemented in web browsers. It prevents the JavaScript code producing or consuming the requests against different origin.
For example, your web application is running on 8080 port and by using JavaScript you are trying to consuming RESTful web services from 9090 port. Under such situations, you will face the Cross-Origin Resource Sharing security issue on your web browsers.
Two requirements are needed to handle this issue −
RESTful web services should support the Cross-Origin Resource Sharing.
RESTful web service application should allow accessing the API(s) from the 8080 port.
In this chapter, we are going to learn in detail about How to Enable Cross-Origin Requests for a RESTful Web Service application.
Enable CORS in Controller Method
We need to set the origins for RESTful web service by using @CrossOrigin annotation for the controller method. This @CrossOrigin annotation supports specific REST API, and not for the entire application.
@RequestMapping(value = "/products")
@CrossOrigin(origins = "http://localhost:8080")
public ResponseEntity<Object> getProduct() {
   return null;
}
Global CORS Configuration
We need to define the shown @Bean configuration to set the CORS configuration support globally to your Spring Boot application.
@Bean
public WebMvcConfigurer corsConfigurer() {
   return new WebMvcConfigurer() {
      @Override
      public void addCorsMappings(CorsRegistry registry) {
         registry.addMapping("/products").allowedOrigins("http://localhost:9000");
      }
   };
}
Example - Setting CORS Configuration
To code to set the CORS configuration globally in main Spring Boot application is given below.
DemoApplication.java
package com.tutorialspoint.demo;

import org.springframework.boot.SpringApplication;
import org.springframework.boot.autoconfigure.SpringBootApplication;
import org.springframework.context.annotation.Bean;
import org.springframework.web.servlet.config.annotation.CorsRegistry;
import org.springframework.web.servlet.config.annotation.WebMvcConfigurer;

@SpringBootApplication
public class DemoApplication {
   public static void main(String[] args) {
      SpringApplication.run(DemoApplication.class, args);
   }
   @Bean
   public WebMvcConfigurer corsConfigurer() {
      return new WebMvcConfigurer() {
         @Override
         public void addCorsMappings(CorsRegistry registry) {
            registry.addMapping("/products").allowedOrigins("http://localhost:8080");
         }
      };
   }
}
Now, you can create a Spring Boot web application that runs on 8080 port and your RESTful web service application that can run on the 9090 port. For further details about implementation about RESTful Web Service, you can refer to the chapter titled Consuming RESTful Web Services of this tutorial.
Spring Boot - Internationalization
Internationalization is a process that makes your application adaptable to different languages and regions without engineering changes on the source code. In ither words, Internationalization is a readiness of Localization.
In this chapter, we are going to learn in detail about How to implement the Internationalization in Spring Boot.
Dependencies
We need the Spring Boot Starter Web and Spring Boot Starter Thymeleaf dependency to develop a web application in Spring Boot.
Maven
<dependency>
   <groupId>org.springframework.boot</groupId>
   <artifactId>spring-boot-starter-web</artifactId>
</dependency>

<dependency>
   <groupId>org.springframework.boot</groupId>
   <artifactId>spring-boot-starter-thymeleaf</artifactId>
</dependency>
Gradle
compile('org.springframework.boot:spring-boot-starter-web')
compile group: 'org.springframework.boot', name: 'spring-boot-starter-thymeleaf'
LocaleResolver
We need to determine default Locale of your application. We need to add the LocaleResolver bean in our Spring Boot application.
@Bean
public LocaleResolver localeResolver() {
   SessionLocaleResolver sessionLocaleResolver = new SessionLocaleResolver();
   sessionLocaleResolver.setDefaultLocale(Locale.US);
   return sessionLocaleResolver;
}
LocaleChangeInterceptor
LocaleChangeInterceptor is a used to change the new Locale based on the value of the language parameter added to a request.
@Bean
public LocaleChangeInterceptor localeChangeInterceptor() {
   LocaleChangeInterceptor localeChangeInterceptor = new LocaleChangeInterceptor();
   localeChangeInterceptor.setParamName("language");
   return localeChangeInterceptor;
}
To take this effect, we need to add the LocaleChangeInterceptor into the applications registry interceptor. The configuration class should extend the WebMvcConfigurerAdapter class and override the addInterceptors() method.
@Override
public void addInterceptors(InterceptorRegistry registry) {
   registry.addInterceptor(localeChangeInterceptor());
}
Messages Sources
Spring Boot application by default takes the message sources from src/main/resources folder under the classpath. The default locale message file name should be messages.properties and files for each locale should name as messages_XX.properties. The XX represents the locale code.
All the message properties should be used as key pair values. If any properties are not found on the locale, the application uses the default property from messages.properties file.
The default messages.properties will be as shown −
welcome.text=Hi Welcome to Everyone
The French language messages_fr.properties will be as shown −
welcome.text=Salut Bienvenue tous
Note − Messages source file should be saved as UTF-8 file format.
HTML file
In the HTML file, use the syntax #{key} to display the messages from the properties file.
<h1 th:text = "#{welcome.text}"></h1>
Example - Internationalization in Spring Boot
The complete code is given below
Maven - pom.xml
<?xml version="1.0" encoding="UTF-8"?>
   <project xmlns="http://maven.apache.org/POM/4.0.0" xmlns:xsi="http://www.w3.org/2001/XMLSchema-instance"
   xsi:schemaLocation="http://maven.apache.org/POM/4.0.0 https://maven.apache.org/xsd/maven-4.0.0.xsd">
   <modelVersion>4.0.0</modelVersion>
   <parent>
      <groupId>org.springframework.boot</groupId>
      <artifactId>spring-boot-starter-parent</artifactId>
      <version>3.5.6</version>
      <relativePath/> <!-- lookup parent from repository -->
   </parent>
   <groupId>com.tutorialspoint</groupId>
   <artifactId>demo</artifactId>
   <version>0.0.1-SNAPSHOT</version>
   <name>demo</name>
   <description>Demo project for Spring Boot</description>
   <url/>
   <licenses>
      <license/>
   </licenses>
   <developers>
      <developer/>
   </developers>
   <scm>
      <connection/>
      <developerConnection/>
      <tag/>
      <url/>
   </scm>
   <properties>
      <java.version>21</java.version>
   </properties>
   <dependencies>
      <dependency>
         <groupId>org.springframework.boot</groupId>
         <artifactId>spring-boot-starter-web</artifactId>
      </dependency>
      <dependency>
         <groupId>org.springframework.boot</groupId>
         <artifactId>spring-boot-starter-test</artifactId>
         <scope>test</scope>
      </dependency>
      <dependency>
         <groupId>org.springframework.boot</groupId>
         <artifactId>spring-boot-starter-thymeleaf</artifactId>
      </dependency>
   </dependencies>
   <build>
      <plugins>
         <plugin>
            <groupId>org.springframework.boot</groupId>
            <artifactId>spring-boot-maven-plugin</artifactId>
         </plugin>
      </plugins>
   </build>
</project>
Gradle - build.gradle
buildscript {
   ext {
      springBootVersion = '3.5.6'
   }
   repositories {
      mavenCentral()
   }
   dependencies {
      classpath("org.springframework.boot:spring-boot-gradle-plugin:${springBootVersion}")
   }
}
apply plugin: 'java'
apply plugin: 'eclipse'
apply plugin: 'org.springframework.boot'

group = 'com.tutorialspoint'
version = '0.0.1-SNAPSHOT'
sourceCompatibility = 21

repositories {
   mavenCentral()
}
dependencies {
   compile('org.springframework.boot:spring-boot-starter-web')
   compile group: 'org.springframework.boot', name: 'spring-boot-starter-thymeleaf'
   testCompile('org.springframework.boot:spring-boot-starter-test')
}
The main Spring Boot application class file is given below −
DemoApplication.java
package com.tutorialspoint.demo;

import org.springframework.boot.SpringApplication;
import org.springframework.boot.autoconfigure.SpringBootApplication;

@SpringBootApplication
public class DemoApplication {
   public static void main(String[] args) {
      SpringApplication.run(DemoApplication.class, args);
   }
}
The controller class file is given below −
ViewController.java
package com.tutorialspoint.demo.controller;

import org.springframework.stereotype.Controller;
import org.springframework.web.bind.annotation.GetMapping;

@Controller
public class ViewController {
   @GetMapping("/locale")
   public String locale() {
      return "locale";
   }
}
Configuration class to support the Internationalization
Internationalization.java
package com.tutorialspoint.demo;

import java.util.Locale;

import org.springframework.context.annotation.Bean;
import org.springframework.context.annotation.Configuration;
import org.springframework.web.servlet.LocaleResolver;
import org.springframework.web.servlet.config.annotation.InterceptorRegistry;
import org.springframework.web.servlet.config.annotation.WebMvcConfigurer;
import org.springframework.web.servlet.i18n.LocaleChangeInterceptor;
import org.springframework.web.servlet.i18n.SessionLocaleResolver;

@Configuration
public class Internationalization implements WebMvcConfigurer {
   @Bean
   public LocaleResolver localeResolver() {
      SessionLocaleResolver sessionLocaleResolver = new SessionLocaleResolver();
      sessionLocaleResolver.setDefaultLocale(Locale.US);
      return sessionLocaleResolver;
   }
   @Bean
   public LocaleChangeInterceptor localeChangeInterceptor() {
      LocaleChangeInterceptor localeChangeInterceptor = new LocaleChangeInterceptor();
      localeChangeInterceptor.setParamName("language");
      return localeChangeInterceptor;
   }
   @Override
   public void addInterceptors(InterceptorRegistry registry) {
      registry.addInterceptor(localeChangeInterceptor());
   }
}
The Message sources messages.properties is as shown −
messages.properties
welcome.text = Hi Welcome to Everyone
The Message sources message_fr.properties is as shown −
messages_fr.properties
welcome.text = Salut Bienvenue tous
The HTML file locale.html should be placed under the templates directory on the classpath as shown −
locale.html
<!DOCTYPE html>
<html>
   <head>
      <meta charset = "ISO-8859-1"/>
      <title>Internationalization</title>
   </head>
   <body>
      <h1 th:text = "#{welcome.text}"></h1>
   </body>
</html>
Output
You can create an executable JAR file, and run the Spring boot application by using the following Maven or Gradle commands −
For Maven, use the following command −
mvn clean install
After BUILD SUCCESS, you can find the JAR file under the target directory.
For Gradle, use the following command −
gradle clean build
After BUILD SUCCESSFUL, you can find the JAR file under the build/libs directory.
Now, run the JAR file by using the command as shown −
java jar <JARFILE>
You will find that the application has started on the Tomcat port 8080.
  .   ____          _            __ _ _
 /\\ / ___'_ __ _ _(_)_ __  __ _ \ \ \ \
( ( )\___ | '_ | '_| | '_ \/ _` | \ \ \ \
 \\/  ___)| |_)| | | | | || (_| |  ) ) ) )
  '  |____| .__|_| |_|_| |_\__, | / / / /
 =========|_|==============|___/=/_/_/_/

 :: Spring Boot ::                (v3.5.6)

[2025-09-29T11:35:14Z] [org.springframework.boot.StartupInfoLogger] [main] [53] [INFO ] Starting DemoApplication using Java 21.0.6 with PID 37552 (D:\Projects\demo\target\classes started by mahes in D:\Projects\demo)
[2025-09-29T11:35:14Z] [org.springframework.boot.SpringApplication] [main] [652] [INFO ] No active profile set, falling back to 1 default profile: "default"
[2025-09-29T11:35:16Z] [org.springframework.boot.web.embedded.tomcat.TomcatWebServer] [main] [111] [INFO ] Tomcat initialized with port 8080 (http)
[2025-09-29T11:35:16Z] [org.apache.juli.logging.DirectJDKLog] [main] [168] [INFO ] Initializing ProtocolHandler ["http-nio-8080"]
[2025-09-29T11:35:16Z] [org.apache.juli.logging.DirectJDKLog] [main] [168] [INFO ] Starting service [Tomcat]
[2025-09-29T11:35:16Z] [org.apache.juli.logging.DirectJDKLog] [main] [168] [INFO ] Starting Servlet engine: [Apache Tomcat/10.1.46]
[2025-09-29T11:35:16Z] [org.apache.juli.logging.DirectJDKLog] [main] [168] [INFO ] Initializing Spring embedded WebApplicationContext
[2025-09-29T11:35:16Z] [org.springframework.boot.web.servlet.context.ServletWebServerApplicationContext] [main] [301] [INFO ] Root WebApplicationContext: initialization completed in 1422 ms
[2025-09-29T11:35:16Z] [org.springframework.boot.autoconfigure.web.servlet.WelcomePageHandlerMapping] [main] [59] [INFO ] Adding welcome page template: index
[2025-09-29T11:35:16Z] [org.apache.juli.logging.DirectJDKLog] [main] [168] [INFO ] Starting ProtocolHandler ["http-nio-8080"]
[2025-09-29T11:35:16Z] [org.springframework.boot.web.embedded.tomcat.TomcatWebServer] [main] [243] [INFO ] Tomcat started on port 8080 (http) with context path '/'
[2025-09-29T11:35:16Z] [org.springframework.boot.StartupInfoLogger] [main] [59] [INFO ] Started DemoApplication in 2.559 seconds (process running for 3.061)
[2025-09-29T11:35:27Z] [org.apache.juli.logging.DirectJDKLog] [http-nio-8080-exec-1] [168] [INFO ] Initializing Spring DispatcherServlet 'dispatcherServlet'
[2025-09-29T11:35:27Z] [org.springframework.web.servlet.FrameworkServlet] [http-nio-8080-exec-1] [532] [INFO ] Initializing Servlet 'dispatcherServlet'
[2025-09-29T11:35:27Z] [org.springframework.web.servlet.FrameworkServlet] [http-nio-8080-exec-1] [554] [INFO ] Completed initialization in 0 ms
Now hit the URL http://localhost:8080/locale in your web browser and you can see the following output −
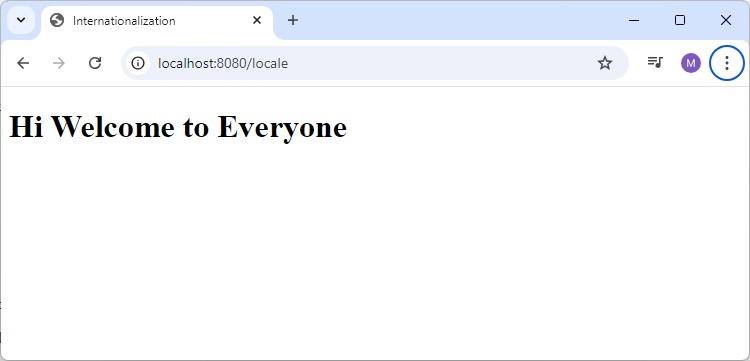
The URL http://localhost:8080/locale?language=fr will give you the output as shown −
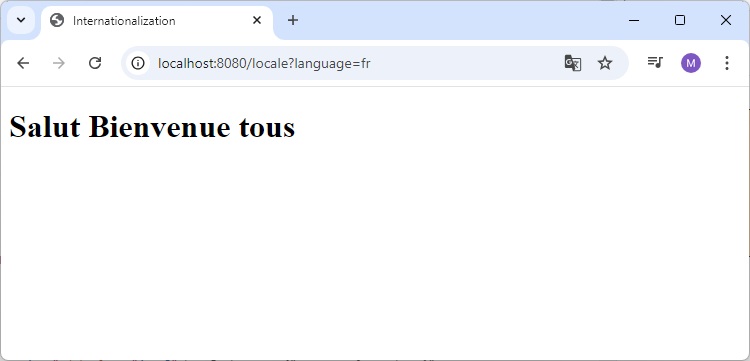
Spring Boot - Scheduling
Scheduling is a process of executing the tasks for the specific time period. Spring Boot provides a good support to write a scheduler on the Spring applications.
Java Cron Expression
Java Cron expressions are used to configure the instances of CronTrigger, a subclass of org.quartz.Trigger. For more information about Java cron expression you can refer to this link −
https://docs.oracle.com/cd/E12058_01/doc/doc.1014/e12030/cron_expressions.htm
The @EnableScheduling annotation is used to enable the scheduler for your application. This annotation should be added into the main Spring Boot application class file.
DemoApplication.java
package com.tutorialspoint.demo;

import org.springframework.boot.SpringApplication;
import org.springframework.boot.autoconfigure.SpringBootApplication;
import org.springframework.scheduling.annotation.EnableScheduling;

@SpringBootApplication
@EnableScheduling
public class DemoApplication {
   public static void main(String[] args) {
      SpringApplication.run(DemoApplication.class, args);
   }
}
pom.xml
<?xml version="1.0" encoding="UTF-8"?>
   <project xmlns="http://maven.apache.org/POM/4.0.0" xmlns:xsi="http://www.w3.org/2001/XMLSchema-instance"
   xsi:schemaLocation="http://maven.apache.org/POM/4.0.0 https://maven.apache.org/xsd/maven-4.0.0.xsd">
   <modelVersion>4.0.0</modelVersion>
   <parent>
      <groupId>org.springframework.boot</groupId>
      <artifactId>spring-boot-starter-parent</artifactId>
      <version>3.5.6</version>
      <relativePath/> <!-- lookup parent from repository -->
   </parent>
   <groupId>com.tutorialspoint</groupId>
   <artifactId>demo</artifactId>
   <version>0.0.1-SNAPSHOT</version>
   <name>demo</name>
   <description>Demo project for Spring Boot</description>
   <url/>
   <licenses>
      <license/>
   </licenses>
   <developers>
      <developer/>
   </developers>
   <scm>
      <connection/>
      <developerConnection/>
      <tag/>
      <url/>
   </scm>
   <properties>
      <java.version>21</java.version>
   </properties>
   <dependencies>
      <dependency>
         <groupId>org.springframework.boot</groupId>
         <artifactId>spring-boot-starter</artifactId>
      </dependency>
      <dependency>
         <groupId>org.springframework.boot</groupId>
         <artifactId>spring-boot-starter-test</artifactId>
         <scope>test</scope>
      </dependency>
   </dependencies>
   <build>
      <plugins>
         <plugin>
            <groupId>org.springframework.boot</groupId>
            <artifactId>spring-boot-maven-plugin</artifactId>
         </plugin>
      </plugins>
   </build>
</project>
Example - Scheduing a Task
The @Scheduled annotation is used to trigger the scheduler for a specific time period.
@Scheduled(cron = "0 0-5 13 * * ?")
public void cronJobSch() throws Exception {
}
The following is a sample code that shows how to execute the task every minute starting at 1:00 PM for next five minutes.
Scheduler.java
package com.tutorialspoint.demo.scheduler;
import java.text.SimpleDateFormat;
import java.util.Date;
import org.springframework.scheduling.annotation.Scheduled;
import org.springframework.stereotype.Component;
@Component
public class Scheduler {
@Scheduled(cron = "0 0-5 13 * * ?")
public void cronJobSch() {
SimpleDateFormat sdf = new SimpleDateFormat("yyyy-MM-dd HH:mm:ss.SSS");
Date now = new Date();
String strDate = sdf.format(now);
System.out.println("Java cron job expression:: " + strDate);
}
}
Output
The following screenshot shows how the application has started at 13:03:00 and for every one minute from that time the cron job scheduler task has executed and it will execute for next five minutes as per the cron job expression.
. ____ _ __ _ _ /\\ / ___'_ __ _ _(_)_ __ __ _ \ \ \ \ ( ( )\___ | '_ | '_| | '_ \/ _` | \ \ \ \ \\/ ___)| |_)| | | | | || (_| | ) ) ) ) ' |____| .__|_| |_|_| |_\__, | / / / / =========|_|==============|___/=/_/_/_/ :: Spring Boot :: (v3.5.6) [2025-09-29T13:03:20Z] [org.springframework.boot.StartupInfoLogger] [main] [53] [INFO ] Starting DemoApplication using Java 21.0.6 with PID 21384 (D:\Projects\demo\target\classes started by mahes in D:\Projects\demo) [2025-09-29T13:03:20Z] [org.springframework.boot.SpringApplication] [main] [652] [INFO ] No active profile set, falling back to 1 default profile: "default" [2025-09-29T13:03:20Z] [org.springframework.boot.web.embedded.tomcat.TomcatWebServer] [main] [111] [INFO ] Tomcat initialized with port 8080 (http) [2025-09-29T13:03:20Z] [org.apache.juli.logging.DirectJDKLog] [main] [168] [INFO ] Initializing ProtocolHandler ["http-nio-8080"] [2025-09-29T13:03:20Z] [org.apache.juli.logging.DirectJDKLog] [main] [168] [INFO ] Starting service [Tomcat] [2025-09-29T13:03:20Z] [org.apache.juli.logging.DirectJDKLog] [main] [168] [INFO ] Starting Servlet engine: [Apache Tomcat/10.1.46] [2025-09-29T13:03:20Z] [org.apache.juli.logging.DirectJDKLog] [main] [168] [INFO ] Initializing Spring embedded WebApplicationContext [2025-09-29T13:03:20Z] [org.springframework.boot.web.servlet.context.ServletWebServerApplicationContext] [main] [301] [INFO ] Root WebApplicationContext: initialization completed in 1127 ms [2025-09-29T13:03:20Z] [org.springframework.boot.autoconfigure.web.servlet.WelcomePageHandlerMapping] [main] [59] [INFO ] Adding welcome page template: index [2025-09-29T13:03:20Z] [org.apache.juli.logging.DirectJDKLog] [main] [168] [INFO ] Starting ProtocolHandler ["http-nio-8080"] [2025-09-29T13:03:20Z] [org.springframework.boot.web.embedded.tomcat.TomcatWebServer] [main] [243] [INFO ] Tomcat started on port 8080 (http) with context path '/' [2025-09-29T13:03:20Z] [org.springframework.boot.StartupInfoLogger] [main] [59] [INFO ] Started DemoApplication in 2.13 seconds (process running for 2.549) Java cron job expression:: 2025-09-29 13:03:00.091 Java cron job expression:: 2025-09-29 13:04:00.013 Java cron job expression:: 2025-09-29 13:05:00.015
Example - Scheduling at Fixed Rate
Fixed Rate scheduler is used to execute the tasks at the specific time. It does not wait for the completion of previous task. The values should be in milliseconds. The sample code is shown here −
@Scheduled(fixedRate = 1000)
public void fixedRateSch() {
}
A sample code for executing a task on every second from the application startup is shown here −
Scheduler.java
package com.tutorialspoint.demo.scheduler;
import java.text.SimpleDateFormat;
import java.util.Date;
import org.springframework.scheduling.annotation.Scheduled;
import org.springframework.stereotype.Component;
@Component
public class Scheduler {
@Scheduled(fixedRate = 1000)
public void fixedRateSch() {
SimpleDateFormat sdf = new SimpleDateFormat("yyyy-MM-dd HH:mm:ss.SSS");
Date now = new Date();
String strDate = sdf.format(now);
System.out.println("Fixed Rate scheduler:: " + strDate);
}
}
Output
Observe the following screenshot that shows the application that has started at 13:06:45 and after that every second fixed rate scheduler task has executed.
Fixed Rate scheduler:: 2025-09-29 13:06:45.832 Fixed Rate scheduler:: 2025-09-29 13:06:46.813 Fixed Rate scheduler:: 2025-09-29 13:06:47.809
Example - Scheduling with Fixed Delay
Fixed Delay scheduler is used to execute the tasks at a specific time. It should wait for the previous task completion. The values should be in milliseconds. A sample code is shown here −
@Scheduled(fixedDelay = 1000, initialDelay = 1000)
public void fixedDelaySch() {
}
Here, the initialDelay is the time after which the task will be executed the first time after the initial delay value.
An example to execute the task for every second after 3 seconds from the application startup has been completed is shown below −
Scheduler.java
package com.tutorialspoint.demo.scheduler;
import java.text.SimpleDateFormat;
import java.util.Date;
import org.springframework.scheduling.annotation.Scheduled;
import org.springframework.stereotype.Component;
@Component
public class Scheduler {
@Scheduled(fixedDelay = 1000, initialDelay = 3000)
public void fixedDelaySch() {
SimpleDateFormat sdf = new SimpleDateFormat("yyyy-MM-dd HH:mm:ss.SSS");
Date now = new Date();
String strDate = sdf.format(now);
System.out.println("Fixed Delay scheduler:: " + strDate);
}
}
Output
Observe the following screenshot which shows the application that has started at 13:11:42 and after every 3 seconds, the fixed delay scheduler task has executed on every second.
Fixed Delay scheduler:: 2025-09-29 13:11:46.061 Fixed Delay scheduler:: 2025-09-29 13:11:47.063 Fixed Delay scheduler:: 2025-09-29 13:11:48.065
Spring Boot - Enabling HTTPS
By default, Spring Boot application uses HTTP 8080 port when the application starts up.
... [2025-09-29T12:25:23Z] [org.apache.juli.logging.DirectJDKLog] [main] [173] [INFO ] Starting ProtocolHandler ["http-nio-8080"] [2025-09-29T12:25:23Z] [org.springframework.boot.web.embedded.tomcat.TomcatWebServer] [main] [243] [INFO ] Tomcat started on port 8080 (http) with context path '/' [2025-09-29T12:25:24Z] [org.springframework.boot.StartupInfoLogger] [main] [56] [INFO ] Started DemoApplication in 1.558 seconds (process running for 2.343)
You need to follow the steps given below to configure the HTTPS and the port 443 in Spring Boot application −
Obtain the SSL certificate Create a self-signed certificate or get one from a Certificate Authority
Enable HTTPS and 443 port
Self-Signed Certificate
To create a self-signed certificate, Java Run Time environment comes bundled with certificate management utility key tool. This utility tool is used to create a Self-Signed certificate. It is shown in the code given here −
keytool -genkey -alias tomcat -storetype PKCS12 -keyalg RSA -keysize 2048 -keystore keystore.p12 -validity 3650
Enter keystore password:
Re-enter new password:
What is your first and last name?
[Unknown]:
What is the name of your organizational unit?
[Unknown]:
What is the name of your organization?
[Unknown]:
What is the name of your City or Locality?
[Unknown]:
What is the name of your State or Province?
[Unknown]:
What is the two-letter country code for this unit?
[Unknown]:
Is CN = Unknown, OU=Unknown, O = Unknown, L = Unknown, ST = Unknown, C = Unknown correct?
[no]: yes
Generating 2,048 bit RSA key pair and self-signed certificate (SHA384withRSA) with a validity of 3,650 days
for: CN=Unknown, OU=Unknown, O=Unknown, L=Unknown, ST=Unknown, C=Unknown
This code will generate a PKCS12 keystore file named as keystore.p12 and the certificate alias name is tomcat. We've stored the keystore in E:/ > Dev directory and keystore password is springboot.
Configure HTTPS
We need to provide the server port as 443, key-store file path, key-store-password, key-store-type and key alias name into the application.properties file. Observe the code given here −
application.properties
server.port: 443 server.ssl.key-store: E:/Dev/keystore.p12 server.ssl.key-store-password: springboot server.ssl.keyStoreType: PKCS12 server.ssl.keyAlias: tomcat
You can use the following code if you are using YAML properties use below application.yml −
application.yml
server:
port: 443
ssl:
key-store: E:/Dev/keystore.p12
key-store-password: springboot
keyStoreType: PKCS12
keyAlias: tomcat
Output
You can create an executable JAR file, and run the spring boot application by using the following Maven or Gradle commands.
For Maven, you can use the following command −
mvn clean install
After "BUILD SUCCESS", you can find the JAR file under the target directory.
For Gradle, you can use the command
gradle clean build
After BUILD SUCCESSFUL, you can find the JAR file under the build/libs directory.
Now, run the JAR file by using the following command −
java jar <JARFILE>
Now, the application has started on the Tomcat port 443 with https as shown −
[2025-09-29T12:30:59Z] [org.apache.juli.logging.DirectJDKLog] [main] [173] [INFO ] Starting ProtocolHandler ["https-jsse-nio-443"] [2025-09-29T12:30:59Z] [org.apache.juli.logging.DirectJDKLog] [main] [173] [INFO ] Connector [https-jsse-nio-443], TLS virtual host [_default_], certificate type [UNDEFINED] configured from keystore [C:\Users\Tutorialspoint\.keystore] using alias [tomcat] with trust store [null] [2025-09-29T12:30:59Z] [org.springframework.boot.web.embedded.tomcat.TomcatWebServer] [main] [243] [INFO ] Tomcat started on port 443 (https) with context path '/' [2025-09-29T12:30:59Z] [org.springframework.boot.StartupInfoLogger] [main] [56] [INFO ] Started DemoApplication in 1.789 seconds (process running for 2.557)
Spring Boot - Eureka Server
Eureka Server is an application that holds the information about all client-service applications. Every Micro service will register into the Eureka server and Eureka server knows all the client applications running on each port and IP address. Eureka Server is also known as Discovery Server.
In this chapter, we will learn in detail about How to build a Eureka server.
Example - Building a Eureka Server
Eureka Server comes with the bundle of Spring Cloud. For this, we need to develop the Eureka server and run it on the default port 8761.
Visit the Spring Initializer homepage https://start.spring.io/ and download the Spring Boot project with Eureka server dependency. It is shown in the screenshot below −
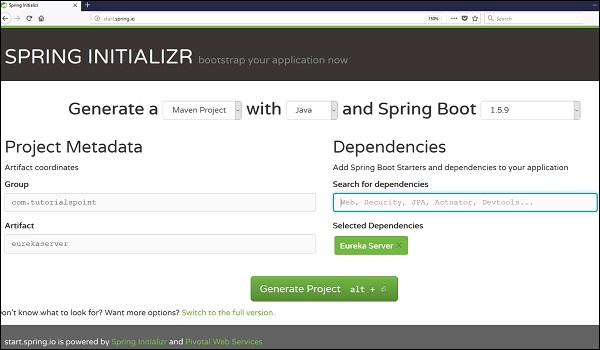
After downloading the project in main Spring Boot Application class file, we need to add @EnableEurekaServer annotation. The @EnableEurekaServer annotation is used to make your Spring Boot application acts as a Eureka Server.
The code for main Spring Boot application class file is as shown below −
EurekaserverApplication.java
package com.tutorialspoint.eurekaserver;
import org.springframework.boot.SpringApplication;
import org.springframework.boot.autoconfigure.SpringBootApplication;
import org.springframework.cloud.netflix.eureka.server.EnableEurekaServer;
@SpringBootApplication
@EnableEurekaServer
public class EurekaserverApplication {
public static void main(String[] args) {
SpringApplication.run(EurekaserverApplication.class, args);
}
}
Make sure Spring cloud Eureka server dependency is added in your build configuration file.
The code for Maven user dependency is shown below −
<dependency> <groupId>org.springframework.cloud</groupId> <artifactId>spring-cloud-starter-netflix-eureka-server</artifactId> </dependency>
The code for Gradle user dependency is given below −
compile('org.springframework.cloud:spring-cloud-starter-netflix-eureka-server')
The complete build configuration file is given below −
Maven - pom.xml
<?xml version="1.0" encoding="UTF-8"?>
<project xmlns="http://maven.apache.org/POM/4.0.0" xmlns:xsi="http://www.w3.org/2001/XMLSchema-instance"
xsi:schemaLocation="http://maven.apache.org/POM/4.0.0 https://maven.apache.org/xsd/maven-4.0.0.xsd">
<modelVersion>4.0.0</modelVersion>
<parent>
<groupId>org.springframework.boot</groupId>
<artifactId>spring-boot-starter-parent</artifactId>
<version>3.5.6</version>
<relativePath/> <!-- lookup parent from repository -->
</parent>
<groupId>com.tutorialspoint</groupId>
<artifactId>eurekaserver</artifactId>
<version>0.0.1-SNAPSHOT</version>
<name>eurekaserver</name>
<description>Demo project for Spring Boot</description>
<url/>
<licenses>
<license/>
</licenses>
<developers>
<developer/>
</developers>
<scm>
<connection/>
<developerConnection/>
<tag/>
<url/>
</scm>
<properties>
<java.version>21</java.version>
<spring-cloud.version>2025.0.0</spring-cloud.version>
</properties>
<dependencies>
<dependency>
<groupId>org.springframework.cloud</groupId>
<artifactId>spring-cloud-starter-netflix-eureka-server</artifactId>
</dependency>
<dependency>
<groupId>org.springframework.boot</groupId>
<artifactId>spring-boot-starter-test</artifactId>
<scope>test</scope>
</dependency>
</dependencies>
<dependencyManagement>
<dependencies>
<dependency>
<groupId>org.springframework.cloud</groupId>
<artifactId>spring-cloud-dependencies</artifactId>
<version>${spring-cloud.version}</version>
<type>pom</type>
<scope>import</scope>
</dependency>
</dependencies>
</dependencyManagement>
<build>
<plugins>
<plugin>
<groupId>org.springframework.boot</groupId>
<artifactId>spring-boot-maven-plugin</artifactId>
</plugin>
</plugins>
</build>
</project>
Gradle build.gradle
buildscript {
ext {
springBootVersion = '3.5.6'
}
repositories {
mavenCentral()
}
dependencies {
classpath("org.springframework.boot:spring-boot-gradle-plugin:${springBootVersion}")
}
}
apply plugin: 'java'
apply plugin: 'eclipse'
apply plugin: 'org.springframework.boot'
group = 'com.tutorialspoint'
version = '0.0.1-SNAPSHOT'
sourceCompatibility = 21
repositories {
mavenCentral()
}
ext {
springCloudVersion = '2025.0.0'
}
dependencies {
compile('org.springframework.cloud:spring-cloud-starter-netflix-eureka-server')
testCompile('org.springframework.boot:spring-boot-starter-test')
}
dependencyManagement {
imports {
mavenBom "org.springframework.cloud:spring-cloud-dependencies:${springCloudVersion}"
}
}
By default, the Eureka Server registers itself into the discovery. You should add the below given configuration into your application.properties file or application.yml file.
application.properties file is given below −
eureka.client.registerWithEureka = false eureka.client.fetchRegistry = false server.port = 8761
The application.yml file is given below −
eureka:
client:
registerWithEureka: false
fetchRegistry: false
server:
port: 8761
Output
Now, you can create an executable JAR file, and run the Spring Boot application by using the Maven or Gradle commands shown below −
For Maven, use the command as shown below −
mvn clean install
After "BUILD SUCCESS", you can find the JAR file under the target directory.
For Gradle, you can use the command shown below −
gradle clean build
After "BUILD SUCCESSFUL", you can find the JAR file under the build/libs directory.
Now, run the JAR file by using the following command −
java jar <JARFILE>
You can find that the application has started on the Tomcat port 8761 as shown below −
. ____ _ __ _ _ /\\ / ___'_ __ _ _(_)_ __ __ _ \ \ \ \ ( ( )\___ | '_ | '_| | '_ \/ _` | \ \ \ \ \\/ ___)| |_)| | | | | || (_| | ) ) ) ) ' |____| .__|_| |_|_| |_\__, | / / / / =========|_|==============|___/=/_/_/_/ :: Spring Boot :: (v3.5.6) 2025-09-29T12:45:26.399+05:30 INFO 41552 --- [eurekaserver] [ main] c.t.e.EurekaserverApplication : Starting EurekaserverApplication using Java 21.0.6 with PID 41552 (D:\Projects\eurekaserver\target\classes started by mahes in D:\Projects\eurekaserver) 2025-09-29T12:45:26.402+05:30 INFO 41552 --- [eurekaserver] [ main] c.t.e.EurekaserverApplication : No active profile set, falling back to 1 default profile: "default" 2025-09-29T12:45:27.714+05:30 INFO 41552 --- [eurekaserver] [ main] o.s.cloud.context.scope.GenericScope : BeanFactory id=37b0aecd-4feb-3fa0-b028-b62a23271b1d 2025-09-29T12:45:28.120+05:30 INFO 41552 --- [eurekaserver] [ main] o.s.b.w.embedded.tomcat.TomcatWebServer : Tomcat initialized with port 8761 (http) 2025-09-29T12:45:28.160+05:30 INFO 41552 --- [eurekaserver] [ main] o.apache.catalina.core.StandardService : Starting service [Tomcat] 2025-09-29T12:45:28.160+05:30 INFO 41552 --- [eurekaserver] [ main] o.apache.catalina.core.StandardEngine : Starting Servlet engine: [Apache Tomcat/10.1.46] 2025-09-29T12:45:28.243+05:30 INFO 41552 --- [eurekaserver] [ main] o.a.c.c.C.[Tomcat].[localhost].[/] : Initializing Spring embedded WebApplicationContext 2025-09-29T12:45:28.246+05:30 INFO 41552 --- [eurekaserver] [ main] w.s.c.ServletWebServerApplicationContext : Root WebApplicationContext: initialization completed in 1783 ms 2025-09-29T12:45:29.129+05:30 INFO 41552 --- [eurekaserver] [ main] c.n.d.provider.DiscoveryJerseyProvider : Using JSON encoding codec LegacyJacksonJson 2025-09-29T12:45:29.130+05:30 INFO 41552 --- [eurekaserver] [ main] c.n.d.provider.DiscoveryJerseyProvider : Using JSON decoding codec LegacyJacksonJson 2025-09-29T12:45:29.316+05:30 INFO 41552 --- [eurekaserver] [ main] c.n.d.provider.DiscoveryJerseyProvider : Using XML encoding codec XStreamXml 2025-09-29T12:45:29.317+05:30 INFO 41552 --- [eurekaserver] [ main] c.n.d.provider.DiscoveryJerseyProvider : Using XML decoding codec XStreamXml 2025-09-29T12:45:29.532+05:30 INFO 41552 --- [eurekaserver] [ main] o.s.v.b.OptionalValidatorFactoryBean : Failed to set up a Bean Validation provider: jakarta.validation.NoProviderFoundException: Unable to create a Configuration, because no Jakarta Bean Validation provider could be found. Add a provider like Hibernate Validator (RI) to your classpath. 2025-09-29T12:45:30.289+05:30 WARN 41552 --- [eurekaserver] [ main] iguration$LoadBalancerCaffeineWarnLogger : Spring Cloud LoadBalancer is currently working with the default cache. While this cache implementation is useful for development and tests, it's recommended to use Caffeine cache in production.You can switch to using Caffeine cache, by adding it and org.springframework.cache.caffeine.CaffeineCacheManager to the classpath. 2025-09-29T12:45:30.318+05:30 INFO 41552 --- [eurekaserver] [ main] o.s.c.n.eureka.InstanceInfoFactory : Setting initial instance status as: STARTING 2025-09-29T12:45:30.344+05:30 INFO 41552 --- [eurekaserver] [ main] com.netflix.discovery.DiscoveryClient : Initializing Eureka in region us-east-1 2025-09-29T12:45:30.345+05:30 INFO 41552 --- [eurekaserver] [ main] com.netflix.discovery.DiscoveryClient : Client configured to neither register nor query for data. 2025-09-29T12:45:30.348+05:30 INFO 41552 --- [eurekaserver] [ main] com.netflix.discovery.DiscoveryClient : Discovery Client initialized at timestamp 1759130130346 with initial instances count: 0 2025-09-29T12:45:30.401+05:30 INFO 41552 --- [eurekaserver] [ main] c.n.eureka.DefaultEurekaServerContext : Initializing ... 2025-09-29T12:45:30.403+05:30 INFO 41552 --- [eurekaserver] [ main] c.n.eureka.cluster.PeerEurekaNodes : Adding new peer nodes [http://localhost:8761/eureka/] 2025-09-29T12:45:30.524+05:30 INFO 41552 --- [eurekaserver] [ main] c.n.d.provider.DiscoveryJerseyProvider : Using JSON encoding codec LegacyJacksonJson 2025-09-29T12:45:30.524+05:30 INFO 41552 --- [eurekaserver] [ main] c.n.d.provider.DiscoveryJerseyProvider : Using JSON decoding codec LegacyJacksonJson 2025-09-29T12:45:30.524+05:30 INFO 41552 --- [eurekaserver] [ main] c.n.d.provider.DiscoveryJerseyProvider : Using XML encoding codec XStreamXml 2025-09-29T12:45:30.524+05:30 INFO 41552 --- [eurekaserver] [ main] c.n.d.provider.DiscoveryJerseyProvider : Using XML decoding codec XStreamXml 2025-09-29T12:45:30.579+05:30 INFO 41552 --- [eurekaserver] [ main] c.n.eureka.cluster.PeerEurekaNodes : Replica node URL: http://localhost:8761/eureka/ 2025-09-29T12:45:30.589+05:30 INFO 41552 --- [eurekaserver] [ main] c.n.e.registry.AbstractInstanceRegistry : Finished initializing remote region registries. All known remote regions: [] 2025-09-29T12:45:30.589+05:30 INFO 41552 --- [eurekaserver] [ main] c.n.eureka.DefaultEurekaServerContext : Initialized 2025-09-29T12:45:30.608+05:30 INFO 41552 --- [eurekaserver] [ main] o.s.b.a.e.web.EndpointLinksResolver : Exposing 1 endpoint beneath base path '/actuator' 2025-09-29T12:45:30.675+05:30 INFO 41552 --- [eurekaserver] [ main] o.s.c.n.e.s.EurekaServiceRegistry : Registering application EUREKASERVER with eureka with status UP 2025-09-29T12:45:30.688+05:30 INFO 41552 --- [eurekaserver] [ Thread-9] o.s.c.n.e.server.EurekaServerBootstrap : isAws returned false 2025-09-29T12:45:30.688+05:30 INFO 41552 --- [eurekaserver] [ Thread-9] o.s.c.n.e.server.EurekaServerBootstrap : Initialized server context 2025-09-29T12:45:30.688+05:30 INFO 41552 --- [eurekaserver] [ Thread-9] c.n.e.r.PeerAwareInstanceRegistryImpl : Got 1 instances from neighboring DS node 2025-09-29T12:45:30.688+05:30 INFO 41552 --- [eurekaserver] [ Thread-9] c.n.e.r.PeerAwareInstanceRegistryImpl : Renew threshold is: 1 2025-09-29T12:45:30.689+05:30 INFO 41552 --- [eurekaserver] [ Thread-9] c.n.e.r.PeerAwareInstanceRegistryImpl : Changing status to UP 2025-09-29T12:45:30.692+05:30 INFO 41552 --- [eurekaserver] [ Thread-9] e.s.EurekaServerInitializerConfiguration : Started Eureka Server 2025-09-29T12:45:30.711+05:30 INFO 41552 --- [eurekaserver] [ main] o.s.b.w.embedded.tomcat.TomcatWebServer : Tomcat started on port 8761 (http) with context path '/' 2025-09-29T12:45:30.712+05:30 INFO 41552 --- [eurekaserver] [ main] .s.c.n.e.s.EurekaAutoServiceRegistration : Updating port to 8761 2025-09-29T12:45:30.734+05:30 INFO 41552 --- [eurekaserver] [ main] c.t.e.EurekaserverApplication : Started EurekaserverApplication in 4.802 seconds (process running for 5.424)
Now, hit the URL http://localhost:8761/ in your web browser and you can find the Eureka Server running on the port 8761 as shown below −
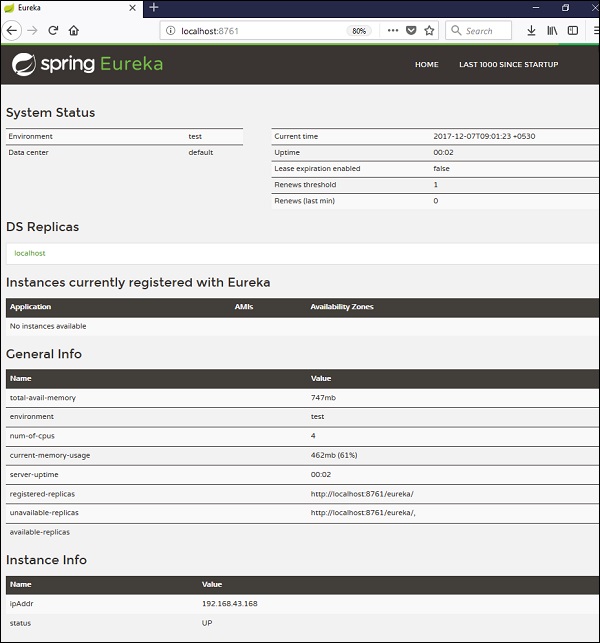
Spring Boot - Service Registration with Eureka
In this chapter, you are going to learn in detail about how to register the Spring Boot Micro service application into the Eureka Server. Before registering the application, please make sure Eureka Server is running on the port 8761 or first build the Eureka Server and run it. For further information on building the Eureka server, you can refer to the previous chapter Spring Boot - Eureka Server
Example - Building a Eureka Client
Eureka Client comes with the bundle of Spring Cloud. For this, we need to develop the Eureka client and run it on the default port 8080.
Visit the Spring Initializer homepage https://start.spring.io/ and download the Spring Boot project with Eureka Client dependency. It is shown in the screenshot below −
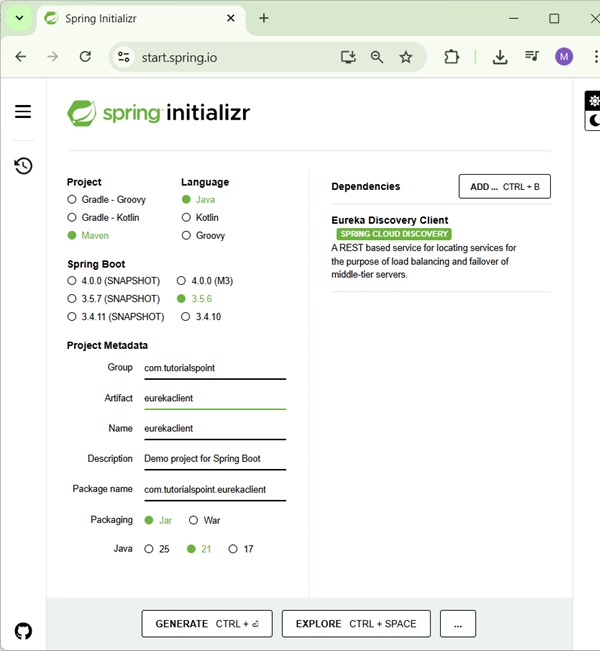
After downloading the project in main Spring Boot Application class file, we need to add @EnableEurekaClient annotation. The @EnableEurekaClient annotation is used to make your Spring Boot application acts as a Eureka Client.
EurekaclientApplication.java
The code for main Spring Boot application class file is as shown below −
package com.tutorialspoint.eurekaclient;
import org.springframework.boot.SpringApplication;
import org.springframework.boot.autoconfigure.SpringBootApplication;
import org.springframework.cloud.client.discovery.EnableDiscoveryClient;
@SpringBootApplication
@EnableDiscoveryClient
public class EurekaclientApplication {
public static void main(String[] args) {
SpringApplication.run(EurekaclientApplication.class, args);
}
}
Make sure Spring cloud Eureka client dependency is added in your build configuration file.
The code for Maven user dependency is shown below −
<dependency> <groupId>org.springframework.cloud</groupId> <artifactId>spring-cloud-starter-netflix-eureka-client</artifactId> </dependency>
The code for Gradle user dependency is given below −
compile('org.springframework.cloud:spring-cloud-starter-netflix-eureka-client')
The complete build configuration file is given below −
Maven - pom.xml
<?xml version="1.0" encoding="UTF-8"?>
<project xmlns="http://maven.apache.org/POM/4.0.0" xmlns:xsi="http://www.w3.org/2001/XMLSchema-instance"
xsi:schemaLocation="http://maven.apache.org/POM/4.0.0 https://maven.apache.org/xsd/maven-4.0.0.xsd">
<modelVersion>4.0.0</modelVersion>
<parent>
<groupId>org.springframework.boot</groupId>
<artifactId>spring-boot-starter-parent</artifactId>
<version>3.5.6</version>
<relativePath/> <!-- lookup parent from repository -->
</parent>
<groupId>com.tutorialspoint</groupId>
<artifactId>eurekaserver</artifactId>
<version>0.0.1-SNAPSHOT</version>
<name>eurekaserver</name>
<description>Demo project for Spring Boot</description>
<url/>
<licenses>
<license/>
</licenses>
<developers>
<developer/>
</developers>
<scm>
<connection/>
<developerConnection/>
<tag/>
<url/>
</scm>
<properties>
<java.version>21</java.version>
<spring-cloud.version>2025.0.0</spring-cloud.version>
</properties>
<dependencies>
<dependency>
<groupId>org.springframework.cloud</groupId>
<artifactId>spring-cloud-starter-netflix-eureka-client</artifactId>
</dependency>
<dependency>
<groupId>org.springframework.boot</groupId>
<artifactId>spring-boot-starter-test</artifactId>
<scope>test</scope>
</dependency>
<dependency>
<groupId>org.springframework.boot</groupId>
<artifactId>spring-boot-starter-web</artifactId>
</dependency>
</dependencies>
<dependencyManagement>
<dependencies>
<dependency>
<groupId>org.springframework.cloud</groupId>
<artifactId>spring-cloud-dependencies</artifactId>
<version>${spring-cloud.version}</version>
<type>pom</type>
<scope>import</scope>
</dependency>
</dependencies>
</dependencyManagement>
<build>
<plugins>
<plugin>
<groupId>org.springframework.boot</groupId>
<artifactId>spring-boot-maven-plugin</artifactId>
</plugin>
</plugins>
</build>
</project>
Gradle - build.gradle
buildscript {
ext {
springBootVersion = '3.5.6'
}
repositories {
mavenCentral()
}
dependencies {
classpath("org.springframework.boot:spring-boot-gradle-plugin:${springBootVersion}")
}
}
apply plugin: 'java'
apply plugin: 'eclipse'
apply plugin: 'org.springframework.boot'
group = 'com.tutorialspoint'
version = '0.0.1-SNAPSHOT'
sourceCompatibility = 21
repositories {
mavenCentral()
}
ext {
springCloudVersion = '2025.0.0'
}
dependencies {
compile('org.springframework.cloud:spring-cloud-starter-eureka-client')
testCompile('org.springframework.boot:spring-boot-starter-test')
}
dependencyManagement {
imports {
mavenBom "org.springframework.cloud:spring-cloud-dependencies:${springCloudVersion}"
}
}
To register the Spring Boot application into Eureka Server we need to add the following configuration in our application.properties file or application.yml file and specify the Eureka Server URL in our configuration.
application.yml
The code for application.yml file is given below −
eureka:
client:
serviceUrl:
defaultZone: http://localhost:8761/eureka
instance:
preferIpAddress: true
spring:
application:
name: eurekaclient
application.properties
The code for application.properties file is given below −
eureka.client.serviceUrl.defaultZone = http://localhost:8761/eureka eureka.client.instance.preferIpAddress = true spring.application.name = eurekaclient
Now, add the Rest Endpoint to return String in the main Spring Boot application and the Spring Boot Starter web dependency in build configuration file. Observe the code given below −
EurekaclientApplication.java
package com.tutorialspoint.eurekaclient;
import org.springframework.boot.SpringApplication;
import org.springframework.boot.autoconfigure.SpringBootApplication;
import org.springframework.cloud.client.discovery.EnableDiscoveryClient;
import org.springframework.web.bind.annotation.GetMapping;
import org.springframework.web.bind.annotation.RestController;
@SpringBootApplication
@EnableDiscoveryClient
@RestController
public class EurekaclientApplication {
public static void main(String[] args) {
SpringApplication.run(EurekaclientApplication.class, args);
}
@GetMapping(value = "/")
public String home() {
return "Eureka Client application";
}
}
Output
You can create an executable JAR file, and run the Spring Boot application by using the following Maven or Gradle commands −
For Maven, you can use the following command −
mvn clean install
After "BUILD SUCCESS", you can find the JAR file under the target directory.
For Gradle, you can use the following command −
gradle clean build
After "BUILD SUCCESSFUL", you can find the JAR file under the build/libs directory.
Now, run the JAR file by using the command as shown −
java jar <JARFILE>
Now, the application has started on the Tomcat port 8080 and Eureka Client application is registered with the Eureka Server as shown below −
. ____ _ __ _ _ /\\ / ___'_ __ _ _(_)_ __ __ _ \ \ \ \ ( ( )\___ | '_ | '_| | '_ \/ _` | \ \ \ \ \\/ ___)| |_)| | | | | || (_| | ) ) ) ) ' |____| .__|_| |_|_| |_\__, | / / / / =========|_|==============|___/=/_/_/_/ :: Spring Boot :: (v3.5.6) 2025-09-29T13:01:11.017+05:30 INFO 10900 --- [eurekaserver] [ main] c.t.e.EurekaserverApplication : Starting EurekaserverApplication using Java 21.0.6 with PID 10900 (D:\Projects\eurekaserver\target\classes started by mahes in D:\Projects\eurekaserver) 2025-09-29T13:01:11.020+05:30 INFO 10900 --- [eurekaserver] [ main] c.t.e.EurekaserverApplication : No active profile set, falling back to 1 default profile: "default" 2025-09-29T13:01:12.509+05:30 INFO 10900 --- [eurekaserver] [ main] o.s.cloud.context.scope.GenericScope : BeanFactory id=37b0aecd-4feb-3fa0-b028-b62a23271b1d 2025-09-29T13:01:12.915+05:30 INFO 10900 --- [eurekaserver] [ main] o.s.b.w.embedded.tomcat.TomcatWebServer : Tomcat initialized with port 8761 (http) 2025-09-29T13:01:12.931+05:30 INFO 10900 --- [eurekaserver] [ main] o.apache.catalina.core.StandardService : Starting service [Tomcat] 2025-09-29T13:01:12.931+05:30 INFO 10900 --- [eurekaserver] [ main] o.apache.catalina.core.StandardEngine : Starting Servlet engine: [Apache Tomcat/10.1.46] 2025-09-29T13:01:13.001+05:30 INFO 10900 --- [eurekaserver] [ main] o.a.c.c.C.[Tomcat].[localhost].[/] : Initializing Spring embedded WebApplicationContext 2025-09-29T13:01:13.002+05:30 INFO 10900 --- [eurekaserver] [ main] w.s.c.ServletWebServerApplicationContext : Root WebApplicationContext: initialization completed in 1918 ms 2025-09-29T13:01:13.933+05:30 INFO 10900 --- [eurekaserver] [ main] c.n.d.provider.DiscoveryJerseyProvider : Using JSON encoding codec LegacyJacksonJson 2025-09-29T13:01:13.934+05:30 INFO 10900 --- [eurekaserver] [ main] c.n.d.provider.DiscoveryJerseyProvider : Using JSON decoding codec LegacyJacksonJson 2025-09-29T13:01:14.158+05:30 INFO 10900 --- [eurekaserver] [ main] c.n.d.provider.DiscoveryJerseyProvider : Using XML encoding codec XStreamXml 2025-09-29T13:01:14.158+05:30 INFO 10900 --- [eurekaserver] [ main] c.n.d.provider.DiscoveryJerseyProvider : Using XML decoding codec XStreamXml 2025-09-29T13:01:14.348+05:30 INFO 10900 --- [eurekaserver] [ main] o.s.v.b.OptionalValidatorFactoryBean : Failed to set up a Bean Validation provider: jakarta.validation.NoProviderFoundException: Unable to create a Configuration, because no Jakarta Bean Validation provider could be found. Add a provider like Hibernate Validator (RI) to your classpath. 2025-09-29T13:01:15.060+05:30 WARN 10900 --- [eurekaserver] [ main] iguration$LoadBalancerCaffeineWarnLogger : Spring Cloud LoadBalancer is currently working with the default cache. While this cache implementation is useful for development and tests, it's recommended to use Caffeine cache in production.You can switch to using Caffeine cache, by adding it and org.springframework.cache.caffeine.CaffeineCacheManager to the classpath. 2025-09-29T13:01:15.095+05:30 INFO 10900 --- [eurekaserver] [ main] o.s.c.n.eureka.InstanceInfoFactory : Setting initial instance status as: STARTING 2025-09-29T13:01:15.131+05:30 INFO 10900 --- [eurekaserver] [ main] com.netflix.discovery.DiscoveryClient : Initializing Eureka in region us-east-1 2025-09-29T13:01:15.131+05:30 INFO 10900 --- [eurekaserver] [ main] com.netflix.discovery.DiscoveryClient : Client configured to neither register nor query for data. 2025-09-29T13:01:15.135+05:30 INFO 10900 --- [eurekaserver] [ main] com.netflix.discovery.DiscoveryClient : Discovery Client initialized at timestamp 1759131075133 with initial instances count: 0 2025-09-29T13:01:15.212+05:30 INFO 10900 --- [eurekaserver] [ main] c.n.eureka.DefaultEurekaServerContext : Initializing ... 2025-09-29T13:01:15.215+05:30 INFO 10900 --- [eurekaserver] [ main] c.n.eureka.cluster.PeerEurekaNodes : Adding new peer nodes [http://localhost:8761/eureka/] 2025-09-29T13:01:15.354+05:30 INFO 10900 --- [eurekaserver] [ main] c.n.d.provider.DiscoveryJerseyProvider : Using JSON encoding codec LegacyJacksonJson 2025-09-29T13:01:15.355+05:30 INFO 10900 --- [eurekaserver] [ main] c.n.d.provider.DiscoveryJerseyProvider : Using JSON decoding codec LegacyJacksonJson 2025-09-29T13:01:15.355+05:30 INFO 10900 --- [eurekaserver] [ main] c.n.d.provider.DiscoveryJerseyProvider : Using XML encoding codec XStreamXml 2025-09-29T13:01:15.355+05:30 INFO 10900 --- [eurekaserver] [ main] c.n.d.provider.DiscoveryJerseyProvider : Using XML decoding codec XStreamXml 2025-09-29T13:01:15.414+05:30 INFO 10900 --- [eurekaserver] [ main] c.n.eureka.cluster.PeerEurekaNodes : Replica node URL: http://localhost:8761/eureka/ 2025-09-29T13:01:15.435+05:30 INFO 10900 --- [eurekaserver] [ main] c.n.e.registry.AbstractInstanceRegistry : Finished initializing remote region registries. All known remote regions: [] 2025-09-29T13:01:15.435+05:30 INFO 10900 --- [eurekaserver] [ main] c.n.eureka.DefaultEurekaServerContext : Initialized 2025-09-29T13:01:15.451+05:30 INFO 10900 --- [eurekaserver] [ main] o.s.b.a.e.web.EndpointLinksResolver : Exposing 1 endpoint beneath base path '/actuator' 2025-09-29T13:01:15.530+05:30 INFO 10900 --- [eurekaserver] [ main] o.s.c.n.e.s.EurekaServiceRegistry : Registering application EUREKASERVER with eureka with status UP 2025-09-29T13:01:15.546+05:30 INFO 10900 --- [eurekaserver] [ Thread-9] o.s.c.n.e.server.EurekaServerBootstrap : isAws returned false 2025-09-29T13:01:15.547+05:30 INFO 10900 --- [eurekaserver] [ Thread-9] o.s.c.n.e.server.EurekaServerBootstrap : Initialized server context 2025-09-29T13:01:15.547+05:30 INFO 10900 --- [eurekaserver] [ Thread-9] c.n.e.r.PeerAwareInstanceRegistryImpl : Got 1 instances from neighboring DS node 2025-09-29T13:01:15.548+05:30 INFO 10900 --- [eurekaserver] [ Thread-9] c.n.e.r.PeerAwareInstanceRegistryImpl : Renew threshold is: 1 2025-09-29T13:01:15.548+05:30 INFO 10900 --- [eurekaserver] [ Thread-9] c.n.e.r.PeerAwareInstanceRegistryImpl : Changing status to UP 2025-09-29T13:01:15.554+05:30 INFO 10900 --- [eurekaserver] [ Thread-9] e.s.EurekaServerInitializerConfiguration : Started Eureka Server 2025-09-29T13:01:15.577+05:30 INFO 10900 --- [eurekaserver] [ main] o.s.b.w.embedded.tomcat.TomcatWebServer : Tomcat started on port 8761 (http) with context path '/' 2025-09-29T13:01:15.578+05:30 INFO 10900 --- [eurekaserver] [ main] .s.c.n.e.s.EurekaAutoServiceRegistration : Updating port to 8761 2025-09-29T13:01:15.602+05:30 INFO 10900 --- [eurekaserver] [ main] c.t.e.EurekaserverApplication : Started EurekaserverApplication in 5.105 seconds (process running for 5.825) 2025-09-29T13:02:15.550+05:30 INFO 10900 --- [eurekaserver] [a-EvictionTimer] c.n.e.registry.AbstractInstanceRegistry : Running the evict task with compensationTime 0ms 2025-09-29T13:03:15.550+05:30 INFO 10900 --- [eurekaserver] [a-EvictionTimer] c.n.e.registry.AbstractInstanceRegistry : Running the evict task with compensationTime 0ms 2025-09-29T13:03:47.823+05:30 INFO 10900 --- [eurekaserver] [nio-8761-exec-1] o.a.c.c.C.[Tomcat].[localhost].[/] : Initializing Spring DispatcherServlet 'dispatcherServlet' 2025-09-29T13:03:47.824+05:30 INFO 10900 --- [eurekaserver] [nio-8761-exec-1] o.s.web.servlet.DispatcherServlet : Initializing Servlet 'dispatcherServlet' 2025-09-29T13:03:47.825+05:30 INFO 10900 --- [eurekaserver] [nio-8761-exec-1] o.s.web.servlet.DispatcherServlet : Completed initialization in 1 ms 2025-09-29T13:03:48.087+05:30 INFO 10900 --- [eurekaserver] [nio-8761-exec-2] c.n.e.registry.AbstractInstanceRegistry : Registered instance EUREKACLIENT/Home:eurekaclient with status UP (replication=false) 2025-09-29T13:03:48.778+05:30 INFO 10900 --- [eurekaserver] [nio-8761-exec-3] c.n.e.registry.AbstractInstanceRegistry : Registered instance EUREKACLIENT/Home:eurekaclient with status UP (replication=true)
Hit the URL http://localhost:8761/ in your web browser and you can see the Eureka Client application is registered with Eureka Server.

Now hit the URL http://localhost:8080/ in your web browser and see the Rest Endpoint output.
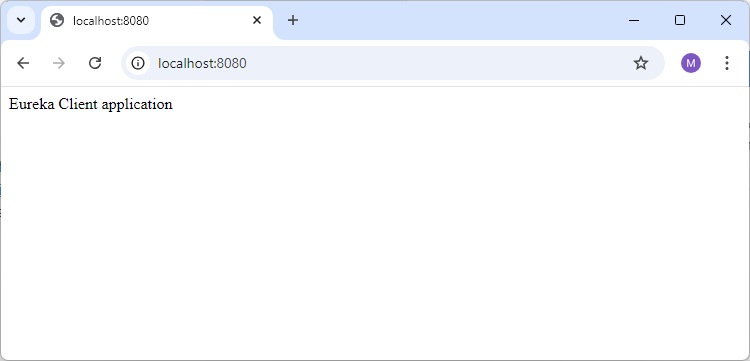
Spring Boot - Gateway Proxy Server and Routing
Gateway Proxy Server is a gateway application that handles all the requests and does the dynamic routing of microservice applications.
For Example, /api/user is mapped to the user service and /api/products is mapped to the product service and Zuul Server dynamically routes the requests to the respective backend application.
spring-cloud-starter-zuul dependency was used to integrate Zuul gateway server in spring boot project. Now it is deprecated and it replaced with spring-cloud-starter-gateway-mvc dependency. We're using Gateway Server terminology instead of Zuul Server now onwards.
In this chapter, we are going to see in detail how to create Gateway Server application in Spring Boot.
Example - Creating Gateway Server Application
The Gateway Server is bundled with Spring Cloud dependency. You can download the Spring Boot project from Spring Initializer page https://start.spring.io/ and choose the Zuul Server dependency.
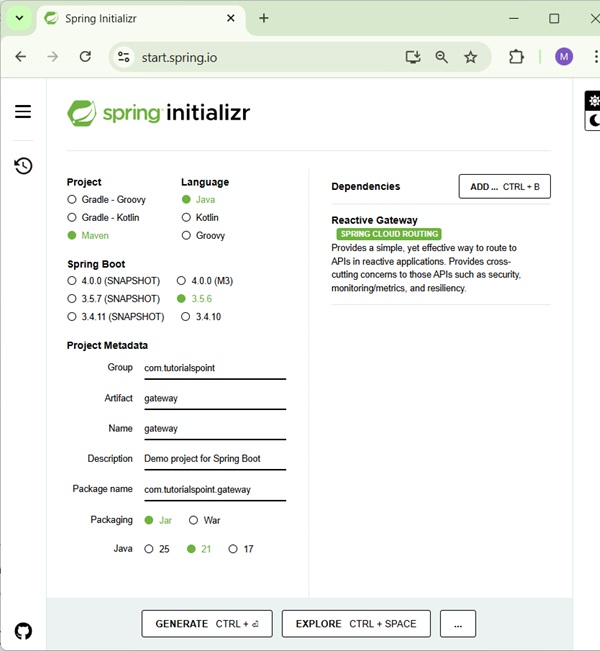
Add the Routing Information in your main Spring Boot application. Here we're rerouting each request received to a different server while adding a sample request header.
GatewayApplication
package com.tutorialspoint.gateway;
import org.springframework.boot.SpringApplication;
import org.springframework.boot.autoconfigure.SpringBootApplication;
import org.springframework.cloud.gateway.route.RouteLocator;
import org.springframework.cloud.gateway.route.builder.RouteLocatorBuilder;
import org.springframework.context.annotation.Bean;
@SpringBootApplication
public class GatewayApplication {
public static void main(String[] args) {
SpringApplication.run(GatewayApplication.class, args);
}
@Bean
public RouteLocator myRoutes(RouteLocatorBuilder builder) {
return builder.routes()
.route(p -> p
.path("/**")
.filters(f -> f.addRequestHeader("Src", "Tutorialspoint"))
.uri("http://localhost:8080/"))
.build();
}
}
You will have to add the Spring Cloud Starter Gateway dependency in our build configuration file.
Maven users will have to add the following dependency in your pom.xml file −
<dependency> <groupId>org.springframework.cloud</groupId> <artifactId>spring-cloud-starter-gateway-server-webflux</artifactId> </dependency>
Update application.properties to point to 8111 port
application.properties
spring.application.name=gateway server.port = 8111
For Gradle users, add the below dependency in your build.gradle file
compile('org.springframework.cloud:spring-cloud-starter-gateway-server-webflux')
application.yaml
spring
application
name: gateway
server
port: 8111
Note − The http://localhost:8080/ application should already be running before routing via Gateway Proxy. Refer to Consuming RESTful Web Services Chapter for REST Service details.
The complete build configuration file is given below.
Maven users can use the pom.xml file given below −
<?xml version="1.0" encoding="UTF-8"?>
<project xmlns="http://maven.apache.org/POM/4.0.0" xmlns:xsi="http://www.w3.org/2001/XMLSchema-instance"
xsi:schemaLocation="http://maven.apache.org/POM/4.0.0 https://maven.apache.org/xsd/maven-4.0.0.xsd">
<modelVersion>4.0.0</modelVersion>
<parent>
<groupId>org.springframework.boot</groupId>
<artifactId>spring-boot-starter-parent</artifactId>
<version>3.5.6</version>
<relativePath/> <!-- lookup parent from repository -->
</parent>
<groupId>com.tutorialspoint</groupId>
<artifactId>gateway</artifactId>
<version>0.0.1-SNAPSHOT</version>
<name>gateway</name>
<description>Demo project for Spring Boot</description>
<url/>
<licenses>
<license/>
</licenses>
<developers>
<developer/>
</developers>
<scm>
<connection/>
<developerConnection/>
<tag/>
<url/>
</scm>
<properties>
<java.version>21</java.version>
<spring-cloud.version>2025.0.0</spring-cloud.version>
</properties>
<dependencies>
<dependency>
<groupId>org.springframework.cloud</groupId>
<artifactId>spring-cloud-starter-gateway-server-webflux</artifactId>
</dependency>
<dependency>
<groupId>org.springframework.boot</groupId>
<artifactId>spring-boot-starter-test</artifactId>
<scope>test</scope>
</dependency>
<dependency>
<groupId>io.projectreactor</groupId>
<artifactId>reactor-test</artifactId>
<scope>test</scope>
</dependency>
</dependencies>
<dependencyManagement>
<dependencies>
<dependency>
<groupId>org.springframework.cloud</groupId>
<artifactId>spring-cloud-dependencies</artifactId>
<version>${spring-cloud.version}</version>
<type>pom</type>
<scope>import</scope>
</dependency>
</dependencies>
</dependencyManagement>
<build>
<plugins>
<plugin>
<groupId>org.springframework.boot</groupId>
<artifactId>spring-boot-maven-plugin</artifactId>
</plugin>
</plugins>
</build>
</project>
Gradle users can use the build.gradle file given below −
buildscript {
ext {
springBootVersion = '3.5.6'
}
repositories {
mavenCentral()
}
dependencies {
classpath("org.springframework.boot:spring-boot-gradle-plugin:${springBootVersion}")
}
}
apply plugin: 'java'
apply plugin: 'eclipse'
apply plugin: 'org.springframework.boot'
group = 'com.tutorialspoint'
version = '0.0.1-SNAPSHOT'
sourceCompatibility = 21
repositories {
mavenCentral()
}
ext {
springCloudVersion = 'Edgware.RELEASE'
}
dependencies {
compile('org.springframework.cloud:spring-cloud-starter-gateway')
testCompile('org.springframework.boot:spring-boot-starter-test')
}
dependencyManagement {
imports {
mavenBom "org.springframework.cloud:spring-cloud-dependencies:${springCloudVersion}"
}
}
Output
You can create an executable JAR file, and run the Spring Boot application by using the Maven or Gradle commands given below −
For Maven, you can use the command given below −
mvn clean install
After BUILD SUCCESS, you can find the JAR file under the target directory.
For Gradle, you can use the command given below −
gradle clean build
After BUILD SUCCESSFUL, you can find the JAR file under the build/libs directory.
Now, run the JAR file by using the command shown below −
java jar <JARFILE>
You can find the application has started on the Tomcat port 8111 as shown here.
. ____ _ __ _ _ /\\ / ___'_ __ _ _(_)_ __ __ _ \ \ \ \ ( ( )\___ | '_ | '_| | '_ \/ _` | \ \ \ \ \\/ ___)| |_)| | | | | || (_| | ) ) ) ) ' |____| .__|_| |_|_| |_\__, | / / / / =========|_|==============|___/=/_/_/_/ :: Spring Boot :: (v3.5.6) 2025-09-29T15:32:05.460+05:30 INFO 28868 --- [gateway] [ main] c.t.gateway.GatewayApplication : Starting GatewayApplication using Java 21.0.6 with PID 28868 (D:\Projects\gateway\target\classes started by mahes in D:\Projects\gateway) 2025-09-29T15:32:05.463+05:30 INFO 28868 --- [gateway] [ main] c.t.gateway.GatewayApplication : No active profile set, falling back to 1 default profile: "default" 2025-09-29T15:32:07.202+05:30 INFO 28868 --- [gateway] [ main] o.s.cloud.context.scope.GenericScope : BeanFactory id=41d2676d-8e80-376d-ac21-c5e6a6abb435 2025-09-29T15:32:08.128+05:30 INFO 28868 --- [gateway] [ main] o.s.c.g.r.RouteDefinitionRouteLocator : Loaded RoutePredicateFactory [After] 2025-09-29T15:32:08.128+05:30 INFO 28868 --- [gateway] [ main] o.s.c.g.r.RouteDefinitionRouteLocator : Loaded RoutePredicateFactory [Before] 2025-09-29T15:32:08.129+05:30 INFO 28868 --- [gateway] [ main] o.s.c.g.r.RouteDefinitionRouteLocator : Loaded RoutePredicateFactory [Between] 2025-09-29T15:32:08.129+05:30 INFO 28868 --- [gateway] [ main] o.s.c.g.r.RouteDefinitionRouteLocator : Loaded RoutePredicateFactory [Cookie] 2025-09-29T15:32:08.129+05:30 INFO 28868 --- [gateway] [ main] o.s.c.g.r.RouteDefinitionRouteLocator : Loaded RoutePredicateFactory [Header] 2025-09-29T15:32:08.129+05:30 INFO 28868 --- [gateway] [ main] o.s.c.g.r.RouteDefinitionRouteLocator : Loaded RoutePredicateFactory [Host] 2025-09-29T15:32:08.129+05:30 INFO 28868 --- [gateway] [ main] o.s.c.g.r.RouteDefinitionRouteLocator : Loaded RoutePredicateFactory [Method] 2025-09-29T15:32:08.129+05:30 INFO 28868 --- [gateway] [ main] o.s.c.g.r.RouteDefinitionRouteLocator : Loaded RoutePredicateFactory [Path] 2025-09-29T15:32:08.129+05:30 INFO 28868 --- [gateway] [ main] o.s.c.g.r.RouteDefinitionRouteLocator : Loaded RoutePredicateFactory [Query] 2025-09-29T15:32:08.129+05:30 INFO 28868 --- [gateway] [ main] o.s.c.g.r.RouteDefinitionRouteLocator : Loaded RoutePredicateFactory [ReadBody] 2025-09-29T15:32:08.129+05:30 INFO 28868 --- [gateway] [ main] o.s.c.g.r.RouteDefinitionRouteLocator : Loaded RoutePredicateFactory [RemoteAddr] 2025-09-29T15:32:08.129+05:30 INFO 28868 --- [gateway] [ main] o.s.c.g.r.RouteDefinitionRouteLocator : Loaded RoutePredicateFactory [XForwardedRemoteAddr] 2025-09-29T15:32:08.129+05:30 INFO 28868 --- [gateway] [ main] o.s.c.g.r.RouteDefinitionRouteLocator : Loaded RoutePredicateFactory [Weight] 2025-09-29T15:32:08.129+05:30 INFO 28868 --- [gateway] [ main] o.s.c.g.r.RouteDefinitionRouteLocator : Loaded RoutePredicateFactory [CloudFoundryRouteService] 2025-09-29T15:32:08.658+05:30 INFO 28868 --- [gateway] [ main] o.s.b.web.embedded.netty.NettyWebServer : Netty started on port 8111 (http) 2025-09-29T15:32:08.720+05:30 INFO 28868 --- [gateway] [ main] c.t.gateway.GatewayApplication : Started GatewayApplication in 4.037 seconds (process running for 4.842)
Now, hit the URL http://localhost:8111/products in your web browser and you can see the output of http://localhost:8080/products REST Endpoint as shown below −
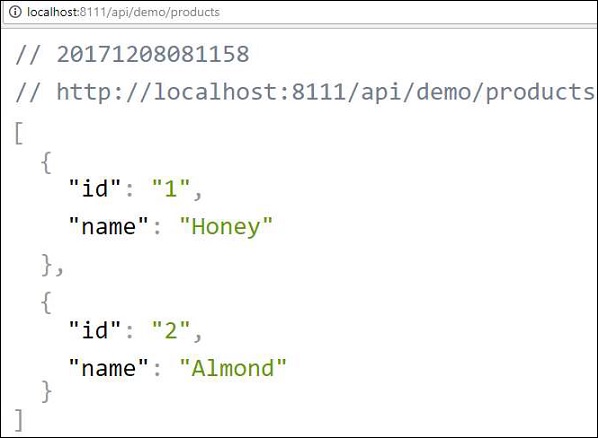
Spring Boot - Cloud Configuration Server
Spring Cloud Configuration Server is a centralized application that manages all the application related configuration properties. In this chapter, you will learn in detail about how to create Spring Cloud Configuration server.
Example - Creating Spring Cloud Configuration Server
First, download the Spring Boot project from the Spring Initializer page and choose the Spring Cloud Config Server dependency. Observe the screenshot given below −
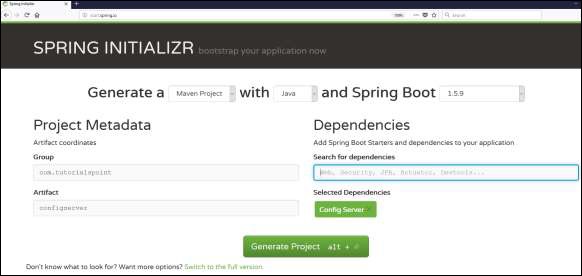
Now, add the Spring Cloud Config server dependency in your build configuration file as explained below −
Maven users can add the below dependency into the pom.xml file.
<dependency> <groupId>org.springframework.cloud</groupId> <artifactId>spring-cloud-config-server</artifactId> </dependency>
Gradle users can add the below dependency in your build.gradle file.
compile('org.springframework.cloud:spring-cloud-config-server')
Now, add the @EnableConfigServer annotation in your main Spring Boot application class file. The @EnableConfigServer annotation makes your Spring Boot application act as a Configuration Server.
The main Spring Boot application class file is given below −
ConfigserverApplication.java
package com.tutorialspoint.configserver;
import org.springframework.boot.SpringApplication;
import org.springframework.boot.autoconfigure.SpringBootApplication;
import org.springframework.cloud.config.server.EnableConfigServer;
@SpringBootApplication
@EnableConfigServer
public class ConfigserverApplication {
public static void main(String[] args) {
SpringApplication.run(ConfigserverApplication.class, args);
}
}
Now, add the below configuration to your application.properties file. Observe the code given below −
application.properties
server.port = 8888 spring.cloud.config.server.git.uri=file:///E:/Dev/config/
Configuration Server runs on the Tomcat port 8888 and application configuration properties are loaded from a git based local file system search locations.
Create Git Repo
Initialize the Git repo
Go to E:/Dev/config/ folder and run the following git command to initialize it as git repo.
git init
Add the properties file
Now, in E:/Dev/config/, place your client application - application.properties file. For example, your client application name is config-client, then rename your application.properties file as config-client.properties and place the properties file on the path E:/Dev/config/.
The code for config-client properties file is given below −
welcome.message = Welcome to Spring cloud config server
Run the following git command to stage all changes.
E:\Dev\config> git add .
Commit the Changes
Run the following git command to commit changes.
E:\Dev\config> git commit -m "First Checkin"
Verify the changes
Run the following git command to check the commited changes.
E:\Dev\config> git log
commit 8081e552232ca5b1af29cef56e6acc6e1a5bd2e3 (HEAD -> master)
Author: maheshparashar84 <mahesh.kumar@tutorialspoint.com>
Date: Thu Sep 12 11:38:28 2024 +0530
First Checkin
E:\Dev\config>
The complete build configuration file is given below −
Maven users can use pom.xml given below −
pom.xml
<?xml version="1.0" encoding="UTF-8"?>
<project xmlns="http://maven.apache.org/POM/4.0.0" xmlns:xsi="http://www.w3.org/2001/XMLSchema-instance"
xsi:schemaLocation="http://maven.apache.org/POM/4.0.0 https://maven.apache.org/xsd/maven-4.0.0.xsd">
<modelVersion>4.0.0</modelVersion>
<parent>
<groupId>org.springframework.boot</groupId>
<artifactId>spring-boot-starter-parent</artifactId>
<version>3.5.6</version>
<relativePath/> <!-- lookup parent from repository -->
</parent>
<groupId>com.tutorialspoint</groupId>
<artifactId>configserver</artifactId>
<version>0.0.1-SNAPSHOT</version>
<name>configserver</name>
<description>Demo project for Spring Boot</description>
<url/>
<licenses>
<license/>
</licenses>
<developers>
<developer/>
</developers>
<scm>
<connection/>
<developerConnection/>
<tag/>
<url/>
</scm>
<properties>
<java.version>21</java.version>
<spring-cloud.version>2025.0.0</spring-cloud.version>
</properties>
<dependencies>
<dependency>
<groupId>org.springframework.cloud</groupId>
<artifactId>spring-cloud-config-server</artifactId>
</dependency>
<dependency>
<groupId>org.springframework.boot</groupId>
<artifactId>spring-boot-starter-test</artifactId>
<scope>test</scope>
</dependency>
</dependencies>
<dependencyManagement>
<dependencies>
<dependency>
<groupId>org.springframework.cloud</groupId>
<artifactId>spring-cloud-dependencies</artifactId>
<version>${spring-cloud.version}</version>
<type>pom</type>
<scope>import</scope>
</dependency>
</dependencies>
</dependencyManagement>
<build>
<plugins>
<plugin>
<groupId>org.springframework.boot</groupId>
<artifactId>spring-boot-maven-plugin</artifactId>
</plugin>
</plugins>
</build>
</project>
Gradle users can use the build.gradle file given below −
build.gradle
<scope>import</scope>
</dependency>
</dependencies>
buildscript {
ext {
springBootVersion = '3.5.6'
}
repositories {
mavenCentral()
}
dependencies {
classpath("org.springframework.boot:spring-boot-gradle-plugin:${springBootVersion}")
}
}
apply plugin: 'java'
apply plugin: 'eclipse'
apply plugin: 'org.springframework.boot'
group = 'com.tutorialspoint'
version = '0.0.1-SNAPSHOT'
sourceCompatibility = 21
repositories {
mavenCentral()
}
ext {
springCloudVersion = '2025.0.0'
}
dependencies {
compile('org.springframework.cloud:spring-cloud-config-server')
testCompile('org.springframework.boot:spring-boot-starter-test')
}
dependencyManagement {
imports {
mavenBom "org.springframework.cloud:spring-cloud-dependencies:${springCloudVersion}"
}
}
Compilation and Execution
Now, create an executable JAR file, and run the Spring Boot application by using the following Maven or Gradle commands −
For Maven, use the command given below −
mvn clean install
After "BUILD SUCCESS", you can find the JAR file under the target directory.
For Gradle, use the command given below −
gradle clean build
After "BUILD SUCCESSFUL", you can find the JAR file under the build/libs directory.
Run the JAR file by using the following command −
java jar <JARFILE>
Now, the application has started on the Tomcat port 8888 as shown here −
. ____ _ __ _ _ /\\ / ___'_ __ _ _(_)_ __ __ _ \ \ \ \ ( ( )\___ | '_ | '_| | '_ \/ _` | \ \ \ \ \\/ ___)| |_)| | | | | || (_| | ) ) ) ) ' |____| .__|_| |_|_| |_\__, | / / / / =========|_|==============|___/=/_/_/_/ :: Spring Boot :: (v3.5.6) 2025-09-29T15:45:51.461+05:30 INFO 38672 --- [configserver] [ main] c.t.c.ConfigserverApplication : Starting ConfigserverApplication using Java 21.0.6 with PID 38672 (D:\Projects\configserver\target\classes started by mahes in D:\Projects\configserver) 2025-09-29T15:45:51.463+05:30 INFO 38672 --- [configserver] [ main] c.t.c.ConfigserverApplication : No active profile set, falling back to 1 default profile: "default" 2025-09-29T15:45:52.818+05:30 INFO 38672 --- [configserver] [ main] o.s.cloud.context.scope.GenericScope : BeanFactory id=1d8d04c8-8df1-3ebe-96a7-ad8601b5ee76 2025-09-29T15:45:53.266+05:30 INFO 38672 --- [configserver] [ main] o.s.b.w.embedded.tomcat.TomcatWebServer : Tomcat initialized with port 8888 (http) 2025-09-29T15:45:53.296+05:30 INFO 38672 --- [configserver] [ main] o.apache.catalina.core.StandardService : Starting service [Tomcat] 2025-09-29T15:45:53.296+05:30 INFO 38672 --- [configserver] [ main] o.apache.catalina.core.StandardEngine : Starting Servlet engine: [Apache Tomcat/10.1.46] 2025-09-29T15:45:53.414+05:30 INFO 38672 --- [configserver] [ main] o.a.c.c.C.[Tomcat].[localhost].[/] : Initializing Spring embedded WebApplicationContext 2025-09-29T15:45:53.417+05:30 INFO 38672 --- [configserver] [ main] w.s.c.ServletWebServerApplicationContext : Root WebApplicationContext: initialization completed in 1866 ms 2025-09-29T15:45:54.317+05:30 INFO 38672 --- [configserver] [ main] o.s.b.w.embedded.tomcat.TomcatWebServer : Tomcat started on port 8888 (http) with context path '/' 2025-09-29T15:45:54.341+05:30 INFO 38672 --- [configserver] [ main] c.t.c.ConfigserverApplication : Started ConfigserverApplication in 3.456 seconds (process running for 4.287) 2025-09-29T15:45:54.341+05:30 INFO 38672 --- [configserver] [ main] .c.s.e.MultipleJGitEnvironmentRepository[0;39m [2m:[0;39m Could not merge remote for master remote: null 2025-09-29T15:45:54.341+05:30 INFO 38672 --- [configserver] [ main] o.s.c.c.s.e.NativeEnvironmentRepository [0;39m [2m:[0;39m Adding property source: Config resource 'file [E:\Dev\config\config-client.properties]' via location 'file:/E:/Dev/config/'
Now hit the URL http://localhost:8888/config-client/default/master on your web browser and you can see your config-client application configuration properties as shown here.
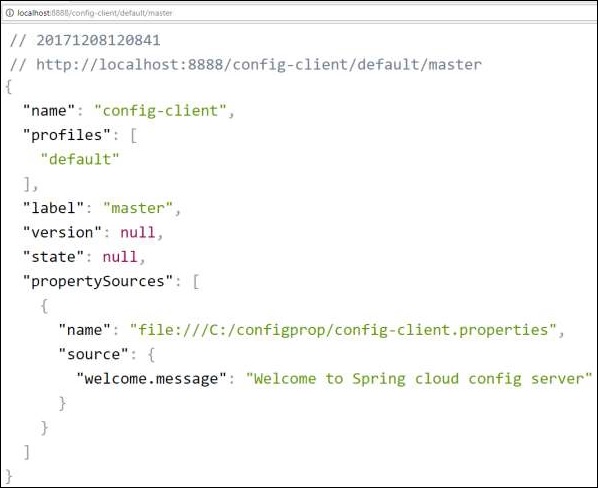
Spring Boot - Cloud Configuration Client
Some applications may need configuration properties that may need a change and developers may need to take them down or restart the application to perform this. However, this might be lead to downtime in production and the need of restarting the application. Spring Cloud Configuration Server lets developers to load the new configuration properties without restarting the application and without any downtime.
Example - Working with Spring Cloud Configuration Client
First, download the Spring Boot project from https://start.spring.io/ and choose the Spring Cloud Config Client dependency.
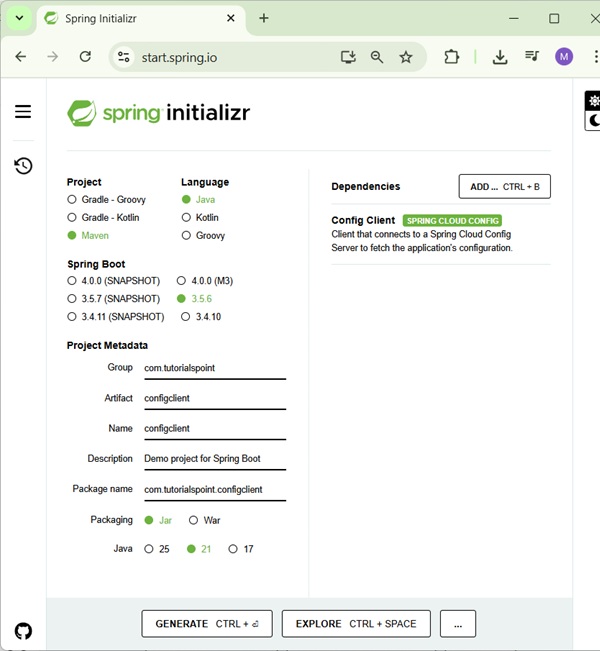
It will add the Spring Cloud Starter Config dependency in your build configuration file.
Maven users can add the following dependency into the pom.xml file.
<dependency> <groupId>org.springframework.cloud</groupId> <artifactId>spring-cloud-starter-config</artifactId> </dependency>
Gradle users can add the following dependency into the build.gradle file.
compile('org.springframework.cloud:spring-cloud-starter-config')
Now, you need to add the @RefreshScope annotation to your main Spring Boot application. The @RefreshScope annotation is used to load the configuration properties value from the Config server.
package com.tutorialspoint.configclient;
import org.springframework.boot.SpringApplication;
import org.springframework.boot.autoconfigure.SpringBootApplication;
import org.springframework.cloud.context.config.annotation.RefreshScope;
@SpringBootApplication
@RefreshScope
public class ConfigclientApplication {
public static void main(String[] args) {
SpringApplication.run(ConfigclientApplication.class, args);
}
}
Now, add the config server URL in your application.properties file and provide your application name.
Note − http://localhost:8888 config server should be run before starting the config client application.
application.properties
spring.application.name = config-client spring.config.import=optional:configserver:http://localhost:8888/ welcome.message=Welcome to Tutorialspoint
The code for writing a simple REST Endpoint to read the welcome message from the configuration server is given below −
ConfigclientApplication.java
package com.tutorialspoint.configclient;
import org.springframework.beans.factory.annotation.Value;
import org.springframework.boot.SpringApplication;
import org.springframework.boot.autoconfigure.SpringBootApplication;
import org.springframework.cloud.context.config.annotation.RefreshScope;
import org.springframework.web.bind.annotation.GetMapping;
import org.springframework.web.bind.annotation.RestController;
@SpringBootApplication
@RefreshScope
@RestController
public class ConfigclientApplication {
@Value("${welcome.message}")
String welcomeText;
public static void main(String[] args) {
SpringApplication.run(ConfigclientApplication.class, args);
}
@GetMapping(value = "/")
public String welcomeText() {
return welcomeText;
}
}
The complete build configuration file is given below −
Maven users can use pom.xml given below −
pom.xml
<?xml version="1.0" encoding="UTF-8"?>
<project xmlns="http://maven.apache.org/POM/4.0.0" xmlns:xsi="http://www.w3.org/2001/XMLSchema-instance"
xsi:schemaLocation="http://maven.apache.org/POM/4.0.0 https://maven.apache.org/xsd/maven-4.0.0.xsd">
<modelVersion>4.0.0</modelVersion>
<parent>
<groupId>org.springframework.boot</groupId>
<artifactId>spring-boot-starter-parent</artifactId>
<version>3.5.6</version>
<relativePath/> <!-- lookup parent from repository -->
</parent>
<groupId>com.tutorialspoint</groupId>
<artifactId>configclient</artifactId>
<version>0.0.1-SNAPSHOT</version>
<name>configserver</name>
<description>Demo project for Spring Boot</description>
<url/>
<licenses>
<license/>
</licenses>
<developers>
<developer/>
</developers>
<scm>
<connection/>
<developerConnection/>
<tag/>
<url/>
</scm>
<properties>
<java.version>21</java.version>
<spring-cloud.version>2025.0.0</spring-cloud.version>
</properties>
<dependencies>
<dependency>
<groupId>org.springframework.cloud</groupId>
<artifactId>spring-cloud-starter-config</artifactId>
</dependency>
<dependency>
<groupId>org.springframework.boot</groupId>
<artifactId>spring-boot-starter-test</artifactId>
<scope>test</scope>
</dependency>
</dependencies>
<dependencyManagement>
<dependencies>
<dependency>
<groupId>org.springframework.cloud</groupId>
<artifactId>spring-cloud-dependencies</artifactId>
<version>${spring-cloud.version}</version>
<type>pom</type>
<scope>import</scope>
</dependency>
</dependencies>
</dependencyManagement>
<build>
<plugins>
<plugin>
<groupId>org.springframework.boot</groupId>
<artifactId>spring-boot-maven-plugin</artifactId>
</plugin>
</plugins>
</build>
</project>
Gradle users can use the build.gradle file given below −
build.gradle
<scope>import</scope>
</dependency>
</dependencies>
buildscript {
ext {
springBootVersion = '3.5.6'
}
repositories {
mavenCentral()
}
dependencies {
classpath("org.springframework.boot:spring-boot-gradle-plugin:${springBootVersion}")
}
}
apply plugin: 'java'
apply plugin: 'eclipse'
apply plugin: 'org.springframework.boot'
group = 'com.tutorialspoint'
version = '0.0.1-SNAPSHOT'
sourceCompatibility = 21
repositories {
mavenCentral()
}
ext {
springCloudVersion = '2025.0.0'
}
dependencies {
compile('org.springframework.cloud:spring-cloud-starter-config')
testCompile('org.springframework.boot:spring-boot-starter-test')
}
dependencyManagement {
imports {
mavenBom "org.springframework.cloud:spring-cloud-dependencies:${springCloudVersion}"
}
}
Output
You can create an executable JAR file, and run the Spring Boot application by using the following Maven or Gradle commands −
For Maven, you can use the command shown below −
mvn clean install
After "BUILD SUCCESS", you can find the JAR file under the target directory.
For Gradle, you can use the command shown below −
gradle clean build
After "BUILD SUCCESSFUL", you can find the JAR file under the build/libs directory.
Now, run the JAR file by using the command shown here:
java jar <JARFILE>
Now, the application has started on the Tomcat port 8080 as shown here −
. ____ _ __ _ _ /\\ / ___'_ __ _ _(_)_ __ __ _ \ \ \ \ ( ( )\___ | '_ | '_| | '_ \/ _` | \ \ \ \ \\/ ___)| |_)| | | | | || (_| | ) ) ) ) ' |____| .__|_| |_|_| |_\__, | / / / / =========|_|==============|___/=/_/_/_/ :: Spring Boot :: (v3.5.6) 2025-09-29T16:01:00.872+05:30 INFO 10896 --- [config-client] [ main] c.t.c.ConfigclientApplication : Starting ConfigclientApplication using Java 21.0.6 with PID 10896 (D:\Projects\configclient\target\classes started by mahes in D:\Projects\configclient) 2025-09-29T16:01:00.874+05:30 INFO 10896 --- [config-client] [ main] c.t.c.ConfigclientApplication : No active profile set, falling back to 1 default profile: "default" 2025-09-29T16:01:00.943+05:30 INFO 10896 --- [config-client] [ main] o.s.c.c.c.ConfigServerConfigDataLoader : Fetching config from server at : http://localhost:8888/ 2025-09-29T16:01:00.943+05:30 WARN 10896 --- [config-client] [ main] o.s.c.c.c.ConfigServerConfigDataLoader : Could not locate PropertySource ([ConfigServerConfigDataResource@591e58fa uris = array['http://localhost:8888/'], optional = true, profiles = 'default']): 500 on GET request for "http://localhost:8888/config-client/default": "{"timestamp":"2025-09-29T10:31:00.613+00:00","status":500,"error":"Internal Server Error","path":"/config-client/default"}" 2025-09-29T16:01:00.944+05:30 INFO 10896 --- [config-client] [ main] o.s.c.c.c.ConfigServerConfigDataLoader : Fetching config from server at : http://localhost:8888/ 2025-09-29T16:01:00.944+05:30 WARN 10896 --- [config-client] [ main] o.s.c.c.c.ConfigServerConfigDataLoader : Could not locate PropertySource ([ConfigServerConfigDataResource@7876d598 uris = array ['http://localhost:8888/'], optional = true, profiles = 'default']): 500 on GET request for "http://localhost:8888/config-client/default": "{"timestamp":"2025-09-29T10:31:00.667+00:00","status":500,"error":"Internal Server Error","path":"/config-client/default"}" 2025-09-29T16:01:00.944+05:30 INFO 10896 --- [config-client] [ main] o.s.c.c.c.ConfigServerConfigDataLoader : Fetching config from server at : http://localhost:8888/ 2025-09-29T16:01:01.500+05:30 INFO 10896 --- [config-client] [ main] o.s.cloud.context.scope.GenericScope : BeanFactory id=a9bf52a2-341f-30e7-9b8c-8726bab3c6f3 2025-09-29T16:01:01.961+05:30 INFO 10896 --- [config-client] [ main] c.t.c.ConfigclientApplication : Started ConfigclientApplication in 2.058 seconds (process running for 2.722)
You can see the log in console window; config-client application is fetching the configuration from the https://localhost:8888
2025-09-29T16:01:00.944+05:30 INFO 10896 --- [config-client] [ main] o.s.c.c.c.ConfigServerConfigDataLoader : Fetching config from server at : http://localhost:8888/
Now hit the URL, http://localhost:8080/ welcome message is loaded from the Configuration server.
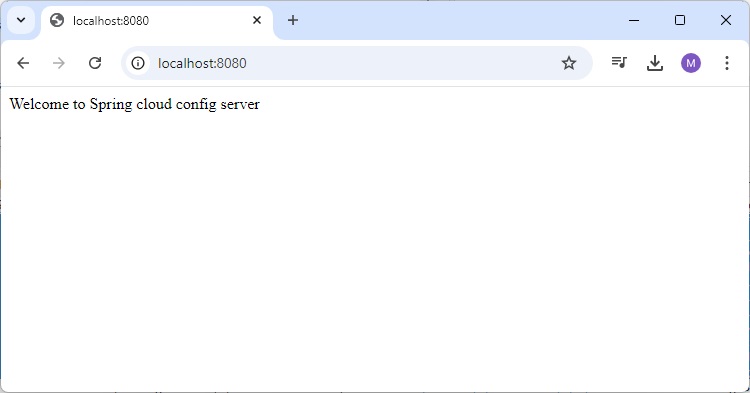
Now, go and change the property value on the Configuration server and hit the actuator Endpoint POST URL http://localhost:8080/refresh and see the new configuration property value in the URL http://localhost:8080/
Spring Boot - Actuator
Spring Boot Actuator provides secured endpoints for monitoring and managing your Spring Boot application. By default, all actuator endpoints are secured. In this chapter, you will learn in detail about how to enable Spring Boot actuator to your application.
Enabling Spring Boot Actuator
To enable Spring Boot actuator endpoints to your Spring Boot application, we need to add the Spring Boot Starter actuator dependency in our build configuration file.
Maven users can add the below dependency in your pom.xml file.
<dependency> <groupId>org.springframework.boot</groupId> <artifactId>spring-boot-starter-actuator</artifactId> </dependency>
Gradle users can add the below dependency in your build.gradle file.
compile group: 'org.springframework.boot', name: 'spring-boot-starter-actuator'
In the application.properties file, we need to disable the security for actuator endpoints.
management.security.enabled = false
YAML file users can add the following property in your application.yml file.
management:
security:
enabled: false
If you want to use the separate port number for accessing the Spring boot actutator endpoints add the management port number in application.properties file.
management.port = 9000
YAML file users can add the following property in your application.yml file.
management: port: 9000
Output
Now, you can create an executable JAR file, and run the Spring Boot application by using the following Maven or Gradle commands.
For Maven, you can use the following command −
mvn clean install
After BUILD SUCCESS, you can find the JAR file under the target directory.
For Gradle, you can use the following command −
gradle clean build
After BUILD SUCCESSFUL, you can find the JAR file under the build/libs directory.
Now, you can run the JAR file by using the following command −
java jar <JARFILE>
Now, the application has started on the Tomcat port 8080. Note that if you specified the management port number, then same application is running on two different port numbers.
. ____ _ __ _ _ /\\ / ___'_ __ _ _(_)_ __ __ _ \ \ \ \ ( ( )\___ | '_ | '_| | '_ \/ _` | \ \ \ \ \\/ ___)| |_)| | | | | || (_| | ) ) ) ) ' |____| .__|_| |_|_| |_\__, | / / / / =========|_|==============|___/=/_/_/_/ :: Spring Boot :: (v3.5.6) [2025-09-29T16:15:38Z] [org.springframework.boot.StartupInfoLogger] [main] [53] [INFO ] Starting DemoApplication using Java 21.0.6 with PID 15076 (D:\Projects\demo\target\classes started by mahes in D:\Projects\demo) [2025-09-29T16:15:38Z] [org.springframework.boot.SpringApplication] [main] [652] [INFO ] No active profile set, falling back to 1 default profile: "default" [2025-09-29T16:15:39Z] [org.springframework.boot.web.embedded.tomcat.TomcatWebServer] [main] [111] [INFO ] Tomcat initialized with port 8080 (http) [2025-09-29T16:15:39Z] [org.apache.juli.logging.DirectJDKLog] [main] [168] [INFO ] Initializing ProtocolHandler ["http-nio-8080"] [2025-09-29T16:15:39Z] [org.apache.juli.logging.DirectJDKLog] [main] [168] [INFO ] Starting service [Tomcat] [2025-09-29T16:15:39Z] [org.apache.juli.logging.DirectJDKLog] [main] [168] [INFO ] Starting Servlet engine: [Apache Tomcat/10.1.46] [2025-09-29T16:15:39Z] [org.apache.juli.logging.DirectJDKLog] [main] [168] [INFO ] Initializing Spring embedded WebApplicationContext [2025-09-29T16:15:39Z] [org.springframework.boot.web.servlet.context.ServletWebServerApplicationContext] [main] [301] [INFO ] Root WebApplicationContext: initialization completed in 1563 ms [2025-09-29T16:15:40Z] [org.springframework.boot.autoconfigure.web.servlet.WelcomePageHandlerMapping] [main] [59] [INFO ] Adding welcome page template: index [2025-09-29T16:15:40Z] [org.springframework.boot.actuate.endpoint.web.EndpointLinksResolver] [main] [60] [INFO ] Exposing 1 endpoint beneath base path '/actuator' [2025-09-29T16:15:40Z] [org.apache.juli.logging.DirectJDKLog] [main] [168] [INFO ] Starting ProtocolHandler ["http-nio-8080"] [2025-09-29T16:15:40Z] [org.springframework.boot.web.embedded.tomcat.TomcatWebServer] [main] [243] [INFO ] Tomcat started on port 8080 (http) with context path '/' [2025-09-29T16:15:40Z] [org.springframework.boot.StartupInfoLogger] [main] [59] [INFO ] Started DemoApplication in 3.11 seconds (process running for 3.636) [2025-09-29T16:15:53Z] [org.apache.juli.logging.DirectJDKLog] [http-nio-8080-exec-1] [168] [INFO ] Initializing Spring DispatcherServlet 'dispatcherServlet' [2025-09-29T16:15:53Z] [org.springframework.web.servlet.FrameworkServlet] [http-nio-8080-exec-1] [532] [INFO ] Initializing Servlet 'dispatcherServlet' [2025-09-29T16:15:53Z] [org.springframework.web.servlet.FrameworkServlet] [http-nio-8080-exec-1] [554] [INFO ] Completed initialization in 4 ms
Some important Spring Boot Actuator endpoints are given below. You can enter them in your web browser and monitor your application behavior.
| ENDPOINTS | USAGE |
|---|---|
| /metrics | To view the application metrics such as memory used, memory free, threads, classes, system uptime etc. |
| /env | To view the list of Environment variables used in the application. |
| /beans | To view the Spring beans and its types, scopes and dependency. |
| /health | To view the application health |
| /info | To view the information about the Spring Boot application. |
| /trace | To view the list of Traces of your Rest endpoints. |
Open http://localhost:8080/actuator/health to check the status of the application as running or stopped.
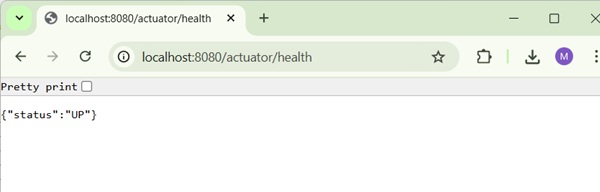
Spring Boot - Admin Server
Monitoring your application by using Spring Boot Actuator Endpoint is slightly difficult. Because, if you have n number of applications, every application has separate actuator endpoints, thus making monitoring difficult. Spring Boot Admin Server is an application used to manage and monitor your Microservice application.
To handle such situations, CodeCentric Team provides a Spring Boot Admin UI to manage and monitor all your Spring Boot application Actuator endpoints at one place.
For building a Spring Boot Admin Server we need to add the below dependencies in your build configuration file.
Maven users can add the below dependencies in your pom.xml file −
<dependency> <groupId>de.codecentric</groupId> <artifactId>spring-boot-admin-starter-server</artifactId> <version>3.5.0</version> </dependency>
Gradle users can add the below dependencies in your build.gradle file −
compile group: 'de.codecentric', name: 'spring-boot-admin-starter-server', version: '3.5.0'
Example - Creating Spring Admin Server
First, download the Spring Boot project from the Spring Initializer page and choose the Spring Admin Server and Admin Server UI dependency. Observe the screenshot given below −
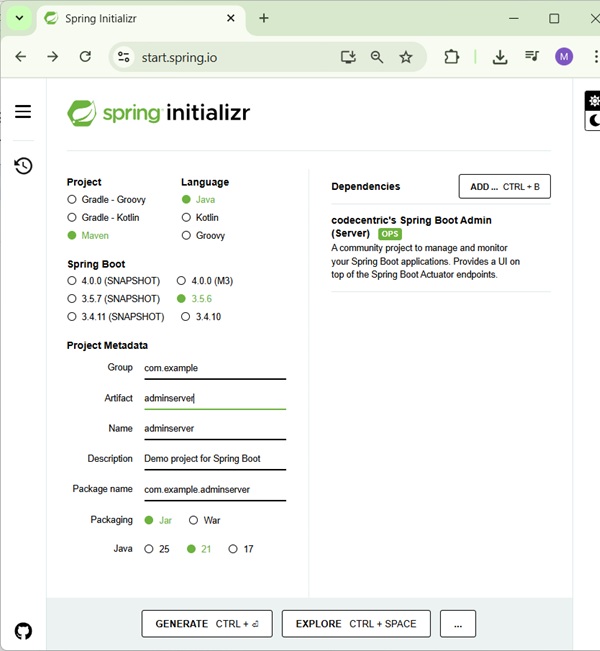
Add the @EnableAdminServer annotation in your main Spring Boot application class file. The @EnableAdminServer annotation is used to make your as Admin Server to monitor all other microservices.
AdminserverApplication
package com.example.adminserver;
import org.springframework.boot.SpringApplication;
import org.springframework.boot.autoconfigure.SpringBootApplication;
import de.codecentric.boot.admin.server.config.EnableAdminServer;
@SpringBootApplication
@EnableAdminServer
public class AdminserverApplication {
public static void main(String[] args) {
SpringApplication.run(AdminserverApplication.class, args);
}
}
Now, define the server.port and application name in application.properties file a shown −
server.port=9090 spring.application.name=adminserver
For YAML users, use the following properties to define the port number and application name in application.yml file.
server:
port: 9090
spring:
application:
name: adminserver
The build configuration file is given below.
pom.xml
<?xml version="1.0" encoding="UTF-8"?>
<project xmlns="http://maven.apache.org/POM/4.0.0" xmlns:xsi="http://www.w3.org/2001/XMLSchema-instance"
xsi:schemaLocation="http://maven.apache.org/POM/4.0.0 https://maven.apache.org/xsd/maven-4.0.0.xsd">
<modelVersion>4.0.0</modelVersion>
<parent>
<groupId>org.springframework.boot</groupId>
<artifactId>spring-boot-starter-parent</artifactId>
<version>3.5.6</version>
<relativePath/> <!-- lookup parent from repository -->
</parent>
<groupId>com.example</groupId>
<artifactId>adminserver</artifactId>
<version>0.0.1-SNAPSHOT</version>
<name>adminserver</name>
<description>Demo project for Spring Boot</description>
<url/>
<licenses>
<license/>
</licenses>
<developers>
<developer/>
</developers>
<scm>
<connection/>
<developerConnection/>
<tag/>
<url/>
</scm>
<properties>
<java.version>21</java.version>
<spring-boot-admin.version>3.5.0</spring-boot-admin.version>
</properties>
<dependencies>
<dependency>
<groupId>de.codecentric</groupId>
<artifactId>spring-boot-admin-starter-server</artifactId>
</dependency>
<dependency>
<groupId>org.springframework.boot</groupId>
<artifactId>spring-boot-starter-test</artifactId>
<scope>test</scope>
</dependency>
</dependencies>
<dependencyManagement>
<dependencies>
<dependency>
<groupId>de.codecentric</groupId>
<artifactId>spring-boot-admin-dependencies</artifactId>
<version>${spring-boot-admin.version}</version>
<type>pom</type>
<scope>import</scope>
</dependency>
</dependencies>
</dependencyManagement>
<build>
<plugins>
<plugin>
<groupId>org.springframework.boot</groupId>
<artifactId>spring-boot-maven-plugin</artifactId>
</plugin>
</plugins>
</build>
</project>
For Gradle users build.gradle file
buildscript {
ext {
springBootVersion = '3.5.6'
}
repositories {
mavenCentral()
}
dependencies {
classpath("org.springframework.boot:spring-boot-gradle-plugin:${springBootVersion}")
}
}
apply plugin: 'java'
apply plugin: 'eclipse'
apply plugin: 'org.springframework.boot'
group = 'com.tutorialspoint'
version = '0.0.1-SNAPSHOT'
sourceCompatibility = 21
repositories {
mavenCentral()
}
dependencies {
compile('org.springframework.boot:spring-boot-starter')
compile group: 'de.codecentric', name: 'spring-boot-admin-server', version: '3.5.0'
testCompile('org.springframework.boot:spring-boot-starter-test')
}
Output
You can create an executable JAR file, and run the Spring Boot application by using the following Maven or Gradle commands −
For Maven, use the command shown here −
mvn clean install
After "BUILD SUCCESS", you can find the JAR file under target directory.
For Gradle, use the command shown here −
gradle clean build
After "BUILD SUCCESSFUL", you can find the JAR file under build/libs directory.
Now, run the JAR file by using the command given below −
java jar <JARFILE>
Now, the application has started on the Tomcat port 9090 as shown here −
. ____ _ __ _ _ /\\ / ___'_ __ _ _(_)_ __ __ _ \ \ \ \ ( ( )\___ | '_ | '_| | '_ \/ _` | \ \ \ \ \\/ ___)| |_)| | | | | || (_| | ) ) ) ) ' |____| .__|_| |_|_| |_\__, | / / / / =========|_|==============|___/=/_/_/_/ :: Spring Boot :: (v3.5.6) 2025-09-29T16:36:36.114+05:30 INFO 37600 --- [adminserver] [ main] c.e.adminserver.AdminserverApplication : Starting AdminserverApplication using Java 21.0.6 with PID 37600 (D:\Projects\adminserver\target\classes started by mahes in D:\Projects\adminserver) 2025-09-29T16:36:36.121+05:30 INFO 37600 --- [adminserver] [ main] c.e.adminserver.AdminserverApplication : No active profile set, falling back to 1 default profile: "default" 2025-09-29T16:36:37.911+05:30 WARN 37600 --- [adminserver] [ main] ion$DefaultTemplateResolverConfiguration : Cannot find template location: classpath:/templates/ (please add some templates, check your Thymeleaf configuration, or set spring.thymeleaf.check-template-location=false) 2025-09-29T16:36:38.140+05:30 INFO 37600 --- [adminserver] [ main] o.s.b.a.e.web.EndpointLinksResolver : Exposing 1 endpoint beneath base path '/actuator' 2025-09-29T16:36:38.901+05:30 INFO 37600 --- [adminserver] [ main] o.s.b.web.embedded.netty.NettyWebServer : Netty started on port 9090 (http) 2025-09-29T16:36:38.917+05:30 INFO 37600 --- [adminserver] [ main] c.e.adminserver.AdminserverApplication : Started AdminserverApplication in 3.315 seconds (process running for 3.748)
Now hit the below URL from your web browser and see the Admin Server UI.
http://localhost:9090/
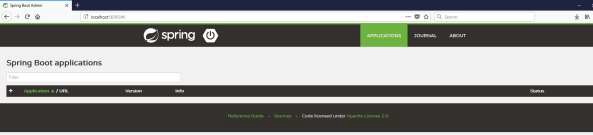
Spring Boot - Admin Client
For monitoring and managing your microservice application via Spring Boot Admin Server, you should add the Spring Boot Admin starter client dependency and point out the Admin Server URI into the application properties file.
Note − For monitoring an application, you should enable the Spring Boot Actuator Endpoints for your Microservice application.
For building a Spring Boot Admin Server we need to add the below dependencies in your build configuration file.
Maven users can add the below dependencies in your pom.xml file −
<dependency> <groupId>de.codecentric</groupId> <artifactId>spring-boot-admin-starter-client</artifactId> </dependency> <dependency> <groupId>org.springframework.boot</groupId> <artifactId>spring-boot-starter-actuator</artifactId> </dependency>
Gradle users can add the below dependencies in your build.gradle file −
compile group: 'de.codecentric', name: 'spring-boot-admin-starter-client', version: '3.3.3'
compile('org.springframework.boot:spring-boot-starter-actuator')
Now, add the Spring Boot Admin Server URL into your application properties file.
For properties file users, add the following properties in the application.properties file.
spring.boot.admin.url = http://localhost:9090/
For YAML users, add the following property in application.yml file.
spring:
boot:
admin:
url: http://localhost:9000/
Example - Creating Spring Admin Client
First, download the Spring Boot project from the Spring Initializer page and choose the Spring Admin Client and Spring Boot Actuator. Observe the screenshot given below −
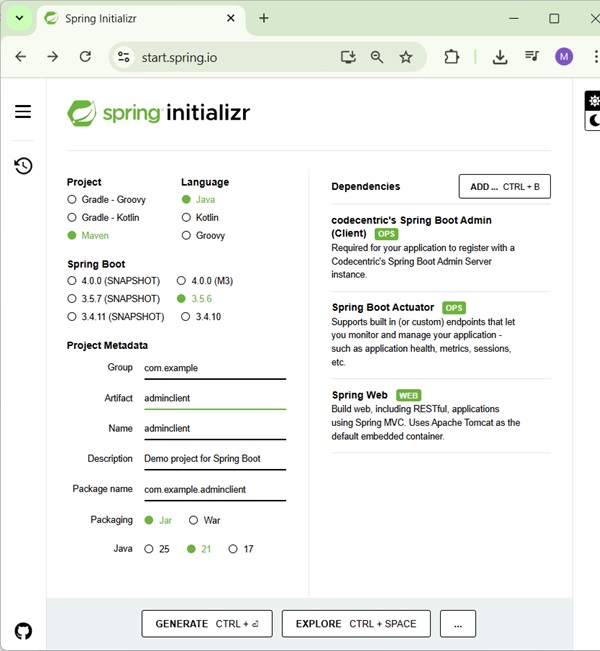
Following is Spring Boot main class.
AdminclientApplication.java
package com.tutorialspoint.adminclient;
import org.springframework.boot.SpringApplication;
import org.springframework.boot.autoconfigure.SpringBootApplication;
@SpringBootApplication
public class AdminclientApplication {
public static void main(String[] args) {
SpringApplication.run(AdminclientApplication.class, args);
}
}
Now, define the admin server url in application.properties file a shown −
spring.boot.admin.client.url=http://localhost:9090 management.endpoints.web.exposure.include=* management.info.env.enabled=true
For YAML users, use the following properties to define the port number and application name in application.yml file.
spring:
application:
name: adminserver
boot:
admin:
client:
url: http://localhost:9090/
The build configuration file is given below.
pom.xml
<?xml version="1.0" encoding="UTF-8"?>
<project xmlns="http://maven.apache.org/POM/4.0.0" xmlns:xsi="http://www.w3.org/2001/XMLSchema-instance"
xsi:schemaLocation="http://maven.apache.org/POM/4.0.0 https://maven.apache.org/xsd/maven-4.0.0.xsd">
<modelVersion>4.0.0</modelVersion>
<parent>
<groupId>org.springframework.boot</groupId>
<artifactId>spring-boot-starter-parent</artifactId>
<version>3.5.6</version>
<relativePath/> <!-- lookup parent from repository -->
</parent>
<groupId>com.tutorialspoint</groupId>
<artifactId>adminclient</artifactId>
<version>0.0.1-SNAPSHOT</version>
<name>adminserver</name>
<description>Demo project for Spring Boot</description>
<url/>
<licenses>
<license/>
</licenses>
<developers>
<developer/>
</developers>
<scm>
<connection/>
<developerConnection/>
<tag/>
<url/>
</scm>
<properties>
<java.version>21</java.version>
<spring-boot-admin.version>3.5.0</spring-boot-admin.version>
</properties>
<dependencies>
<dependency>
<groupId>org.springframework.boot</groupId>
<artifactId>spring-boot-starter-actuator</artifactId>
</dependency>
<dependency>
<groupId>de.codecentric</groupId>
<artifactId>spring-boot-admin-starter-client</artifactId>
</dependency>
<dependency>
<groupId>org.springframework.boot</groupId>
<artifactId>spring-boot-starter-test</artifactId>
<scope>test</scope>
</dependency>
</dependencies>
<dependencyManagement>
<dependencies>
<dependency>
<groupId>de.codecentric</groupId>
<artifactId>spring-boot-admin-dependencies</artifactId>
<version>${spring-boot-admin.version}</version>
<type>pom</type>
<scope>import</scope>
</dependency>
</dependencies>
</dependencyManagement>
<build>
<plugins>
<plugin>
<groupId>org.springframework.boot</groupId>
<artifactId>spring-boot-maven-plugin</artifactId>
</plugin>
</plugins>
</build>
</project>
For Gradle users build.gradle file
buildscript {
ext {
springBootVersion = '3.5.0'
}
repositories {
mavenCentral()
}
dependencies {
classpath("org.springframework.boot:spring-boot-gradle-plugin:${springBootVersion}")
}
}
apply plugin: 'java'
apply plugin: 'eclipse'
apply plugin: 'org.springframework.boot'
group = 'com.tutorialspoint'
version = '0.0.1-SNAPSHOT'
sourceCompatibility = 21
repositories {
mavenCentral()
}
dependencies {
compile('org.springframework.boot:spring-boot-starter')
compile('org.springframework.boot:spring-boot-starter-actuator')
compile group: 'de.codecentric', name: 'spring-boot-admin-client', version: '3.5.0'
testCompile('org.springframework.boot:spring-boot-starter-test')
}
Output
You can create an executable JAR file, and run the Spring Boot application by using the following Maven or Gradle commands −
For Maven, use the command shown here −
mvn clean install
After "BUILD SUCCESS", you can find the JAR file under target directory.
For Gradle, use the command shown here −
gradle clean build
After "BUILD SUCCESSFUL", you can find the JAR file under build/libs directory.
Now, run the JAR file by using the command given below −
java jar <JARFILE>
Now, the application has started on the Tomcat port 9090 as shown here −
. ____ _ __ _ _ /\\ / ___'_ __ _ _(_)_ __ __ _ \ \ \ \ ( ( )\___ | '_ | '_| | '_ \/ _` | \ \ \ \ \\/ ___)| |_)| | | | | || (_| | ) ) ) ) ' |____| .__|_| |_|_| |_\__, | / / / / =========|_|==============|___/=/_/_/_/ :: Spring Boot :: (v3.5.6) 2025-09-29T16:54:57.381+05:30 INFO 16572 --- [ main] c.e.adminclient.AdminclientApplication : Starting AdminclientApplication using Java 21.0.6 with PID 16572 (D:\Projects\adminclient\target\classes started by mahes in D:\Projects\adminclient) 2025-09-29T16:54:57.386+05:30 INFO 16572 --- [ main] c.e.adminclient.AdminclientApplication : No active profile set, falling back to 1 default profile: "default" 2025-09-29T16:54:59.411+05:30 INFO 16572 --- [ main] o.s.b.w.embedded.tomcat.TomcatWebServer : Tomcat initialized with port 8080 (http) 2025-09-29T16:54:59.432+05:30 INFO 16572 --- [ main] o.apache.catalina.core.StandardService : Starting service [Tomcat] 2025-09-29T16:54:59.432+05:30 INFO 16572 --- [ main] o.apache.catalina.core.StandardEngine : Starting Servlet engine: [Apache Tomcat/10.1.46] 2025-09-29T16:54:59.497+05:30 INFO 16572 --- [ main] o.a.c.c.C.[Tomcat].[localhost].[/] : Initializing Spring embedded WebApplicationContext 2025-09-29T16:54:59.500+05:30 INFO 16572 --- [ main] w.s.c.ServletWebServerApplicationContext : Root WebApplicationContext: initialization completed in 2036 ms 2025-09-29T16:55:01.102+05:30 INFO 16572 --- [ main] o.s.b.a.e.web.EndpointLinksResolver : Exposing 13 endpoints beneath base path '/actuator' 2025-09-29T16:55:01.365+05:30 INFO 16572 --- [ main] o.s.b.w.embedded.tomcat.TomcatWebServer : Tomcat started on port 8080 (http) with context path '/' 2025-09-29T16:55:01.382+05:30 INFO 16572 --- [ main] c.e.adminclient.AdminclientApplication : Started AdminclientApplication in 4.653 seconds (process running for 5.131) 2025-09-29T16:55:02.001+05:30 INFO 16572 --- [gistrationTask1] d.c.b.a.c.r.ApplicationRegistrator : Application registered itself as 50ed04178953 2025-09-29T16:55:02.030+05:30 INFO 16572 --- [nio-8080-exec-1] o.a.c.c.C.[Tomcat].[localhost].[/] : Initializing Spring DispatcherServlet 'dispatcherServlet' 2025-09-29T16:55:02.030+05:30 INFO 16572 --- [nio-8080-exec-1] o.s.web.servlet.DispatcherServlet : Initializing Servlet 'dispatcherServlet' 2025-09-29T16:55:02.032+05:30 INFO 16572 --- [nio-8080-exec-1] o.s.web.servlet.DispatcherServlet : Completed initialization in 2 ms
Now hit the following URL from your web browser and see your spring Boot application is registered with Spring Boot Admin Server.
http://localhost:9090/
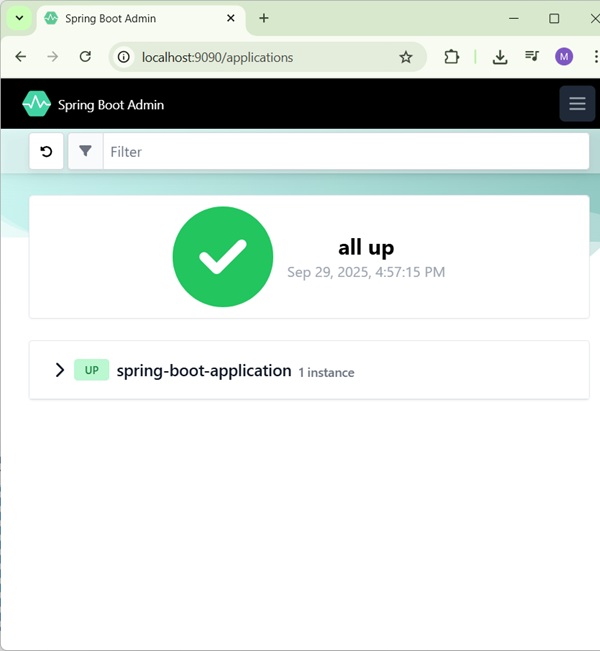
Now, click the Details button and the see the actuator endpoints in Admin Server UI.
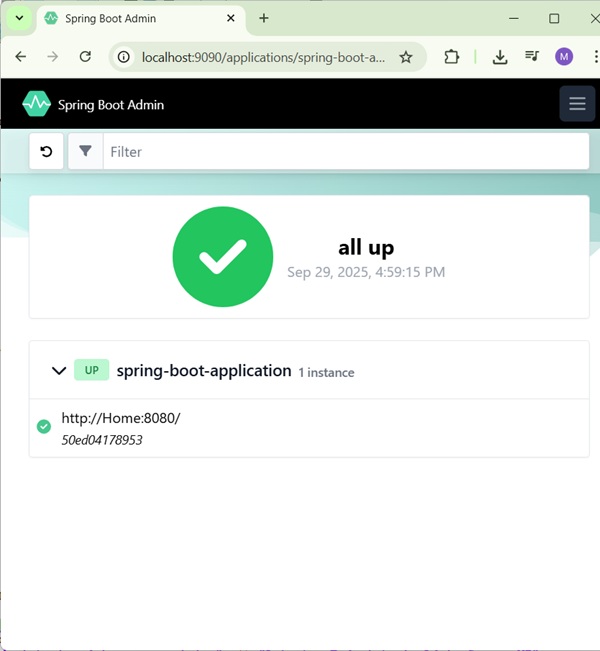
Spring Boot - Using SpringDoc OpenAPI
springdoc-openapi is an open source project used to generate API documentation for Spring Boot based projects. It examines application at runtime for API semantics based on spring configurations, class structures and annotations. It supports following APIs.
OpenAPI 3
Spring Boot 3
JSR-303 specification including @NotNull, @Min, @Max, and @Size.
Swagger-ui
OAuth 2
GraalVM native images
We're enabling Swagger UI in this example. To enable the Swagger in Spring Boot application, you need to add the following dependencies in our build configurations file.
<dependency> <groupId>org.springdoc</groupId> <artifactId>springdoc-openapi-starter-webmvc-ui</artifactId> <version>3.0.0-M1</version> </dependency>
For Gradle users, add the following dependencies in your build.gradle file.
compile group: 'org.springdoc', name: 'springdoc-openapi-starter-webmvc-ui', version: '3.0.0-M1'
That's it. No other configuration is required. We can check the API specifications in JSON using following URL −
http://server:port/<context-path>/v3/api-docs
and Swagger UI is accessible using following URL −
http://server:port/<context-path>/swagger-ui/index.html
Example - Usage of SpringDoc OpenAPI for documentation
Let's add OpenAPI documentation support to our REST API example discussed in Spring Boot - Consuming RESTful Web Services Chapter.
The complete build configuration file is given below −
Maven - pom.xml
<?xml version="1.0" encoding="UTF-8"?>
<project xmlns="http://maven.apache.org/POM/4.0.0" xmlns:xsi="http://www.w3.org/2001/XMLSchema-instance"
xsi:schemaLocation="http://maven.apache.org/POM/4.0.0 https://maven.apache.org/xsd/maven-4.0.0.xsd">
<modelVersion>4.0.0</modelVersion>
<parent>
<groupId>org.springframework.boot</groupId>
<artifactId>spring-boot-starter-parent</artifactId>
<version>3.5.6</version>
<relativePath/> <!-- lookup parent from repository -->
</parent>
<groupId>com.tutorialspoint</groupId>
<artifactId>demo</artifactId>
<version>0.0.1-SNAPSHOT</version>
<packaging>jar</packaging>
<name>demo</name>
<description>Demo project for Spring Boot</description>
<url/>
<licenses>
<license/>
</licenses>
<developers>
<developer/>
</developers>
<scm>
<connection/>
<developerConnection/>
<tag/>
<url/>
</scm>
<properties>
<java.version>21</java.version>
</properties>
<dependencies>
<dependency>
<groupId>org.springframework.boot</groupId>
<artifactId>spring-boot-starter-web</artifactId>
</dependency>
<dependency>
<groupId>org.springdoc</groupId>
<artifactId>springdoc-openapi-starter-webmvc-ui</artifactId>
<version>3.0.0-M1</version>
</dependency>
<dependency>
<groupId>org.springframework.boot</groupId>
<artifactId>spring-boot-starter-thymeleaf</artifactId>
</dependency>
<dependency>
<groupId>org.springframework.boot</groupId>
<artifactId>spring-boot-starter-test</artifactId>
<scope>test</scope>
</dependency>
</dependencies>
<build>
<plugins>
<plugin>
<groupId>org.springframework.boot</groupId>
<artifactId>spring-boot-maven-plugin</artifactId>
</plugin>
</plugins>
</build>
</project>
Gradle - build.gradle
buildscript {
ext {
springBootVersion = '3.5.6'
}
repositories {
mavenCentral()
}
dependencies {
classpath("org.springframework.boot:spring-boot-gradle-plugin:${springBootVersion}")
}
}
apply plugin: 'java'
apply plugin: 'eclipse'
apply plugin: 'org.springframework.boot'
group = 'com.tutorialspoint'
version = '0.0.1-SNAPSHOT'
sourceCompatibility = 21
repositories {
mavenCentral()
} dependencies {
compile('org.springframework.boot:spring-boot-starter-web')
testCompile('org.springframework.boot:spring-boot-starter-test')
compile group: 'org.springdoc', name: 'springdoc-openapi-starter-webmvc-ui', version: '3.0.0-M1'
}
Output
You can create an executable JAR file, and run the spring boot application by using the below Maven or Gradle commands as shown −
For Maven, use the command shown below −
mvn clean install
After "BUILD SUCCESS", you can find the JAR file under the target directory.
For Gradle, use the command shown below −
gradle clean build
After "BUILD SUCCESSFUL", you can find the JAR file under the build/libs directory.
You can run the JAR file by using the command shown below −
java jar <JARFILE>
This will start the application on the Tomcat port 8080 as shown below −
. ____ _ __ _ _ /\\ / ___'_ __ _ _(_)_ __ __ _ \ \ \ \ ( ( )\___ | '_ | '_| | '_ \/ _` | \ \ \ \ \\/ ___)| |_)| | | | | || (_| | ) ) ) ) ' |____| .__|_| |_|_| |_\__, | / / / / =========|_|==============|___/=/_/_/_/ :: Spring Boot :: (v3.5.6) [2025-09-29T10:44:58Z] [org.springframework.boot.StartupInfoLogger] [main] [53] [INFO ] Starting DemoApplication using Java 21.0.6 with PID 16712 (D:\Projects\demo\target\classes started by mahes in D:\Projects\demo) [2025-09-29T10:44:58Z] [org.springframework.boot.SpringApplication] [main] [652] [INFO ] No active profile set, falling back to 1 default profile: "default" [2025-09-29T10:45:00Z] [org.springframework.boot.web.embedded.tomcat.TomcatWebServer] [main] [111] [INFO ] Tomcat initialized with port 8080 (http) [2025-09-29T10:45:00Z] [org.apache.juli.logging.DirectJDKLog] [main] [168] [INFO ] Initializing ProtocolHandler ["http-nio-8080"] [2025-09-29T10:45:00Z] [org.apache.juli.logging.DirectJDKLog] [main] [168] [INFO ] Starting service [Tomcat] [2025-09-29T10:45:00Z] [org.apache.juli.logging.DirectJDKLog] [main] [168] [INFO ] Starting Servlet engine: [Apache Tomcat/10.1.46] [2025-09-29T10:45:00Z] [org.apache.juli.logging.DirectJDKLog] [main] [168] [INFO ] Initializing Spring embedded WebApplicationContext [2025-09-29T10:45:00Z] [org.springframework.boot.web.servlet.context.ServletWebServerApplicationContext] [main] [301] [INFO ] Root WebApplicationContext: initialization completed in 1330 ms [2025-09-29T10:45:00Z] [org.springframework.boot.autoconfigure.thymeleaf.ThymeleafAutoConfiguration$DefaultTemplateResolverConfiguration] [main] [102] [WARN ] Cannot find template location: classpath:/templates/ (please add some templates, check your Thymeleaf configuration, or set spring.thymeleaf.check-template-location=false) [2025-09-29T10:45:00Z] [org.apache.juli.logging.DirectJDKLog] [main] [168] [INFO ] Starting ProtocolHandler ["http-nio-8080"] [2025-09-29T10:45:00Z] [org.springframework.boot.web.embedded.tomcat.TomcatWebServer] [main] [243] [INFO ] Tomcat started on port 8080 (http) with context path '/' [2025-09-29T10:45:01Z] [org.springframework.boot.StartupInfoLogger] [main] [59] [INFO ] Started DemoApplication in 2.461 seconds (process running for 3.026) [2025-09-29T10:45:01Z] [org.springframework.boot.StartupInfoLogger] [main] [59] [INFO ] Init duration for springdoc-openapi is: 148 ms
Output
Now hit the URL shown below in browser to see APIs in JSON Format.
http://localhost:8080/v3/api-docs

Now hit the URL shown below in browser to see API documentation in Swagger UI.
http://localhost:8080/swagger-ui/index.html

Spring Boot - Creating Docker Image
Docker is a container management service that eases building and deployment. If you are a beginner to Docker, you can learn about is in detail at this link − https://www.tutorialspoint.com/docker/index.htm
In this chapter, we are going to see How to create a Docker image by using Maven and Gradle dependencies for your Spring Boot application.
Create Dockerfile
First, create a file with the name Dockerfile under the directories src/main/docker with the contents shown below. Note that this file is important to create a Docker image.
FROM java:8 VOLUME /tmp ADD dockerapp-0.0.1-SNAPSHOT.jar app.jar RUN bash -c 'touch /app.jar' ENTRYPOINT ["java","-Djava.security.egd=file:/dev/./urandom","-jar","/app.jar"]
Maven - pom.xml
For Maven, add the Docker Maven plugin into your build configuration file pom.xml
<properties>
<docker.image.prefix>spring-boot-tutorialspoint</docker.image.prefix>
</properties>
<build>
<plugins>
<plugin>
<groupId>com.spotify</groupId>
<artifactId>docker-maven-plugin</artifactId>
<version>1.0.0</version>
<configuration>
<imageName>${docker.image.prefix}/${project.artifactId}</imageName>
<dockerDirectory>src/main/docker</dockerDirectory>
<resources>
<resource>
<directory>${project.build.directory}</directory>
<include>${project.build.finalName}.jar</include>
</resource>
</resources>
</configuration>
</plugin>
<plugin>
<groupId>org.springframework.boot</groupId>
<artifactId>spring-boot-maven-plugin</artifactId>
</plugin>
</plugins>
</build>
The complete pom.xml file is given below −
pom.xml
<?xml version = "1.0" encoding = "UTF-8"?>
<project xmlns = "http://maven.apache.org/POM/4.0.0"
xmlns:xsi = "http://www.w3.org/2001/XMLSchema-instance"
xsi:schemaLocation = "http://maven.apache.org/POM/4.0.0
http://maven.apache.org/xsd/maven-4.0.0.xsd">
<modelVersion>4.0.0</modelVersion>
<groupId>com.tutorialspoint</groupId>
<artifactId>dockerapp</artifactId>
<version>0.0.1-SNAPSHOT</version>
<packaging>jar</packaging>
<name>dockerapp</name>
<description>Demo project for Spring Boot</description>
<parent>
<groupId>org.springframework.boot</groupId>
<artifactId>spring-boot-starter-parent</artifactId>
<version>3.5.6</version>
<relativePath /> <!-- lookup parent from repository -->
</parent>
<properties>
<project.build.sourceEncoding>UTF-8</project.build.sourceEncoding>
<project.reporting.outputEncoding>UTF-8</project.reporting.outputEncoding>
<java.version>21</java.version>
<docker.image.prefix>spring-boot-tutorialspoint</docker.image.prefix>
</properties>
<dependencies>
<dependency>
<groupId>org.springframework.boot</groupId>
<artifactId>spring-boot-starter-web</artifactId>
</dependency>
<dependency>
<groupId>org.springframework.boot</groupId>
<artifactId>spring-boot-starter-test</artifactId>
<scope>test</scope>
</dependency>
</dependencies>
<build>
<plugins>
<plugin>
<groupId>com.spotify</groupId>
<artifactId>docker-maven-plugin</artifactId>
<version>1.0.0</version>
<configuration>
<imageName>${docker.image.prefix}/${project.artifactId}</imageName>
<dockerDirectory>src/main/docker</dockerDirectory>
<resources>
<resource>
<directory>${project.build.directory}</directory>
<include>${project.build.finalName}.jar</include>
</resource>
</resources>
</configuration>
</plugin>
<plugin>
<groupId>org.springframework.boot</groupId>
<artifactId>spring-boot-maven-plugin</artifactId>
</plugin>
</plugins>
</build>
</project>
Compilation and Execution
Now, you can run your application by using the Maven command mvn package docker:build

Note − Enable the Expose daemon on tcp://localhost:2375 without TLS.
After build success, you can see the output on the console as shown below −
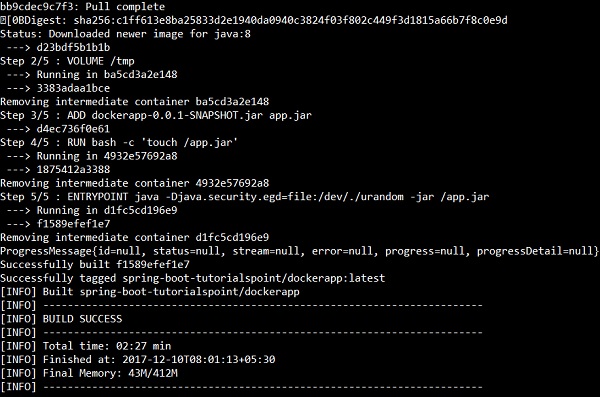
Now, see the Docker images by the command using docker images and see the image info on the console.

Gradle
To build a Docker image by using Gradle build configuration, we need to add the docker plugin and need to write a task buildDocker to create a Docker image.
The code for Gradle Docker configuration is given below.
buildscript {
.....
dependencies {
.....
classpath('se.transmode.gradle:gradle-docker:1.2')
}
}
group = 'spring-boot-tutorialspoint'
.....
apply plugin: 'docker'
task buildDocker(type: Docker, dependsOn: build) {
applicationName = jar.baseName
dockerfile = file('src/main/docker/Dockerfile')
doFirst {
copy {
from jar
into stageDir
}
}
}
The complete build.gradle file is given below.
buildscript {
ext {
springBootVersion = '3.5.6'
}
repositories {
mavenCentral()
}
dependencies {
classpath("org.springframework.boot:spring-boot-gradle-plugin:${springBootVersion}")
classpath('se.transmode.gradle:gradle-docker:1.2')
}
}
group = 'spring-boot-tutorialspoint'
apply plugin: 'java'
apply plugin: 'eclipse'
apply plugin: 'org.springframework.boot'
apply plugin: 'docker'
group = 'com.tutorialspoint'
version = '0.0.1-SNAPSHOT'
sourceCompatibility = 21
repositories {
mavenCentral()
}
dependencies {
compile('org.springframework.boot:spring-boot-starter-web')
testCompile('org.springframework.boot:spring-boot-starter-test')
}
task buildDocker(type: Docker, dependsOn: build) {
applicationName = jar.baseName
dockerfile = file('src/main/docker/Dockerfile')
doFirst {
copy {
from jar
into stageDir
}
}
}
Now, create a Docker image by using the command shown below −
gradle build buildDocker
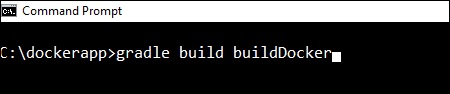
After executing the command, you can see the BUILD SUCCESSFUL log on the console window.

Now, see the Docker images by the command using docker images and see the images info on the console.

Spring Boot - Tracing Micro Service Logs
Most developers face difficulty of tracing logs if any issue occurred. This can be solved by Spring Cloud Sleuth and ZipKin server for Spring Boot application.
Note* - Spring Cloud Sleuth is not supported in Spring Boot 3 and is moved to a distributed version micrometer.
Spring Cloud Sleuth
Spring cloud Sleuth logs are printed in the following format −
[application-name,traceid,spanid,zipkin-export]
Where,
Application-name − Name of the application
Traceid − each request and response traceid is same when calling same service or one service to another service.
Spanid − Span Id is printed along with Trace Id. Span Id is different every request and response calling one service to another service.
Zipkin-export − By default it is false. If it is true, logs will be exported to the Zipkin server.
Now, add the Spring Cloud Starter Sleuth dependency in your build configuration file as follows −
Maven users can add the following dependency in your pom.xml file −
<dependency> <groupId>org.springframework.cloud</groupId> <artifactId>spring-cloud-starter-sleuth</artifactId> </dependency>
Gradle users can add the following dependency in your build.gradle file −
compile('org.springframework.cloud:spring-cloud-starter-sleuth')
Example - Tracing Logs
Now, add the Logs into your Spring Boot application Rest Controller class file as shown here −
package com.tutorialspoint.sleuthapp;
import java.util.logging.Level;
import java.util.logging.Logger;
import org.springframework.boot.SpringApplication;
import org.springframework.boot.autoconfigure.SpringBootApplication;
import org.springframework.web.bind.annotation.GetMapping;
import org.springframework.web.bind.annotation.RestController;
@SpringBootApplication
@RestController
public class SleuthappApplication {
private static final Logger LOG = Logger.getLogger(SleuthappApplication.class.getName());
public static void main(String[] args) {
SpringApplication.run(SleuthappApplication.class, args);
}
@GetMapping("/")
public String index() {
LOG.log(Level.INFO, "Index API is calling");
return "Welcome Sleuth!";
}
}
Now, add the application name in application.properties file as shown −
spring.application.name = tracinglogs
The complete code for build configuration file is given below −
Maven pom.xml
<?xml version = "1.0" encoding = "UTF-8"?>
<project xmlns = "http://maven.apache.org/POM/4.0.0"
xmlns:xsi = "http://www.w3.org/2001/XMLSchema-instance"
xsi:schemaLocation = "http://maven.apache.org/POM/4.0.0
http://maven.apache.org/xsd/maven-4.0.0.xsd">
<modelVersion>4.0.0</modelVersion>
<groupId>com.tutorialspoint</groupId>
<artifactId>sleuthapp</artifactId>
<version>0.0.1-SNAPSHOT</version>
<packaging>jar</packaging>
<name>sleuthapp</name>
<description>Demo project for Spring Boot</description>
<parent>
<groupId>org.springframework.boot</groupId>
<artifactId>spring-boot-starter-parent</artifactId>
<version>3.5.6</version>
<relativePath/> <!-- lookup parent from repository -->
</parent>
<properties>
<project.build.sourceEncoding>UTF-8</project.build.sourceEncoding>
<project.reporting.outputEncoding>UTF-8</project.reporting.outputEncoding>
<java.version>21</java.version>
<spring-cloud.version>Edgware.RELEASE</spring-cloud.version>
</properties>
<dependencies>
<dependency>
<groupId>org.springframework.cloud</groupId>
<artifactId>spring-cloud-starter-sleuth</artifactId>
</dependency>
<dependency>
<groupId>org.springframework.boot</groupId>
<artifactId>spring-boot-starter-web</artifactId>
</dependency>
<dependency>
<groupId>org.springframework.boot</groupId>
<artifactId>spring-boot-starter-test</artifactId>
<scope>test</scope>
</dependency>
</dependencies>
<dependencyManagement>
<dependencies>
<dependency>
<groupId>org.springframework.cloud</groupId>
<artifactId>spring-cloud-dependencies</artifactId>
<version>${spring-cloud.version}</version>
<type>pom</type>
<scope>import</scope>
</dependency>
</dependencies>
</dependencyManagement>
<build>
<plugins>
<plugin>
<groupId>org.springframework.boot</groupId>
<artifactId>spring-boot-maven-plugin</artifactId>
</plugin>
</plugins>
</build>
</project>
Gradle build.gradle
buildscript {
ext {
springBootVersion = '3.5.6'
}
repositories {
mavenCentral()
}
dependencies {
classpath("org.springframework.boot:spring-boot-gradle-plugin:${springBootVersion}")
}
}
apply plugin: 'java'
apply plugin: 'eclipse'
apply plugin: 'org.springframework.boot'
group = 'com.tutorialspoint'
version = '0.0.1-SNAPSHOT'
sourceCompatibility = 21
repositories {
mavenCentral()
}
ext {
springCloudVersion = 'Edgware.RELEASE'
}
dependencies {
compile('org.springframework.cloud:spring-cloud-starter-sleuth')
compile('org.springframework.boot:spring-boot-starter-web')
testCompile('org.springframework.boot:spring-boot-starter-test')
}
dependencyManagement {
imports {
mavenBom "org.springframework.cloud:spring-cloud-dependencies:${springCloudVersion}"
}
}
Output
You can create an executable JAR file, and run the Spring Boot application by using the following Maven or Gradle commands.
For Maven, you can use the following command −
mvn clean install
After "BUILD SUCCESS", you can find the JAR file under the target directory.
For Gradle, you can use the following command −
gradle clean build
After "BUILD SUCCESSFUL", you can find the JAR file under the build/libs directory.
Now, run the JAR file by using the command shown here −
java jar <JARFILE>
Now, the application has started on the Tomcat port 8080.

Now, hit the URL in your web browser and see the output in console log.
http://localhost:8080/
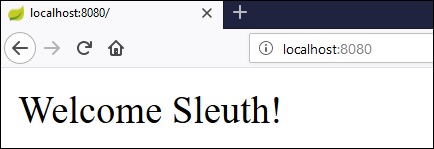
You can see the following logs in the console window. Observe that log is printed in the following format [application-name, traceid, spanid, zipkin-export]

Spring Boot - Flyway Database
Flyway is a version control application to evolve your Database schema easily and reliably across all your instances. To learn more about Flyway, you can use the link − www.flywaydb.org
Many software projects use relational databases. This requires the handling of database migrations, also often called schema migrations.
In this chapter, you are going to learn in detail about how to configure Flyway database in your Spring Boot application.
Configuring Flyway Database
First, download the Spring Boot project from Spring Initializer page www.start.spring.io and choose the following dependencies −
- Spring Web
- Flyway Migration
- MySQL Driver
- Spring Data JPA
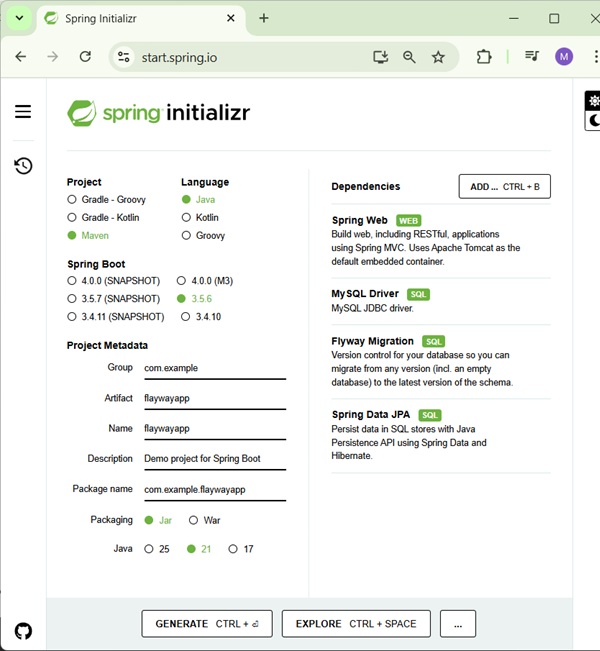
Maven users can add the following dependencies in pom.xml file.
<dependency> <groupId>org.springframework.boot</groupId> <artifactId>spring-boot-starter-data-jpa</artifactId> </dependency> <dependency> <groupId>org.springframework.boot</groupId> <artifactId>spring-boot-starter-web</artifactId> </dependency> <dependency> <groupId>org.flywaydb</groupId> <artifactId>flyway-core</artifactId> </dependency> <dependency> <groupId>org.flywaydb</groupId> <artifactId>flyway-mysql</artifactId> </dependency> <dependency> <groupId>com.mysql</groupId> <artifactId>mysql-connector-j</artifactId> <scope>runtime</scope> </dependency> <dependency> <groupId>org.springframework.boot</groupId> <artifactId>spring-boot-starter-test</artifactId> <scope>test</scope> </dependency>
Gradle users can add the following dependencies in build.gradle file.
compile('org.flywaydb:flyway-core')
compile('org.flywaydb:flyway-mysql')
compile('org.springframework.boot:spring-boot-starter-data-jpa')
compile('org.springframework.boot:spring-boot-starter-web')
compile('org.springframework.boot:spring-boot-starter-test')
compile('mysql:mysql-connector-j')
In application properties, we need to configure the database properties for creating a DataSource and also flyway properties we need to configure in application properties.
For properties file users, add the below properties in the application.properties file.
spring.application.name=flywayapp spring.datasource.url=jdbc:mysql://localhost:3306/details spring.datasource.username=guest spring.datasource.password=guest123 spring.flyway.enabled=true spring.flyway.validate-on-migrate=true spring.flyway.baseline-on-migrate=true spring.flyway.baseline-version=0
YAML users can add the following properties in application.yml file.
spring:
application:
name: flywayapp
datasource:
url: jdbc:mysql://localhost:3306/details
password: guest123
username: guest
flyway:
enabled: true
validate-on-migrate: true
baseline-on-migrate: true
baseline-version: 0
Now, create a SQL file under the src/main/resources/db/migration directory. Name the SQL file as "V1__Initial.sql" considering the naming convention as V<version-number>__<Name>.sql
CREATE TABLE USERS (ID INT AUTO_INCREMENT PRIMARY KEY, USERID VARCHAR(45)); INSERT INTO USERS (ID, USERID) VALUES (1, 'tutorialspoint.com');
The main Spring Boot application class file code is given below −
FlywayappApplication.java
package com.tutorialspoint.flywayapp;
import org.springframework.boot.SpringApplication;
import org.springframework.boot.autoconfigure.SpringBootApplication;
@SpringBootApplication
public class FlywayappApplication {
public static void main(String[] args) {
SpringApplication.run(FlywayappApplication.class, args);
}
}
The complete build configuration file is given below.
Maven - pom.xml
<?xml version="1.0" encoding="UTF-8"?>
<project xmlns="http://maven.apache.org/POM/4.0.0" xmlns:xsi="http://www.w3.org/2001/XMLSchema-instance"
xsi:schemaLocation="http://maven.apache.org/POM/4.0.0 https://maven.apache.org/xsd/maven-4.0.0.xsd">
<modelVersion>4.0.0</modelVersion>
<parent>
<groupId>org.springframework.boot</groupId>
<artifactId>spring-boot-starter-parent</artifactId>
<version>3.5.6</version>
<relativePath/> <!-- lookup parent from repository -->
</parent>
<groupId>com.tutorialspoint</groupId>
<artifactId>flywayapp</artifactId>
<version>0.0.1-SNAPSHOT</version>
<name>flywayapp</name>
<description>Demo project for Spring Boot</description>
<url/>
<licenses>
<license/>
</licenses>
<developers>
<developer/>
</developers>
<scm>
<connection/>
<developerConnection/>
<tag/>
<url/>
</scm>
<properties>
<java.version>21</java.version>
</properties>
<dependencies>
<dependency>
<groupId>org.springframework.boot</groupId>
<artifactId>spring-boot-starter-data-jpa</artifactId>
</dependency>
<dependency>
<groupId>org.springframework.boot</groupId>
<artifactId>spring-boot-starter-web</artifactId>
</dependency>
<dependency>
<groupId>org.flywaydb</groupId>
<artifactId>flyway-core</artifactId>
</dependency>
<dependency>
<groupId>org.flywaydb</groupId>
<artifactId>flyway-mysql</artifactId>
</dependency>
<dependency>
<groupId>com.mysql</groupId>
<artifactId>mysql-connector-j</artifactId>
<scope>runtime</scope>
</dependency>
<dependency>
<groupId>org.springframework.boot</groupId>
<artifactId>spring-boot-starter-test</artifactId>
<scope>test</scope>
</dependency>
</dependencies>
<build>
<plugins>
<plugin>
<groupId>org.springframework.boot</groupId>
<artifactId>spring-boot-maven-plugin</artifactId>
</plugin>
</plugins>
</build>
</project>
Gradle build.gradle
buildscript {
ext {
springBootVersion = '3.5.6'
}
repositories {
mavenCentral()
}
dependencies {
classpath("org.springframework.boot:spring-boot-gradle-plugin:${springBootVersion}")
}
}
apply plugin: 'java'
apply plugin: 'eclipse'
apply plugin: 'org.springframework.boot'
group = 'com.tutorialspoint'
version = '0.0.1-SNAPSHOT'
sourceCompatibility = 21
repositories {
mavenCentral()
}
dependencies {
compile('org.flywaydb:flyway-core')
compile('org.flywaydb:flyway-mysql')
compile('org.springframework.boot:spring-boot-starter-data-jpa')
compile('org.springframework.boot:spring-boot-starter-web')
compile('mysql:mysql-connector-j')
testCompile('org.springframework.boot:spring-boot-starter-test')
}
Output
You can create an executable JAR file, and run the Spring Boot application by using the Maven or Gradle commands given below −
For Maven, you can use the command shown here −
mvn clean install
After "BUILD SUCCESS", you can find the JAR file under the target directory.
For Gradle, you can use the command shown here −
gradle clean build
After "BUILD SUCCESSFUL", you can find the JAR file under the build/libs directory.
Now, run the JAR file by using the following command −
java jar <JARFILE>
Now, Tomcat started on the port 8080 and in the console window you can see the flyway database logs as shown here.
. ____ _ __ _ _ /\\ / ___'_ __ _ _(_)_ __ __ _ \ \ \ \ ( ( )\___ | '_ | '_| | '_ \/ _` | \ \ \ \ \\/ ___)| |_)| | | | | || (_| | ) ) ) ) ' |____| .__|_| |_|_| |_\__, | / / / / =========|_|==============|___/=/_/_/_/ :: Spring Boot :: (v3.5.6) 2025-09-29T20:21:45.006+05:30 INFO 22704 --- [flywayapp ] [ main] c.e.flaywayapp.FlaywayappApplication : Starting FlaywayappApplication using Java 21.0.6 with PID 22704 (D:\Projects\flaywayapp\target\classes started by mahes in D:\Projects\flaywayapp) 2025-09-29T20:21:45.012+05:30 INFO 22704 --- [flywayapp ] [ main] c.e.flaywayapp.FlaywayappApplication : No active profile set, falling back to 1 default profile: "default" 2025-09-29T20:21:45.838+05:30 INFO 22704 --- [flywayapp ] [ main] .s.d.r.c.RepositoryConfigurationDelegate : Bootstrapping Spring Data JPA repositories in DEFAULT mode. 2025-09-29T20:21:45.883+05:30 INFO 22704 --- [flywayapp ] [ main] .s.d.r.c.RepositoryConfigurationDelegate : Finished Spring Data repository scanning in 27 ms. Found 0 JPA repository interfaces. 2025-09-29T20:21:46.376+05:30 INFO 22704 --- [flywayapp ] [ main] o.s.b.w.embedded.tomcat.TomcatWebServer : Tomcat initialized with port 8080 (http) 2025-09-29T20:21:46.404+05:30 INFO 22704 --- [flywayapp ] [ main] o.apache.catalina.core.StandardService : Starting service [Tomcat] 2025-09-29T20:21:46.405+05:30 INFO 22704 --- [flywayapp ] [ main] o.apache.catalina.core.StandardEngine : Starting Servlet engine: [Apache Tomcat/10.1.46] 2025-09-29T20:21:46.480+05:30 INFO 22704 --- [flywayapp ] [ main] o.a.c.c.C.[Tomcat].[localhost].[/] : Initializing Spring embedded WebApplicationContext 2025-09-29T20:21:46.481+05:30 INFO 22704 --- [flywayapp ] [ main] w.s.c.ServletWebServerApplicationContext : Root WebApplicationContext: initialization completed in 1395 ms 2025-09-29T20:21:46.842+05:30 INFO 22704 --- [flywayapp ] [ main] com.zaxxer.hikari.HikariDataSource : HikariPool-1 - Starting... 2025-09-29T20:21:47.251+05:30 INFO 22704 --- [flywayapp ] [ main] com.zaxxer.hikari.pool.HikariPool : HikariPool-1 - Added connection com.mysql.cj.jdbc.ConnectionImpl@47df5041 2025-09-29T20:21:47.253+05:30 INFO 22704 --- [flywayapp ] [ main] com.zaxxer.hikari.HikariDataSource : HikariPool-1 - Start completed. 2025-09-29T20:21:47.399+05:30 INFO 22704 --- [flywayapp ] [ main] org.flywaydb.core.FlywayExecutor : Database: jdbc:mysql://localhost:3306/details (MySQL 8.0) 2025-09-29T20:21:47.502+05:30 INFO 22704 --- [flywayapp ] [ main] o.f.c.i.s.JdbcTableSchemaHistory : Schema history table `details`.`flyway_schema_history` does not exist yet 2025-09-29T20:21:47.506+05:30 INFO 22704 --- [flywayapp ] [ main] o.f.core.internal.command.DbValidate : Successfully validated 1 migration (execution time 00:00.037s) 2025-09-29T20:21:47.591+05:30 INFO 22704 --- [flywayapp ] [ main] o.f.c.i.s.JdbcTableSchemaHistory : Creating Schema History table `details`.`flyway_schema_history` with baseline ... 2025-09-29T20:21:47.789+05:30 INFO 22704 --- [flywayapp ] [ main] o.f.core.internal.command.DbBaseline : Successfully baselined schema with version: 0 2025-09-29T20:21:47.825+05:30 INFO 22704 --- [flywayapp ] [ main] o.f.core.internal.command.DbMigrate : Current version of schema `details`: 0 2025-09-29T20:21:47.844+05:30 INFO 22704 --- [flywayapp ] [ main] o.f.core.internal.command.DbMigrate : Migrating schema `details` to version "1 - Initial" 2025-09-29T20:21:47.913+05:30 INFO 22704 --- [flywayapp ] [ main] o.f.core.internal.command.DbMigrate : Successfully applied 1 migration to schema `details`, now at version v1 (execution time 00:00.034s) 2025-09-29T20:21:48.043+05:30 INFO 22704 --- [flywayapp ] [ main] o.hibernate.jpa.internal.util.LogHelper : HHH000204: Processing PersistenceUnitInfo [name: default] 2025-09-29T20:21:48.106+05:30 INFO 22704 --- [flywayapp ] [ main] org.hibernate.Version : HHH000412: Hibernate ORM core version 6.6.29.Final 2025-09-29T20:21:48.168+05:30 INFO 22704 --- [flywayapp ] [ main] o.h.c.internal.RegionFactoryInitiator : HHH000026: Second-level cache disabled 2025-09-29T20:21:48.541+05:30 INFO 22704 --- [flywayapp ] [ main] o.s.o.j.p.SpringPersistenceUnitInfo : No LoadTimeWeaver setup: ignoring JPA class transformer 2025-09-29T20:21:48.657+05:30 INFO 22704 --- [flywayapp ] [ main] org.hibernate.orm.connections.pooling : HHH10001005: Database info: Database JDBC URL [Connecting through datasource 'HikariDataSource (HikariPool-1)'] Database driver: undefined/unknown Database version: 8.0.43 Autocommit mode: undefined/unknown Isolation level: undefined/unknown Minimum pool size: undefined/unknown Maximum pool size: undefined/unknown 2025-09-29T20:21:48.893+05:30 INFO 22704 --- [flywayapp ] [ main] o.h.e.t.j.p.i.JtaPlatformInitiator : HHH000489: No JTA platform available (set 'hibernate.transaction.jta.platform' to enable JTA platform integration) 2025-09-29T20:21:48.897+05:30 INFO 22704 --- [flywayapp ] [ main] j.LocalContainerEntityManagerFactoryBean : Initialized JPA EntityManagerFactory for persistence unit 'default' 2025-09-29T20:21:48.949+05:30 WARN 22704 --- [flywayapp ] [ main] JpaBaseConfiguration$JpaWebConfiguration : spring.jpa.open-in-view is enabled by default. Therefore, database queries may be performed during view rendering. Explicitly configure spring.jpa.open-in-view to disable this warning 2025-09-29T20:21:49.444+05:30 INFO 22704 --- [flywayapp ] [ main] o.s.b.w.embedded.tomcat.TomcatWebServer : Tomcat started on port 8080 (http) with context path '/' 2025-09-29T20:21:49.456+05:30 INFO 22704 --- [flywayapp ] [ main] c.e.flaywayapp.FlaywayappApplication : Started FlaywayappApplication in 4.961 seconds (process running for 5.337)
You can now go to the database and check the Users table created in details schema with the details as per the script provided in V1__Initial.sql
mysql> select * from users; +----+--------------------+ | ID | USERID | +----+--------------------+ | 1 | tutorialspoint.com | +----+--------------------+ 1 row in set (0.00 sec)
You can also track the migrations in flyway metadata table flyway_schema_history as shown below:
mysql> select * from flyway_schema_history; +----------------+---------+-----------------------+----------+-----------------------+-------------+--------------+---------------------+----------------+---------+ | installed_rank | version | description | type | script | checksum | installed_by | installed_on | execution_time | success | +----------------+---------+-----------------------+----------+-----------------------+-------------+--------------+---------------------+----------------+---------+ | 1 | 0 | << Flyway Baseline >> | BASELINE | << Flyway Baseline >> | NULL | guest | 2025-09-29 20:21:47 | 0 | 1 | | 2 | 1 | Initial | SQL | V1__Initial.sql | -1994336522 | guest | 2025-09-29 20:21:47 | 34 | 1 | +----------------+---------+-----------------------+----------+-----------------------+-------------+--------------+---------------------+----------------+---------+ 2 rows in set (0.00 sec)
Spring Boot - Sending Email
By using Spring Boot RESTful web service, you can send an email with Gmail Transport Layer Security. In this chapter, let us understand in detail how to use this feature.
First, we need to add the Spring Boot Starter Mail dependency in your build configuration file.
Maven users can add the following dependency into the pom.xml file.
<dependency> <groupId>org.springframework.boot</groupId> <artifactId>spring-boot-starter-mail</artifactId> </dependency>
Gradle users can add the following dependency in your build.gradle file.
compile('org.springframework.boot:spring-boot-starter-mail')
The code of main Spring Boot application class file is given below −
package com.tutorialspoint.emailapp;
import org.springframework.boot.SpringApplication;
import org.springframework.boot.autoconfigure.SpringBootApplication;
@SpringBootApplication
public class EmailappApplication {
public static void main(String[] args) {
SpringApplication.run(EmailappApplication.class, args);
}
}
You can write a simple Rest API to send to email in Rest Controller class file as shown.
package com.tutorialspoint.emailapp;
import org.springframework.web.bind.annotation.GetMapping;
import org.springframework.web.bind.annotation.RestController;
@RestController
public class EmailController {
@GetMapping(value = "/sendemail")
public String sendEmail() {
return "Email sent successfully";
}
}
You can write a method to send the email with Attachment. Define the mail.smtp properties and used PasswordAuthentication.
private void sendmail() throws AddressException, MessagingException, IOException {
Properties props = new Properties();
props.put("mail.smtp.auth", "true");
props.put("mail.smtp.starttls.enable", "true");
props.put("mail.smtp.host", "smtp.gmail.com");
props.put("mail.smtp.port", "587");
Session session = Session.getInstance(props, new javax.mail.Authenticator() {
protected PasswordAuthentication getPasswordAuthentication() {
return new PasswordAuthentication("tutorialspoint@gmail.com", "<your password>");
}
});
Message msg = new MimeMessage(session);
msg.setFrom(new InternetAddress("tutorialspoint@gmail.com", false));
msg.setRecipients(Message.RecipientType.TO, InternetAddress.parse("tutorialspoint@gmail.com"));
msg.setSubject("Tutorials point email");
msg.setContent("Tutorials point email", "text/html");
msg.setSentDate(new Date());
MimeBodyPart messageBodyPart = new MimeBodyPart();
messageBodyPart.setContent("Tutorials point email", "text/html");
Multipart multipart = new MimeMultipart();
multipart.addBodyPart(messageBodyPart);
MimeBodyPart attachPart = new MimeBodyPart();
attachPart.attachFile("/var/tmp/image19.png");
multipart.addBodyPart(attachPart);
msg.setContent(multipart);
Transport.send(msg);
}
Now, call the above sendmail() method from the Rest API as shown −
@GetMapping(value = "/sendemail")
public String sendEmail() throws AddressException, MessagingException, IOException {
sendmail();
return "Email sent successfully";
}
Note − Please switch ON allow less secure apps in your Gmail account settings before sending an email.
Example - Creating Mail Server
First, download the Spring Boot project from the Spring Initializer page and choose the Spring Web and Java Mail Sender as dependencies. Observe the screenshot given below −
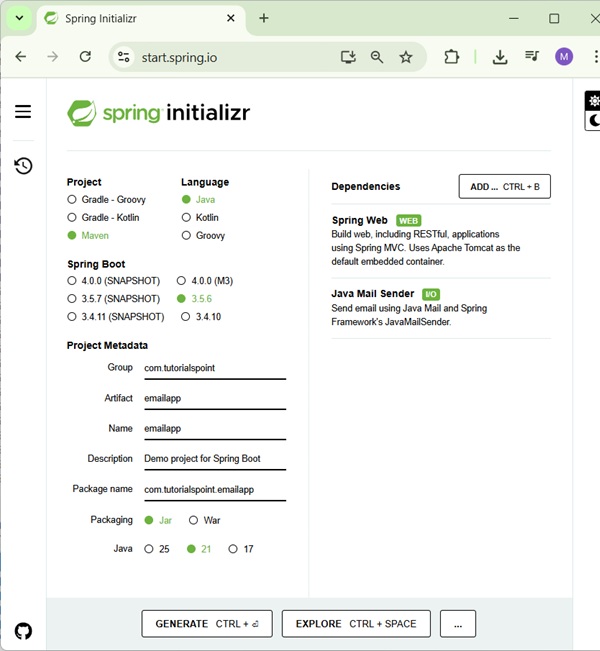
The complete build configuration file is given below.
Maven - pom.xml
<?xml version="1.0" encoding="UTF-8"?>
<project xmlns="http://maven.apache.org/POM/4.0.0" xmlns:xsi="http://www.w3.org/2001/XMLSchema-instance"
xsi:schemaLocation="http://maven.apache.org/POM/4.0.0 https://maven.apache.org/xsd/maven-4.0.0.xsd">
<modelVersion>4.0.0</modelVersion>
<parent>
<groupId>org.springframework.boot</groupId>
<artifactId>spring-boot-starter-parent</artifactId>
<version>3.5.6</version>
<relativePath/> <!-- lookup parent from repository -->
</parent>
<groupId>com.tutorialspoint</groupId>
<artifactId>emailapp</artifactId>
<version>0.0.1-SNAPSHOT</version>
<name>emailapp</name>
<description>Demo project for Spring Boot</description>
<url/>
<licenses>
<license/>
</licenses>
<developers>
<developer/>
</developers>
<scm>
<connection/>
<developerConnection/>
<tag/>
<url/>
</scm>
<properties>
<java.version>21</java.version>
</properties>
<dependencies>
<dependency>
<groupId>org.springframework.boot</groupId>
<artifactId>spring-boot-starter-mail</artifactId>
</dependency>
<dependency>
<groupId>org.springframework.boot</groupId>
<artifactId>spring-boot-starter-web</artifactId>
</dependency>
<dependency>
<groupId>org.springframework.boot</groupId>
<artifactId>spring-boot-starter-test</artifactId>
<scope>test</scope>
</dependency>
</dependencies>
<build>
<plugins>
<plugin>
<groupId>org.springframework.boot</groupId>
<artifactId>spring-boot-maven-plugin</artifactId>
</plugin>
</plugins>
</build>
</project>
Gradle - build.gradle
buildscript {
ext {
springBootVersion = '3.5.6'
}
repositories {
mavenCentral()
}
dependencies {
classpath("org.springframework.boot:spring-boot-gradle-plugin:${springBootVersion}")
}
}
apply plugin: 'java'
apply plugin: 'eclipse'
apply plugin: 'org.springframework.boot'
group = 'com.tutorialspoint'
version = '0.0.1-SNAPSHOT'
sourceCompatibility = 21
repositories {
mavenCentral()
}
dependencies {
compile('org.springframework.boot:spring-boot-starter-web')
compile('org.springframework.boot:spring-boot-starter-mail')
testCompile('org.springframework.boot:spring-boot-starter-test')
}
EmailController.java
package com.tutorialspoint.emailapp;
import java.io.IOException;
import java.util.Date;
import java.util.Properties;
import org.springframework.web.bind.annotation.GetMapping;
import org.springframework.web.bind.annotation.RestController;
import jakarta.mail.Authenticator;
import jakarta.mail.Message;
import jakarta.mail.MessagingException;
import jakarta.mail.Multipart;
import jakarta.mail.PasswordAuthentication;
import jakarta.mail.Session;
import jakarta.mail.Transport;
import jakarta.mail.internet.AddressException;
import jakarta.mail.internet.InternetAddress;
import jakarta.mail.internet.MimeBodyPart;
import jakarta.mail.internet.MimeMessage;
import jakarta.mail.internet.MimeMultipart;
@RestController
public class EmailController {
@GetMapping(value = "/sendemail")
public String sendEmail() throws AddressException, MessagingException, IOException {
sendmail();
return "Email sent successfully";
}
private void sendmail() throws AddressException, MessagingException, IOException {
Properties props = new Properties();
props.put("mail.smtp.auth", "true");
props.put("mail.smtp.starttls.enable", "true");
props.put("mail.smtp.host", "smtp.gmail.com");
props.put("mail.smtp.port", "587");
Session session = Session.getInstance(props, new Authenticator() {
protected PasswordAuthentication getPasswordAuthentication() {
return new PasswordAuthentication("tutorialspoint@gmail.com", "<your password>");
}
});
Message msg = new MimeMessage(session);
msg.setFrom(new InternetAddress("tutorialspoint@gmail.com", false));
msg.setRecipients(Message.RecipientType.TO, InternetAddress.parse("tutorialspoint@gmail.com"));
msg.setSubject("Tutorials point email");
msg.setContent("Tutorials point email", "text/html");
msg.setSentDate(new Date());
MimeBodyPart messageBodyPart = new MimeBodyPart();
messageBodyPart.setContent("Tutorials point email", "text/html");
Multipart multipart = new MimeMultipart();
multipart.addBodyPart(messageBodyPart);
MimeBodyPart attachPart = new MimeBodyPart();
attachPart.attachFile("/var/tmp/image19.png");
multipart.addBodyPart(attachPart);
msg.setContent(multipart);
Transport.send(msg);
}
}
Compilation and Execution
Now, you can create an executable JAR file, and run the Spring Boot application by using the Maven or Gradle commands shown below −
For Maven, you can use the command as shown −
mvn clean install
After "BUILD SUCCESS", you can find the JAR file under the target directory.
For Gradle, you can use the command as shown −
gradle clean build
After "BUILD SUCCESSFUL", you can find the JAR file under the build/libs directory.
Now, run the JAR file by using the command given below −
java jar <JARFILE>
You can see that the application has started on the Tomcat port 8080.
. ____ _ __ _ _ /\\ / ___'_ __ _ _(_)_ __ __ _ \ \ \ \ ( ( )\___ | '_ | '_| | '_ \/ _` | \ \ \ \ \\/ ___)| |_)| | | | | || (_| | ) ) ) ) ' |____| .__|_| |_|_| |_\__, | / / / / =========|_|==============|___/=/_/_/_/ :: Spring Boot :: (v3.5.6) 2025-09-29T20:41:20.902+05:30 INFO 2936 --- [emailapp] [ main] c.t.emailapp.EmailappApplication : Starting EmailappApplication using Java 21.0.6 with PID 2936 (D:\Projects\emailapp\target\classes started by mahes in D:\Projects\emailapp) 2025-09-29T20:41:20.913+05:30 INFO 2936 --- [emailapp] [ main] c.t.emailapp.EmailappApplication : No active profile set, falling back to 1 default profile: "default" 2025-09-29T20:41:22.228+05:30 INFO 2936 --- [emailapp] [ main] o.s.b.w.embedded.tomcat.TomcatWebServer : Tomcat initialized with port 8080 (http) 2025-09-29T20:41:22.253+05:30 INFO 2936 --- [emailapp] [ main] o.apache.catalina.core.StandardService : Starting service [Tomcat] 2025-09-29T20:41:22.253+05:30 INFO 2936 --- [emailapp] [ main] o.apache.catalina.core.StandardEngine : Starting Servlet engine: [Apache Tomcat/10.1.46] 2025-09-29T20:41:22.312+05:30 INFO 2936 --- [emailapp] [ main] o.a.c.c.C.[Tomcat].[localhost].[/] : Initializing Spring embedded WebApplicationContext 2025-09-29T20:41:22.316+05:30 INFO 2936 --- [emailapp] [ main] w.s.c.ServletWebServerApplicationContext : Root WebApplicationContext: initialization completed in 1318 ms 2025-09-29T20:41:22.922+05:30 INFO 2936 --- [emailapp] [ main] o.s.b.w.embedded.tomcat.TomcatWebServer : Tomcat started on port 8080 (http) with context path '/' 2025-09-29T20:41:22.936+05:30 INFO 2936 --- [emailapp] [ main] c.t.emailapp.EmailappApplication : Started EmailappApplication in 2.572 seconds (process running for 2.978)
Now hit the following URL from your web browser and you will receive an email.
http://localhost:8080/sendemail
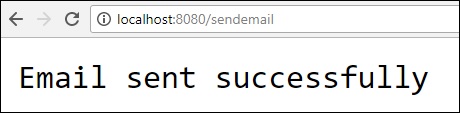
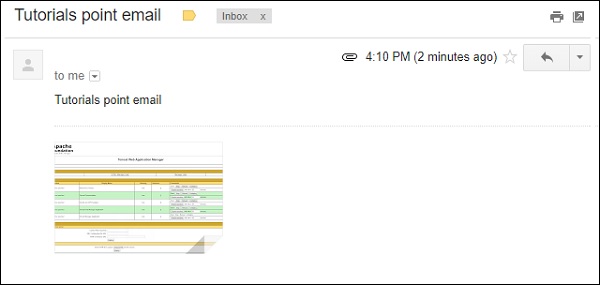
Spring Boot - Web Socket
In this chapter, let us understand how to build an interactive web application by using Spring Boot with Web sockets.
To build an interactive web application in Spring Boot with Web socket, you need to add the following dependencies.
Maven users should add the following dependencies in the pom.xml file.
<dependency> <groupId>org.springframework.boot</groupId> <artifactId>spring-boot-starter-websocket</artifactId> </dependency> <dependency> <groupId>org.webjars</groupId> <artifactId>webjars-locator</artifactId> </dependency> <dependency> <groupId>org.webjars</groupId> <artifactId>sockjs-client</artifactId> <version>1.0.2</version> </dependency> <dependency> <groupId>org.webjars</groupId> <artifactId>stomp-websocket</artifactId> <version>2.3.3</version> </dependency> <dependency> <groupId>org.webjars</groupId> <artifactId>bootstrap</artifactId> <version>3.3.7</version> </dependency> <dependency> <groupId>org.webjars</groupId> <artifactId>jquery</artifactId> <version>3.1.0</version> </dependency>
Gradle users can add the following dependencies in your build.gradle file −
compile("org.springframework.boot:spring-boot-starter-websocket")
compile("org.webjars:webjars-locator")
compile("org.webjars:sockjs-client:1.0.2")
compile("org.webjars:stomp-websocket:2.3.3")
compile("org.webjars:bootstrap:3.3.7")
compile("org.webjars:jquery:3.1.0")
Let us create a Message handling controller to work with STOMP messaging. STOMP messages can be routed to @Controller class file. For example, GreetingController is mapped to handle the messages to destination /hello.
package com.tutorialspoint.websocketapp;
import org.springframework.messaging.handler.annotation.MessageMapping;
import org.springframework.messaging.handler.annotation.SendTo;
import org.springframework.stereotype.Controller;
@Controller
public class GreetingController {
@MessageMapping("/hello")
@SendTo("/topic/greetings")
public Greeting greeting(HelloMessage message) throws Exception {
Thread.sleep(1000); // simulated delay
return new Greeting("Hello, " + message.getName() + "!");
}
}
Now, configure Spring for STOMP messaging. Write a WebSocketConfig class file that extends the AbstractWebSocketMessageBrokerConfigurer class as shown below.
package com.tutorialspoint.websocketapp;
import org.springframework.context.annotation.Configuration;
import org.springframework.messaging.simp.config.MessageBrokerRegistry;
import org.springframework.web.socket.config.annotation.AbstractWebSocketMessageBrokerConfigurer;
import org.springframework.web.socket.config.annotation.EnableWebSocketMessageBroker;
import org.springframework.web.socket.config.annotation.StompEndpointRegistry;
@Configuration
@EnableWebSocketMessageBroker
public class WebSocketConfig extends AbstractWebSocketMessageBrokerConfigurer {
@Override
public void configureMessageBroker(MessageBrokerRegistry config) {
config.enableSimpleBroker("/topic");
config.setApplicationDestinationPrefixes("/app");
}
@Override
public void registerStompEndpoints(StompEndpointRegistry registry) {
registry.addEndpoint("/tutorialspoint-websocket").withSockJS();
}
}
The @EnableWebSocketMessageBroker annotation is used to configure the Web socket message broker to create STOMP endpoints.
You can create a browser client file under the src/main/resources/static/index.html as shown −
<!DOCTYPE html>
<html>
<head>
<title>Hello WebSocket</title>
<link href = "/webjars/bootstrap/css/bootstrap.min.css" rel = "stylesheet">
<link href = "/main.css" rel = "stylesheet">
<script src = "/webjars/jquery/jquery.min.js"></script>
<script src = "/webjars/sockjs-client/sockjs.min.js"></script>
<script src = "/webjars/stomp-websocket/stomp.min.js"></script>
<script src = "/app.js"></script>
</head>
<body>
<noscript>
<h2 style = "color: #ff0000">
Seems your browser doesn't support Javascript! Websocket relies on Javascript being
enabled. Please enable Javascript and reload this page!
</h2>
</noscript>
<div id = "main-content" class = "container">
<div class = "row">
<div class = "col-md-6">
<form class = "form-inline">
<div class = "form-group">
<label for = "connect">WebSocket connection:</label>
<button id = "connect" class = "btn btn-default" type = "submit">Connect</button>
<button id = "disconnect" class = "btn btn-default" type = "submit" disabled = "disabled">Disconnect
</button>
</div>
</form>
</div>
<div class = "col-md-6">
<form class = "form-inline">
<div class = "form-group">
<label for = "name">What is your name?</label>
<input type = "text" id = "name" class = "form-control" placeholder = "Your name here...">
</div>
<button id = "send" class = "btn btn-default" type = "submit">Send</button>
</form>
</div>
</div>
<div class = "row">
<div class = "col-md-12">
<table id = "conversation" class = "table table-striped">
<thead>
<tr>
<th>Greetings</th>
</tr>
</thead>
<tbody id = "greetings"></tbody>
</table>
</div>
</div>
</div>
</body>
</html>
Let us create an app.js file to consume and produce the messages by using STOMP.
var stompClient = null;
function setConnected(connected) {
$("#connect").prop("disabled", connected);
$("#disconnect").prop("disabled", !connected);
if (connected) {
$("#conversation").show();
} else {
$("#conversation").hide();
}
$("#greetings").html("");
}
function connect() {
var socket = new SockJS('/tutorialspoint-websocket');
stompClient = Stomp.over(socket);
stompClient.connect({}, function (frame) {
setConnected(true);
console.log('Connected: ' + frame);
stompClient.subscribe('/topic/greetings', function (greeting) {
showGreeting(JSON.parse(greeting.body).content);
});
});
}
function disconnect() {
if (stompClient !== null) {
stompClient.disconnect();
}
setConnected(false);
console.log("Disconnected");
}
function sendName() {
stompClient.send("/app/hello", {}, JSON.stringify({'name': $("#name").val()}));
}
function showGreeting(message) {
$("#greetings").append("<tr><td>" + message + "</td></tr>");
}
$(function () {
$( "form" ).on('submit', function (e) {e.preventDefault();});
$( "#connect" ).click(function() { connect(); });
$( "#disconnect" ).click(function() { disconnect(); });
$( "#send" ).click(function() { sendName(); });
});
The code for main Spring Boot application is shown below.
WebsocketappApplication.java
package com.tutorialspoint.websocketapp;
import org.springframework.boot.SpringApplication;
import org.springframework.boot.autoconfigure.SpringBootApplication;
@SpringBootApplication
public class WebsocketappApplication {
public static void main(String[] args) {
SpringApplication.run(WebsocketappApplication.class, args);
}
}
The complete build configuration file is given below.
Maven pom.xml
<?xml version = "1.0" encoding = "UTF-8"?>
<project xmlns = "http://maven.apache.org/POM/4.0.0"
xmlns:xsi = "http://www.w3.org/2001/XMLSchema-instance"
xsi:schemaLocation = "http://maven.apache.org/POM/4.0.0
http://maven.apache.org/xsd/maven-4.0.0.xsd">
<modelVersion>4.0.0</modelVersion>
<groupId>com.tutorialspoint</groupId>
<artifactId>websocketapp</artifactId>
<version>0.0.1-SNAPSHOT</version>
<packaging>jar</packaging>
<name>websocketapp</name>
<description>Demo project for Spring Boot</description>
<parent>
<groupId>org.springframework.boot</groupId>
<artifactId>spring-boot-starter-parent</artifactId>
<version>3.5.6</version>
</parent>
<dependencies>
<dependency>
<groupId>org.springframework.boot</groupId>
<artifactId>spring-boot-starter-websocket</artifactId>
</dependency>
<dependency>
<groupId>org.webjars</groupId>
<artifactId>webjars-locator</artifactId>
</dependency>
<dependency>
<groupId>org.webjars</groupId>
<artifactId>sockjs-client</artifactId>
<version>1.0.2</version>
</dependency>
<dependency>
<groupId>org.webjars</groupId>
<artifactId>stomp-websocket</artifactId>
<version>2.3.3</version>
</dependency>
<dependency>
<groupId>org.webjars</groupId>
<artifactId>bootstrap</artifactId>
<version>3.3.7</version>
</dependency>
<dependency>
<groupId>org.webjars</groupId>
<artifactId>jquery</artifactId>
<version>3.1.0</version>
</dependency>
<dependency>
<groupId>org.springframework.boot</groupId>
<artifactId>spring-boot-starter-test</artifactId>
<scope>test</scope>
</dependency>
</dependencies>
<properties>
<java.version>21</java.version>
</properties>
<build>
<plugins>
<plugin>
<groupId>org.springframework.boot</groupId>
<artifactId>spring-boot-maven-plugin</artifactId>
</plugin>
</plugins>
</build>
</project>
Gradle build.gradle
buildscript {
repositories {
mavenCentral()
}
dependencies {
classpath("org.springframework.boot:spring-boot-gradle-plugin:3.5.6")
}
}
apply plugin: 'java'
apply plugin: 'eclipse'
apply plugin: 'org.springframework.boot'
jar {
baseName = 'websocketapp'
version = '0.1.0'
}
sourceCompatibility = 21
targetCompatibility = 21
repositories {
mavenCentral()
}
dependencies {
compile("org.springframework.boot:spring-boot-starter-websocket")
compile("org.webjars:webjars-locator")
compile("org.webjars:sockjs-client:1.0.2")
compile("org.webjars:stomp-websocket:2.3.3")
compile("org.webjars:bootstrap:3.3.7")
compile("org.webjars:jquery:3.1.0")
testCompile("org.springframework.boot:spring-boot-starter-test")
}
Output
You can create an executable JAR file, and run the Spring Boot application by using the Maven or Gradle commands as shown below −
For Maven, you can use the command given below −
mvn clean install
After BUILD SUCCESS, you can find the JAR file under the target directory.
For Gradle, you can use the command as shown −
gradle clean build
After BUILD SUCCESSFUL, you can find the JAR file under the build/libs directory.
Run the JAR file by using the command given here −
java jar <JARFILE>
Now, the application has started on the Tomcat port 8080 as shown.

Now, hit the URL http://localhost:8080/ in your web browser and connect the web socket and send the greeting and receive the message.
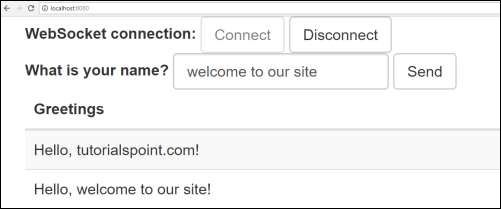
Spring Boot - Batch Service
Batch Service is a process to execute more than one command in a single task. In this chapter, you are going to learn how to create batch service in a Spring Boot application.
Let us consider an example where we are going to save the CSV file content into MySql.
To create a Batch Service program, we need to add the Spring Boot Starter Batch, MySQL and Spring Data JPA dependency in our build configuration file.
Maven users can add the following dependencies in pom.xml file.
<dependency> <groupId>org.springframework.boot</groupId> <artifactId>spring-boot-starter-batch</artifactId> </dependency> <dependency> <groupId>com.mysql</groupId> <artifactId>mysql-connector-j</artifactId> </dependency> <dependency> <groupId>org.springframework.boot</groupId> <artifactId>spring-boot-starter-data-jpa</artifactId> </dependency>
Gradle users can add the following dependencies in build.gradle file.
compile("org.springframework.boot:spring-boot-starter-batch")
compile("org.springframework.boot:spring-boot-starter-data-jpa")
compile("com.mysql:mysql-connector-j")
Example - Usage of Batch Service in Spring Boot
Create a Maven based project with groupid as com.tutorialspoint, artifactid as batchservice.
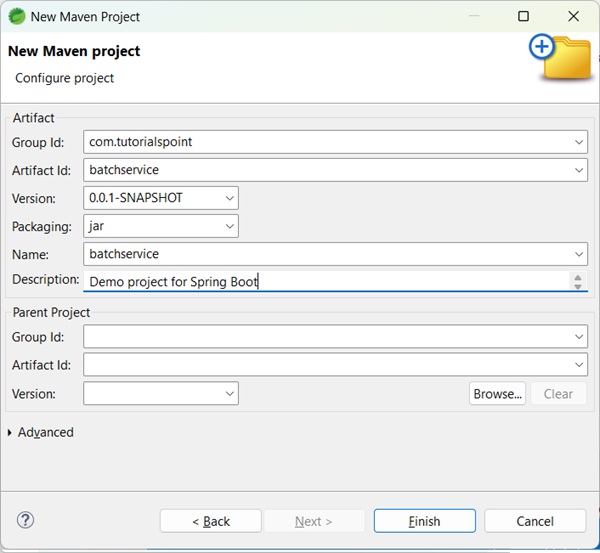
Update the pom.xml as shown below −
pom.xml
<?xml version="1.0" encoding="UTF-8"?>
<project xmlns="http://maven.apache.org/POM/4.0.0" xmlns:xsi="http://www.w3.org/2001/XMLSchema-instance"
xsi:schemaLocation="http://maven.apache.org/POM/4.0.0 https://maven.apache.org/xsd/maven-4.0.0.xsd">
<modelVersion>4.0.0</modelVersion>
<parent>
<groupId>org.springframework.boot</groupId>
<artifactId>spring-boot-starter-parent</artifactId>
<version>3.5.6</version>
<relativePath/> <!-- lookup parent from repository -->
</parent>
<groupId>com.tutorialspoint</groupId>
<artifactId>batchservice</artifactId>
<version>0.0.1-SNAPSHOT</version>
<name>batchservice</name>
<description>Demo project for Spring Boot</description>
<url/>
<licenses>
<license/>
</licenses>
<developers>
<developer/>
</developers>
<scm>
<connection/>
<developerConnection/>
<tag/>
<url/>
</scm>
<properties>
<java.version>21</java.version>
</properties>
<dependencies>
<dependency>
<groupId>org.springframework.boot</groupId>
<artifactId>spring-boot-starter-batch</artifactId>
</dependency>
<dependency>
<groupId>org.springframework.boot</groupId>
<artifactId>spring-boot-starter-data-jpa</artifactId>
</dependency>
<dependency>
<groupId>com.mysql</groupId>
<artifactId>mysql-connector-j</artifactId>
<scope>runtime</scope>
</dependency>
<dependency>
<groupId>org.springframework.boot</groupId>
<artifactId>spring-boot-starter-test</artifactId>
<scope>test</scope>
</dependency>
<dependency>
<groupId>org.springframework.batch</groupId>
<artifactId>spring-batch-test</artifactId>
<scope>test</scope>
</dependency>
</dependencies>
<build>
<plugins>
<plugin>
<groupId>org.springframework.boot</groupId>
<artifactId>spring-boot-maven-plugin</artifactId>
</plugin>
</plugins>
</build>
</project>
Now, add the simple CSV data file under classpath resources src/main/resources and name the file as report.csv as shown −
report.csv
William,John Mike, Sebastian Lawarance, Lime Kumar, Mahesh Goswami, Saikat Khan, Jaid Kaur, Manpreet
Create a POJO class for USERS model as shown −
User.java
package com.tutorialspoint.batchservice.model;
import jakarta.persistence.Entity;
import jakarta.persistence.GeneratedValue;
import jakarta.persistence.Id;
@Entity
public class User {
@Id
@GeneratedValue
private Long id;
private String lastName;
private String firstName;
public User() {
}
public User(String firstName, String lastName) {
this.firstName = firstName;
this.lastName = lastName;
}
public void setFirstName(String firstName) {
this.firstName = firstName;
}
public String getFirstName() {
return firstName;
}
public String getLastName() {
return lastName;
}
public void setLastName(String lastName) {
this.lastName = lastName;
}
@Override
public String toString() {
return "firstName: " + firstName + ", lastName: " + lastName;
}
}
Now, create an intermediate processor to do the operations after the reading the data from the CSV file and before writing the data into SQL.
UserItemProcessor.java
package com.tutorialspoint.batchservice.processor;
import org.slf4j.Logger;
import org.slf4j.LoggerFactory;
import org.springframework.batch.item.ItemProcessor;
import com.tutorialspoint.batchservice.model.User;
public class UserItemProcessor implements ItemProcessor<User, User> {
private static final Logger log = LoggerFactory.getLogger(UserItemProcessor.class);
@Override
public User process(final User user) throws Exception {
final String firstName = user.getFirstName().toUpperCase();
final String lastName = user.getLastName().toUpperCase();
final User transformedPerson = new User(firstName, lastName);
log.info("Converting (" + user + ") into (" + transformedPerson + ")");
return transformedPerson;
}
}
Let us create a Batch configuration file, to read the data from CSV and write into the Database as shown below.
BatchConfiguration.java
package com.tutorialspoint.batchservice.configuration;
import org.springframework.batch.core.Job;
import org.springframework.batch.core.JobExecutionListener;
import org.springframework.batch.core.Step;
import org.springframework.batch.core.configuration.annotation.StepScope;
import org.springframework.batch.core.job.builder.JobBuilder;
import org.springframework.batch.core.launch.support.RunIdIncrementer;
import org.springframework.batch.core.repository.JobRepository;
import org.springframework.batch.core.step.builder.StepBuilder;
import org.springframework.batch.item.ItemWriter;
import org.springframework.batch.item.file.FlatFileItemReader;
import org.springframework.batch.item.file.mapping.BeanWrapperFieldSetMapper;
import org.springframework.batch.item.file.mapping.DefaultLineMapper;
import org.springframework.batch.item.file.transform.DelimitedLineTokenizer;
import org.springframework.beans.factory.annotation.Autowired;
import org.springframework.context.annotation.Bean;
import org.springframework.context.annotation.Configuration;
import org.springframework.core.io.ClassPathResource;
import org.springframework.transaction.PlatformTransactionManager;
import com.tutorialspoint.batchservice.listener.UserListener;
import com.tutorialspoint.batchservice.model.User;
import com.tutorialspoint.batchservice.processor.UserItemProcessor;
import com.tutorialspoint.batchservice.repository.UserRepository;
@Configuration
public class BatchConfiguration {
@Bean
FlatFileItemReader<User> reader() {
FlatFileItemReader<User> reader= new FlatFileItemReader<>();
reader.setResource(new ClassPathResource("/report.csv"));
reader.setLineMapper(new DefaultLineMapper<>() {{
setLineTokenizer(new DelimitedLineTokenizer() {{
setDelimiter(DELIMITER_COMMA);
setNames("lastName","firstName");
}});
setFieldSetMapper(new BeanWrapperFieldSetMapper<>() {{
setTargetType(User.class);
}});
}});
return reader;
}
@Autowired
UserRepository repository;
@Bean
ItemWriter<User> writer(){
return users -> {
System.out.println("Saving User: " +users);
repository.saveAll(users);
};
}
@Bean
public JobExecutionListener listener() {
return new UserListener();
}
@Bean
Job importUserJob(JobRepository jobRepository, Step step1) {
return new JobBuilder("importUserJob", jobRepository)
.incrementer(new RunIdIncrementer())
.listener(listener())
.start(step1)
.build();
}
@Bean
Step step1(JobRepository jobRepository, PlatformTransactionManager transactionManager) {
return new StepBuilder("step1", jobRepository)
.<User, User>chunk(100, transactionManager)
.reader(reader())
.processor(userProcessor())
.writer(writer())
.build();
}
@Bean
@StepScope
UserItemProcessor userProcessor() {
return new UserItemProcessor();
}
}
The reader() method is used to read the data from the CSV file and writer() method is used to write a data into the Database.
Next, we will have to write a Job Completion Notification Listener class used to notify after the Job completion.
UserListener.java
package com.tutorialspoint.batchservice.listener;
import org.springframework.batch.core.JobExecution;
import org.springframework.batch.core.JobExecutionListener;
public class UserListener implements JobExecutionListener{
@Override
public void beforeJob(JobExecution jobExecution) {
System.out.println("Job Started: "+ jobExecution.getStartTime()
+ ", Status: " + jobExecution.getStatus());
}
@Override
public void afterJob(JobExecution jobExecution) {
System.out.println("Job Started: "+ jobExecution.getStartTime()
+ ", Status: " + jobExecution.getStatus());
}
}
We will have to write a Repository which will save users to the database.
UserRepository.java
package com.tutorialspoint.batchservice.repository;
import org.springframework.data.jpa.repository.JpaRepository;
import com.tutorialspoint.batchservice.model.User;
public interface UserRepository extends JpaRepository<User, Long> {
}
Main Spring Boot Application class.
BatchserviceApplication.java
package com.tutorialspoint.batchservice;
import org.springframework.boot.SpringApplication;
import org.springframework.boot.autoconfigure.SpringBootApplication;
@SpringBootApplication()
public class BatchserviceApplication {
public static void main(String[] args) {
SpringApplication.run(BatchserviceApplication.class, args);
}
}
application.properties
spring.application.name=batchservice #Database Connection spring.datasource.driver-class-name=com.mysql.cj.jdbc.Driver spring.datasource.url=jdbc:mysql://localhost:3306/details spring.datasource.username=guest spring.datasource.password=guest123 spring.jpa.show-sql=true spring.jpa.hibernate.ddl-auto=create spring.batch.jdbc.initialize-schema=always
Output
Now, create an executable JAR file, and run the Spring Boot application by using the following Maven or Gradle commands.
For Maven, use the command as shown −
mvn clean install
After BUILD SUCCESS, you can find the JAR file under the target directory.
For Gradle, you can use the command as shown −
gradle clean build
After BUILD SUCCESSFUL, you can find the JAR file under the build/libs directory.
Run the JAR file by using the command given here −
java jar <JARFILE>
You can see the output in console window as shown −
. ____ _ __ _ _
/\\ / ___'_ __ _ _(_)_ __ __ _ \ \ \ \
( ( )\___ | '_ | '_| | '_ \/ _` | \ \ \ \
\\/ ___)| |_)| | | | | || (_| | ) ) ) )
' |____| .__|_| |_|_| |_\__, | / / / /
=========|_|==============|___/=/_/_/_/
:: Spring Boot :: (v3.5.6)
2025-09-30T10:42:52.295+05:30 INFO 2232 --- [batchservice] [ main] c.t.b.BatchserviceApplication : Starting BatchserviceApplication using Java 21.0.6 with PID 2232 (D:\workspace\batchservice\target\classes started by mahes in D:\workspace\batchservice)
2025-09-30T10:42:52.297+05:30 INFO 2232 --- [batchservice] [ main] c.t.b.BatchserviceApplication : No active profile set, falling back to 1 default profile: "default"
2025-09-30T10:42:53.216+05:30 INFO 2232 --- [batchservice] [ main] .s.d.r.c.RepositoryConfigurationDelegate : Bootstrapping Spring Data JPA repositories in DEFAULT mode.
2025-09-30T10:42:53.353+05:30 INFO 2232 --- [batchservice] [ main] .s.d.r.c.RepositoryConfigurationDelegate : Finished Spring Data repository scanning in 117 ms. Found 1 JPA repository interface.
2025-09-30T10:42:53.789+05:30 INFO 2232 --- [batchservice] [ main] com.zaxxer.hikari.HikariDataSource : HikariPool-1 - Starting...
2025-09-30T10:42:54.404+05:30 INFO 2232 --- [batchservice] [ main] com.zaxxer.hikari.pool.HikariPool : HikariPool-1 - Added connection com.mysql.cj.jdbc.ConnectionImpl@4afbb6c2
2025-09-30T10:42:54.405+05:30 INFO 2232 --- [batchservice] [ main] com.zaxxer.hikari.HikariDataSource : HikariPool-1 - Start completed.
2025-09-30T10:42:55.074+05:30 INFO 2232 --- [batchservice] [ main] o.hibernate.jpa.internal.util.LogHelper : HHH000204: Processing PersistenceUnitInfo [name: default]
2025-09-30T10:42:55.151+05:30 INFO 2232 --- [batchservice] [ main] org.hibernate.Version : HHH000412: Hibernate ORM core version 6.6.29.Final
2025-09-30T10:42:55.197+05:30 INFO 2232 --- [batchservice] [ main] o.h.c.internal.RegionFactoryInitiator : HHH000026: Second-level cache disabled
2025-09-30T10:42:55.543+05:30 INFO 2232 --- [batchservice] [ main] o.s.o.j.p.SpringPersistenceUnitInfo : No LoadTimeWeaver setup: ignoring JPA class transformer
2025-09-30T10:42:55.693+05:30 INFO 2232 --- [batchservice] [ main] org.hibernate.orm.connections.pooling : HHH10001005: Database info:
Database JDBC URL [Connecting through datasource 'HikariDataSource (HikariPool-1)']
Database driver: undefined/unknown
Database version: 8.0.43
Autocommit mode: undefined/unknown
Isolation level: undefined/unknown
Minimum pool size: undefined/unknown
Maximum pool size: undefined/unknown
2025-09-30T10:42:56.539+05:30 INFO 2232 --- [batchservice] [ main] o.h.e.t.j.p.i.JtaPlatformInitiator : HHH000489: No JTA platform available (set 'hibernate.transaction.jta.platform' to enable JTA platform integration)
Hibernate: drop table if exists user
Hibernate: drop table if exists user_seq
Hibernate: create table user (id bigint not null, first_name varchar(255), last_name varchar(255), primary key (id)) engine=InnoDB
Hibernate: create table user_seq (next_val bigint) engine=InnoDB
Hibernate: insert into user_seq values ( 1 )
2025-09-30T10:42:56.673+05:30 INFO 2232 --- [batchservice] [ main] j.LocalContainerEntityManagerFactoryBean : Initialized JPA EntityManagerFactory for persistence unit 'default'
2025-09-30T10:42:57.332+05:30 INFO 2232 --- [batchservice] [ main] c.t.b.BatchserviceApplication : Started BatchserviceApplication in 5.702 seconds (process running for 6.189)
2025-09-30T10:42:57.339+05:30 INFO 2232 --- [batchservice] [ main] o.s.b.a.b.JobLauncherApplicationRunner : Running default command line with: []
2025-09-30T10:42:57.507+05:30 INFO 2232 --- [batchservice] [ main] o.s.b.c.l.s.TaskExecutorJobLauncher : Job: [SimpleJob: [name=importUserJob]] launched with the following parameters: [{'run.id':'{value=1, type=class java.lang.Long, identifying=true}'}]
Job Started: 2025-09-30T10:42:57.514874100, Status: STARTED
2025-09-30T10:42:57.552+05:30 INFO 2232 --- [batchservice] [ main] o.s.batch.core.job.SimpleStepHandler : Executing step: [step1]
2025-09-30T10:42:57.592+05:30 INFO 2232 --- [batchservice] [ main] c.t.b.processor.UserItemProcessor : Converting (firstName: John, lastName: William) into (firstName: JOHN, lastName: WILLIAM)
2025-09-30T10:42:57.593+05:30 INFO 2232 --- [batchservice] [ main] c.t.b.processor.UserItemProcessor : Converting (firstName: Sebastian, lastName: Mike) into (firstName: SEBASTIAN, lastName: MIKE)
2025-09-30T10:42:57.593+05:30 INFO 2232 --- [batchservice] [ main] c.t.b.processor.UserItemProcessor : Converting (firstName: Lime, lastName: Lawarance) into (firstName: LIME, lastName: LAWARANCE)
2025-09-30T10:42:57.593+05:30 INFO 2232 --- [batchservice] [ main] c.t.b.processor.UserItemProcessor : Converting (firstName: Mahesh, lastName: Kumar) into (firstName: MAHESH, lastName: KUMAR)
2025-09-30T10:42:57.593+05:30 INFO 2232 --- [batchservice] [ main] c.t.b.processor.UserItemProcessor : Converting (firstName: Saikat, lastName: Goswami) into (firstName: SAIKAT, lastName: GOSWAMI)
2025-09-30T10:42:57.593+05:30 INFO 2232 --- [batchservice] [ main] c.t.b.processor.UserItemProcessor : Converting (firstName: Jaid, lastName: Khan) into (firstName: JAID, lastName: KHAN)
2025-09-30T10:42:57.593+05:30 INFO 2232 --- [batchservice] [ main] c.t.b.processor.UserItemProcessor : Converting (firstName: Manpreet, lastName: Kaur) into (firstName: MANPREET, lastName: KAUR)
Saving User: [items=[firstName: JOHN, lastName: WILLIAM, firstName: SEBASTIAN, lastName: MIKE, firstName: LIME, lastName: LAWARANCE, firstName: MAHESH, lastName: KUMAR, firstName: SAIKAT, lastName: GOSWAMI, firstName: JAID, lastName: KHAN, firstName: MANPREET, lastName: KAUR], skips=[]]
Hibernate: select next_val as id_val from user_seq for update
Hibernate: update user_seq set next_val= ? where next_val=?
Hibernate: select next_val as id_val from user_seq for update
Hibernate: update user_seq set next_val= ? where next_val=?
Hibernate: insert into user (first_name,last_name,id) values (?,?,?)
Hibernate: insert into user (first_name,last_name,id) values (?,?,?)
Hibernate: insert into user (first_name,last_name,id) values (?,?,?)
Hibernate: insert into user (first_name,last_name,id) values (?,?,?)
Hibernate: insert into user (first_name,last_name,id) values (?,?,?)
Hibernate: insert into user (first_name,last_name,id) values (?,?,?)
Hibernate: insert into user (first_name,last_name,id) values (?,?,?)
2025-09-30T10:42:57.673+05:30 INFO 2232 --- [batchservice] [ main] o.s.batch.core.step.AbstractStep : Step: [step1] executed in 121ms
Job Started: 2025-09-30T10:42:57.514874100, Status: COMPLETED
2025-09-30T10:42:57.699+05:30 INFO 2232 --- [batchservice] [ main] o.s.b.c.l.s.TaskExecutorJobLauncher : Job: [SimpleJob: [name=importUserJob]] completed with the following parameters: [{'run.id':'{value=1, type=class java.lang.Long, identifying=true}'}] and the following status: [COMPLETED] in 175ms
2025-09-30T10:42:57.705+05:30 INFO 2232 --- [batchservice] [ionShutdownHook] j.LocalContainerEntityManagerFactoryBean : Closing JPA EntityManagerFactory for persistence unit 'default'
2025-09-30T10:42:57.706+05:30 INFO 2232 --- [batchservice] [ionShutdownHook] com.zaxxer.hikari.HikariDataSource : HikariPool-1 - Shutdown initiated...
2025-09-30T10:42:57.714+05:30 INFO 2232 --- [batchservice] [ionShutdownHook] com.zaxxer.hikari.HikariDataSource : HikariPool-1 - Shutdown completed.
You can check the users table in database as well for the entries.
Spring Boot - Apache Kafka
Apache Kafka is an open source project used to publish and subscribe the messages based on the fault-tolerant messaging system. It is fast, scalable and distributed by design. If you are a beginner to Kafka, or want to gain a better understanding on it, please refer to this link − www.tutorialspoint.com/apache_kafka/
In this chapter, we are going to see how to implement the Apache Kafka in Spring Boot application.
Example - Configuring Kafka
First, download the Spring Boot project from Spring Initializer page www.start.spring.io and choose the following dependencies −
- Spring for Apache Kafka
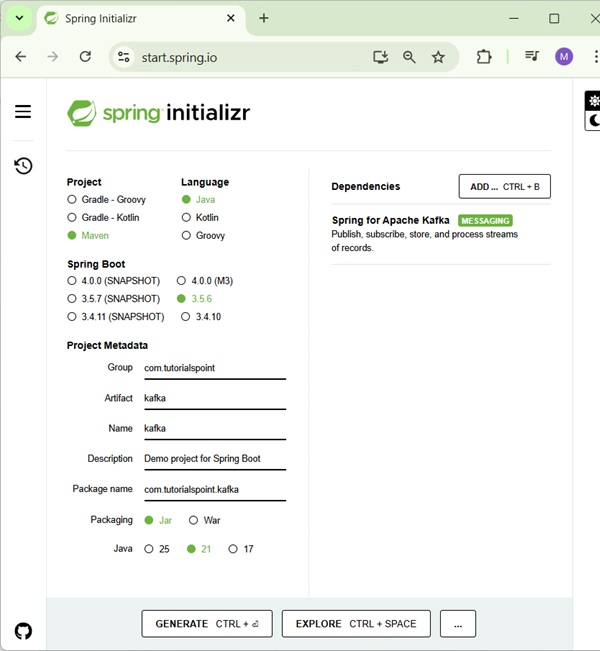
First, we need to add the Spring Kafka dependency in our build configuration file.
Maven users can add the following dependency in the pom.xml file.
<dependency> <groupId>org.springframework.kafka</groupId> <artifactId>spring-kafka</artifactId> </dependency>
Gradle users can add the following dependency in the build.gradle file.
compile group: 'org.springframework.kafka', name: 'spring-kafka'
Producing Messages
To produce messages into Apache Kafka, we need to define the Configuration class for Producer configuration as shown −
KafkaProducerConfig.java
package com.tutorialspoint.kafka;
import java.util.HashMap;
import java.util.Map;
import org.apache.kafka.clients.producer.ProducerConfig;
import org.apache.kafka.common.serialization.StringSerializer;
import org.springframework.context.annotation.Bean;
import org.springframework.context.annotation.Configuration;
import org.springframework.kafka.core.DefaultKafkaProducerFactory;
import org.springframework.kafka.core.KafkaTemplate;
import org.springframework.kafka.core.ProducerFactory;
@Configuration
public class KafkaProducerConfig {
@Bean
ProducerFactory<String, String> producerFactory() {
Map<String, Object> configProps = new HashMap<>();
configProps.put(ProducerConfig.BOOTSTRAP_SERVERS_CONFIG, "localhost:9092");
configProps.put(ProducerConfig.KEY_SERIALIZER_CLASS_CONFIG, StringSerializer.class);
configProps.put(ProducerConfig.VALUE_SERIALIZER_CLASS_CONFIG, StringSerializer.class);
return new DefaultKafkaProducerFactory<>(configProps);
}
@Bean
KafkaTemplate<String, String> kafkaTemplate() {
return new KafkaTemplate<>(producerFactory());
}
}
To publish a message, auto wire the Kafka Template object and produce the message as shown.
@Autowired
private KafkaTemplate<String, String> kafkaTemplate;
public void sendMessage(String msg) {
kafkaTemplate.send(topicName, msg);
}
Consuming a Message
To consume messages, we need to write a Consumer configuration class file as shown below.
KafkaConsumerConfig.java
package com.tutorialspoint.kafka;
import java.util.HashMap;
import java.util.Map;
import org.apache.kafka.clients.consumer.ConsumerConfig;
import org.apache.kafka.common.serialization.StringDeserializer;
import org.springframework.context.annotation.Bean;
import org.springframework.context.annotation.Configuration;
import org.springframework.kafka.annotation.EnableKafka;
import org.springframework.kafka.config.ConcurrentKafkaListenerContainerFactory;
import org.springframework.kafka.core.ConsumerFactory;
import org.springframework.kafka.core.DefaultKafkaConsumerFactory;
@EnableKafka
@Configuration
public class KafkaConsumerConfig {
@Bean
public ConsumerFactory<String, String> consumerFactory() {
Map<String, Object> props = new HashMap<>();
props.put(ConsumerConfig.BOOTSTRAP_SERVERS_CONFIG, "localhost:2181");
props.put(ConsumerConfig.GROUP_ID_CONFIG, "group-id");
props.put(ConsumerConfig.KEY_DESERIALIZER_CLASS_CONFIG, StringDeserializer.class);
props.put(ConsumerConfig.VALUE_DESERIALIZER_CLASS_CONFIG, StringDeserializer.class);
return new DefaultKafkaConsumerFactory<>(props);
}
@Bean
public ConcurrentKafkaListenerContainerFactory<String, String> kafkaListenerContainerFactory() {
ConcurrentKafkaListenerContainerFactory<String, String>
factory = new ConcurrentKafkaListenerContainerFactory<>();
factory.setConsumerFactory(consumerFactory());
return factory;
}
}
Next, write a Listener to listen to the messages.
@KafkaListener(topics = "tutorialspoint", groupId = "group-id")
public void listen(String message) {
System.out.println("Received Messasge in group - group-id: " + message);
}
Let us call the sendMessage() method from ApplicationRunner class run method from the main Spring Boot application class file and consume the message from the same class file.
Your main Spring Boot application class file code is given below −
KafkaDemoApplication.java
package com.tutorialspoint.kafka;
import org.springframework.beans.factory.annotation.Autowired;
import org.springframework.boot.ApplicationArguments;
import org.springframework.boot.ApplicationRunner;
import org.springframework.boot.SpringApplication;
import org.springframework.boot.autoconfigure.SpringBootApplication;
import org.springframework.kafka.annotation.KafkaListener;
import org.springframework.kafka.core.KafkaTemplate;
@SpringBootApplication
public class KafkaApplication implements ApplicationRunner {
@Autowired
private KafkaTemplate<String, String> kafkaTemplate;
public void sendMessage(String msg) {
kafkaTemplate.send("tutorialspoint", msg);
}
public static void main(String[] args) {
SpringApplication.run(KafkaApplication.class, args);
}
@KafkaListener(topics = "tutorialspoint", groupId = "group-id")
public void listen(String message) {
System.out.println("Received Messasge in group - group-id: " + message);
}
@Override
public void run(ApplicationArguments args) throws Exception {
sendMessage("Hi Welcome to Spring For Apache Kafka");
}
}
The code for complete build configuration file is given below.
Maven - pom.xml
<?xml version="1.0" encoding="UTF-8"?>
<project xmlns="http://maven.apache.org/POM/4.0.0" xmlns:xsi="http://www.w3.org/2001/XMLSchema-instance"
xsi:schemaLocation="http://maven.apache.org/POM/4.0.0 https://maven.apache.org/xsd/maven-4.0.0.xsd">
<modelVersion>4.0.0</modelVersion>
<parent>
<groupId>org.springframework.boot</groupId>
<artifactId>spring-boot-starter-parent</artifactId>
<version>3.5.6</version>
<relativePath/> <!-- lookup parent from repository -->
</parent>
<groupId>com.tutorialspoint</groupId>
<artifactId>kafka</artifactId>
<version>0.0.1-SNAPSHOT</version>
<name>kafka</name>
<description>Demo project for Spring Boot</description>
<url/>
<licenses>
<license/>
</licenses>
<developers>
<developer/>
</developers>
<scm>
<connection/>
<developerConnection/>
<tag/>
<url/>
</scm>
<properties>
<java.version>21</java.version>
</properties>
<dependencies>
<dependency>
<groupId>org.springframework.boot</groupId>
<artifactId>spring-boot-starter</artifactId>
</dependency>
<dependency>
<groupId>org.springframework.kafka</groupId>
<artifactId>spring-kafka</artifactId>
</dependency>
<dependency>
<groupId>org.springframework.boot</groupId>
<artifactId>spring-boot-starter-test</artifactId>
<scope>test</scope>
</dependency>
<dependency>
<groupId>org.springframework.kafka</groupId>
<artifactId>spring-kafka-test</artifactId>
<scope>test</scope>
</dependency>
</dependencies>
<build>
<plugins>
<plugin>
<groupId>org.springframework.boot</groupId>
<artifactId>spring-boot-maven-plugin</artifactId>
</plugin>
</plugins>
</build>
</project>
Gradle build.gradle
buildscript {
ext {
springBootVersion = '3.5.6'
}
repositories {
mavenCentral()
}
dependencies {
classpath("org.springframework.boot:spring-boot-gradle-plugin:${springBootVersion}")
}
}
apply plugin: 'java'
apply plugin: 'eclipse'
apply plugin: 'org.springframework.boot'
group = 'com.tutorialspoint'
version = '0.0.1-SNAPSHOT'
sourceCompatibility = 21
repositories {
mavenCentral()
}
dependencies {
compile('org.springframework.boot:spring-boot-starter')
compile group: 'org.springframework.kafka', name: 'spring-kafka')
testCompile('org.springframework.boot:spring-boot-starter-test')
testCompile('org.springframework.kafka:spring-kafka-test')
}
Output
Now, create an executable JAR file, and run the Spring Boot application by using the below Maven or Gradle commands as shown −
For Maven, use the command as shown −
mvn clean install
After BUILD SUCCESS, you can find the JAR file under the target directory.
For Gradle, use the command as shown −
gradle clean build
After BUILD SUCCESSFUL, you can find the JAR file under the build/libs directory.
Run the JAR file by using the command given here −
java jar <JARFILE>
You can see the output in console window.
. ____ _ __ _ _ /\\ / ___'_ __ _ _(_)_ __ __ _ \ \ \ \ ( ( )\___ | '_ | '_| | '_ \/ _` | \ \ \ \ \\/ ___)| |_)| | | | | || (_| | ) ) ) ) ' |____| .__|_| |_|_| |_\__, | / / / / =========|_|==============|___/=/_/_/_/ :: Spring Boot :: (v3.5.6) 2025-09-30T11:27:14.839+05:30 INFO 25460 --- [kafka] [ main] c.tutorialspoint.kafka.KafkaApplication : Starting KafkaApplication using Java 21.0.6 with PID 25460 (D:\Projects\kafka\target\classes started by mahes in D:\Projects\kafka) 2025-09-30T11:27:14.842+05:30 INFO 25460 --- [kafka] [ main] c.tutorialspoint.kafka.KafkaApplication : No active profile set, falling back to 1 default profile: "default" 2025-09-30T11:27:15.905+05:30 INFO 25460 --- [kafka] [ main] o.a.k.clients.consumer.ConsumerConfig : ConsumerConfig values: allow.auto.create.topics = true auto.commit.interval.ms = 5000 auto.include.jmx.reporter = true auto.offset.reset = latest bootstrap.servers = [localhost:2181] check.crcs = true client.dns.lookup = use_all_dns_ips client.id = consumer-group-id-1 client.rack = connections.max.idle.ms = 540000 ... 2025-09-30T11:27:15.967+05:30 INFO 25460 --- [kafka] [ main] o.a.k.c.t.i.KafkaMetricsCollector : initializing Kafka metrics collector 2025-09-30T11:27:16.303+05:30 INFO 25460 --- [kafka] [ main] o.a.kafka.common.utils.AppInfoParser : Kafka version: 3.9.1 2025-09-30T11:27:16.305+05:30 INFO 25460 --- [kafka] [ main] o.a.kafka.common.utils.AppInfoParser : Kafka commitId: f745dfdcee2b9851 2025-09-30T11:27:16.305+05:30 INFO 25460 --- [kafka] [ main] o.a.kafka.common.utils.AppInfoParser : Kafka startTimeMs: 1759211836301 2025-09-30T11:27:16.310+05:30 INFO 25460 --- [kafka] [ main] o.a.k.c.c.i.ClassicKafkaConsumer : [Consumer clientId=consumer-group-id-1, groupId=group-id] Subscribed to topic(s): tutorialspoint 2025-09-30T11:27:16.334+05:30 INFO 25460 --- [kafka] [ main] c.tutorialspoint.kafka.KafkaApplication : Started KafkaApplication in 1.967 seconds (process running for 2.299) 2025-09-30T11:27:16.374+05:30 INFO 25460 --- [kafka] [ main] o.a.k.clients.producer.ProducerConfig : ProducerConfig values: acks = -1 auto.include.jmx.reporter = true batch.size = 16384 bootstrap.servers = [localhost:9092] buffer.memory = 33554432 client.dns.lookup = use_all_dns_ips client.id = kafka-producer-1 ... 2025-09-30T11:27:16.376+05:30 INFO 25460 --- [kafka] [ main] o.a.k.c.t.i.KafkaMetricsCollector : initializing Kafka metrics collector 2025-09-30T11:27:16.403+05:30 INFO 25460 --- [kafka] [ main] o.a.k.clients.producer.KafkaProducer : [Producer clientId=kafka-producer-1] Instantiated an idempotent producer. 2025-09-30T11:27:16.436+05:30 INFO 25460 --- [kafka] [ main] o.a.kafka.common.utils.AppInfoParser : Kafka version: 3.9.1 2025-09-30T11:27:16.436+05:30 INFO 25460 --- [kafka] [ main] o.a.kafka.common.utils.AppInfoParser : Kafka commitId: f745dfdcee2b9851 2025-09-30T11:27:16.437+05:30 INFO 25460 --- [kafka] [ main] o.a.kafka.common.utils.AppInfoParser : Kafka startTimeMs: 1759211836436
Spring Boot - Twillio
Twilio is a 3rd party application used to send SMS and make voice calls from our application. It allows us to send the SMS and make voice calls programmatically.
In this chapter, you are going to learn how to implement the SMS sending and making voice calls by using Spring Boot with Twilio.
Note − We used the Trail account in Twilio to send the SMS and making voice calls. You can learn more about Twilio at www.twilio.com.
Example - Sending SMS using Twillio
First, we need to add the Twilio dependency in our build configuration file.
Maven users can add the following dependency in the pom.xml file.
<dependency> <groupId>com.twilio.sdk</groupId> <artifactId>twilio</artifactId> <version>10.5.1</version> </dependency>
Gradle users can add the following dependency in the build.gradle file.
compile group: "com.twilio.sdk", name:"twilio", version: "10.5.1"
Now, initialize the Twilio account with ACCOUNT_SID and AUTH_ID in static block as shown −
static {
Twilio.init(ACCOUNT_SID, AUTH_ID);
}
To send the SMS, we need to provide a from-number and to-number to the Message.create() method. Message body content also we need to provide for the method Message.creator()as shown −
Message.creator(new PhoneNumber("to-number"), new PhoneNumber("from-number"),
"Message from Spring Boot Application").create();
The main Spring Boot application class file looks below.
SmsdemoApplication.java
package com.tutorialspoint.smsdemo;
import org.springframework.boot.ApplicationArguments;
import org.springframework.boot.ApplicationRunner;
import org.springframework.boot.SpringApplication;
import org.springframework.boot.autoconfigure.SpringBootApplication;
import com.twilio.Twilio;
import com.twilio.rest.api.v2010.account.Message;
import com.twilio.type.PhoneNumber;
@SpringBootApplication
public class SmsdemoApplication implements ApplicationRunner {
private final static String ACCOUNT_SID = "<your-account-sid>";
private final static String AUTH_ID = "<your-auth-id>";
static {
Twilio.init(ACCOUNT_SID, AUTH_ID);
}
public static void main(String[] args) {
SpringApplication.run(SmsdemoApplication.class, args);
}
@Override
public void run(ApplicationArguments arg0) throws Exception {
Message.creator(new PhoneNumber("to-number"), new PhoneNumber("from-number"),
"Message from Spring Boot Application").create();
}
}
The complete code to build configuration file is given below −
Maven pom.xml
<?xml version="1.0" encoding="UTF-8"?>
<project xmlns="http://maven.apache.org/POM/4.0.0" xmlns:xsi="http://www.w3.org/2001/XMLSchema-instance"
xsi:schemaLocation="http://maven.apache.org/POM/4.0.0 https://maven.apache.org/xsd/maven-4.0.0.xsd">
<modelVersion>4.0.0</modelVersion>
<parent>
<groupId>org.springframework.boot</groupId>
<artifactId>spring-boot-starter-parent</artifactId>
<version>3.5.6</version>
<relativePath/> <!-- lookup parent from repository -->
</parent>
<groupId>com.tutorialspoint</groupId>
<artifactId>smsdemo</artifactId>
<version>0.0.1-SNAPSHOT</version>
<name>smsdemo</name>
<description>Demo project for Spring Boot</description>
<url/>
<licenses>
<license/>
</licenses>
<developers>
<developer/>
</developers>
<scm>
<connection/>
<developerConnection/>
<tag/>
<url/>
</scm>
<properties>
<java.version>21</java.version>
</properties>
<dependencies>
<dependency>
<groupId>org.springframework.boot</groupId>
<artifactId>spring-boot-starter</artifactId>
</dependency>
<dependency>
<groupId>com.twilio.sdk</groupId>
<artifactId>twilio</artifactId>
<version>10.5.1</version>
</dependency>
<dependency>
<groupId>org.springframework.boot</groupId>
<artifactId>spring-boot-starter-test</artifactId>
<scope>test</scope>
</dependency>
</dependencies>
<build>
<plugins>
<plugin>
<groupId>org.springframework.boot</groupId>
<artifactId>spring-boot-maven-plugin</artifactId>
</plugin>
</plugins>
</build>
</project>
Gradle build.gradle
buildscript {
ext {
springBootVersion = '3.5.6'
}
repositories {
mavenCentral()
}
dependencies {
classpath("org.springframework.boot:spring-boot-gradle-plugin:${springBootVersion}")
}
}
apply plugin: 'java'
apply plugin: 'eclipse'
apply plugin: 'org.springframework.boot'
group = 'com.tutorialspoint'
version = '0.0.1-SNAPSHOT'
sourceCompatibility = 21
repositories {
mavenCentral()
}
dependencies {
compile('org.springframework.boot:spring-boot-starter')
testCompile('org.springframework.boot:spring-boot-starter-test')
compile group: "com.twilio.sdk", name:"twilio", version: "10.5.1"
}
Output
You can create an executable JAR file, and run the spring boot application by using the following Maven or Gradle commands −
For Maven, use the command as shown −
mvn clean install
After BUILD SUCCESS, you can find the JAR file under the target directory.
For Gradle, use the command as shown −
gradle clean build
After BUILD SUCCESSFUL, you can find the JAR file under the build/libs directory.
Run the JAR file by using the command as given below −
java jar <JARFILE>
Now, you will receive the SMS to your to-number.
Message received to to-number.
Sent from your Twilio trail account - Message from Spring Boot Application
Note − In this example, we used the Trail account. So, you should verify the numbers before sending the SMS.
Example - Making Voice Calls using Twillio
To make voice calls by using Twilio, we need to call the Call.creator() method. For this method, we need to provide a to-number, from-number, and voice-note as shown here.
Call.creator(new PhoneNumber("<to-number>"), new PhoneNumber("<from-number>"),
new URI("http://demo.twilio.com/docs/voice.xml")).create();
The code for main Spring Boot application class file is given below.
SmsdemoApplication.java
package com.tutorialspoint.smsdemo;
import java.net.URI;
import org.springframework.boot.ApplicationArguments;
import org.springframework.boot.ApplicationRunner;
import org.springframework.boot.SpringApplication;
import org.springframework.boot.autoconfigure.SpringBootApplication;
import com.twilio.Twilio;
import com.twilio.rest.api.v2010.account.Call;
import com.twilio.type.PhoneNumber;
@SpringBootApplication
public class SmsdemoApplication implements ApplicationRunner {
private final static String ACCOUNT_SID = "<ACCOUNT-SID>";
private final static String AUTH_ID = "AUTH-ID";
static {
Twilio.init(ACCOUNT_SID, AUTH_ID);
}
public static void main(String[] args) {
SpringApplication.run(SmsdemoApplication.class, args);
}
@Override
public void run(ApplicationArguments arg0) throws Exception {
Call.creator(new PhoneNumber("<to-number>"), new PhoneNumber("<from-number>"),
new URI("http://demo.twilio.com/docs/voice.xml")).create();
}
}
The code for complete build configuration file is given below −
Maven - pom.xml
<?xml version="1.0" encoding="UTF-8"?>
<project xmlns="http://maven.apache.org/POM/4.0.0" xmlns:xsi="http://www.w3.org/2001/XMLSchema-instance"
xsi:schemaLocation="http://maven.apache.org/POM/4.0.0 https://maven.apache.org/xsd/maven-4.0.0.xsd">
<modelVersion>4.0.0</modelVersion>
<parent>
<groupId>org.springframework.boot</groupId>
<artifactId>spring-boot-starter-parent</artifactId>
<version>3.5.6</version>
<relativePath/> <!-- lookup parent from repository -->
</parent>
<groupId>com.tutorialspoint</groupId>
<artifactId>smsdemo</artifactId>
<version>0.0.1-SNAPSHOT</version>
<name>smsdemo</name>
<description>Demo project for Spring Boot</description>
<url/>
<licenses>
<license/>
</licenses>
<developers>
<developer/>
</developers>
<scm>
<connection/>
<developerConnection/>
<tag/>
<url/>
</scm>
<properties>
<java.version>21</java.version>
</properties>
<dependencies>
<dependency>
<groupId>org.springframework.boot</groupId>
<artifactId>spring-boot-starter</artifactId>
</dependency>
<dependency>
<groupId>com.twilio.sdk</groupId>
<artifactId>twilio</artifactId>
<version>10.5.1</version>
</dependency>
<dependency>
<groupId>org.springframework.boot</groupId>
<artifactId>spring-boot-starter-test</artifactId>
<scope>test</scope>
</dependency>
</dependencies>
<build>
<plugins>
<plugin>
<groupId>org.springframework.boot</groupId>
<artifactId>spring-boot-maven-plugin</artifactId>
</plugin>
</plugins>
</build>
</project>
Gradle - build.gradle
buildscript {
ext {
springBootVersion = '3.5.6'
}
repositories {
mavenCentral()
}
dependencies {
classpath("org.springframework.boot:spring-boot-gradle-plugin:${springBootVersion}")
}
}
apply plugin: 'java'
apply plugin: 'eclipse'
apply plugin: 'org.springframework.boot'
group = 'com.tutorialspoint'
version = '0.0.1-SNAPSHOT'
sourceCompatibility = 21
repositories {
mavenCentral()
}
dependencies {
compile('org.springframework.boot:spring-boot-starter')
testCompile('org.springframework.boot:spring-boot-starter-test')
compile group: "com.twilio.sdk", name:"twilio", version: "10.5.1"
}
Output
You can create an executable JAR file, and run the Spring Boot application by using the following Maven or Gradle commands.
For Maven, use the command as shown −
mvn clean install
After BUILD SUCCESS, you can find the JAR file under the target directory.
For Gradle, use the command as shown −
gradle clean build
After BUILD SUCCESSFUL, you can find the JAR file under the build/libs directory.
Now, run the JAR file by using the command given here −
java jar <JARFILE>
Now, you will receive call to your to-number from Twilio.
Press any key after attending the call, you will hear the voice note from https://demo.twilio.com/docs/voice.xml
Note − In this example, we used the Trail account. So, you should verify the numbers before making calls.
Spring Boot - Unit Testing
Unit Testing is a one of the testing done by the developers to make sure individual unit or component functionalities are working fine.
In this tutorial, we are going to see how to write a unit test case by using Mockito and Web Controller.
Example - Using Mockito for unit Testing a Web Controller
For injecting Mockito Mocks into Spring Beans, we need to add the Mockito-core dependency in our build configuration file.
In this chapter, we are going to see how to use Mockito in Spring Boot application.
First, download the Spring Boot project from Spring Initializer page www.start.spring.io.
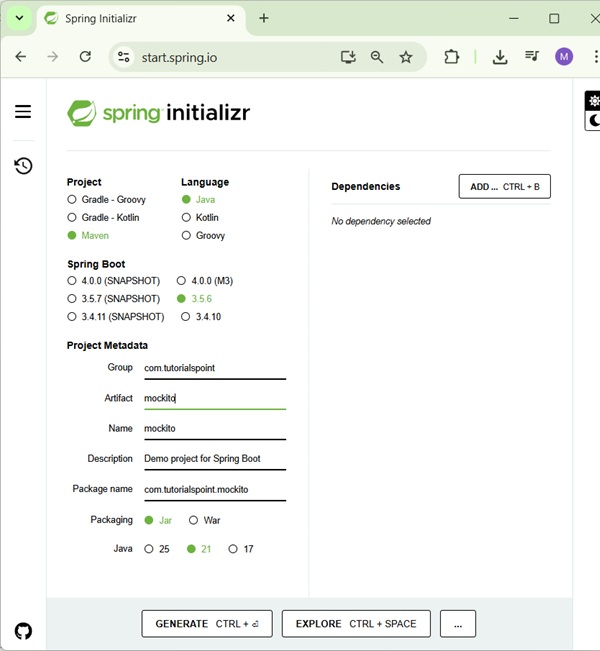
Maven users can add the following dependency in your pom.xml file.
<dependency> <groupId>org.mockito</groupId> <artifactId>mockito-core</artifactId> </dependency>
Gradle users can add the following dependency in the build.gradle file.
compile group: 'org.mockito', name: 'mockito-core', version: '5.13.0'
testCompile('org.springframework.boot:spring-boot-starter-test')
The code to write a Service class which contains a method that returns the String value is given here.
ProductService.java
package com.tutorialspoint.mockito;
import org.springframework.stereotype.Service;
@Service
public class ProductService {
public String getProductName() {
return "Honey";
}
}
Now, inject the ProductService class into another Service class file as shown.
OrderService.java
package com.tutorialspoint.mockito;
import org.springframework.beans.factory.annotation.Autowired;
import org.springframework.stereotype.Service;
@Service
public class OrderService {
@Autowired
ProductService productService;
public OrderService(ProductService productService) {
this.productService = productService;
}
public String getProductName() {
return productService.getProductName();
}
}
The main Spring Boot application class file is given below −
MockitoApplication.java
package com.tutorialspoint.mockitodemo;
import org.springframework.boot.SpringApplication;
import org.springframework.boot.autoconfigure.SpringBootApplication;
@SpringBootApplication
public class MockitoApplication {
public static void main(String[] args) {
SpringApplication.run(MockitoApplication.class, args);
}
}
Then, configure the Application context for the tests. The @Profile("test") annotation is used to configure the class when the Test cases are running.
ProductServiceTestConfiguration.java
package com.tutorialspoint.mockito;
import org.mockito.Mockito;
import org.springframework.context.annotation.Bean;
import org.springframework.context.annotation.Configuration;
import org.springframework.context.annotation.Primary;
import org.springframework.context.annotation.Profile;
@Profile("test")
@Configuration
public class ProductServiceTestConfiguration {
@Bean
@Primary
ProductService productService() {
return Mockito.mock(ProductService.class);
}
}
Now, you can write a Unit Test case for Order Service under the src/test/java package.
MockitoApplicationTests.java
package com.tutorialspoint.mockito;
import static org.junit.jupiter.api.Assertions.assertEquals;
import org.junit.jupiter.api.Test;
import org.junit.jupiter.api.extension.ExtendWith;
import org.mockito.Mockito;
import org.mockito.junit.jupiter.MockitoExtension;
import org.springframework.beans.factory.annotation.Autowired;
import org.springframework.boot.test.context.SpringBootTest;
import org.springframework.test.context.ActiveProfiles;
@SpringBootTest
@ActiveProfiles("test")
@ExtendWith(MockitoExtension.class)
public class MockitoApplicationTests {
@Autowired
private OrderService orderService;
@Autowired
private ProductService productService;
@Test
public void whenUserIdIsProvided_thenRetrievedNameIsCorrect() {
Mockito.when(productService.getProductName()).thenReturn("Mock Product Name");
String testName = orderService.getProductName();
assertEquals("Mock Product Name", testName);
}
}
The complete code for build configuration file is given below.
Maven pom.xml
<?xml version="1.0" encoding="UTF-8"?>
<project xmlns="http://maven.apache.org/POM/4.0.0" xmlns:xsi="http://www.w3.org/2001/XMLSchema-instance"
xsi:schemaLocation="http://maven.apache.org/POM/4.0.0 https://maven.apache.org/xsd/maven-4.0.0.xsd">
<modelVersion>4.0.0</modelVersion>
<parent>
<groupId>org.springframework.boot</groupId>
<artifactId>spring-boot-starter-parent</artifactId>
<version>3.5.6</version>
<relativePath/> <!-- lookup parent from repository -->
</parent>
<groupId>com.tutorialspoint</groupId>
<artifactId>mockito</artifactId>
<version>0.0.1-SNAPSHOT</version>
<name>mockito</name>
<description>Demo project for Spring Boot</description>
<url/>
<licenses>
<license/>
</licenses>
<developers>
<developer/>
</developers>
<scm>
<connection/>
<developerConnection/>
<tag/>
<url/>
</scm>
<properties>
<java.version>21</java.version>
</properties>
<dependencies>
<dependency>
<groupId>org.springframework.boot</groupId>
<artifactId>spring-boot-starter</artifactId>
</dependency>
<dependency>
<groupId>org.mockito</groupId>
<artifactId>mockito-core</artifactId>
</dependency>
<dependency>
<groupId>org.springframework.boot</groupId>
<artifactId>spring-boot-starter-test</artifactId>
<scope>test</scope>
</dependency>
</dependencies>
<build>
<plugins>
<plugin>
<groupId>org.springframework.boot</groupId>
<artifactId>spring-boot-maven-plugin</artifactId>
</plugin>
</plugins>
</build>
</project>
Gradle build.gradle
buildscript {
ext {
springBootVersion = '3.5.6'
}
repositories {
mavenCentral()
}
dependencies {
classpath("org.springframework.boot:spring-boot-gradle-plugin:${springBootVersion}")
}
}
apply plugin: 'java'
apply plugin: 'eclipse'
apply plugin: 'org.springframework.boot'
group = 'com.tutorialspoint'
version = '0.0.1-SNAPSHOT'
sourceCompatibility = 21
repositories {
mavenCentral()
}
dependencies {
compile('org.springframework.boot:spring-boot-starter')
compile group: 'org.mockito', name: 'mockito-core', version: '5.13.0'
testCompile('org.springframework.boot:spring-boot-starter-test')
}
Output
You can create an executable JAR file, and run the Spring Boot application by using the following Maven or Gradle commands.
For Maven, you can use the command as shown −
mvn clean install
You can see the test results in console window.
[INFO] Scanning for projects... [INFO] [INFO] [1m---------------------< [0;36mcom.tutorialspoint:mockito[0;1m >---------------------[m [INFO] [1mBuilding mockito 0.0.1-SNAPSHOT[m [INFO] from pom.xml [INFO] [1m--------------------------------[ jar ]---------------------------------[m [INFO] [INFO] [1m--- [0;32mresources:3.3.1:resources[m [1m(default-resources)[m @ [36mmockito[0;1m ---[m [INFO] Copying 1 resource from src\main\resources to target\classes [INFO] Copying 0 resource from src\main\resources to target\classes [INFO] [INFO] [1m--- [0;32mcompiler:3.14.0:compile[m [1m(default-compile)[m @ [36mmockito[0;1m ---[m [INFO] Recompiling the module because of [1madded or removed source files[m. [INFO] Compiling 4 source files with javac [debug parameters release 21] to target\classes [INFO] [INFO] [1m--- [0;32mresources:3.3.1:testResources[m [1m(default-testResources)[m @ [36mmockito[0;1m ---[m [INFO] skip non existing resourceDirectory D:\Projects\mockito\src\test\resources [INFO] [INFO] [1m--- [0;32mcompiler:3.14.0:testCompile[m [1m(default-testCompile)[m @ [36mmockito[0;1m ---[m [INFO] Recompiling the module because of [1mchanged dependency[m. [INFO] Compiling 1 source file with javac [debug parameters release 21] to target\test-classes [INFO] [INFO] [1m--- [0;32msurefire:3.5.4:test[m [1m(default-test)[m @ [36mmockito[0;1m ---[m [INFO] Using auto detected provider org.apache.maven.surefire.junitplatform.JUnitPlatformProvider [INFO] [INFO] ------------------------------------------------------- [INFO] T E S T S [INFO] ------------------------------------------------------- [INFO] Running com.tutorialspoint.mockito.[1mMockitoApplicationTests[m 11:56:42.986 [main] INFO org.springframework.test.context.support.AnnotationConfigContextLoaderUtils -- Could not detect default configuration classes for test class [com.tutorialspoint.mockito.MockitoApplicationTests]: MockitoApplicationTests does not declare any static, non-private, non-final, nested classes annotated with @Configuration. 11:56:43.115 [main] INFO org.springframework.boot.test.context.SpringBootTestContextBootstrapper -- Found @SpringBootConfiguration com.tutorialspoint.mockito.MockitoApplication for test class com.tutorialspoint.mockito.MockitoApplicationTests . ____ _ __ _ _ /\\ / ___'_ __ _ _(_)_ __ __ _ \ \ \ \ ( ( )\___ | '_ | '_| | '_ \/ _` | \ \ \ \ \\/ ___)| |_)| | | | | || (_| | ) ) ) ) ' |____| .__|_| |_|_| |_\__, | / / / / =========|_|==============|___/=/_/_/_/ :: Spring Boot :: (v3.5.6) 2025-09-30T11:56:43.588+05:30 INFO 43764 --- [mockito] [ main] c.t.mockito.MockitoApplicationTests : Starting MockitoApplicationTests using Java 21.0.6 with PID 43764 (started by mahes in D:\Projects\mockito) 2025-09-30T11:56:43.589+05:30 INFO 43764 --- [mockito] [ main] c.t.mockito.MockitoApplicationTests : The following 1 profile is active: "test" Mockito is currently self-attaching to enable the inline-mock-maker. This will no longer work in future releases of the JDK. Please add Mockito as an agent to your build as described in Mockito's documentation: https://javadoc.io/doc/org.mockito/mockito-core/latest/org.mockito/org/mockito/Mockito.html#0.3 OpenJDK 64-Bit Server VM warning: Sharing is only supported for boot loader classes because bootstrap classpath has been appended WARNING: A Java agent has been loaded dynamically (C:\Users\mahes\.m2\repository\net\bytebuddy\byte-buddy-agent\1.17.7\byte-buddy-agent-1.17.7.jar) WARNING: If a serviceability tool is in use, please run with -XX:+EnableDynamicAgentLoading to hide this warning WARNING: If a serviceability tool is not in use, please run with -Djdk.instrument.traceUsage for more information WARNING: Dynamic loading of agents will be disallowed by default in a future release 2025-09-30T11:56:45.108+05:30 INFO 43764 --- [mockito] [ main] c.t.mockito.MockitoApplicationTests : Started MockitoApplicationTests in 1.831 seconds (process running for 2.769) [INFO] [1;32mTests run: [0;1;32m1[m, Failures: 0, Errors: 0, Skipped: 0, Time elapsed: 2.435 s -- in com.tutorialspoint.mockito.[1mMockitoApplicationTests[m [INFO] [INFO] Results: [INFO] [INFO] [1;32mTests run: 1, Failures: 0, Errors: 0, Skipped: 0[m [INFO] [INFO] [INFO] [1m--- [0;32mjar:3.4.2:jar[m [1m(default-jar)[m @ [36mmockito[0;1m ---[m [INFO] Building jar: D:\Projects\mockito\target\mockito-0.0.1-SNAPSHOT.jar [INFO] [INFO] [1m--- [0;32mspring-boot:3.5.6:repackage[m [1m(repackage)[m @ [36mmockito[0;1m ---[m [INFO] Replacing main artifact D:\Projects\mockito\target\mockito-0.0.1-SNAPSHOT.jar with repackaged archive, adding nested dependencies in BOOT-INF/. [INFO] The original artifact has been renamed to D:\Projects\mockito\target\mockito-0.0.1-SNAPSHOT.jar.original [INFO] [INFO] [1m--- [0;32minstall:3.1.4:install[m [1m(default-install)[m @ [36mmockito[0;1m ---[m [INFO] Installing D:\Projects\mockito\pom.xml to C:\Users\mahes\.m2\repository\com\tutorialspoint\mockito\0.0.1-SNAPSHOT\mockito-0.0.1-SNAPSHOT.pom [INFO] Installing D:\Projects\mockito\target\mockito-0.0.1-SNAPSHOT.jar to C:\Users\mahes\.m2\repository\com\tutorialspoint\mockito\0.0.1-SNAPSHOT\mockito-0.0.1-SNAPSHOT.jar [INFO] [1m------------------------------------------------------------------------[m [INFO] [1;32mBUILD SUCCESS[m [INFO] [1m------------------------------------------------------------------------[m [INFO] Total time: 8.257 s [INFO] Finished at: 2025-09-30T11:56:47+05:30 [INFO] [1m------------------------------------------------------------------------[m
Spring Boot - Rest Controller Unit Testing
Spring Boot provides an easy way to write a Unit Test for Rest Controller file. With the help of SpringJUnit4ClassRunner and MockMvc, we can create a web application context to write Unit Test for Rest Controller file.
Unit Tests should be written under the src/test/java directory and classpath resources for writing a test should be placed under the src/test/resources directory.
Example - Unit Testing a Rest Controller
For Writing a Unit Test, we need to add the Spring Boot Starter Test dependency in your build configuration file as shown below.
<dependency> <groupId>org.springframework.boot</groupId> <artifactId>spring-boot-starter-test</artifactId> </dependency>
Gradle users can add the following dependency in your build.gradle file.
testCompile('org.springframework.boot:spring-boot-starter-test')
Before writing a Test case, we should first build RESTful web services. For further information on building RESTful web services, please refer to the Building RESTful Web Services chapter.
Writing a Unit Test for REST Controller
In this section, let us see how to write a Unit Test for the REST Controller.
First, we need to create Abstract class file used to create web application context by using MockMvc and define the mapToJson() and mapFromJson() methods to convert the Java object into JSON string and convert the JSON string into Java object.
AbstractTest.java
package com.tutorialspoint.demo;
import java.io.IOException;
import org.springframework.beans.factory.annotation.Autowired;
import org.springframework.boot.test.context.SpringBootTest;
import org.springframework.test.context.web.WebAppConfiguration;
import org.springframework.test.web.servlet.MockMvc;
import org.springframework.test.web.servlet.setup.MockMvcBuilders;
import org.springframework.web.context.WebApplicationContext;
import com.fasterxml.jackson.core.JsonParseException;
import com.fasterxml.jackson.core.JsonProcessingException;
import com.fasterxml.jackson.databind.JsonMappingException;
import com.fasterxml.jackson.databind.ObjectMapper;
@SpringBootTest(classes = DemoApplication.class)
@WebAppConfiguration
public abstract class AbstractTest {
protected MockMvc mvc;
@Autowired
WebApplicationContext webApplicationContext;
protected void setUp() {
mvc = MockMvcBuilders.webAppContextSetup(webApplicationContext).build();
}
protected String mapToJson(Object obj) throws JsonProcessingException {
ObjectMapper objectMapper = new ObjectMapper();
return objectMapper.writeValueAsString(obj);
}
protected <T> T mapFromJson(String json, Class<T> clazz)
throws JsonParseException, JsonMappingException, IOException {
ObjectMapper objectMapper = new ObjectMapper();
return objectMapper.readValue(json, clazz);
}
}
Next, write a class file that extends the AbstractTest class and write a Unit Test for each method such GET, POST, PUT and DELETE.
The code for GET API Test case is given below. This API is to view the list of products.
@Test
public void getProductsList() throws Exception {
String uri = "/products";
MvcResult mvcResult = mvc.perform(MockMvcRequestBuilders.get(uri)
.accept(MediaType.APPLICATION_JSON_VALUE)).andReturn();
int status = mvcResult.getResponse().getStatus();
assertEquals(200, status);
String content = mvcResult.getResponse().getContentAsString();
Product[] productlist = super.mapFromJson(content, Product[].class);
assertTrue(productlist.length > 0);
}
The code for POST API test case is given below. This API is to create a product.
@Test
public void createProduct() throws Exception {
String uri = "/products";
Product product = new Product();
product.setId("3");
product.setName("Ginger");
String inputJson = super.mapToJson(product);
MvcResult mvcResult = mvc.perform(MockMvcRequestBuilders.post(uri)
.contentType(MediaType.APPLICATION_JSON_VALUE).content(inputJson)).andReturn();
int status = mvcResult.getResponse().getStatus();
assertEquals(201, status);
String content = mvcResult.getResponse().getContentAsString();
assertEquals(content, "Product is created successfully");
}
The code for PUT API Test case is given below. This API is to update the existing product.
@Test
public void updateProduct() throws Exception {
String uri = "/products/2";
Product product = new Product();
product.setName("Lemon");
String inputJson = super.mapToJson(product);
MvcResult mvcResult = mvc.perform(MockMvcRequestBuilders.put(uri)
.contentType(MediaType.APPLICATION_JSON_VALUE).content(inputJson)).andReturn();
int status = mvcResult.getResponse().getStatus();
assertEquals(200, status);
String content = mvcResult.getResponse().getContentAsString();
assertEquals(content, "Product is updated successsfully");
}
The code for Delete API Test case is given below. This API will delete the existing product.
@Test
public void deleteProduct() throws Exception {
String uri = "/products/2";
MvcResult mvcResult = mvc.perform(MockMvcRequestBuilders.delete(uri)).andReturn();
int status = mvcResult.getResponse().getStatus();
assertEquals(200, status);
String content = mvcResult.getResponse().getContentAsString();
assertEquals(content, "Product is deleted successsfully");
}
The full Controller Test class file is given below −
ProductServiceControllerTest.java
package com.tutorialspoint.demo;
import static org.junit.jupiter.api.Assertions.assertEquals;
import static org.junit.jupiter.api.Assertions.assertTrue;
import org.junit.jupiter.api.BeforeEach;
import org.junit.jupiter.api.Test;
import org.springframework.http.MediaType;
import org.springframework.test.web.servlet.MvcResult;
import org.springframework.test.web.servlet.request.MockMvcRequestBuilders;
import com.tutorialspoint.demo.model.Product;
public class ProductServiceControllerTest extends AbstractTest {
@Override
@BeforeEach
public void setUp() {
super.setUp();
}
@Test
public void getProductsList() throws Exception {
String uri = "/products";
MvcResult mvcResult = mvc.perform(MockMvcRequestBuilders.get(uri)
.accept(MediaType.APPLICATION_JSON_VALUE)).andReturn();
int status = mvcResult.getResponse().getStatus();
assertEquals(200, status);
String content = mvcResult.getResponse().getContentAsString();
Product[] productlist = super.mapFromJson(content, Product[].class);
assertTrue(productlist.length > 0);
}
@Test
public void createProduct() throws Exception {
String uri = "/products";
Product product = new Product();
product.setId("3");
product.setName("Ginger");
String inputJson = super.mapToJson(product);
MvcResult mvcResult = mvc.perform(MockMvcRequestBuilders.post(uri)
.contentType(MediaType.APPLICATION_JSON_VALUE)
.content(inputJson)).andReturn();
int status = mvcResult.getResponse().getStatus();
assertEquals(201, status);
String content = mvcResult.getResponse().getContentAsString();
assertEquals(content, "Product is created successfully");
}
@Test
public void updateProduct() throws Exception {
String uri = "/products/2";
Product product = new Product();
product.setName("Lemon");
String inputJson = super.mapToJson(product);
MvcResult mvcResult = mvc.perform(MockMvcRequestBuilders.put(uri)
.contentType(MediaType.APPLICATION_JSON_VALUE)
.content(inputJson)).andReturn();
int status = mvcResult.getResponse().getStatus();
assertEquals(200, status);
String content = mvcResult.getResponse().getContentAsString();
assertEquals(content, "Product is updated successsfully");
}
@Test
public void deleteProduct() throws Exception {
String uri = "/products/2";
MvcResult mvcResult = mvc.perform(MockMvcRequestBuilders.delete(uri)).andReturn();
int status = mvcResult.getResponse().getStatus();
assertEquals(200, status);
String content = mvcResult.getResponse().getContentAsString();
assertEquals(content, "Product is deleted successsfully");
}
}
The code for complete build configuration file Maven build pom.xml is given below −
pom.xml
<?xml version="1.0" encoding="UTF-8"?>
<project xmlns="http://maven.apache.org/POM/4.0.0" xmlns:xsi="http://www.w3.org/2001/XMLSchema-instance"
xsi:schemaLocation="http://maven.apache.org/POM/4.0.0 https://maven.apache.org/xsd/maven-4.0.0.xsd">
<modelVersion>4.0.0</modelVersion>
<parent>
<groupId>org.springframework.boot</groupId>
<artifactId>spring-boot-starter-parent</artifactId>
<version>3.5.6</version>
<relativePath/> <!-- lookup parent from repository -->
</parent>
<groupId>com.tutorialspoint</groupId>
<artifactId>demo</artifactId>
<version>0.0.1-SNAPSHOT</version>
<packaging>jar</packaging>
<name>demo</name>
<description>Demo project for Spring Boot</description>
<url/>
<licenses>
<license/>
</licenses>
<developers>
<developer/>
</developers>
<scm>
<connection/>
<developerConnection/>
<tag/>
<url/>
</scm>
<properties>
<java.version>21</java.version>
</properties>
<dependencies>
<dependency>
<groupId>org.springframework.boot</groupId>
<artifactId>spring-boot-starter-web</artifactId>
</dependency>
<dependency>
<groupId>org.springframework.boot</groupId>
<artifactId>spring-boot-starter-test</artifactId>
</dependency>
</dependencies>
<build>
<plugins>
<plugin>
<groupId>org.springframework.boot</groupId>
<artifactId>spring-boot-maven-plugin</artifactId>
</plugin>
</plugins>
</build>
</project>
Compilation and Execution
You can create an executable JAR file, and run the Spring Boot application by using the Maven or Gradle commands given below −
For Maven, you can use the command given below −
mvn clean install
Now, you can see the test results in console window.
[INFO] Scanning for projects... [INFO] [INFO] [1m----------------------< [0;36mcom.tutorialspoint:demo[0;1m >-----------------------[m [INFO] [1mBuilding demo 0.0.1-SNAPSHOT[m [INFO] from pom.xml [INFO] [1m--------------------------------[ war ]---------------------------------[m [INFO] [INFO] [1m--- [0;32mresources:3.3.1:resources[m [1m(default-resources)[m @ [36mdemo[0;1m ---[m [INFO] Copying 1 resource from src\main\resources to target\classes [INFO] Copying 8 resources from src\main\resources to target\classes [INFO] [INFO] [1m--- [0;32mcompiler:3.14.0:compile[m [1m(default-compile)[m @ [36mdemo[0;1m ---[m [INFO] Nothing to compile - all classes are up to date. [INFO] [INFO] [1m--- [0;32mresources:3.3.1:testResources[m [1m(default-testResources)[m @ [36mdemo[0;1m ---[m [INFO] skip non existing resourceDirectory D:\Projects\demo\src\test\resources [INFO] [INFO] [1m--- [0;32mcompiler:3.14.0:testCompile[m [1m(default-testCompile)[m @ [36mdemo[0;1m ---[m [INFO] Nothing to compile - all classes are up to date. [INFO] [INFO] [1m--- [0;32msurefire:3.5.4:test[m [1m(default-test)[m @ [36mdemo[0;1m ---[m [INFO] Using auto detected provider org.apache.maven.surefire.junitplatform.JUnitPlatformProvider [INFO] [INFO] ------------------------------------------------------- [INFO] T E S T S [INFO] ------------------------------------------------------- [INFO] Running com.tutorialspoint.demo.[1mDemoApplicationTests[m [2025-09-30T12:09:38Z] [org.springframework.test.context.support.AnnotationConfigContextLoaderUtils] [main] [83] [INFO ] Could not detect default configuration classes for test class [com.tutorialspoint.demo.DemoApplicationTests]: DemoApplicationTests does not declare any static, non-private, non-final, nested classes annotated with @Configuration. [2025-09-30T12:09:38Z] [org.springframework.boot.test.context.SpringBootTestContextBootstrapper] [main] [234] [INFO ] Found @SpringBootConfiguration com.tutorialspoint.demo.DemoApplication for test class com.tutorialspoint.demo.DemoApplicationTests . ____ _ __ _ _ /\\ / ___'_ __ _ _(_)_ __ __ _ \ \ \ \ ( ( )\___ | '_ | '_| | '_ \/ _` | \ \ \ \ \\/ ___)| |_)| | | | | || (_| | ) ) ) ) ' |____| .__|_| |_|_| |_\__, | / / / / =========|_|==============|___/=/_/_/_/ :: Spring Boot :: (v3.5.6) [2025-09-30T12:09:38Z] [org.springframework.boot.StartupInfoLogger] [main] [53] [INFO ] Starting DemoApplicationTests using Java 21.0.6 with PID 38544 (started by mahes in D:\Projects\demo) [2025-09-30T12:09:38Z] [org.springframework.boot.SpringApplication] [main] [652] [INFO ] No active profile set, falling back to 1 default profile: "default" [2025-09-30T12:09:40Z] [org.springframework.boot.autoconfigure.web.servlet.WelcomePageHandlerMapping] [main] [59] [INFO ] Adding welcome page template: index [2025-09-30T12:09:41Z] [org.springframework.boot.actuate.endpoint.web.EndpointLinksResolver] [main] [60] [INFO ] Exposing 1 endpoint beneath base path '/actuator' [2025-09-30T12:09:41Z] [org.springframework.boot.StartupInfoLogger] [main] [59] [INFO ] Started DemoApplicationTests in 2.571 seconds (process running for 3.792) Mockito is currently self-attaching to enable the inline-mock-maker. This will no longer work in future releases of the JDK. Please add Mockito as an agent to your build as described in Mockito's documentation: https://javadoc.io/doc/org.mockito/mockito-core/latest/org.mockito/org/mockito/Mockito.html#0.3 WARNING: A Java agent has been loaded dynamically (C:\Users\mahes\.m2\repository\net\bytebuddy\byte-buddy-agent\1.17.7\byte-buddy-agent-1.17.7.jar) WARNING: If a serviceability tool is in use, please run with -XX:+EnableDynamicAgentLoading to hide this warning WARNING: If a serviceability tool is not in use, please run with -Djdk.instrument.traceUsage for more information WARNING: Dynamic loading of agents will be disallowed by default in a future release OpenJDK 64-Bit Server VM warning: Sharing is only supported for boot loader classes because bootstrap classpath has been appended [INFO] [1;32mTests run: [0;1;32m1[m, Failures: 0, Errors: 0, Skipped: 0, Time elapsed: 4.134 s -- in com.tutorialspoint.demo.[1mDemoApplicationTests[m [INFO] Running com.tutorialspoint.demo.[1mProductServiceControllerTest[m . ____ _ __ _ _ /\\ / ___'_ __ _ _(_)_ __ __ _ \ \ \ \ ( ( )\___ | '_ | '_| | '_ \/ _` | \ \ \ \ \\/ ___)| |_)| | | | | || (_| | ) ) ) ) ' |____| .__|_| |_|_| |_\__, | / / / / =========|_|==============|___/=/_/_/_/ :: Spring Boot :: (v3.5.6) [2025-09-30T12:09:42Z] [org.springframework.boot.StartupInfoLogger] [main] [53] [INFO ] Starting ProductServiceControllerTest using Java 21.0.6 with PID 38544 (started by mahes in D:\Projects\demo) [2025-09-30T12:09:42Z] [org.springframework.boot.SpringApplication] [main] [652] [INFO ] No active profile set, falling back to 1 default profile: "default" [2025-09-30T12:09:42Z] [org.springframework.boot.autoconfigure.web.servlet.WelcomePageHandlerMapping] [main] [59] [INFO ] Adding welcome page template: index [2025-09-30T12:09:42Z] [org.springframework.boot.actuate.endpoint.web.EndpointLinksResolver] [main] [60] [INFO ] Exposing 1 endpoint beneath base path '/actuator' [2025-09-30T12:09:42Z] [org.springframework.boot.StartupInfoLogger] [main] [59] [INFO ] Started ProductServiceControllerTest in 0.472 seconds (process running for 5.203) [2025-09-30T12:09:42Z] [org.springframework.mock.web.MockServletContext] [main] [440] [INFO ] Initializing Spring TestDispatcherServlet '' [2025-09-30T12:09:42Z] [org.springframework.web.servlet.FrameworkServlet] [main] [532] [INFO ] Initializing Servlet '' [2025-09-30T12:09:42Z] [org.springframework.web.servlet.FrameworkServlet] [main] [554] [INFO ] Completed initialization in 1 ms Pre Handle method is Calling Post Handle method is Calling Request and Response is completed [2025-09-30T12:09:42Z] [org.springframework.mock.web.MockServletContext] [main] [440] [INFO ] Initializing Spring TestDispatcherServlet '' [2025-09-30T12:09:42Z] [org.springframework.web.servlet.FrameworkServlet] [main] [532] [INFO ] Initializing Servlet '' [2025-09-30T12:09:42Z] [org.springframework.web.servlet.FrameworkServlet] [main] [554] [INFO ] Completed initialization in 1 ms Pre Handle method is Calling Post Handle method is Calling Request and Response is completed [2025-09-30T12:09:42Z] [org.springframework.mock.web.MockServletContext] [main] [440] [INFO ] Initializing Spring TestDispatcherServlet '' [2025-09-30T12:09:42Z] [org.springframework.web.servlet.FrameworkServlet] [main] [532] [INFO ] Initializing Servlet '' [2025-09-30T12:09:42Z] [org.springframework.web.servlet.FrameworkServlet] [main] [554] [INFO ] Completed initialization in 1 ms Pre Handle method is Calling Post Handle method is Calling Request and Response is completed [2025-09-30T12:09:42Z] [org.springframework.mock.web.MockServletContext] [main] [440] [INFO ] Initializing Spring TestDispatcherServlet '' [2025-09-30T12:09:42Z] [org.springframework.web.servlet.FrameworkServlet] [main] [532] [INFO ] Initializing Servlet '' [2025-09-30T12:09:42Z] [org.springframework.web.servlet.FrameworkServlet] [main] [554] [INFO ] Completed initialization in 1 ms Pre Handle method is Calling Post Handle method is Calling Request and Response is completed [INFO] [1;32mTests run: [0;1;32m4[m, Failures: 0, Errors: 0, Skipped: 0, Time elapsed: 0.773 s -- in com.tutorialspoint.demo.[1mProductServiceControllerTest[m [INFO] [INFO] Results: [INFO] [INFO] [1;32mTests run: 5, Failures: 0, Errors: 0, Skipped: 0[m [INFO] [INFO] [INFO] [1m--- [0;32mwar:3.4.0:war[m [1m(default-war)[m @ [36mdemo[0;1m ---[m [INFO] Packaging webapp [INFO] Assembling webapp [demo] in [D:\Projects\demo\target\demo-0.0.1-SNAPSHOT] [INFO] Processing war project [INFO] Copying webapp resources [D:\Projects\demo\src\main\webapp] [INFO] Building war: D:\Projects\demo\target\demo-0.0.1-SNAPSHOT.war [INFO] [INFO] [1m--- [0;32mspring-boot:3.5.6:repackage[m [1m(repackage)[m @ [36mdemo[0;1m ---[m [INFO] Replacing main artifact D:\Projects\demo\target\demo-0.0.1-SNAPSHOT.war with repackaged archive, adding nested dependencies in BOOT-INF/. [INFO] The original artifact has been renamed to D:\Projects\demo\target\demo-0.0.1-SNAPSHOT.war.original [INFO] [INFO] [1m--- [0;32minstall:3.1.4:install[m [1m(default-install)[m @ [36mdemo[0;1m ---[m [INFO] Installing D:\Projects\demo\pom.xml to C:\Users\mahes\.m2\repository\com\tutorialspoint\demo\0.0.1-SNAPSHOT\demo-0.0.1-SNAPSHOT.pom [INFO] Installing D:\Projects\demo\target\demo-0.0.1-SNAPSHOT.war to C:\Users\mahes\.m2\repository\com\tutorialspoint\demo\0.0.1-SNAPSHOT\demo-0.0.1-SNAPSHOT.war [INFO] [1m------------------------------------------------------------------------[m [INFO] [1;32mBUILD SUCCESS[m [INFO] [1m------------------------------------------------------------------------[m [INFO] Total time: 10.730 s [INFO] Finished at: 2025-09-30T12:09:46+05:30 [INFO] [1m------------------------------------------------------------------------[m
Spring Boot - Database Handling
Spring Boot provides excellent support to create a DataSource for Database. We need not write any extra code to create a DataSource in Spring Boot. Just adding the dependencies and doing the configuration details is enough to create a DataSource and connect the Database.
In this chapter, we are going to use Spring Boot JDBC driver connection to connect the database.
First, we need to add the Spring Boot Starter JDBC dependency in our build configuration file.
Maven users can add the following dependencies in the pom.xml file.
<dependency> <groupId>org.springframework.boot</groupId> <artifactId>spring-boot-starter-jdbc</artifactId> </dependency>
Gradle users can add the following dependencies in the build.gradle file.
compile('org.springframework.boot:spring-boot-starter-jdbc')
Connect to H2 database
To connect the H2 database, we need to add the H2 database dependency in our build configuration file.
For Maven users, add the below dependency in your pom.xml file.
<dependency> <groupId>com.h2database</groupId> <artifactId>h2</artifactId> <scope>runtime</scope> </dependency>
For Gradle users, add the below dependency in your build.gradle file.
compile('com.h2database:h2')
We need to create the schema.sql file and data.sql file under the classpath src/main/resources directory to connect the H2 database.
The schema.sql file is given below.
CREATE TABLE PRODUCT (ID INT PRIMARY KEY, PRODUCT_NAME VARCHAR(25));
The data.sql file is given below.
INSERT INTO PRODUCT (ID,PRODUCT_NAME) VALUES (1,'Honey'); INSERT INTO PRODUCT (ID,PRODUCT_NAME) VALUES (2,'Almond');
Connect MySQL
To connect the MySQL database, we need to add the MySQL dependency into our build configuration file.
For Maven users, add the following dependency in your pom.xml file.
<dependency> <groupId>mysql</groupId> <artifactId>mysql-connector-j</artifactId> <scope>runtime</scope> </dependency>
For Gradle users, add the following dependency in your build.gradle file.
compile('mysql:mysql-connector-j')
Now, create database and tables in MySQL as shown −
For properties file users, add the following properties in the application.properties file.
spring.datasource.url = jdbc:mysql://localhost:3306/PRODUCTSERVICE spring.datasource.username = root spring.datasource.password = root
For YAML users, add the following properties in the application.yml file.
spring:
datasource:
url: "jdbc:mysql://localhost:3306/PRODUCTSERVICE"
username: "root"
password: "root"
Connect Redis
Redis is an open source database used to store the in-memory data structure. To connect the Redis database in Spring Boot application, we need to add the Redis dependency in our build configuration file.
Maven users should add the following dependency in your pom.xml file.
<dependency> <groupId>org.springframework.boot</groupId> <artifactId>spring-boot-starter-redis</artifactId> </dependency>
Gradle users should add the following dependency in your build.gradle file.
compile('org.springframework.boot:spring-boot-starter-data-redis')
For Redis connection, we need to use RedisTemplate. For RedisTemplate we need to provide the JedisConnectionFactory details.
@Bean
JedisConnectionFactory jedisConnectionFactory() {
JedisConnectionFactory jedisConFactory = new JedisConnectionFactory();
jedisConFactory.setHostName("localhost");
jedisConFactory.setPort(6000);
jedisConFactory.setUsePool(true);
return jedisConFactory;
}
@Bean
public RedisTemplate<String, Object> redisTemplate() {
RedisTemplate<String, Object> template = new RedisTemplate<>();
template.setConnectionFactory(jedisConnectionFactory());
template.setKeySerializer(new StringRedisSerializer());
template.setHashKeySerializer(new StringRedisSerializer());
template.setHashValueSerializer(new StringRedisSerializer());
template.setValueSerializer(new StringRedisSerializer());
return template;
}
Now auto wire the RedisTemplate class and access the data from Redis database.
@Autowired RedisTemplate<String, Object> redis; Map<Object,Object> datalist = redis.opsForHash().entries(Redis_code_index_key);
JDBCTemplate
To access the Relational Database by using JdbcTemplate in Spring Boot application, we need to add the Spring Boot Starter JDBC dependency in our build configuration file.
Then, if you @Autowired the JdbcTemplate class, Spring Boot automatically connects the Database and sets the Datasource for the JdbcTemplate object.
@Autowired
JdbcTemplate jdbcTemplate;
Collection<Map<String, Object>> rows = jdbc.queryForList("SELECT QUERY");
The @Repository annotation should be added into the class file. The @Repository annotation is used to create database repository for your Spring Boot application.
@Repository
public class ProductServiceDAO {
}
Multiple DataSource
We can keep n number Datasources in a single Spring Boot application. The example given here shows how to create more than 1 data source in Spring Boot application. Now, add the two data source configuration details in the application properties file.
For properties file users, add the following properties into your application.properties file.
spring.dbProductService.url = jdbc:mysql://localhost:3306/PRODUCTSERVICE spring.dbProductService.username = root spring.dbProductService.password = root spring.dbUserService.url = jdbc:mysql://localhost:3306/USERSERVICE spring.dbUserService.username = root spring.dbUserService.password = root
Yaml users should add the following properties in your application.yml file.
spring:
dbProductService:
url: "jdbc:mysql://localhost:3306/PRODUCTSERVICE?autoreconnect=true"
password: "root"
username: "root"
dbUserService:
url: "jdbc:mysql://localhost:3306/USERSERVICE?autoreconnect=true"
password: "root"
username: "root"
Now, create a Configuration class to create a DataSource and JdbcTemplate for multiple data sources.
import javax.sql.DataSource;
import org.springframework.beans.factory.annotation.Autowired;
import org.springframework.beans.factory.annotation.Qualifier;
import org.springframework.boot.autoconfigure.jdbc.DataSourceBuilder;
import org.springframework.boot.context.properties.ConfigurationProperties;
import org.springframework.context.annotation.Bean;
import org.springframework.context.annotation.Configuration;
import org.springframework.context.annotation.Primary;
import org.springframework.jdbc.core.JdbcTemplate;
@Configuration
public class DatabaseConfig {
@Bean(name = "dbProductService")
@ConfigurationProperties(prefix = "spring.dbProductService")
@Primary
public DataSource createProductServiceDataSource() {
return DataSourceBuilder.create().build();
}
@Bean(name = "dbUserService")
@ConfigurationProperties(prefix = "spring.dbUserService")
public DataSource createUserServiceDataSource() {
return DataSourceBuilder.create().build();
}
@Bean(name = "jdbcProductService")
@Autowired
public JdbcTemplate createJdbcTemplate_ProductService(@Qualifier("dbProductService") DataSource productServiceDS) {
return new JdbcTemplate(productServiceDS);
}
@Bean(name = "jdbcUserService")
@Autowired
public JdbcTemplate createJdbcTemplate_UserService(@Qualifier("dbUserService") DataSource userServiceDS) {
return new JdbcTemplate(userServiceDS);
}
}
Then, auto wire the JDBCTemplate object by using @Qualifier annotation.
@Qualifier("jdbcProductService")
@Autowired
JdbcTemplate jdbcTemplate;
@Qualifier("jdbcUserService")
@Autowired
JdbcTemplate jdbcTemplate;
Spring Boot - Securing Web Applications
If a Spring Boot Security dependency is added on the classpath, Spring Boot application automatically requires the Basic Authentication for all HTTP Endpoints. The Endpoint / and /home does not require any authentication. All other Endpoints require authentication.
For adding a Spring Boot Security to your Spring Boot application, we need to add the Spring Boot Starter Security dependency in our build configuration file.
Maven users can add the following dependency in the pom.xml file.
<dependency> <groupId>org.springframework.boot</groupId> <artifactId>spring-boot-starter-security</artifactId> </dependency>
Gradle users can add the following dependency in the build.gradle file.
compile("org.springframework.boot:spring-boot-starter-security")
Example - Securing a Web application
First, create an unsecure web application by using Thymeleaf templates.
Download the Spring Boot project from Spring Initializer page www.start.spring.io and choose the following dependencies −
Spring Web
Spring Security
Thymeleaf
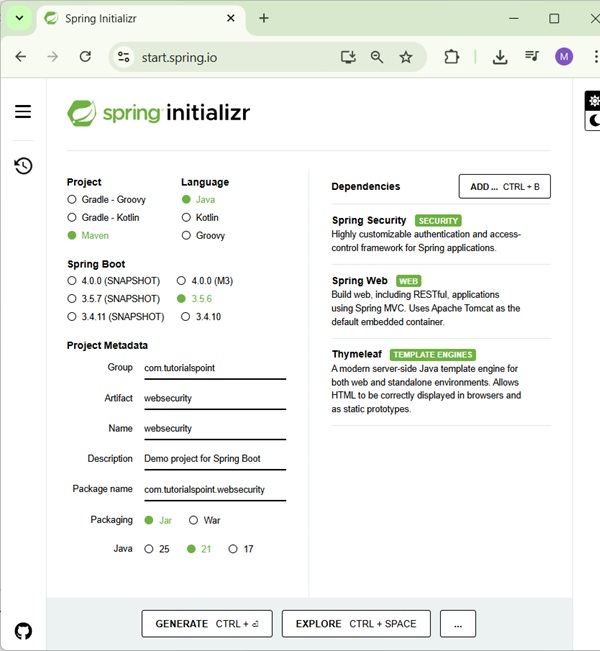
Then, create a home.html file under src/main/resources/templates directory.
home.html
<!DOCTYPE html>
<html xmlns = "http://www.w3.org/1999/xhtml"
xmlns:th = "http://www.thymeleaf.org"
xmlns:sec = "http://www.thymeleaf.org/thymeleaf-extras-springsecurity6">
<head>
<title>Spring Security Example</title>
</head>
<body>
<h1>Welcome!</h1>
<p>Click <a th:href = "@{/hello}">here</a> to see a greeting.</p>
</body>
</html>
The simple view /hello defined in the HTML file by using Thymeleaf templates.
Now, create a hello.html under src/main/resources/templates directory.
hello.html
<!DOCTYPE html>
<html xmlns = "http://www.w3.org/1999/xhtml"
xmlns:th = "http://www.thymeleaf.org"
xmlns:sec = "http://www.thymeleaf.org/thymeleaf-extras-springsecurity6">
<head>
<title>Hello World!</title>
</head>
<body>
<h1>Hello world!</h1>
</body>
</html>
Now, we need to setup the Spring MVC View controller for home and hello views.
For this, create a ViewsController class.
ViewsController.java
package com.tutorialspoint.websecurity;
import org.springframework.stereotype.Controller;
import org.springframework.web.bind.annotation.GetMapping;
@Controller
public class ViewsController {
@GetMapping("/hello")
public String hello() {
return "hello";
}
@GetMapping("/home")
public String home() {
return "home";
}
@GetMapping("/")
public String index() {
return "hello";
}
@GetMapping("/login")
public String login() {
return "login";
}
}
Now, create a Web Security Configuration file, that is used to secure your application to access the HTTP Endpoints by using basic authentication.
WebSecurityConfig.java
package com.tutorialspoint.websecurity;
import org.springframework.context.annotation.Bean;
import org.springframework.context.annotation.Configuration;
import org.springframework.security.config.annotation.web.builders.HttpSecurity;
import org.springframework.security.config.annotation.web.configuration.EnableWebSecurity;
import org.springframework.security.config.annotation.web.configurers.AbstractHttpConfigurer;
import org.springframework.security.core.userdetails.User;
import org.springframework.security.core.userdetails.UserDetails;
import org.springframework.security.core.userdetails.UserDetailsService;
import org.springframework.security.crypto.bcrypt.BCryptPasswordEncoder;
import org.springframework.security.crypto.password.PasswordEncoder;
import org.springframework.security.provisioning.InMemoryUserDetailsManager;
import org.springframework.security.web.SecurityFilterChain;
@Configuration
@EnableWebSecurity
public class WebSecurityConfig {
@Bean
protected UserDetailsService userDetailsService() {
UserDetails user = User.builder()
.username("user")
.password(passwordEncoder().encode("password"))
.roles("USER")
.build();
return new InMemoryUserDetailsManager(user);
}
@Bean
protected PasswordEncoder passwordEncoder() {
return new BCryptPasswordEncoder();
}
@Bean
protected SecurityFilterChain filterChain(HttpSecurity http) throws Exception {
return http
.csrf(AbstractHttpConfigurer::disable)
.authorizeHttpRequests(
request -> request
.requestMatchers("/").permitAll()
.requestMatchers("/home").permitAll()
.anyRequest().authenticated()
)
.formLogin(form -> form
.loginPage("/login")
.permitAll())
.logout(config -> config
.logoutSuccessUrl("/login"))
.build();
}
}
Now, create a login.html file under the src/main/resources/templates directory to allow the user to access the HTTP Endpoint via login screen.
login.html
<!DOCTYPE html>
<html xmlns = "http://www.w3.org/1999/xhtml" xmlns:th = "http://www.thymeleaf.org"
xmlns:sec = "http://www.thymeleaf.org/thymeleaf-extras-springsecurity6">
<head>
<title>Spring Security Example </title>
</head>
<body>
<div th:if = "${param.error}">
Invalid username and password.
</div>
<div th:if = "${param.logout}">
You have been logged out.
</div>
<form th:action = "@{/login}" method = "post">
<div>
<label> User Name : <input type = "text" name = "username"/> </label>
</div>
<div>
<label> Password: <input type = "password" name = "password"/> </label>
</div>
<div>
<input type = "submit" value = "Sign In"/>
</div>
</form>
</body>
</html>
Finally, update the hello.html file to allow the user to Sign-out from the application and display the current username as shown below −
hello.html
<!DOCTYPE html>
<html xmlns = "http://www.w3.org/1999/xhtml" xmlns:th = "http://www.thymeleaf.org"
xmlns:sec = "http://www.thymeleaf.org/thymeleaf-extras-springsecurity6">
<head>
<title>Hello World!</title>
</head>
<body>
<h1 th:inline="text">Hello <span sec:authentication="name"></span>!</h1>
<form th:action = "@{/logout}" method = "post">
<input type = "submit" value = "Sign Out"/>
</form>
</body>
</html>
The code for main Spring Boot application is given below −
WebsecurityApplication.java
package com.tutorialspoint.websecurity;
import org.springframework.boot.SpringApplication;
import org.springframework.boot.autoconfigure.SpringBootApplication;
@SpringBootApplication
public class WebsecurityApplication {
public static void main(String[] args) {
SpringApplication.run(WebsecurityDemoApplication.class, args);
}
}
The complete code for build configuration file is given below.
Maven - pom.xml
<?xml version="1.0" encoding="UTF-8"?>
<project xmlns="http://maven.apache.org/POM/4.0.0" xmlns:xsi="http://www.w3.org/2001/XMLSchema-instance"
xsi:schemaLocation="http://maven.apache.org/POM/4.0.0 https://maven.apache.org/xsd/maven-4.0.0.xsd">
<modelVersion>4.0.0</modelVersion>
<parent>
<groupId>org.springframework.boot</groupId>
<artifactId>spring-boot-starter-parent</artifactId>
<version>3.5.6</version>
<relativePath/> <!-- lookup parent from repository -->
</parent>
<groupId>com.tutorialspoint</groupId>
<artifactId>websecurity</artifactId>
<version>0.0.1-SNAPSHOT</version>
<name>websecurity</name>
<description>Demo project for Spring Boot</description>
<url/>
<licenses>
<license/>
</licenses>
<developers>
<developer/>
</developers>
<scm>
<connection/>
<developerConnection/>
<tag/>
<url/>
</scm>
<properties>
<java.version>21</java.version>
</properties>
<dependencies>
<dependency>
<groupId>org.springframework.boot</groupId>
<artifactId>spring-boot-starter-security</artifactId>
</dependency>
<dependency>
<groupId>org.springframework.boot</groupId>
<artifactId>spring-boot-starter-thymeleaf</artifactId>
</dependency>
<dependency>
<groupId>org.springframework.boot</groupId>
<artifactId>spring-boot-starter-web</artifactId>
</dependency>
<dependency>
<groupId>org.thymeleaf.extras</groupId>
<artifactId>thymeleaf-extras-springsecurity6</artifactId>
</dependency>
<dependency>
<groupId>org.springframework.boot</groupId>
<artifactId>spring-boot-starter-test</artifactId>
<scope>test</scope>
</dependency>
<dependency>
<groupId>org.springframework.security</groupId>
<artifactId>spring-security-test</artifactId>
<scope>test</scope>
</dependency>
</dependencies>
<build>
<plugins>
<plugin>
<groupId>org.springframework.boot</groupId>
<artifactId>spring-boot-maven-plugin</artifactId>
</plugin>
</plugins>
</build>
</project>
Gradle build.gradle
buildscript {
ext {
springBootVersion = '3.5.6'
}
repositories {
mavenCentral()
}
dependencies {
classpath("org.springframework.boot:spring-boot-gradle-plugin:${springBootVersion}")
}
}
apply plugin: 'java'
apply plugin: 'eclipse'
apply plugin: 'org.springframework.boot'
group = 'com.tutorialspoint'
version = '0.0.1-SNAPSHOT'
sourceCompatibility = 21
repositories {
mavenCentral()
}
dependencies {
compile('org.springframework.boot:spring-boot-starter-security')
compile('org.springframework.boot:spring-boot-starter-thymeleaf')
compile('org.springframework.boot:spring-boot-starter-web')
testCompile('org.springframework.boot:spring-boot-starter-test')
testCompile('org.springframework.security:spring-security-test')
}
Compilation and Execution
Now, create an executable JAR file, and run the Spring Boot application by using the following Maven or Gradle commands.
Maven users can use the command as given below −
mvn clean install
After BUILD SUCCESS, you can find the JAR file under target directory.
Gradle users can use the command as shown −
gradle clean build
After BUILD SUCCESSFUL, you can find the JAR file under the build/libs directory.
Now, run the JAR file by using the command shown below −
java jar <JARFILE>
You can see that the application has started on the Tomcat port 8080.
. ____ _ __ _ _ /\\ / ___'_ __ _ _(_)_ __ __ _ \ \ \ \ ( ( )\___ | '_ | '_| | '_ \/ _` | \ \ \ \ \\/ ___)| |_)| | | | | || (_| | ) ) ) ) ' |____| .__|_| |_|_| |_\__, | / / / / =========|_|==============|___/=/_/_/_/ :: Spring Boot :: (v3.5.6) 2025-09-30T12:37:55.632+05:30 INFO 39760 --- [websecurity] [ main] c.t.websecurity.WebsecurityApplication : Starting WebsecurityApplication using Java 21.0.6 with PID 39760 (D:\Projects\websecurity\target\classes started by mahes in D:\Projects\websecurity) 2025-09-30T12:37:55.637+05:30 INFO 39760 --- [websecurity] [ main] c.t.websecurity.WebsecurityApplication : No active profile set, falling back to 1 default profile: "default" 2025-09-30T12:37:56.969+05:30 INFO 39760 --- [websecurity] [ main] o.s.b.w.embedded.tomcat.TomcatWebServer : Tomcat initialized with port 8080 (http) 2025-09-30T12:37:56.985+05:30 INFO 39760 --- [websecurity] [ main] o.apache.catalina.core.StandardService : Starting service [Tomcat] 2025-09-30T12:37:56.986+05:30 INFO 39760 --- [websecurity] [ main] o.apache.catalina.core.StandardEngine : Starting Servlet engine: [Apache Tomcat/10.1.46] 2025-09-30T12:37:57.043+05:30 INFO 39760 --- [websecurity] [ main] o.a.c.c.C.[Tomcat].[localhost].[/] : Initializing Spring embedded WebApplicationContext 2025-09-30T12:37:57.045+05:30 INFO 39760 --- [websecurity] [ main] w.s.c.ServletWebServerApplicationContext : Root WebApplicationContext: initialization completed in 1325 ms 2025-09-30T12:37:57.472+05:30 INFO 39760 --- [websecurity] [ main] r$InitializeUserDetailsManagerConfigurer : Global AuthenticationManager configured with UserDetailsService bean with name userDetailsService 2025-09-30T12:37:57.761+05:30 INFO 39760 --- [websecurity] [ main] o.s.b.w.embedded.tomcat.TomcatWebServer : Tomcat started on port 8080 (http) with context path '/' 2025-09-30T12:37:57.778+05:30 INFO 39760 --- [websecurity] [ main] c.t.websecurity.WebsecurityApplication : Started WebsecurityApplication in 2.638 seconds (process running for 2.99)
Hit the URL http://localhost:8080/ in your web browser. You can see the output as shown.
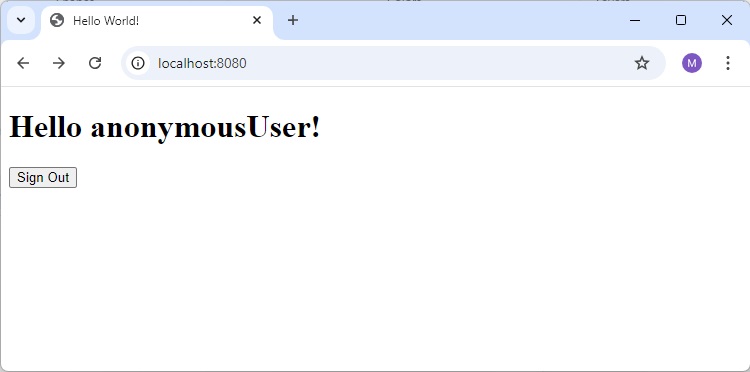
Login Page
Click on Signout button
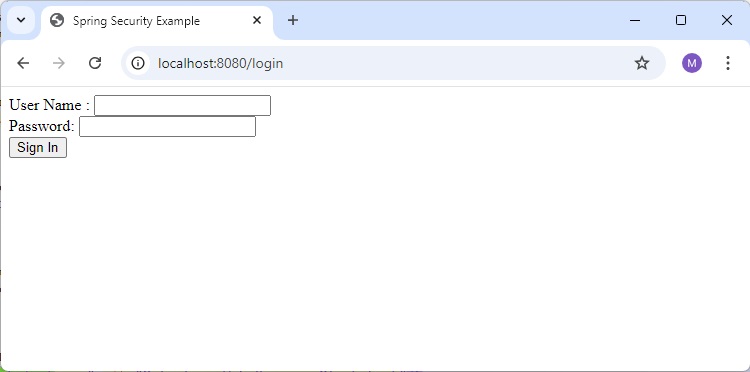
Login
Login using user/password and see the home page.
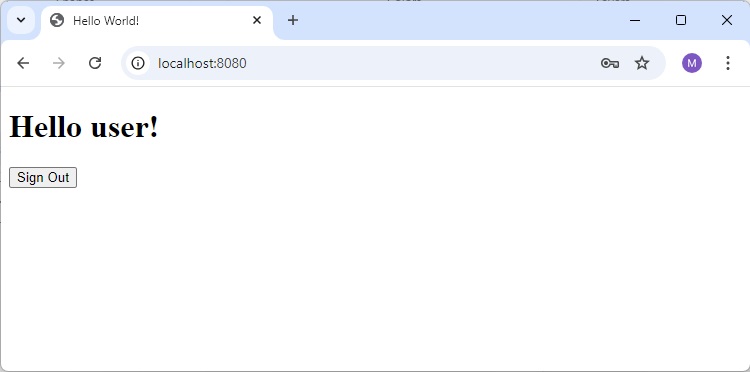
Logged Out
Click on signout button.
Invalid Username Password
Try login with invalid username/password.
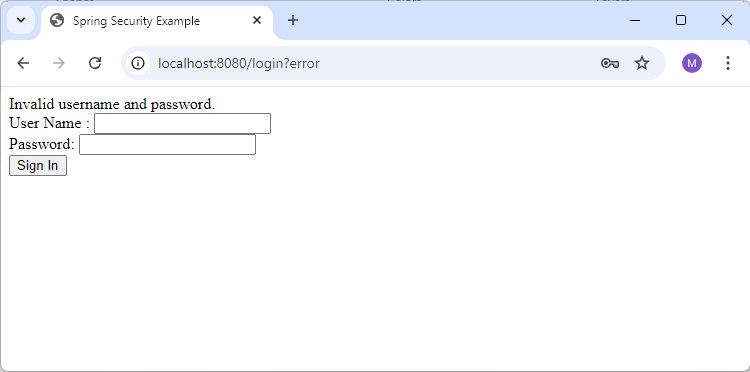
Spring Boot - Google Cloud Platform
Google Cloud Platform provides a cloud computing services that run the Spring Boot application in the cloud environment. In this chapter, we are going to see how to deploy the Spring Boot application in GCP app engine platform.
Example - Create a GCP Project
First, download the Gradle build Spring Boot application from Spring Initializer page www.start.spring.io. Observe the following screenshot.
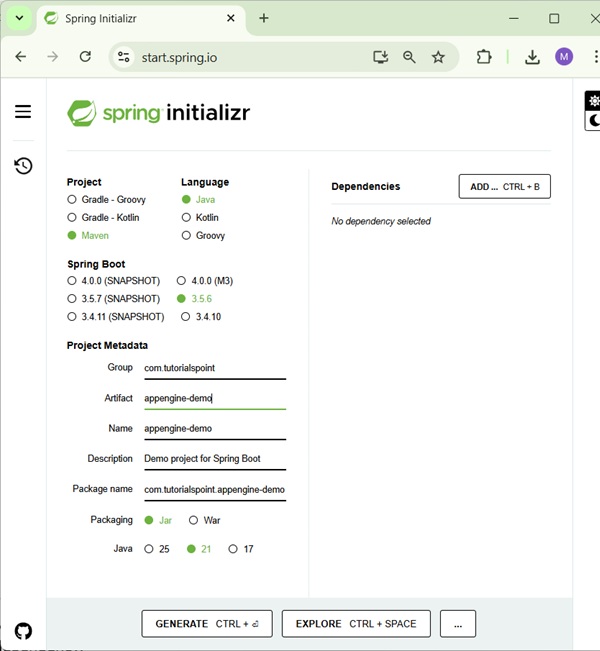
Now, in build.gradle file, add the Google Cloud appengine plugin and appengine classpath dependency.
The code for build.gradle file is given below −
buildscript {
ext {
springBootVersion = '3.5.6'
}
repositories {
mavenCentral()
}
dependencies {
classpath("org.springframework.boot:spring-boot-gradle-plugin:${springBootVersion}")
classpath 'com.google.cloud.tools:appengine-gradle-plugin:2.8.1'
}
}
apply plugin: 'java'
apply plugin: 'eclipse'
apply plugin: 'org.springframework.boot'
apply plugin: 'com.google.cloud.tools.appengine'
group = 'com.tutorialspoint'
version = '0.0.1-SNAPSHOT'
sourceCompatibility = 21
repositories {
mavenCentral()
}
dependencies {
compile('org.springframework.boot:spring-boot-starter-web')
testCompile('org.springframework.boot:spring-boot-starter-test')
}
Now, write a simple HTTP Endpoint and it returns the String success as shown −
package com.tutorialspoint.appenginedemo;
import org.springframework.boot.SpringApplication;
import org.springframework.boot.autoconfigure.SpringBootApplication;
import org.springframework.web.bind.annotation.RequestMapping;
import org.springframework.web.bind.annotation.RestController;
@SpringBootApplication
@RestController
public class AppengineDemoApplication {
public static void main(String[] args) {
SpringApplication.run(AppengineDemoApplication.class, args);
}
@RequestMapping(value = "/")
public String success() {
return "APP Engine deployment success";
}
}
Next, add the app.yml file under src/main/appengine directory as shown −
runtime: java env: flex handlers: - url: /.* script: this field is required, but ignored
Now, go to the Google Cloud console and click the Activate Google cloud shell at the top of the page.

Now, move your source files and Gradle file into home directory of your google cloud machine by using google cloud shell.

Now, execute the command gradle appengineDeploy and it will deploy your application into the Google Cloud appengine.
Note − GCP should be billing enabled and before deploying your application into appengine, you should create appengine platform in GCP.
It will take few minutes to deploy your application into GCP appengine platform.
After build successful you can see the Service URL in console window.
Now, hit the service URL and see the output.

Google Cloud SQL
To connect the Google Cloud SQL into your Spring Boot application, you should add the following properties into your application.properties file.
JDBC URL Format
jdbc:mysql://google/<DATABASE-NAME>?cloudSqlInstance = <GOOGLE_CLOUD_SQL_INSTANCE_NAME> &socketFactory = com.google.cloud.sql.mysql.SocketFactory&user = <USERNAME>&password = <PASSWORD>
Note − The Spring Boot application and Google Cloud SQL should be in same GCP project.
The application.properties file is given below.
spring.dbProductService.driverClassName = com.mysql.jdbc.Driver spring.dbProductService.url = jdbc:mysql://google/PRODUCTSERVICE?cloudSqlInstance = springboot-gcp-cloudsql:asia-northeast1:springboot-gcp-cloudsql-instance&socketFactory = com.google.cloud.sql.mysql.SocketFactory&user = root&password = rootspring.dbProductService.username = root spring.dbProductService.password = root
YAML file users can add the below properties to your application.yml file.
spring:
datasource:
driverClassName: com.mysql.jdbc.Driver
url: "jdbc:mysql://google/PRODUCTSERVICE?cloudSqlInstance=springboot-gcp-cloudsql:asia-northeast1:springboot-gcp-cloudsql-instance&socketFactory=com.google.cloud.sql.mysql.SocketFactory&user=root&password=root"
password: "root"
username: "root"
Spring Boot - Google OAuth2 Sign-In
In this chapter, we are going to see how to add the Google OAuth2 Sign-In by using Spring Boot application with Gradle build.
Example - Usage of Google OAuth2 sign-in
First, add the Spring Boot OAuth2 security dependency in your build configuration file and your build configuration file is given below.
buildscript {
ext {
springBootVersion = '3.5.6'
}
repositories {
mavenCentral()
}
dependencies {
classpath("org.springframework.boot:spring-boot-gradle-plugin:${springBootVersion}")
}
}
apply plugin: 'java'
apply plugin: 'eclipse'
apply plugin: 'org.springframework.boot'
group = 'com.tutorialspoint.projects'
version = '0.0.1-SNAPSHOT'
sourceCompatibility = 21
repositories {
mavenCentral()
}
dependencies {
compile('org.springframework.boot:spring-boot-starter')
testCompile('org.springframework.boot:spring-boot-starter-test')
compile('org.springframework.security.oauth:spring-security-oauth2-client')
compile('org.springframework.boot:spring-boot-starter-web')
testCompile('org.springframework.boot:spring-boot-starter-test')
}
Now, add the HTTP Endpoint to read the User Principal from the Google after authenticating via Spring Boot in main Spring Boot application class file as given below −
GoogleserviceApplication.java
package com.tutorialspoint.projects.googleservice;
import java.security.Principal;
import org.springframework.boot.SpringApplication;
import org.springframework.boot.autoconfigure.SpringBootApplication;
import org.springframework.web.bind.annotation.GetMapping;
import org.springframework.web.bind.annotation.RestController;
@SpringBootApplication
@RestController
public class GoogleserviceApplication {
public static void main(String[] args) {
SpringApplication.run(GoogleserviceApplication.class, args);
}
@GetMapping(value = "/user")
public Principal user(Principal principal) {
return principal;
}
}
Now, write a Configuration file to enable the OAuth2SSO for web security and remove the authentication for index.html file as shown −
WebSecurityConfig.java
package com.tutorialspoint.projects.googleservice;
import org.springframework.context.annotation.Bean;
import org.springframework.context.annotation.Configuration;
import org.springframework.security.config.Customizer;
import org.springframework.security.config.annotation.web.builders.HttpSecurity;
import org.springframework.security.config.annotation.web.configuration.EnableWebSecurity;
import org.springframework.security.config.annotation.web.configurers.AbstractHttpConfigurer;
import org.springframework.security.web.SecurityFilterChain;
@Configuration
@EnableWebSecurity
public class WebSecurityConfig {
@Bean
protected SecurityFilterChain filterChain(HttpSecurity http) throws Exception {
return http
.csrf(AbstractHttpConfigurer::disable)
.authorizeHttpRequests(
request -> request
.requestMatchers("/").permitAll()
.requestMatchers("/home").permitAll()
.anyRequest().authenticated()
)
.formLogin(form -> form.loginPage("/login")
.permitAll())
.logout(config -> config
.logoutSuccessUrl("/")
.permitAll())
.oauth2Client(Customizer.withDefaults())
.oauth2Login(Customizer.withDefaults())
.build();
}
}
Next, add the index.html file under static resources and add the link to redirect into user HTTP Endpoint to read the Google user Principal as shown below −
index.html
<!DOCTYPE html>
<html>
<head>
<meta charset = "ISO-8859-1">
<title>Insert title here</title>
</head>
<body>
<a href = "user">Click here to Google Login</a>
</body>
</html>
Note − In Google Cloud console - Enable the Gmail Services, Analytics Services and Google+ service API(s).
Then, go the Credentials section and create a credentials and choose OAuth Client ID.
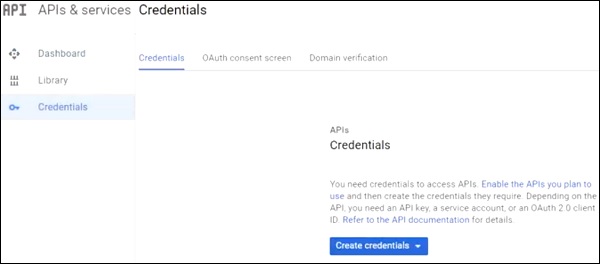
Next, provide a Product Name in OAuth2 consent screen.
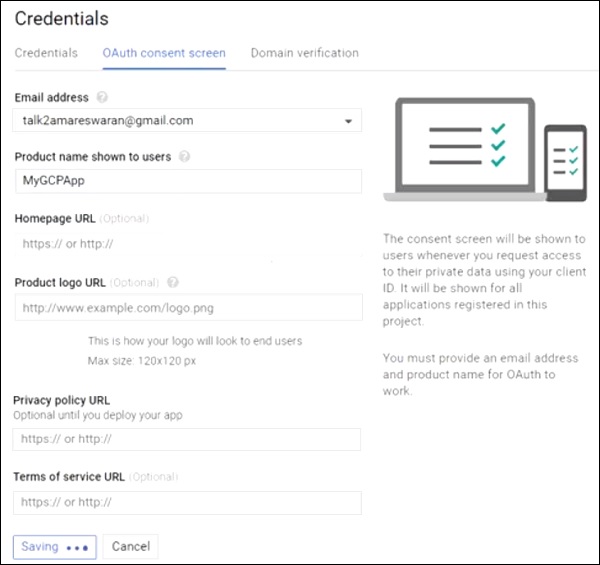
Next, choose the Application Type as Web application, provide the Authorized JavaScript origins and Authorized redirect URIs.
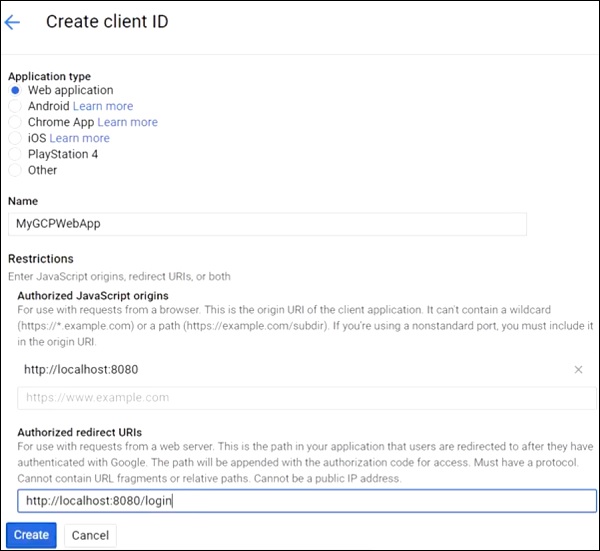
Now, your OAuth2 Client Id and Client Secret is created.
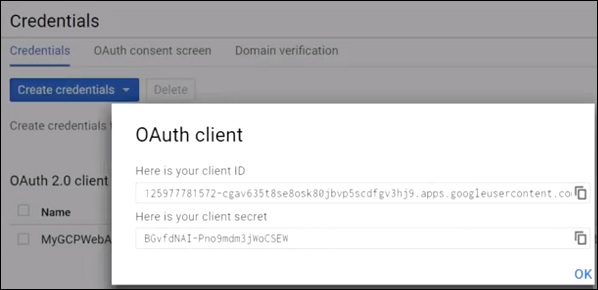
Next, add the Client Id and Client Secret in your application properties file.
spring.security.oauth2.client.registration.google.clientId = <CLIENT_ID> spring.security.oauth2.client.registration.google.client-secret= <CLIENT_SECRET> spring.security.oauth2.client.registration.google.authorization-grant-type=client_credentials
Output
Now, you can create an executable JAR file, and run the Spring Boot application by using the following Gradle command.
For Gradle, you can use the command as shown −
gradle clean build
After BUILD SUCCESSFUL, you can find the JAR file under the build/libs directory.
Run the JAR file by using the command java jar <JARFILE> and application is started on the Tomcat port 8080.
Now hit the URL http://localhost:8080/ and click the Google Login link.

It will redirect to the Google login screen and provide a Gmail login details.
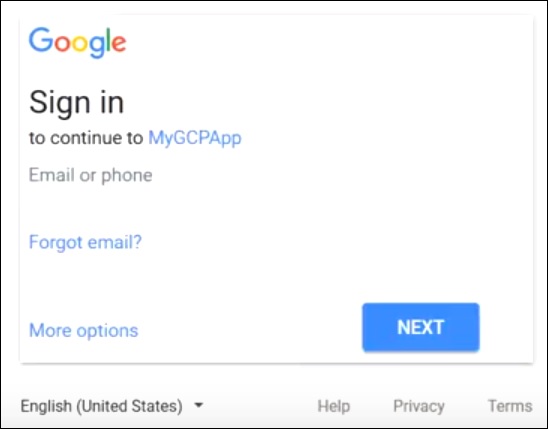
If login success, we will receive the Principal object of the Gmail user.
