- Spring Boot - Home
- Spring Boot - Introduction
- Spring Boot - Quick Start using CLI
- Spring Boot - Bootstrapping
- Spring Tool Suite
- Spring Boot - Tomcat Deployment
- Spring Boot - Build Systems
- Spring Boot - Code Structure
- Spring Boot - Beans & Dependency Injection
- Spring Boot - Runners
- Spring Boot - Starters
- Spring Boot - Application Properties
- Spring Boot - Configuration
- Spring Boot - Annotations
- Spring Boot - Logging
- Building RESTful Web Services
- Spring Boot - Exception Handling
- Spring Boot - Interceptor
- Spring Boot - Servlet Filter
- Spring Boot - Tomcat Port Number
- Spring Boot - Rest Template
- Spring Boot - File Handling
- Spring Boot - Service Components
- Spring Boot - Thymeleaf
- Consuming RESTful Web Services
- Spring Boot - CORS Support
- Spring Boot - Internationalization
- Spring Boot - Scheduling
- Spring Boot - Enabling HTTPS
- Spring Boot - Eureka Server
- Service Registration with Eureka
- Gateway Proxy Server and Routing
- Spring Cloud Configuration Server
- Spring Cloud Configuration Client
- Spring Boot - Actuator
- Spring Boot - Admin Server
- Spring Boot - Admin Client
- Spring Boot - Enabling Swagger2
- Spring Boot - Using SpringDoc OpenAPI
- Spring Boot - Creating Docker Image
- Tracing Micro Service Logs
- Spring Boot - Flyway Database
- Spring Boot - Sending Email
- Spring Boot - Hystrix
- Spring Boot - Web Socket
- Spring Boot - Batch Service
- Spring Boot - Apache Kafka
- Spring Boot - Twilio
- Spring Boot - Unit Testing
- Rest Controller Unit Testing
- Spring Boot - Database Handling
- Securing Web Applications
- Spring Boot - OAuth2 with JWT
- Spring Boot - Google Cloud Platform
- Spring Boot - Google OAuth2 Sign-In
Spring Boot Resources
Spring Boot - Apache Kafka
Apache Kafka is an open source project used to publish and subscribe the messages based on the fault-tolerant messaging system. It is fast, scalable and distributed by design. If you are a beginner to Kafka, or want to gain a better understanding on it, please refer to this link − www.tutorialspoint.com/apache_kafka/
In this chapter, we are going to see how to implement the Apache Kafka in Spring Boot application.
Example - Configuring Kafka
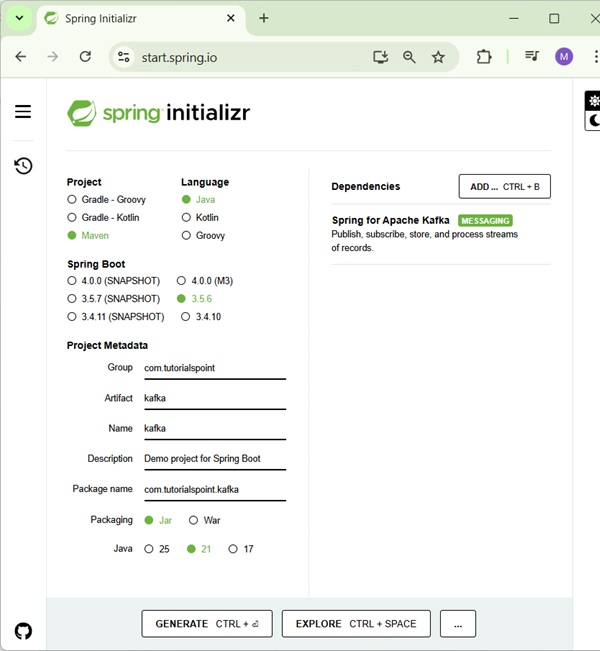
First, download the Spring Boot project from Spring Initializer page www.start.spring.io and choose the following dependencies −
- Spring for Apache Kafka
First, we need to add the Spring Kafka dependency in our build configuration file.
Maven users can add the following dependency in the pom.xml file.
<dependency>
   <groupId>org.springframework.kafka</groupId>
   <artifactId>spring-kafka</artifactId>
</dependency>
Gradle users can add the following dependency in the build.gradle file.
compile group: 'org.springframework.kafka', name: 'spring-kafka'
Producing Messages
To produce messages into Apache Kafka, we need to define the Configuration class for Producer configuration as shown −
KafkaProducerConfig.java
package com.tutorialspoint.kafka;

import java.util.HashMap;
import java.util.Map;

import org.apache.kafka.clients.producer.ProducerConfig;
import org.apache.kafka.common.serialization.StringSerializer;
import org.springframework.context.annotation.Bean;
import org.springframework.context.annotation.Configuration;
import org.springframework.kafka.core.DefaultKafkaProducerFactory;
import org.springframework.kafka.core.KafkaTemplate;
import org.springframework.kafka.core.ProducerFactory;

@Configuration
public class KafkaProducerConfig {
   @Bean
   ProducerFactory<String, String> producerFactory() {
      Map<String, Object> configProps = new HashMap<>();
      configProps.put(ProducerConfig.BOOTSTRAP_SERVERS_CONFIG, "localhost:9092");
      configProps.put(ProducerConfig.KEY_SERIALIZER_CLASS_CONFIG, StringSerializer.class);
      configProps.put(ProducerConfig.VALUE_SERIALIZER_CLASS_CONFIG, StringSerializer.class);
      return new DefaultKafkaProducerFactory<>(configProps);
   }
   @Bean
   KafkaTemplate<String, String> kafkaTemplate() {
      return new KafkaTemplate<>(producerFactory());
   }
}
To publish a message, auto wire the Kafka Template object and produce the message as shown.
@Autowired
private KafkaTemplate<String, String> kafkaTemplate;

public void sendMessage(String msg) {
   kafkaTemplate.send(topicName, msg);
}
Consuming a Message
To consume messages, we need to write a Consumer configuration class file as shown below.
KafkaConsumerConfig.java
package com.tutorialspoint.kafka;

import java.util.HashMap;
import java.util.Map;

import org.apache.kafka.clients.consumer.ConsumerConfig;
import org.apache.kafka.common.serialization.StringDeserializer;
import org.springframework.context.annotation.Bean;
import org.springframework.context.annotation.Configuration;
import org.springframework.kafka.annotation.EnableKafka;
import org.springframework.kafka.config.ConcurrentKafkaListenerContainerFactory;
import org.springframework.kafka.core.ConsumerFactory;
import org.springframework.kafka.core.DefaultKafkaConsumerFactory;

@EnableKafka
@Configuration
public class KafkaConsumerConfig {
   @Bean
   public ConsumerFactory<String, String> consumerFactory() {
      Map<String, Object> props = new HashMap<>();
      props.put(ConsumerConfig.BOOTSTRAP_SERVERS_CONFIG, "localhost:2181");
      props.put(ConsumerConfig.GROUP_ID_CONFIG, "group-id");
      props.put(ConsumerConfig.KEY_DESERIALIZER_CLASS_CONFIG, StringDeserializer.class);
      props.put(ConsumerConfig.VALUE_DESERIALIZER_CLASS_CONFIG, StringDeserializer.class);
      return new DefaultKafkaConsumerFactory<>(props);
   }
   @Bean
   public ConcurrentKafkaListenerContainerFactory<String, String> kafkaListenerContainerFactory() {
      ConcurrentKafkaListenerContainerFactory<String, String>
      factory = new ConcurrentKafkaListenerContainerFactory<>();
      factory.setConsumerFactory(consumerFactory());
      return factory;
   }
}
Next, write a Listener to listen to the messages.
@KafkaListener(topics = "tutorialspoint", groupId = "group-id")
public void listen(String message) {
   System.out.println("Received Messasge in group - group-id: " + message);
}
Let us call the sendMessage() method from ApplicationRunner class run method from the main Spring Boot application class file and consume the message from the same class file.
Your main Spring Boot application class file code is given below −
KafkaDemoApplication.java
package com.tutorialspoint.kafka;

import org.springframework.beans.factory.annotation.Autowired;
import org.springframework.boot.ApplicationArguments;
import org.springframework.boot.ApplicationRunner;
import org.springframework.boot.SpringApplication;
import org.springframework.boot.autoconfigure.SpringBootApplication;
import org.springframework.kafka.annotation.KafkaListener;
import org.springframework.kafka.core.KafkaTemplate;

@SpringBootApplication
public class KafkaApplication implements ApplicationRunner {
   @Autowired
   private KafkaTemplate<String, String> kafkaTemplate;

   public void sendMessage(String msg) {
      kafkaTemplate.send("tutorialspoint", msg);
   }
   public static void main(String[] args) {
      SpringApplication.run(KafkaApplication.class, args);
   }
   @KafkaListener(topics = "tutorialspoint", groupId = "group-id")
   public void listen(String message) {
      System.out.println("Received Messasge in group - group-id: " + message);
   }
   @Override
   public void run(ApplicationArguments args) throws Exception {
      sendMessage("Hi Welcome to Spring For Apache Kafka");
   }
}
The code for complete build configuration file is given below.
Maven - pom.xml
<?xml version="1.0" encoding="UTF-8"?>
<project xmlns="http://maven.apache.org/POM/4.0.0" xmlns:xsi="http://www.w3.org/2001/XMLSchema-instance"
   xsi:schemaLocation="http://maven.apache.org/POM/4.0.0 https://maven.apache.org/xsd/maven-4.0.0.xsd">
   <modelVersion>4.0.0</modelVersion>
   <parent>
      <groupId>org.springframework.boot</groupId>
      <artifactId>spring-boot-starter-parent</artifactId>
      <version>3.5.6</version>
      <relativePath/> <!-- lookup parent from repository -->
   </parent>
   <groupId>com.tutorialspoint</groupId>
   <artifactId>kafka</artifactId>
   <version>0.0.1-SNAPSHOT</version>
   <name>kafka</name>
   <description>Demo project for Spring Boot</description>
   <url/>
   <licenses>
      <license/>
   </licenses>
   <developers>
      <developer/>
   </developers>
   <scm>
      <connection/>
      <developerConnection/>
      <tag/>
      <url/>
   </scm>
   <properties>
      <java.version>21</java.version>
   </properties>
   <dependencies>
      <dependency>
         <groupId>org.springframework.boot</groupId>
         <artifactId>spring-boot-starter</artifactId>
      </dependency>
      <dependency>
         <groupId>org.springframework.kafka</groupId>
         <artifactId>spring-kafka</artifactId>
      </dependency>
      <dependency>
         <groupId>org.springframework.boot</groupId>
         <artifactId>spring-boot-starter-test</artifactId>
         <scope>test</scope>
      </dependency>
      <dependency>
         <groupId>org.springframework.kafka</groupId>
         <artifactId>spring-kafka-test</artifactId>
         <scope>test</scope>
      </dependency>
   </dependencies>
   <build>
      <plugins>
         <plugin>
            <groupId>org.springframework.boot</groupId>
            <artifactId>spring-boot-maven-plugin</artifactId>
         </plugin>
      </plugins>
   </build>
</project>
Gradle build.gradle
buildscript {
   ext {
      springBootVersion = '3.5.6'
   }
   repositories {
      mavenCentral()
   }
   dependencies {
      classpath("org.springframework.boot:spring-boot-gradle-plugin:${springBootVersion}")
   }
}

apply plugin: 'java'
apply plugin: 'eclipse'
apply plugin: 'org.springframework.boot'

group = 'com.tutorialspoint'
version = '0.0.1-SNAPSHOT'
sourceCompatibility = 21

repositories {
   mavenCentral()
}
dependencies {
   compile('org.springframework.boot:spring-boot-starter')
   compile group: 'org.springframework.kafka', name: 'spring-kafka')
   testCompile('org.springframework.boot:spring-boot-starter-test')
   testCompile('org.springframework.kafka:spring-kafka-test')
}
Output
Now, create an executable JAR file, and run the Spring Boot application by using the below Maven or Gradle commands as shown −
For Maven, use the command as shown −
mvn clean install
After BUILD SUCCESS, you can find the JAR file under the target directory.
For Gradle, use the command as shown −
gradle clean build
After BUILD SUCCESSFUL, you can find the JAR file under the build/libs directory.
Run the JAR file by using the command given here −
java jar <JARFILE>
You can see the output in console window.
  .   ____          _            __ _ _
 /\\ / ___'_ __ _ _(_)_ __  __ _ \ \ \ \
( ( )\___ | '_ | '_| | '_ \/ _` | \ \ \ \
 \\/  ___)| |_)| | | | | || (_| |  ) ) ) )
  '  |____| .__|_| |_|_| |_\__, | / / / /
 =========|_|==============|___/=/_/_/_/

 :: Spring Boot ::                (v3.5.6)

2025-09-30T11:27:14.839+05:30  INFO 25460 --- [kafka] [           main] c.tutorialspoint.kafka.KafkaApplication  : Starting KafkaApplication using Java 21.0.6 with PID 25460 (D:\Projects\kafka\target\classes started by mahes in D:\Projects\kafka)
2025-09-30T11:27:14.842+05:30  INFO 25460 --- [kafka] [           main] c.tutorialspoint.kafka.KafkaApplication  : No active profile set, falling back to 1 default profile: "default"
2025-09-30T11:27:15.905+05:30  INFO 25460 --- [kafka] [           main] o.a.k.clients.consumer.ConsumerConfig    : ConsumerConfig values:
	allow.auto.create.topics = true
	auto.commit.interval.ms = 5000
	auto.include.jmx.reporter = true
	auto.offset.reset = latest
	bootstrap.servers = [localhost:2181]
	check.crcs = true
	client.dns.lookup = use_all_dns_ips
	client.id = consumer-group-id-1
	client.rack =
	connections.max.idle.ms = 540000
...
2025-09-30T11:27:15.967+05:30  INFO 25460 --- [kafka] [           main] o.a.k.c.t.i.KafkaMetricsCollector        : initializing Kafka metrics collector
2025-09-30T11:27:16.303+05:30  INFO 25460 --- [kafka] [           main] o.a.kafka.common.utils.AppInfoParser     : Kafka version: 3.9.1
2025-09-30T11:27:16.305+05:30  INFO 25460 --- [kafka] [           main] o.a.kafka.common.utils.AppInfoParser     : Kafka commitId: f745dfdcee2b9851
2025-09-30T11:27:16.305+05:30  INFO 25460 --- [kafka] [           main] o.a.kafka.common.utils.AppInfoParser     : Kafka startTimeMs: 1759211836301
2025-09-30T11:27:16.310+05:30  INFO 25460 --- [kafka] [           main] o.a.k.c.c.i.ClassicKafkaConsumer         : [Consumer clientId=consumer-group-id-1, groupId=group-id] Subscribed to topic(s): tutorialspoint
2025-09-30T11:27:16.334+05:30  INFO 25460 --- [kafka] [           main] c.tutorialspoint.kafka.KafkaApplication  : Started KafkaApplication in 1.967 seconds (process running for 2.299)
2025-09-30T11:27:16.374+05:30  INFO 25460 --- [kafka] [           main] o.a.k.clients.producer.ProducerConfig    : ProducerConfig values:
	acks = -1
	auto.include.jmx.reporter = true
	batch.size = 16384
	bootstrap.servers = [localhost:9092]
	buffer.memory = 33554432
	client.dns.lookup = use_all_dns_ips
	client.id = kafka-producer-1
...
2025-09-30T11:27:16.376+05:30  INFO 25460 --- [kafka] [           main] o.a.k.c.t.i.KafkaMetricsCollector        : initializing Kafka metrics collector
2025-09-30T11:27:16.403+05:30  INFO 25460 --- [kafka] [           main] o.a.k.clients.producer.KafkaProducer     : [Producer clientId=kafka-producer-1] Instantiated an idempotent producer.
2025-09-30T11:27:16.436+05:30  INFO 25460 --- [kafka] [           main] o.a.kafka.common.utils.AppInfoParser     : Kafka version: 3.9.1
2025-09-30T11:27:16.436+05:30  INFO 25460 --- [kafka] [           main] o.a.kafka.common.utils.AppInfoParser     : Kafka commitId: f745dfdcee2b9851
2025-09-30T11:27:16.437+05:30  INFO 25460 --- [kafka] [           main] o.a.kafka.common.utils.AppInfoParser     : Kafka startTimeMs: 1759211836436
