- Spring Boot - Home
- Spring Boot - Introduction
- Spring Boot - Quick Start using CLI
- Spring Boot - Bootstrapping
- Spring Tool Suite
- Spring Boot - Tomcat Deployment
- Spring Boot - Build Systems
- Spring Boot - Code Structure
- Spring Boot - Beans & Dependency Injection
- Spring Boot - Runners
- Spring Boot - Starters
- Spring Boot - Application Properties
- Spring Boot - Configuration
- Spring Boot - Annotations
- Spring Boot - Logging
- Building RESTful Web Services
- Spring Boot - Exception Handling
- Spring Boot - Interceptor
- Spring Boot - Servlet Filter
- Spring Boot - Tomcat Port Number
- Spring Boot - Rest Template
- Spring Boot - File Handling
- Spring Boot - Service Components
- Spring Boot - Thymeleaf
- Consuming RESTful Web Services
- Spring Boot - CORS Support
- Spring Boot - Internationalization
- Spring Boot - Scheduling
- Spring Boot - Enabling HTTPS
- Spring Boot - Eureka Server
- Service Registration with Eureka
- Gateway Proxy Server and Routing
- Spring Cloud Configuration Server
- Spring Cloud Configuration Client
- Spring Boot - Actuator
- Spring Boot - Admin Server
- Spring Boot - Admin Client
- Spring Boot - Enabling Swagger2
- Spring Boot - Using SpringDoc OpenAPI
- Spring Boot - Creating Docker Image
- Tracing Micro Service Logs
- Spring Boot - Flyway Database
- Spring Boot - Sending Email
- Spring Boot - Hystrix
- Spring Boot - Web Socket
- Spring Boot - Batch Service
- Spring Boot - Apache Kafka
- Spring Boot - Twilio
- Spring Boot - Unit Testing
- Rest Controller Unit Testing
- Spring Boot - Database Handling
- Securing Web Applications
- Spring Boot - OAuth2 with JWT
- Spring Boot - Google Cloud Platform
- Spring Boot - Google OAuth2 Sign-In
Spring Boot Resources
Spring Boot - Service Registration with Eureka
In this chapter, you are going to learn in detail about how to register the Spring Boot Micro service application into the Eureka Server. Before registering the application, please make sure Eureka Server is running on the port 8761 or first build the Eureka Server and run it. For further information on building the Eureka server, you can refer to the previous chapter Spring Boot - Eureka Server
Example - Building a Eureka Client
Eureka Client comes with the bundle of Spring Cloud. For this, we need to develop the Eureka client and run it on the default port 8080.
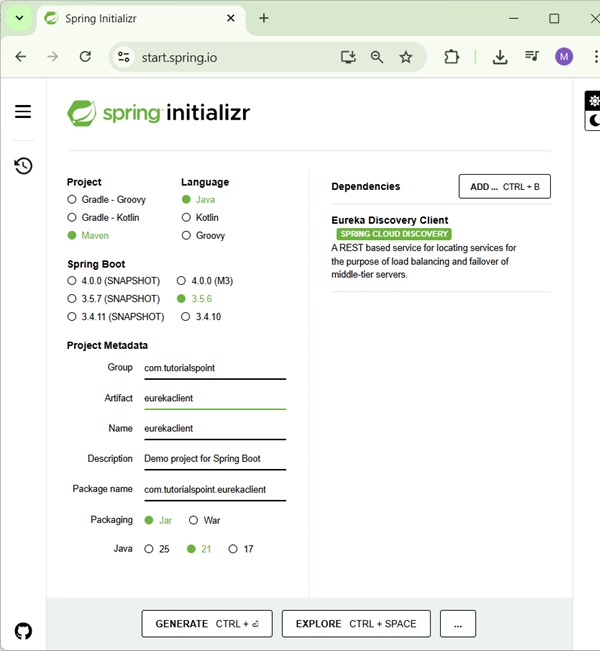
Visit the Spring Initializer homepage https://start.spring.io/ and download the Spring Boot project with Eureka Client dependency. It is shown in the screenshot below −
After downloading the project in main Spring Boot Application class file, we need to add @EnableEurekaClient annotation. The @EnableEurekaClient annotation is used to make your Spring Boot application acts as a Eureka Client.
EurekaclientApplication.java
The code for main Spring Boot application class file is as shown below −
package com.tutorialspoint.eurekaclient;

import org.springframework.boot.SpringApplication;
import org.springframework.boot.autoconfigure.SpringBootApplication;
import org.springframework.cloud.client.discovery.EnableDiscoveryClient;

@SpringBootApplication
@EnableDiscoveryClient
public class EurekaclientApplication {
   public static void main(String[] args) {
      SpringApplication.run(EurekaclientApplication.class, args);
   }
}
Make sure Spring cloud Eureka client dependency is added in your build configuration file.
The code for Maven user dependency is shown below −
<dependency>
<groupId>org.springframework.cloud</groupId>
   <artifactId>spring-cloud-starter-netflix-eureka-client</artifactId>
</dependency>
The code for Gradle user dependency is given below −
compile('org.springframework.cloud:spring-cloud-starter-netflix-eureka-client')
The complete build configuration file is given below −
Maven - pom.xml
<?xml version="1.0" encoding="UTF-8"?>
<project xmlns="http://maven.apache.org/POM/4.0.0" xmlns:xsi="http://www.w3.org/2001/XMLSchema-instance"
   xsi:schemaLocation="http://maven.apache.org/POM/4.0.0 https://maven.apache.org/xsd/maven-4.0.0.xsd">
   <modelVersion>4.0.0</modelVersion>
   <parent>
      <groupId>org.springframework.boot</groupId>
      <artifactId>spring-boot-starter-parent</artifactId>
      <version>3.5.6</version>
      <relativePath/> <!-- lookup parent from repository -->
   </parent>
   <groupId>com.tutorialspoint</groupId>
   <artifactId>eurekaserver</artifactId>
   <version>0.0.1-SNAPSHOT</version>
   <name>eurekaserver</name>
   <description>Demo project for Spring Boot</description>
   <url/>
   <licenses>
      <license/>
   </licenses>
   <developers>
      <developer/>
   </developers>
   <scm>
      <connection/>
      <developerConnection/>
      <tag/>
      <url/>
   </scm>
   <properties>
      <java.version>21</java.version>
      <spring-cloud.version>2025.0.0</spring-cloud.version>
   </properties>
   <dependencies>
      <dependency>
         <groupId>org.springframework.cloud</groupId>
         <artifactId>spring-cloud-starter-netflix-eureka-client</artifactId>
      </dependency>
      <dependency>
         <groupId>org.springframework.boot</groupId>
         <artifactId>spring-boot-starter-test</artifactId>
         <scope>test</scope>
      </dependency>
      <dependency>
         <groupId>org.springframework.boot</groupId>
         <artifactId>spring-boot-starter-web</artifactId>
      </dependency>
   </dependencies>
   <dependencyManagement>
      <dependencies>
         <dependency>
            <groupId>org.springframework.cloud</groupId>
            <artifactId>spring-cloud-dependencies</artifactId>
            <version>${spring-cloud.version}</version>
            <type>pom</type>
            <scope>import</scope>
         </dependency>
      </dependencies>
   </dependencyManagement>
   <build>
      <plugins>
         <plugin>
            <groupId>org.springframework.boot</groupId>
             <artifactId>spring-boot-maven-plugin</artifactId>
         </plugin>
      </plugins>
   </build>
</project>
Gradle - build.gradle
buildscript {
   ext {
      springBootVersion = '3.5.6'
   }
   repositories {
      mavenCentral()
   }
   dependencies {
      classpath("org.springframework.boot:spring-boot-gradle-plugin:${springBootVersion}")
   }
}

apply plugin: 'java'
apply plugin: 'eclipse'
apply plugin: 'org.springframework.boot'

group = 'com.tutorialspoint'
version = '0.0.1-SNAPSHOT'
sourceCompatibility = 21

repositories {
   mavenCentral()
}
ext {
   springCloudVersion = '2025.0.0'
}
dependencies {
   compile('org.springframework.cloud:spring-cloud-starter-eureka-client')
   testCompile('org.springframework.boot:spring-boot-starter-test')
}
dependencyManagement {
   imports {
      mavenBom "org.springframework.cloud:spring-cloud-dependencies:${springCloudVersion}"
   }
}
To register the Spring Boot application into Eureka Server we need to add the following configuration in our application.properties file or application.yml file and specify the Eureka Server URL in our configuration.
application.yml
The code for application.yml file is given below −
eureka:
   client:
      serviceUrl:
         defaultZone: http://localhost:8761/eureka
      instance:
      preferIpAddress: true
spring:
   application:
      name: eurekaclient
application.properties
The code for application.properties file is given below −
eureka.client.serviceUrl.defaultZone  = http://localhost:8761/eureka
eureka.client.instance.preferIpAddress = true
spring.application.name = eurekaclient
Now, add the Rest Endpoint to return String in the main Spring Boot application and the Spring Boot Starter web dependency in build configuration file. Observe the code given below −
EurekaclientApplication.java
package com.tutorialspoint.eurekaclient;

import org.springframework.boot.SpringApplication;
import org.springframework.boot.autoconfigure.SpringBootApplication;
import org.springframework.cloud.client.discovery.EnableDiscoveryClient;
import org.springframework.web.bind.annotation.GetMapping;
import org.springframework.web.bind.annotation.RestController;

@SpringBootApplication
@EnableDiscoveryClient
@RestController
public class EurekaclientApplication {

   public static void main(String[] args) {
      SpringApplication.run(EurekaclientApplication.class, args);
   }

   @GetMapping(value = "/")
   public String home() {
      return "Eureka Client application";
   }
}
Output
You can create an executable JAR file, and run the Spring Boot application by using the following Maven or Gradle commands −
For Maven, you can use the following command −
mvn clean install
After "BUILD SUCCESS", you can find the JAR file under the target directory.
For Gradle, you can use the following command −
gradle clean build
After "BUILD SUCCESSFUL", you can find the JAR file under the build/libs directory.
Now, run the JAR file by using the command as shown −
java jar <JARFILE>
Now, the application has started on the Tomcat port 8080 and Eureka Client application is registered with the Eureka Server as shown below −
  .   ____          _            __ _ _
 /\\ / ___'_ __ _ _(_)_ __  __ _ \ \ \ \
( ( )\___ | '_ | '_| | '_ \/ _` | \ \ \ \
 \\/  ___)| |_)| | | | | || (_| |  ) ) ) )
  '  |____| .__|_| |_|_| |_\__, | / / / /
 =========|_|==============|___/=/_/_/_/

 :: Spring Boot ::                (v3.5.6)

2025-09-29T13:01:11.017+05:30  INFO 10900 --- [eurekaserver] [           main] c.t.e.EurekaserverApplication            : Starting EurekaserverApplication using Java 21.0.6 with PID 10900 (D:\Projects\eurekaserver\target\classes started by mahes in D:\Projects\eurekaserver)
2025-09-29T13:01:11.020+05:30  INFO 10900 --- [eurekaserver] [           main] c.t.e.EurekaserverApplication            : No active profile set, falling back to 1 default profile: "default"
2025-09-29T13:01:12.509+05:30  INFO 10900 --- [eurekaserver] [           main] o.s.cloud.context.scope.GenericScope     : BeanFactory id=37b0aecd-4feb-3fa0-b028-b62a23271b1d
2025-09-29T13:01:12.915+05:30  INFO 10900 --- [eurekaserver] [           main] o.s.b.w.embedded.tomcat.TomcatWebServer  : Tomcat initialized with port 8761 (http)
2025-09-29T13:01:12.931+05:30  INFO 10900 --- [eurekaserver] [           main] o.apache.catalina.core.StandardService   : Starting service [Tomcat]
2025-09-29T13:01:12.931+05:30  INFO 10900 --- [eurekaserver] [           main] o.apache.catalina.core.StandardEngine    : Starting Servlet engine: [Apache Tomcat/10.1.46]
2025-09-29T13:01:13.001+05:30  INFO 10900 --- [eurekaserver] [           main] o.a.c.c.C.[Tomcat].[localhost].[/]       : Initializing Spring embedded WebApplicationContext
2025-09-29T13:01:13.002+05:30  INFO 10900 --- [eurekaserver] [           main] w.s.c.ServletWebServerApplicationContext : Root WebApplicationContext: initialization completed in 1918 ms
2025-09-29T13:01:13.933+05:30  INFO 10900 --- [eurekaserver] [           main] c.n.d.provider.DiscoveryJerseyProvider   : Using JSON encoding codec LegacyJacksonJson
2025-09-29T13:01:13.934+05:30  INFO 10900 --- [eurekaserver] [           main] c.n.d.provider.DiscoveryJerseyProvider   : Using JSON decoding codec LegacyJacksonJson
2025-09-29T13:01:14.158+05:30  INFO 10900 --- [eurekaserver] [           main] c.n.d.provider.DiscoveryJerseyProvider   : Using XML encoding codec XStreamXml
2025-09-29T13:01:14.158+05:30  INFO 10900 --- [eurekaserver] [           main] c.n.d.provider.DiscoveryJerseyProvider   : Using XML decoding codec XStreamXml
2025-09-29T13:01:14.348+05:30  INFO 10900 --- [eurekaserver] [           main] o.s.v.b.OptionalValidatorFactoryBean     : Failed to set up a Bean Validation provider: jakarta.validation.NoProviderFoundException: Unable to create a Configuration, because no Jakarta Bean Validation provider could be found. Add a provider like Hibernate Validator (RI) to your classpath.
2025-09-29T13:01:15.060+05:30  WARN 10900 --- [eurekaserver] [           main] iguration$LoadBalancerCaffeineWarnLogger : Spring Cloud LoadBalancer is currently working with the default cache. While this cache implementation is useful for development and tests, it's recommended to use Caffeine cache in production.You can switch to using Caffeine cache, by adding it and org.springframework.cache.caffeine.CaffeineCacheManager to the classpath.
2025-09-29T13:01:15.095+05:30  INFO 10900 --- [eurekaserver] [           main] o.s.c.n.eureka.InstanceInfoFactory       : Setting initial instance status as: STARTING
2025-09-29T13:01:15.131+05:30  INFO 10900 --- [eurekaserver] [           main] com.netflix.discovery.DiscoveryClient    : Initializing Eureka in region us-east-1
2025-09-29T13:01:15.131+05:30  INFO 10900 --- [eurekaserver] [           main] com.netflix.discovery.DiscoveryClient    : Client configured to neither register nor query for data.
2025-09-29T13:01:15.135+05:30  INFO 10900 --- [eurekaserver] [           main] com.netflix.discovery.DiscoveryClient    : Discovery Client initialized at timestamp 1759131075133 with initial instances count: 0
2025-09-29T13:01:15.212+05:30  INFO 10900 --- [eurekaserver] [           main] c.n.eureka.DefaultEurekaServerContext    : Initializing ...
2025-09-29T13:01:15.215+05:30  INFO 10900 --- [eurekaserver] [           main] c.n.eureka.cluster.PeerEurekaNodes       : Adding new peer nodes [http://localhost:8761/eureka/]
2025-09-29T13:01:15.354+05:30  INFO 10900 --- [eurekaserver] [           main] c.n.d.provider.DiscoveryJerseyProvider   : Using JSON encoding codec LegacyJacksonJson
2025-09-29T13:01:15.355+05:30  INFO 10900 --- [eurekaserver] [           main] c.n.d.provider.DiscoveryJerseyProvider   : Using JSON decoding codec LegacyJacksonJson
2025-09-29T13:01:15.355+05:30  INFO 10900 --- [eurekaserver] [           main] c.n.d.provider.DiscoveryJerseyProvider   : Using XML encoding codec XStreamXml
2025-09-29T13:01:15.355+05:30  INFO 10900 --- [eurekaserver] [           main] c.n.d.provider.DiscoveryJerseyProvider   : Using XML decoding codec XStreamXml
2025-09-29T13:01:15.414+05:30  INFO 10900 --- [eurekaserver] [           main] c.n.eureka.cluster.PeerEurekaNodes       : Replica node URL:  http://localhost:8761/eureka/
2025-09-29T13:01:15.435+05:30  INFO 10900 --- [eurekaserver] [           main] c.n.e.registry.AbstractInstanceRegistry  : Finished initializing remote region registries. All known remote regions: []
2025-09-29T13:01:15.435+05:30  INFO 10900 --- [eurekaserver] [           main] c.n.eureka.DefaultEurekaServerContext    : Initialized
2025-09-29T13:01:15.451+05:30  INFO 10900 --- [eurekaserver] [           main] o.s.b.a.e.web.EndpointLinksResolver      : Exposing 1 endpoint beneath base path '/actuator'
2025-09-29T13:01:15.530+05:30  INFO 10900 --- [eurekaserver] [           main] o.s.c.n.e.s.EurekaServiceRegistry        : Registering application EUREKASERVER with eureka with status UP
2025-09-29T13:01:15.546+05:30  INFO 10900 --- [eurekaserver] [       Thread-9] o.s.c.n.e.server.EurekaServerBootstrap   : isAws returned false
2025-09-29T13:01:15.547+05:30  INFO 10900 --- [eurekaserver] [       Thread-9] o.s.c.n.e.server.EurekaServerBootstrap   : Initialized server context
2025-09-29T13:01:15.547+05:30  INFO 10900 --- [eurekaserver] [       Thread-9] c.n.e.r.PeerAwareInstanceRegistryImpl    : Got 1 instances from neighboring DS node
2025-09-29T13:01:15.548+05:30  INFO 10900 --- [eurekaserver] [       Thread-9] c.n.e.r.PeerAwareInstanceRegistryImpl    : Renew threshold is: 1
2025-09-29T13:01:15.548+05:30  INFO 10900 --- [eurekaserver] [       Thread-9] c.n.e.r.PeerAwareInstanceRegistryImpl    : Changing status to UP
2025-09-29T13:01:15.554+05:30  INFO 10900 --- [eurekaserver] [       Thread-9] e.s.EurekaServerInitializerConfiguration : Started Eureka Server
2025-09-29T13:01:15.577+05:30  INFO 10900 --- [eurekaserver] [           main] o.s.b.w.embedded.tomcat.TomcatWebServer  : Tomcat started on port 8761 (http) with context path '/'
2025-09-29T13:01:15.578+05:30  INFO 10900 --- [eurekaserver] [           main] .s.c.n.e.s.EurekaAutoServiceRegistration : Updating port to 8761
2025-09-29T13:01:15.602+05:30  INFO 10900 --- [eurekaserver] [           main] c.t.e.EurekaserverApplication            : Started EurekaserverApplication in 5.105 seconds (process running for 5.825)
2025-09-29T13:02:15.550+05:30  INFO 10900 --- [eurekaserver] [a-EvictionTimer] c.n.e.registry.AbstractInstanceRegistry  : Running the evict task with compensationTime 0ms
2025-09-29T13:03:15.550+05:30  INFO 10900 --- [eurekaserver] [a-EvictionTimer] c.n.e.registry.AbstractInstanceRegistry  : Running the evict task with compensationTime 0ms
2025-09-29T13:03:47.823+05:30  INFO 10900 --- [eurekaserver] [nio-8761-exec-1] o.a.c.c.C.[Tomcat].[localhost].[/]       : Initializing Spring DispatcherServlet 'dispatcherServlet'
2025-09-29T13:03:47.824+05:30  INFO 10900 --- [eurekaserver] [nio-8761-exec-1] o.s.web.servlet.DispatcherServlet        : Initializing Servlet 'dispatcherServlet'
2025-09-29T13:03:47.825+05:30  INFO 10900 --- [eurekaserver] [nio-8761-exec-1] o.s.web.servlet.DispatcherServlet        : Completed initialization in 1 ms
2025-09-29T13:03:48.087+05:30  INFO 10900 --- [eurekaserver] [nio-8761-exec-2] c.n.e.registry.AbstractInstanceRegistry  : Registered instance EUREKACLIENT/Home:eurekaclient with status UP (replication=false)
2025-09-29T13:03:48.778+05:30  INFO 10900 --- [eurekaserver] [nio-8761-exec-3] c.n.e.registry.AbstractInstanceRegistry  : Registered instance EUREKACLIENT/Home:eurekaclient with status UP (replication=true)
Hit the URL http://localhost:8761/ in your web browser and you can see the Eureka Client application is registered with Eureka Server.

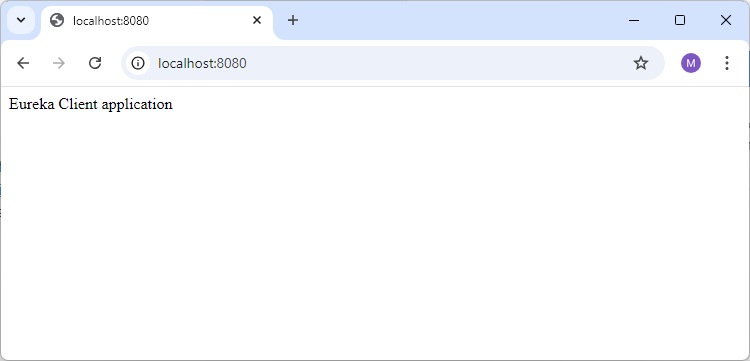
Now hit the URL http://localhost:8080/ in your web browser and see the Rest Endpoint output.