- Spring Boot - Home
- Spring Boot - Introduction
- Spring Boot - Quick Start using CLI
- Spring Boot - Bootstrapping
- Spring Tool Suite
- Spring Boot - Tomcat Deployment
- Spring Boot - Build Systems
- Spring Boot - Code Structure
- Spring Boot - Beans & Dependency Injection
- Spring Boot - Runners
- Spring Boot - Starters
- Spring Boot - Application Properties
- Spring Boot - Configuration
- Spring Boot - Annotations
- Spring Boot - Logging
- Building RESTful Web Services
- Spring Boot - Exception Handling
- Spring Boot - Interceptor
- Spring Boot - Servlet Filter
- Spring Boot - Tomcat Port Number
- Spring Boot - Rest Template
- Spring Boot - File Handling
- Spring Boot - Service Components
- Spring Boot - Thymeleaf
- Consuming RESTful Web Services
- Spring Boot - CORS Support
- Spring Boot - Internationalization
- Spring Boot - Scheduling
- Spring Boot - Enabling HTTPS
- Spring Boot - Eureka Server
- Service Registration with Eureka
- Gateway Proxy Server and Routing
- Spring Cloud Configuration Server
- Spring Cloud Configuration Client
- Spring Boot - Actuator
- Spring Boot - Admin Server
- Spring Boot - Admin Client
- Spring Boot - Enabling Swagger2
- Spring Boot - Using SpringDoc OpenAPI
- Spring Boot - Creating Docker Image
- Tracing Micro Service Logs
- Spring Boot - Flyway Database
- Spring Boot - Sending Email
- Spring Boot - Hystrix
- Spring Boot - Web Socket
- Spring Boot - Batch Service
- Spring Boot - Apache Kafka
- Spring Boot - Twilio
- Spring Boot - Unit Testing
- Rest Controller Unit Testing
- Spring Boot - Database Handling
- Securing Web Applications
- Spring Boot - OAuth2 with JWT
- Spring Boot - Google Cloud Platform
- Spring Boot - Google OAuth2 Sign-In
Spring Boot Resources
Spring Boot - Bootstrapping
This chapter will explain you how to perform bootstrapping on a Spring Boot application.
Spring Initializer
One of the ways to Bootstrapping a Spring Boot application is by using Spring Initializer. To do this, you will have to visit the Spring Initializer web page www.start.spring.io and choose your Build, Spring Boot Version and platform. Also, you need to provide a Group, Artifact and required dependencies to run the application.
Observe the following screenshot that shows an example where we added the spring-boot-starter-web dependency to write REST Endpoints.
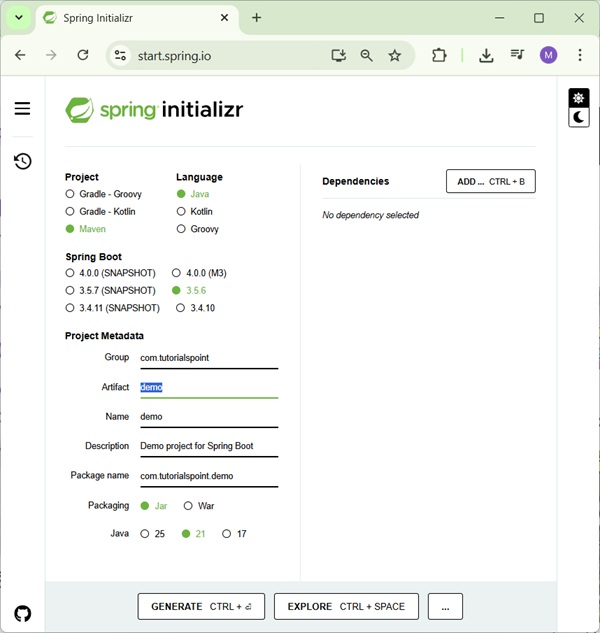
Once you provided the Group, Artifact, Dependencies, Build Project, Platform and Version, click Generate Project button. The zip file will download and the files will be extracted.
This section explains you the examples by using both Maven and Gradle.
Maven
After you download the project, unzip the file. Now, your pom.xml file looks as shown below −
pom.xml
<?xml version="1.0" encoding="UTF-8"?>
   <project xmlns="http://maven.apache.org/POM/4.0.0" xmlns:xsi="http://www.w3.org/2001/XMLSchema-instance"
   xsi:schemaLocation="http://maven.apache.org/POM/4.0.0 https://maven.apache.org/xsd/maven-4.0.0.xsd">
   <modelVersion>4.0.0</modelVersion>
   <parent>
      <groupId>org.springframework.boot</groupId>
      <artifactId>spring-boot-starter-parent</artifactId>
      <version>3.5.6</version>
      <relativePath/> <!-- lookup parent from repository -->
   </parent>
   <groupId>com.tutorialspoint</groupId>
   <artifactId>demo</artifactId>
   <version>0.0.1-SNAPSHOT</version>
   <name>demo</name>
   <description>Demo project for Spring Boot</description>
   <url/>
   <licenses>
      <license/>
   </licenses>
   <developers>
      <developer/>
   </developers>
   <scm>
      <connection/>
      <developerConnection/>
      <tag/>
      <url/>
   </scm>
   <properties>
      <java.version>21</java.version>
   </properties>
   <dependencies>
      <dependency>
         <groupId>org.springframework.boot</groupId>
         <artifactId>spring-boot-starter-web</artifactId>
      </dependency>
      <dependency>
         <groupId>org.springframework.boot</groupId>
         <artifactId>spring-boot-starter-test</artifactId>
         <scope>test</scope>
      </dependency>
   </dependencies>
   <build>
      <plugins>
         <plugin>
            <groupId>org.springframework.boot</groupId>
            <artifactId>spring-boot-maven-plugin</artifactId>
         </plugin>
      </plugins>
   </build>
</project>
Gradle
In case of Gradle, you can check the build.gradle as following:
build.gradle
buildscript {
   ext {
      springBootVersion = '3.5.6'
   }
   repositories {
      mavenCentral()
   }
   dependencies {
      classpath("org.springframework.boot:spring-boot-gradle-plugin:${springBootVersion}")
   }
}
apply plugin: 'java'
apply plugin: 'eclipse'
apply plugin: 'org.springframework.boot'

group = 'com.tutorialspoint'
version = '0.0.1-SNAPSHOT'
sourceCompatibility = 21

repositories {
   mavenCentral()
}
dependencies {
   compile('org.springframework.boot:spring-boot-starter-web')
   testCompile('org.springframework.boot:spring-boot-starter-test')
}
Class Path Dependencies
Spring Boot provides a number of Starters to add the jars in our class path. For example, for writing a Rest Endpoint, we need to add the spring-boot-starter-web dependency in our class path. Observe the codes shown below for a better understanding −
Maven dependency
<dependencies>
   <dependency>
      <groupId>org.springframework.boot</groupId>
      <artifactId>spring-boot-starter-web</artifactId>
   </dependency>
</dependencies>
Gradle dependencies
dependencies {
   compile('org.springframework.boot:spring-boot-starter-web')
}
Main Method
The main method should be writing the Spring Boot Application class. This class should be annotated with @SpringBootApplication. This is the entry point of the spring boot application to start. You can find the main class file under src/java/main directories with the default package.
In this example, the main class file is located at the src/java/main directories with the default package com.tutorialspoint.demo. Observe the code shown here for a better understanding −
DemoApplication.java
package com.tutorialspoint.demo;

import org.springframework.boot.SpringApplication;
import org.springframework.boot.autoconfigure.SpringBootApplication;

@SpringBootApplication
public class DemoApplication {
   public static void main(String[] args) {
      SpringApplication.run(DemoApplication.class, args);
   }
}
Write a Rest Endpoint
To write a simple Hello World Rest Endpoint in the Spring Boot Application main class file itself, follow the steps shown below −
Firstly, add the @RestController annotation at the top of the class.
Now, write a Request URI method with @GetMapping annotation.
Then, the Request URI method should return the Hello World string.
Now, your main Spring Boot Application class file will look like as shown in the code given below −
DemoApplication.java
package com.tutorialspoint.demo;

import org.springframework.boot.SpringApplication;
import org.springframework.boot.autoconfigure.SpringBootApplication;
import org.springframework.web.bind.annotation.GetMapping;
import org.springframework.web.bind.annotation.RestController;

@RestController
@SpringBootApplication
public class DemoApplication {

   public static void main(String[] args) {
      SpringApplication.run(DemoApplication.class, args);
   }
   @GetMapping(value = "/")
   public String hello() {
      return "Hello World";
   }
}
Create an Executable JAR
Let us create an executable JAR file to run the Spring Boot application by using Maven commands in the command prompt as shown below −
Use the Maven command mvn clean install as shown below −
D:\Projects\demo>mvn clean install
You'll see the result similar to as below:
[INFO] Scanning for projects...
[INFO]
[INFO] ----------------------< com.tutorialspoint:demo >-----------------------
[INFO] Building demo 0.0.1-SNAPSHOT
[INFO]   from pom.xml
[INFO] --------------------------------[ jar ]---------------------------------
[INFO]
[INFO] --- clean:3.4.1:clean (default-clean) @ demo ---
[INFO] Deleting D:\Projects\demo\target
[INFO]
[INFO] --- resources:3.3.1:resources (default-resources) @ demo ---
[INFO] Copying 1 resource from src\main\resources to target\classes
[INFO] Copying 0 resource from src\main\resources to target\classes
[INFO]
[INFO] --- compiler:3.14.0:compile (default-compile) @ demo ---
[INFO] Recompiling the module because of changed source code.
[INFO] Compiling 1 source file with javac [debug parameters release 21] to target\classes
[INFO]
[INFO] --- resources:3.3.1:testResources (default-testResources) @ demo ---
[INFO] skip non existing resourceDirectory D:\Projects\demo\src\test\resources
[INFO]
[INFO] --- compiler:3.14.0:testCompile (default-testCompile) @ demo ---
[INFO] Recompiling the module because of changed dependency.
[INFO] Compiling 1 source file with javac [debug parameters release 21] to target\test-classes
[INFO]
[INFO] --- surefire:3.5.4:test (default-test) @ demo ---
[INFO] Using auto detected provider org.apache.maven.surefire.junitplatform.JUnitPlatformProvider
[INFO]
[INFO] -------------------------------------------------------
[INFO]  T E S T S
[INFO] -------------------------------------------------------
[INFO] Running com.tutorialspoint.demo.DemoApplicationTests
13:26:53.939 [main] INFO org.springframework.test.context.support.AnnotationConfigContextLoaderUtils -- Could not detect default configuration classes for test class [com.tutorialspoint.demo.DemoApplicationTests]: DemoApplicationTests does not declare any static, non-private, non-final, nested classes annotated with @Configuration.
13:26:54.064 [main] INFO org.springframework.boot.test.context.SpringBootTestContextBootstrapper -- Found @SpringBootConfiguration com.tutorialspoint.demo.DemoApplication for test class com.tutorialspoint.demo.DemoApplicationTests

  .   ____          _            __ _ _
 /\\ / ___'_ __ _ _(_)_ __  __ _ \ \ \ \
( ( )\___ | '_ | '_| | '_ \/ _` | \ \ \ \
 \\/  ___)| |_)| | | | | || (_| |  ) ) ) )
  '  |____| .__|_| |_|_| |_\__, | / / / /
 =========|_|==============|___/=/_/_/_/

 :: Spring Boot ::                (v3.5.6)

2025-09-28T13:26:54.627+05:30  INFO 37592 --- [demo] [           main] c.t.demo.DemoApplicationTests            : Starting DemoApplicationTests using Java 24.0.1 with PID 37592 (started by mahes in D:\Projects\demo)
2025-09-28T13:26:54.629+05:30  INFO 37592 --- [demo] [           main] c.t.demo.DemoApplicationTests            : No active profile set, falling back to 1 default profile: "default"
2025-09-28T13:26:55.910+05:30  INFO 37592 --- [demo] [           main] c.t.demo.DemoApplicationTests            : Started DemoApplicationTests in 1.69 seconds (process running for 2.659)
Mockito is currently self-attaching to enable the inline-mock-maker. This will no longer work in future releases of the JDK. Please add Mockito as an agent to your build as described in Mockito's documentation: https://javadoc.io/doc/org.mockito/mockito-core/latest/org.mockito/org/mockito/Mockito.html#0.3
Java HotSpot(TM) 64-Bit Server VM warning: Sharing is only supported for boot loader classes because bootstrap classpath has been appended
WARNING: A Java agent has been loaded dynamically (C:\Users\mahes\.m2\repository\net\bytebuddy\byte-buddy-agent\1.17.7\byte-buddy-agent-1.17.7.jar)
WARNING: If a serviceability tool is in use, please run with -XX:+EnableDynamicAgentLoading to hide this warning
WARNING: If a serviceability tool is not in use, please run with -Djdk.instrument.traceUsage for more information
WARNING: Dynamic loading of agents will be disallowed by default in a future release
[INFO] Tests run: 1, Failures: 0, Errors: 0, Skipped: 0, Time elapsed: 2.859 s -- in com.tutorialspoint.demo.DemoApplicationTests
[INFO]
[INFO] Results:
[INFO]
[INFO] Tests run: 1, Failures: 0, Errors: 0, Skipped: 0
[INFO]
[INFO]
[INFO] --- jar:3.4.2:jar (default-jar) @ demo ---
[INFO] Building jar: D:\Projects\demo\target\demo-0.0.1-SNAPSHOT.jar
[INFO]
[INFO] --- spring-boot:3.5.6:repackage (repackage) @ demo ---
[INFO] Replacing main artifact D:\Projects\demo\target\demo-0.0.1-SNAPSHOT.jar with repackaged archive, adding nested dependencies in BOOT-INF/.
[INFO] The original artifact has been renamed to D:\Projects\demo\target\demo-0.0.1-SNAPSHOT.jar.original
[INFO]
[INFO] --- install:3.1.4:install (default-install) @ demo ---
[INFO] Installing D:\Projects\demo\pom.xml to C:\Users\mahes\.m2\repository\com\tutorialspoint\demo\0.0.1-SNAPSHOT\demo-0.0.1-SNAPSHOT.pom
[INFO] Installing D:\Projects\demo\target\demo-0.0.1-SNAPSHOT.jar to C:\Users\mahes\.m2\repository\com\tutorialspoint\demo\0.0.1-SNAPSHOT\demo-0.0.1-SNAPSHOT.jar
[INFO] ------------------------------------------------------------------------
[INFO] BUILD SUCCESS
[INFO] ------------------------------------------------------------------------
[INFO] Total time:  10.119 s
[INFO] Finished at: 2025-09-28T13:26:59+05:30
[INFO] ------------------------------------------------------------------------
Similarly for Gradle, you can run the following command to build the jar.
gradle clean build
Run Hello World with Java
Once you have created an executable JAR file, you can find it under the target directory. In our case it is in D: > Projects > demo > target > demo-0.0.1-SNAPSHOT.jar.
Now, run the JAR file by using the command java jar <JARFILE>. Observe that in the above example, the JAR file is named demo-0.0.1-SNAPSHOT.jar
D:\Projects\demo\target>java -jar demo-0.0.1-SNAPSHOT.jar
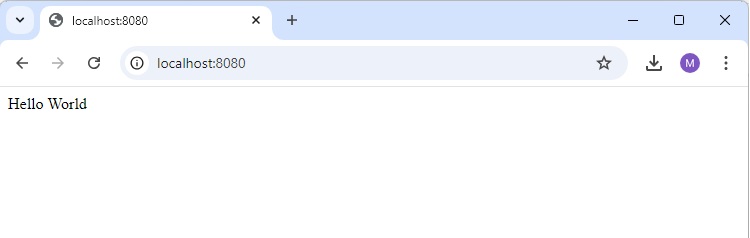
Once you run the jar file, you can see the output in the console window as shown below −
  .   ____          _            __ _ _
 /\\ / ___'_ __ _ _(_)_ __  __ _ \ \ \ \
( ( )\___ | '_ | '_| | '_ \/ _` | \ \ \ \
 \\/  ___)| |_)| | | | | || (_| |  ) ) ) )
  '  |____| .__|_| |_|_| |_\__, | / / / /
 =========|_|==============|___/=/_/_/_/

 :: Spring Boot ::                (v3.5.6)

2025-09-28T13:28:57.375+05:30  INFO 35152 --- [demo] [           main] c.tutorialspoint.demo.DemoApplication    : Starting DemoApplication v0.0.1-SNAPSHOT using Java 24.0.1 with PID 35152 (D:\Projects\demo\target\demo-0.0.1-SNAPSHOT.jar started by mahes in D:\Projects\demo\target)
2025-09-28T13:28:57.381+05:30  INFO 35152 --- [demo] [           main] c.tutorialspoint.demo.DemoApplication    : No active profile set, falling back to 1 default profile: "default"
2025-09-28T13:28:58.533+05:30  INFO 35152 --- [demo] [           main] o.s.b.w.embedded.tomcat.TomcatWebServer  : Tomcat initialized with port 8080 (http)
2025-09-28T13:28:58.552+05:30  INFO 35152 --- [demo] [           main] o.apache.catalina.core.StandardService   : Starting service [Tomcat]
2025-09-28T13:28:58.552+05:30  INFO 35152 --- [demo] [           main] o.apache.catalina.core.StandardEngine    : Starting Servlet engine: [Apache Tomcat/10.1.46]
2025-09-28T13:28:58.585+05:30  INFO 35152 --- [demo] [           main] o.a.c.c.C.[Tomcat].[localhost].[/]       : Initializing Spring embedded WebApplicationContext
2025-09-28T13:28:58.586+05:30  INFO 35152 --- [demo] [           main] w.s.c.ServletWebServerApplicationContext : Root WebApplicationContext: initialization completed in 1085 ms
2025-09-28T13:28:59.069+05:30  INFO 35152 --- [demo] [           main] o.s.b.w.embedded.tomcat.TomcatWebServer  : Tomcat started on port 8080 (http) with context path '/'
2025-09-28T13:28:59.085+05:30  INFO 35152 --- [demo] [           main] c.tutorialspoint.demo.DemoApplication    : Started DemoApplication in 2.537 seconds (process running for 2.958)
Now, look at the console, Tomcat started on port 8080 (http). Now, go to the web browser and hit the URL http://localhost:8080/ and you can see the output as shown below −