- Spring Boot - Home
- Spring Boot - Introduction
- Spring Boot - Quick Start using CLI
- Spring Boot - Bootstrapping
- Spring Tool Suite
- Spring Boot - Tomcat Deployment
- Spring Boot - Build Systems
- Spring Boot - Code Structure
- Spring Boot - Beans & Dependency Injection
- Spring Boot - Runners
- Spring Boot - Starters
- Spring Boot - Application Properties
- Spring Boot - Configuration
- Spring Boot - Annotations
- Spring Boot - Logging
- Building RESTful Web Services
- Spring Boot - Exception Handling
- Spring Boot - Interceptor
- Spring Boot - Servlet Filter
- Spring Boot - Tomcat Port Number
- Spring Boot - Rest Template
- Spring Boot - File Handling
- Spring Boot - Service Components
- Spring Boot - Thymeleaf
- Consuming RESTful Web Services
- Spring Boot - CORS Support
- Spring Boot - Internationalization
- Spring Boot - Scheduling
- Spring Boot - Enabling HTTPS
- Spring Boot - Eureka Server
- Service Registration with Eureka
- Gateway Proxy Server and Routing
- Spring Cloud Configuration Server
- Spring Cloud Configuration Client
- Spring Boot - Actuator
- Spring Boot - Admin Server
- Spring Boot - Admin Client
- Spring Boot - Enabling Swagger2
- Spring Boot - Using SpringDoc OpenAPI
- Spring Boot - Creating Docker Image
- Tracing Micro Service Logs
- Spring Boot - Flyway Database
- Spring Boot - Sending Email
- Spring Boot - Hystrix
- Spring Boot - Web Socket
- Spring Boot - Batch Service
- Spring Boot - Apache Kafka
- Spring Boot - Twilio
- Spring Boot - Unit Testing
- Rest Controller Unit Testing
- Spring Boot - Database Handling
- Securing Web Applications
- Spring Boot - OAuth2 with JWT
- Spring Boot - Google Cloud Platform
- Spring Boot - Google OAuth2 Sign-In
Spring Boot Resources
Spring Boot - Enabling Swagger2
Swagger2 is an open source project used to generate the REST API documents for RESTful web services. It provides a user interface to access our RESTful web services via the web browser.
To enable the Swagger2 in Spring Boot application, you need to add the following dependencies in our build configurations file.
<dependency>
   <groupId>io.springfox</groupId>
   <artifactId>springfox-swagger2</artifactId>
   <version>2.7.0</version>
</dependency>
<dependency>
   <groupId>io.springfox</groupId>
   <artifactId>springfox-swagger-ui</artifactId>
   <version>2.7.0</version>
</dependency>
For Gradle users, add the following dependencies in your build.gradle file.
compile group: 'io.springfox', name: 'springfox-swagger2', version: '2.7.0'
compile group: 'io.springfox', name: 'springfox-swagger-ui', version: '2.7.0'
Now, add the @EnableSwagger2 annotation in your main Spring Boot application. The @EnableSwagger2 annotation is used to enable the Swagger2 for your Spring Boot application.
The code for main Spring Boot application is shown below −
package com.tutorialspoint.swaggerdemo;

import org.springframework.boot.SpringApplication;
import org.springframework.boot.autoconfigure.SpringBootApplication;
import springfox.documentation.swagger2.annotations.EnableSwagger2;

@SpringBootApplication
@EnableSwagger2
public class SwaggerDemoApplication {
   public static void main(String[] args) {
      SpringApplication.run(SwaggerDemoApplication.class, args);
   }
}
Next, create Docket Bean to configure Swagger2 for your Spring Boot application. We need to define the base package to configure REST API(s) for Swagger2.
   @Bean
   public Docket productApi() {
      return new Docket(DocumentationType.SWAGGER_2).select()
         .apis(RequestHandlerSelectors.basePackage("com.tutorialspoint.swaggerdemo")).build();
   }
Now, add this bean in main Spring Boot application class file itself and your main Spring Boot application class will look as shown below −
SwaggerDemoApplication.java
package com.tutorialspoint.swaggerdemo;

import org.springframework.boot.SpringApplication;
import org.springframework.boot.autoconfigure.SpringBootApplication;
import org.springframework.context.annotation.Bean;

import springfox.documentation.builders.RequestHandlerSelectors;
import springfox.documentation.spi.DocumentationType;
import springfox.documentation.spring.web.plugins.Docket;
import springfox.documentation.swagger2.annotations.EnableSwagger2;

@SpringBootApplication
@EnableSwagger2
public class SwaggerDemoApplication {
   public static void main(String[] args) {
      SpringApplication.run(SwaggerDemoApplication.class, args);
   }
   @Bean
   public Docket productApi() {
      return new Docket(DocumentationType.SWAGGER_2).select()
         .apis(RequestHandlerSelectors.basePackage("com.tutorialspoint.swaggerdemo")).build();
   }
}
Now, add the below Spring Boot Starter Web dependency in your build configuration file to write a REST Endpoints as shown below −
Maven users can add the following dependency in your pom.xml file −
<dependency>
   <groupId>org.springframework.boot</groupId>
   <artifactId>spring-boot-starter-web</artifactId>
</dependency>
Gradle users can add the following dependency in build.gradle file −
compile('org.springframework.boot:spring-boot-starter-web')
Now, the code to build two simple RESTful web services GET and POST in Rest Controller file is shown here −
package com.tutorialspoint.swaggerdemo;

import java.util.ArrayList;
import java.util.List;

import org.springframework.web.bind.annotation.RequestMapping;
import org.springframework.web.bind.annotation.RequestMethod;
import org.springframework.web.bind.annotation.RestController;

@RestController
public class SwaggerAPIController {
   @RequestMapping(value = "/products", method = RequestMethod.GET)
   public List<String> getProducts() {
      List<String> productsList = new ArrayList<>();
      productsList.add("Honey");
      productsList.add("Almond");
      return productsList;
   }
   @RequestMapping(value = "/products", method = RequestMethod.POST)
   public String createProduct() {
      return "Product is saved successfully";
   }
}
The complete build configuration file is given below −
Maven pom.xml
<?xml version = "1.0" encoding = "UTF-8"?>
<project xmlns = "http://maven.apache.org/POM/4.0.0"
   xmlns:xsi = "http://www.w3.org/2001/XMLSchema-instance"
   xsi:schemaLocation = "http://maven.apache.org/POM/4.0.0
   http://maven.apache.org/xsd/maven-4.0.0.xsd">
   <modelVersion>4.0.0</modelVersion>

   <groupId>com.tutorialspoint</groupId>
   <artifactId>swagger-demo</artifactId>
   <version>0.0.1-SNAPSHOT</version>
   <packaging>jar</packaging>
   <name>swagger-demo</name>
   <description>Demo project for Spring Boot</description>

   <parent>
      <groupId>org.springframework.boot</groupId>
      <artifactId>spring-boot-starter-parent</artifactId>
      <version>1.5.9.RELEASE</version>
      <relativePath /> <!-- lookup parent from repository -->
   </parent>

   <properties>
      <project.build.sourceEncoding>UTF-8</project.build.sourceEncoding>
      <project.reporting.outputEncoding>UTF-8</project.reporting.outputEncoding>
      <java.version>1.8</java.version>
   </properties>

   <dependencies>
      <dependency>
         <groupId>org.springframework.boot</groupId>
         <artifactId>spring-boot-starter-web</artifactId>
      </dependency>

      <dependency>
         <groupId>org.springframework.boot</groupId>
         <artifactId>spring-boot-starter-test</artifactId>
         <scope>test</scope>
      </dependency>

      <dependency>
         <groupId>io.springfox</groupId>
         <artifactId>springfox-swagger2</artifactId>
         <version>2.7.0</version>
      </dependency>

      <dependency>
         <groupId>io.springfox</groupId>
         <artifactId>springfox-swagger-ui</artifactId>
         <version>2.7.0</version>
      </dependency>
   </dependencies>

   <build>
      <plugins>
         <plugin>
            <groupId>org.springframework.boot</groupId>
            <artifactId>spring-boot-maven-plugin</artifactId>
         </plugin>
      </plugins>
   </build>

</project>
Gradle build.gradle
buildscript {
   ext {
      springBootVersion = '1.5.9.RELEASE'
   }
   repositories {
      mavenCentral()
   }
   dependencies {
      classpath("org.springframework.boot:spring-boot-gradle-plugin:${springBootVersion}")
   }
}
apply plugin: 'java'
apply plugin: 'eclipse'
apply plugin: 'org.springframework.boot'

group = 'com.tutorialspoint'
version = '0.0.1-SNAPSHOT'
sourceCompatibility = 1.8

repositories {
   mavenCentral()
} dependencies {
   compile('org.springframework.boot:spring-boot-starter-web')
   testCompile('org.springframework.boot:spring-boot-starter-test')
   compile group: 'io.springfox', name: 'springfox-swagger2', version: '2.7.0'
   compile group: 'io.springfox', name: 'springfox-swagger-ui', version: '2.7.0'
}
Compilation and Execution
You can create an executable JAR file, and run the Spring Boot application by using the following Maven or Gradle commands.
For Maven, you can use the command shown here −
mvn clean install
After BUILD SUCCESS, you can find the JAR file under the target directory.
For Gradle, you can use the command as shown here −
gradle clean build
After BUILD SUCCESSFUL, you can find the JAR file under the build/libs directory.
Now, run the JAR file by using the command shown here −
java jar <JARFILE>
Now, the application will start on the Tomcat port 8080 as shown −

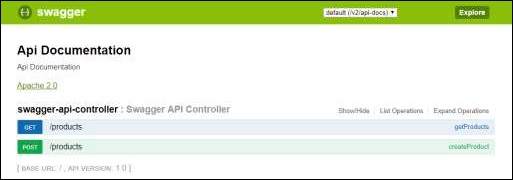
Now, hit the URL in your web browser and see the Swagger API functionalities.
http://localhost:8080/swagger-ui.html
