- Spring Boot - Home
- Spring Boot - Introduction
- Spring Boot - Quick Start using CLI
- Spring Boot - Bootstrapping
- Spring Tool Suite
- Spring Boot - Tomcat Deployment
- Spring Boot - Build Systems
- Spring Boot - Code Structure
- Spring Boot - Beans & Dependency Injection
- Spring Boot - Runners
- Spring Boot - Starters
- Spring Boot - Application Properties
- Spring Boot - Configuration
- Spring Boot - Annotations
- Spring Boot - Logging
- Building RESTful Web Services
- Spring Boot - Exception Handling
- Spring Boot - Interceptor
- Spring Boot - Servlet Filter
- Spring Boot - Tomcat Port Number
- Spring Boot - Rest Template
- Spring Boot - File Handling
- Spring Boot - Service Components
- Spring Boot - Thymeleaf
- Consuming RESTful Web Services
- Spring Boot - CORS Support
- Spring Boot - Internationalization
- Spring Boot - Scheduling
- Spring Boot - Enabling HTTPS
- Spring Boot - Eureka Server
- Service Registration with Eureka
- Gateway Proxy Server and Routing
- Spring Cloud Configuration Server
- Spring Cloud Configuration Client
- Spring Boot - Actuator
- Spring Boot - Admin Server
- Spring Boot - Admin Client
- Spring Boot - Enabling Swagger2
- Spring Boot - Using SpringDoc OpenAPI
- Spring Boot - Creating Docker Image
- Tracing Micro Service Logs
- Spring Boot - Flyway Database
- Spring Boot - Sending Email
- Spring Boot - Hystrix
- Spring Boot - Web Socket
- Spring Boot - Batch Service
- Spring Boot - Apache Kafka
- Spring Boot - Twilio
- Spring Boot - Unit Testing
- Rest Controller Unit Testing
- Spring Boot - Database Handling
- Securing Web Applications
- Spring Boot - OAuth2 with JWT
- Spring Boot - Google Cloud Platform
- Spring Boot - Google OAuth2 Sign-In
Spring Boot Resources
Spring Boot - Cloud Configuration Server
Spring Cloud Configuration Server is a centralized application that manages all the application related configuration properties. In this chapter, you will learn in detail about how to create Spring Cloud Configuration server.
Example - Creating Spring Cloud Configuration Server
First, download the Spring Boot project from the Spring Initializer page and choose the Spring Cloud Config Server dependency. Observe the screenshot given below −
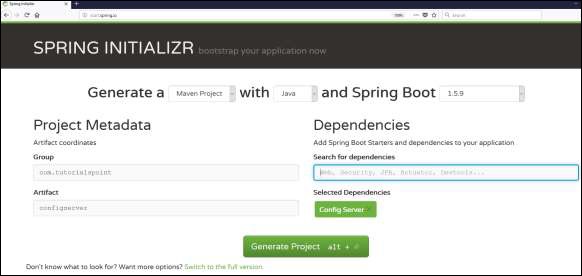
Now, add the Spring Cloud Config server dependency in your build configuration file as explained below −
Maven users can add the below dependency into the pom.xml file.
<dependency>
   <groupId>org.springframework.cloud</groupId>
   <artifactId>spring-cloud-config-server</artifactId>
</dependency>
Gradle users can add the below dependency in your build.gradle file.
compile('org.springframework.cloud:spring-cloud-config-server')
Now, add the @EnableConfigServer annotation in your main Spring Boot application class file. The @EnableConfigServer annotation makes your Spring Boot application act as a Configuration Server.
The main Spring Boot application class file is given below −
ConfigserverApplication.java
package com.tutorialspoint.configserver;

import org.springframework.boot.SpringApplication;
import org.springframework.boot.autoconfigure.SpringBootApplication;
import org.springframework.cloud.config.server.EnableConfigServer;

@SpringBootApplication
@EnableConfigServer
public class ConfigserverApplication {
   public static void main(String[] args) {
      SpringApplication.run(ConfigserverApplication.class, args);
   }
}
Now, add the below configuration to your application.properties file. Observe the code given below −
application.properties
server.port = 8888
spring.cloud.config.server.git.uri=file:///E:/Dev/config/
Configuration Server runs on the Tomcat port 8888 and application configuration properties are loaded from a git based local file system search locations.
Create Git Repo
Initialize the Git repo
Go to E:/Dev/config/ folder and run the following git command to initialize it as git repo.
git init
Add the properties file
Now, in E:/Dev/config/, place your client application - application.properties file. For example, your client application name is config-client, then rename your application.properties file as config-client.properties and place the properties file on the path E:/Dev/config/.
The code for config-client properties file is given below −
welcome.message = Welcome to Spring cloud config server
Run the following git command to stage all changes.
E:\Dev\config> git add .
Commit the Changes
Run the following git command to commit changes.
E:\Dev\config> git commit -m "First Checkin"
Verify the changes
Run the following git command to check the commited changes.
E:\Dev\config> git log
commit 8081e552232ca5b1af29cef56e6acc6e1a5bd2e3 (HEAD -> master)
Author: maheshparashar84 <mahesh.kumar@tutorialspoint.com>
Date:   Thu Sep 12 11:38:28 2024 +0530

    First Checkin

E:\Dev\config>
The complete build configuration file is given below −
Maven users can use pom.xml given below −
pom.xml
<?xml version="1.0" encoding="UTF-8"?>
<project xmlns="http://maven.apache.org/POM/4.0.0" xmlns:xsi="http://www.w3.org/2001/XMLSchema-instance"
   xsi:schemaLocation="http://maven.apache.org/POM/4.0.0 https://maven.apache.org/xsd/maven-4.0.0.xsd">
   <modelVersion>4.0.0</modelVersion>
   <parent>
      <groupId>org.springframework.boot</groupId>
      <artifactId>spring-boot-starter-parent</artifactId>
      <version>3.5.6</version>
      <relativePath/> <!-- lookup parent from repository -->
   </parent>
   <groupId>com.tutorialspoint</groupId>
   <artifactId>configserver</artifactId>
   <version>0.0.1-SNAPSHOT</version>
   <name>configserver</name>
   <description>Demo project for Spring Boot</description>
   <url/>
   <licenses>
      <license/>
   </licenses>
   <developers>
      <developer/>
   </developers>
   <scm>
      <connection/>
      <developerConnection/>
      <tag/>
      <url/>
   </scm>
   <properties>
      <java.version>21</java.version>
      <spring-cloud.version>2025.0.0</spring-cloud.version>
   </properties>
   <dependencies>
      <dependency>
         <groupId>org.springframework.cloud</groupId>
         <artifactId>spring-cloud-config-server</artifactId>
      </dependency>
      <dependency>
         <groupId>org.springframework.boot</groupId>
         <artifactId>spring-boot-starter-test</artifactId>
         <scope>test</scope>
      </dependency>
   </dependencies>
   <dependencyManagement>
      <dependencies>
         <dependency>
            <groupId>org.springframework.cloud</groupId>
            <artifactId>spring-cloud-dependencies</artifactId>
            <version>${spring-cloud.version}</version>
            <type>pom</type>
            <scope>import</scope>
         </dependency>
      </dependencies>
   </dependencyManagement>
   <build>
      <plugins>
         <plugin>
            <groupId>org.springframework.boot</groupId>
            <artifactId>spring-boot-maven-plugin</artifactId>
         </plugin>
      </plugins>
   </build>
</project>
Gradle users can use the build.gradle file given below −
build.gradle
<scope>import</scope>
</dependency>
</dependencies>
buildscript {
   ext {
      springBootVersion = '3.5.6'
   }
   repositories {
      mavenCentral()
   }
   dependencies {
      classpath("org.springframework.boot:spring-boot-gradle-plugin:${springBootVersion}")
   }
}
apply plugin: 'java'
apply plugin: 'eclipse'
apply plugin: 'org.springframework.boot'

group = 'com.tutorialspoint'
version = '0.0.1-SNAPSHOT'
sourceCompatibility = 21

repositories {
   mavenCentral()
}
ext {
   springCloudVersion = '2025.0.0'
}
dependencies {
   compile('org.springframework.cloud:spring-cloud-config-server')
   testCompile('org.springframework.boot:spring-boot-starter-test')
}
dependencyManagement {
   imports {
      mavenBom "org.springframework.cloud:spring-cloud-dependencies:${springCloudVersion}"
   }
}
Compilation and Execution
Now, create an executable JAR file, and run the Spring Boot application by using the following Maven or Gradle commands −
For Maven, use the command given below −
mvn clean install
After "BUILD SUCCESS", you can find the JAR file under the target directory.
For Gradle, use the command given below −
gradle clean build
After "BUILD SUCCESSFUL", you can find the JAR file under the build/libs directory.
Run the JAR file by using the following command −
java jar <JARFILE>
Now, the application has started on the Tomcat port 8888 as shown here −
  .   ____          _            __ _ _
 /\\ / ___'_ __ _ _(_)_ __  __ _ \ \ \ \
( ( )\___ | '_ | '_| | '_ \/ _` | \ \ \ \
 \\/  ___)| |_)| | | | | || (_| |  ) ) ) )
  '  |____| .__|_| |_|_| |_\__, | / / / /
 =========|_|==============|___/=/_/_/_/

 :: Spring Boot ::                (v3.5.6)

2025-09-29T15:45:51.461+05:30  INFO 38672 --- [configserver] [           main] c.t.c.ConfigserverApplication            : Starting ConfigserverApplication using Java 21.0.6 with PID 38672 (D:\Projects\configserver\target\classes started by mahes in D:\Projects\configserver)
2025-09-29T15:45:51.463+05:30  INFO 38672 --- [configserver] [           main] c.t.c.ConfigserverApplication            : No active profile set, falling back to 1 default profile: "default"
2025-09-29T15:45:52.818+05:30  INFO 38672 --- [configserver] [           main] o.s.cloud.context.scope.GenericScope     : BeanFactory id=1d8d04c8-8df1-3ebe-96a7-ad8601b5ee76
2025-09-29T15:45:53.266+05:30  INFO 38672 --- [configserver] [           main] o.s.b.w.embedded.tomcat.TomcatWebServer  : Tomcat initialized with port 8888 (http)
2025-09-29T15:45:53.296+05:30  INFO 38672 --- [configserver] [           main] o.apache.catalina.core.StandardService   : Starting service [Tomcat]
2025-09-29T15:45:53.296+05:30  INFO 38672 --- [configserver] [           main] o.apache.catalina.core.StandardEngine    : Starting Servlet engine: [Apache Tomcat/10.1.46]
2025-09-29T15:45:53.414+05:30  INFO 38672 --- [configserver] [           main] o.a.c.c.C.[Tomcat].[localhost].[/]       : Initializing Spring embedded WebApplicationContext
2025-09-29T15:45:53.417+05:30  INFO 38672 --- [configserver] [           main] w.s.c.ServletWebServerApplicationContext : Root WebApplicationContext: initialization completed in 1866 ms
2025-09-29T15:45:54.317+05:30  INFO 38672 --- [configserver] [           main] o.s.b.w.embedded.tomcat.TomcatWebServer  : Tomcat started on port 8888 (http) with context path '/'
2025-09-29T15:45:54.341+05:30  INFO 38672 --- [configserver] [           main] c.t.c.ConfigserverApplication            : Started ConfigserverApplication in 3.456 seconds (process running for 4.287)
2025-09-29T15:45:54.341+05:30  INFO 38672 --- [configserver] [           main] .c.s.e.MultipleJGitEnvironmentRepository[0;39m [2m:[0;39m Could not merge remote for master remote: null
2025-09-29T15:45:54.341+05:30  INFO 38672 --- [configserver] [           main] o.s.c.c.s.e.NativeEnvironmentRepository [0;39m [2m:[0;39m Adding property source: Config resource 'file [E:\Dev\config\config-client.properties]' via location 'file:/E:/Dev/config/'
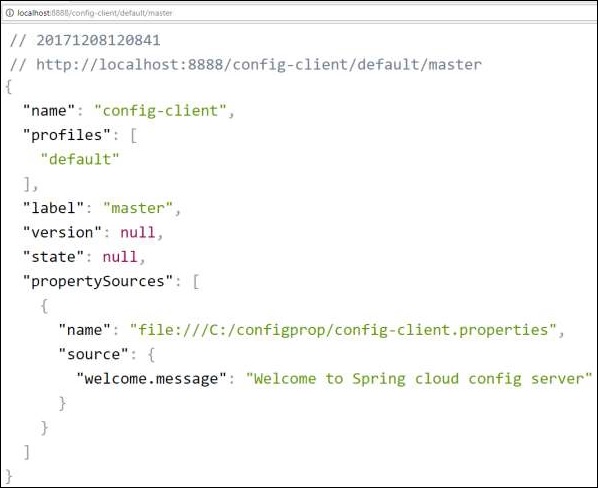
Now hit the URL http://localhost:8888/config-client/default/master on your web browser and you can see your config-client application configuration properties as shown here.