- TestLodge - Home
- TestLodge - Introduction
- TestLodge - Features
- TestLodge - Free Trial Access
- TestLodge - Login
- TestLodge - Dashboard
- TestLodge - Add Users
- TestLodge - Add a Project
- TestLodge - Test Plans
- TestLodge - Copy a Test Plan
- TestLodge - Requirements
- TestLodge - Copy Requirements
- TestLodge - Test Suites
- TestLodge - Copy Test Cases
- TestLodge - Import Test Cases
- TestLodge - Add Test Run
- TestLodge - Execute a Test Run
- TestLodge - Test Run Summary
- TestLodge - Reports
- TestLodge - Export Contents
- Issue Tracker Integration
- TestLodge - Search
- TestLodge - Logout
TestLodge - Quick Guide
TestLodge - Introduction
TestLodge is a cloud-based test case management tool used for Project Management and test management. It simplifies the testing process. It provides an easy way to organize, collaborate, and track the progress of tests.
This tool is used to write and manage test plans as well test cases. It was developed by 6-member team. TestLodge CEO is Scott Sherwood.
TestLodge is a cloud-based tool and supports all browsers especially Chrome, Firefox, IE, etc. It supports different Windows OS such as Windows XP, Windows Vista, Windows 7, etc. It can be integrated with many other tools JIRA, Mantis, Bugzilla, FogBugz, Version One, GitHub, codebase, TFS, etc.
License and Free Trial
This is a commercial tool and is available as a Trial version for limited time of 30 days for all accounts Premium, Plus, Basic, and Personal. To utilize TestLodge services beyond 30 days, a license is required. TestLodge provides a free license for 30 days.
Uses
- Used in tracking all QA activities from the first phase of software testing lifecycle.
- Useful in Project Management, Requirement Management, and Test Management.
- Supports all test level activities performed by QA.
- Useful in performing QA tasks such as writing Test Cases, execution, reports, etc.
TestLodge Specifications
| Sr.No. | Specification & Description |
|---|---|
| 1 | Application copyright It is taken by TestLodge It provides Commercial and Trial Version |
| 2 | Tool scope It can be used for Test Management and Project Management is utilized as a Testing Utility |
| 3 | Testing Methods Agile Testing Black box testing Exploratory Testing Functional/Manual Testing Traditional Testing |
| 4 | Tool Objectives Desktop Testing Web Testing |
| 5 | Management Features Requirement Management Project Management Test Management Report |
| 6 | Software Requirement Since it is a cloud-based online tool, it can be used on any of the browsers such as IE, Chrome, Mozilla, etc. |
TestLodge - Features
TestLodge has a wide range of features to attract QAs and other stakeholders for test management.
Core Features
Following are the core features of TestLodge.
| Sr.No. | Core Features & Description |
|---|---|
| 1 | Testing Support TestLodge supports following test methodologies −
|
| 2 | Centralize & Organize
|
| 3 | Manage & Track Execution
|
| 4 | Notification
|
| 5 | Search
|
| 6 | Reports
|
| 7 | Scale with Team Growth
|
| 8 | Integration
|
TestLodge - Free Trial Access
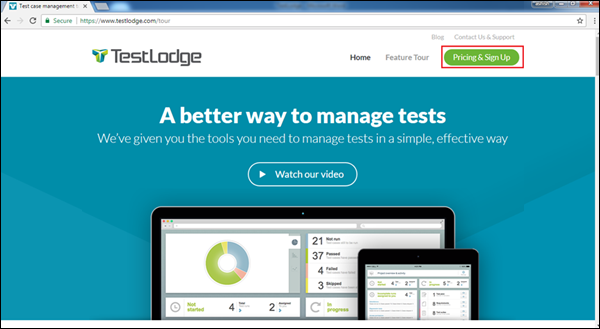
TestLodge provides 30-days free trials to email, access to unlimited users, with basic features. It has other plans as well with different advanced features and add-ins. Cost depends on different plans. Visit https://www.testlodge.com and click Pricing & Sign Up. The user can view different available plans for trial.
Set Up for Free Trials
Following are the steps to be followed to set up for free trials.
Step 1 − Visit https://www.testlodge.com and click Pricing & Sign Up at the top right side corner of the screen.
Step 2 − Click Sign Up based on the choosen plan as shown in the following screenshot.
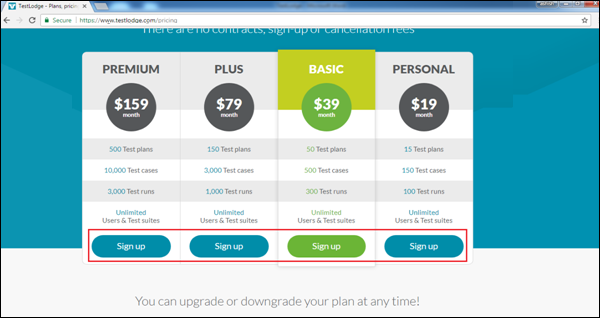
A basic form to create a TestLodge account pops up.
Step 3 − Enter the following details in the respective fields as shown in the following screenshots.
First Name
Last Name
Email
Create your TestLodge site addess: It should be unique and this URL will be used to access TestLodge application.
Password − To authenticate access of this URL.
Re-type password
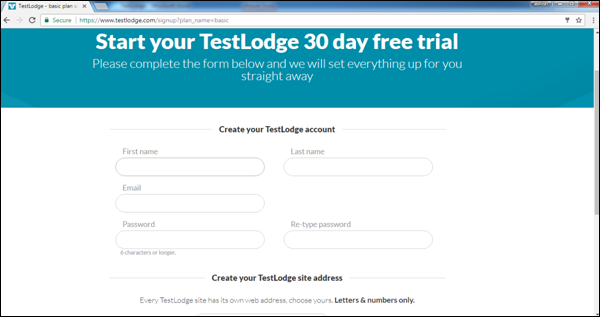
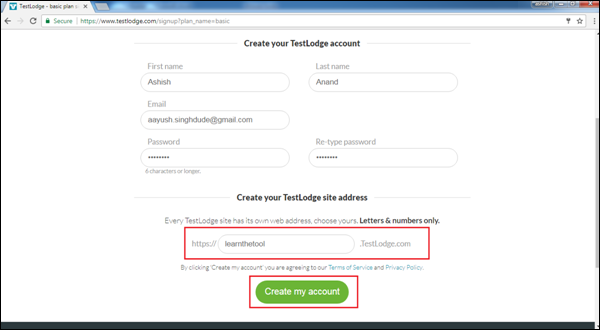
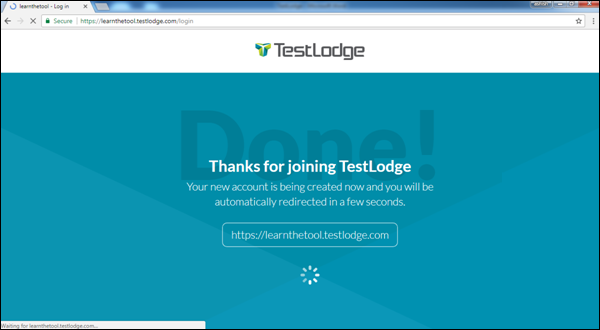
Step 4 − After entering all details, click Create my account as shown in the above screenshot. It will display a Thank you page of the New User as shown in the following screenshot.
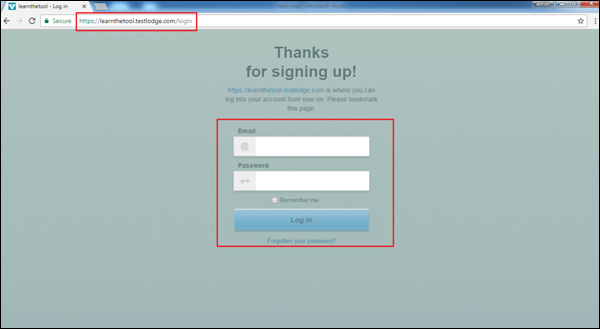
Step 5 − Enter the URL and after a few seconds, you will see the Login Page.
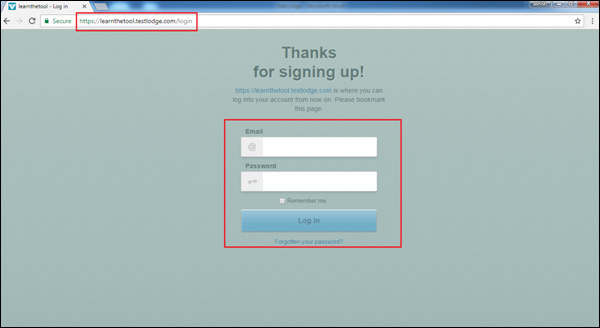
The following screenshot displays the Login page where you can enter the details to visit the home page.
TestLodge - Login
Following are the steps to login to TestLodge.
Step 1 − To login to TestLodge, go to your sample website selected while creating the free trial. It will open a login page.
Step 2 − Enter your registered email address as username and enter the Password.
Step 3 − Click the Log In button.
The following screenshot shows how to login into TestLodge using credentials.
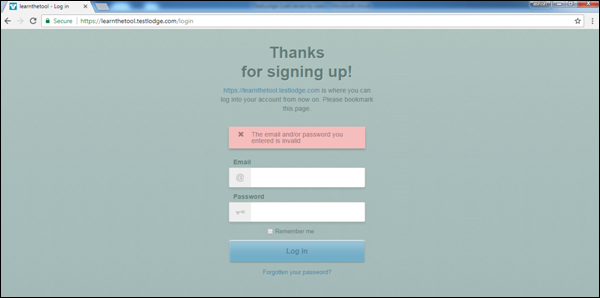
On Error
An error may occur due to an incorrect combination of email id or password. You would get to see the following error page, as a result of an unsuccessful login or when the credentials are incorrect.
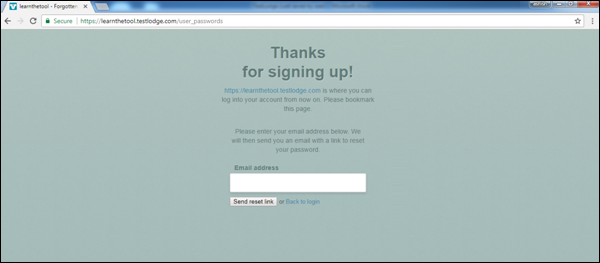
If you forgot the password, then you can follow the steps given below to recover your password −
Step 1 − Click the Forgot Your Password? link below the Log In button.
Step 2 − Enter the Email Address.
Step 3 − Click the Send reset link.
You can use the following page to recover the password, if you have forgotten it. You will get an email with the details of the username or a link to reset the password.
On Successful Login
On successful login, the system dashboard will be displayed, if the account is associated with any project by admin or the user can create a sample project.
The following screenshot displays the welcome page/dashboard of TestLodge on successful login.
TestLodge - Dashboard
After logging into TestLodge, Dashboard is the first page that is displayed. Dashboard is customized by the Admin. Based on the roles, admin can set the access to TestLodge. The admin also has the right to change the colors and logo of TestLodge.
Here, you need to note the following points −
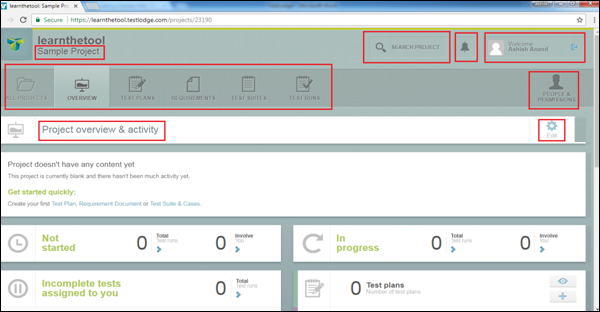
The navigation bar, present at the top left corner of TestLodge page, will be the same across all pages/screen of TestLodge.
URL - <Project Name>, All Projects, Overview, Test Plans, Requirements, Test Suites and Test Run are the main links. These links are used to navigate respective functionality.
Navigation bar contains links that provide quick access to the most useful functions of TestLodge.
By Default, the Overview page of the default project displays on successful login.
Below the navigation bar, Project overview and the activity section is displayed.
The information provided on the left side below the Project overview & activity section are details of the not started, in progress, incomplete tests assigned to the users.
On the right side of the page, User Profile, Notification, and Search are the main features. This remains the same across all pages/screen of TestLodge.
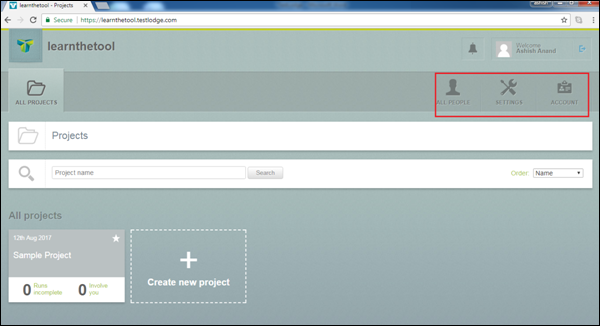
Using the All Projects tab, the user can view the Settings, Account Information, and All people (if the user is logged in as Admin) link.
The following screenshot shows the overview of the Dashboard page of TestLodge.
The following screenshot displays the All Projects tab.
TestLodge - Add Users
To add new users to your TestLodge domain, following are the steps involved.
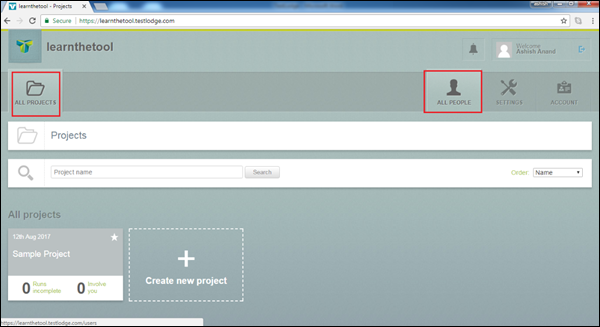
Step 1 − Navigate to the All Project section and click All People icon as shown in the following screenshot.
Step 2 − Click Add person icon on the right side of the screen as shown in the following screenshot.
Step 3 − Now, Add person form opens. Enter the name and email id of the invited person. Select the access project and check the checkbox to send an email to the concerned person.
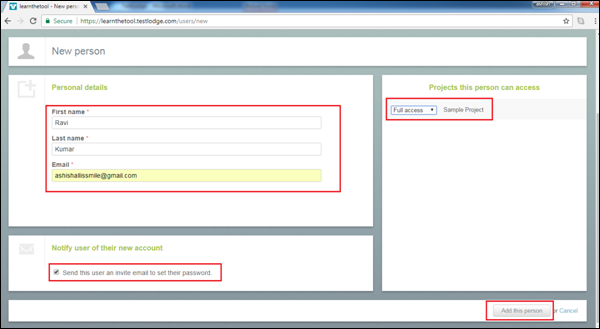
Step 4 − Click Add the person button to add the user as shown above.
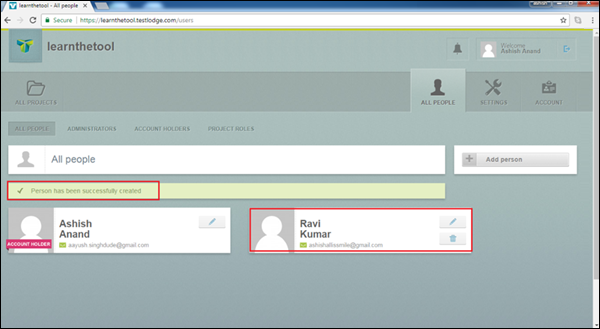
After adding the person, a successful message displays and the user gets listed in the list as shown in the following screenshot.
TestLodge - Add a Project
To add a project, the user should be logged in as Admin.
Create a Project
Following are the steps to add a project into TestLodge.
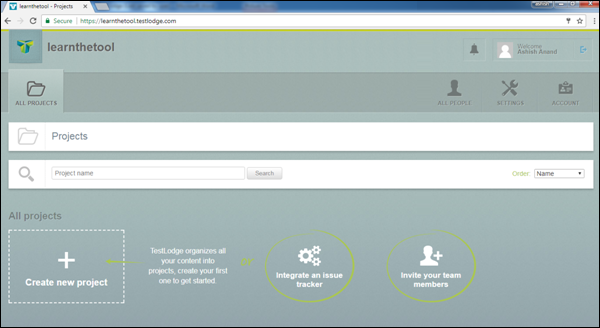
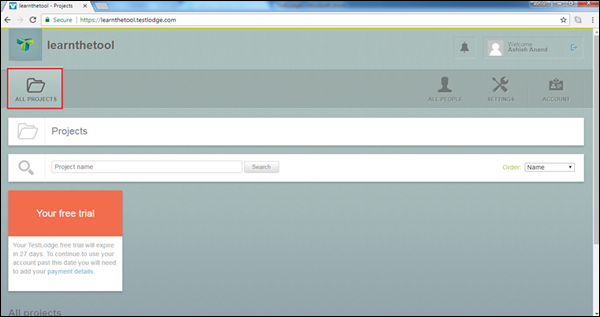
Step 1 − Login to TestLodge account and click the All Projects icon
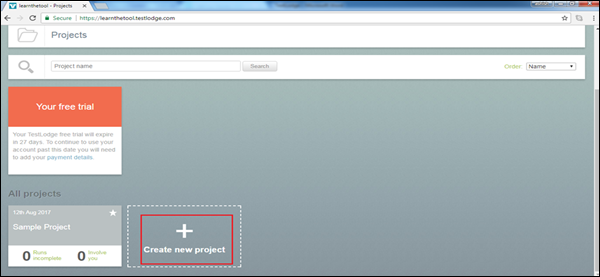
Step 2 − Following screenshot displays showing the Create New Project link. Click the Create New Project as shown in the following screenshot.
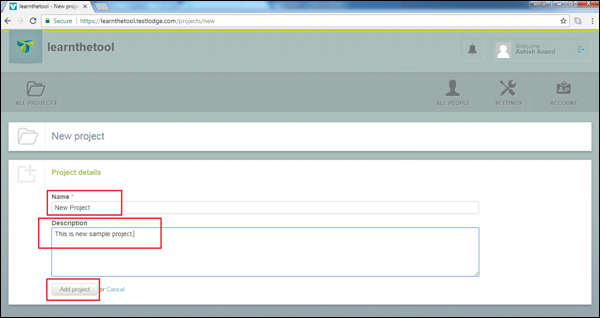
Step 3 − A Project form is displayed. Enter the Project Details Name and Description. Then, click the Add Project button as shown in the following screenshot.
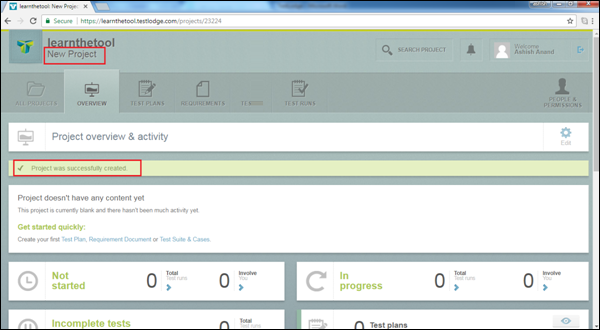
By clicking the Add Project button, Projects get added successfully and the Overview page is displayed along with a successful message as shown in the following screenshot.
Step 4 − You can access all available projects by clicking the All Project tab and selecting the project name from the list below.
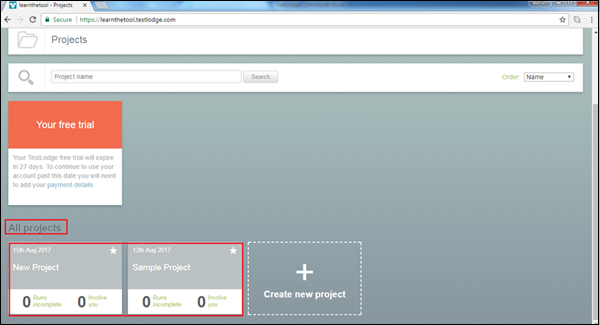
Once you click the Project name, the Overview page displays the corresponding project.
TestLodge - Test Plans
TestLodge supports flexible and lightweight project management within the Test Plan module. Test Plan is a testing artifact that provides the details of the process and objectives to follow while testing the specific product.
Test Plan provides the details of time, dependencies, resources involved, acceptance criteria, etc. A test plan can be created using a pre-built template or from scratch.
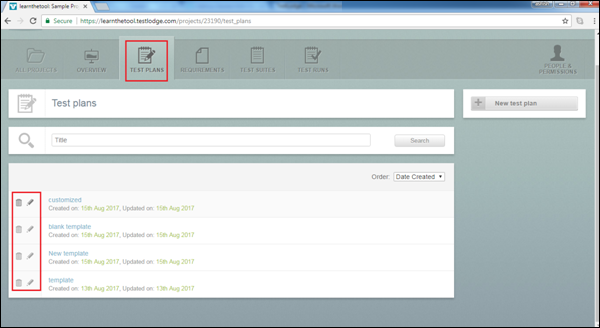
The users can also link the test plans to test suites. In the Test Plans tab, the user can view all available test plans. There is an edit and delete icon on the left side of the Test Plan page that can be used to edit or delete a test plan.
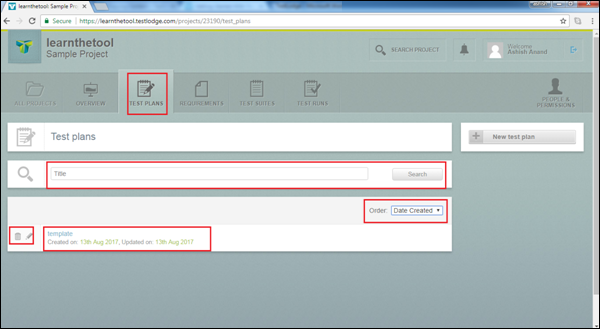
Test Plans can be sorted using Date Created, Date Updated, or Title options. There is a search textbox using which the user can search a specific test plan using Title of the test plan.
The following screenshot displays the Test Plans page.
Create a Test Plan
To create a Test Plan, you should have Create Test Plan permission.
To create a new Test plan, there are two options.
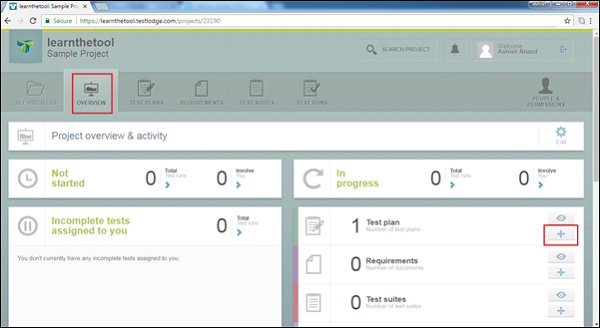
Using the first option, go to the Overview tab and click the + sign present on the right side of the screen for Test Plan as shown in the following screenshot.
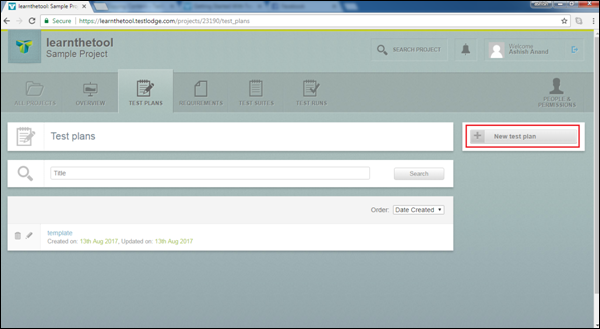
Using the second option, go to the Test Plan section and click the New Test Plan button on the right side of the screen as shown in the following screenshot.
You will get the following Create Test Plan form, by using any of the above two options.
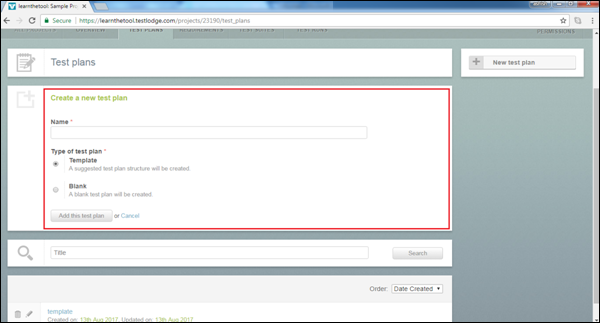
Following are the steps to create a Test Plan −
Step 1 − Enter the Name of the Test Plan.
Step 2 − Select the Type of test plan as Template or Blank. Template is a suggested test plan structure that allows to enter the details in different section whereas by choosing blank, it creates a blank test plan where the user has to add title and contents.
Step 3 − Click Add the test plan button as shown in the previous screenshot.
The following screenshot displays a Template test plan structure.
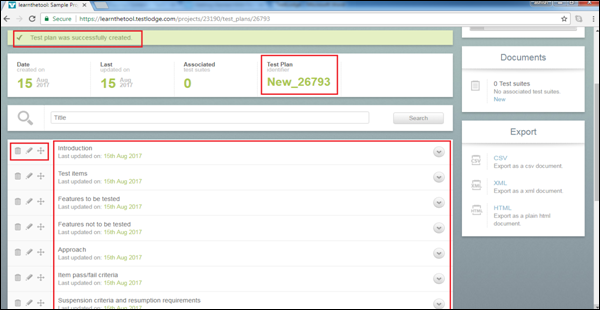
At the top of the screen, a successful message appears and in the next line, you will see a template name.
After the search section, you will see a Test Plan structure having different sub-sections such as Introduction, Test Items, and Features to be tested.
On the left side of each section, there are three buttons Delete, Edit, Re-Position (left to right).
Step 4 − Select the Blank Test Plan and a blank template gets added as shown in the following screenshot.
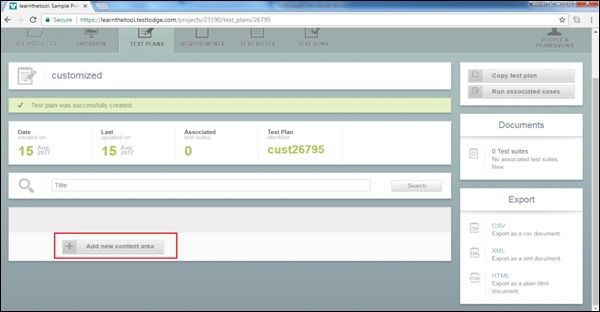
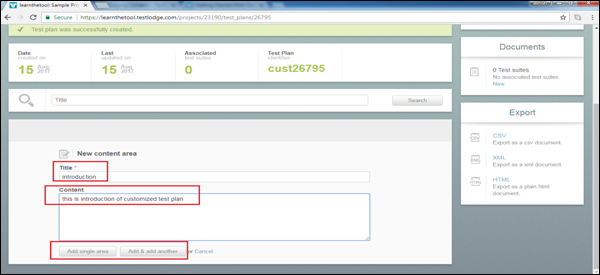
Step 5 − Click the Add new content area and it opens a page. Add the title and the content. Then, click the Add single area or Add & add another button. The latter will open a new form same as it to add another field.
The following screenshot shows how to add new content.
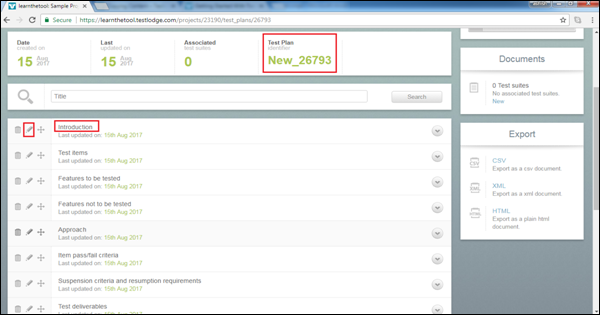
Edit a Test Plan
To edit a test plan, you should have Edit Test Plan Permission. Following are the steps to edit a test plan −
Step 1 − Select a Test Plan to edit. Click to open the different sub-sections of test plans.
Step 2 − Click the Edit icon present on the left side of each section as shown in the following screenshot.
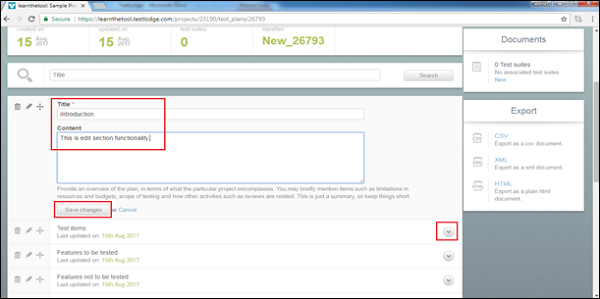
Step 3 − This will enable the text for editing. Click the Save Changes button as shown in the following screenshot. By clicking the arrow sign, you can view content of a specific section inside the test plan.
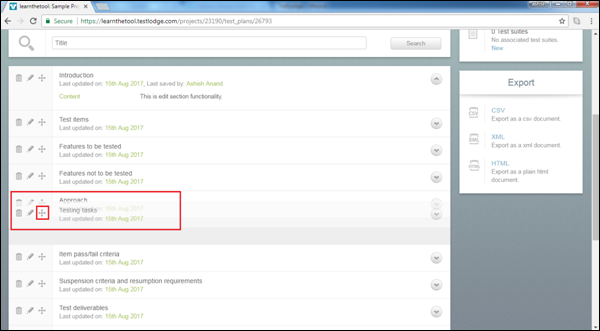
Move a Section
You can re-order the different sections of a test plan according to the process followed by the team.
To move a section up or down, use the drag and drop button present on the left side of the section as shown in the following screenshot.
Delete a Section
You can delete an unwanted section in a test plan.
Select a delete button present on the left side of each section.
You will get a confirmation pop-up to delete. Once you click OK, it will delete the specific sub-section as shown in the following screenshot.
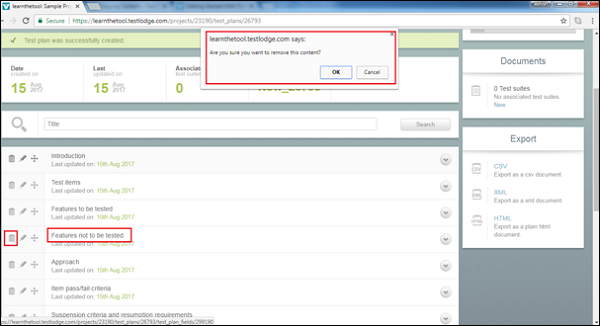
Similarly, to delete/edit a test plan, select delete/edit icon present on the left side of the screen of Test Plans.
TestLodge - Copy a Test Plan
You can copy the contents of a test plan as another test plan in the same project as well as across the project. Test plans can be copied into a new project as well.
Following are the steps to copy a Test Plan.
Step 1 − To copy a Test Plan, go to Test Plans section and click one of the listed test plans that you want to copy.
It will open the content of the Test Plan. You will be able to see Copy test plan button on the upper right corner of the screen as shown in the following screenshot.
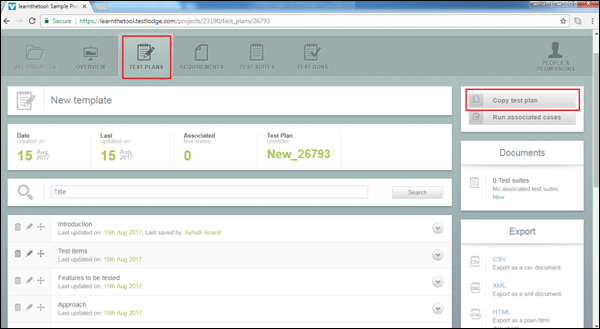
Step 2 − Click the Copy test plan button. It displays Copy From (left side) and Copy To (right side) section.
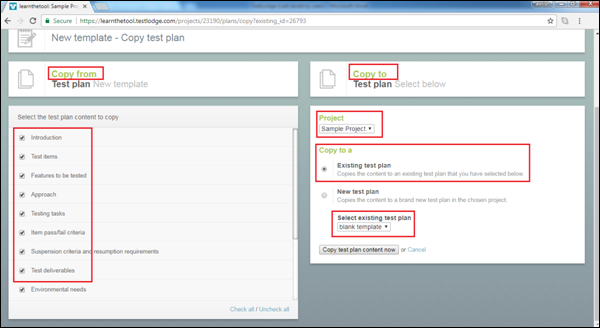
Step 3 − On the left side in the Copy From section, all content of the test plan is displayed. Choose the contents to copy into the new test plan by checking the checkbox. It depends on whether you want to choose all or individual contents.
Step 4 − On the right side in the Copy To section, the first field is Project. Select the Project Name where the Test Plan should be copied. It can be the same project or other projects listed in the TestLodge account.
The next field is − Copy to a - where there are two radio buttons Existing Test Plan and New Test Plan. The Existing Test Plan, copies the content to an existing test plan that you select in another dropdown named as Select existing test plan as shown in the following screenshot.
The New Test Plan option, copies the content to a brand new test plan in the chosen project. Once you select the New Test Plan option, the new text field displays New Test Plan Name where you need to enter the name of the test plan as shown in the following screenshot.
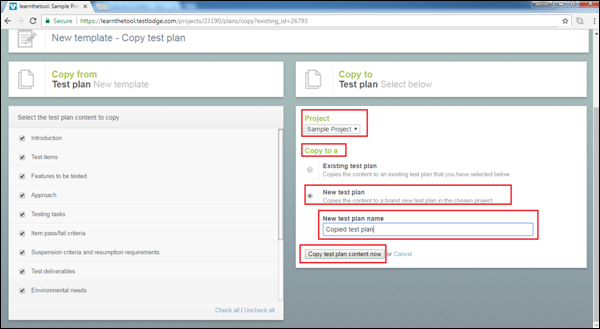
Step 5 − After careful selection, click the Copy test plan content now button.
You will get a successful message as shown in the following screenshot.

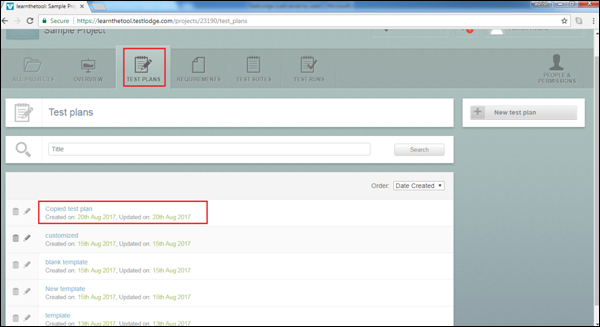
Step 6 − Navigate to the Test Plan section, the copied test plan can be seen as shown in the following screenshot.
TestLodge - Requirements
TestLodge has simple and flexible interface for Requirements.
It allows users to sync the project requirements structure to test design structure as Traceability Matrix.
In this interface, user can create, edit, move and delete requirements details within the Requirement section.
Requirements can be created and exported as CSV, XML and HTML. You can also track Requirement Traceability and Test Execution report.
Create a New Requirement
Following are the steps to create a Requirement.
Step 1 − Go to the Requirement section.
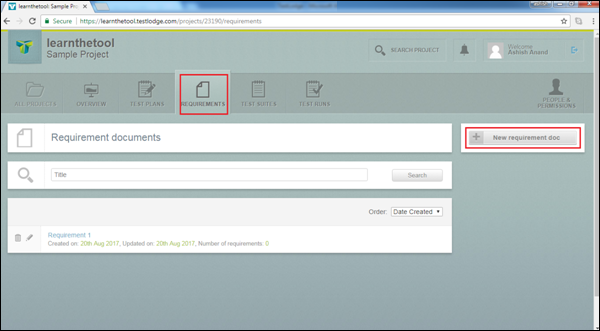
Step 2 − Click the New requirement doc button on the right side of the screen as shown in the following screenshot.
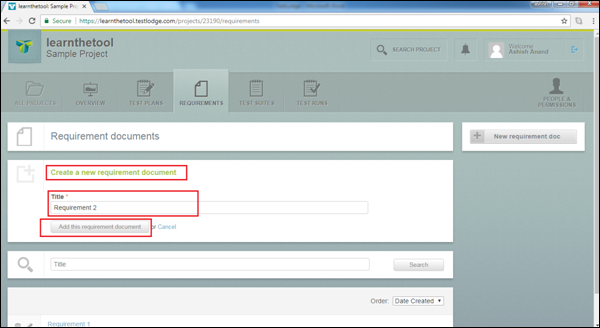
Step 3 − By clicking the button, it opens the Create Requirement form. Enter the Requirement in the Title textbox and click the Add this requirement document button.
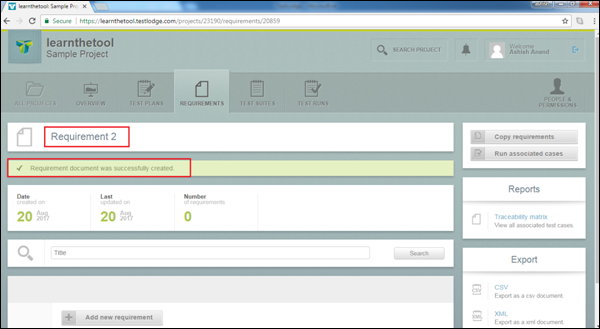
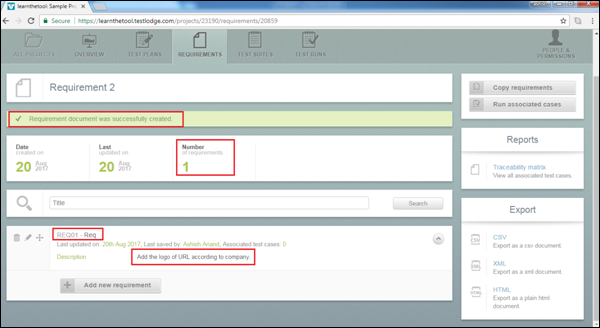
Now a success message and Requirement Name appears on the page as displayed in the following screenshot.
The added requirement document is blank. There is no content for this requirement document. You can add many requirements inside one requirement document.
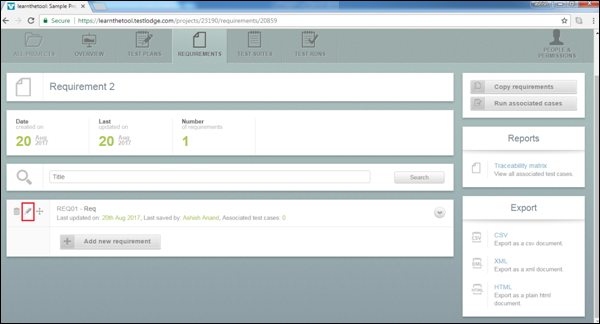
Step 4 − To add the content in the requirement, click the Add new requirement button.
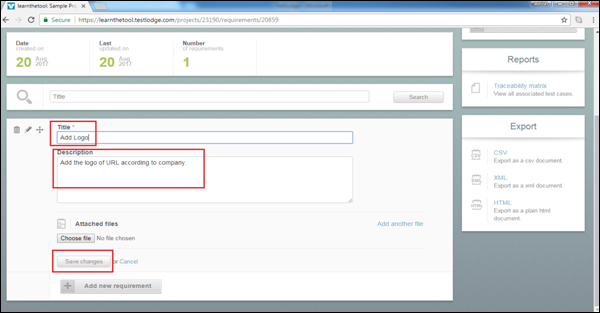
It will open a new requirement form. Enter the title, description and if required you can even attach a file.
Step 5 − Click the Add single requirement or Add & add another button as shown in the following screenshot.

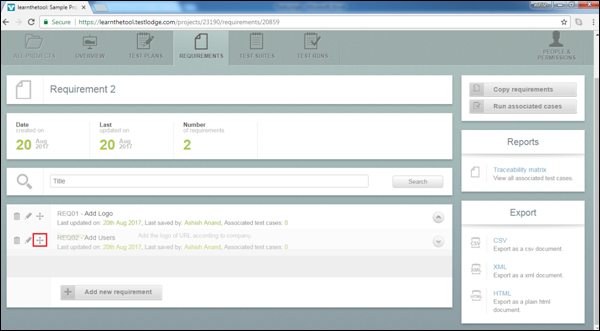
You will get a success message and the Requirement will get an ID inside the Requirement Document, since many requirements can be added into one document. You can also count the number of requirements in a Requirement Document as shown in the following screenshot.
Edit a Requirement
Following are the steps to edit a requirement in a Requirement document.
Step 1 − Go to the Requirement section. Select a Requirement document to edit and click to open the details.
Step 2 − Click the Edit icon present on the left side of the screen as displayed in the following screenshot.
Step 3 − It will open the details of requirement in the edit form. After changes, click the Save changes button.
Move a Requirement
This functionality allows re-ordering of Requirements in a requirement document.
Step 1 − Go to the Requirement section. Select a Requirement document to edit and click to open the details.
Step 2 − Click the re-ordering icon and drag up or down, depending on where you want to re-position it and drop at the required position.
Delete a Requirement
Following are the steps to delete a requirement in the Requirement document.
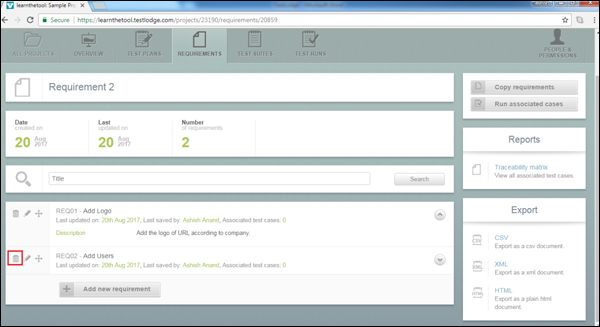
Step 1 − Go to the Requirement section. Select a Requirement document and click to open the details.
Step 2 − Click the Delete icon at one of requirements to delete as shown in the following screenshot.
Step 3 − A pop-up will display for confirmation to delete. Click OK.
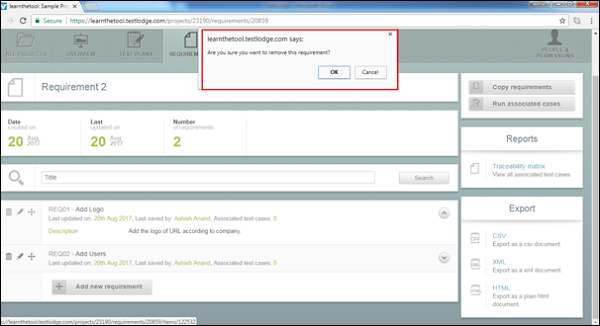
The page will be refreshed and the requirement will be deleted from the Requirement document.
TestLodge - Copy Requirements
You can copy the contents of a requirement document to another requirement document in the same project as well as across the project. A requirement document can be copied to a new project as well.
Following are the steps to copy requirements.
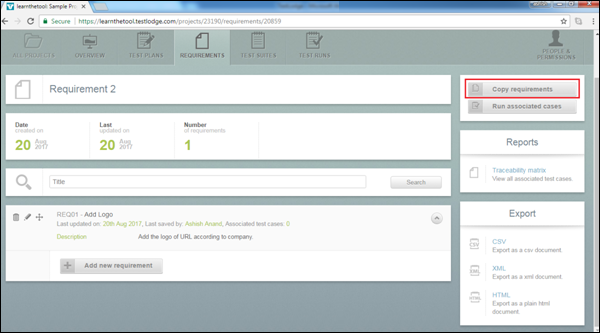
Step 1 − Go to the Requirements section and click one of the listed requirement documents that you want to copy.
It will open the content of the Requirement document and you will be able to see Copy requirements button on the right side of the screen as shown in the following screenshot.
Step 2 − Click Copy requirements and it will display Copy From (left side) and Copy To (right side) section.
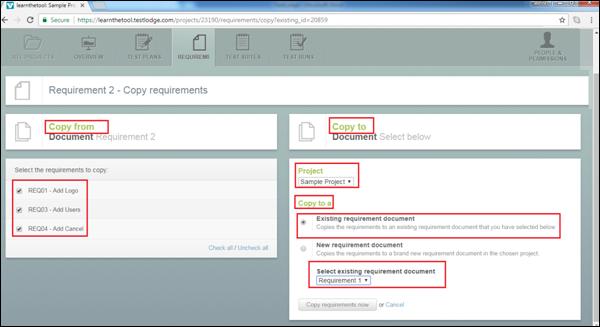
Step 3 − On the left side in the Copy From section, all the content of the requirement document is displayed. Choose the contents to copy into the new requirement document by checking the checkbox. It depends whether you want to choose all the content or each individually.
Step 4 − On the right side in the Copy To section, the first field is Project. Select the Project Name where the Requirement document should be copied. It can be the same project or other projects listed in the TestLodge account.
The next field is − Copy to a − where there are two radio buttons present Existing requirement document and New requirement document.
The Existing requirement document, copies the requirements to an existing requirement document that you have to select in another dropdown named as Select existing requirement document as shown in the following screenshot.
The New requirement document option, copies requirements to a brand new requirement document in the chosen project. Once you select the New requirement document option, the new text field displays New requirement document title where you have to enter the name of the requirement document name as shown in the following screenshot.
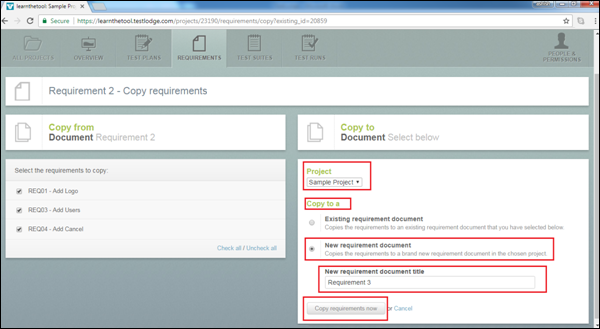
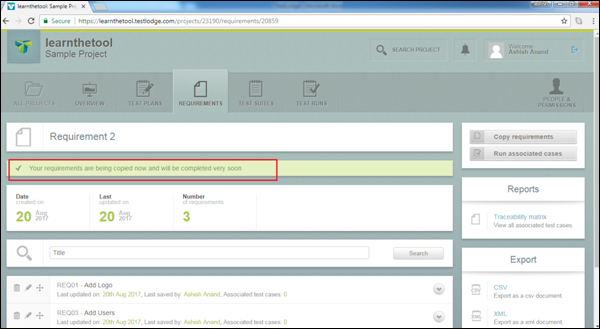
Step 5 − After careful selection, click the Copy requirements now button.
You will get a successful message as shown in the following screenshot.
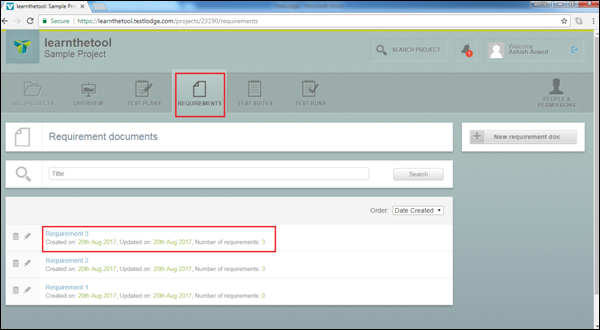
Step 6 − Navigate to the Requirements section, the copied requirement document can be seen as shown in the following screenshot.
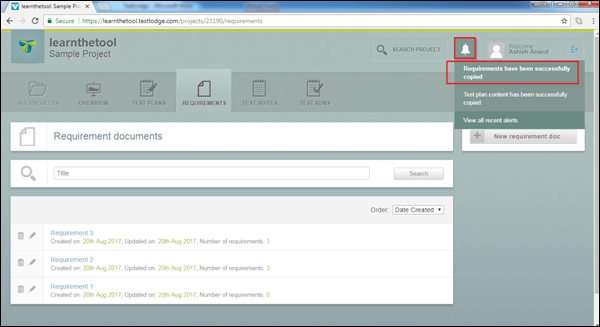
You will get a notification that the Requirement has been added successfully.
TestLodge - Test Suites
TestLodge has a simple and flexible interface for test suites. In TestLodge, you can maintain test suites and respective test cases, those that can be used in test execution.
A test suite must be created before the creation of test cases. Using this interface, you can create, edit, move or delete test suites/cases within the Test Suite section.
Test suites can be created and exported as CSV, XML and HTML. You can associate with requirements, test plan, and test execution.
Create a Test Suite
Following are the steps to create a Test suite.
Step 1 − Go to the Test Suite section.
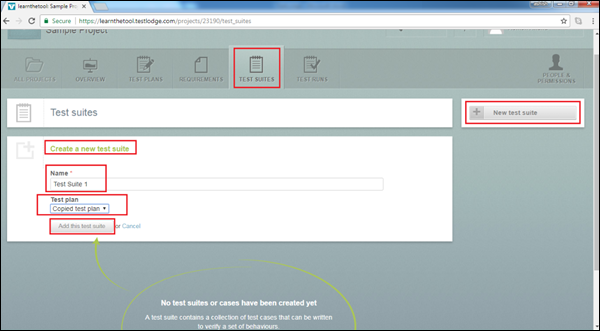
Step 2 − Click the New test suite button on the right side of the screen.
Step 3 − Clicking the button opens the Create a new test suite form. Enter the Test suite name in Name text box (required). Select the test plans from Test Plan list (optional) and click the Add this test suite button.
After clicking the Add this test suite button, you will receive a success message and the Requirement Name appears on the page as displayed in the following screenshot.
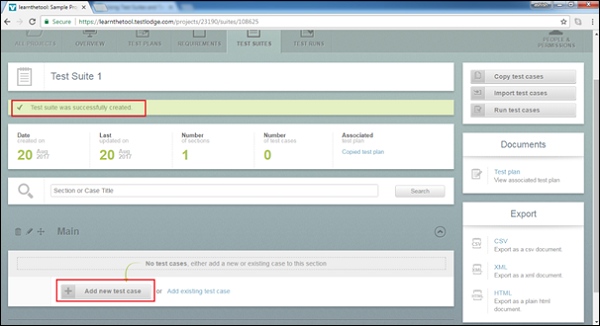
Step 4 − The added Test Suite is blank. There are no test cases for this suite. Now, you can add as many test cases inside the test suite.
Create Test Cases
Test cases are individual verifications. They are step-by-step sequential activities. These should be followed in order to execute the test.
Step 1 − To add the test case in a test suite, click the Add new test case button.
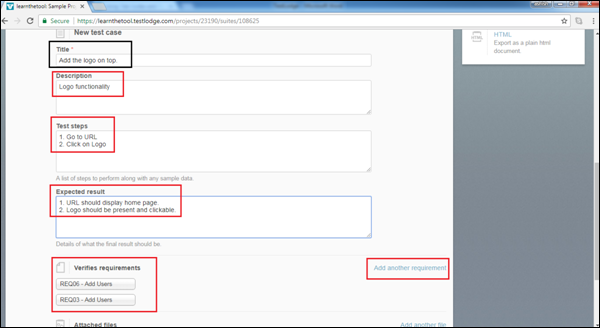
Step 2 − It will open a new test case form. Enter the following details.
Title − The name of the test case
Description − Overview functionality to verify
Test steps − Detailed sequential step by step
Expected result − Detail of what the final result should be
Verifies Requirements − Associate the test case with respective one or multiple requirement
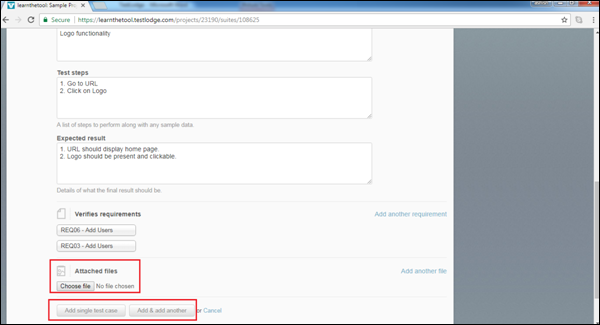
Attached files − Attach any supporting files
Step 3 − Click "Add single test case" or "Add & add another" button as shown in the following screenshot.
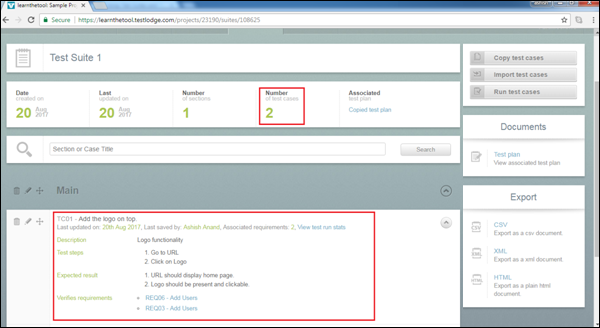
Test case will get an ID inside the test suite. You can also count the number of test cases in a test suite as shown in the following screenshot.
Edit a Test Case
Following are the steps to edit a test case in a test suite.
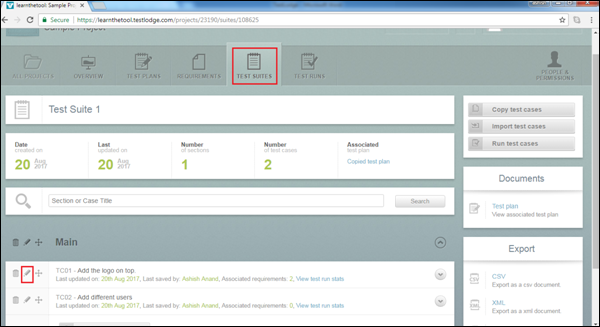
Step 1 − Go to the Test Suites section. Select a Test Suite to edit and click to open the details.
Step 2 − Click the Edit icon of the respective test case to edit as displayed in the following screenshot.
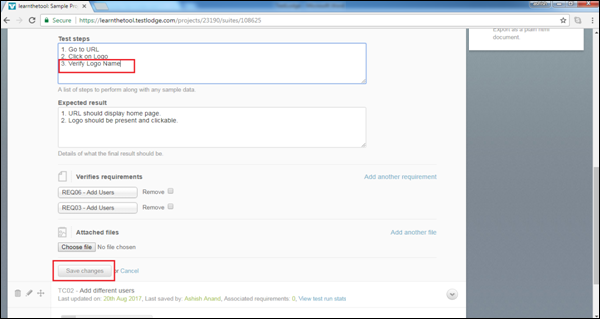
It will open the details of the test case in the edit form.
Step 3 − After making the changes, click the Save changes button.
Move a Test Case
This functionality allows re-ordering of test cases in a test suite.
Step 1 − Go to the Test Suite section. Select a Test Suite to edit and click to open the details.
Step 2 − Click the re-ordering icon and drag up or down depending on where you want to re-position it and drop at the required position.
Delete a Test Case
Following steps are the steps to delete a test case in a test suite.
Step 1 − Go to the Test Suites section. Select a test suite and click to open the details.
Step 2 − Click the Delete icon at one of test cases to delete.
Step 3 − A pop-up will be displayed for confirmation to delete. Click OK as shown in the following screenshot.
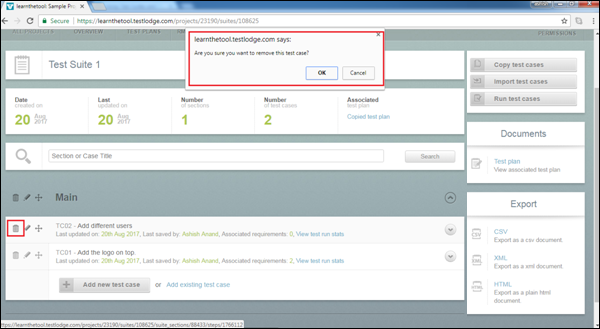
The page will be refreshed and a test case will be deleted from the test suite.
TestLodge - Copy Test Cases
You can copy the test cases to another test suite in the same project or across projects. Test suite can be copied into a new project as well.
Following are the steps to copy test cases.
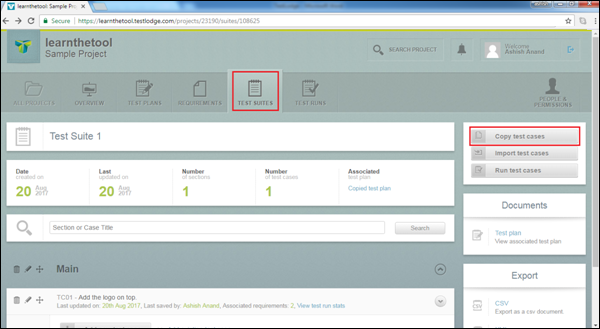
Step 1 − Go to Test Suites and click one of the listed test suites.
It will open the list of test cases. You will be able to see Copy test cases button on the right side of the screen as shown in the following screenshot.
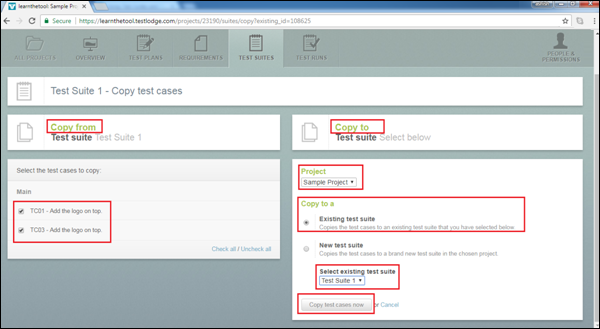
Step 2 − Clicks Copy test cases. It displays Copy From (left side) and Copy To (right side) section.
Step 3 − On the left side in the Copy From section, all the test cases are displayed from where the user can choose the test case to copy to a new test suite by checking the checkbox. It depends on you if you want to choose all the test cases or one individually.
Step 4 − On the right side in the Copy To section, the first field is Project. Select the Project Name where the test cases will be copied. It can be the same project or other projects listed in the TestLodge account.
The next field is - Copy to a - where there are two radio buttons Existing test suite and New test suite.
The Existing test suite, copies test cases to an existing test suite that you select in another dropdown named as Select existing test suite as shown in the following screenshot.
The New test suite option, copies test cases to a brand new test suite in the chosen project. Once you select the New test suite option, the new text field displays New test suite name where you have to enter the name of the test suite as shown in the following screenshot.
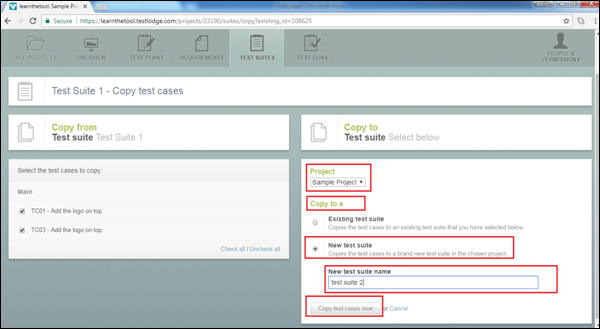
Step 5 − After careful selection, click the Copy test cases now button.
You will receive a successful message as shown in the following screenshot.
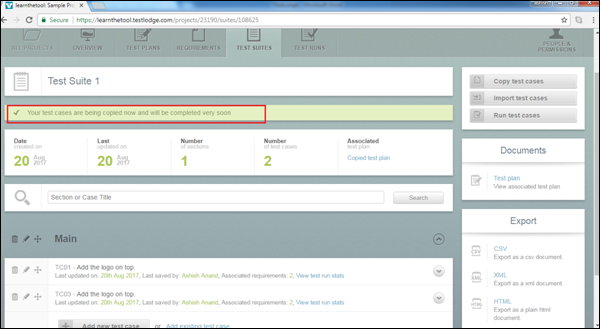
Step 6 − Navigate to the Test Suites section and the copied test cases can be seen as shown in the following screenshot.
You will get a notification that the test cases have been copied successfully.
TestLodge - Import Test Cases
You can create multiple test cases at a time using Excel spreadsheet or CSV file. Excel/csv files are text files represented by rows and columns as cells.
TestLodge uses Google Docs to import the spreadsheet. You have to first upload the spreadsheet to Google doc account and then authorize the account to access the file. After authorization, TestLodge automatically identifies all uploaded spreadsheets into the account.
You can select the spreadsheet and map the column name with the fields of TestLodge. Each spreadsheet is associated with a Test Suite. You have to then import the test cases into a test suite. Hence, it always better to make sure that the test suite is already present in TestLodge.
Each test case should be in its own one row only. A new test case should write into a new row. TestLodge imports the title, description, test steps, and expected result from the spreadsheet. If the test case has multiple steps, it can be written into a new line, the same row/cell using CTRL+ Enter.
You can use the first row as the column name or the first row can also be used as a test case data.
Following is a sample excel sheet.
| Title | Description | Expected Result | Test Steps | Custom Field 1 (if any) |
|---|---|---|---|---|
| Case 1 | Step 1 | Step Expected Result 1 | Step 1 Step 2 Step 3 |
|
| Case 2 | Step 1 | Step Expected Result 1 | Step 1 Step 2 Step 3 |
|
| Case n | Step 1 | Step Expected Result 1 | Step 1 Step 2 Step 3 |
Import the File
Step 1 − Make sure the csv or excel is imported as Google Spreadsheet into a Google Doc.
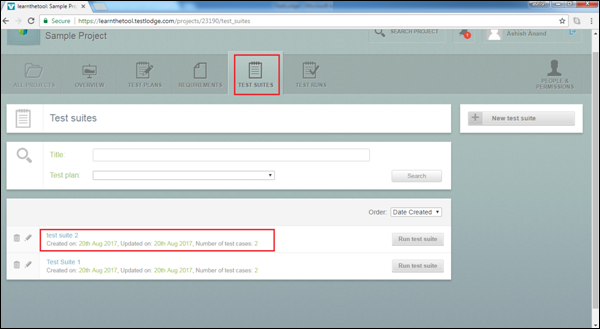
Step 2 − To copy test cases, go to Test Suites and click one of the listed test suites.
Step 3 − Click the Import test cases button present on the right side of the screen.

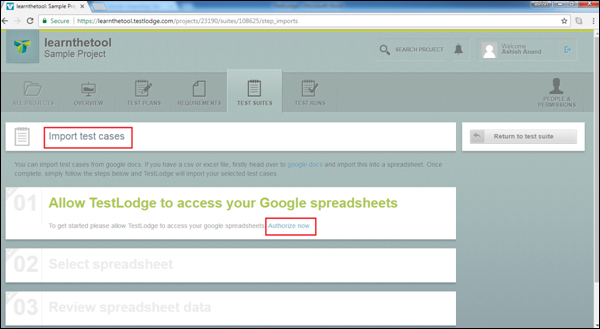
Now, the Import Test Case page opens.
Step 4 − Click Authorize now to allow TestLodge to access the Google spreadsheet as shown in the following screenshot.
Step 5 − Login to your Google account and click Allow to authorize TestLodge to access the account.

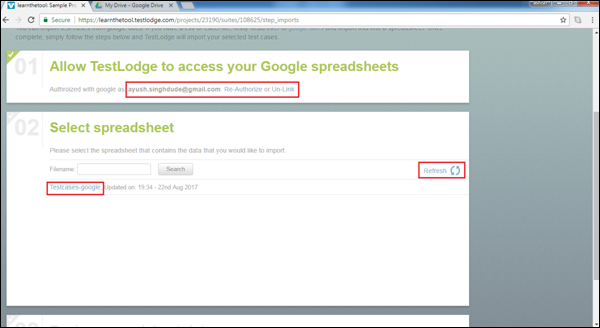
TestLodge will access and display a list of all CSV and Excel files in Google account.
Step 6 − Click the file containing the test cases to select the file as shown in the following screenshot.
Step 7 − Review the spreadsheet data and map it to the appropriate fields in TestLodge. If the first row of data in the spreadsheet is a header, select Yes for TestLodge to ignore the first row.
Step 8 − Select the column name for the Title, Description, Test steps, and Expected results.
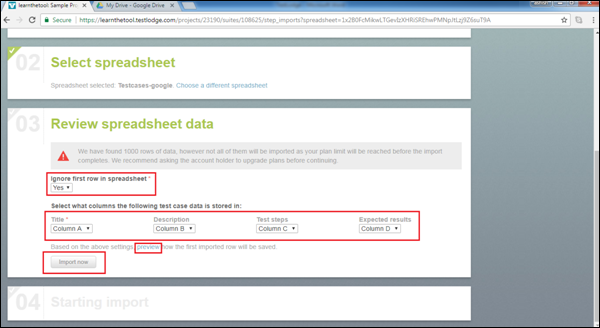
Step 9 − Click the preview button and you will be able to see which data will be imported as first case.
The following screenshot displays how the preview file looks like.
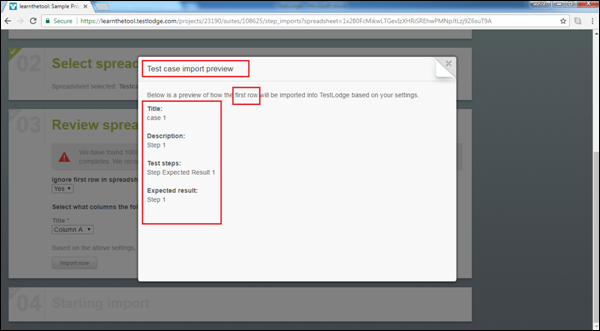
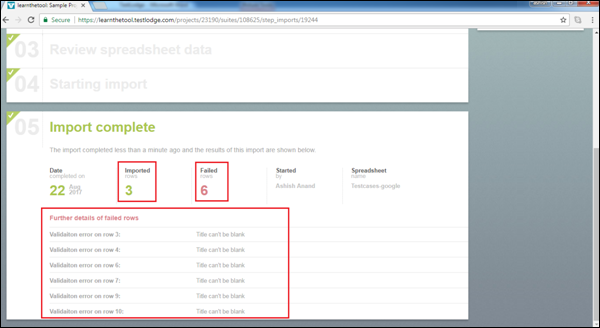
By clicking the Import now button, the import will start and display a success or failure message. You can see how many test cases are imported successfully and how many failed along with the failure messages. Note that the Title and Description are the required fields. Once the import is complete, you can go back to the Test Suite and see the imported test cases.
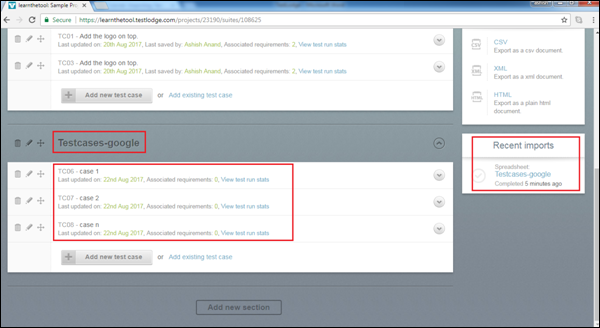
On successful import, you will get a notification and will be able to see the name of the spreadsheet on the right side of the screen in the Recent imports section as shown in the following screenshot.
TestLodge - Add Test Run
To execute a Test Run, you should create a Test Run first. Test Run can be created under a Test Plan, i.e. each test run should be associated with a Test Plan.
Following are the steps to create a Test Run −
Step 1 − To create a new Test Run, go to the Test Runs section. Scroll down and click the New Test Run button present on the bottom right side as shown in the following screenshot.
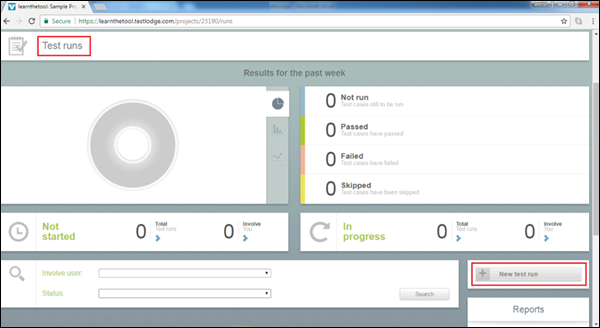
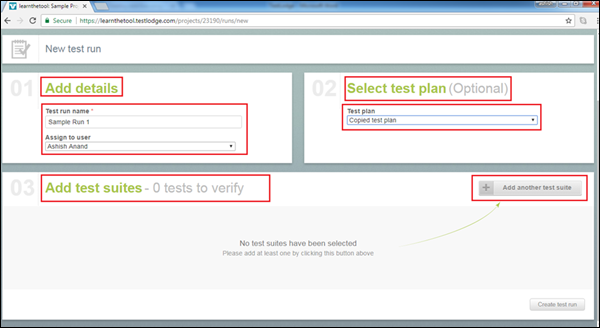
It will open a New Test run page that has 3 sections − Add Details, Select Test Plan, and Add test suites.
Step 2 − In the Add details section, enter the Test Run name and assign it to yourself.
Step 3 − In the Select test plan section, choose a test plan so that these test runs will be associated with the test plan. Once association is made, user can see these test suites in the test plan section as well. And, you can run test cases in the test plan section too.
Step 4 − To add a test suite, click the Add another test suite button present on the right side of the screen.
The following screenshot displays the New Test Run page.
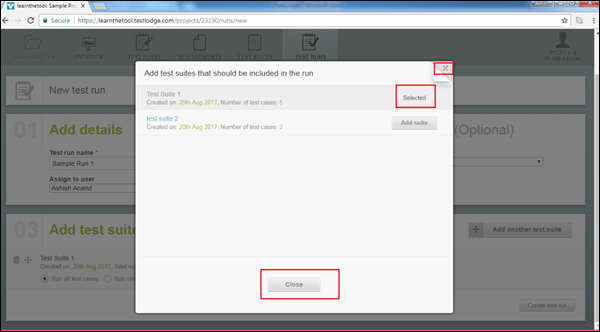
Step 5 − Once you click the button, it will open all test suites having test cases, created in the Test Suites section. Click the Add Suite button to add to test runs as shown in the following screenshot.

Step 6 − After selection, the button will change as Selected. Click Close to go back to the Test Run page. You can choose multiple test suites to add to a test run.
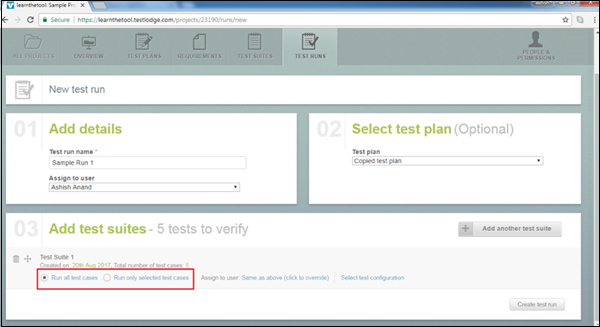
Step 7 − After closing the wizard, the test suite gets added with options as Run all test cases and Run only selected test cases. By default, Run all test cases option is selected as shown in the following screenshot.
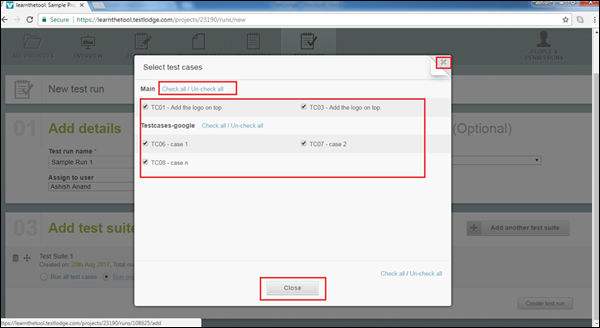
Step 8 − Select the Run only selected test cases option. A pop-up opens where the list of all test cases are present. You can check and un-check according to the requirement. After careful selection, click on Close to go back to the Test Run section.
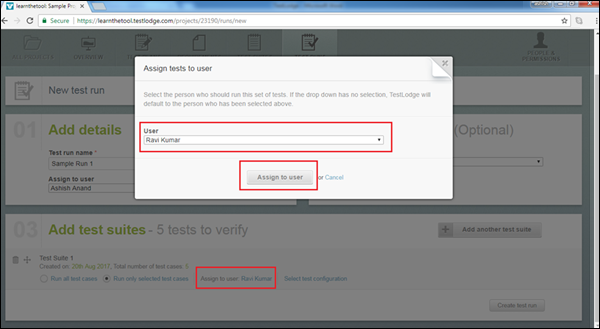
There is another option Assign to user. Using this option, you can assign rights to any of the listed users.
Step 9 − Click the Assign to user link and a pop-up is displayed. Select the user and click the Assign to user button. The user name will be displayed as shown in the following screenshot.
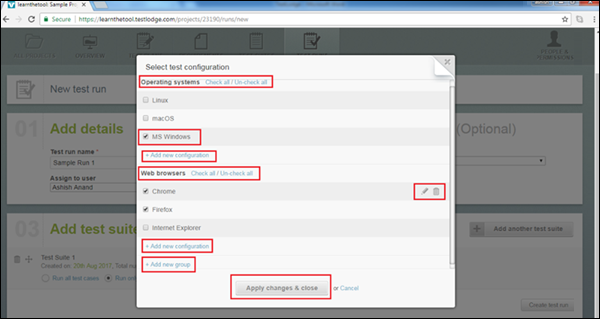
There is one more option Select test configuration to configure a test run.
Step 10 − Click on this link and the Select test configuration wizard opens.
By default, operating system and web browsers are the two categories to configure a test run by checking/unchecking the available option.
You can add new configuration in each category as well as edit/delete an available option and category. You can even create a new group.
Step 11 − Configure as required and click the Apply changes & close button.
The following screenshot shows the test configuration wizard.
Now, you can see all the possible combinations of configuration to run test cases. For each combination, there is a Assign User option which can be used to assign rights to other users.
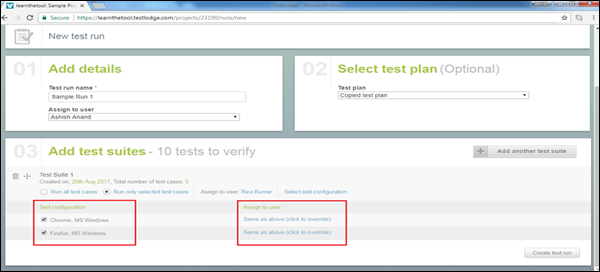
Step 12 − Carefully make all these selections and click the Create test run button present at the bottom right hand corner of the screen.
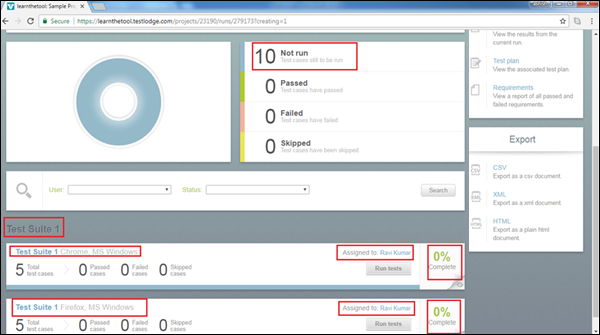
A test suite will be added for each combination of configuration. You can see the total number of test cases to execute in each configuration and the progress percentage as well. It will also display the name of the assigned user.
The following screenshot displays the added test suite for run.
TestLodge - Execute a Test Run
You can execute a single or multiple Test Runs and Test Suites. You can even assign individual test cases to different users from the same test suite. While executing a test case, the tester follows the written manual steps and records the result. TestLodge supports the functionality to mark test cases as Pass, Fail, or Skip. You can add the actual result and attach images as well.
Execute Test Runs
There are many ways to start the execution of test cases such as from a Test Plan or Requirement tab. Here, we will discuss about Test Run tab. After clicking Test run from any of the available options, brings the control at Test Run.
Following are the steps to execute a test run.
Step 1 − Go to the Test Runs section. Move down and select one of the available test runs and click as shown in the following screenshot.
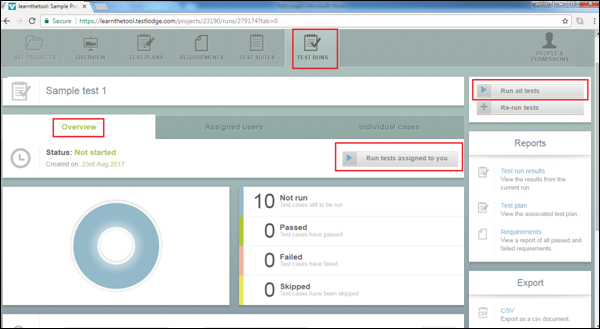
It will open the Test Run Overview page. There are many options to start the execution −
Run tests assigned to you − This button is present at the starting of the Overview section.
Run all tests − This button is present on the right side of the page.
Run tests − This button is at the bottom of the page, user can see this button against each suite.
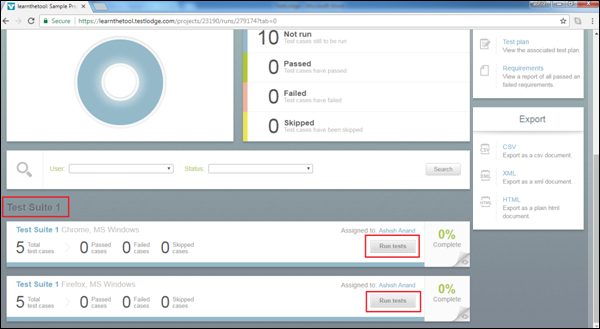
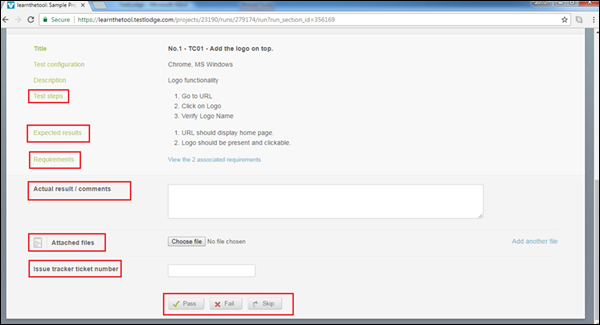
Step 2 − Click Run tests to run individual test cases. It opens the detail of test case where steps, expected result, and requirements are available.
Step 3 − Enter the actual result and attach the result file, if required.
Step 4 − Click Pass/Fail/Skip. If it is failed, you can enter the issue tracker number for a defect.
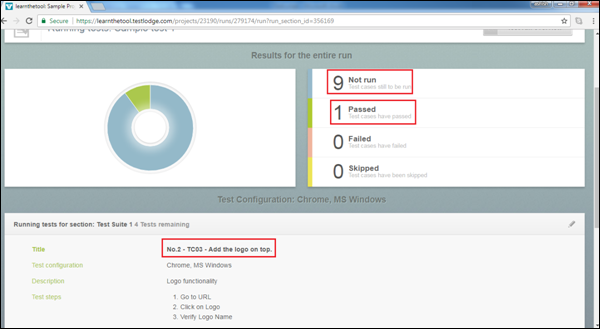
The following screenshot shows the test run page of individual test case.
Step 5 − Click Pass. It updates the test run summary and the next test case opens automatically as shown in the following screenshot.
When you click on Run tests assigned to you or Run all tests, it works the same as explained above.
Re-Run Tests
Re-run tests option allows you to run test cases again. You can choose which test cases need to re-run such as only failed/passed/skipped or All test cases.
Following are the steps to use this option.
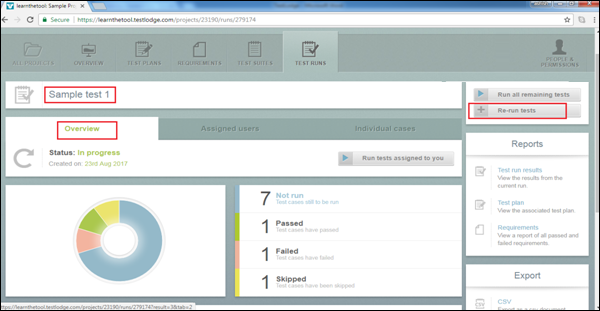
Step 1 − Select the test run and click Re-Run tests button present on the right side of the screen.
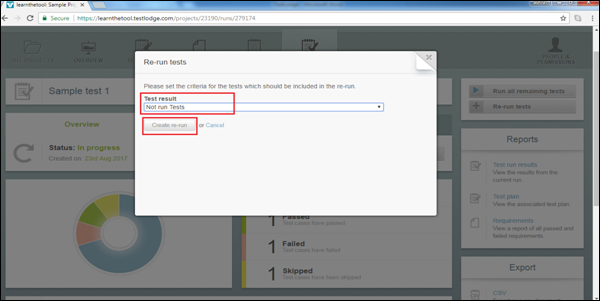
It opens re-run tests screen, where you can select criteria of tests, which should be included in the re-run. The available options are All Tests, Failed Tests, No Run Tests, Passed Tests, and Skipped Tests.
Step 2 − After careful selection, click Create re-run.
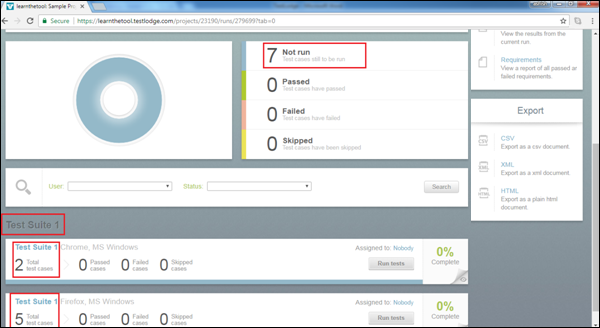
It will create a new test suite with all cases that are in No Run status. It basically groups all No Run test cases at one place from different test suites.
The following screenshot displays the re-run test suite.
Step 3 − Follow the same steps as explained in the execution of test runs section from here on.
TestLodge - Test Run Summary
The test run section displays test run execution progress at real time. It provides a test run summary for the overall project as well as individual test suite with test case result and progress. It displays the daily progress chart as well.
When you navigate to the Test Run section, it displays the latest summary of the Project in terms of Test Case passed, failed, skipped, or no run.
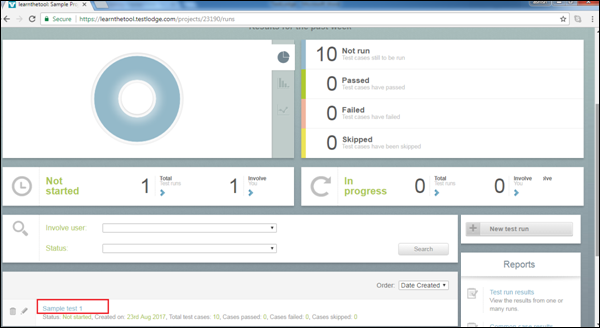
The following screenshot displays the Test Summary page. Details of the page are listed below.
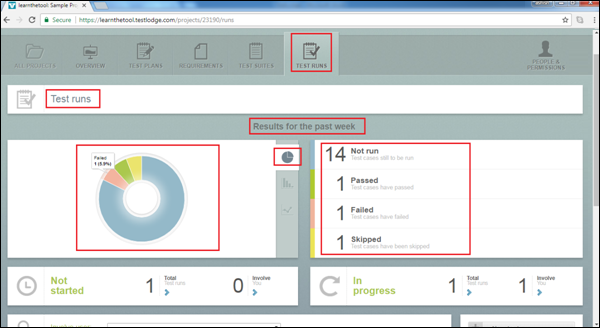
The first section is Result for the past week.
On the right side of the screen, you can view <No. of test cases> No Run, <No. of test cases> Passed, <No. of test cases> Failed and <No. of test cases> Skipped. These details are derived from all test suites present at the project level.
On the left side of the screen, you can see different diagrams such as Pie-chart, Tabular, and Continuous Graph.
In the Pie-chart, it displays total number of test cases passed/failed/skipped/No run.
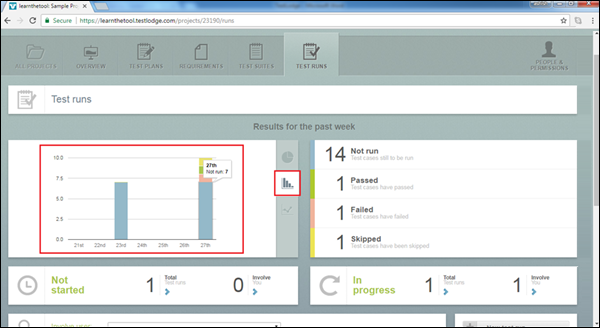
Similarly, you can view everyday progress in a tabular graph as shown in the following screenshot.
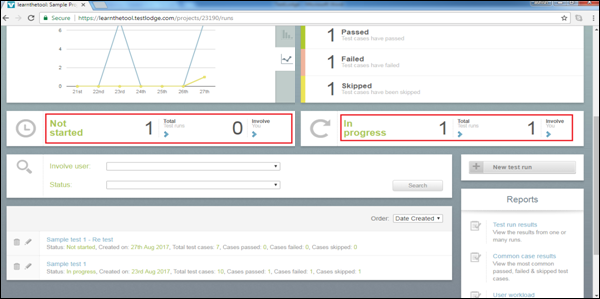
You can also view day-by-day progress using a continuous graph present below the Tabular graph.
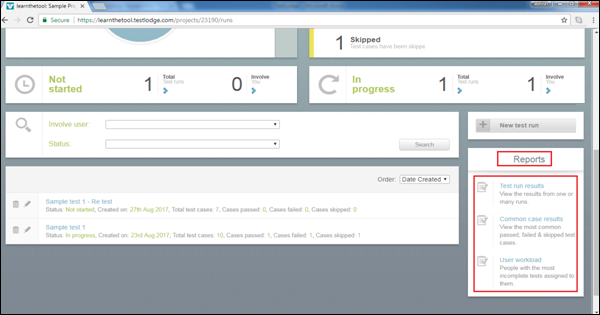
Below the graph section on the left side of the screen, you can view the number of test runs that have not started yet and how many are assigned to the logged-in user.
On the right side of the screen, you can view how many test runs are in progress and in how many test runs the logged-in user is involved.
The following screenshot shows the Not Started and In-progress details of the test run −
Individual Test Suite/Case Summary
You can view the status on individual test case in a Test suite.
Following are the steps to view the progress of individual test case:
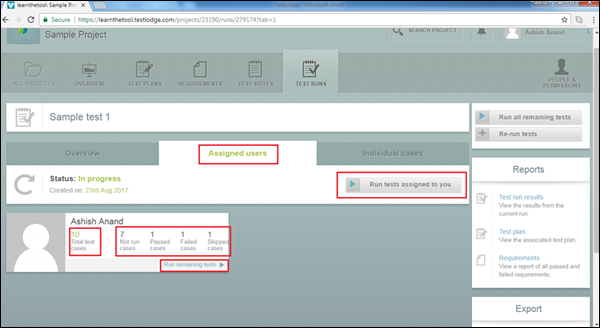
Step 1 − Go to Test Run and click the Test suite present at the bottom of the page.
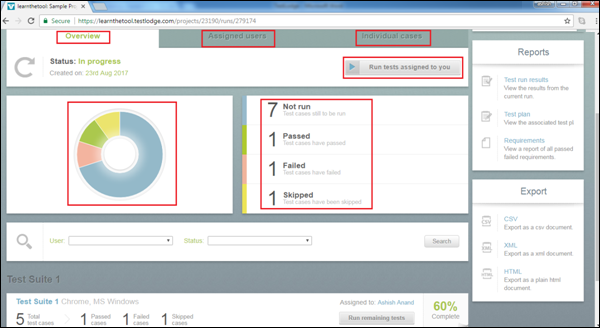
It will open the Test Suite − Overview page. There are two other sub-tab - Assigned users and Individual cases.
On the right side of the screen, you can see the number of test cases in No Run/Passed/failed/Skipped status, while on the right side you can see a Pie chart about the progress of the test suite.
Step 2 − Click the Run tests assigned to you button and you will be able to run all those test cases assigned to the logged-in user in the test suite.
The following screenshot displays the Test Suite − Overview page.
Step 3 − Click the Assigned user sub-tab. You can view the number of test cases assigned to the logged-in user. You can view among the assigned test cases, how many are passed/failed/skipped.
Step 4 − Click the Run all remaining test cases/Run tests assigned to you button to run test cases.
The following screenshot displays the details of Assigned users section.
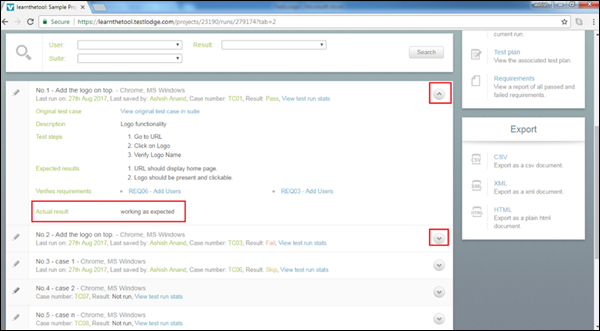
Step 5 − Click the next tab − Individual cases. It displays all the test cases present in the test suite. There is an additional line below the name of each test case that shows Last Run Date, Last saved user name, Case Number, and Result as Pass/Fail/Skip.
The following screenshot displays Individual cases details.
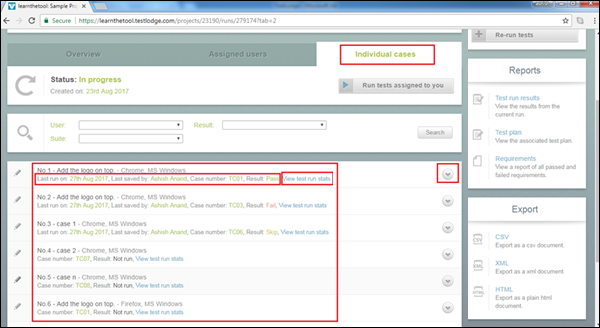
There is a link name as View test run stats. It displays all test instance results of a particular test case as shown in the following screenshot.
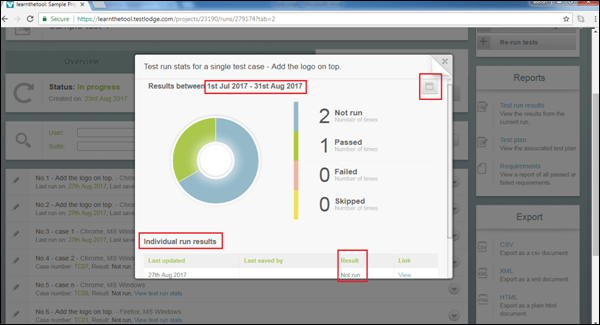
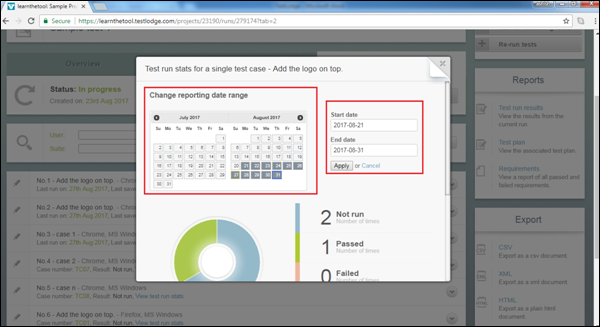
Step 6 − Click the Calendar sign on the right side of the screen and select the timeline to see the status. Individual run results display all test instances and Result present during the chosen timeline.
Step 7 − Click View and it displays the details of the particular instance.
The following screenshot shows how to filter with dates.
Step 8 − Click the down arrow present on the right side of the screen. It displays all the details of the test case. You can see the actual comments and attachment added while executing the test case.
TestLodge - Reports
TestLodge supports the reporting functionality, using which you can create a report to track the progress.
TestLodge mainly supports the following types of reports −
- Test run results
- Common case results
- User workload
- Traceability Matrix
The first three reports are present in the Test Runs section, while the Traceability Matrix is present in the Requirements section.
On the Test Run page, the Reports section is present on the right side of the screen.
Test Run Results
Test run results is a very simple report that provides a high level view of the test results of all the test cases.
In this report, you can view the following details −
- Test cases in the No Run status
- Test cases which have Passed
- Test cases which have Failed
- Test cases which have been skipped
To access this report, go to Test Runs → Report section and click Test run results. It will open the report in HTML format as shown in the following screenshot.
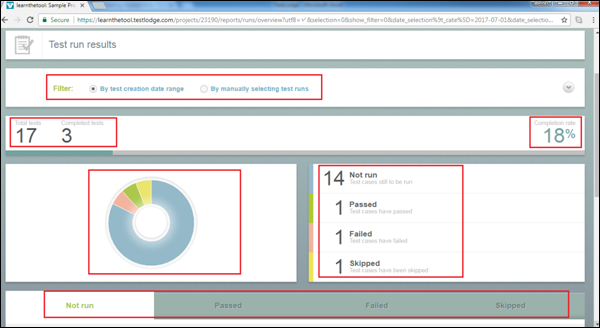
There are two filter options to manipulate the report. First, is By test creation date range. This option generates the report based on the provided start and end dates. Second, is By manually selecting test cases. This option provides the report of the selected test suite.
You can view the total number of test cases and passed test cases along with the Completion % on the right side of the screen.
The next section displays a Pie chart and tabular form of Not Run, Passed, Failed and Skipped test cases.
The last section, groups all the test cases in different statuses such as No Run, Passed, Failed and Skipped. It displays the detailed status of individual test cases as shown in the following screenshot.
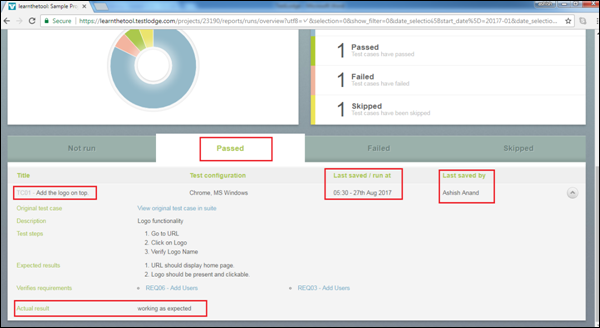
Similarly, test run result report can be seen for each test suite individually in the Report section, when you select a test suite.
Common Case Results
The Common Case Results report shows top 10 passed, failed, and skipped test cases. This report helps to understand the strengths and weaknesses of the application under test.
This report includes information such as −
- Title
- Total runs
- Total passed
- Pass rate (total passed / total runs)
To access this report, go to Test Runs → Reports section and click the Common case results link.
The following screenshot displays the Common case results report page.
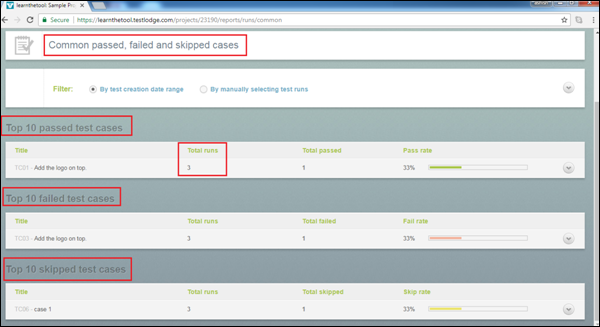
This report displays top 10 Passed, Failed, and Skipped test cases. Total runs mention the number of instances started for this test case, while Total passed displays the number of test instances passed.
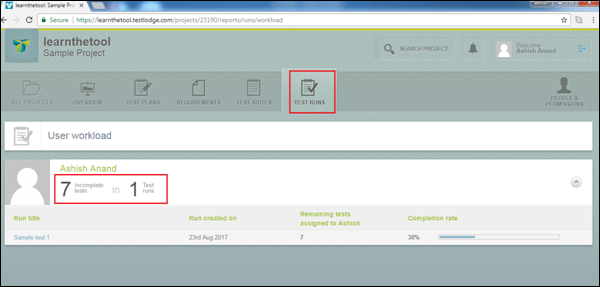
User Workload
The User Workload report is used for capacity planning. This report is useful for the management to understand how much work each team member has completed, and how much they have left to do.
This report includes the following information −
- Name of the team member
- Number of incomplete test cases and the number of test runs involved
- Run title
- Run creation date
- Remaining tests assigned to the user
- Completion rate
To access this report, go to Test Runs → Reports section and click the User Workload link.
The following screenshot displays the User workload report page.
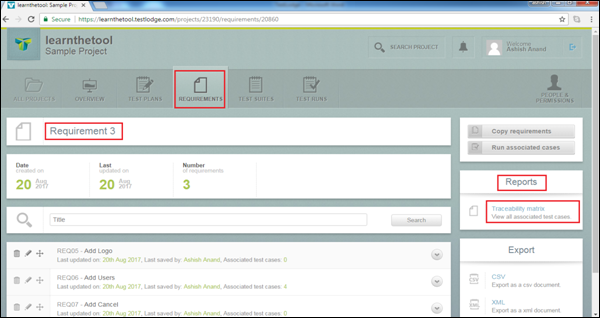
Traceability Matrix
A requirement traceability matrix helps to track and ensure that all of the requirements have been tested. It is very useful to view which requirements have been verified by tests and which requirements have not yet been verified.
In order to leverage the requirements traceability report, you should have requirements created and linked to individual test cases.
To access the requirements traceability report, select one of the requirements documents and select Traceability Matrix under Reports as shown in the following screenshot.
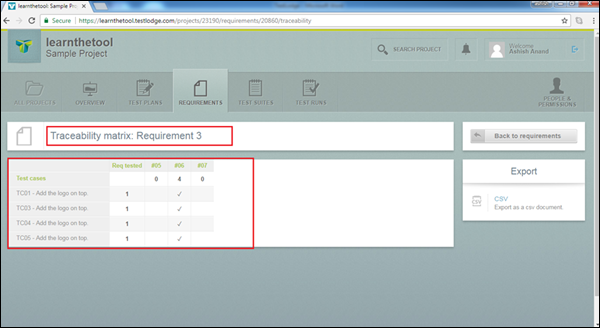
In this report, you can see which requirement is tested against which test case.
The following screenshot displays the Traceability Matrix page.
TestLodge - Export Contents
TestLodge allows to export all of the contents in CSV, XML, or HTML files. These files are helpful to upload the contents to other system, if required. You can export the contents of Test Plan, Requirements, Test Suites, and Test Run reports.
Export a Test Plan
A test plan can be exported into CSV, XML or HTML files. Following are the steps to export a test plan.
Step 1 − Go to Test Plan section and click one of the available test plans.
Step 2 − Go to the Export section and click the desired file format name as shown in the following screenshot.
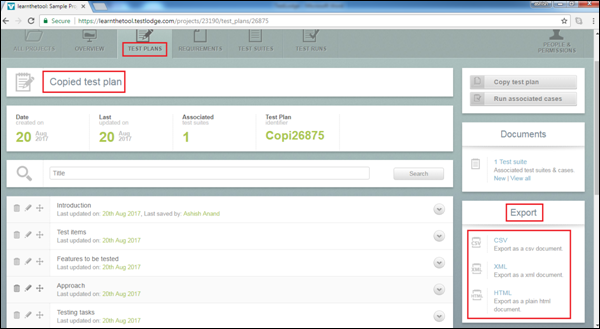
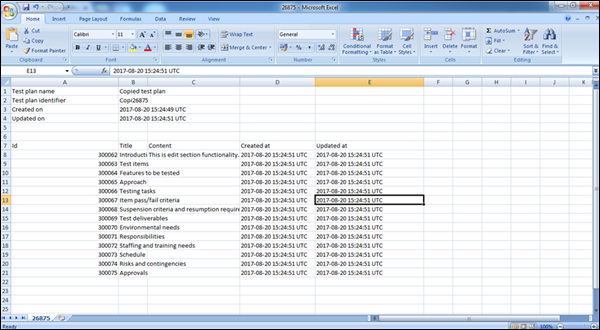
If you select a CSV file, it looks like the following −
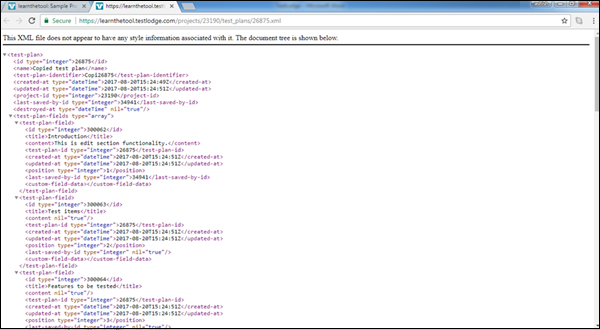
The XML file looks as follows −
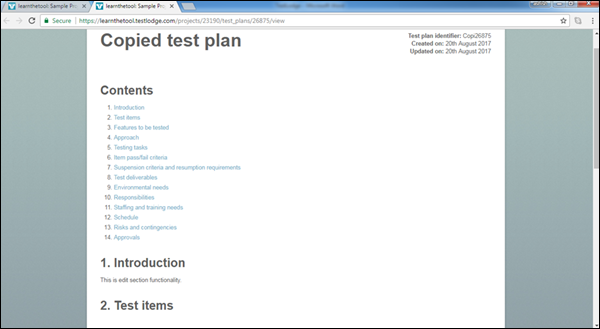
The HTML file looks as follows −
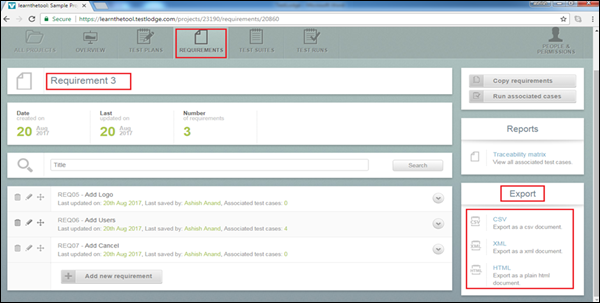
Export Requirements
You can export all the requirements present in a requirement document. Similar to Test Plans, requirements also support CSV, XML, and HTML reports.
Following are the steps to export requirements.
Step 1 − Go to the Requirements tab and select one of the available requirement documents.
Step 2 − Go to the export section and click one of the file formats as shown in the following screenshot.
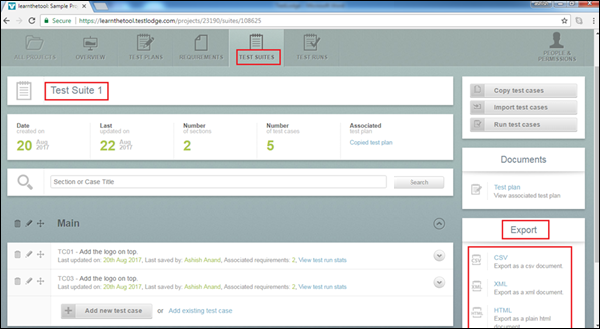
Export a Test Suite
You can export all test suites and all test cases belonging to the test suite. Similar to Test Plans, Test Suites also support CSV, XML, and HTML reports.
Following are the steps to export a test suite.
Step 1 − Go to Test Suites tab and select one of the available test suites.
Step 2 − Go to the export section and click one of the file formats as shown in the following screenshot.
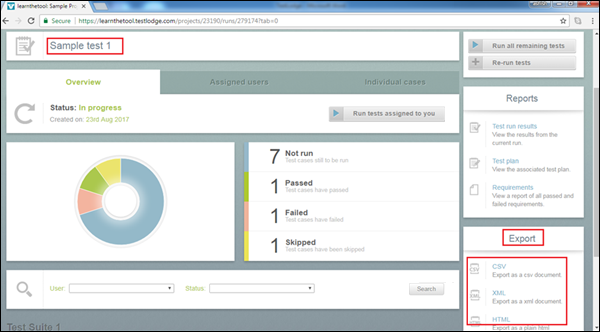
Export Test Run Summary
You can export only the test run summary of a particular test run/suite. Similar to Test Plans, it also supports CSV, XML, and HTML reports.
Following are the steps to export test run summary.Step 1 − Go to the Test Run tab and select one of the available test suites/run.
Step 2 − Go to the export section and click on one of the file formats as shown in the following screenshot.
Note that no file format exports chart, it only exports the details of test cases and their status.
TestLodge - Issue Tracker Integration
TestLodge integrates with more than 20 of the leading issue-tracking tools. These integrations allow us to create tickets/defects for failed test cases directly in TestLodge. By using these integrations, you can save time while logging tickets/defects during the testing process.
Configuration
Connecting TestLodge with different issue tracker is very simple. Here, we will learn how to configure TestLodge with Mantis bug tracker.
Step 1 − Go to All Projects tabs and click the Settings as shown in the following screenshot.
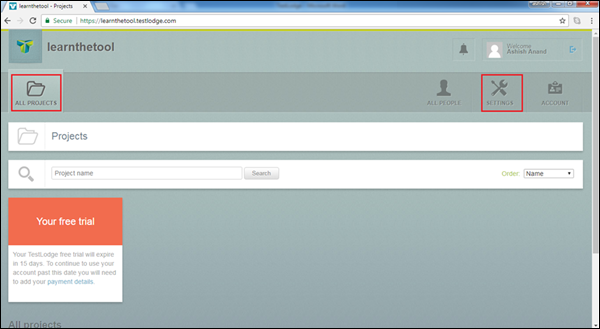
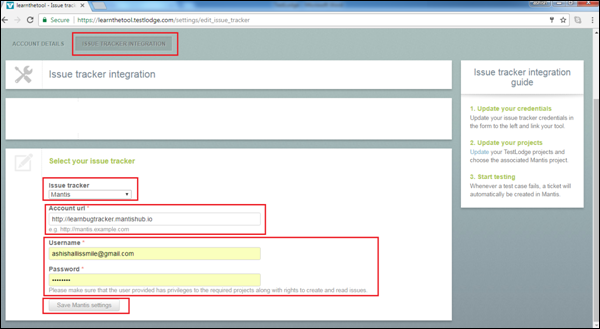
Step 2 − Click the Issue Tracker Integration.
Step 3 − Fill the following details in the Select your issue tracker.
Issue Tracker − Select Mantis from the dropdown
Account URL − Provide the Mantis URL to access projects and other information
Username − Enter Mantis username
Password − Provide password to access mantis
Step 4 − Click Save Mantis settings.
Now, TestLodge can access the issue tracker account.
The next step is to link the TestLodge project with the issue tracker project.
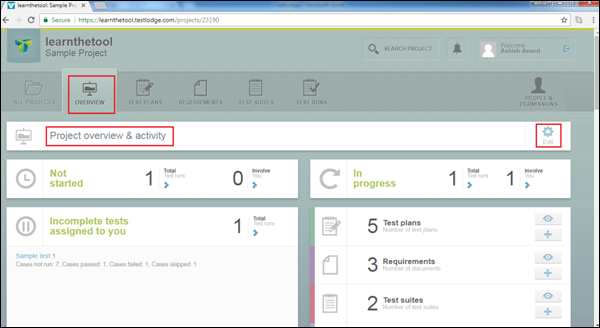
Step 5 − Go to All Projects and select the project.
Step 6 − In the overview section, click the Edit symbol present on the right side of the screen.
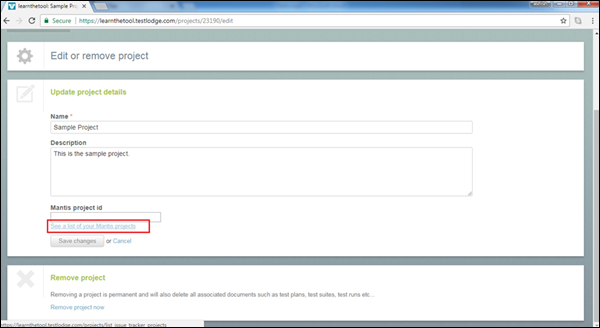
Step 7 − Click the link Select a list of your mantis projects. Select the project where you want to create tickets/defects for failed test cases.
The following screenshot displays how to select a Mantis project.
The following screenshot displays the list of projects available.
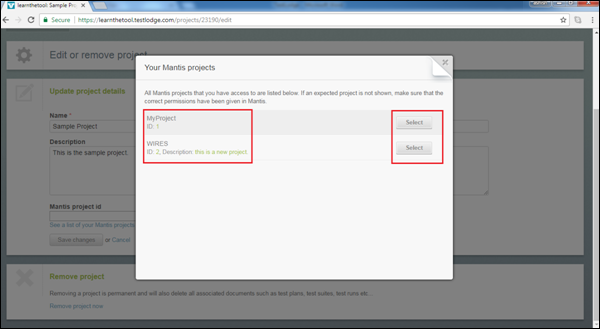
Step 8 − Finally, click Save Changes.
TestLodge - Search
TestLodge supports simple search functionality which you can utilize to find contents in the projects, different test plans, requirements, and test suites. You can simply type the name in the corresponding search textbox and it provides the result.
Search a Project
When you navigate to one of the available projects, Search Project link appears at the top of the page. This link is present throughout all tabs such as Overview, Test Plan, Requirements, Test Suites, and Test Run.
Now, when you click the Search Project link, it opens the search page having two fields − Search for and Show.
Search for − This is a simple textbox where the user enters the title of the project that will be searched.
Show − This is the dropdown with options such as Everything, Test Plans, Requirements, Test Suites and Cases, and Test Runs.
Once you select the dropdown option, TestLodge will search the specific documents in the project. Click the Go button to search.
The following screenshot shows the Search project functionality page.

Search Test Plans
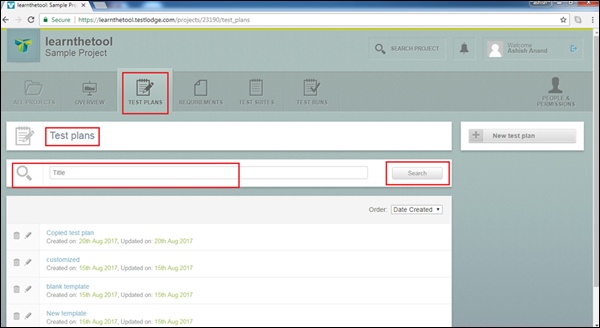
TestLodge supports search functionality specifically for Test Plans tab. You can search specific test plans here using the title.
Once you navigate to the Test Plans tab, the Search textbox is present in the first section.
You can type the title of the test plan to search and click the Search button as shown in the following screenshot.
Once you click one of the test plans, its content is displayed.
A Test Plan has various sections. Search functionality supports to search the different sections inside a test plan.
You can type the title in the search box and click the Search button.
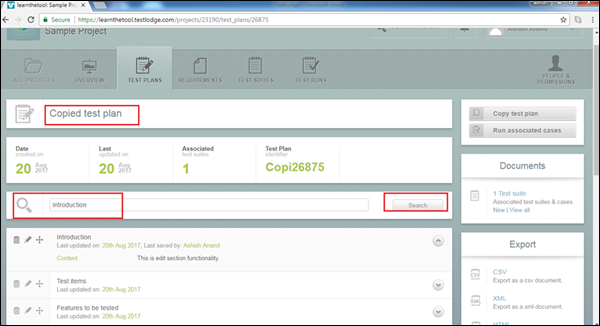
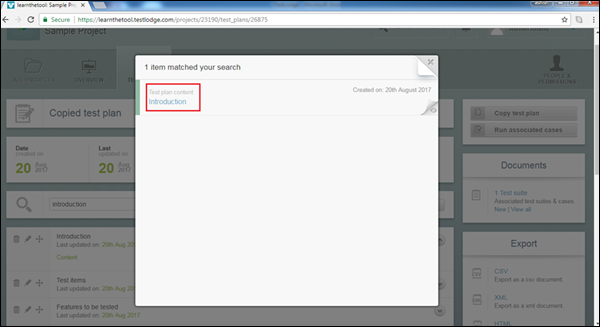
After clicking the search button, it displays the searched content in the new wizard. Click the searched content to directly navigate to it as shown in the following screenshot.
In a similar manner, you can utilize the Search functionality for Requirements tab as well.
Search Test Suites
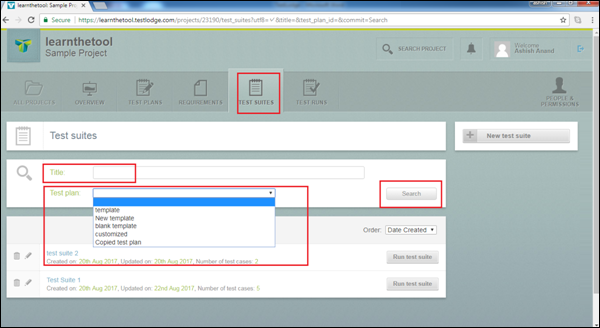
In the Test Suites tab, you can search different test suites that belong to a test plan.
There are two fields present Title and Test Plan.
Title − Enter the Test Suite Name
Test Plan − Select the test plan where you want to search the test suite
While performing the search operation, either of the fields can be used. It is not required to mention the details in both the fields.
After entering the search criteria, click the Search button.
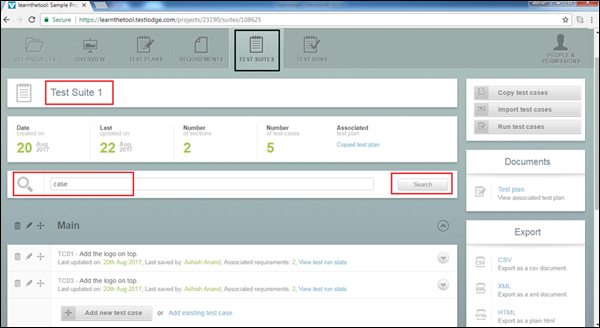
The following screenshot displays how to search the test suite.
Once you click one of the test suites, it can again utilize the search functionality to find a specific test case.
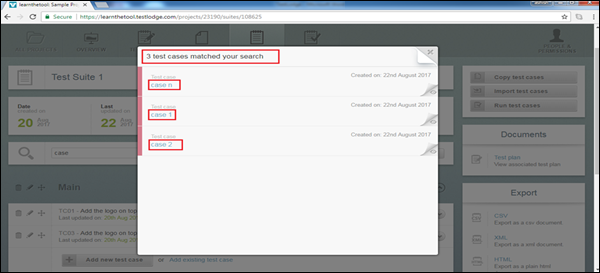
In the search box, type the title of the test case and click Search. It will display all the matched test cases as shown in the following screenshot.
After clicking the search button, result contents are displayed in the new wizard. You can directly move to the content by clicking the hyperlink of the searched content.
Search Test Runs
You can search test runs using Assigned User names and the status of test runs as Complete, In Progress, and Not started.
When you move down the page of test runs, you will find a Search section with two fields −
Involve User − This is a dropdown list. It is the assigned user list. It will search the test runs assigned to a selected user.
Status − You can search the test results based on the status of Test run as Complete, Not started, or In Progress.
You can utilize either combinations or any one of the fields to search the content.
After providing a search criterion, click the Search button as shown in the following screenshot.

TestLodge - Logout
It is always suggested and is a best practice to Logout from the TestLodge account once your work is done to secure the data.
Note − TestLodge doesnt have any timeout for inactive session. You will never log out automatically until the Logout button is clicked. You are logged out, if the browser is closed directly, however, it is not a good practice.
For example, if you have logged into the TestLodge account and havent logged out from the account, neither did you close the browser, then you can view all contents after 10 hours too and continue the work without logging in again.
It is highly recommended to log out from the account as soon as your work is completed.
Following is the way to log out from the account.
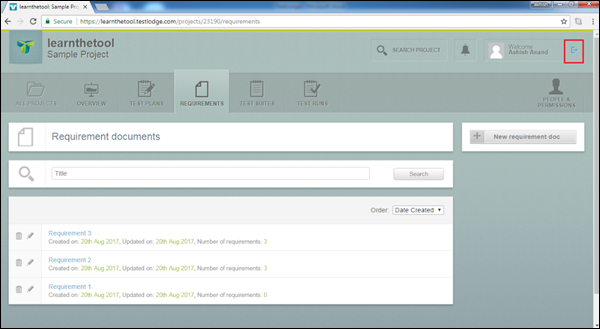
The logout button is present at the right top corner of the page. This button is present throughout all tabs/pages of TestLodge.
The following screenshot displays the Logout button on the page.
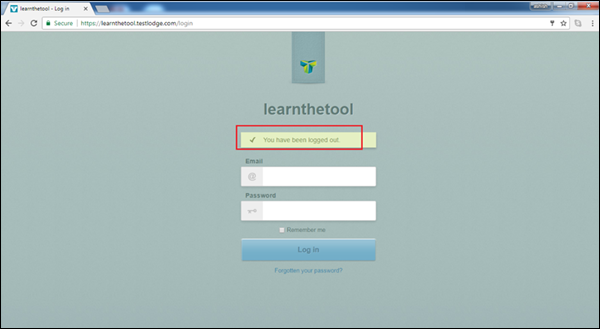
Whenever you want to log out from the page, click the above button. Once you click the button, you are logged out and the TestLodge Login page is displayed along with the logout message as You have been logged out.
You can re-enter the credentials to login to the account again.
The following screenshot displays the logout page.