- TestLodge - Home
- TestLodge - Introduction
- TestLodge - Features
- TestLodge - Free Trial Access
- TestLodge - Login
- TestLodge - Dashboard
- TestLodge - Add Users
- TestLodge - Add a Project
- TestLodge - Test Plans
- TestLodge - Copy a Test Plan
- TestLodge - Requirements
- TestLodge - Copy Requirements
- TestLodge - Test Suites
- TestLodge - Copy Test Cases
- TestLodge - Import Test Cases
- TestLodge - Add Test Run
- TestLodge - Execute a Test Run
- TestLodge - Test Run Summary
- TestLodge - Reports
- TestLodge - Export Contents
- Issue Tracker Integration
- TestLodge - Search
- TestLodge - Logout
TestLodge - Copy a Test Plan
You can copy the contents of a test plan as another test plan in the same project as well as across the project. Test plans can be copied into a new project as well.
Following are the steps to copy a Test Plan.
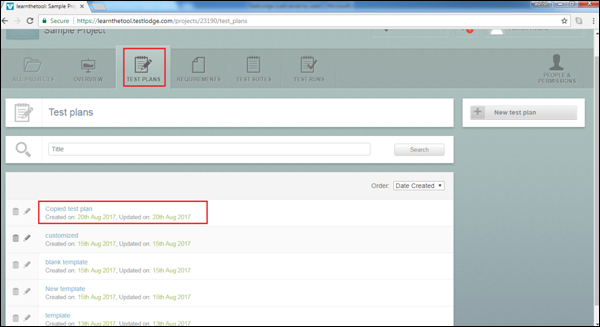
Step 1 − To copy a Test Plan, go to Test Plans section and click one of the listed test plans that you want to copy.
It will open the content of the Test Plan. You will be able to see Copy test plan button on the upper right corner of the screen as shown in the following screenshot.
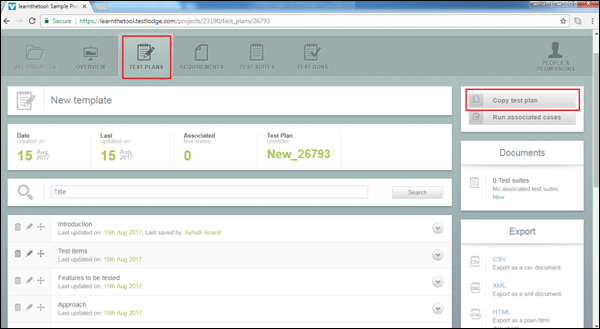
Step 2 − Click the Copy test plan button. It displays Copy From (left side) and Copy To (right side) section.
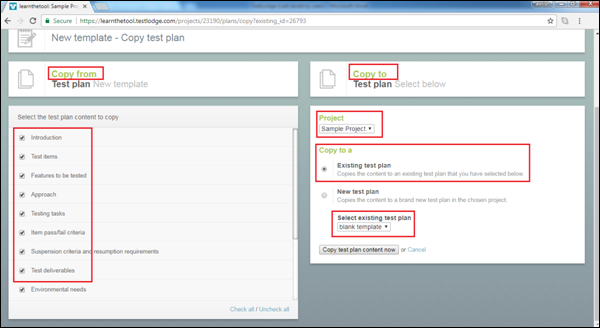
Step 3 − On the left side in the Copy From section, all content of the test plan is displayed. Choose the contents to copy into the new test plan by checking the checkbox. It depends on whether you want to choose all or individual contents.
Step 4 − On the right side in the Copy To section, the first field is Project. Select the Project Name where the Test Plan should be copied. It can be the same project or other projects listed in the TestLodge account.
The next field is − Copy to a - where there are two radio buttons Existing Test Plan and New Test Plan. The Existing Test Plan, copies the content to an existing test plan that you select in another dropdown named as Select existing test plan as shown in the following screenshot.
The New Test Plan option, copies the content to a brand new test plan in the chosen project. Once you select the New Test Plan option, the new text field displays New Test Plan Name where you need to enter the name of the test plan as shown in the following screenshot.
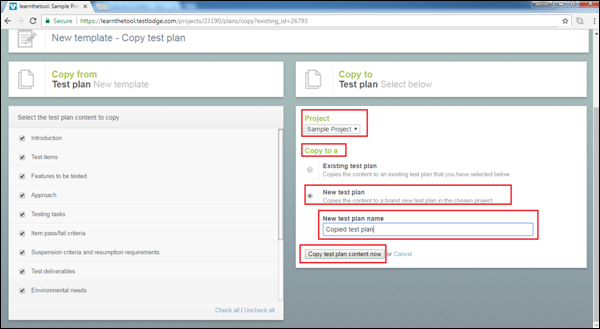
Step 5 − After careful selection, click the Copy test plan content now button.
You will get a successful message as shown in the following screenshot.

Step 6 − Navigate to the Test Plan section, the copied test plan can be seen as shown in the following screenshot.