- Next.js - Home
- Next.js - Overview
- Next.js - Project Setup
- Next.js - Folder Structure
- Next.js - App Router
- Next.js - Page Router
- Next.js Features
- Next.js - Pages
- Next.js - Data Fetching
- Next.js - ISR
- Next.js - Static File Serving
- Next.js - Pre-Rendering
- Next.js - Partial Pre Rendering
- Next.js - Server Side Rendering
- Next.js - Client Side Rendering
- Next.js Routing
- Next.js - Routing
- Next.js - Nested Routing
- Next.js - Dynamic Routing
- Next.js - Parallel Routing
- Next.js - Imperative Routing
- Next.js - Shallow Routing
- Next.js - Intercepting Routes
- Next.js - Redirecting Routes
- Next.js - Navigation and Linking
- Next.js Configuration
- Next.js - TypeScript
- Next.js - Environment Variables
- Next.js - File Conventions
- Next.js - ESLint
- Next.js API & Backend
- Next.js - API Routes
- Next.js - Dynamic API Routes
- Next.js - Route Handlers
- Next.js - API MiddleWares
- Next.js - Response Helpers
- Next.js API Reference
- Next.js - CLI Commands
- Next.js - Functions
- Next.js - Directives
- Next.js - Components
- Next.js - Image Component
- Next.js - Font Component
- Next.js - Head Component
- Next.js - Form Component
- Next.js - Link Component
- Next.js - Script Component
- Next.js Styling & SEO
- Next.js - CSS Support
- Next.js - Global CSS Support
- Next.js - Meta Data
- Next.js Advanced Topics
- Next.js - Error Handling
- Next.js - Server Actions
- Next.js - Fast Refresh
- Next.js - Internationalization
- Next.js - Authentication
- Next.js - Session Management
- Next.js - Authorization
- Next.js - Caching
- Next.js - Data Caching
- Next.js - Router Caching
- Next.js - Full Route Caching
- Next.js - Request Memoization
- Next.js Performance Optimization
- Next.js - Optimizations
- Next.js - Image Optimization
- Next.js - Lazy Loading
- Next.js - Font Optimization
- Next.js - Video Optimization
- Next.js - Script Optimization
- Next.js - Memory Optimization
- Next.js - Using OpenTelemetry
- Next.js - Package Bundling Optimization
- Next.js Testing
- Next.js - Testing
- Next.js - Testing with Jest
- Next.js - Testing with Cypress
- Next.js - Testing with Vitest
- Next.js - Testing with Playwright
- Next.js Debugging & Deployment
- Next.js - Debugging
- Next.js - Deployment
- Next.js Useful Resources
- Next.js - Interview Questions
- Next.js - Quick Guide
- Next.js - Useful Resources
- Next.js - Discussion
Next.js - Page Router Setup
Next.js Page Router
Next.js versions before 13 uses page router setup, in which the structure of your pages/ directory determines the routes of your application. This system is known as the Page Router in Next.js. In this chapter, we will learn how to setup and use the page router system in Next.js.
Setup Page Router
To setup the page router, follow the steps below:
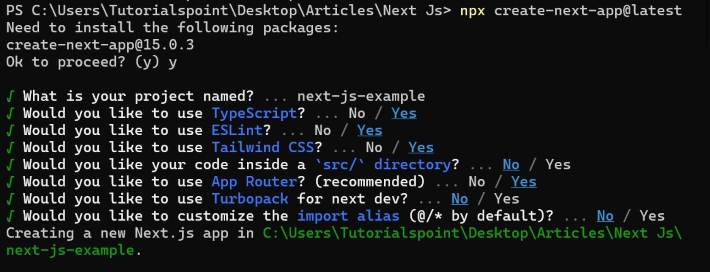
Step 1: Create a Next js Project
First, we need to create a Next.js project. We can do this by running the following command in the terminal:
>> npx create-next-app@latest
After running this you will be prompted to give name for your project. Enter a suitable name, and then you will be asked to choose page router or app router setup. Choose the page router setup. Use the image below as reference.
Step 2: Understanding the Page Router System
In Next.js, every file inside the pages/ directory automatically becomes a route. For example, if we have a file called pages/about/index.tsx, it will become the /about route.
The pages/index.tsx file is the default route. If you don't specify a route, it will be the default route.
my-next-app/
 pages/
     index.tsx           '/'
     about/
         index.tsx       '/about'
     contact/
         index.tsx       '/contact'
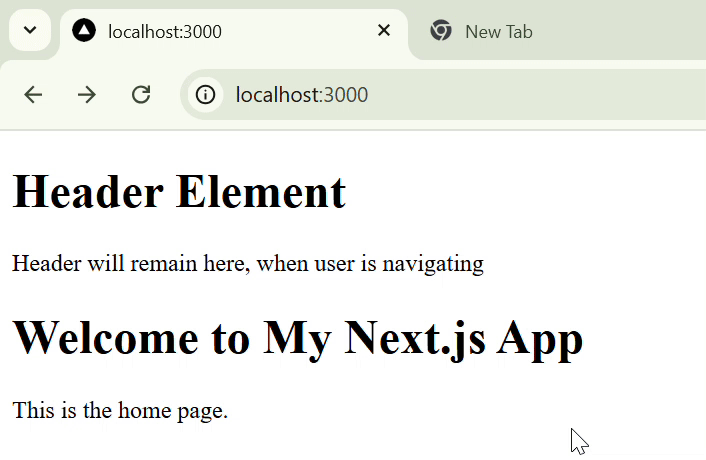
Step 3: Setup Nested Routes
Nested routing refers to defining routes within other routes, to create a hierarchical structure of routes in a web application.
To create a nested About page, create a new folder named 'about' inside the /app/ directory and inside that add a file page.tsx with following code.
// File: pages/about/index.tsx

export default function About() {
    return (
        <div>
            <h1>About Us</h1>
            <p>Welcome to the about page!</p>
        </div>
    );
}
To see output, visit "http://localhost:3000/about". It will look like this.

Step 4: Setup Dynamic Routes
Dynamic routing refers to defining routes that can accept parameters. For example, we can create a route that accepts a parameter like /users/:id. Where :id is a dynamic parameter chosen by the user.
// File: pages/users/[id].tsx

import { useRouter } from 'next/router';

export default function UserProfile() {
  const router = useRouter();
  const { id } = router.query;

return <h1>User Profile: {id}</h1>;
}
Now, visiting http://localhost:3000/users/123 will display User Profile: 123.
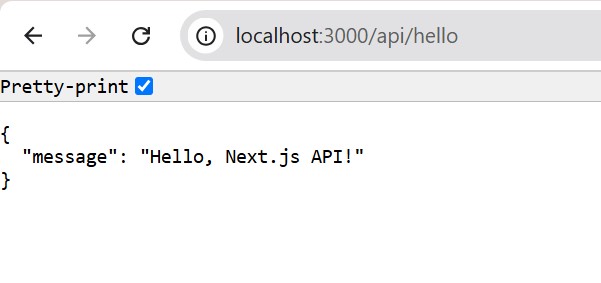
Step 5: API Routes
API Routes are used to create simple API endpoints inside Next.js applications. The API Routes are defined in the pages/api directory. For example, we can create a route that accepts a POST request to /api/hello and returns a JSON response.
// File: pages/api/hello.js

export default function handler(req, res) {
  res.status(200).json({ message: 'Hello, Next.js API!' });
}
Now, if you visit the URL '/api/hello', you will see the following JSON response:
Example of Page Router Setup
In the example below, we will create a dynamic product page. First we start by creating a folder named "products" inside the `/app/` directory. Then, inside the "products" folder, create an `[id].tsx` file. The square brackets `[id]` indicate that this folder represents a dynamic route and the name can be changed based on the product selected by the user.
// pages/products/[id].tsx

import { useRouter } from 'next/router';

export default function ProductPage() {
  const router = useRouter();
  const { id } = router.query;

  return (
    <div>
        <h1>Product {id}</h1>
        <p>This is the product page for item {id}.</p>
    </div>
  );
}
Output
See the output below, page changes based on URL given.