- Next.js - Home
- Next.js - Overview
- Next.js - Project Setup
- Next.js - Folder Structure
- Next.js - App Router
- Next.js - Page Router
- Next.js Features
- Next.js - Pages
- Next.js - Data Fetching
- Next.js - ISR
- Next.js - Static File Serving
- Next.js - Pre-Rendering
- Next.js - Partial Pre Rendering
- Next.js - Server Side Rendering
- Next.js - Client Side Rendering
- Next.js Routing
- Next.js - Routing
- Next.js - Nested Routing
- Next.js - Dynamic Routing
- Next.js - Parallel Routing
- Next.js - Imperative Routing
- Next.js - Shallow Routing
- Next.js - Intercepting Routes
- Next.js - Redirecting Routes
- Next.js - Navigation and Linking
- Next.js Configuration
- Next.js - TypeScript
- Next.js - Environment Variables
- Next.js - File Conventions
- Next.js - ESLint
- Next.js API & Backend
- Next.js - API Routes
- Next.js - Dynamic API Routes
- Next.js - Route Handlers
- Next.js - API MiddleWares
- Next.js - Response Helpers
- Next.js API Reference
- Next.js - CLI Commands
- Next.js - Functions
- Next.js - Directives
- Next.js - Components
- Next.js - Image Component
- Next.js - Font Component
- Next.js - Head Component
- Next.js - Form Component
- Next.js - Link Component
- Next.js - Script Component
- Next.js Styling & SEO
- Next.js - CSS Support
- Next.js - Global CSS Support
- Next.js - Meta Data
- Next.js Advanced Topics
- Next.js - Error Handling
- Next.js - Server Actions
- Next.js - Fast Refresh
- Next.js - Internationalization
- Next.js - Authentication
- Next.js - Session Management
- Next.js - Authorization
- Next.js - Caching
- Next.js - Data Caching
- Next.js - Router Caching
- Next.js - Full Route Caching
- Next.js - Request Memoization
- Next.js Performance Optimization
- Next.js - Optimizations
- Next.js - Image Optimization
- Next.js - Lazy Loading
- Next.js - Font Optimization
- Next.js - Video Optimization
- Next.js - Script Optimization
- Next.js - Memory Optimization
- Next.js - Using OpenTelemetry
- Next.js - Package Bundling Optimization
- Next.js Testing
- Next.js - Testing
- Next.js - Testing with Jest
- Next.js - Testing with Cypress
- Next.js - Testing with Vitest
- Next.js - Testing with Playwright
- Next.js Debugging & Deployment
- Next.js - Debugging
- Next.js - Deployment
- Next.js Useful Resources
- Next.js - Interview Questions
- Next.js - Quick Guide
- Next.js - Useful Resources
- Next.js - Discussion
Next.js - Metadata
Metadata of a webpage stores important information like webpage title, description, title card images, etc. Proper metadata is essential for better search engine results. In this chapter, we will explain metadata object in Next.js, how to define static and dynamic metadata, generate metadata image using CSS.
Metadata Object in Next.js
In Next.js, the metadata object is part of the App Router used to define metadata for each route. With metadata object, we can define title, description and other SEO components even for dynamically generated routes. Here is syntax of metadata object.
export const metadata = {
    title: "Title of Webpage",
    description: "Description of Webpage"
}
Title Attribute
The title attribute is used to set the title of the document. It can be defined as a simple string or an optional template object.
import type { Metadata } from 'next'

export const metadata: Metadata = {
  title: {
    default: '...',
    template: '...',
    absolute: '...',
  },
}
- default : This default title value, that define fallback title to child routes
- template : Used to add a prefix or a suffix to titles defined in child routes
- absolute : Used to provide a title that ignores title.template set in parent route.
Declare a Static Metadata
Static metadata means the metadata that does not depend on data from external sources. This static meta data remains same for all users and it is defined while coding application.
In App router, you can define a static metadata by exporting a Metadata object from a 'layout.tsx' or static 'page.tsx' file. The metadata defined in layout.tsx will be accessible to all components in layout. A metadata defined in page.tsx will particular to that component and it can override metadata of layout page.
Example of Metadata of Layout Component
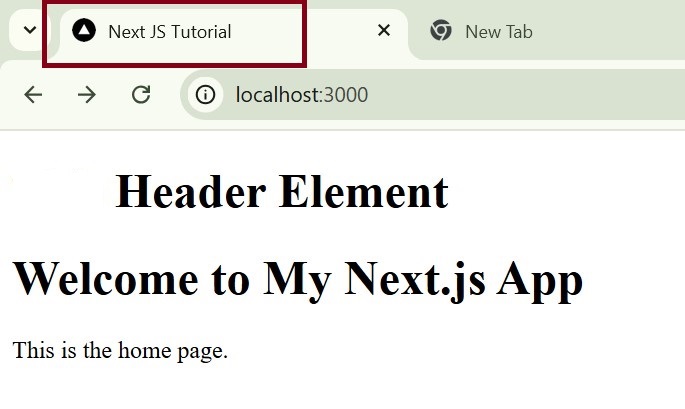
In the code below, we defined metadata for a layout component using Metadata object. The title we defined will be visible at top of browser tab.
// app/layout.tsx file

import { ReactNode } from 'react';
import type { Metadata } from 'next'

export const metadata: Metadata = {
  title: 'Next JS Tutorial',
  description: 'We provide simple and easy to learn tutorial on Next JS',
}

interface RootLayoutProps {
  children: ReactNode;
}

export default function RootLayout({ children }: RootLayoutProps) {
  return (
    <html lang="en">
      <body>
        <header>
            <h1>Header Element</h1>
        </header>
        <main>{children}</main>
      </body>
    </html>
  );
}
Output
Here is the output of above code. The title metadata is highlighted in red rectangle.

Example of Metadata for any Component
As mentioned above, we can override the metadata of layout page inside any component. In the example below we defined a new title and description for About page.
// app/about/page.tsx file

import type { Metadata } from 'next';

export const metadata: Metadata = {
  title: 'Next JS About Page',
  description: 'We provide simple and easy to learn tutorial on Next JS',
}

export default function About() {
    return (
        <div>
            <h1>About Us</h1>
            <h2>Welcome to the Next JS About page!</h2>
            <h4>This page is same for all users</h4>
        </div>
    );
}
Output
This is the combined output of above two codes. You can see that the metadata defined in layout page is default metadata and it is overridden by metadata of About page when we open About page.

Declare a Dynamic Metadata
Dynamic metadata depends on dynamic information, such as the current route parameters, external data, or metadata in parent segments. It can be set by exporting a 'generateMetadata()' function that returns a Metadata object. Learn how dynamic routes works before going through the example.
Example of Dynamic Title Based on Route
In the example below, we will generate a dynamic title for component based on page selected by user.
// app/products/[id]/page.tsx

import { Metadata } from "next";

type Props ={
    params: {
        id: string;
    };
}
// Dynamic Metadata function
export const generateMetadata = ({ params }: Props): Metadata => {
    return {
        title: `Product ${params.id} - My Store`,
    };
}

export default function ProductPage({params }: Props) {

    return (
        <div>
            <h1>Product {params.id}</h1>
            <p>This is the product page for item {params.id}</p>
        </div>
    );
}
Output
In the output you can see that the page is changing based on route we choose.

Metadata Image Generation
Metadata images are used for creating social media images such as Open Graph images, Twitter cards, and more. This image will be displayed when our link of our webpage is shared in Whatsapp, Twitter etc.
Example of Simple Hello World Image
The below example uses ImageResponse constructor to generate dynamic images using JSX and CSS. We will display the generated image in same webpage itself, so that you can see it in output.
// app/api/og/route.js

import { ImageResponse } from 'next/og';

export async function GET() {
  return new ImageResponse(
    (
      <div
        style={{
          fontSize: 50,
          background: 'grey',
          color: '#f0f0f0',
          width: '100%',
          height: '100%',
          display: 'flex',
          textAlign: 'center',
          alignItems: 'center',
          justifyContent: 'center',
        }}
      >
        Hello world!
      </div>
    ),
    {
      width: 300,
      height: 100,
    }
  );
}

// app/contacts/page.js

export default function Page() {
    return (
      <div>
        <h1>Contacts Page</h1>
        <img src="/api/og" alt="Generated Image" />
      </div>
    );
  }
Output
In the output below you can see generated image with 'Hello World' message.
