- Next.js - Home
- Next.js - Overview
- Next.js - Project Setup
- Next.js - Folder Structure
- Next.js - App Router
- Next.js - Page Router
- Next.js Features
- Next.js - Pages
- Next.js - Data Fetching
- Next.js - ISR
- Next.js - Static File Serving
- Next.js - Pre-Rendering
- Next.js - Partial Pre Rendering
- Next.js - Server Side Rendering
- Next.js - Client Side Rendering
- Next.js Routing
- Next.js - Routing
- Next.js - Nested Routing
- Next.js - Dynamic Routing
- Next.js - Parallel Routing
- Next.js - Imperative Routing
- Next.js - Shallow Routing
- Next.js - Intercepting Routes
- Next.js - Redirecting Routes
- Next.js - Navigation and Linking
- Next.js Configuration
- Next.js - TypeScript
- Next.js - Environment Variables
- Next.js - File Conventions
- Next.js - ESLint
- Next.js API & Backend
- Next.js - API Routes
- Next.js - Dynamic API Routes
- Next.js - Route Handlers
- Next.js - API MiddleWares
- Next.js - Response Helpers
- Next.js API Reference
- Next.js - CLI Commands
- Next.js - Functions
- Next.js - Directives
- Next.js - Components
- Next.js - Image Component
- Next.js - Font Component
- Next.js - Head Component
- Next.js - Form Component
- Next.js - Link Component
- Next.js - Script Component
- Next.js Styling & SEO
- Next.js - CSS Support
- Next.js - Global CSS Support
- Next.js - Meta Data
- Next.js Advanced Topics
- Next.js - Error Handling
- Next.js - Server Actions
- Next.js - Fast Refresh
- Next.js - Internationalization
- Next.js - Authentication
- Next.js - Session Management
- Next.js - Authorization
- Next.js - Caching
- Next.js - Data Caching
- Next.js - Router Caching
- Next.js - Full Route Caching
- Next.js - Request Memoization
- Next.js Performance Optimization
- Next.js - Optimizations
- Next.js - Image Optimization
- Next.js - Lazy Loading
- Next.js - Font Optimization
- Next.js - Video Optimization
- Next.js - Script Optimization
- Next.js - Memory Optimization
- Next.js - Using OpenTelemetry
- Next.js - Package Bundling Optimization
- Next.js Testing
- Next.js - Testing
- Next.js - Testing with Jest
- Next.js - Testing with Cypress
- Next.js - Testing with Vitest
- Next.js - Testing with Playwright
- Next.js Debugging & Deployment
- Next.js - Debugging
- Next.js - Deployment
- Next.js Useful Resources
- Next.js - Interview Questions
- Next.js - Quick Guide
- Next.js - Useful Resources
- Next.js - Discussion
Next.js - Imperative Routing
In Next.js, routing can be achieved declaratively using the <link> component or imperatively through programmatic navigation. So far we learned declarative routing and it's implementation. In this chapter we will learn, what is imperative routing, how to implement it and how to define a routing based on programmatic conditions.
What is Imperative Routing?
Imperative routing is a method of navigating programmatically based on certain condition or user action such as clicking button. This approach is particularly useful when navigation depends on user authentication status, dynamic condition and custom business logic.
Imperative Routing using useRouter
To implement imperative routing, Next.js provides useRouter hook to redirect or navigate between routes at the client side. This hook can only be used in client side components. This is useful when we want redirect user to home page or any other page after clicking a button or submitting a form.
Example
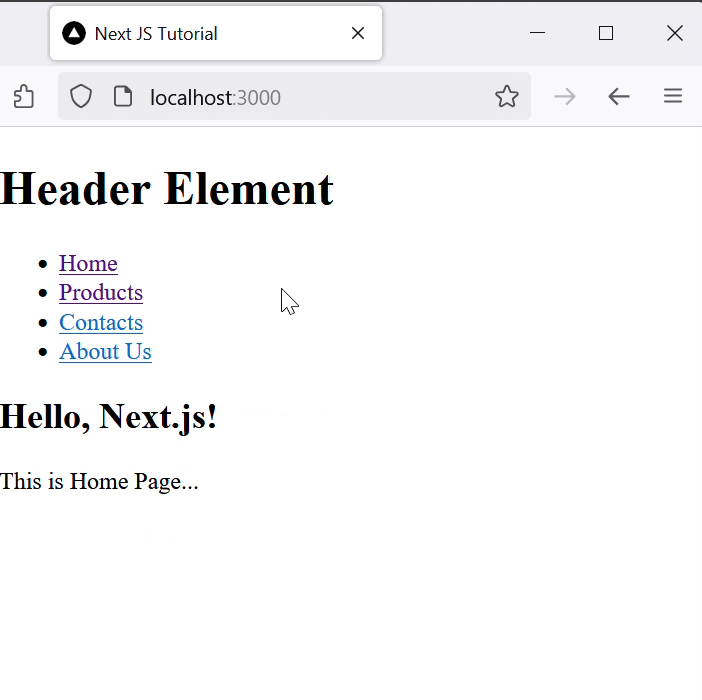
In the example below, we implemented a product ordering feature to the product page we created in the previous chapters. On clicking the button, user will get a confirmation of the order and redirect them to home page using 'useRoute' hook.
"use client";

import { useRouter } from "next/navigation";
import { PageProps } from "next/dist/shared/lib/router/utils/page-props";

export default function ProductPage({ params }: PageProps) {
    const router = useRouter();

    const handleClick = () =>{
        alert("Order Placed...");

        // Navigate to home page after placing order
        router.push("/");
    };
    return (
        <div>
            <h1>Product {params.id}</h1>
            <p>This is the product page for item {params.id}</p>
            <button onClick={handleClick}>Order Item</button>
        </div>
    );
}
Output
In the output, after placing order user is getting redirected to home page.
Routing Based on Condition
We can use useRouter hook to define routing URL based on certain conditions like if user is authenticated or logged in. See the example below.
Example
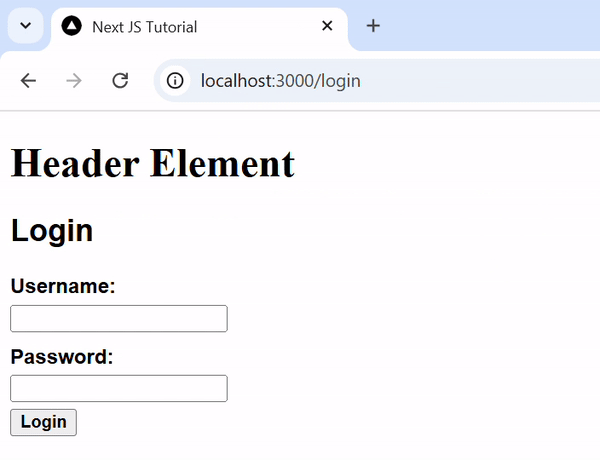
In the example below, we defined a next.js client components to check if user is authenticated and display login page or protected page based on it. We kept userAuthenticated as false, so that redirecting will be visible in output.
// app/protected-page/page.tsx file

"use client";

import { useEffect } from 'react';
import { useRouter } from 'next/navigation';

export default function ProtectedPage() {
  const router = useRouter();

  useEffect(() => {
    // Replace with actual authentication logic
    const userAuthenticated = false;
    if (!userAuthenticated) {
      router.replace('/login'); // Redirect to login page
    }
  }, [router]);

  return <div> Welcome to the Protected Page </div>;
}

// app/login/page.tsx file

export default function Login() {
    return (
      <div>
        <h2>Login</h2>
        <div>
          <label htmlFor="username">Username:</label>
          <input type="text"/>
        </div>
        <div>
          <label htmlFor="password">Password:</label>
          <input type="password"/>
        </div>

        <button type="submit">Login </button>
      </div>
    );
}
Output
In the output, when we are trying to access protected page, we are getting redirected to login page.