- ML - Home
- ML - Introduction
- ML - Getting Started
- ML - Basic Concepts
- ML - Ecosystem
- ML - Python Libraries
- ML - Applications
- ML - Life Cycle
- ML - Required Skills
- ML - Implementation
- ML - Challenges & Common Issues
- ML - Limitations
- ML - Reallife Examples
- ML - Data Structure
- ML - Mathematics
- ML - Artificial Intelligence
- ML - Neural Networks
- ML - Deep Learning
- ML - Getting Datasets
- ML - Categorical Data
- ML - Data Loading
- ML - Data Understanding
- ML - Data Preparation
- ML - Models
- ML - Supervised Learning
- ML - Unsupervised Learning
- ML - Semi-supervised Learning
- ML - Reinforcement Learning
- ML - Supervised vs. Unsupervised
- Machine Learning Data Visualization
- ML - Data Visualization
- ML - Histograms
- ML - Density Plots
- ML - Box and Whisker Plots
- ML - Correlation Matrix Plots
- ML - Scatter Matrix Plots
- Statistics for Machine Learning
- ML - Statistics
- ML - Mean, Median, Mode
- ML - Standard Deviation
- ML - Percentiles
- ML - Data Distribution
- ML - Skewness and Kurtosis
- ML - Bias and Variance
- ML - Hypothesis
- Regression Analysis In ML
- ML - Regression Analysis
- ML - Linear Regression
- ML - Simple Linear Regression
- ML - Multiple Linear Regression
- ML - Polynomial Regression
- Classification Algorithms In ML
- ML - Classification Algorithms
- ML - Logistic Regression
- ML - K-Nearest Neighbors (KNN)
- ML - Naïve Bayes Algorithm
- ML - Decision Tree Algorithm
- ML - Support Vector Machine
- ML - Random Forest
- ML - Confusion Matrix
- ML - Stochastic Gradient Descent
- Clustering Algorithms In ML
- ML - Clustering Algorithms
- ML - Centroid-Based Clustering
- ML - K-Means Clustering
- ML - K-Medoids Clustering
- ML - Mean-Shift Clustering
- ML - Hierarchical Clustering
- ML - Density-Based Clustering
- ML - DBSCAN Clustering
- ML - OPTICS Clustering
- ML - HDBSCAN Clustering
- ML - BIRCH Clustering
- ML - Affinity Propagation
- ML - Distribution-Based Clustering
- ML - Agglomerative Clustering
- Dimensionality Reduction In ML
- ML - Dimensionality Reduction
- ML - Feature Selection
- ML - Feature Extraction
- ML - Backward Elimination
- ML - Forward Feature Construction
- ML - High Correlation Filter
- ML - Low Variance Filter
- ML - Missing Values Ratio
- ML - Principal Component Analysis
- Reinforcement Learning
- ML - Reinforcement Learning Algorithms
- ML - Exploitation & Exploration
- ML - Q-Learning
- ML - REINFORCE Algorithm
- ML - SARSA Reinforcement Learning
- ML - Actor-critic Method
- ML - Monte Carlo Methods
- ML - Temporal Difference
- Deep Reinforcement Learning
- ML - Deep Reinforcement Learning
- ML - Deep Reinforcement Learning Algorithms
- ML - Deep Q-Networks
- ML - Deep Deterministic Policy Gradient
- ML - Trust Region Methods
- Quantum Machine Learning
- ML - Quantum Machine Learning
- ML - Quantum Machine Learning with Python
- Machine Learning Miscellaneous
- ML - Performance Metrics
- ML - Automatic Workflows
- ML - Boost Model Performance
- ML - Gradient Boosting
- ML - Bootstrap Aggregation (Bagging)
- ML - Cross Validation
- ML - AUC-ROC Curve
- ML - Grid Search
- ML - Data Scaling
- ML - Train and Test
- ML - Association Rules
- ML - Apriori Algorithm
- ML - Gaussian Discriminant Analysis
- ML - Cost Function
- ML - Bayes Theorem
- ML - Precision and Recall
- ML - Adversarial
- ML - Stacking
- ML - Epoch
- ML - Perceptron
- ML - Regularization
- ML - Overfitting
- ML - P-value
- ML - Entropy
- ML - MLOps
- ML - Data Leakage
- ML - Monetizing Machine Learning
- ML - Types of Data
- Machine Learning - Resources
- ML - Quick Guide
- ML - Cheatsheet
- ML - Interview Questions
- ML - Useful Resources
- ML - Discussion
K-Nearest Neighbors (KNN) in Machine Learning
K-Nearest Neighbors (KNN) Algorithm
K-nearest neighbors (KNN) algorithm is a type of supervised ML algorithm which can be used for both classification as well as regression predictive problems. However, it is mainly used for classification predictive problems in industry. The main idea behind KNN is to find the k-nearest data points to a given test data point and use these nearest neighbors to make a prediction. The value of k is a hyperparameter that needs to be tuned, and it represents the number of neighbors to consider.
For classification problems, the KNN algorithm assigns the test data point to the class that appears most frequently among the k-nearest neighbors. In other words, the class with the highest number of neighbors is the predicted class.
For regression problems, the KNN algorithm assigns the test data point the average of the k-nearest neighbors' values.
The distance metric used to measure the similarity between two data points is an essential factor that affects the KNN algorithm's performance. The most commonly used distance metrics are Euclidean distance, Manhattan distance, and Minkowski distance.
The following two properties would define KNN well −
Lazy learning algorithm − KNN is a lazy learning algorithm because it does not have a specialized training phase and uses all the data for training while classification.
Non-parametric learning algorithm − KNN is also a non-parametric learning algorithm because it doesn't assume anything about the underlying data.
How Does K-Nearest Neighbors Algorithm Work?
K-nearest neighbors (KNN) algorithm uses 'feature similarity' to predict the values of new datapoints which further means that the new data point will be assigned a value based on how closely it matches the points in the training set. We can understand its working with the help of following steps −
Step 1 − For implementing any algorithm, we need dataset. So during the first step of KNN, we must load the training as well as test data.
Step 2 − Next, we need to choose the value of K i.e. the nearest data points. K can be any integer.
Step 3 − For each point in the test data do the following −
3.1 − Calculate the distance between test data and each row of training data with the help of any of the method namely: Euclidean, Manhattan or Hamming distance. The most commonly used method to calculate distance is Euclidean.
3.2 − Now, based on the distance value, sort them in ascending order.
3.3 − Next, it will choose the top K rows from the sorted array.
3.4 − Now, it will assign a class to the test point based on most frequent class of these rows.
Step 4 − End
Example
The following is an example to understand the concept of K and working of KNN algorithm −
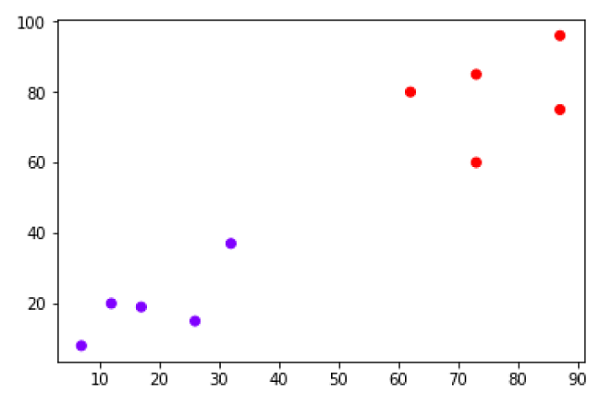
Suppose we have a dataset which can be plotted as follows −
Now, we need to classify new data point with black dot (at point 60,60) into blue or red class. We are assuming K = 3 i.e. it would find three nearest data points. It is shown in the next diagram −
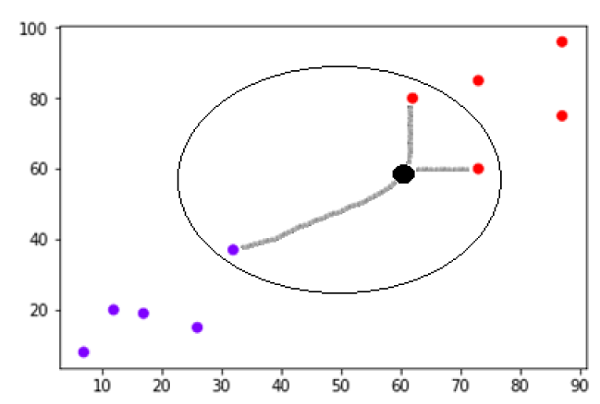
We can see in the above diagram the three nearest neighbors of the data point with black dot. Among those three, two of them lies in Red class hence the black dot will also be assigned in red class.
Building a K Nearest Neighbors Model
We can follow the below steps to build a KNN model −
Load the data − The first step is to load the dataset into memory. This can be done using various libraries such as pandas or numpy.
Split the data − The next step is to split the data into training and test sets. The training set is used to train the KNN algorithm, while the test set is used to evaluate its performance.
Normalize the data − Before training the KNN algorithm, it is essential to normalize the data to ensure that each feature contributes equally to the distance metric calculation.
Calculate distances − Once the data is normalized, the KNN algorithm calculates the distances between the test data point and each data point in the training set.
Select k-nearest neighbors − The KNN algorithm selects the k-nearest neighbors based on the distances calculated in the previous step.
Make a prediction − For classification problems, the KNN algorithm assigns the test data point to the class that appears most frequently among the k-nearest neighbors. For regression problems, the KNN algorithm assigns the test data point the average of the k-nearest neighbors' values.
Evaluate performance − Finally, the KNN algorithm's performance is evaluated using various metrics such as accuracy, precision, recall, and F1-score.
Implementation of KNN Algorithm in Python
As we know K-nearest neighbors (KNN) algorithm can be used for both classification as well as regression. The following are the recipes in Python to use KNN as classifier as well as regressor −
KNN as Classifier
First, start with importing necessary python packages −
import numpy as np
import matplotlib.pyplot as plt
import pandas as pd
Next, download the iris dataset from its weblink as follows −
path = "https://archive.ics.uci.edu/ml/machine-learning-databases/iris/iris.data"
Next, we need to assign column names to the dataset as follows −
headernames = ['sepal-length', 'sepal-width', 'petal-length', 'petal-width', 'Class']
Now, we need to read dataset to pandas dataframe as follows −
dataset = pd.read_csv(path, names=headernames)
dataset.head()
| slno. | sepal-length | sepal-width | petal-length | petal-width | Class |
|---|---|---|---|---|---|
| 0 | 5.1 | 3.5 | 1.4 | 0.2 | Iris-setosa |
| 1 | 4.9 | 3.0 | 1.4 | 0.2 | Iris-setosa |
| 2 | 4.7 | 3.2 | 1.3 | 0.2 | Iris-setosa |
| 3 | 4.6 | 3.1 | 1.5 | 0.2 | Iris-setosa |
| 4 | 5.0 | 3.6 | 1.4 | 0.2 | Iris-setosa |
Data Preprocessing will be done with the help of following script lines −
X = dataset.iloc[:, :-1].values
y = dataset.iloc[:, 4].values
Next, we will divide the data into train and test split. Following code will split the dataset into 60% training data and 40% of testing data −
from sklearn.model_selection import train_test_split
X_train, X_test, y_train, y_test = train_test_split(X, y, test_size=0.40)
Next, data scaling will be done as follows −
from sklearn.preprocessing import StandardScaler
scaler = StandardScaler()
scaler.fit(X_train)
X_train = scaler.transform(X_train)
X_test = scaler.transform(X_test)
Next, train the model with the help of KNeighborsClassifier class of sklearn as follows −
from sklearn.neighbors import KNeighborsClassifier
classifier = KNeighborsClassifier(n_neighbors=8)
classifier.fit(X_train, y_train)
At last we need to make prediction. It can be done with the help of following script −
y_pred = classifier.predict(X_test)
Next, print the results as follows −
from sklearn.metrics import classification_report, confusion_matrix, accuracy_score
result = confusion_matrix(y_test, y_pred)
print("Confusion Matrix:")
print(result)
result1 = classification_report(y_test, y_pred)
print("Classification Report:",)
print (result1)
result2 = accuracy_score(y_test,y_pred)
print("Accuracy:",result2)
Output
Confusion Matrix:
[[21 0 0]
[ 0 16 0]
[ 0 7 16]]
Classification Report:
            precision      recall       f1-score       support
Iris-setosa       1.00        1.00         1.00          21
Iris-versicolor   0.70        1.00         0.82          16
Iris-virginica    1.00        0.70         0.82          23
micro avg         0.88        0.88         0.88          60
macro avg         0.90        0.90         0.88          60
weighted avg      0.92        0.88         0.88          60


Accuracy: 0.8833333333333333
KNN as Regressor
First, start with importing necessary Python packages −
import numpy as np
import pandas as pd
Next, download the iris dataset from its weblink as follows −
path = "https://archive.ics.uci.edu/ml/machine-learning-databases/iris/iris.data"
Next, we need to assign column names to the dataset as follows −
headernames = ['sepal-length', 'sepal-width', 'petal-length', 'petal-width', 'Class']
Now, we need to read dataset to pandas dataframe as follows −
data = pd.read_csv(url, names=headernames)
array = data.values
X = array[:,:2]
Y = array[:,2]
data.shape

output:(150, 5)
Next, import KNeighborsRegressor from sklearn to fit the model −
from sklearn.neighbors import KNeighborsRegressor
knnr = KNeighborsRegressor(n_neighbors=10)
knnr.fit(X, y)
At last, we can find the MSE as follows −
print ("The MSE is:",format(np.power(y-knnr.predict(X),2).mean()))
Output
The MSE is: 0.12226666666666669
Pros and Cons of KNN
Pros
It is very simple algorithm to understand and interpret.
It is very useful for nonlinear data because there is no assumption about data in this algorithm.
It is a versatile algorithm as we can use it for classification as well as regression.
It has relatively high accuracy but there are much better supervised learning models than KNN.
Cons
It is computationally a bit expensive algorithm because it stores all the training data.
High memory storage required as compared to other supervised learning algorithms.
Prediction is slow in case of big N.
It is very sensitive to the scale of data as well as irrelevant features.
Applications of KNN
The following are some of the areas in which KNN can be applied successfully −
Banking System
KNN can be used in banking system to predict weather an individual is fit for loan approval? Does that individual have the characteristics similar to the defaulters one?
Calculating Credit Ratings
KNN algorithms can be used to find an individual's credit rating by comparing with the persons having similar traits.
Politics
With the help of KNN algorithms, we can classify a potential voter into various classes like "Will Vote", "Will not Vote", "Will Vote to Party 'Congress', "Will Vote to Party 'BJP'.
Other areas in which KNN algorithm can be used are Speech Recognition, Handwriting Detection, Image Recognition and Video Recognition.
