- MySQL Basics
- MySQL - Home
- MySQL - Introduction
- MySQL - Features
- MySQL - Versions
- MySQL - Variables
- MySQL - Installation
- MySQL - Administration
- MySQL - PHP Syntax
- MySQL - Node.js Syntax
- MySQL - Java Syntax
- MySQL - Python Syntax
- MySQL - Connection
- MySQL - Workbench
- MySQL Databases
- MySQL - Create Database
- MySQL - Drop Database
- MySQL - Select Database
- MySQL - Show Database
- MySQL - Copy Database
- MySQL - Database Export
- MySQL - Database Import
- MySQL - Database Info
- MySQL Users
- MySQL - Create Users
- MySQL - Drop Users
- MySQL - Show Users
- MySQL - Change Password
- MySQL - Grant Privileges
- MySQL - Show Privileges
- MySQL - Revoke Privileges
- MySQL - Lock User Account
- MySQL - Unlock User Account
- MySQL Tables
- MySQL - Create Tables
- MySQL - Show Tables
- MySQL - Alter Tables
- MySQL - Rename Tables
- MySQL - Clone Tables
- MySQL - Truncate Tables
- MySQL - Temporary Tables
- MySQL - Repair Tables
- MySQL - Describe Tables
- MySQL - Add/Delete Columns
- MySQL - Show Columns
- MySQL - Rename Columns
- MySQL - Table Locking
- MySQL - Drop Tables
- MySQL - Derived Tables
- MySQL Queries
- MySQL - Queries
- MySQL - Constraints
- MySQL - Insert Query
- MySQL - Select Query
- MySQL - Update Query
- MySQL - Delete Query
- MySQL - Replace Query
- MySQL - Insert Ignore
- MySQL - Insert on Duplicate Key Update
- MySQL - Insert Into Select
- MySQL Indexes
- MySQL - Indexes
- MySQL - Create Index
- MySQL - Drop Index
- MySQL - Show Indexes
- MySQL - Unique Index
- MySQL - Clustered Index
- MySQL - Non-Clustered Index
- MySQL Operators and Clauses
- MySQL - Where Clause
- MySQL - Limit Clause
- MySQL - Distinct Clause
- MySQL - Order By Clause
- MySQL - Group By Clause
- MySQL - Having Clause
- MySQL - AND Operator
- MySQL - OR Operator
- MySQL - Like Operator
- MySQL - IN Operator
- MySQL - ANY Operator
- MySQL - EXISTS Operator
- MySQL - NOT Operator
- MySQL - NOT EQUAL Operator
- MySQL - IS NULL Operator
- MySQL - IS NOT NULL Operator
- MySQL - Between Operator
- MySQL - UNION Operator
- MySQL - UNION vs UNION ALL
- MySQL - MINUS Operator
- MySQL - INTERSECT Operator
- MySQL - INTERVAL Operator
- MySQL Joins
- MySQL - Using Joins
- MySQL - Inner Join
- MySQL - Left Join
- MySQL - Right Join
- MySQL - Cross Join
- MySQL - Full Join
- MySQL - Self Join
- MySQL - Delete Join
- MySQL - Update Join
- MySQL - Union vs Join
- MySQL Keys
- MySQL - Unique Key
- MySQL - Primary Key
- MySQL - Foreign Key
- MySQL - Composite Key
- MySQL - Alternate Key
- MySQL Triggers
- MySQL - Triggers
- MySQL - Create Trigger
- MySQL - Show Trigger
- MySQL - Drop Trigger
- MySQL - Before Insert Trigger
- MySQL - After Insert Trigger
- MySQL - Before Update Trigger
- MySQL - After Update Trigger
- MySQL - Before Delete Trigger
- MySQL - After Delete Trigger
- MySQL Data Types
- MySQL - Data Types
- MySQL - VARCHAR
- MySQL - BOOLEAN
- MySQL - ENUM
- MySQL - DECIMAL
- MySQL - INT
- MySQL - FLOAT
- MySQL - BIT
- MySQL - TINYINT
- MySQL - BLOB
- MySQL - SET
- MySQL Regular Expressions
- MySQL - Regular Expressions
- MySQL - RLIKE Operator
- MySQL - NOT LIKE Operator
- MySQL - NOT REGEXP Operator
- MySQL - regexp_instr() Function
- MySQL - regexp_like() Function
- MySQL - regexp_replace() Function
- MySQL - regexp_substr() Function
- MySQL Fulltext Search
- MySQL - Fulltext Search
- MySQL - Natural Language Fulltext Search
- MySQL - Boolean Fulltext Search
- MySQL - Query Expansion Fulltext Search
- MySQL - ngram Fulltext Parser
- MySQL Functions & Operators
- MySQL - Date and Time Functions
- MySQL - Arithmetic Operators
- MySQL - Numeric Functions
- MySQL - String Functions
- MySQL - Aggregate Functions
- MySQL Misc Concepts
- MySQL - NULL Values
- MySQL - Transactions
- MySQL - Using Sequences
- MySQL - Handling Duplicates
- MySQL - SQL Injection
- MySQL - SubQuery
- MySQL - Comments
- MySQL - Check Constraints
- MySQL - Storage Engines
- MySQL - Export Table into CSV File
- MySQL - Import CSV File into Database
- MySQL - UUID
- MySQL - Common Table Expressions
- MySQL - On Delete Cascade
- MySQL - Upsert
- MySQL - Horizontal Partitioning
- MySQL - Vertical Partitioning
- MySQL - Cursor
- MySQL - Stored Functions
- MySQL - Signal
- MySQL - Resignal
- MySQL - Character Set
- MySQL - Collation
- MySQL - Wildcards
- MySQL - Alias
- MySQL - ROLLUP
- MySQL - Today Date
- MySQL - Literals
- MySQL - Stored Procedure
- MySQL - Explain
- MySQL - JSON
- MySQL - Standard Deviation
- MySQL - Find Duplicate Records
- MySQL - Delete Duplicate Records
- MySQL - Select Random Records
- MySQL - Show Processlist
- MySQL - Change Column Type
- MySQL - Reset Auto-Increment
- MySQL - Coalesce() Function
MySQL - Installation

All downloads for MySQL are located at MySQL Downloads. Pick the version number of MySQL Community Server which is required along with the platform you will be running it on.
Installing MySQL on Windows
In this tutorial, we are installing the latest version of MySQL (8.0.34) on Windows 11. Follow the given steps to do so −
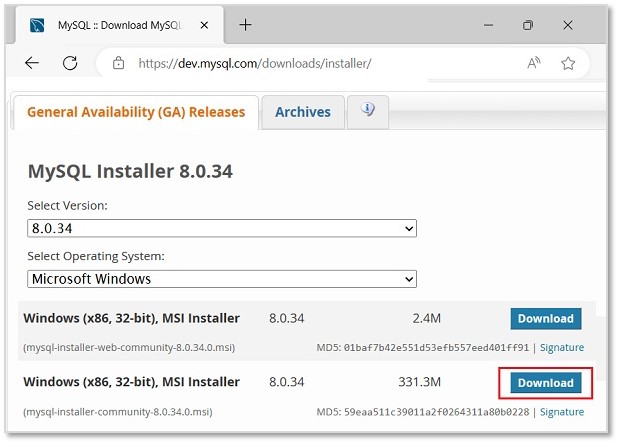
Step 1: Firstly, choose the MySQL version and operating system. Then, we download the desired MSI installer on your system by clicking the 'Download' button shown in the image below. This installer is suitable for both 32-bit and 64-bit systems.
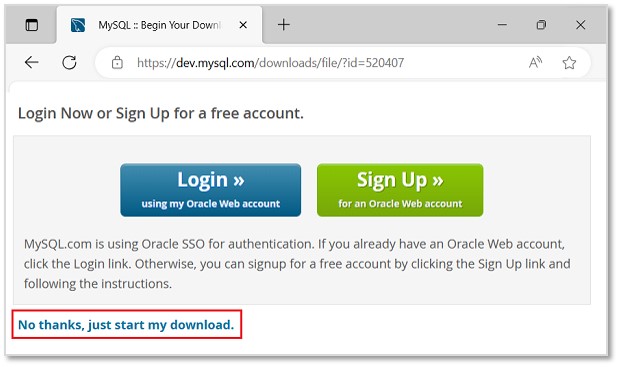
Step 2: Then, we will be redirected to another file download page. Here, ignore the prompts asking to log in or sign up and directly start downloading by clicking on the link as shown in the image.
Step 3: Once the installer is downloaded, run it to start the MySQL installation.
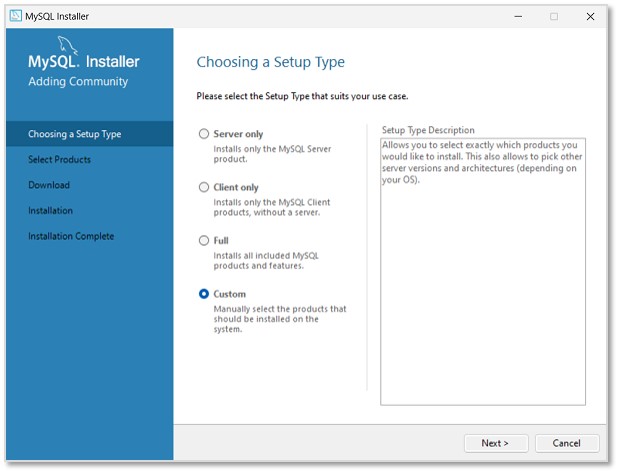
Step 4: Now, we can see the installer community window, asking to choose a Setup type for our MySQL products. Choose Custom and click Next to decide what products we want to actually install.
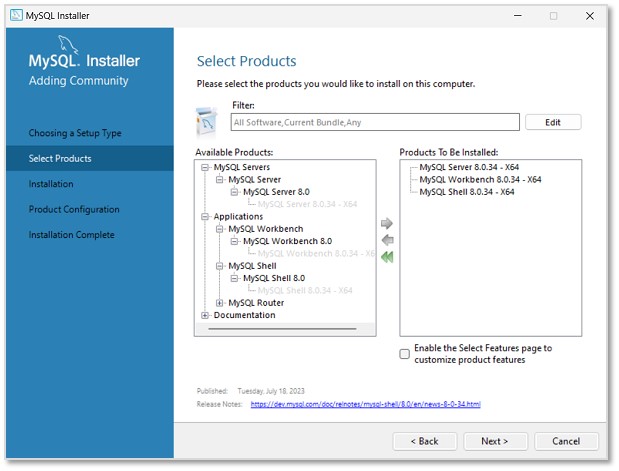
Step 5: In the next step, select MySQL Server, MySQL Workbench, MySQL Shell (all latest versions) to be installed. We can also choose more products available as per necessity. Click Next.
Step 6: The installation process will now begin. However, path conflicts might arise if there exists a path directory with the same name. After the installation is done, click Next.

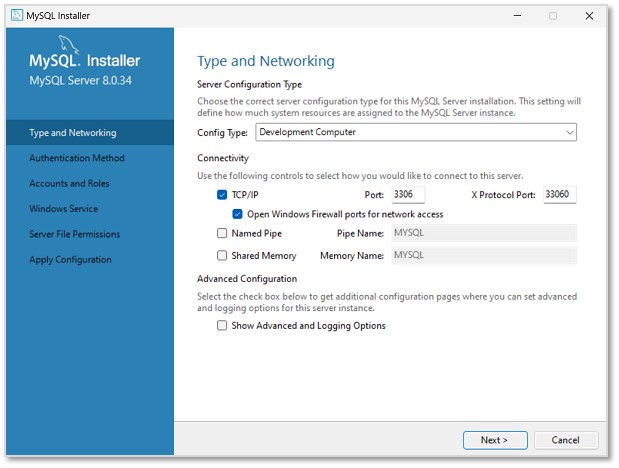
Step 7: In this step, we will be asked to set Type and Networking of MySQL. Unless there is any particular change we want to make, it is recommended to keep the settings as they are, and click Next.
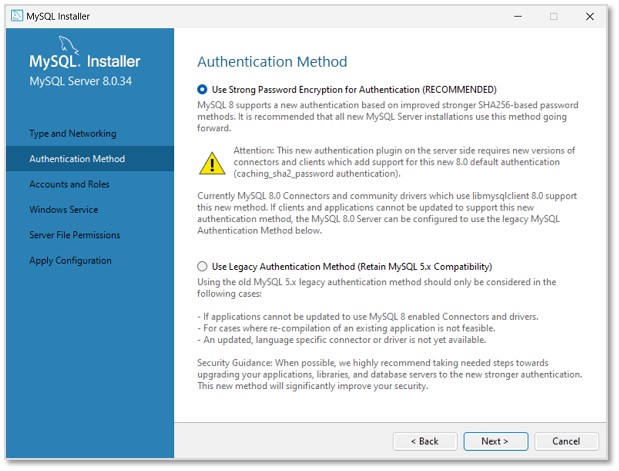
Step 8: Then, we need to set the Authentication method to access MySQL root user. So, choose the strong password encryption method (as it is recommended) and click Next.
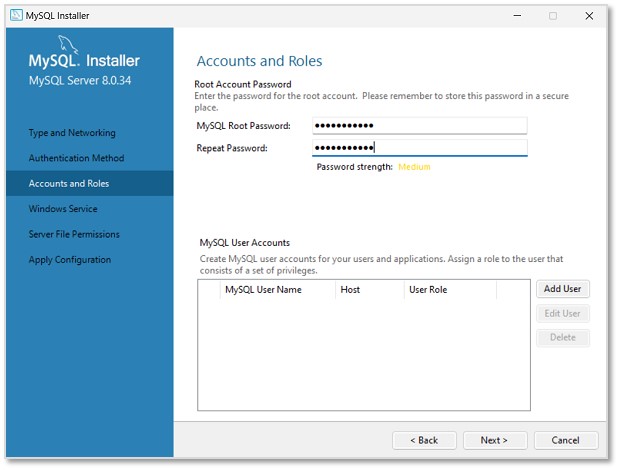
Step 9: Set a password for the root account. This password must always be used to log into the root account in every session. After setting password, click Next.
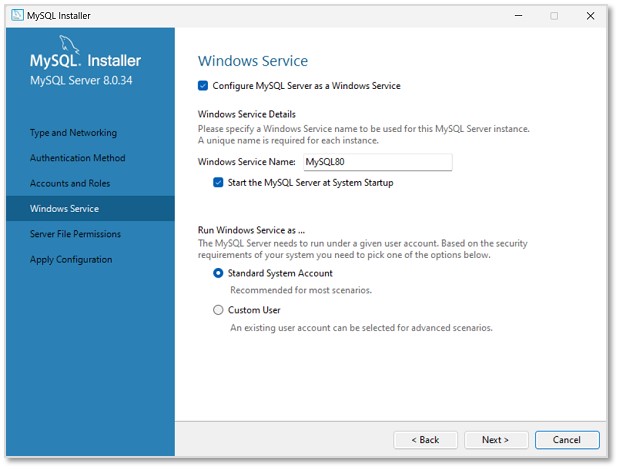
Step 10: In this step, MySQL Server Instance will be configured as a Windows Service. The default name will be set as "MySQL80", which can be changed if needed. Click Next.
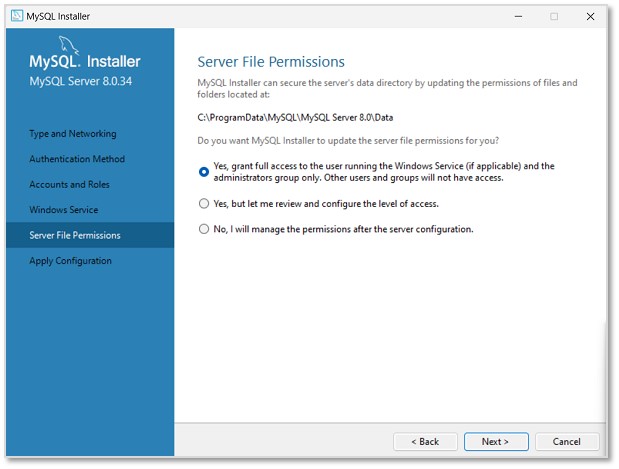
Step 11: Now, set the file permissions as required and click Next.
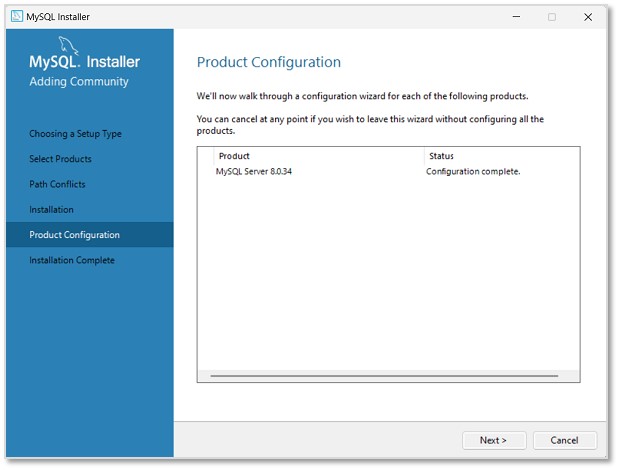
Step 12: As shown in the image below, the specified configuration steps will be applied on clicking Execute.

Once it is completed, click Finish. The next window will display the products on which the configuration is applied. Click Next to finish the installation.
Step 12: The installation is now complete. Uncheck the options asking to start MySQL Workbench and Shell after setup, so that they will not run after setup. Click Finish.
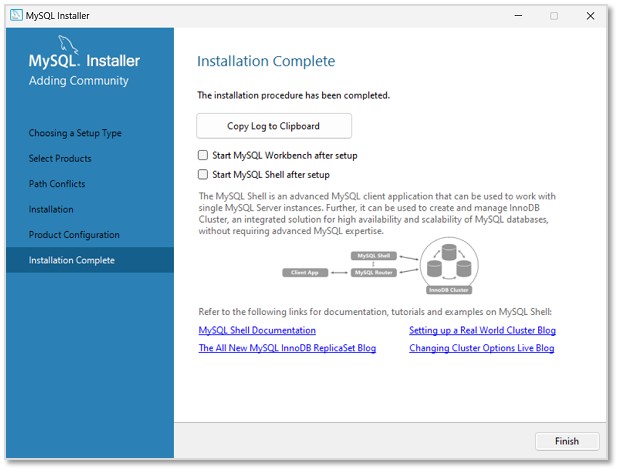
The MySQL Server is now installed in the Windows Operating System. We can now access it via the Command Prompt or the UI products we installed with it (Shell and Workbench).
Installing MySQL on Linux/UNIX
The recommended way to install MySQL on a Linux system is via RPM. MySQL AB makes the following RPMs available for download on its website −
MySQL − The MySQL database server manages the databases and tables, controls user access and processes the SQL queries.
MySQL-client − MySQL client programs, which make it possible to connect to and interact with the server.
MySQL-devel − Libraries and header files that come in handy when compiling other programs that use MySQL.
MySQL-shared − Shared libraries for the MySQL client.
MySQL-bench − Benchmark and performance testing tools for the MySQL database server.
The MySQL RPMs listed here are all built on a SuSE Linux system, but they will usually work on other Linux variants with no difficulty.
Now, you will need to adhere to the steps given below, to proceed with the installation −
Login to the system using the root user.
Switch to the directory containing the RPMs.
Install the MySQL database server by executing the following command. Remember to replace the filename in italics with the file name of your RPM.
[root@host]# rpm -i MySQL-5.0.9-0.i386.rpm
The above command takes care of installing the MySQL server, creating a user of MySQL, creating necessary configuration and starting the MySQL server automatically.
You can find all the MySQL related binaries in /usr/bin and /usr/sbin. All the tables and databases will be created in the /var/lib/mysql directory.
The following code box has an optional but recommended step to install the remaining RPMs in the same manner −
[root@host]# rpm -i MySQL-client-5.0.9-0.i386.rpm
[root@host]# rpm -i MySQL-devel-5.0.9-0.i386.rpm
[root@host]# rpm -i MySQL-shared-5.0.9-0.i386.rpm
[root@host]# rpm -i MySQL-bench-5.0.9-0.i386.rpm