- GWT Tutorial
- GWT - Home
- GWT - Overview
- GWT - Environment Setup
- GWT - Applications
- GWT - Create Application
- GWT - Deploy Application
- GWT - Style with CSS
- GWT - Basic Widgets
- GWT - Form Widgets
- GWT - Complex widgets
- GWT - Layout Panels
- GWT - Event Handling
- GWT - Custom Widgets
- GWT - UIBinder
- GWT - RPC Communication
- GWT - JUnit Integration
- GWT - Debugging Application
- GWT - Internationalization
- GWT - History Class
- GWT - Bookmark Support
- GWT - Logging Framework
- GWT Useful Resources
- GWT - Questions and Answers
- GWT - Quick Guide
- GWT - Useful Resources
- GWT - Discussion
GWT - Logging Framework
The logging framework emulates java.util.logging, so it uses the same syntax and has the same behavior as server side logging code
GWT logging is configured using .gwt.xml files.
We can configure logging to be enabled/disabled; we can enable/disable particular handlers, and change the default logging level.
Types of Logger
Loggers are organized in a tree structure, with the Root Logger at the root of the tree.
Name of the logger determine the Parent/Child relationships using . to separate sections of the name.
As an example if we have two loggers Hospital.room1 and Hospital.room2, then they are siblings, with their parent being the logger named Hospital. The Hospital logger (and any logger with a name which does not contain a dot ".") has the Root Logger as a parent.
private static Logger room1Logger = Logger.getLogger("Hospital.room1");
private static Logger room2Logger = Logger.getLogger("Hospital.room2");
private static Logger hospitalLogger = Logger.getLogger("Hospital");
private static Logger rootLogger = Logger.getLogger("");
Log Handlers
GWT provides default handlers which will show the log entries made using loggers.
| Handler | Logs to | Description |
|---|---|---|
| SystemLogHandler | stdout | These messages can only be seen in Development Mode in the DevMode window. |
| DevelopmentModeLogHandler | DevMode Window | Logs by calling method GWT.log. These messages can only be seen in Development Mode in the DevMode window. |
| ConsoleLogHandler | javascript console | Logs to the javascript console, which is used by Firebug Lite (for IE), Safari and Chrome. |
| FirebugLogHandler | Firebug | Logs to the firebug console. |
| PopupLogHandler | popup | Logs to the popup which resides in the upper left hand corner of application when this handler is enabled. |
| SimpleRemoteLogHandler | server | This handler sends log messages to the server, where they will be logged using the server side logging mechanism. |
Configure Logging in GWT Application
HelloWorld.gwt.xml file is to be configured to enable GWT logging as follows −
# add logging module
   <inherits name = "com.google.gwt.logging.Logging"/>
# To change the default logLevel
   <set-property name = "gwt.logging.logLevel" value = "SEVERE"/>
# To enable logging
   <set-property name = "gwt.logging.enabled" value = "TRUE"/>
# To disable a popup Handler
   <set-property name = "gwt.logging.popupHandler" value = "DISABLED" />
Use logger to log user actions
/* Create Root Logger */
private static Logger rootLogger = Logger.getLogger("");
...
rootLogger.log(Level.SEVERE, "pageIndex selected: " + event.getValue());
...
Logging Framework Example
This example will take you through simple steps to demonstrate Logging Capability of a GWT application. Follow the following steps to update the GWT application we created in GWT - Create Application chapter −
| Step | Description |
|---|---|
| 1 | Create a project with a name HelloWorld under a package com.tutorialspoint as explained in the GWT - Create Application chapter. |
| 2 | Modify HelloWorld.gwt.xml, HelloWorld.css, HelloWorld.html and HelloWorld.java as explained below. Keep rest of the files unchanged. |
| 3 | Compile and run the application to verify the result of the implemented logic. |
Following is the content of the modified module descriptor src/com.tutorialspoint/HelloWorld.gwt.xml.
<?xml version = "1.0" encoding = "UTF-8"?>
<module rename-to = 'helloworld'>
   <!-- Inherit the core Web Toolkit stuff.                        -->
   <inherits name = 'com.google.gwt.user.User'/>

   <!-- Inherit the default GWT style sheet.                       -->
   <inherits name = 'com.google.gwt.user.theme.clean.Clean'/>
   <inherits name = "com.google.gwt.logging.Logging"/>
   <!-- Specify the app entry point class.                         -->
   <entry-point class = 'com.tutorialspoint.client.HelloWorld'/>
   <!-- Specify the paths for translatable code                    -->
   <source path = 'client'/>
   <source path = 'shared'/>
   <set-property name = "gwt.logging.logLevel" value="SEVERE"/>
   <set-property name = "gwt.logging.enabled" value = "TRUE"/>
   <set-property name = "gwt.logging.popupHandler" value=  "DISABLED" />
</module>
Following is the content of the modified Style Sheet file war/HelloWorld.css.
body {
   text-align: center;
   font-family: verdana, sans-serif;
}

h1 {
   font-size: 2em;
   font-weight: bold;
   color: #777777;
   margin: 40px 0px 70px;
   text-align: center;
}
Following is the content of the modified HTML host file war/HelloWorld.html
<html>
   <head>
      <title>Hello World</title>
      <link rel = "stylesheet" href = "HelloWorld.css"/>
      <script language = "javascript" src = "helloworld/helloworld.nocache.js">
      </script>
   </head>

   <body>
      <iframe src = "javascript:''"id = "__gwt_historyFrame"
         style = "width:0;height:0;border:0"></iframe>
      <h1> Logging Demonstration</h1>
      <div id = "gwtContainer"></div>
   </body>
</html>
Let us have following content of Java file src/com.tutorialspoint/HelloWorld.java using which we will demonstrate Bookmarking in GWT Code.
package com.tutorialspoint.client;

import java.util.logging.Level;
import java.util.logging.Logger;

import com.google.gwt.core.client.EntryPoint;

import com.google.gwt.event.logical.shared.ValueChangeEvent;
import com.google.gwt.event.logical.shared.ValueChangeHandler;

import com.google.gwt.logging.client.HasWidgetsLogHandler;

import com.google.gwt.user.client.History;
import com.google.gwt.user.client.ui.HTML;
import com.google.gwt.user.client.ui.HorizontalPanel;
import com.google.gwt.user.client.ui.Hyperlink;
import com.google.gwt.user.client.ui.RootPanel;
import com.google.gwt.user.client.ui.TabPanel;
import com.google.gwt.user.client.ui.VerticalPanel;

public class HelloWorld implements EntryPoint {

   private TabPanel tabPanel;
   /* Create Root Logger */
   private static Logger rootLogger = Logger.getLogger("");
   private VerticalPanel customLogArea;

   private void selectTab(String historyToken){
      /*  parse the history token */
      try {
         if (historyToken.substring(0, 9).equals("pageIndex")) {
            String tabIndexToken = historyToken.substring(9, 10);
            int tabIndex = Integer.parseInt(tabIndexToken);
            /* Select the specified tab panel */
            tabPanel.selectTab(tabIndex);
         } else {
            tabPanel.selectTab(0);
         }
      } catch (IndexOutOfBoundsException e) {
         tabPanel.selectTab(0);
      }
   }

   /**
    * This is the entry point method.
    */
   public void onModuleLoad() {
      /* create a tab panel to carry multiple pages */
      tabPanel = new TabPanel();

      /* create pages */
      HTML firstPage = new HTML("<h1>We are on first Page.</h1>");
      HTML secondPage = new HTML("<h1>We are on second Page.</h1>");
      HTML thirdPage = new HTML("<h1>We are on third Page.</h1>");

      String firstPageTitle = "First Page";
      String secondPageTitle = "Second Page";
      String thirdPageTitle = "Third Page";

      Hyperlink firstPageLink = new Hyperlink("1", "pageIndex0");
      Hyperlink secondPageLink = new Hyperlink("2", "pageIndex1");
      Hyperlink thirdPageLink = new Hyperlink("3", "pageIndex2");

      HorizontalPanel linksHPanel = new HorizontalPanel();
      linksHPanel.setSpacing(10);
      linksHPanel.add(firstPageLink);
      linksHPanel.add(secondPageLink);
      linksHPanel.add(thirdPageLink);

      /* If the application starts with no history token,
         redirect to a pageIndex0 */
      String initToken = History.getToken();

      if (initToken.length() == 0) {
         History.newItem("pageIndex0");
         initToken = "pageIndex0";
      }

      tabPanel.setWidth("400");
      /* add pages to tabPanel*/
      tabPanel.add(firstPage, firstPageTitle);
      tabPanel.add(secondPage,secondPageTitle);
      tabPanel.add(thirdPage, thirdPageTitle);

      /* add value change handler to History
       * this method will be called, when browser's Back button
       * or Forward button are clicked.
       * and URL of application changes.
       * */
      History.addValueChangeHandler(new ValueChangeHandler<String>() {
         @Override
         public void onValueChange(ValueChangeEvent<String> event) {
            selectTab(event.getValue());
            rootLogger.log(Level.SEVERE, "pageIndex selected: "
            + event.getValue());
         }
      });

      selectTab(initToken);

      VerticalPanel vPanel = new VerticalPanel();

      vPanel.setSpacing(10);
      vPanel.add(tabPanel);
      vPanel.add(linksHPanel);

      customLogArea = new VerticalPanel();
      vPanel.add(customLogArea);

      /* an example of using own custom logging area. */
      rootLogger.addHandler(new HasWidgetsLogHandler(customLogArea));

      /* add controls to RootPanel */
      RootPanel.get().add(vPanel);
   }
}
Once you are ready with all the changes done, let us compile and run the application in development mode as we did in GWT - Create Application chapter. If everything is fine with your application, this will produce following result −
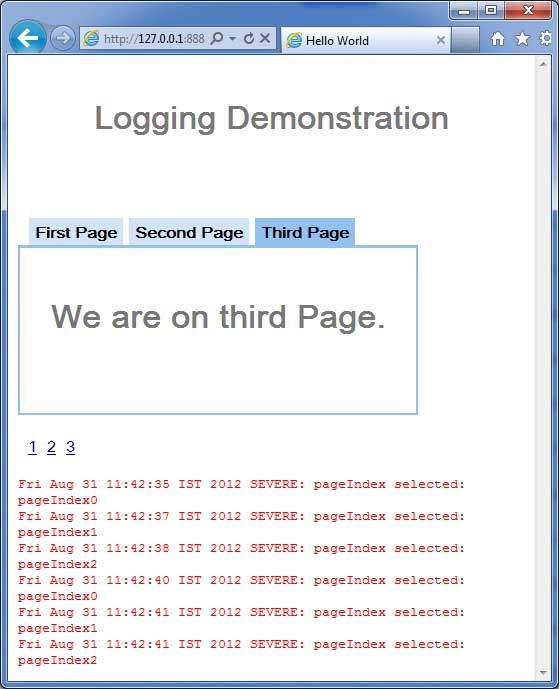
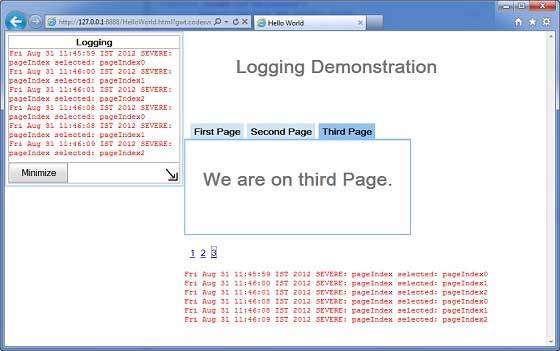
Now click on 1, 2 or 3. You can notice, when you click on 1,2 or 3 ,you can see the log is getting printed displaying the pageIndex. Check the Console output in Eclipse. You can see the log is getting printed in Eclipse console as well.
Fri Aug 31 11:42:35 IST 2012
SEVERE: pageIndex selected: pageIndex0
Fri Aug 31 11:42:37 IST 2012
SEVERE: pageIndex selected: pageIndex1
Fri Aug 31 11:42:38 IST 2012
SEVERE: pageIndex selected: pageIndex2
Fri Aug 31 11:42:40 IST 2012
SEVERE: pageIndex selected: pageIndex0
Fri Aug 31 11:42:41 IST 2012
SEVERE: pageIndex selected: pageIndex1
Fri Aug 31 11:42:41 IST 2012
SEVERE: pageIndex selected: pageIndex2
Now update module descriptor src/com.tutorialspoint/HelloWorld.gwt.xml to enable popupHandler.
<?xml version = "1.0" encoding = "UTF-8"?>
<module rename-to = 'helloworld'>
  <!-- Inherit the core Web Toolkit stuff.                        -->
   <inherits name = 'com.google.gwt.user.User'/>

   <!-- Inherit the default GWT style sheet.                       -->
   <inherits name = 'com.google.gwt.user.theme.clean.Clean'/>
   <inherits name = "com.google.gwt.logging.Logging"/>
   <!-- Specify the app entry point class.                         -->
   <entry-point class = 'com.tutorialspoint.client.HelloWorld'/>
   <!-- Specify the paths for translatable code                    -->
   <source path = 'client'/>
   <source path = 'shared'/>
   <set-property name = "gwt.logging.logLevel" value = "SEVERE"/>
   <set-property name = "gwt.logging.enabled" value = "TRUE"/>
   <set-property name="gwt.logging.popupHandler" value = "ENABLED" />
</module>
Once you are ready with all the changes done, reload the application by refreshing the browser window (press F5/reload button of the browser). Notice a popup window is present now in upper left corner of the application.
Now click on 1, 2 or 3. You can notice, when you click on 1,2 or 3 ,you can see the log is getting printed displaying the pageIndex in the popup window.