- GWT Tutorial
- GWT - Home
- GWT - Overview
- GWT - Environment Setup
- GWT - Applications
- GWT - Create Application
- GWT - Deploy Application
- GWT - Style with CSS
- GWT - Basic Widgets
- GWT - Form Widgets
- GWT - Complex widgets
- GWT - Layout Panels
- GWT - Event Handling
- GWT - Custom Widgets
- GWT - UIBinder
- GWT - RPC Communication
- GWT - JUnit Integration
- GWT - Debugging Application
- GWT - Internationalization
- GWT - History Class
- GWT - Bookmark Support
- GWT - Logging Framework
- GWT Useful Resources
- GWT - Questions and Answers
- GWT - Quick Guide
- GWT - Useful Resources
- GWT - Discussion
GWT - Environment Setup
This tutorial will guide you on how to prepare a development environment to start your work with GWT Framework. This tutorial will also teach you how to setup JDK, Tomcat and Eclipse on your machine before you setup GWT Framework −
System Requirement
GWT requires JDK 1.6 or higher so the very first requirement is to have JDK installed in your machine.
| JDK | 1.6 or above. |
|---|---|
| Memory | no minimum requirement. |
| Disk Space | no minimum requirement. |
| Operating System | no minimum requirement. |
Follow the given steps to setup your environment to start with GWT application development.
Step 1 - Verify Java Installation on your Machine
Now open console and execute the following java command.
| OS | Task | Command |
|---|---|---|
| Windows | Open Command Console | c:\> java -version |
| Linux | Open Command Terminal | $ java -version |
| Mac | Open Terminal | machine:~ joseph$ java -version |
Let's verify the output for all the operating systems
| Sr.No. | OS & Generated Output |
|---|---|
| 1 |
Windows java version "1.6.0_21" Java(TM) SE Runtime Environment (build 1.6.0_21-b07) Java HotSpot(TM) Client VM (build 17.0-b17, mixed mode, sharing) |
| 2 |
Linux java version "1.6.0_21" Java(TM) SE Runtime Environment (build 1.6.0_21-b07) ava HotSpot(TM) Client VM (build 17.0-b17, mixed mode, sharing) |
| 3 |
Mac java version "1.6.0_21" Java(TM) SE Runtime Environment (build 1.6.0_21-b07) Java HotSpot(TM)64-Bit Server VM (build 17.0-b17, mixed mode, sharing) |
Step 2 - Setup Java Development Kit (JDK)
If you do not have Java installed then you can install the Java Software Development Kit (SDK) from Oracle's Java site: Java SE Downloads. You will find instructions for installing JDK in downloaded files, follow the given instructions to install and configure the setup. Finally set PATH and JAVA_HOME environment variables to refer to the directory that contains java and javac, typically java_install_dir/bin and java_install_dir respectively.
Set the JAVA_HOME environment variable to point to the base directory location where Java is installed on your machine. For example
| Sr.No. | OS & Output |
|---|---|
| 1 |
Windows Set the environment variable JAVA_HOME to C:\Program Files\Java\jdk1.6.0_21 |
| 2 |
Linux export JAVA_HOME = /usr/local/java-current |
| 3 |
Mac export JAVA_HOME = /Library/Java/Home |
Append Java compiler location to System Path.
| Sr.No. | OS & Output |
|---|---|
| 1 |
Windows Append the string ;%JAVA_HOME%\bin to the end of the system variable, Path. |
| 2 |
Linux export PATH=$PATH:$JAVA_HOME/bin/ |
| 3 |
Mac not required |
Alternatively, if you use an Integrated Development Environment (IDE) like Borland JBuilder, Eclipse, IntelliJ IDEA, or Sun ONE Studio, compile and run a simple program to confirm that the IDE knows where you installed Java, otherwise do proper setup as given document of the IDE.
Step 3 - Setup Eclipse IDE
All the examples in this tutorial have been written using Eclipse IDE. So I would suggest you should have latest version of Eclipse installed on your machine based on your operating system.
To install Eclipse IDE, download the latest Eclipse binaries from https://www.eclipse.org. Once you downloaded the installation, unpack the binary distribution into a convenient location. For example in C:\eclipse on windows, or /usr/local/eclipse on Linux/Unix and finally set PATH variable appropriately.
Eclipse can be started by executing the following commands on windows machine, or you can simply double click on eclipse.exe
%C:\eclipse\eclipse.exe
Eclipse can be started by executing the following commands on Unix (Solaris, Linux, etc.) machine −
$/usr/local/eclipse/eclipse
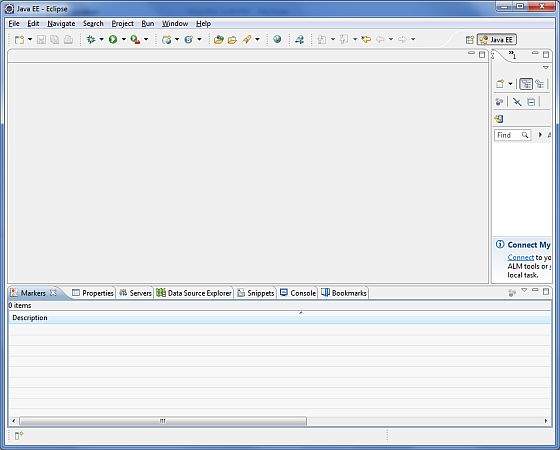
After a successful startup, if everything is fine then it should display following result −
Step 4 - Install GWT SDK & Plugin for Eclipse
Follow the instructions given at the link Plugin for Eclipse (incl. SDKs) to install GWT SDK & Plugin for Eclipse version installed on your machine.
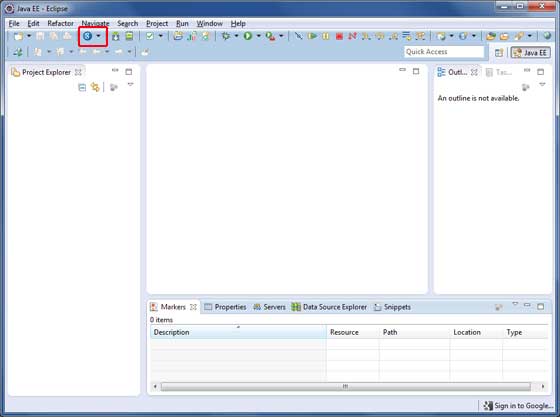
After a successful setup for the GWT plugin, if everything is fine then it should display following screen with Google icon marked with red rectangle as shown below −
Step 5: Setup Apache Tomcat
You can download the latest version of Tomcat from https://tomcat.apache.org/. Once you downloaded the installation, unpack the binary distribution into a convenient location. For example in C:\apache-tomcat-6.0.33 on windows, or /usr/local/apache-tomcat-6.0.33 on Linux/Unix and set CATALINA_HOME environment variable pointing to the installation locations.
Tomcat can be started by executing the following commands on windows machine, or you can simply double click on startup.bat
%CATALINA_HOME%\bin\startup.bat
or
/usr/local/apache-tomcat-6.0.33/bin/startup.sh
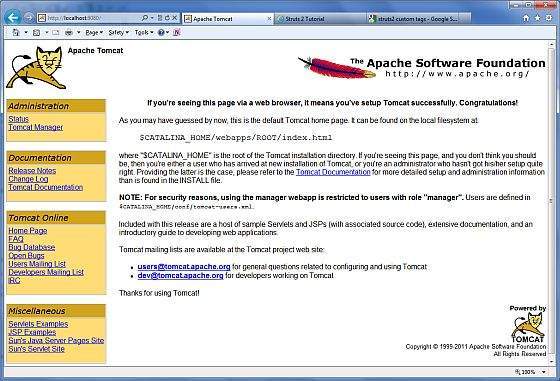
After a successful startup, the default web applications included with Tomcat will be available by visiting http://localhost:8080/. If everything is fine then it should display following result −
Further information about configuring and running Tomcat can be found in the documentation included here, as well as on the Tomcat web site − https://tomcat.apache.org/
Tomcat can be stopped by executing the following commands on windows machine −
%CATALINA_HOME%\bin\shutdown
or
C:\apache-tomcat-5.5.29\bin\shutdown
Tomcat can be stopped by executing the following commands on Unix (Solaris, Linux, etc.) machine −
$CATALINA_HOME/bin/shutdown.sh
or
/usr/local/apache-tomcat-5.5.29/bin/shutdown.sh