- Xamarin - Home
- Xamarin - Installation
- Xamarin - First Application
- Xamarin - Application Manifest
- Xamarin - Android Resources
- Xamarin - Android Activity Lifecycle
- Xamarin - Permissions
- Xamarin - Building the App GUI
- Xamarin - Menus
- Xamarin - Layouts
- Xamarin - Android Widgets
- Xamarin - Android Dialogs
- Xamarin - Gallery
- Xamarin - Andriod Views
- Xamarin - Multiscreen App
- Xamarin - Deploying Your App
Xamarin - Menus
Popup Menus
A popup menu refers to a menu that is attached to a view; it is also referred to as a shortcut menu. Lets see how to add a popup menu to an Android App.
Create a new project and call it popUpMenu App. Open Main.axml and create a button which will be used to display the popup menu.
<?xml version = "1.0" encoding = "utf-8"?>
<LinearLayout xmlns:android = "http://schemas.android.com/apk/res/android"
   android:orientation = "vertical"
   android:background = "#d3d3d3"
   android:layout_width = "fill_parent"
   android:layout_height = "fill_parent">
   <Button
      android:id = "@+id/popupButton"
      android:layout_width = "fill_parent"
      android:layout_height = "wrap_content"
      android:text = "Show popup menu"
      android:background = "@android:color/holo_green_dark"
      android:textColor = "@android:color/black" />
</LinearLayout>
Create a new folder under the Resources folder and call it Menu. Inside the Menu folder, add a new xml file called popMenu.xml.
Under popMenu.xml, add the following menu items.
<?xml version = "1.0" encoding="utf-8"?>
<menu xmlns:android = "http://schemas.android.com/apk/res/android">
   <item
      android:id = "@+id/file_settings"
      android:icon = "@drawable/img_settings"
      android:title = "Settings"
      android:showAsAction = "ifRoom">

      <item
         android:id = "@+id/new_game1"
         android:icon = "@drawable/imgNew"
         android:title = "New File Settings"/>
      <item
         android:id = "@+id/help"
         android:icon = "@drawable/img_help"
         android:title = "Help" />
      <item
         android:id = "@+id/about_app"
         android:icon = "@drawable/img_help"
         android:title = "About app"/>
   </item>
</menu>
After adding the menu items, go to mainActivity.cs to display the popup menu on button click.
protected override void OnCreate(Bundle bundle) {
   base.OnCreate(bundle);
   SetContentView(Resource.Layout.Main);
   Button showPopupMenu = FindViewById<Button>(Resource.Id.popupButton);
   showPopupMenu.Click += (s, arg) => {
      PopupMenu menu = new PopupMenu(this, showPopupMenu);
      menu.Inflate(Resource.Menu.popMenu);
      menu.Show();
   };
}
Now, build and run your application. It should produce the following output −

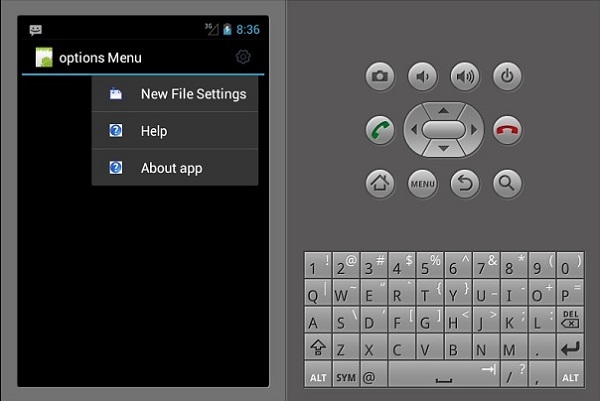
Options Menu
Options Menu is a collection of menus that are primary to an App and are mainly used to store settings, search, etc. Here, we are going to create a menu for settings with three items inside, i.e., New File Settings, Help, and About App.
To create an options menu, we must create a new XML layout file in the resources folder. First of all, we will add a new XML file. Right-click on the Layout folder, then go to Add → New item → Visual C# → XML File.
Choose an appropriate name for the layout file. In our example, we will call our file myMenu.xml.
Inside myMenu.xml, we are going to create a new menu and add items inside. The following code shows how to do it.
<?xml version = "1.0" encoding = "utf-8"?>
<menu xmlns:android = "http://schemas.android.com/apk/res/android">
  <item
      android:id = "@+id/file_settings"
      android:icon = "@drawable/img_settings"
      android:title = "Settings"
      android:showAsAction = "ifRoom">

      <menu>
         <item
            android:id = "@+id/new_game1"
            android:icon = "@drawable/imgNew"
            android:title = "New File Settings" />
         <item
            android:id = "@+id/help"
            android:icon = "@drawable/img_help"
            android:title = "Help" />
         <item
            android:id = "@+id/about_app"
            android:icon = "@drawable/img_help"
            android:title = "About app"/>
      </menu>
   </item>
</menu>
Next, we navigate to MainActivity.cs and create an override class for onOptionsMenu().
public override bool OnCreateOptionsMenu(IMenu menu) {
   MenuInflater.Inflate(Resource.Menu.myMenu, menu);
   return base.OnPrepareOptionsMenu(menu);
}
Next, we create an action to respond to the settings menu when it is selected. To do this, we create another override class for the OnOptionsItemSelected() menu.
public override bool OnOptionsItemSelected(IMenuItem item) {
   if (item.ItemId == Resource.Id.file_settings) {
      // do something here...
      return true;
   }
   return base.OnOptionsItemSelected(item);
}
Our final complete code will look as follows −
namespace optionsMenuApp {
   [Activity(Label = "options Menu", MainLauncher = true, Icon = "@drawable/icon")]
   public class MainActivity : Activity {
      public override bool OnCreateOptionsMenu(IMenu menu) {
         MenuInflater.Inflate(Resource.Menu.myMenu, menu);
         return base.OnPrepareOptionsMenu(menu);
      }
      public override bool OnOptionsItemSelected(IMenuItem item) {
         if (item.ItemId == Resource.Id.file_settings) {
            // do something here...
            return true;
         }
         return base.OnOptionsItemSelected(item);
      }
   }
}
Now, build and run your application. It should produce the following output −