- Xamarin - Home
- Xamarin - Installation
- Xamarin - First Application
- Xamarin - Application Manifest
- Xamarin - Android Resources
- Xamarin - Android Activity Lifecycle
- Xamarin - Permissions
- Xamarin - Building the App GUI
- Xamarin - Menus
- Xamarin - Layouts
- Xamarin - Android Widgets
- Xamarin - Android Dialogs
- Xamarin - Gallery
- Xamarin - Andriod Views
- Xamarin - Multiscreen App
- Xamarin - Deploying Your App
Xamarin - Building the App GUI
TextView
TextView is a very important component of the Android widgets. It is primarily used for displaying texts on an Android screen.
To create a textview, simply open main.axml and add the following code between the linear layout tags.
<TextView
   android:text = "Hello I am a text View"
   android:layout_width = "match_parent"
   android:layout_height = "wrap_content"
   android:id = "@+id/textview1" />
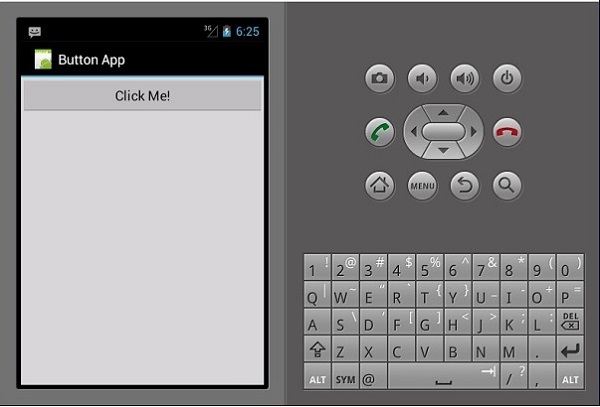
Button
A button is a control used to trigger an event when it is clicked. Under your Main.axml file, type the following code to create a button.
<Button
   android:id = "@+id/MyButton"
   android:layout_width = "fill_parent"
   android:layout_height = "wrap_content"
   android:text = "@string/Hello" />
Open Resources\Values\Strings.xml and type the following line of code in between <resources> tag.
<string name="Hello">Click Me!</string>
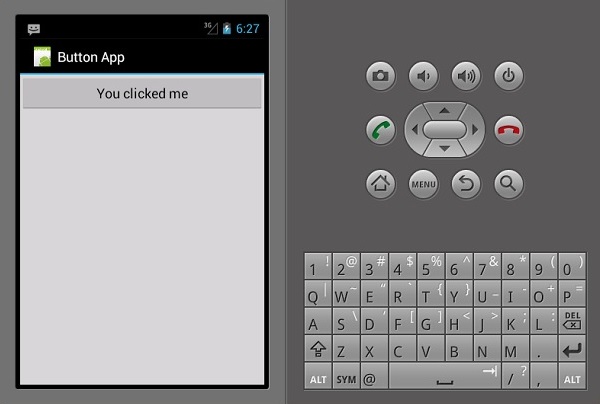
The above code provides the value of the button we created. Next, we open MainActivity.cs and create the action to be performed when the button is clicked. Type the following code under base.OnCreate (bundle) method.
Button button = FindViewById<Button>(Resource.Id.MyButton);
button.Click += delegate { button.Text = "You clicked me"; };
The above code displays You Clicked Me when a user clicks on the button.
FindViewById<< --> This method finds the ID of a view that was identified. It searches for the id in the .axml layout file.
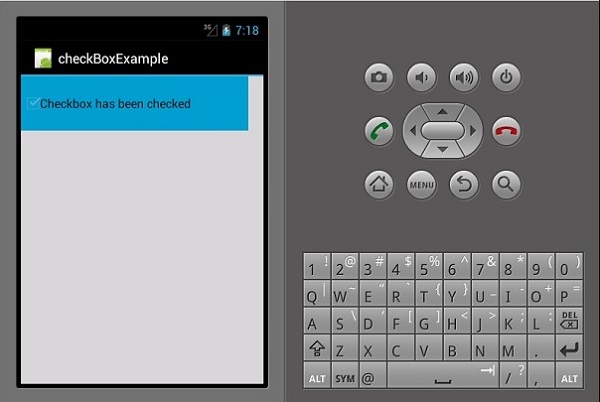
Checkbox
A checkbox is used when one wants to select more than one option from a group of options. In this example, we are going to create a checkbox which on selected, displays a message that it has been checked, else it displays unchecked.
To start with, we open Main.axml file in our project and type the following line of code to create a checkbox.
<?xml version = "1.0" encoding = "utf-8"?>
<LinearLayout xmlns:android = "http://schemas.android.com/apk/res/android"
   android:orientation = "vertical"
   android:background = "#d3d3d3"
   android:layout_width = "fill_parent"
   android:layout_height = "fill_parent">
   <CheckBox
      android:text = "CheckBox"
      android:padding = "25dp"
      android:layout_width = "300dp"
      android:layout_height = "wrap_content"
      android:id = "@+id/checkBox1"
      android:textColor = "@android:color/black"
      android:background = "@android:color/holo_blue_dark" />
</LinearLayout>
Next, go to MainActivity.cs to add the functionality code.
CheckBox checkMe = FindViewById<CheckBox>(Resource.Id.checkBox1);
checkMe.CheckedChange += (object sender, CompoundButton.CheckedChangeEventArgs e) => {
   CheckBox check = (CheckBox)sender;
   if(check.Checked) {
      check.Text = "Checkbox has been checked";
   } else {
      check.Text = "Checkbox has not been checked";
   }
};
From the above code, we first find the checkbox using findViewById. Next, we create a handler method for our checkbox and in our handler, we create an if else statement which displays a message depending on the outcome selected.
CompoundButton.CheckedChangeEventArgs → This method fires an event when the checkbox state changes.
Progress Bar
A progress bar is a control that is used to show the progression of an operation. To add a progress bar, add the following line of code in Main.axml file.
<ProgressBar
   style="?android:attr/progressBarStyleHorizontal"
   android:layout_width = "match_parent"
   android:layout_height = "wrap_content"
   android:id = "@+id/progressBar1" />
Next, go to MainActivity.cs and set the value of the progress bar.
ProgressBar pb = FindViewById<ProgressBar>(Resource.Id.progressBar1);
pb.Progress = 35;
In the above code, we have created a progress bar with a value of 35.
Radio Buttons
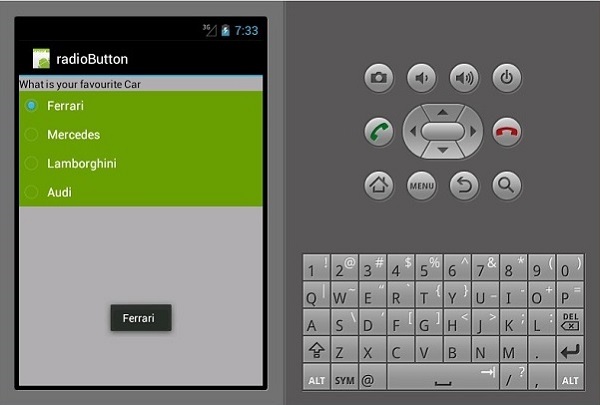
This is an Android widget which allows a person to choose one from a set of options. In this section, we are going to create a radio group containing a list of cars which will retrieve a checked radio button.
First, we add a radio group and a textview as shown in the following code −
<?xml version = "1.0" encoding = "utf-8"?>
<LinearLayout xmlns:android = "http://schemas.android.com/apk/res/android"
   android:orientation = "vertical"
   android:background = "@android:color/darker_gray"
   android:layout_width = "fill_parent"
   android:layout_height = "fill_parent">
   <TextView
      android:text = "What is your favourite Car"
      android:layout_width = "match_parent"
      android:layout_height = "wrap_content"
      android:id = "@+id/textView1"
      android:textColor = "@android:color/black" />
   <RadioGroup
      android:layout_width = "match_parent"
      android:layout_height = "wrap_content"
      android:id = "@+id/radioGroup1"
      android:backgroundTint = "#a52a2aff"
      android:background = "@android:color/holo_green_dark">
   <RadioButton
      android:layout_width = "wrap_content"
      android:layout_height = "wrap_content"
      android:text = "Ferrari"
      android:id = "@+id/radioFerrari" />
   <RadioButton
      android:layout_width = "wrap_content"
      android:layout_height = "wrap_content"
      android:text = "Mercedes"
      android:id = "@+id/radioMercedes" />
   <RadioButton
      android:layout_width = "wrap_content"
      android:layout_height = "wrap_content"
      android:text = "Lamborghini"
      android:id = "@+id/radioLamborghini" />
   <RadioButton
      android:text = "Audi"
      android:layout_width = "match_parent"
      android:layout_height = "wrap_content"
      android:id = "@+id/radioAudi" />
   </RadioGroup>
</LinearLayout>
To perform an action, when a radio button is clicked, we add an activity. Go to MainActivity.cs and create a new event handler as shown below.
private void onClickRadioButton(object sender, EventArgs e) {
   RadioButton cars = (RadioButton)sender;
   Toast.MakeText(this, cars.Text, ToastLength.Short).Show
   ();
}
Toast.MakeText() → This is a view method used to display a message/output in a small pop up. At the bottom of the OnCreate() method just after SetContentView(), add the following piece of code. This will capture each of the radio buttons and add them to the event handler we created.
RadioButton radio_Ferrari = FindViewById<RadioButton>
   (Resource.Id.radioFerrari);
   RadioButton radio_Mercedes = FindViewById<RadioButton>
   (Resource.Id.radioMercedes);
   RadioButton radio_Lambo = FindViewById<RadioButton>
   (Resource.Id.radioLamborghini);
   RadioButton radio_Audi = FindViewById<RadioButton>
   (Resource.Id.radioAudi);
   radio_Ferrari.Click += onClickRadioButton;
   radio_Mercedes.Click += onClickRadioButton;
   radio_Lambo.Click += onClickRadioButton;
   radio_Audi.Click += onClickRadioButton;
Now, run your application. It should display the following screen as the output −
Toggle Buttons
Toggle button are used to alternate between two states, e.g., it can toggle between ON and OFF. Open Resources\layout\Main.axml and add the following lines of code to create a toggle button.
<?xml version = "1.0" encoding = "utf-8"?>
<LinearLayout xmlns:android = "http://schemas.android.com/apk/res/android"
   android:orientation = "vertical"
   android:background = "#d3d3d3"
   android:layout_width = "fill_parent"
   android:layout_height = "fill_parent">
   <ToggleButton
      android:id = "@+id/togglebutton"
      android:layout_width = "wrap_content"
      android:layout_height = "wrap_content"
      android:textOn = "Torch ON"
      android:textOff = "Torch OFF"
      android:textColor = "@android:color/black" />
</LinearLayout>
We can add actions to the toggle bar when it is clicked. Open MainActivity.cs and add the following lines of code after the OnCreate() method class.
ToggleButton togglebutton = FindViewById<ToggleButton> (Resource.Id.togglebutton);
togglebutton.Click += (o, e) => {
   if (togglebutton.Checked)
      Toast.MakeText(this, "Torch is ON", ToastLength.Short).Show ();
   else
      Toast.MakeText(this, "Torch is OFF",
      ToastLength.Short).Show();
};
Now, when you run the App, it should display the following output −

Ratings Bar
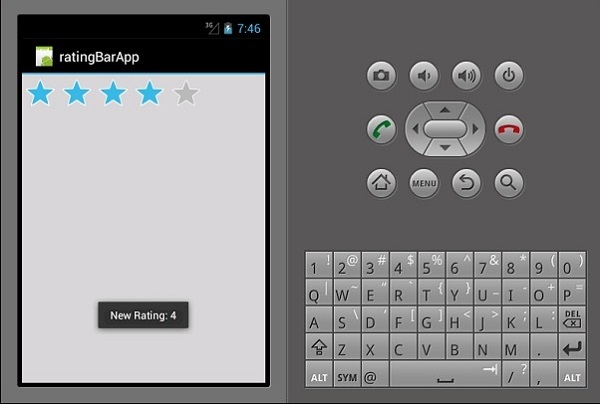
A Ratings Bar is a form element that is made up of stars which app users can use to rate things you have provided for them. In your Main.axml file, create a new rating bar with 5 stars.
<?xml version = "1.0" encoding = "utf-8"?>
<LinearLayout xmlns:android = "http://schemas.android.com/apk/res/android"
   android:orientation = "vertical"
   android:background = "#d3d3d3"
   android:layout_width = "fill_parent"
   android:layout_height = "fill_parent">
   <RatingBar
      android:layout_width = "wrap_content"
      android:layout_height = "wrap_content"
      android:id = "@+id/ratingBar1"
      android:numStars = "5"
      android:stepSize = "1.0" />
</LinearLayout>
On running the app, it should display the following output −
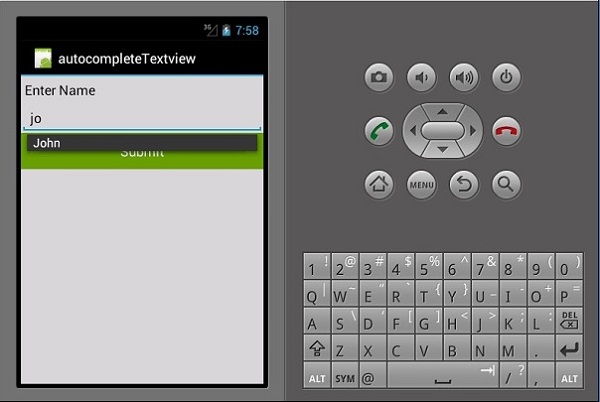
Autocomplete Textview
This is a textview that shows full suggestions while a user is typing. We are going to create an autocomplete textview containing a list of peoples names and a button which on click will show us the selected name.
Open Main.axml and write the following code.
<?xml version = "1.0" encoding = "utf-8"?>
<LinearLayout xmlns:android = "http://schemas.android.com/apk/res/android"
   android:orientation = "vertical"
   android:layout_width = "fill_parent"
   android:background = "#d3d3d3"
   android:layout_height = "fill_parent">
   <TextView
      android:text = "Enter Name"
      android:textAppearance = "?android:attr/textAppearanceMedium"
      android:layout_width = "fill_parent"
      android:layout_height = "wrap_content"
      android:id = "@+id/textView1"
      android:padding = "5dp"
      android:textColor = "@android:color/black" />
   <AutoCompleteTextView
      android:layout_width = "fill_parent"
      android:layout_height = "wrap_content"
      android:id = "@+id/autoComplete1"
      android:textColor = "@android:color/black" />
   <Button
      android:text = "Submit"
      android:layout_width = "fill_parent"
      android:layout_height = "wrap_content"
      android:id = "@+id/btn_Submit"
      android:background="@android:color/holo_green_dark" />
</LinearLayout>
The above code generates a TextView for typing, AutoCompleteTextView for showing suggestions, and a button to display the names entered from the TextView. Go to MainActivity.cs to add the functionality.
Create a new event handler method as shown below.
protected void ClickedBtnSubmit(object sender, System.EventArgs e){
   if (autoComplete1.Text != ""){
      Toast.MakeText(this, "The Name Entered ="
         + autoComplete1.Text, ToastLength.Short).Show();
   } else {
      Toast.MakeText(this, "Enter a Name!", ToastLength.Short).Show();
   }
}
The created handler checks whether the autocomplete textview is empty. If it is not empty, then it displays the selected autocomplete text. Type the following code inside the OnCreate() class.
autoComplete1 = FindViewById<AutoCompleteTextView>(Resource.Id.autoComplete1);
btn_Submit = FindViewById<Button>(Resource.Id.btn_Submit);
var names = new string[] { "John", "Peter", "Jane", "Britney" };
ArrayAdapter adapter = new ArrayAdapter<string>(this,
   Android.Resource.Layout.SimpleSpinnerItem, names);
autoComplete1.Adapter = adapter;
btn_Submit.Click += ClickedBtnSubmit;
ArrayAdapter − This is a collection handler that reads data items from a list collection and returns them as a view or displays them on the screen.
Now, when you run the application, it should display the following output.