- Xamarin - Home
- Xamarin - Installation
- Xamarin - First Application
- Xamarin - Application Manifest
- Xamarin - Android Resources
- Xamarin - Android Activity Lifecycle
- Xamarin - Permissions
- Xamarin - Building the App GUI
- Xamarin - Menus
- Xamarin - Layouts
- Xamarin - Android Widgets
- Xamarin - Android Dialogs
- Xamarin - Gallery
- Xamarin - Andriod Views
- Xamarin - Multiscreen App
- Xamarin - Deploying Your App
Xamarin - Andriod Views
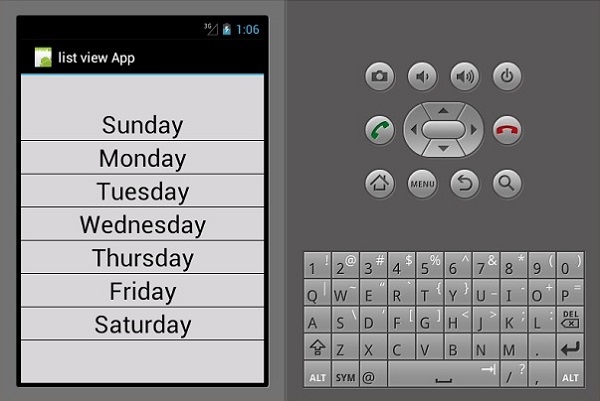
ListViews
A Listview is a user interface element that displays lists of items that are scrollable.
Binding data to listviews
In this example, you are going to create a listView that displays the days of the week. To start with, let us create a new XML file and name it listViewTemplate.xml.
In listViewTemplate.xml, we add a new textview as shown below.
<?xml version = "1.0" encoding = "utf-8" ?>
<TextView xmlns:android = "http://schemas.android.com/apk/res/android"
android:id = "@+id/textItem"
android:textSize ="20sp"
android:layout_width = "fill_parent"
android:layout_height = "wrap_content"/>
Next, go to Main.axml and create a new listview inside the Linear Layout.
<ListView
   android:minWidth="25px"
   android:minHeight="25px"
   android:layout_width="match_parent"
   android:layout_height="match_parent"
   android:id="@+id/listView1" />
Open MainActivity.cs and type the following code to bind the data to the listview we created. The code must be written inside the OnCreate() method.
SetContentView(Resource.Layout.Main);
var listView = FindViewById<ListView>(Resource.Id.listView1);
var data = new string[] {
   "Sunday", "Monday", "Tuesday", "Wednesday", "Thursday", "Friday", "Saturday"
};
listView.Adapter = new ArrayAdapter(this, Resource.Layout.ListViewTemplate, data);
Var data = new string[] simply holds our items as an array.
Array Adapter returns the items in our collection as a view. By default, the Array Adapter uses a default textView to display each item. In the above code, we created our own textview in ListViewTemplate.xml and referenced it using the constructor shown below.
ArrayAdapter(this, Resource.Layout.ListViewTemplate, data);
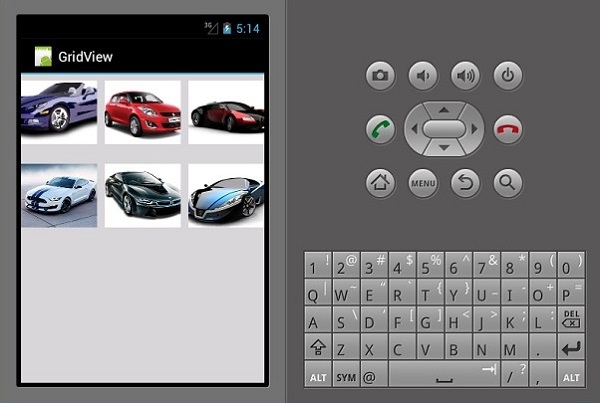
Finally, build and run your application to view the output.
GridViews
A gridView is a view group that allows applications to lay out content in a two-dimensional way, scrollable grid.
To add a GridView, create a new project and call it gridViewApp. Go to Main.axml and add a grid as shown below.
<?xml version = "1.0" encoding="utf-8"?>
<GridView xmlns:android = "http://schemas.android.com/apk/res/android"
   android:id = "@+id/gridview"
   android:layout_width = "fill_parent"
   android:layout_height = "fill_parent"
   android:columnWidth = "90dp"
   android:numColumns = "auto_fit"
   android:verticalSpacing = "10dp"
   android:horizontalSpacing = "10dp"
   android:stretchMode = "columnWidth"
   android:gravity = "center" />
Next, create a new class and name it ImageAdpter.cs. This class will contain the adapter classes for all items which will be shown in the grid.
Inside ImageAdapter, add the following code −
public class ImageAdapter : BaseAdapter {
   Context context;
   public ImageAdapter(Context ch) {
      context = ch;
   }

   public override int Count {
      get {
         return cars.Length;
      }
   }

   public override long GetItemId(int position) {
   return 0;
   }

   public override Java.Lang.Object GetItem(int position) {
      return null;
   }

   public override View GetView(int position,
      View convertView, ViewGroup parent) {
      ImageView imageView;
      if (convertView == null) {
         imageView = new ImageView(context);
         imageView.LayoutParameters = new GridView.LayoutParams(100, 100);
         imageView.SetScaleType(ImageView.ScaleType.CenterCrop);
         imageView.SetPadding(8, 8, 8, 8);
      } else {
         imageView = (ImageView)convertView;
      }

      imageView.SetImageResource(cars[position]);
      return imageView;
   }

   int[] cars = {
      Resource.Drawable.img1, Resource.Drawable.img2,
      Resource.Drawable.img3, Resource.Drawable.img4,
      Resource.Drawable.img5, Resource.Drawable.img6,
   };
}
In the above code, we have simply bound our car images to the image adapters. Next, open MainActivity.cs and add the following code after setContentView().
var gridview = FindViewById<GridView>(Resource.Id.gridview);
gridview.Adapter = new ImageAdapter(this);
gridview.ItemClick += delegate(object sender,
   AdapterView.ItemClickEventArgs args) {
      Toast.MakeText(this,
         args.Position.ToString(), ToastLength.Short).Show();
};
The above code finds the gridView in main.axml and binds it to the imageAdapter class. Gridview.ItemClick creates an onClick event which returns the position of the selected image when a user clicks on an image.
Now, build and run your application to view the output.