- SAP SuccessFactors - Home
- SAP SuccessFactors - Introduction
- SAP SF - Integration Add-On
- SAP SuccessFactors - HCM Suite
- SAP SuccessFactors - Architecture
- SAP SuccessFactors - Landscape
- SAP SuccessFactors - Landscape HCI
- Performance & Availability Mgmt
- SAP SF - Customize Welcome Portlet
- SAP SuccessFactors - Navigation
- Compensation and Variable Pay
- SAP SuccessFactors - Foundation
- SAP SF - Intelligent Services
- SAP SuccessFactors - Onboarding
- SAP SF - Performance and Goals
- Succession and Development
- SAP SF - Employee Central
- SAP SF - Employee Central Activities
- SAP SuccessFactors - Recruiting
SAP SuccessFactors - Quick Guide
SAP SuccessFactors - Introduction
SuccessFactors is a SAP product suite to provide cloud based solution to manage business alignment, people performance, recruitment, and employee central and learning activities for all sizes of organizations in more than 60 industries. SAP SuccessFactors is a cloud based HCM solution and developed on Software as a Service (SaaS) model.
SuccessFactors is the name of a company founded in 2001 that developed cloud-based HCM solution known as SuccessFactors and was acquired by SAP in 2011.
Key Features of SAP SuccessFactors
Following are the key features that are covered in SAP SuccessFactors cloud-based HCM solution provided to the users −
- Recruitment
- HR Transactions
- Changes and Transfers
- Position Management
- Time Off
- Payroll Time Sheets
- Reporting, Compliance and Auditing
- Integration & Extensibility
- Learning and development
Software as a Service
SAP SuccessFactors is cloud based HCM solution and is designed on Software as a Service (SaaS) cloud model. Software as a Service is also known as On-demand software solution where software is licensed on a subscription basis and is centrally hosted.
SaaS has become a common delivery model for many business applications, including office and messaging software, payroll processing software, DBMS software, management software, CAD software, development software, gamification, virtualization, accounting, collaboration, customer relationship management (CRM), management information systems (MIS), enterprise resource planning (ERP), invoicing, human resource management (HRM), talent acquisition management and other software and infrastructure services.
In SaaS, software and application data is hosted on a remote cloud and can be accessed on demand from any location using secured login credentials.
SaaS software is multitenant that allows many instances of the software to be accessed and are on the same application version.
Users have an option to select features and functionality to use in the standard solution and in the regular releases that are introduced by the vendor.
SaaS Solution is based on multitenant architecture where a single configuration is applied for all the tenants or customers. To provide scalability, you install application on multiple machines.
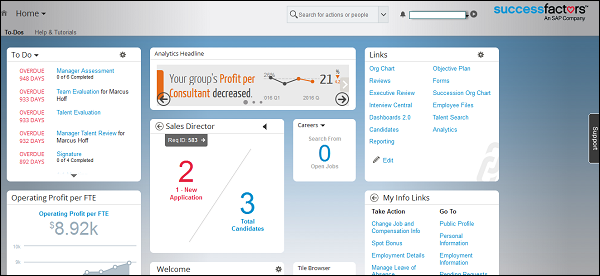
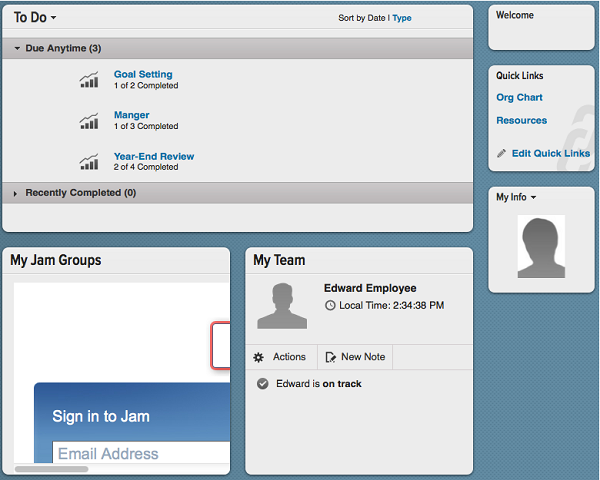
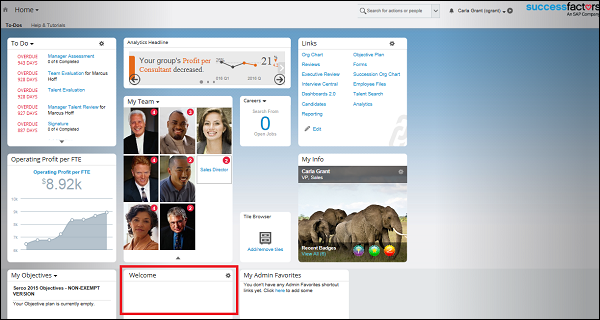
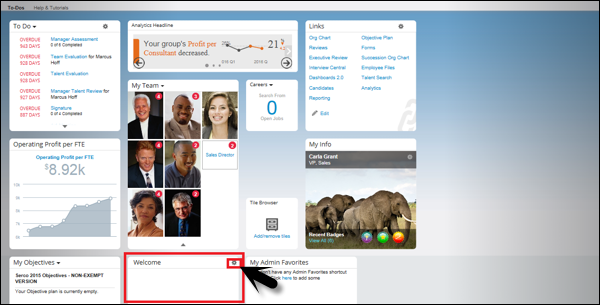
The following screenshot shows the homepage of SAP SuccessFactors. At the top, you have a search option where you can perform any active search. In addition, you will find a To-Dos tab to quickly access daily tasks and a help & tutorial tab that you can use to seek any help related to SuccessFactors.
Benefits of Cloud Solutions
There are various benefits of using a Cloud environment as compared to an On-premise system.
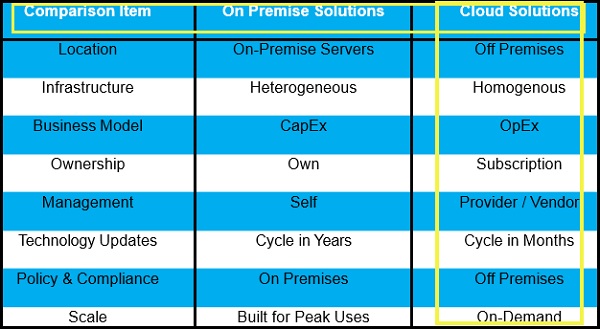
The major benefits of using Cloud environment are as follows −
Cost Effective
Capital Expenditure − Capital Expenditure is involved in IT infrastructure for on premise solution. Cost of IT infrastructure is very high. Example: Servers, interfaces, network devices, etc.
Operational Expenditure − In a Cloud solution, you do not need capital expenditure, so it saves huge money to procure hardware platform. In a Cloud environment, hardware is shared and procured by Cloud service provider and the company has to bear only operational costs like users and maintenance of tenant.
Ownership
Company Owned − An on-premise solution is owned by a company.
Subscription − In cloud environment, you have to subscribe to a cloud vendor.
SAP SuccessFactors - Integration Add-On
Integration add-on for SAP ERP HCM and SuccessFactors HCM allows you to integrate data between two environments related to organizational structure, organizational data, compensation and qualification data.
Compensation Data
You can support compensation process on Business Execution by transferring data from compensation SAP ERP HCM to SuccessFactors BizX. It is also possible to transfer planned compensation data from SuccessFactors Business Execution to SAP ERP HCM and you can import this data in payroll cycle in HCM suite.
Employee Data
Integration add-on allows you to transfer employee and organizational data from SAP ERP HCM to SuccessFactors and you can manage Talent Management process on SuccessFactors Business Execution (BizX).
Evaluation Data
You can manage work force planning and analytics by transferring data from SAP ERP HCM to SuccessFactors cloud.
Integration Add-On Releases
Integration add-on releases are as follows −
- Integration Add-On 1.0 for SAP ERP HCM and SuccessFactors BizX
- Integration Add-On 2.0 for SAP ERP HCM and SuccessFactors BizX
- Integration Add-On 3.0 for SAP ERP HCM and SuccessFactors
In the following illustration, you can see integration between SAP ERP HCM suite and SAP SuccessFactors HCM.
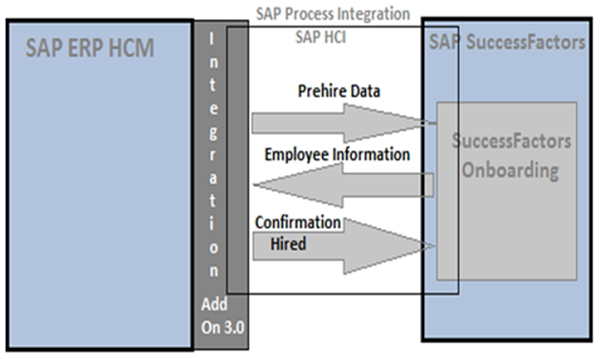
You can see employee pre-hired data is exported from HCM suite to SuccessFactors onboarding. When the onboarding task is completed in SuccessFactors, data is extracted and information is sent from SuccessFactors onboarding to SAP ERP HCM suite. Exported and imported data is stored in stages and with the use of Transaction: HRSFI_ONB_HIRE, you can move the data to employee master.
Middleware and Landscape
Two types of landscapes are possible as a part of integration scenario −
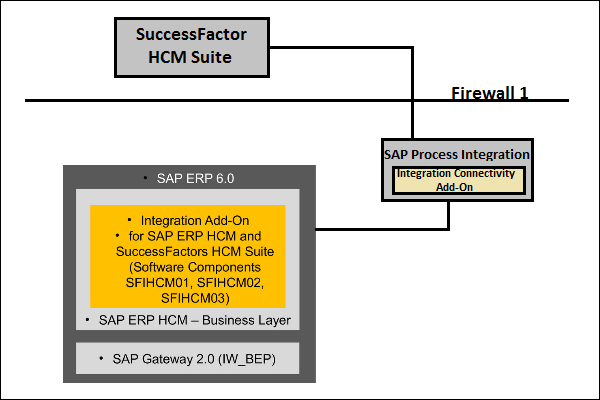
- SAP PI is a part of SAP ERP HCM On-premise landscape.
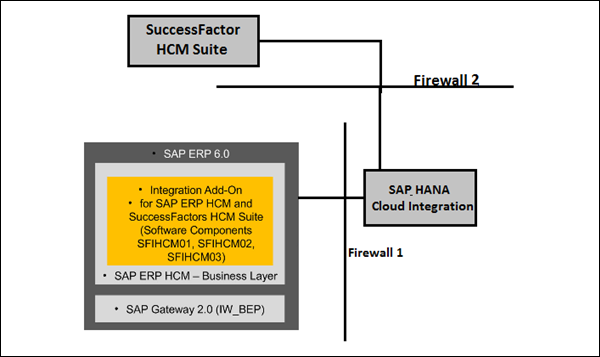
- SAP HCI is a separate component from SAP ERP HCM suite.
The integration add-on supports the integration scenario using middleware. You can use SAP Process Integration (PI) or SAP HANA Cloud Integration (HCI) for transferring content as middleware. When you use SAP Process Integration as middleware, integration add-on is embedded and integration connectivity add-on is a part of On-premise SAP ERP HCM suite.
When you use SAP HANA Cloud Integration as middleware, it is considered as a part of different environment from SAP ERP HCM suite.
SAP SuccessFactors - HCM Suite
SAP SuccessFactors HCM suite is a web based tool and requires an internet connection and a system with the following configurations −
Desktop Browser
- Microsoft Internet Explorer 11 (Internet Explorer 10 Metro is not supported at this time)
- Microsoft Edge
- Mozilla Firefox
- Apple Safari 6, 7, 8
- Google Chrome
Mobile Browser
- Apple Safari for iOS 8.0+
- Google Android 4.1+ default browser
- Google Chrome for Android
Oracle Java Runtime Environment
- 1.6/ higher to use video and audio recording
- 1.7 for Plateau Report Designer (PRD) 4.4.1
- On-premise customers can elect to require JRE for content tracking in a crossdomain solution.
Operating System
- Microsoft Windows Vista
- Microsoft Windows 7
- Microsoft Windows 8+
- Apple Mac OS X Lion (10.7) or higher
Document Types
SAP SF HCM suite supports the following document types −
You can open .BMP, CSV, DOC, GIF, HTM, HTML, JPEG, JPG, PDF, PNG, PPT, RTF, TXT, XLS, and XML.
You can also use XLSX and DOCX as part of learning management system.
Other Configurations
Network bandwidth − Recommended connection speed 300400 kpbs
Screen resolution − Required screen resolution is XGA 1024x768 (high color) or higher
Minimum cache size − 250 MB of cache size is recommended.
Adobe Flash Player − Version 10 or higher.
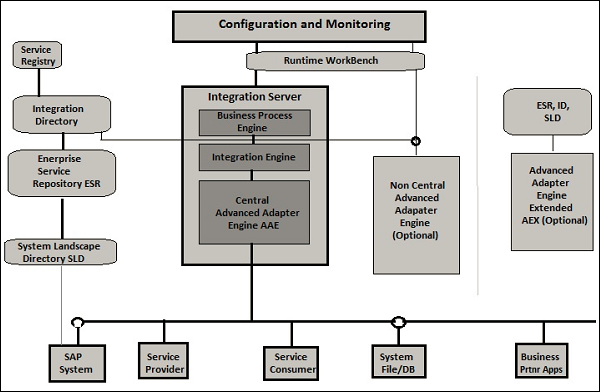
SAP SuccessFactors - Architecture
SAP SF allows organizations to manage their HR functions on the cloud environment. This cloud solution can be integrated to SAP ERP using SAP PI or SAP HCI. However, majority of clients in SuccessFactors do not go for integration with SAP ERP solution.
There are two types of deployment models possible with SAP SF −
- Talent Hybrid
- Full Cloud HCM
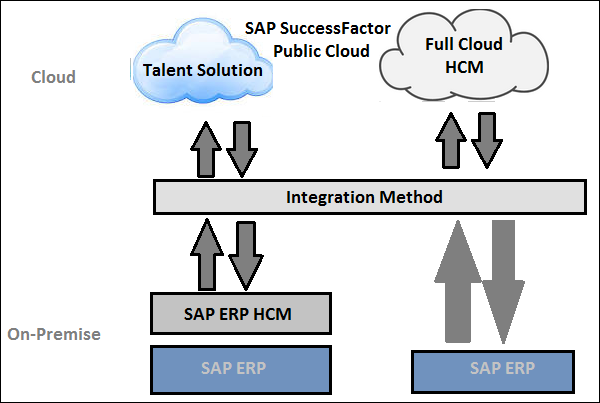
In Hybrid scenario, you can connect your core business suite like SAP ERP HCM with other SAP cloud solutions.
SAP SuccessFactors - Landscape
As mentioned in the previous topic, you can use two middleware to implement integration between On-premise and Cloud environment.
HANA Cloud Integration
SAP HANA Cloud Integration (HCI) is used to implement the integration of business processes and data between cloud and on premise solution. You can integrate business processes between different companies, organizations, or business units in a same organization. SAP HCI allows you to easily perform an ETL function Extract-TransformLoad between on premise and cloud system.
PI/XI
SAP Process Integration is a part of the SAP NetWeaver platform. It is called SAP NetWeaver Exchange Infrastructure XI in NetWeaver 7.0 ehp2 and older versions. SAP NetWeaver Process Integration is a part of the NetWeaver software component and is used for exchange of information in companys internal system or with external parties.
SAP PI/XI enables you to set up cross system communication and integration and allows you to connect SAP and non-SAP systems based on different programming language like Java and SAP ABAP. It provides an open source environment that is necessary in complex system landscape for the integration of systems and for communication.
SAP Process Integration is a middleware to allow seamless integration between SAP and non-SAP application in a company or with systems outside the company.
SAP Process Integration
SAP Process Integration as middleware, Integration add-on is embedded and integration connectivity add-on is part of On-premise SAP ERP HCM suite.
The following screenshot shows the architecture of SAP PI system to set up cross-system communication. You can use this to connect SAP and non-SAP system based on Java and ABAP.
In the following screenshot, you can see that SAP PI is a part of SAP ERP6.0 HCM suite and landscape is separated by a single firewall between ERP and HCM suite.
SAP SuccessFactors - Landscape HCI
Using SAP HANA Cloud Integration (HCI), you can implement various business processes like synchronization, etc. You can use Eclipsed based integration that allows you to perform mapping of business operations and messages and set up those on SAP HCI platform.
The SAP HCI tool kit contains features to develop and configure integration flows. It allows the integration of data between On-premise and cloud applications.
Integration option in HCI allows you to integrate business processes across multiple organizations, companies or multiple departments in an organization.
Following are the prerequisites to install HCI −
| Component | Prerequisite |
|---|---|
Eclipse Platform |
Mars(4.5) |
Operating System |
Windows 8 64-Bit Note: The SAP HANA Cloud Integration Tools are not supported for MAC OS |
Java Runtime |
JRE version 1.7 or higher |
As shown in the following screenshot, HCI is a separate kit. So you can see two different firewalls- FW1 and FW2 in system landscape.
Instance Types
Depending on the customers purchase agreement, they may be starting their configuration from one of the following types −
BizX Suite Bundles
- SuccessFactors Align & Perform
- SuccessFactors Perform & Reward
- SuccessFactors Talent Management Suite
- SuccessFactors Recruiting Plus
- SuccessFactors Learning Plus
Professional Edition
It is tailored specifically for small businesses (1-500 employees). This automated and easily configurable web-based solution includes four core modules −
- Employee Profile
- Goal Management (GM)
- Performance Management (PM)
- Jam
PE also offers the following additional modules −
- Compensation Planning
- Recruiting Management
- Jam (Premier Edition)
Job Code
A Job Code is assigned to each employee to map the competencies for their role to the Job Code.
Portlet
A portlet is a configurable object on the SuccessFactors screen. Portlets provide resources, charting, or features for users to assist them with performance processes.
In the following screenshot, you can see a To-do Portlet that shows the to-do tasks for a user. You can also customize the portlet as per your requirement. We have explained the customization of a portlet later in this tutorial.
Role Names
Role Names or codes are used to designate to whom a form should be forwarded using the route map. Examples include −
- E Employee
- EM Employees Manager
- EMM Employees Managers
- Manager or 2nd Level Manager
- EH Employees HR Representative
Performance and Availability Management
Using SuccessFactors admin tools, you can monitor performance and availability and detect deviations from expected performance targets.
As per contract with the service provider, you can request wide range of reports or schedule them monthly from service provider.
The common report types are −
- System Availability
- Response Time Report
- API report
- Service Availability Report
- Use cases
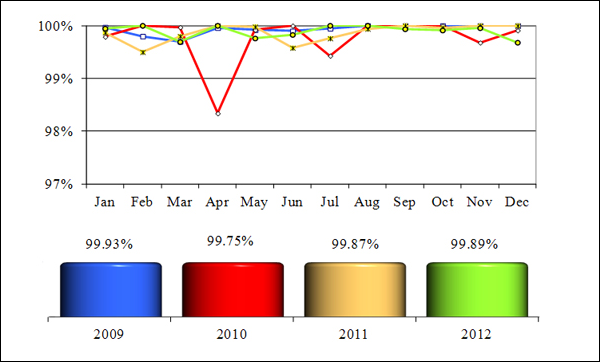
System Availability Report
Your application URL is monitored from different testing sites and with the use of monitoring tools, you can check the system available time. System availability is defined in terms of percentage and varies as per system available time.
The system may be unavailable for multiple reasons such as, internet connectivity issue, application or data center issue, scheduled outages and maintenance activities, etc. The data generated for system availability can vary as per entered time range.
The following diagram shows a Sample availability report −
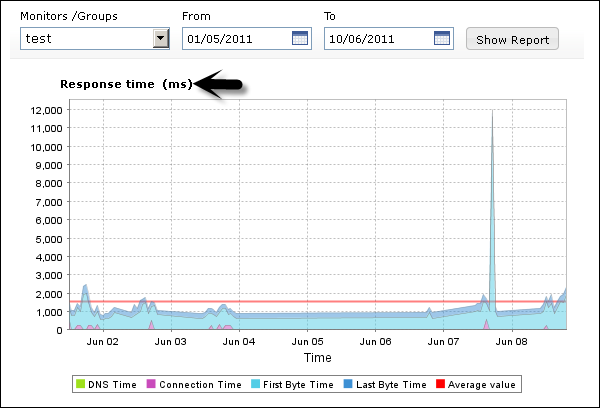
Response Time Report
Response time report contains response time for each minute test with the average of measure period in millisecond. Given below is a sample of response time for a system −
API Report
The API Report allows you to see API analytics usage for a specific time period. You can check how many times API was called and count of API accessed in the system.
Sample API report can contain number of times an API was called and total count of API in the system.
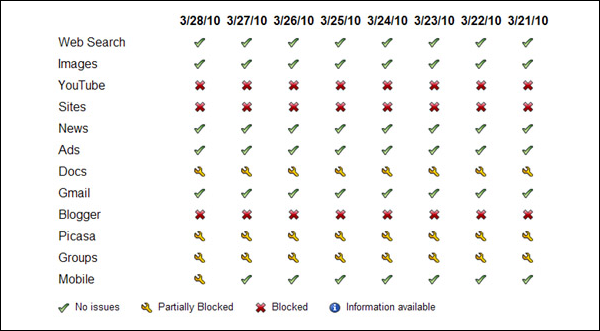
Service Availability Report
This report allows you to view the availability of different services configured in the system. You can configure it to view in the form of dashboard and to see the service status as per specific time zone.
Use Cases
You can also check the performance of SuccessFactors environment using some predefined scripts. These scripts should only be used when you experience a poor performance from the system as this puts extra load on cloud service provider.
Customers can create and run arbitrary EEM scripts that call SFSF Cloud HCM applications and execute navigation steps and other actions in their SuccessFactors HCM Cloud solutions. Creating and maintaining such scripts would be a customer specific activity, in order to reflect the customer's individual functionality and configuration.
These are standard scripts that you can run for performance optimization to check current system scalability and component usability. Like in an on-premise system, you can check CPU, Memory, and File System Utilization.
SAP SF - Customize Welcome Portlet
How to Customize a Portlet in SuccessFactors?
A portlet is a configurable object on the SuccessFactors screen. Portlets provide resources, charting, or features for users to assist them with performance processes. To customize a portlet, follow the steps given below −
Step 1 − Go to SuccessFactors environment → Login and you can come to Welcome screen.
Step 2 − Click Toggle on the upper right hand side of the Welcome tile as shown below −
A new page Edit Custom Tile opens. There are two options −
- Tile Settings
- Configure Contents
Step 3 − Under Tile Setting, enter the tile name. Enter the name that describes the type of tile you are creating and this is not displayed to your users.
Step 4 − Under configure contents −
Enter Tile title − This is the title, a user will see at the top.
Description − This is the description, a user will see in their tile browser.
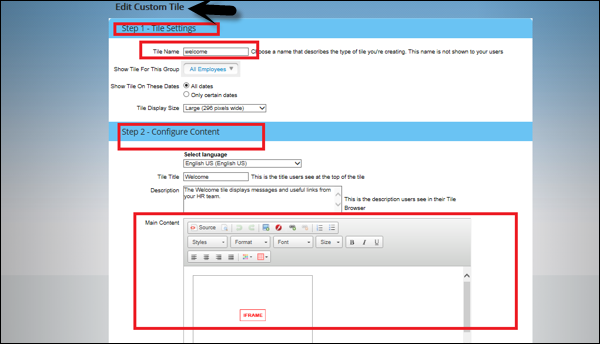
At the bottom, you have a preview option to see how the tile will look.
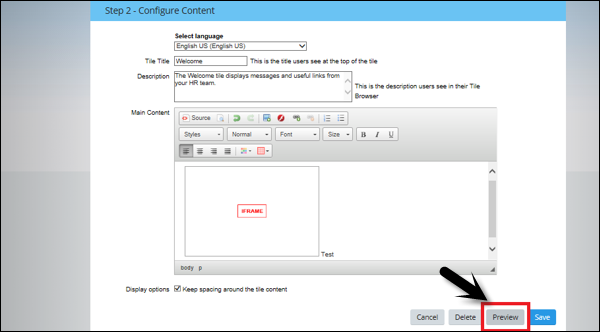
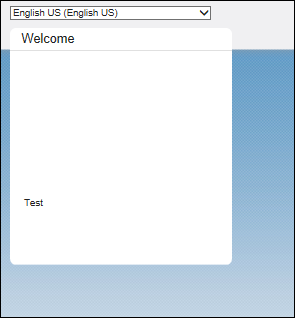
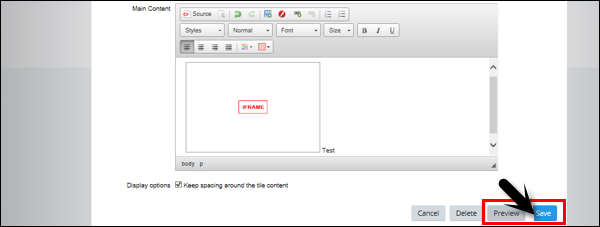
Step 5 − Once you click on Preview, Tile title will be displayed along with the description as shown in the following image. You can decide if you want to save this or make further changes.
Step 6 − To save the tile, click the save button at the bottom.
SAP SuccessFactors - Navigation
How to Perform an Active Search in SuccessFactors?
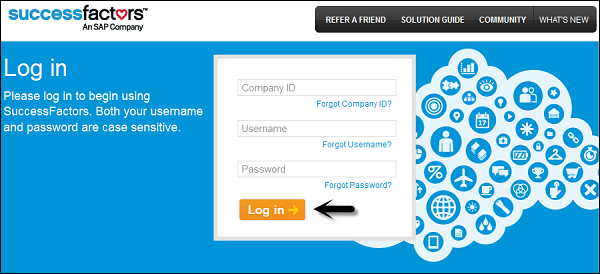
When you open SuccessFactors URL, you are prompted to enter user name, password and company Id. To perform an active search in SuccessFactors, follow the steps given below −
Step 1 − Login to SuccessFactors, it opens the home screen of SAP SuccessFactors. Enter Company Id, user name and password. Click Log in.
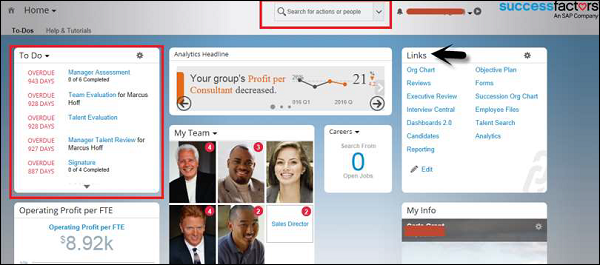
Step 2 − On the home screen, you have To-do Portlet on the left side and quick links. You have quick action search that you can use to search in SuccessFactors environment.
Step 3 − You can perform a search by entering a name. Here, you enter an employee name and click the Search icon.
Example
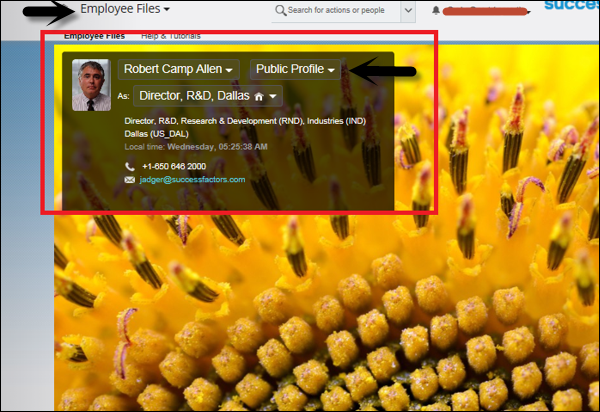
Let us understand this with the help of an example. We have searched for Robert in the following action search.
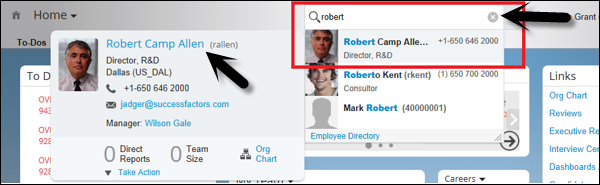
Step 1 − When you click the employee name, it will open a public profile of that employee.
You can check his designation, location, direct dial, Email Id, Local time, and other public-profile details.
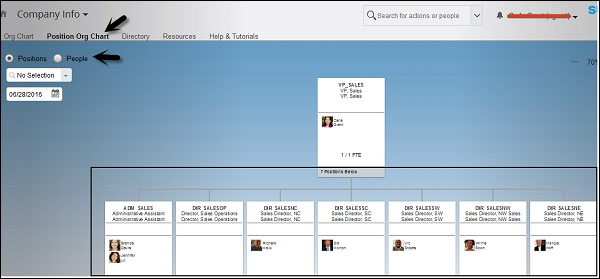
Step 2 − You can also check the Organization chart of the employee. Go to the public profile of employee and click Full Size.

Step 3 − Click Uplevel and it will show you the Organization chart of the employee.

Step 4 − When you click Position Org Chart, it will show you organization chart as per the employee designation. You can also search in Org chart.
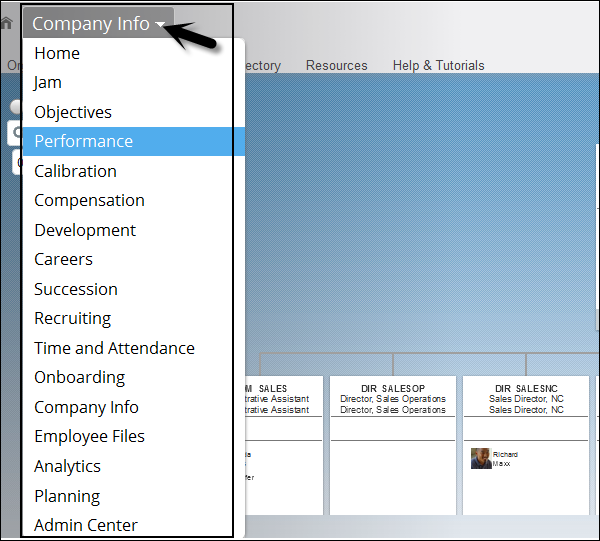
Step 5 − When you click Company info at the top, you will see a drop down list of various options to navigate to SuccessFactors link.
To go to the home screen, click Home under the Company Info option.
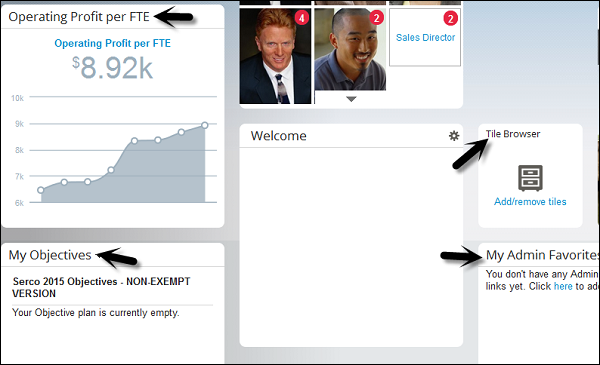
When you scroll down further on Home page, you have various other options −
- My Admin Favorites
- Tile Browser
- My Objectives
- Portlet
SAP SF - Compensation and Variable Pay
Compensation, variable pay, and bonus are a part of Compensation management package in SuccessFactors and are available under same license. Compensation deals with fixed salary paid to the employees.
Bonus and Variable calculations are based on the following three goals −
- Individual goals
- Team Goals
- Group Goals
Bonus in compensation management also depends on performance management. When you are using variable pay, calculations are done with a separate program in SuccessFactors instance. The resulted calculations are shown to People manager who can edit the sheet for final bonus and variable pay.
Standard bonus calculation has a disadvantage that calculations can be performed using one performance form per employee. When you change the organization assignment of an employee in mid-year, there is a need to define separate objectives and they have to be calculated separately.
Variable pay, on the contrary, allows you to perform separate calculations for different time periods in a same year. You can perform separate calculation for employees who move from one project to other or move from one part of business unit to the other. Later, this can sum up to calculate one amount for the payment.
If you are not using Employee Central, you need to upload additional data to perform the calculation. The following file types are required in addition to the user master data.
| Import File Name | Content & Use |
|---|---|
| Employee History Import File | Multiple rows per employee with validity dates, Assignment to bonus plan, Data relevant for determination of eligibility, Base of calculation (salary), score on each business goal. |
| Business Goals Import File | Business goal definitions, goal forecasts, and goal results for every participating employee. |
| Eligibility Rules Import File | List of rules to which employees are assigned via Employee History File. |
| Bonus Plans Import File | Weighting of different types of goals in bonus plan(group/team/individual) |
| Business Goal Weights Import File | Weighting of business goals per bonus plan |
Now, lets go step by step and see how compensation and variable pay are managed using SuccessFactors.
Step 1 − Go to Compensation.
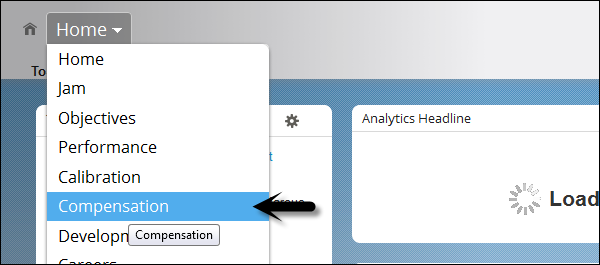
Step 2 − When you go to compensation, you will find the following options −
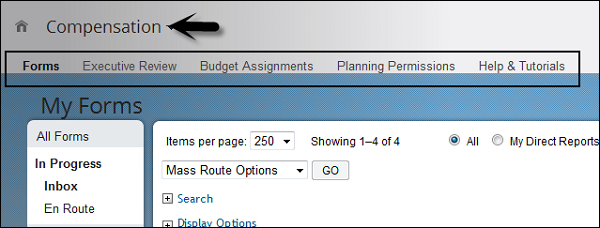
Forms − A Form contains data for comp planner and the data exists only for those employees, which are part of comp planner hierarchy.
Executive Review − You can use Executive review to check and manage the compensation planning process for a large population of employees. It allows you to group the data from multiple forms into a single view.
Executive review allows a user to check all the data that a comp planner can see on a form and this includes demographic data, merit increases, adjustments, and any other data field that appears on a comp form.
The key difference between Forms and Executive Review is that in executive review all the employees from multiple forms are listed on one page. The user with Executive Review permission does not necessarily have to be included in the forms route map in order to see the data.

Step 3 − In Executive summary, you have display and filter options. The Display option allows you to select all the fields in executive summary.
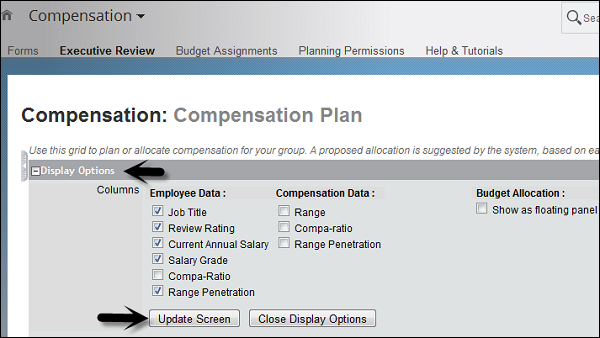
The screen will be updated.

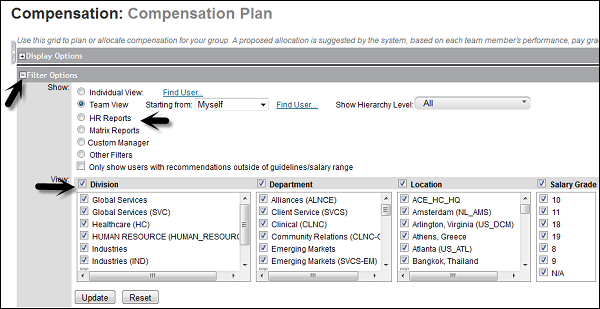
Executive review gives users the ability to filter, sort, view, and export data based on division, departments, locations, etc.
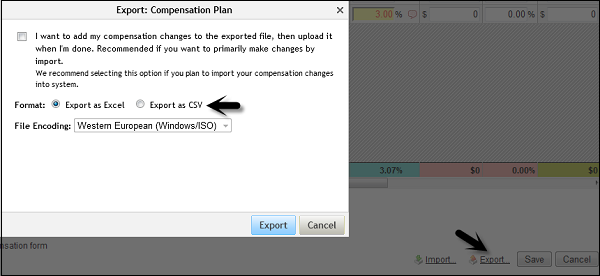
Step 4 − Open the Filter Options menu to see the options.
Step 5 − You also have an option to Import/Export in compensation plan. Once you click Export, you have an option to select the File type −
In a large organization, the following staff have access to Executive review −
- Senior level management/Executive
- Human Resources
- Administrators
- Site Managers/Division managers, which are not part of hierarchy.
SAP SuccessFactors - Foundation
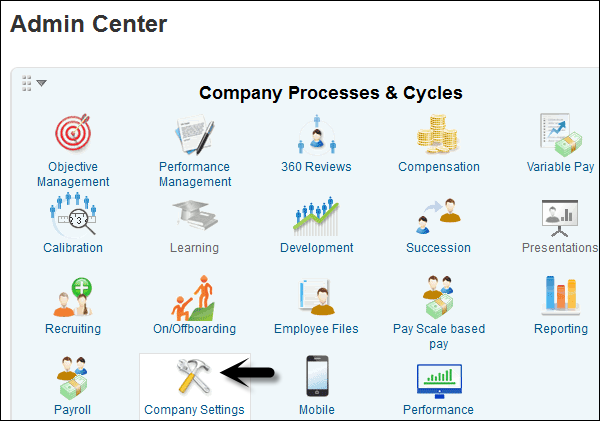
SAP SuccessFactors Foundation deals with setting up SuccessFactors environment and configuring basic activities in Admin center.
The key activities of Foundation include −
- Enabling, using and managing Action search
- Public profile
- Role-based permissions
- SuccessFactors home page and configure theme
- Enabling and using Admin center
- Configuring People Profile
We have already discussed some of these activities. Let us see how to perform role-based permissions in Admin center.
Role-Based Permission
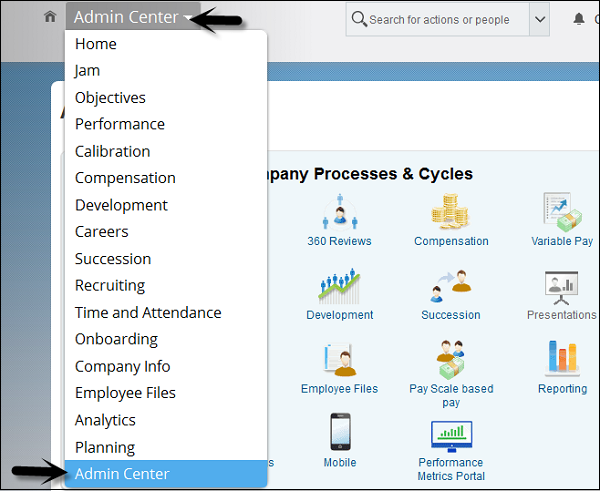
Step 1 − Login to SuccessFactors home page. From the drop down list, select Admin Center.
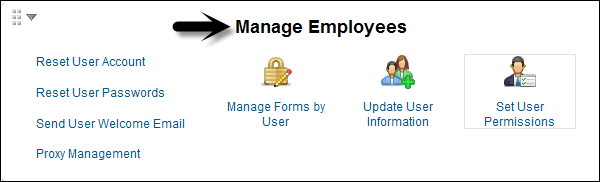
Step 2 − Click Manage employee portlet → Set user permissions → Manage Permission Groups.
Step 3 − To create a new group, click the New button. You have to mention the Group name and Category.

Step 4 − Specify the time zone and you can also define hierarchical relationships to specify group. Click Done.
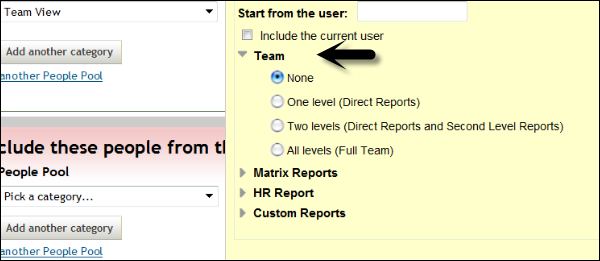
Step 5 − To add people pool, add categories and items. You can add up to three people pool in the group. This is required to add people from different locations or departments in a similar group.

If you want to exclude some people, you can use Exclude these people from the group section. Click Done to complete the group creation.
Configure Theme
To configure theme, follow the steps given below −
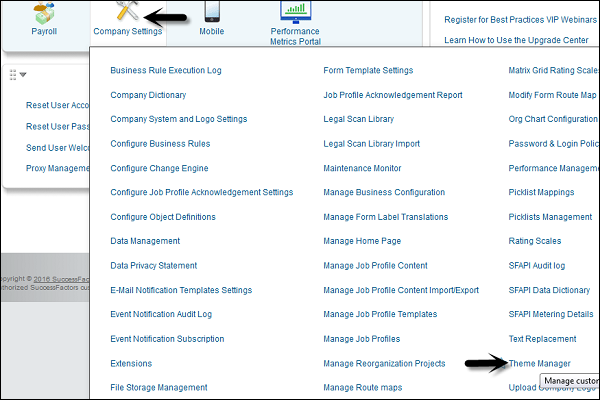
Step 1 − Go to SuccessFactors home page → Admin center.
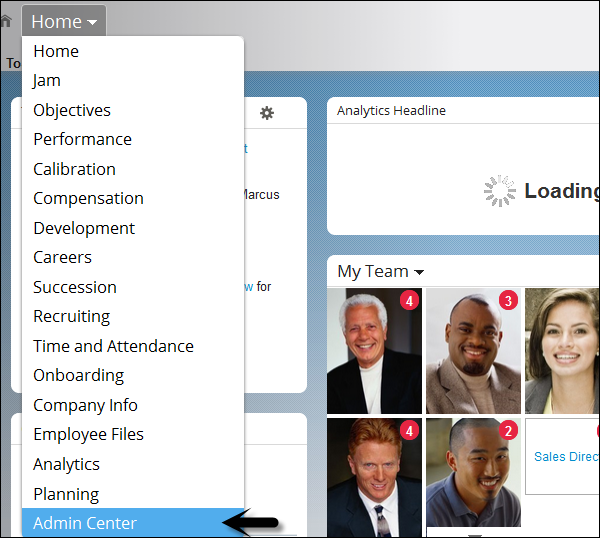
The Admin Center page will open.
Step 2 − Click Company setting and select Theme Manager at the bottom as shown in the screenshot given below.
Themes determine the look of your SuccessFactors pages. You can assign any theme for a specific group. The theme marked as Default is the one that is visible to everyone else. You can change themes as often as you like.
Step 3 − To create a new theme, click Create a new Theme.

Step 4 − Give your new theme a name, description, and custom colors or you can also select the desired colors as shown in the following screenshot.
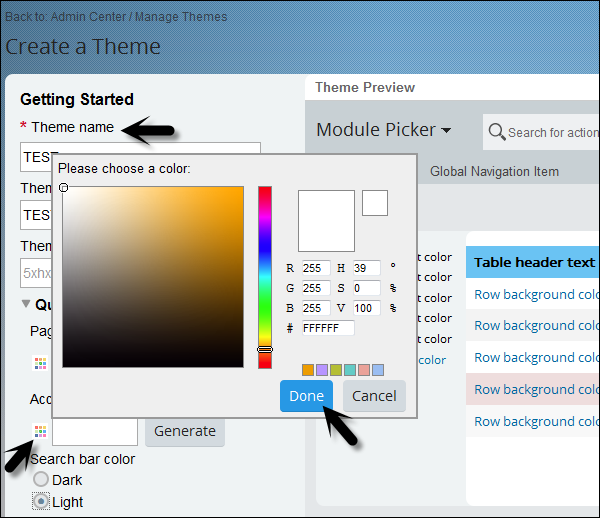
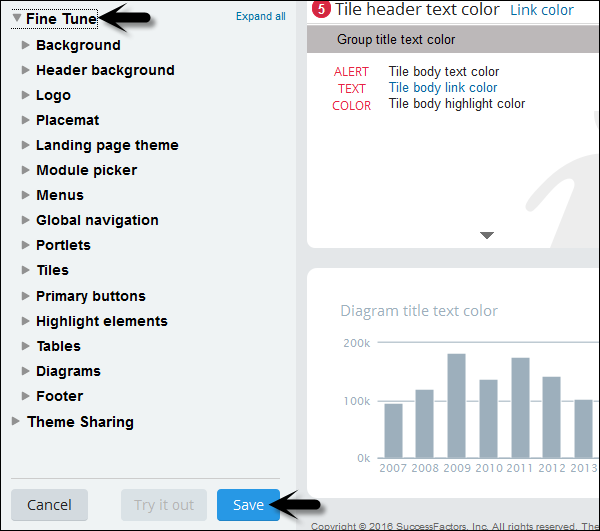
Step 5 − You can make different selection for each section. Click Fine Tuning and it will display different components in Theme designer.
Once you make the necessary combination, you can save your Theme.
SAP SuccessFactors - Intelligent Services
In SuccessFactors, you can use intelligent services to publish events to third-party applications. When there is a change in employee information, intelligent service event triggers and third-party applications can be configured as subscribers for these events.
Setting up Roles
You can set up roles for event notification subscription.
Step 1 − Login to SuccessFactors. On the home page, go to Admin Center.

Step 2 − Click Manage Permission Roles. Choose the group to grant permission and go to the Permission Details Page.
Step 3 − In Permission window, go to Administration Permission > Manage Integration Tools.
Select Access to Event Notification subscription.
Select Access to Event Notification Audit Log.
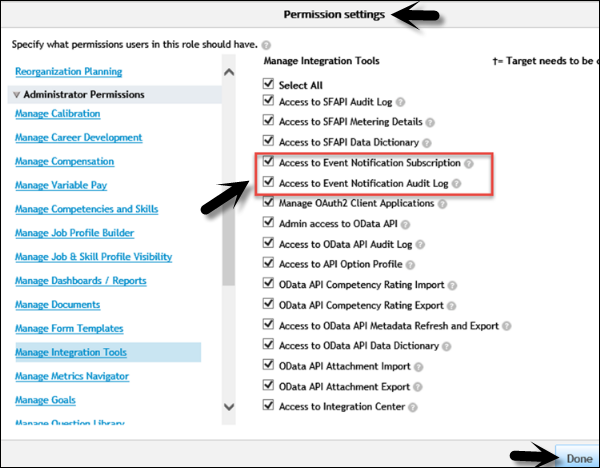
Step 4 − Click Done and then click Finish to make the applicable changes.
Setting Third-Party Application as Subscriber
The steps given below will guide for setting third party application as subscriber.
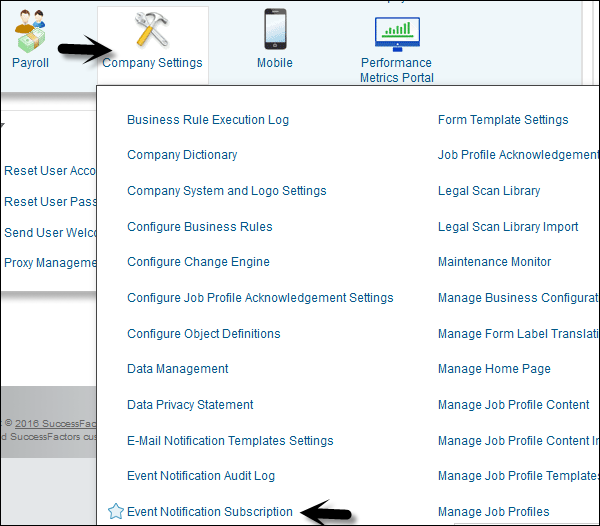
Step 1 − Go to Admin Center > Company Settings.
Step 2 − Under Company Settings, select Event Notification Subscription.
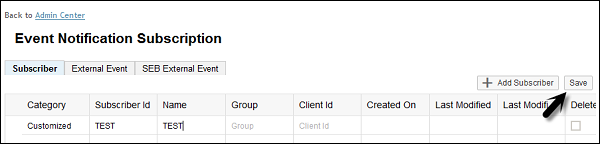
Step 3 − Under the Subscriber tab, click Edit Subscriber.

Step 4 − Select the Add Subscriber button to add third party application as subscriber.
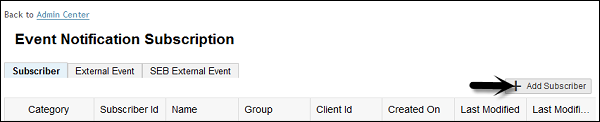
Step 5 − Enter the Subscriber ID field. Rest of the fields are optional.
Configure External Subscribers
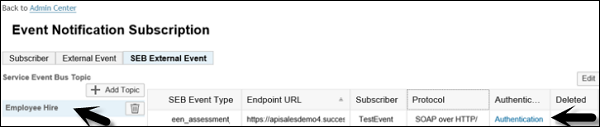
To configure external subscribers for specified events, follow the steps given below −
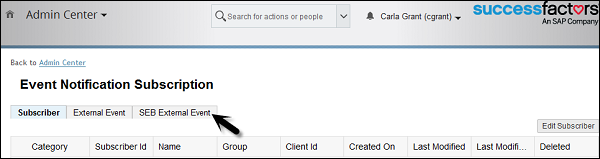
Step 1 − Go to SEB External Event Tab under Event notification subscription.
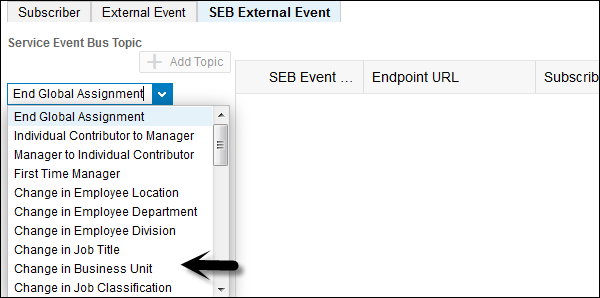
Step 2 − Click the Add Topic button −

Step 3 − Select the event that you want your third-party application to subscribe −
Step 4 − Click Add subscription to add subscriber for these type of events.
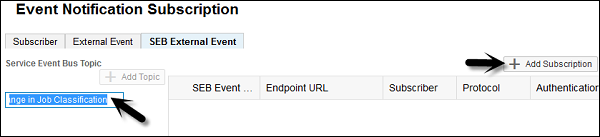
Step 5 − Configure the subscriber from the available list and click Save.
SAP SuccessFactors - Onboarding
Using SuccessFactors onboarding, you can engage new hires from the start. It is important to provide enhanced onboarding experience to the new hires to engage top talents from university.
SuccessFactors Onboarding provides an exceptional, enhanced set of onboarding activities in an organization to manage new hires from the start.
Key Features of SuccessFactors Onboarding
The key features of SuccessFactors Onboarding are as follows −
Hiring coordinator can initiate onboarding for hires recruited through SuccessFactors recruitment.
Hiring process involves kickoff onboarding process in SuccessFactors for all hires and complete new hire steps.
Onboarding involves follow up with hire to make sure that he has completed new hire steps and has taken advantage of the new hire portal.
Onboarding can be integrated with recruitment and Employee central to manage new hire activities.
SAP SF - Performance and Goals
SAP Performance and Goal management helps people managers to align individual goals with the company business objectives and core values. It ensures that all the employees are working on same similar goals to achieve and eliminate gap and stay on the right path to achieve organization goals.
If a customer purchases Goal and Performance management together, then all the goals in Goal management are automatically populated in Performance management. Performance management helps managers to measure metrics as per employee performance to meet objectives as per company targets and objectives.
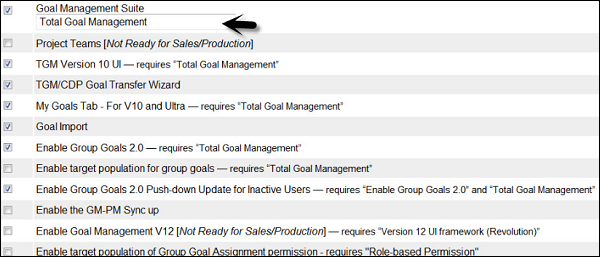
Importing a Goal Plan Template
When you want total goal management in an organization, you have to import goal plan template for a company. You must create and edit your goal plan templates using an XML editor and import/re-import the goal plan to see your changes.
Step 1 − To import Goal plan template, go to Provisioning and select company for which you want to import/reimport goal plan template.
Under managing plan template > Import/Update/Export/Objective Plan template.

Step 2 − You have to select the goal template and click Upload.

Copying Goals from other goal plans
You can copy goals between goal plans as well as export the goals from a particular goal plan. For example, you want to allow a user to copy a goal from the 2015 goal plan to the 2016 goal plan.
You can enable the wizard for copying goals between goal plans from Provisioning using the TGM/CDP Objective Transfer Wizard setting.
Example − A user can copy a goal from the 2014 goal plan into the 2015 goal plan.
Performance Management Forms validation
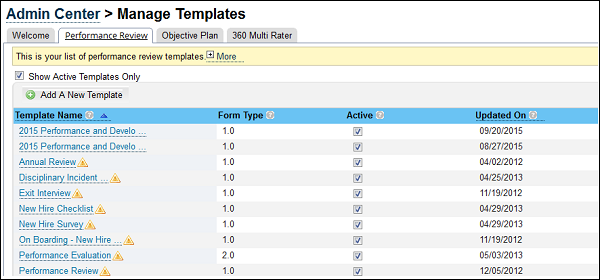
In SuccessFactors, you can validate and update existing performance management template using the Manage Templates tool.

Step 1 − Go to Performance Review tab on the new page. Templates that need to be updated are marked with an alert sign, as shown in the following screenshot.
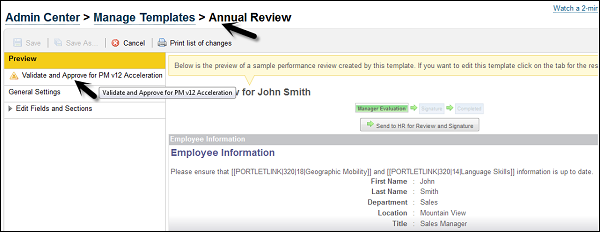
Step 2 − When you open a template, you will see a new tab on the left side, Validate and Approve for PM v12 Acceleration. This tab contains instructions on how to go about the validation process.
SAP SF - Succession and Development
You have to perform various activities related to success and development that helps you to develop talent needed to improve strength of an organization. It helps organization to provide continuous supply of internal talent to meet critical objectives, employees to perform their full potential and accelerate their development and target plans.
Key activities that are included in succession and development −
Career Development Planning − Career Development Planning helps an employee select from a wide range of development and career planning activities and the manager can track the success of their resources.
Succession − To increase employee engagement, maximize career opportunities for top talent, and helping organizations to become employer of choice.
There are two versions of Career development planning −
Career Develop Planning Lite − This is the basic version and available free with Performance management.
Full Career Development Planning − The full version has to be purchased and includes the following features −
Development Plan
Career Worksheet
Career Path
Managing Content Development
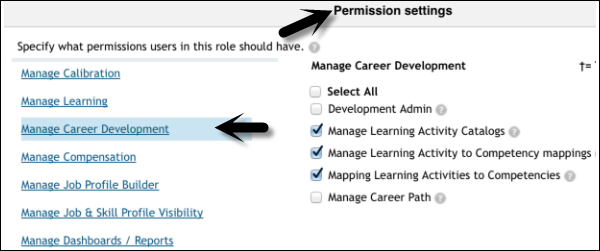
To manage development content, go to Admin Center > Set User Permissions > Manage Permission Roles
Select the role for which you want to grant access to managing development content. Under permission settings, go to manage career development.
Managing Career Path
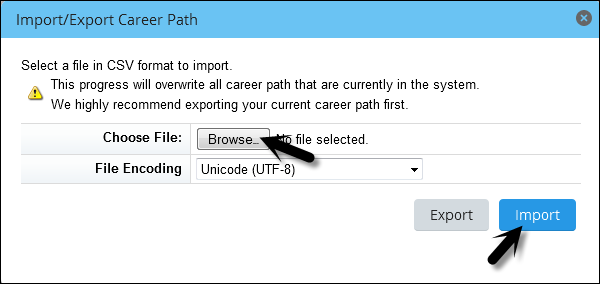
You can also import/export career path for use on career worksheet.
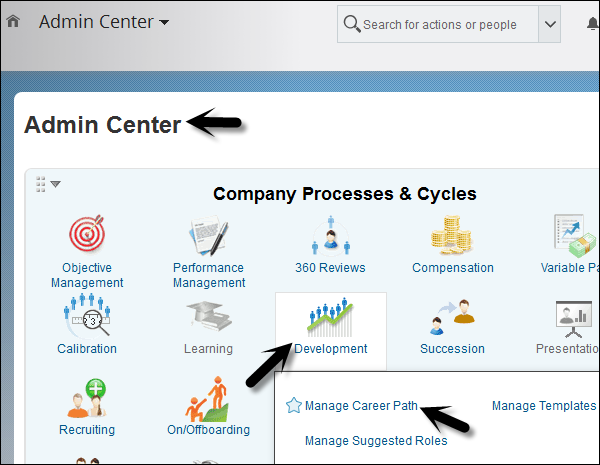
Step 1 − Go to Admin Center → Development.
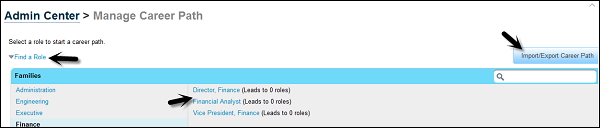
Step 2 − You have to select a role to start a career path. Go to Find a role and select the role.
Step 3 − When you click the Import/Export Career Path button, you have to select CSV format to import. Go to browse and select the file. Click the Import button.
SAP SuccessFactors - Employee Central
SuccessFactors Employee Central provides an option to manage key HR operations and contains HR master data like employee name, identification, user name, etc.
The most important features of Employee Central are listed below −
As SuccessFactors is a cloud solution and manages quarterly, you can easily accommodate an organizations changing work force structure.
SuccessFactors Employee central manages different events occurred in the life cycle of an employee. You can track basic events like new hire, promotion, transfer and new assignment, and other activities in Employee Central.
Integration of SuccessFactors Employee Central to ERP is more robust and provides better quality HR solution.
It provides additional functionalities like increased cloud solution portfolio, integration with third party products, outsourcing function, etc.
The following diagram shows the integration of SAP SuccessFactors with SAP ERP and other modules for better management of HR functions and events.
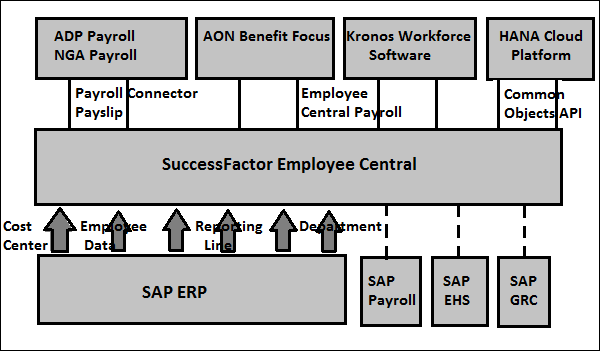
Employee Central Integration
SAP ERP depends primarily on HR data. The HR system takes various data from other SAP modules. The first integration started for SAP ERP cost center in SAP Financials to SuccessFactor. Various other integration scenarios were developed at later stage.
SuccessFactors Employee Central can be integrated with the following systems −
SAP ERP to SuccessFactor Employee Central
This includes providing cost center from SAP Financial to SuccessFactors to accommodate costs for cost centers, maintenance of employee to cost center assignment and other activities.
SuccessFactor to ERP Integration
You can integrate SAP SuccessFactors to SAP ERP for master data. Various master data can be used from ERP to SuccessFactors for HR functions −
Employee Data Integration − Integration of employee data related to key activities like time reporting, travel request, expense report for adhoc requests, etc.
Reporting Line Integration − Reporting line information like employee to line manager information is managed in SuccessFactors employee central as part of employee job information.
Employee to department assignment integration − The employee department assignment integration is interpreted within SAP Organizational Management as the relationship between the employees position and the appropriate organizational unit.
Employee to Cost Center assignment integration − The integration of cost centers from SAP ERP to SuccessFactors Employee Central allows assignments of cost centers to employees. This information is back to ERP system for managing cost information to employee position.
Employee Central Payroll
SuccessFactors Employee central payroll is a cloud solution to manage payroll related activities, like run payroll, tax and other benefits.
Employee Central Payroll is a system provided by SAP −
- Cloud customers who want to run the payroll on cloud features.
- Customers who are using ECC to manage payroll run.
- Customers who want to integrate their Human Resource system to Employee Central cloud solution.
Major differences between Employee Central Payroll and On-premise Payroll system are given below −
EC Payroll is hosted by SAP, whereas a customer owned HCM solution is hosted by the company or a third party vendor.
Support package management is performed by SAP as per latest releases for SuccessFactors in EC Payroll, whereas the BASIS team performs On-premise solution patch management.
EC Payroll has latest release pack for SuccessFactors, whereas On-premise system is as per company defined support package policy.
In EC Payroll, there is no access to Operating system, whereas in On-premise HCM system you have OS level access.
The integration between On-premise ERP HCM and EC Payroll for master data is done using a middleware known as Dell BOOMi.
Now HCI HANA Cloud Integration is being provided for replicating the master data to HCM system. Employee Central and HCM are both SAP solutions, which makes it easier to be integrated seamlessly.
There is an option for customers to select SAP HCI or Dell Boomi when purchasing a SAP SuccessFactors Enterprise Package.
On the Home tab, click Payroll from the dropdown list.
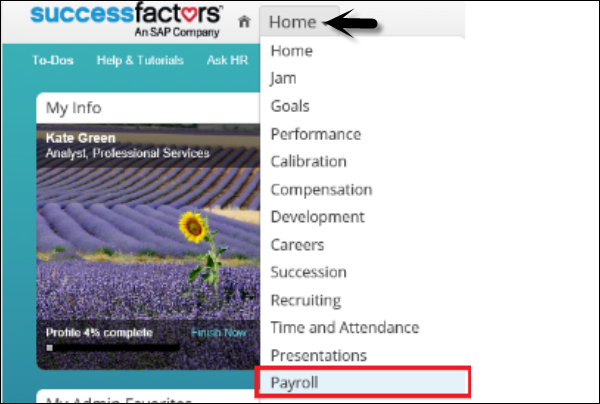
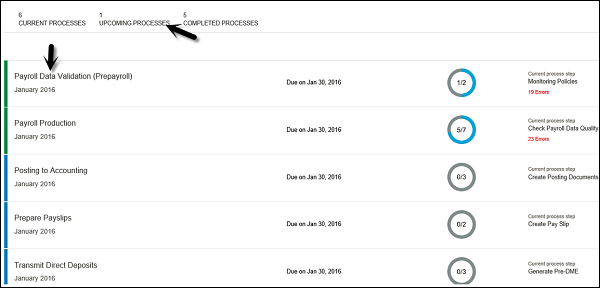
When you click the Payroll button from drop down list, you will be redirected to Payroll Control Center or the Payroll Cockpit as shown below. As per your role, you can see the screens to run the payroll like Payroll Manager.
The following is a list of the supported countries in Employee Central Payroll: Argentina, Australia, Austria, Brazil, Canada, Chile, China, Colombia, Finland, France, Germany, Hong Kong, India, Ireland, Italy, Japan, Malaysia, Mexico, Netherlands, New Zealand, Qatar, Russia, Saudi Arabia, Singapore, South Africa, South Korea, Spain, Sweden, Switzerland, Taiwan, Thailand, United Arab Emirates, United Kingdom, United States, and Venezuela.
SAP SF - Employee Central Activities
Various activities can be performed under SAP SuccessFactors Employee Central (EC). Its key functions include −
- Time Off
- Payroll Time Sheets
- HR Transactions
- New Hires and Onboarding
- Changes and Transfers
- Position Management
- Reporting, Compliance and Auditing
Employee Central Time Off
Time Off option can be used to apply for time off such as vacation, paid time off (PTO), sick leave, leave of absence or you can also apply for other type of absence.
Using time off, you can enter a request and you can see who else is absent during that period when you are requesting time off.
In Time Off, you can check your time account balance - how much time off you have earned, taken, and planned time off.
You can also view all your requests and cancel or edit requests for time off.
SAP EC Raising a Time Off Request
Go to MyInfo tile and click Request Time Off.
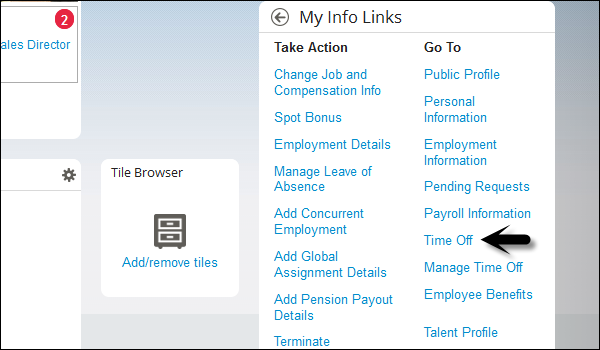
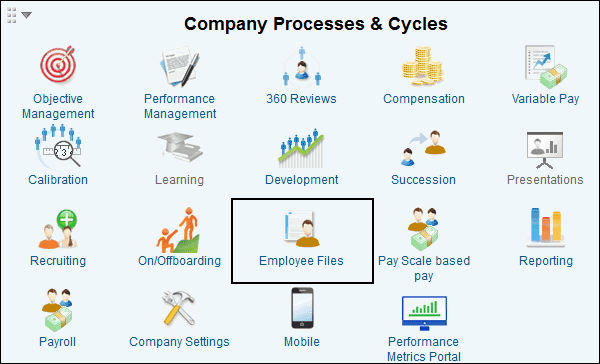
You can also go to Home > Employee Files and select Time Off under Public Profile.
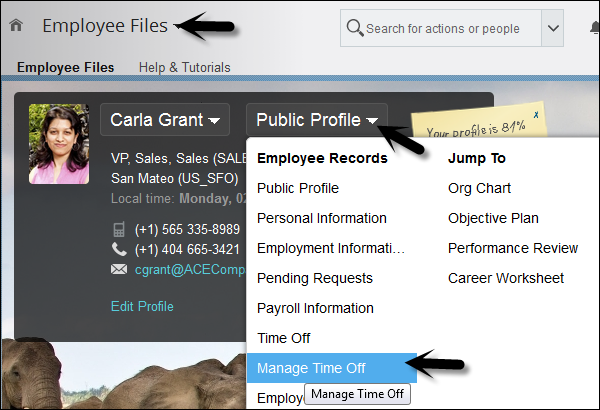
A new page will open as shown in the screenshot given below −
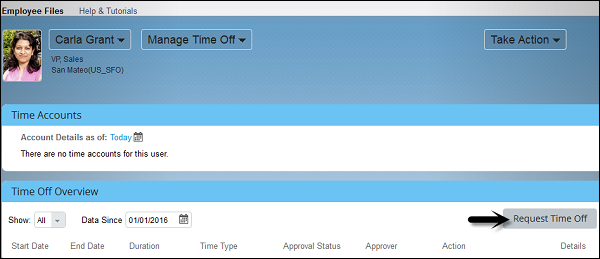
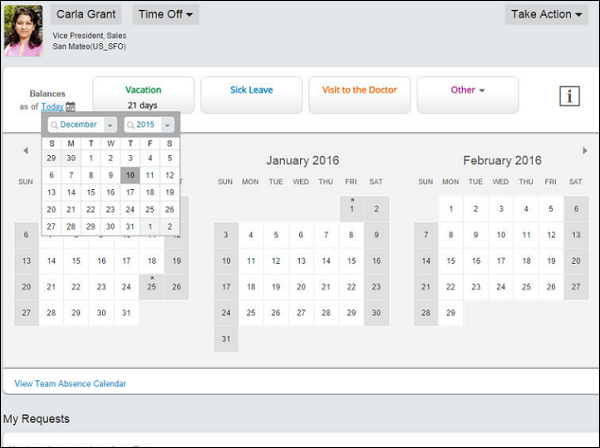
The Time Off calendar looks like this −
At the bottom of the screen, a box - My Requests is present. It shows the time off requests you have submitted and their status. One of the following status may be present.
Pending − This shows that request has been submitted and approval is required and the person responsible for approving it has not yet made a decision.
Approved − This represents that request has been submitted and the person responsible for approving has approved the request.
Cancellation Pending − This shows that cancellation workflow is active and you cancel an absence request. Your manager must approve the cancellation. This represents that you have cancelled the request and approval is pending from manager side.
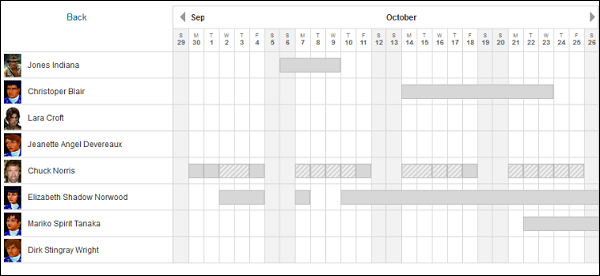
Click View Team absence calendar to see who all are on leave during that time period.
Employee Central Payroll Time Sheet
Payroll time sheet can be used to record the attendance, overtime and negative time booking in weekly time sheet. In Employee central, you can assign attendance time, overtime and other exceptions to time types and cost centers.
Payroll timesheet has to be submitted for approval and you can also enter your standby allowance and other allowances.
When timesheet is approved, time sheet is processed for payroll section. Incase approval is declined you can make changes and resubmit it again.
Time Recording Variants
Time sheet can be recorded in two ways −
Duration based recording − You record the length of time you work each day, in hours and minutes. Start and end times of the recorded time are not recorded.
Clock Time based recording − You record start and end time of your working time each day.
Timesheet Recording Methods
Various timesheet recording methods are present, which you can use to record time −
Positive Time Recording − In this type of time-recording method, an employee records all the times they actually work in addition to overtime, absence and other allowances.
Negative Time recording − This is used to record exceptions from planned working time. You can also record on-call time, allowances, and overtime using this method. As a negative time recorder, you can record certain other types of attendance like training time, travel or self-learning, etc.
Overtime only recording − In this time-recording method, an employee record only the time they work that is in addition to their planned working time, plus on-call time and allowances.
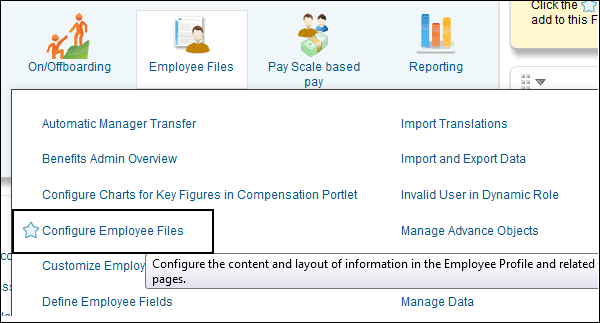
Employee Central Configure Employee Files
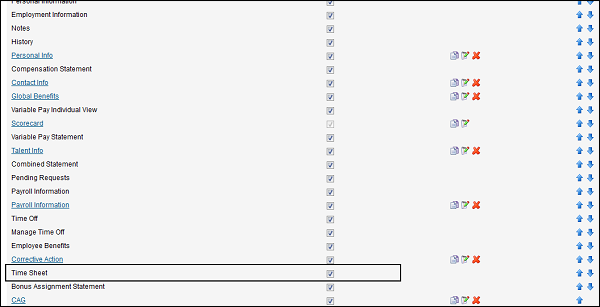
For the Time Sheet tab to appear in the Employee File, you need to switch it on.
You can Configure Employee Files Tab in Admin Center.
Step 1 − Go to Admin Center > Employee Files.
Step 2 − Select Configure Employee files.
Step 3 − Select Time sheet
Employee Central HR Transactions
There are various HR functions that can be performed under HR transactions in Employee Central.
Organization Chart − Org chart can be used to browse the organization and understand department structure and reporting relationships. You can search for various people in your organization and know more about them, their interest, department details, skills, etc.
Employee Self Service − Employees can update information and run actions such as advances and deductions. Employees can update personal data, bank account details, change benefit elections, and other employee service transactions like nominees, dependent details, etc.
Manager Self Service − This allows managers to access employee information that they have rights like personal information, training history, performance history, education details, leave details, external trainings attended, etc.
Employee Central Changes and Transfers
With SAP Employee Central, you can perform the following activities −
Track Employee Status − You can check the status of employees. The following are possible status for an employee in SAP SuccessFactors Employee central −
Active
Leave
Terminated
Employee Transfer Information − This is used to check transformer information related to an employee. In Employee Central you can maintain the following information about employee transfer −
Transfer Reason
Transfer Date
Transfer to and from department
Absence Details − Employee Central also contain HR transactions related to employee leave of absence. Following information can be maintained under this −
Leave Type
Leave Details
Leave to and From
Leave Approver
Promotions and Demotions − In Employee Central, details regarding promotions & demotions, grade change, title change, transfer, responsibility change, cost center change, and step progression can be maintained.
Termination Details − Employee Central also contains HR transactions related to employee termination. Following information can be maintained under this −
Termination Dates
Termination Reason
Reason
Rehire eligibility, etc.
Employee Central: Integration and Extensibility
You can perform various activities related to integration and extensibility for SAP SuccessFactors integration to HCM and ERPFIN. Key activities include −
SAP ERP Integration
SAP develops, supports, and maintains prebuilt, configurable end-to-end integration processes for SAP ERP HCM and SAP ERP FIN. These integrations comprise add-ons for SAP ERP and middleware content for Dell Boomi.
Prepackaged Templates
Template connectors for third party benefits, time, payroll, finance, and travel applications encapsulates HR-XML standards and best practice knowledge of integration patterns in each of these categories. It helps expedite implementation and saves time and money for customers. Prepackaged template integrations are maintained by the customer.
APIs
Use APIs to build custom integrations on SAP HANA Cloud Integration technology and custom extensions on SAP HANA Cloud Platform. Custom integrations and extensions are maintained by the customer.
SAP SuccessFactors - Recruiting
In a company, talent acquisition is one of the most important process of HR to a business and hiring right people in the organization has a considerable impact on business performance. SAP SuccessFactors-Recruiting helps you source, engage, and hire the worlds best talent.
SAP SuccessFactors recruiting helps organization to source, engage and hire top talent and manage right people in an organization. You can attract and engage top talent, select and hire the best candidates as per company requirement, and measure the business results. You can emphasize primarily on hiring process and selecting the best candidates.
The benefits of SAP SF Recruiting are as follows −
It ensures that you get the right candidate with right skills at correct time.
You can evaluate the candidate speed-up the hiring process and keep it fast and fair.
You can fasten new hire onboarding and allows you to access resources in employee social network.
You can increase return on the recruiting spend and demonstrate how your recruiting strategy is driving business results.
Recruiting Rating Scales
A rating scale in SuccessFactors recruiting is used in Requisition Template and is used to rate competencies on the interview assessment. The benefits of using rating scales is that you can put more than one correct answer.
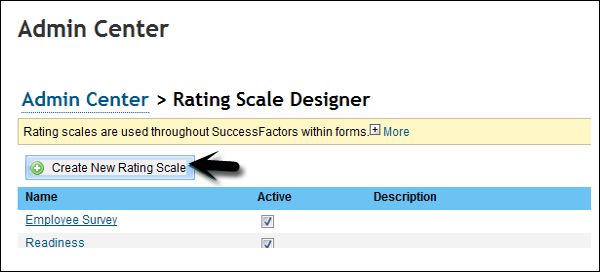
To create or edit an existing rating scale, go to Admin center > Company Settings > Rating Scale.
Step 1 − Click the Create New Rating Scale button.
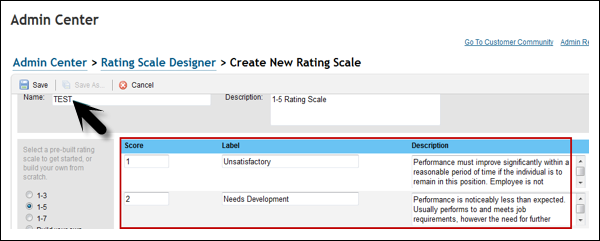
Step 2 − To define or modify a rating scale, open the rating scale. If you are creating a new scale, the creation process takes you to the edit functionality.
Select a rating scale by clicking one of the prebuilt rating scale options, or build your own. When creating a new rating scale, the system defaults to the 1-5 scale. Click Save.
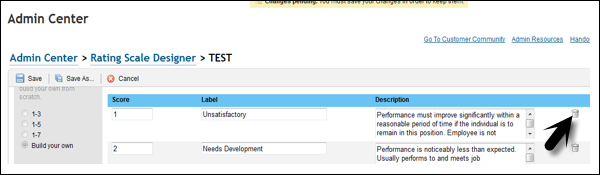
Step 3 − To delete a rating score, click the Delete button.
Step 4 − To modify the scale, enter the score, label, and description, and then click Add New Score.

Step 5 − Enter the details as given below. Click Save.

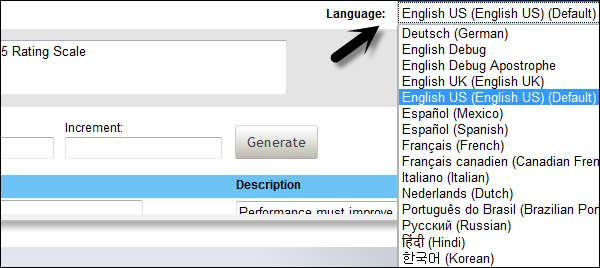
Step 6 − You can also add Rating scale in different languages by selecting a language from the drop down list.
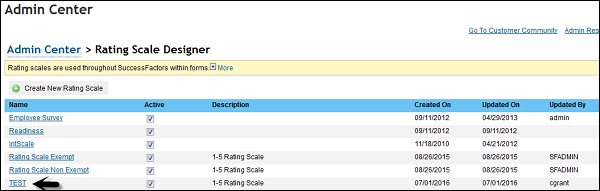
Step 7 − To view the Rating Scale, click the Rating Scale icon next to admin center. You can see that a Rating Scale has been created. To edit an existing scale, click Rating scale and a new window will open.
You can also check created on, updated on and Updated by details and description.
Recruiting email Templates
You can use recruiting email templates to create automatic status triggered responses and emails from a recruiter. Recruiting e-mail templates support the use of CC and BCC functionality. This allows a set of users, operators, or e-mail addresses to be specified on an e-mail template.
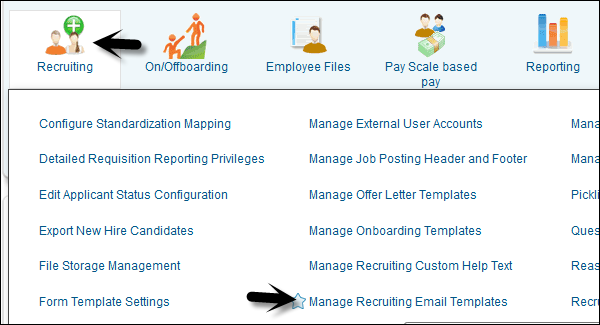
Step 1 − Go to Admin Tools > Recruiting > Manage Recruiting Email Templates.
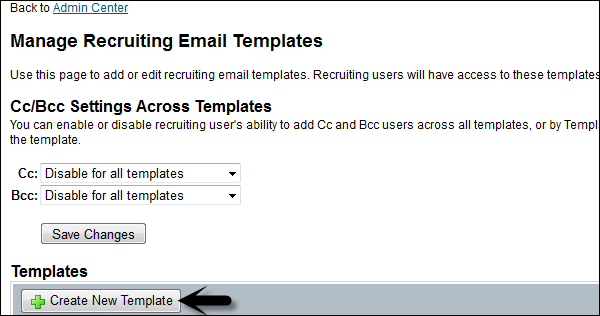
Step 2 − Click Create New Template and enter the template name.
Step 3 − Set the template to Enabled. Create a Subject for the e-mail. Write the e-mail body, using tokens where appropriate.
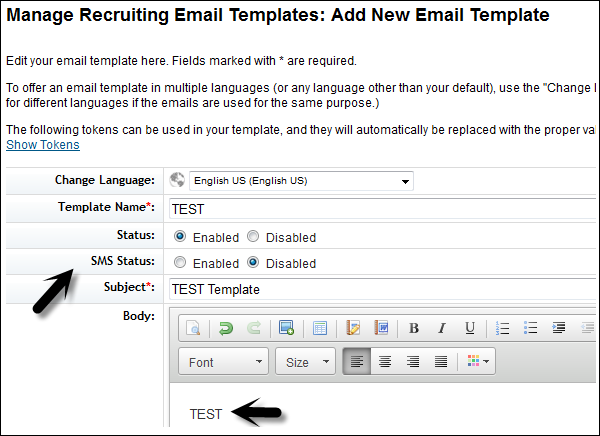
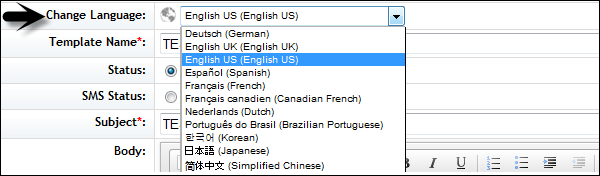
Step 4 − To offer an email template in multiple languages, you can use the option Change Language from the drop-down menu and complete all the fields for the translation.
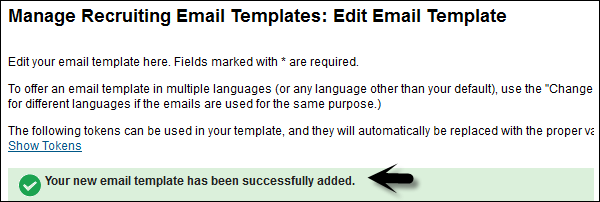
Step 5 − To save changes, scroll down and click Save Changes.

You will see the following page −
To see the template, go to Admin Center > Manage Recruiting Email Templates.
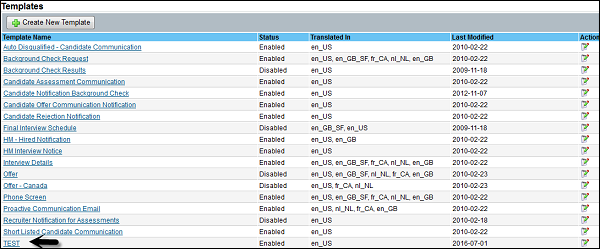
You can see Status, Translated language, last modified and action field. To edit a template, click Edit field under action.
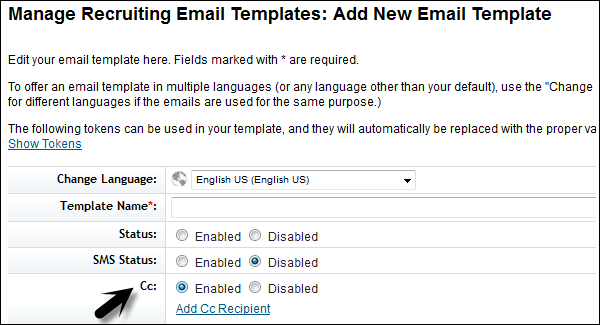
Cc/Bcc Settings
You can enable or disable to add Cc and Bcc users across all templates. When you enable Cc and Bcc option, you can add roles or specific users to the default Cc or Bcc line by editing the template.
You have the following three options as shown in the image given below −
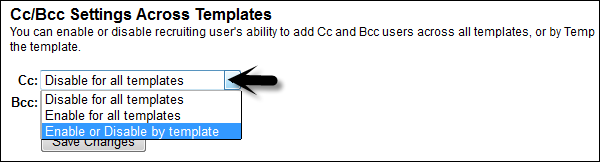
When you select enable or disable by template, click Save changes to apply.
When you create a new template, it will enable CC option in new template. You can add recipient email ID.
To see Template summary, go to Email Template summary.

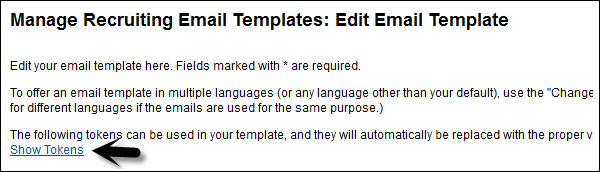
Show Token
You can use tokens in the body of an e-mail template. View the available tokens by clicking Show Tokens. To use token, copy and paste the token you need in the appropriate place in the e-mail body.
Example − To thank a candidate for applying, you may use Open an email template > Show Token.
You will see a list of tokens −
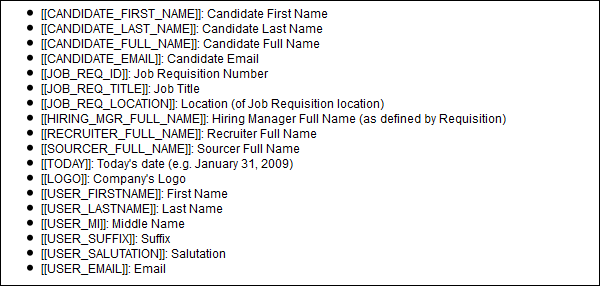
Output
Dear [[CANDIDATE_FIRST_NAME]], we have received your application for [[JOB_REQ_ID]], [[JOB_REQ_TITLE]] and are excited to review your qualifications against this position!
Recruiting Management Settings
You can set various recruitment settings, which are internal facing and external facing information about the company.
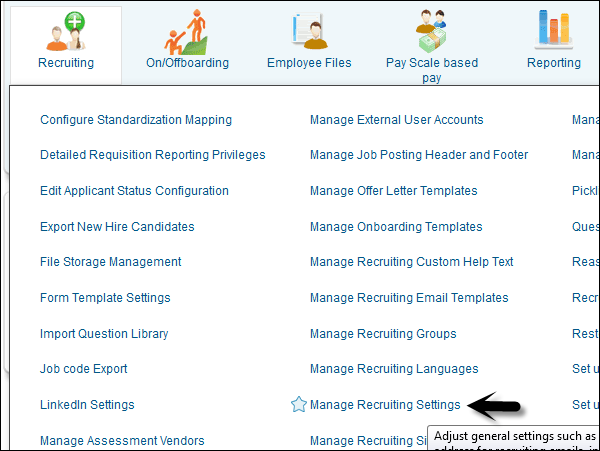
Step 1 − Go to Admin Center > Recruiting > Manage Recruiting Settings
Step 2 − You can set up Company Contact Information, return email address notification, applicant profile settings, interview center, offer approval, etc.
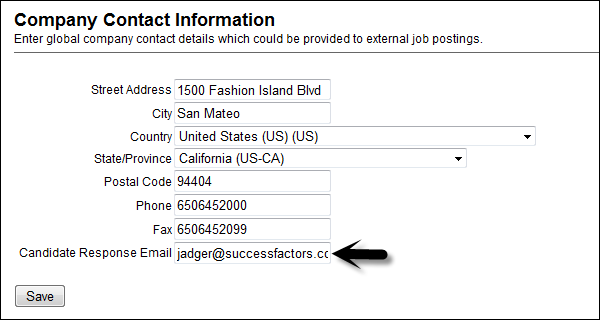
Step 3 − The Return Email Address Information section enables you to override the default company-email address. You can lock it down so only this email address will be displayed in the correspondence back to candidates. You can make it editable so recruiters can change it to their own email address.
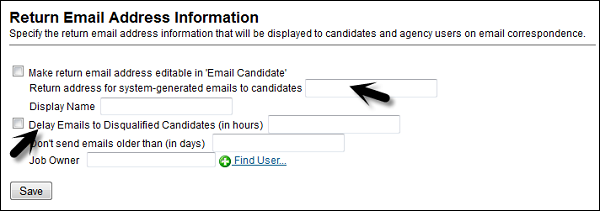
Step 4 − Recruiting Admin status can trigger an email to be sent to each candidate announcing this disqualification. To enable this option, select Delay Emails and enter a number (for hours). This prevents the candidates from learning exactly when they were disqualified.
The recommended setting is to delay over 20 hours and to stagger this to an odd number of hours - 21, 27, or 39 instead of using even number as it does not appear an automated message to candidates.
Step 5 − The Candidate Profile Settings section enables candidates to enter multiple lines of data such as previous work experience or educational history on their candidate profile. A candidates most recent work history is highlighted in the candidate profile.

Step 6 − With applicant Profile Settings, you can skip status in an application audit trail. SuccessFactors audit tracks every move that a candidate makes through the hiring process. If you want to leave a step, you can skip the process and it will appear as blank.
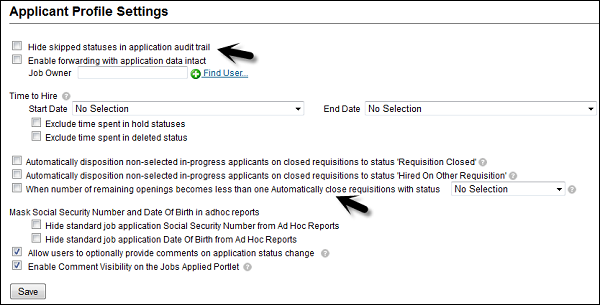
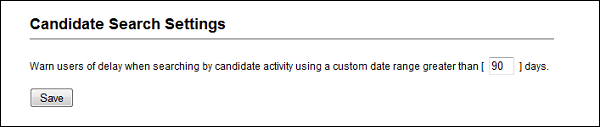
Step 7 − You can use Candidate Search Settings section as a system performance configuration. You can set a threshold based on your systems size and performance (30, 60, or 90 days) for candidate search. If a recruiter admin, tries to enter 120 days of data it will return only 90 days of data.
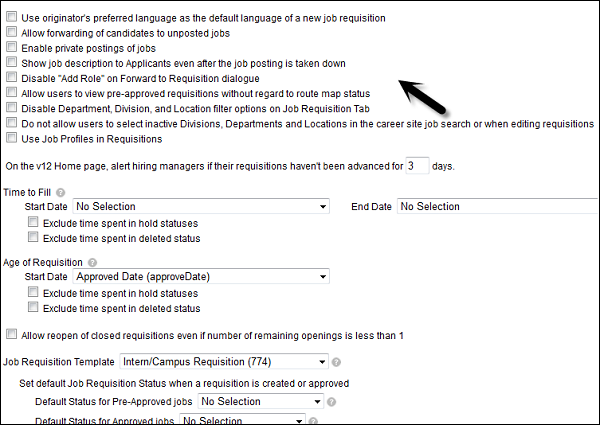
Step 8 − In the job-requisition section, various configurations and administration settings related to recruitment management process −
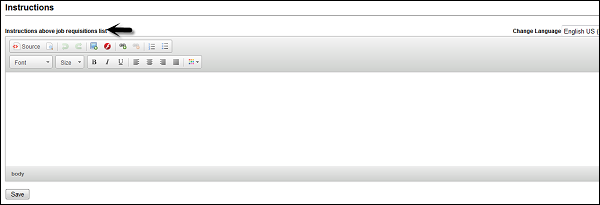
Step 9 − You have an instructions section at the end, which contains a text editor using which an admin can place a text on the top of job requirement.
Apart from these, various other settings are available under Recruitment management that an administrator can configure to manage recruitment management effectively.
