
Article Categories
- All Categories
-
 Data Structure
-
 Networking
-
 RDBMS
RDBMS
-
 Operating System
-
 Java
Java
-
 MS Excel
-
 iOS
iOS
-
 HTML
HTML
-
 CSS
CSS
-
 Android
-
 Python
-
 C Programming
-
 C++
C++
-
 C#
C#
-
 MongoDB
-
 MySQL
MySQL
-
 Javascript
-
 PHP
PHP
-
 Economics & Finance
Interfacing a speaker with Arduino
In this tutorial, we will interface a simple piezo-buzzer with Arduino to create beeping sounds. Such an arrangement can be used in applications like burglar alarms, or water level indicators or such similar projects.
Circuit Diagram
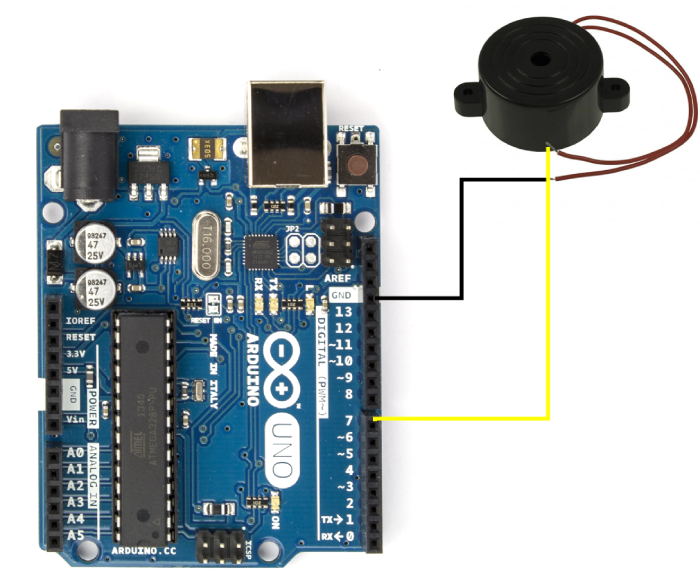
As you can see, the circuit diagram is quite straightforward. You need to connect the buzzer’s GND to Arduino’s GND, and the other wire to one GPIO of the Arduino (we have chosen pin 7). You can optionally add a small resistor (~100 Ohm), between the GPIO and the buzzer.
Code Walkthrough
The entire code is given below −
#define buzzerPin 7                // buzzer to arduino uno pin 7

void setup(){
   pinMode(buzzerPin, OUTPUT);    // Set buzzer - pin 9 as an output
}

void loop(){
   tone(buzzerPin, 2000);     // Send 2000Hz sound signal...
   delay(500);                // ...for 0.5 sec
   noTone(buzzerPin);         // Stop sound...
   delay(500);                // ...for 0.5 sec
}
As you can see, the code is pretty straightforward. We first define the buzzerPin
#define buzzerPin 7 //buzzer to arduino uno pin 7
In the Setup, we just initialize the pin as OUTPUT.
void setup(){
   pinMode(buzzerPin, OUTPUT); // Set buzzer - pin 9 as an output
}
In the loop, we use the tone() function to create a 2000 Hz tone on the buzzerPin for half a second, after which we stop the tone using the noTone() function, for another half second. This goes on in the loop and creates the beeping effect. You can read more about the tone() function here.
void loop(){
   tone(buzzerPin, 2000);          // Send 2000Hz sound signal...
   delay(500);                    // ...for 0.5 sec
   noTone(buzzerPin);             // Stop sound...
   delay(500);                   // ...for 0.5 sec
} 
1K+ Views
