 Data Structure
 Networking
 RDBMS
RDBMS Operating System
 Java
Java MS Excel
 iOS
iOS HTML
HTML CSS
CSS Android
 Python
 C Programming
 C++
C++ C#
C# MongoDB
 MySQL
MySQL Javascript
 PHP
PHP
- Selected Reading
- UPSC IAS Exams Notes
- Developer's Best Practices
- Questions and Answers
- Effective Resume Writing
- HR Interview Questions
- Computer Glossary
- Who is Who
Controlling a Servo Motor with Arduino
A servo motor has a shaft that can be, using coded signals, positioned to specific angular positions. Luckily for us, we won’t have to understand the coded signals required to rotate the shaft to a specific angle. The Arduino Servo library does it for us.
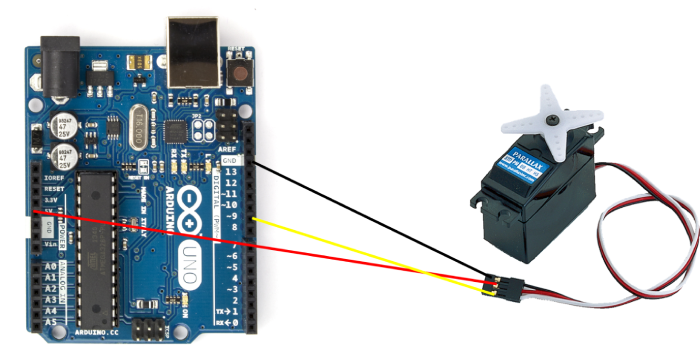
Circuit Diagram

As you can see, the Vcc of the Servo (typically red) is connected to 5V, GND (typically black) to GND, and the signal pin (white in the above image, typically white or yellow or orange) is connected to pin 9 of the Arduino.
Code Walkthrough
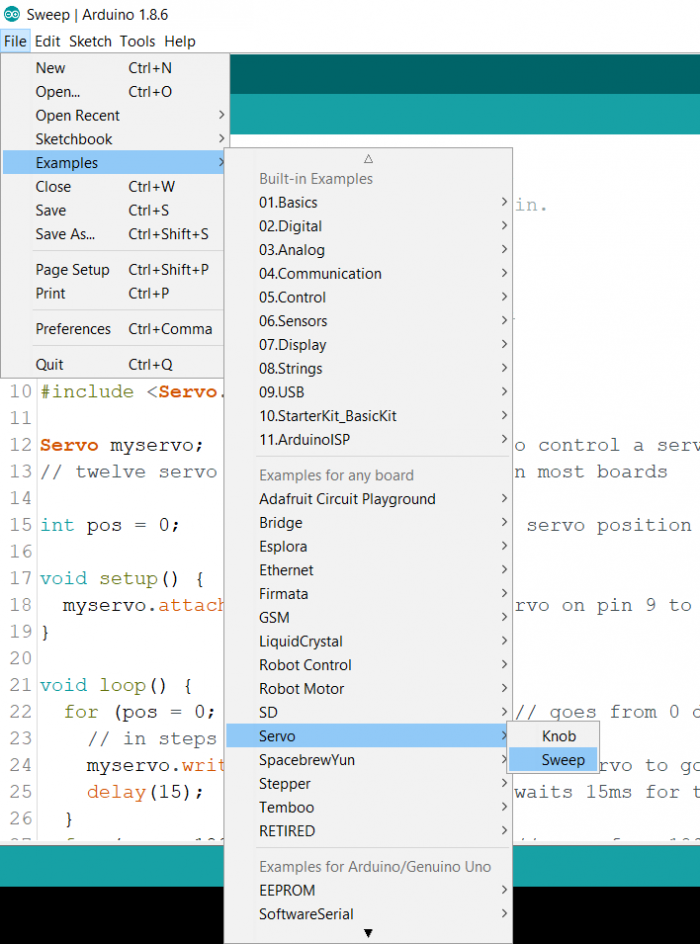
We will be walking through an example code that comes in with Arduino. Go to File → Examples → Servo → Sweep

As you can see, we begin with the inclusion of the Servo library and define the Servo object, and set a variable pos to 0.
#include <Servo.h>

Servo myservo; // create servo object to control a servo
// twelve servo objects can be created on most boards

int pos = 0;
Within the setup, we attach the servo’s signal pin to the servo object created. Here, since we have connected the signal pin to pin 9, we will specify 9 in the argument.
void setup() {
   myservo.attach(9); // attaches the servo on pin 9 to the servo object
}
In the loop, we vary the pos from 0 to 180, in steps of 1, and in each step, give the servo motor 15 ms to achieve that position.
Then, we repeat the same exercise, this time from 180 degrees to 0 degrees. This goes on in the loop.
void loop() {
   for (pos = 0; pos <= 180; pos += 1) {
      // goes from 0 degrees to 180 degrees in steps of 1 degree
      myservo.write(pos); // tell servo to go to position in variable 'pos'
      delay(15); // waits 15ms for the servo to reach the position
   }
   for (pos = 180; pos >= 0; pos -= 1) {
      // goes from 180 degrees to 0 degrees
      myservo.write(pos);       // tell servo to go to position in variable 'pos'
      delay(15);                // waits 15ms for the servo to reach the position
   }
}
