
Article Categories
- All Categories
-
 Data Structure
-
 Networking
-
 RDBMS
RDBMS
-
 Operating System
-
 Java
Java
-
 MS Excel
-
 iOS
iOS
-
 HTML
HTML
-
 CSS
CSS
-
 Android
-
 Python
-
 C Programming
-
 C++
C++
-
 C#
C#
-
 MongoDB
-
 MySQL
MySQL
-
 Javascript
-
 PHP
PHP
-
 Economics & Finance
Interfacing GNSS receiver with Arduino to get location
In this tutorial, we will interface Arduino with a GNSS Receiver and obtain the current location. Any GNSS receiver generally uses UART for communication. We will be using the ublox Neo6M GNSS module for this
Circuit Diagram
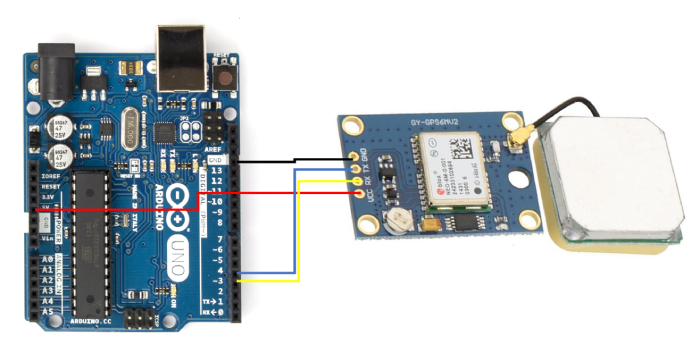
As you can see, we connect Vcc to 5V, GND to GND, RX of the Neo 6M to pin 3 of Arduino Uno, and TX of Neo 6M to pin 4 of Arduino Uno.
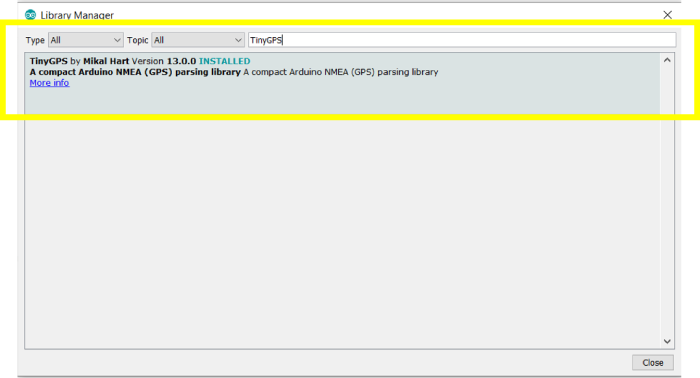
Required Libraries
TinyGPS library will be required for interfacing Arduino Uno with the OLED Display −
Go to Tools → Manage Libraries, search for this library, and click Install.
Code Walkthrough
We will walkthrough an example code that comes along with the TinyGPS library. Go to File → Examples → TinyGPS → simple_test to access the code.
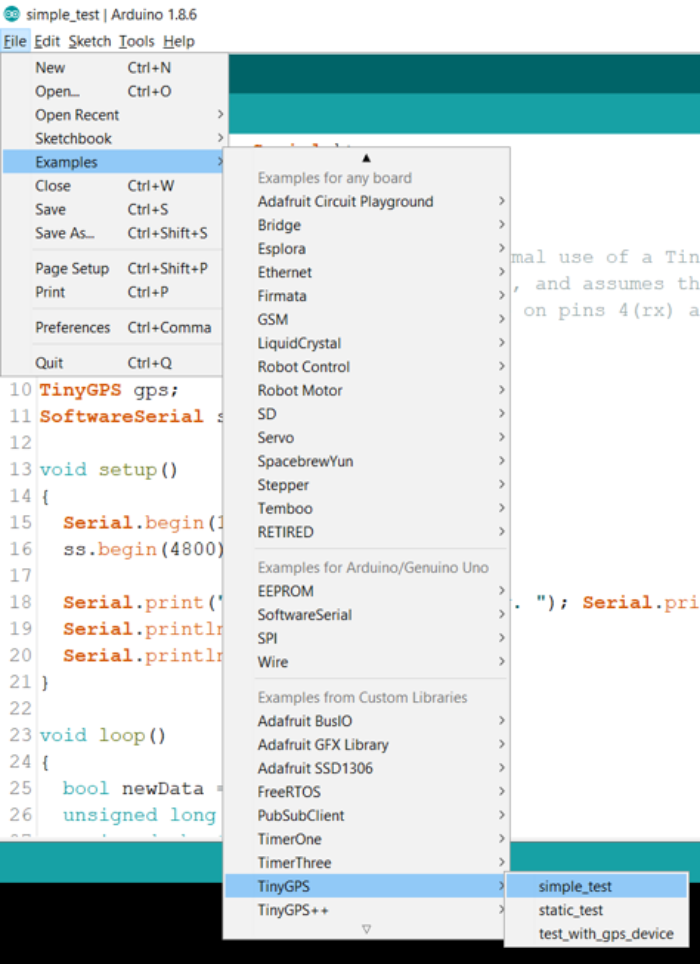
Alternatively, the code can be accessed on GitHub here − https://github.com/mikalhart/TinyGPS/blob/master/examples/simple_test/simple_test.ino
As you can see, we begin with the inclusion of the required libraries, SoftwareSerial and TinyGPS. SoftwareSerial is a library that enables Serial communication with any digital pin which is not a part of the Serial port. Here, we will use that library to enable serial communication with pins 3 and 4 of Arduino Uno.
#include −SoftwareSerial.h>

#include −TinyGPS.h>
Next, we define the TinyGPS object and the Software Serial object. For defining the software serial, we have to provide RX and TX pins as the arguments. Since pin 4 of the Arduino is connected to the TX of the Neo 6M module, pin 4 is the RX on the Arduino side, and similarly, pin 3 is the TX.
TinyGPS gps;
SoftwareSerial ss(4, 3);
Within Setup, we initialize Serial and also the Software Serial. In the example code, they have initialized the Software Serial with a baud rate of 4800. Please check the datasheet of your Neo 6M module, and if you require a higher baud rate, say 9600, make appropriate changes. Later, a couple of print statements are added, which include the version number of the library.
void setup()
{
   Serial.begin(115200);
   ss.begin(4800);

   Serial.print("Simple TinyGPS library v. ");
   Serial.println(TinyGPS::library_version());
   Serial.println("by Mikal Hart");
   Serial.println();
}
Let’s go through the loop carefully now. The loop begins with the definition of a few variables −
void loop()
{
   bool newData = false;
   unsigned long chars;
   unsigned short sentences, failed;
Next, there is a for loop which lasts exactly one second, wherein the data coming in from the software serial is parsed. The gps.encode() function takes in each byte coming in from the software serial and returns true when the data has been fully parsed and is ready to be used.
Therefore, when it returns true, we set newData to true.
   // For one second we parse GPS data and report some key values
   for (unsigned long start = millis(); millis() - start lt; 1000;)
   {
      while (ss.available())
      {
         char c = ss.read();
         // Serial.write(c); // uncomment this line if you want to see the GPS data flowing
         if (gps.encode(c)) // Did a new valid sentence come in?
            newData = true;
      }
   }
If newData is true, we use the f_get_position() function to get the latitude and longitude as floating point values, and also get the age of the data (how long ago it was gathered). We use the .satellites() function to get the number of satellites visible to the receiver, and the .hdop() function to get the horizontal dilution of precision. You can read more about hdop https://en.wikipedia.org/wiki/Dilution_of_precision_(navigation)#:~:text=DOP%20can%20be%20expressed%20as,position%20(3D)%20dilution%20of%20precision here.
At each print statement, we check if the INVALID flag is true, in which case we print 0, else we print the computed values.
if (newData)
   {
      float flat, flon;
      unsigned long age;
      gps.f_get_position(&flat, &flon, &age);
      Serial.print("LAT=");
      Serial.print(flat == TinyGPS::GPS_INVALID_F_ANGLE ? 0.0 : flat, 6);
      Serial.print(" LON=");
      Serial.print(flon == TinyGPS::GPS_INVALID_F_ANGLE ? 0.0 : flon, 6);
      Serial.print(" SAT=");
      Serial.print(gps.satellites() == TinyGPS::GPS_INVALID_SATELLITES ? 0 : gps.satellites());
      Serial.print(" PREC=");
      Serial.print(gps.hdop() == TinyGPS::GPS_INVALID_HDOP ? 0 : gps.hdop());
   }
Later, we use the .stats() function to calculate the number of characters, sentences received from the GNSS receiver, and the number of times the checksum calculation failed.
gps.stats(&chars, &sentences, &failed);
   Serial.print(" CHARS=");
   Serial.print(chars);
   Serial.print(" SENTENCES=");
   Serial.print(sentences);
   Serial.print(" CSUM ERR=");
   Serial.println(failed);
   if (chars == 0)
      Serial.println("** No characters received from GPS: check wiring **");
Please note that you may need to keep the receiver and its antenna near the window to get accurate position. Also note that the GNSS receivers generally have a cold start time of the order of 30-40 seconds. This means that it will take about 30-40 seconds post power ON to get a valid position fix.

1K+ Views
