 Data Structure
 Networking
 RDBMS
RDBMS Operating System
 Java
Java MS Excel
 iOS
iOS HTML
HTML CSS
CSS Android
 Python
 C Programming
 C++
C++ C#
C# MongoDB
 MySQL
MySQL Javascript
 PHP
PHP
- Selected Reading
- UPSC IAS Exams Notes
- Developer's Best Practices
- Questions and Answers
- Effective Resume Writing
- HR Interview Questions
- Computer Glossary
- Who is Who
How to Create Monthly or Yearly Calendar in Excel
Excel is an effective programme that can be used for many things, including creating calendars. Excel offers a flexible and adjustable platform to construct calendars adapted to your unique needs, whether you want to manage your personal schedule, keep track of significant events, or arrange your business activities. We'll walk you through the process of using Excel to create monthly and yearly calendars step-by-step in this article. We'll go over the core methods and components needed to create a calendar that is both useful and aesthetically pleasing. No prior Excel experience is necessary because we will walk you through each step in simple terms.
You will be able to create your own customised calendars by the end of this tutorial, including necessary details like dates, weekdays, and holidays. Additionally, you will discover how to format and personalise the look of your calendars, enabling you to give them a unique touch and improve their aesthetic appeal. So let's get started and explore Excel's capacity to build dynamic, interactive, and useful calendars that will keep you organised and aware of your essential activities all year long.
Creating Monthly/Yearly Calendar in Excel
Here we will first create a VBA module, then run it and specify the month and year to complete the task. So let us see a simple process to learn how you can create a monthly or yearly calendar in Excel.
Step 1
Consider any Excel sheet.
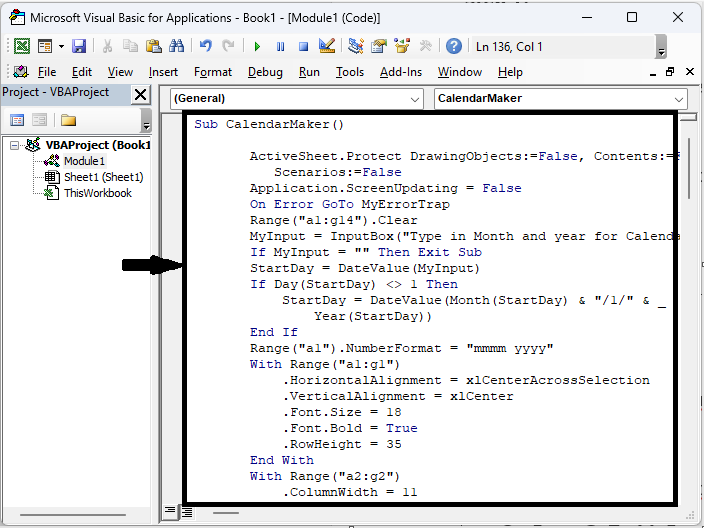
First, right-click on the sheet name and select View code to open the VBA application.
Step 2
Then click on Insert, select Module, and copy the below code into the text box.
Insert > Module > Copy.
Example
Sub CalendarMaker()

   ActiveSheet.Protect DrawingObjects:=False, Contents:=False, _
   Scenarios:=False
   Application.ScreenUpdating = False
   On Error GoTo MyErrorTrap
   Range("a1:g14").Clear
   MyInput = InputBox("Type in Month and year for Calendar ")
   If MyInput = "" Then Exit Sub
   StartDay = DateValue(MyInput)
   If Day(StartDay) <> 1 Then
      StartDay = DateValue(Month(StartDay) & "/1/" & _
         Year(StartDay))
      End If
      Range("a1").NumberFormat = "mmmm yyyy"
      With Range("a1:g1")
         .HorizontalAlignment = xlCenterAcrossSelection
         .VerticalAlignment = xlCenter
         .Font.Size = 18
         .Font.Bold = True
         .RowHeight = 35
      End With
      With Range("a2:g2")
         .ColumnWidth = 11
         .VerticalAlignment = xlCenter
         .HorizontalAlignment = xlCenter
         .VerticalAlignment = xlCenter
         .Orientation = xlHorizontal
         .Font.Size = 12
         .Font.Bold = True
         .RowHeight = 20
      End With
      Range("a2") = "Sunday"
      Range("b2") = "Monday"
      Range("c2") = "Tuesday"
      Range("d2") = "Wednesday"
      Range("e2") = "Thursday"
      Range("f2") = "Friday"
      Range("g2") = "Saturday"
      With Range("a3:g8")
         .HorizontalAlignment = xlRight
         .VerticalAlignment = xlTop
         .Font.Size = 18
         .Font.Bold = True
         .RowHeight = 21
      End With
      Range("a1").Value = Application.Text(MyInput, "mmmm yyyy")
      DayofWeek = WeekDay(StartDay)
      CurYear = Year(StartDay)
      CurMonth = Month(StartDay)
      FinalDay = DateSerial(CurYear, CurMonth + 1, 1)
      Select Case DayofWeek
         Case 1
            Range("a3").Value = 1
         Case 2
            Range("b3").Value = 1
         Case 3
            Range("c3").Value = 1
         Case 4
            Range("d3").Value = 1
         Case 5
            Range("e3").Value = 1
         Case 6
            Range("f3").Value = 1
         Case 7
            Range("g3").Value = 1
      End Select
      For Each cell In Range("a3:g8")
         RowCell = cell.Row
         ColCell = cell.Column
         If cell.Column = 1 And cell.Row = 3 Then
         ElseIf cell.Column <> 1 Then
            If cell.Offset(0, -1).Value >= 1 Then
               cell.Value = cell.Offset(0, -1).Value + 1
               If cell.Value > (FinalDay - StartDay) Then
                  cell.Value = ""
                  Exit For
                  End If
               End If
         ElseIf cell.Row > 3 And cell.Column = 1 Then
            cell.Value = cell.Offset(-1, 6).Value + 1
            ' Stop when the last day of the month has been entered.
            If cell.Value > (FinalDay - StartDay) Then
               cell.Value = ""
               Exit For
               End If
         End If
      Next

      For x = 0 To 5
         Range("A4").Offset(x * 2, 0).EntireRow.Insert
         With Range("A4:G4").Offset(x * 2, 0)
            .RowHeight = 65
            .HorizontalAlignment = xlCenter
            .VerticalAlignment = xlTop
            .WrapText = True
            .Font.Size = 10
            .Font.Bold = False
            .Locked = False
         End With
         ' Put border around the block of dates.
         With Range("A3").Offset(x * 2, 0).Resize(2, _
         7).Borders(xlLeft)
            .Weight = xlThick
            .ColorIndex = xlAutomatic
         End With

         With Range("A3").Offset(x * 2, 0).Resize(2, _
         7).Borders(xlRight)
            .Weight = xlThick
            .ColorIndex = xlAutomatic
         End With
         Range("A3").Offset(x * 2, 0).Resize(2, 7).BorderAround _
            Weight:=xlThick, ColorIndex:=xlAutomatic
      Next
      If Range("A13").Value = "" Then Range("A13").Offset(0, 0) _
         .Resize(2, 8).EntireRow.Delete
      ActiveWindow.DisplayGridlines = False
      ActiveSheet.Protect DrawingObjects:=True, Contents:=True, _
          Scenarios:=True

      ActiveWindow.WindowState = xlMaximized
      ActiveWindow.ScrollRow = 1
      Application.ScreenUpdating = True
      Exit Sub
   MyErrorTrap:
      MsgBox "You may not have entered your Month and Year correctly." _
      & Chr(13) & "Spell the Month correctly" _
      & " (or use 3 letter abbreviation)" _
      & Chr(13) & "and 4 digits for the Year"
      MyInput = InputBox("Type in Month and year for Calendar")
      If MyInput = "" Then Exit Sub
      Resume
   End Sub

Step 3
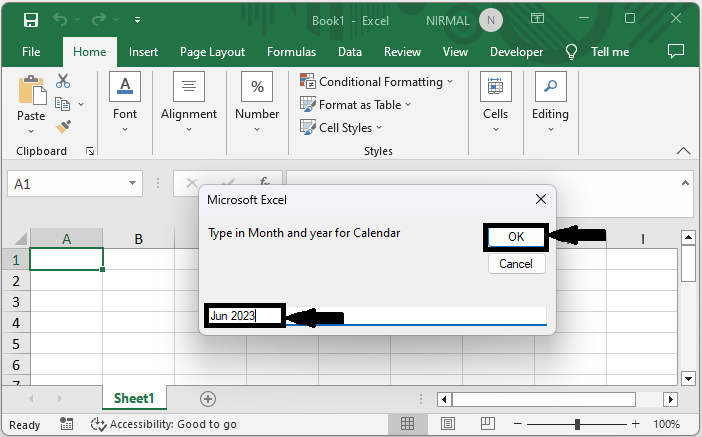
Then click F5 to run the module, specify the month and year, and click Ok to complete the task.
F5 > Month and Year > Ok.

Conclusion
In this tutorial, we have used a simple example to demonstrate how you can create a monthly or yearly calendar in Excel to highlight a particular set of data.

