
Article Categories
- All Categories
-
 Data Structure
-
 Networking
-
 RDBMS
RDBMS
-
 Operating System
-
 Java
Java
-
 MS Excel
-
 iOS
iOS
-
 HTML
HTML
-
 CSS
CSS
-
 Android
-
 Python
-
 C Programming
-
 C++
C++
-
 C#
C#
-
 MongoDB
-
 MySQL
MySQL
-
 Javascript
-
 PHP
PHP
-
 Economics & Finance
How to Create a Calendar in Excel?
Calendars are crucial tools for planning our days, keeping track of events, and efficiently managing our time. Excel offers a flexible design environment for creating unique calendars that suit your own requirements. This tutorial will walk you through the process step-by-step whether you want to make a monthly, annual, or even a custom calendar.
In this article, we'll look at Excel tricks and features that let you create an effective and aesthetically pleasing calendar. You don't need to be an Excel expert to follow along because we'll start with the fundamentals and work our way up to more complex ideas.
Create a Calendar
Here we will first create a VBA module, then enter the month and year to get the calendar. So let us see a simple process to learn how you can create a calendar in Excel.
Step 1
Consider any Excel workbook.
First, right-click on the sheet name and select View code to open the VBA application.
Right-click > View Code.
Step 2
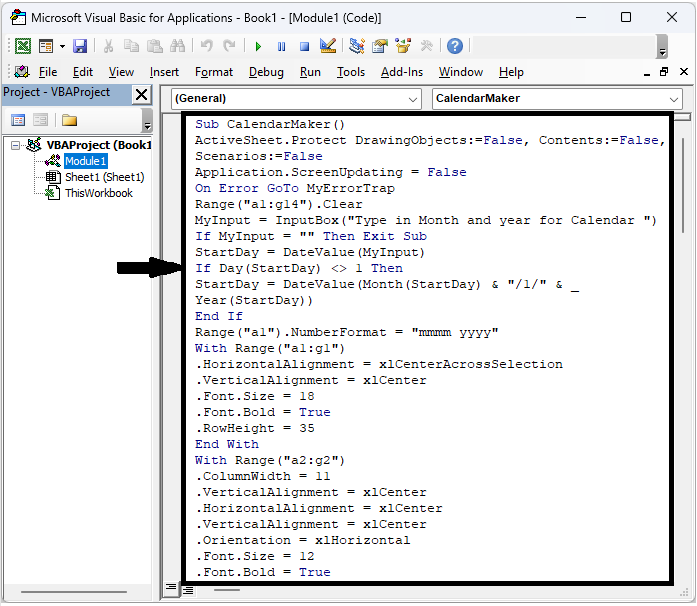
Then click on Insert, select Module, and copy the below code into the text box.
Insert > Module > Copy.
Code
Sub CalendarMaker()
ActiveSheet.Protect DrawingObjects:=False, Contents:=False, _
Scenarios:=False
Application.ScreenUpdating = False
On Error GoTo MyErrorTrap
Range("a1:g14").Clear
MyInput = InputBox("Type in Month and year for Calendar ")
If MyInput = "" Then Exit Sub
StartDay = DateValue(MyInput)
If Day(StartDay) <> 1 Then
StartDay = DateValue(Month(StartDay) & "/1/" & _
Year(StartDay))
End If
Range("a1").NumberFormat = "mmmm yyyy"
With Range("a1:g1")
.HorizontalAlignment = xlCenterAcrossSelection
.VerticalAlignment = xlCenter
.Font.Size = 18
.Font.Bold = True
.RowHeight = 35
End With
With Range("a2:g2")
.ColumnWidth = 11
.VerticalAlignment = xlCenter
.HorizontalAlignment = xlCenter
.VerticalAlignment = xlCenter
.Orientation = xlHorizontal
.Font.Size = 12
.Font.Bold = True
.RowHeight = 20
End With
Range("a2") = "Sunday"
Range("b2") = "Monday"
Range("c2") = "Tuesday"
Range("d2") = "Wednesday"
Range("e2") = "Thursday"
Range("f2") = "Friday"
Range("g2") = "Saturday"
With Range("a3:g8")
.HorizontalAlignment = xlRight
.VerticalAlignment = xlTop
.Font.Size = 18
.Font.Bold = True
.RowHeight = 21
End With
Range("a1").Value = Application.Text(MyInput, "mmmm yyyy")
DayofWeek = Weekday(StartDay)
CurYear = Year(StartDay)
CurMonth = Month(StartDay)
FinalDay = DateSerial(CurYear, CurMonth + 1, 1)
Select Case DayofWeek
Case 1
Range("a3").Value = 1
Case 2
Range("b3").Value = 1
Case 3
Range("c3").Value = 1
Case 4
Range("d3").Value = 1
Case 5
Range("e3").Value = 1
Case 6
Range("f3").Value = 1
Case 7
Range("g3").Value = 1
End Select
For Each cell In Range("a3:g8")
RowCell = cell.Row
ColCell = cell.Column
If cell.Column = 1 And cell.Row = 3 Then
ElseIf cell.Column <> 1 Then
If cell.Offset(0, -1).Value >= 1 Then
cell.Value = cell.Offset(0, -1).Value + 1
If cell.Value > (FinalDay - StartDay) Then
cell.Value = ""
Exit For
End If
End If
ElseIf cell.Row > 3 And cell.Column = 1 Then
cell.Value = cell.Offset(-1, 6).Value + 1
If cell.Value > (FinalDay - StartDay) Then
cell.Value = ""
Exit For
End If
End If
Next
For x = 0 To 5
Range("A4").Offset(x * 2, 0).EntireRow.Insert
With Range("A4:G4").Offset(x * 2, 0)
.RowHeight = 65
.HorizontalAlignment = xlCenter
.VerticalAlignment = xlTop
.WrapText = True
.Font.Size = 10
.Font.Bold = False
.Locked = False
End With
With Range("A3").Offset(x * 2, 0).Resize(2, _
7).Borders(xlLeft)
.Weight = xlThick
.ColorIndex = xlAutomatic
End With
With Range("A3").Offset(x * 2, 0).Resize(2, _
7).Borders(xlRight)
.Weight = xlThick
.ColorIndex = xlAutomatic
End With
Range("A3").Offset(x * 2, 0).Resize(2, 7).BorderAround _
Weight:=xlThick, ColorIndex:=xlAutomatic
Next
If Range("A13").Value = "" Then Range("A13").Offset(0, 0) _
.Resize(2, 8).EntireRow.Delete
ActiveWindow.DisplayGridlines = False
ActiveSheet.Protect DrawingObjects:=True, Contents:=True, _
Scenarios:=True
ActiveWindow.WindowState = xlMaximized
ActiveWindow.ScrollRow = 1
Application.ScreenUpdating = True
Exit Sub
MyErrorTrap:
MsgBox "You may not have entered your Month and Year correctly." _
& Chr(13) & "Spell the Month correctly" _
& " (or use 3 letter abbreviation)" _
& Chr(13) & "and 4 digits for the Year"
MyInput = InputBox("Type in Month and year for Calendar")
If MyInput = "" Then Exit Sub
Resume
End Sub
Step 3
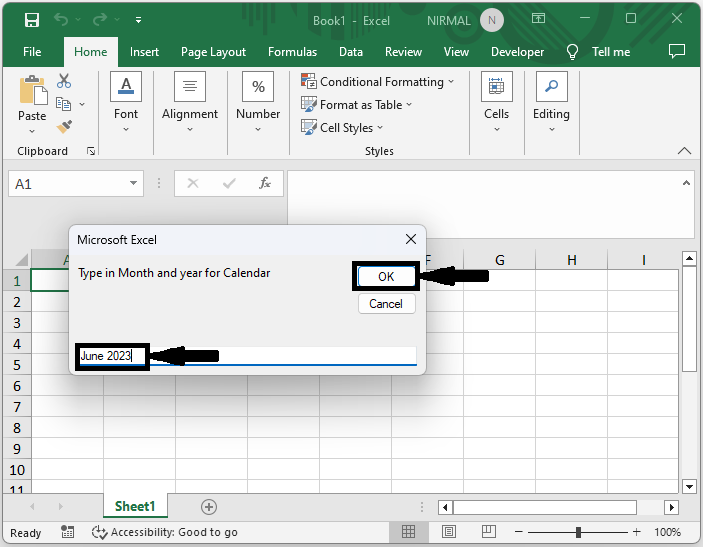
Then click F5 to run the module. Then enter the month and year and click OK to get the calendar.
F5 > Month And Year > Ok.
This is how you can create a calendar in Excel.
Conclusion
In this tutorial, we have used a simple example to demonstrate how you can create a calendar in Excel to highlight a particular set of data.

393 Views
