- Entity Framework - Home
- Entity Framework - Overview
- Entity Framework - Architecture
- Entity F - Environment Setup
- Entity Framework - Database Setup
- Entity Framework - Data Model
- Entity Framework - DbContext
- Entity Framework - Types
- Entity Framework - Relationships
- Entity Framework - Lifecycle
- Entity F - Code First Approach
- Entity F - Model First Approach
- Entity F - Database First Approach
- Entity Framework - DEV Approaches
- Entity F - Database Operations
- Entity Framework - Concurrency
- Entity Framework - Transaction
- Entity Framework - Views
- Entity Framework - Index
- Entity F - Stored Procedures
- Entity F - Disconnected Entities
- Entity F - Table-Valued Function
- Entity Framework - Native SQL
- Entity Framework - Enum Support
- Entity F - Asynchronous Query
- Entity Framework - Persistence
- Entity F - Projection Queries
- Entity F - Command Logging
- Entity F - Command Interception
- Entity Framework - Spatial Data Type
- Entity Framework - Inheritance
- Entity Framework - Migration
- Entity Framework - Eager Loading
- Entity Framework - Lazy Loading
- Entity Framework - Explicit Loading
- Entity Framework - Validation
- Entity Framework - Track Changes
- Entity Framework - Colored Entities
- Entity F - Code First Approach
- Entity Framework - First Example
- Entity Framework - Data Annotations
- Entity Framework - Fluent API
- Entity Framework - Seed Database
- Entity F - Code First Migration
- Entity F - Multiple DbContext
- Entity F - Nested Entity Types
- Entity Framework - Quick Guide
- Entity Framework - Useful Resources
- Entity Framework - Bulk Extensions
- Entity Framework - Discussion
Entity Framework - Quick Guide
Entity Framework - Overview
What is Entity Framework?
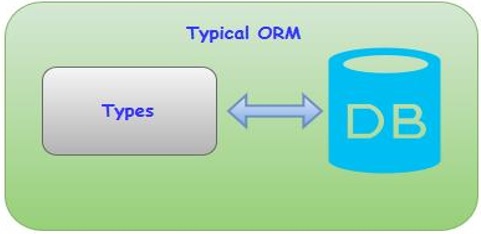
Entity Framework was first released in 2008, Microsoft's primary means of interacting between .NET applications and relational databases. Entity Framework is an Object Relational Mapper (ORM) which is a type of tool that simplifies mapping between objects in your software to the tables and columns of a relational database.
Entity Framework (EF) is an open source ORM framework for ADO.NET which is a part of .NET Framework.
An ORM takes care of creating database connections and executing commands, as well as taking query results and automatically materializing those results as your application objects.
An ORM also helps to keep track of changes to those objects, and when instructed, it will also persist those changes back to the database for you.
Why Entity Framework?
Entity Framework is an ORM and ORMs are aimed to increase the developers productivity by reducing the redundant task of persisting the data used in the applications.
Entity Framework can generate the necessary database commands for reading or writing data in the database and execute them for you.
If you're querying, you can express your queries against your domain objects using LINQ to entities.
Entity Framework will execute the relevant query in the database and then materialize results into instances of your domain objects for you to work within your app.
There are other ORMs in the marketplace such as NHibernate and LLBLGen Pro. Most ORMs typically map domain types directly to the database schema.
Entity Framework has a more granular mapping layer so you can customize mappings, for example, by mapping the single entity to multiple database tables or even multiple entities to a single table.
Entity Framework is Microsoft's recommended data access technology for new applications.
ADO.NET seems to refer directly to the technology for data sets and data tables.
Entity Framework is where all of the forward moving investment is being made, which has been the case for a number of years already.
Microsoft recommends that you use Entity Framework over ADO.NET or LINQ to SQL for all new development.
Conceptual Model
For developers who are used to database focused development, the biggest shift with Entity Framework is that it lets you focus on your business domain. What it is that you want your application to do without being limited by what the database is able to do?
With Entity Framework, the focal point is referred to as a conceptual model. It's a model of the objects in your application, not a model of the database you use to persist your application data.
Your conceptual model may happen to align with your database schema or it may be quite different.
You can use a Visual Designer to define your conceptual model, which can then generate the classes you will ultimately use in your application.
You can just define your classes and use a feature of Entity Framework called Code First. And then Entity Framework will comprehend the conceptual model.
Either way, Entity Framework works out how to move from your conceptual model to your database. So, you can query against your conceptual model objects and work directly with them.
Features
Following are the basic features of Entity Framework. This list is created based on the most notable features and also from frequently asked questions about Entity Framework.
- Entity Framework is a Microsoft tool.
- Entity Framework is being developed as an Open Source product.
- Entity Framework is no longer tied or dependent to the .NET release cycle.
- Works with any relational database with valid Entity Framework provider.
- SQL command generation from LINQ to Entities.
- Entity Framework will create parameterized queries.
- Tracks changes to in-memory objects.
- Allows to insert, update and delete command generation.
- Works with a visual model or with your own classes.
- Entity Framework has stored Procedure Support.
Entity Framework - Architecture
The architecture of Entity Framework, from the bottom up, consists of the following −
Data Providers
These are source specific providers, which abstract the ADO.NET interfaces to connect to the database when programming against the conceptual schema.
It translates the common SQL languages such as LINQ via command tree to native SQL expression and executes it against the specific DBMS system.
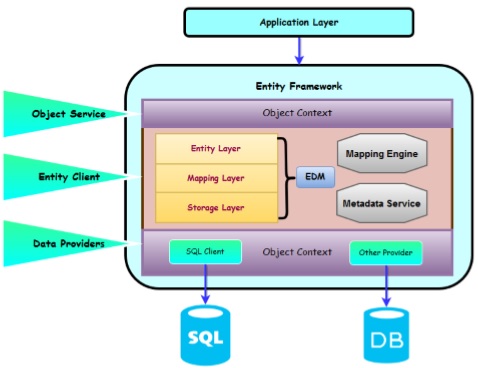
Entity Client
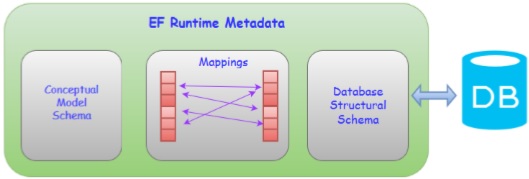
This layer exposes the entity layer to the upper layer. Entity client provides the ability for developers to work against entities in the form of rows and columns using entity SQL queries without the need to generate classes to represent conceptual schema. Entity Client shows the entity framework layers, which are the core functionality. These layers are called as Entity Data Model.
The Storage Layer contains the entire database schema in XML format.
The Entity Layer which is also an XML file defines the entities and relationships.
The Mapping layer is an XML file that maps the entities and relationships defined at conceptual layer with actual relationships and tables defined at logical layer.
The Metadata services which is also represented in Entity Client provides centralized API to access metadata stored Entity, Mapping and Storage layers.
Object Service
Object Services layer is the Object Context, which represents the session of interaction between the applications and the data source.
The main use of the Object Context is to perform different operations like add, delete instances of entities and to save the changed state back to the database with the help of queries.
It is the ORM layer of Entity Framework, which represents the data result to the object instances of entities.
This services allow developer to use some of the rich ORM features like primary key mapping, change tracking, etc. by writing queries using LINQ and Entity SQL.
Entity Framework - Environment Setup
Whats New in Entity Framework 6?
Framework has a complex API that lets you have granular control over everything from its modeling to its runtime behavior. Part of Entity Framework 5 lives inside of .NET. And another part of it lives inside of an additional assembly that's distributed using NuGet.
The core functionality of Entity Framework is built into the .NET Framework.
The Code First support, that's what lets Entity Framework use classes in lieu of a visual model, and a lighter way API for interacting with EF are in the NuGet package.
The core is what provides the querying, change tracking and all of the transformation from your queries to SQL queries as well as from data return into the objects.
You can use the EF 5 NuGet package with both .NET 4 and with .NET 4.5.
One big point of confusion - .NET 4.5 added support for enums and spatial data to the core Entity Framework APIs, which means if you're using EF 5 with .NET 4, you won't get these new features. You'll only get them when combining EF5 with .NET 4.5.
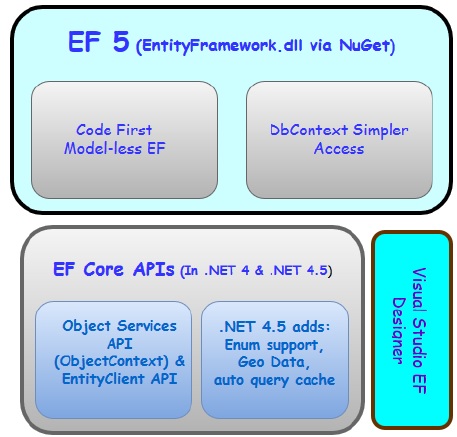
Let us now take a look at Entity Framework 6. The core APIs which were inside of .NET in Entity Framework 6 are now a part of NuGet package.

It means −
All of the Entity Framework lives insides this assembly that's distributed by NuGet
You won't be dependent on .NET to provide specific features like the Entity Framework enum support and special data support.
You'll see that one of the features of EF6 is that it supports enums and spatial data for .NET 4
To start working on Entity Framework you need to install the following development tools −
- Visual Studio 2013 or above
- SQL Server 2012 or above
- Entity Framework updates from NuGet Package
Microsoft provides a free version of visual studio which also contains SQL Server and it can be downloaded from www.visualstudio.com.
Installation
Step 1 − Once downloading is complete, run the installer. The following dialog will be displayed.
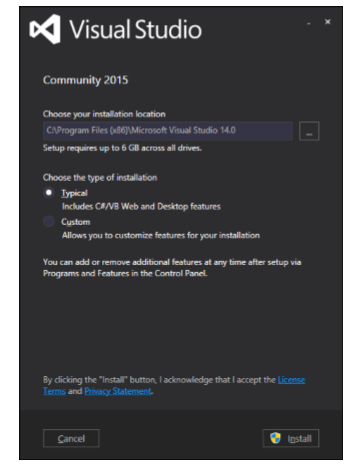
Step 2 − Click on the Install button and it will start the installation process.

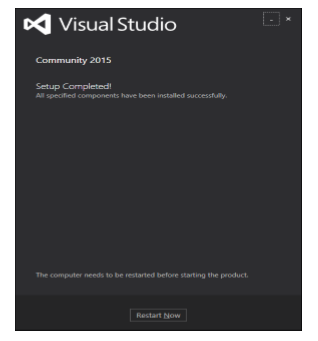
Step 3 − Once the installation process is completed successfully, you will see the following dialog. Close this dialog and restart your computer if required.
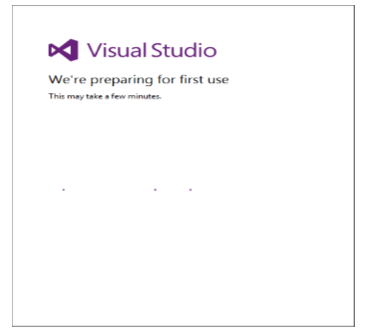
Step 4 − Open Visual Studio from start Menu which will open the following dialog. It will be a while for the first time for preparation.
Step 5 − Once all is done you will see the main window of Visual studio.
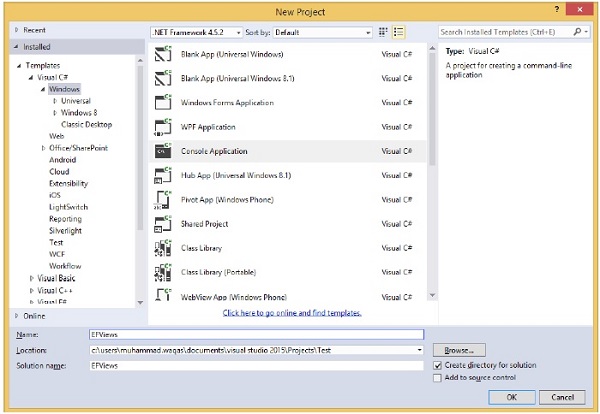
Lets create a new project from File → New → Project
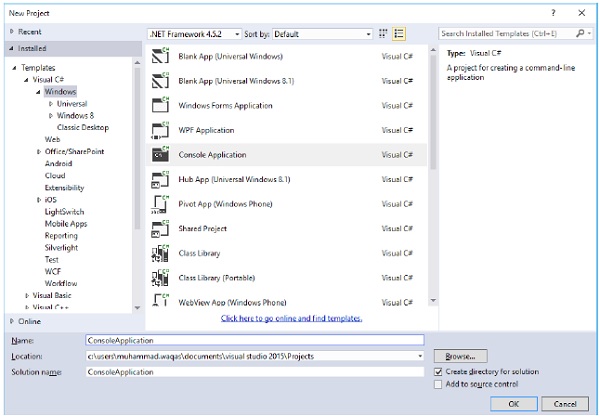
Step 1 − Select Console Application and click OK button.
Step 2 − In solution Explorer, right-click on your project.
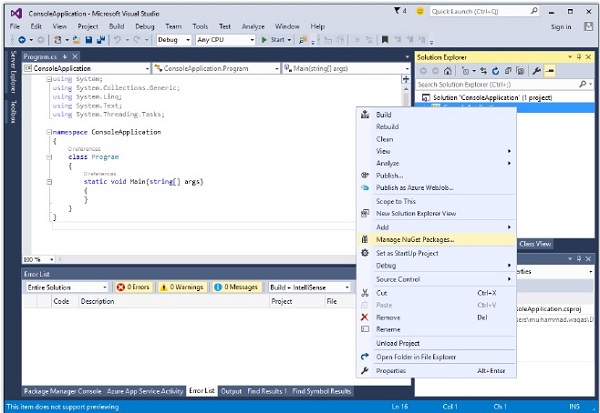
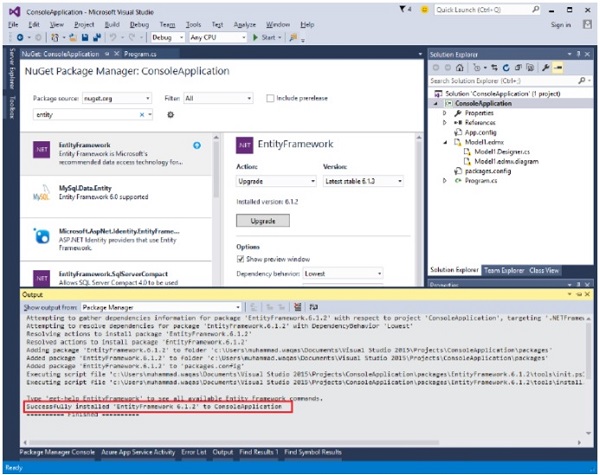
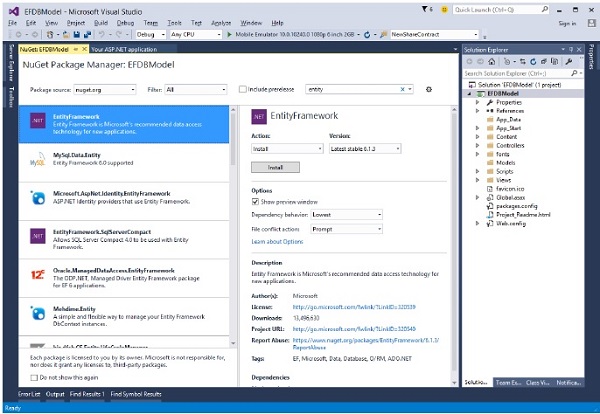
Step 3 − Select Manage NuGet Packages as shown in the above image, which will open the following window in Visual Studio.
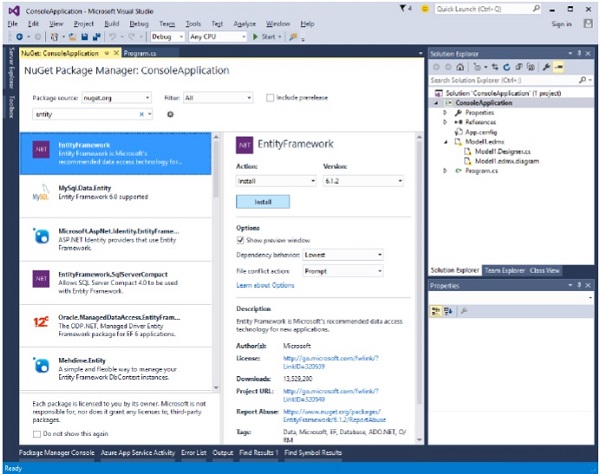
Step 4 − Search for Entity Framework and install the latest version by pressing the install button.
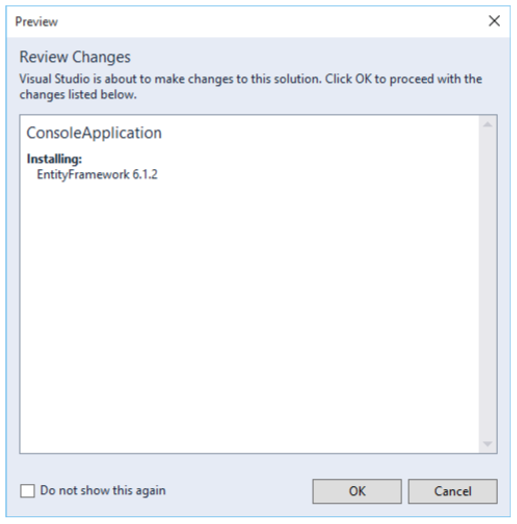
Step 5 − Click Ok. Once installation is done, you will see the following message in your output Window.
You are now ready to start your application.
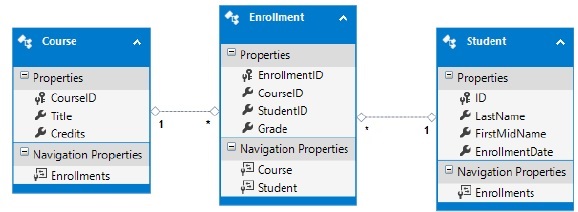
Entity Framework - Database Setup
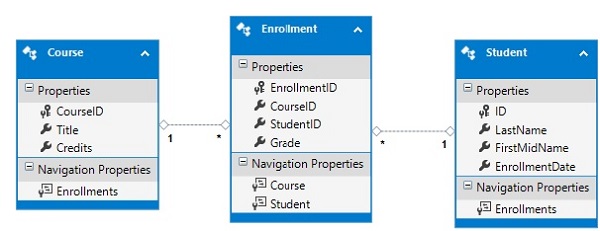
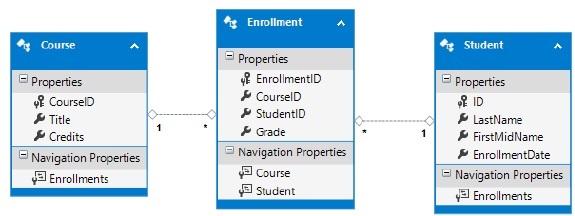
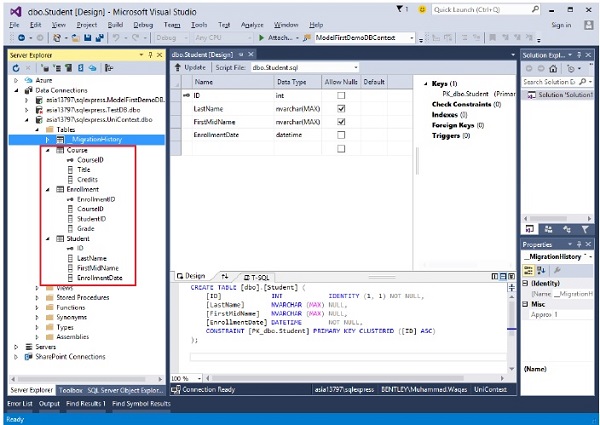
In this tutorial, we will be using a simple University database. A University database can be much more complex as a whole but for demo and learning purpose, we are using the simplest form of this database. The following diagram contains three tables.
- Student
- Course
- Enrollment
Whenever a term database is used one thing comes directly to our mind and that is different kind of tables which has some sort of relationship. There are three types of relationships between tables and the relationship between different tables depends on how the related columns are defined.
- One-to-Many Relationship
- Many-to-Many Relationship
- One-to-One Relationship
One-to-Many Relationship
One-to-many relationship is the most common type of relationship. In this type of relationship, a row in table A can have many matching rows in table B, but a row in table B can have only one matching row in table A. For example, in the above diagram, Student and Enrollment table have one-to-many relationship, each student may have many enrollments, but each enrollment belongs to only one student.
Many-to-Many Relationship
In a many-to-many relationship, a row in table A can have many matching rows in table B, and vice versa. You create such a relationship by defining a third table, called a junction table, whose primary key consists of the foreign keys from both table A and table B. For example, Student and Course table have many-to-many relationship that is defined by a one-to-many relationship from each of these tables to the Enrollment table.
One-to-One Relationship
In one-to-one relationship, a row in table A can have no more than one matching row in table B, and vice versa. A one-to-one relationship is created if both of the related columns are primary keys or have unique constraints.
This type of relationship is not common because most information related in this way would be all-in-one table. You might use a one-to-one relationship to −
- Divide a table with many columns.
- Isolate part of a table for security reasons.
- Store data that is short-lived and could be easily deleted by simply deleting the table.
- Store information that applies only to a subset of the main table.
Entity Framework - Data Model
The Entity Data Model (EDM) is an extended version of the Entity-Relationship model which specifies the conceptual model of the data using various modelling technique. It also refers to a set of concepts that describe data structure, regardless of its stored form.
EDM supports a set of primitive data types that define properties in a conceptual model. We need to consider 3 core parts which form the basis for Entity Framework and collectively it is known as Entity Data Model. Following are the three core parts of EDM.
- The Storage Schema Model
- The Conceptual Model
- The Mapping Model
The Storage Schema Model
The Storage Model also called as Storage Schema Definition Layer (SSDL) represents the schematic representation of the backend data store.
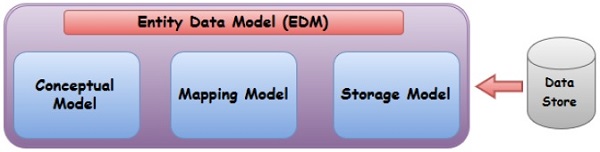
The Conceptual Model
The Conceptual Model also called as Conceptual Schema Definition Layer (CSDL) is the real entity model, against which we write our queries.
The Mapping Model
Mapping Layer is just a mapping between the Conceptual model and the Storage model.
The logical schema and its mapping with the physical schema is represented as an EDM.
Visual Studio also provides Entity Designer, for visual creation of the EDM and the mapping specification.
The output of the tool is the XML file (*.edmx) specifying the schema and the mapping.
Edmx file contains Entity Framework metadata artifacts.
Schema Definition Language
ADO.NET Entity Framework uses an XML based Data Definition Language called Schema Definition Language (SDL) to define the EDM Schema.
The SDL defines the Simple Types similar to other primitive types, including String, Int32, Double, Decimal, and DateTime, among others.
An Enumeration, which defines a map of primitive values and names, is also considered a simple type.
Enumerations are supported from framework version 5.0 onwards only.
Complex Types are created from an aggregation of other types. A collection of properties of these types define an Entity Type.
The data model primarily has three key concepts to describe data structure −
- Entity type
- Association type
- Property
Entity Type
The entity type is the fundamental building block for describing the structure of data in EDM.
In a conceptual model, entity types are constructed from properties and describe the structure of top-level concepts, such as a Students and Enrollments in a business application.
An entity represents a specific object such as a specific Student or Enrollment.
Each entity must have a unique entity key within an entity set. An entity set is a collection of instances of a specific entity type. Entity sets (and association sets) are logically grouped in an entity container.
Inheritance is supported with entity types, that is, one entity type can be derived from another.
Association Type
It is another fundamental building block for describing relationships in EDM. In a conceptual model, an association represents a relationship between two entity types such as Student and Enrollment.
Every association has two association ends that specify the entity types involved in the association.
Each association end also specifies an association end multiplicity that indicates the number of entities that can be at that end of the association.
An association end multiplicity can have a value of one (1), zero or one (0..1), or many (*).
Entities at one end of an association can be accessed through navigation properties, or through foreign keys if they are exposed on an entity type.
Property
Entity types contain properties that define their structure and characteristics. For example, a Student entity type may have properties such as Student Id, Name etc.
A property can contain primitive data (such as a string, an integer, or a Boolean value), or structured data (such as a complex type).
Entity Framework - DbContext
The Entity Framework enables you to query, insert, update, and delete data, using Common Language Runtime (CLR) objects which is known as entities. The Entity Framework maps the entities and relationships that are defined in your model to a database. It also provides facilities to −
- Materialize data returned from the database as entity objects
- Track changes that were made to the objects
- Handle concurrency
- Propagate object changes back to the database
- Bind objects to controls
The primary class that is responsible for interacting with data as objects is System.Data.Entity.DbContext. The DbContext API is not released as part of the .NET Framework. In order to be more flexible and frequent with releasing new features to Code First and the DbContext API, the Entity Framework team distributes EntityFramework.dll through Microsofts NuGet distribution feature.
NuGet allows you to add references to your .NET projects by pulling the relevant DLLs directly into your project from the Web.
A Visual Studio extension called the Library Package Manager provides an easy way to pull the appropriate assembly from the Web into your projects.
DbContext API is mostly targeted at simplifying your interaction with Entity Framework.
It also reduces the number of methods and properties you need to access commonly used tasks.
In previous versions of Entity Framework, these tasks were often complicated to discover and code.
The context class manages the entity objects during run time, which includes populating objects with data from a database, change tracking, and persisting data to the database.
Defining a DbContext Derived Class
The recommended way to work with context is to define a class that derives from DbContext and exposes DbSet properties that represent collections of the specified entities in the context. If you are working with the EF Designer, the context will be generated for you. If you are working with Code First, you will typically write the context yourself.
The following code is a simple example which shows that UniContext is derived from DbContext.
You can use automatic properties with DbSet such as getter and setter.
It also makes much cleaner code, but you arent required to use it for the purpose of creating a DbSet when you have no other logic to apply.
public class UniContext : DbContext {
   public UniContext() : base("UniContext") { }
   public DbSet<Student> Students { get; set; }
   public DbSet<Enrollment> Enrollments { get; set; }
   public DbSet<Course> Courses { get; set; }
}
Previously, EDM used to generate context classes that were derived from the ObjectContext class.
Working with ObjectContext was a little complex.
DbContext is a wrapper around ObjectContext which is actually similar to ObjectContext and is useful and easy in all the development models such Code First, Model First and Database First.
Queries
There are three types of queries you can use such as −
- Adding a new entity.
- Changing or updating the property values of an existing entity.
- Deleting an existing entity.
Adding New Entities
Adding a new object with Entity Framework is as simple as constructing a new instance of your object and registering it using the Add method on DbSet. The following code is for when you want to add a new student to database.
private static void AddStudent() {

   using (var context = new UniContext()) {

      var student = new Student {
         LastName = "Khan",
         FirstMidName = "Ali",
         EnrollmentDate = DateTime.Parse("2005-09-01")
      };

      context.Students.Add(student);
      context.SaveChanges();

   }
}
Changing Existing Entities
Changing existing objects is as simple as updating the value assigned to the property(s) you want changed and calling SaveChanges. In the following code, the last name of Ali has been changed from Khan to Aslam.
private static void AddStudent() {

   private static void ChangeStudent() {

      using (var context = new UniContext()) {

         var student = (from d in context.Students
            where d.FirstMidName == "Ali" select d).Single();
         student.LastName = "Aslam";
         context.SaveChanges();

      }
   }
}
Deleting Existing Entities
To delete an entity using Entity Framework, you use the Remove method on DbSet. Remove works for both existing and newly added entities. Calling Remove on an entity that has been added but not yet saved to the database will cancel the addition of the entity. The entity is removed from the change tracker and is no longer tracked by the DbContext. Calling Remove on an existing entity that is being change-tracked will register the entity for deletion the next time SaveChanges is called. The following example shows an instance where the student is removed from the database whose first name is Ali.
private static void DeleteStudent() {

   using (var context = new UniContext()) {
      var bay = (from d in context.Students where d.FirstMidName == "Ali" select d).Single();
      context.Students.Remove(bay);
      context.SaveChanges();
   }
}
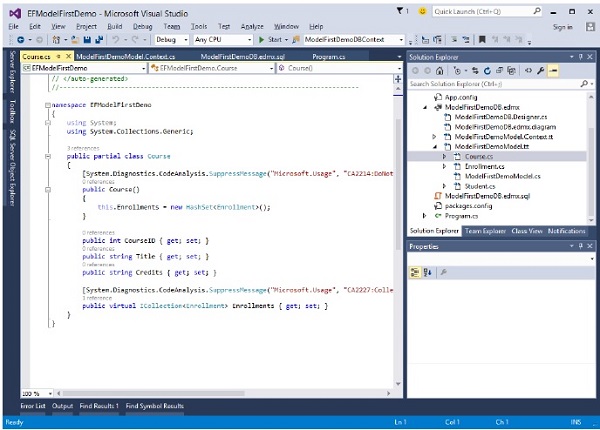
Entity Framework - Types
In Entity Framework, there are two types of entities that allow developers to use their own custom data classes together with data model without making any modifications to the data classes themselves.
- POCO entities
- Dynamic Proxy
POCO Entities
POCO stands for "plain-old" CLR objects which can be used as existing domain objects with your data model.
POCO data classes which are mapped to entities are defined in a data model.
It also supports most of the same query, insert, update, and delete behaviors as entity types that are generated by the Entity Data Model tools.
You can use the POCO template to generate persistence-ignorant entity types from a conceptual model.
Lets take a look at the following example of Conceptual Entity Data Model.
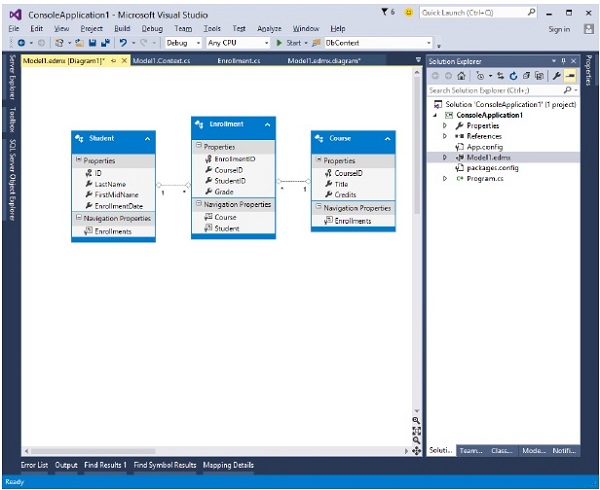
To generate POCO entities for the above Entity model −
Step 1 − Right click on the designer window. It will display the following dialog.
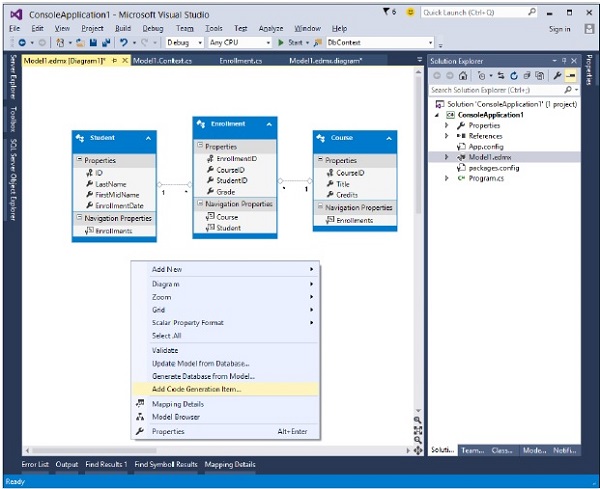
Step 2 − Select the Add Code Generation Item...
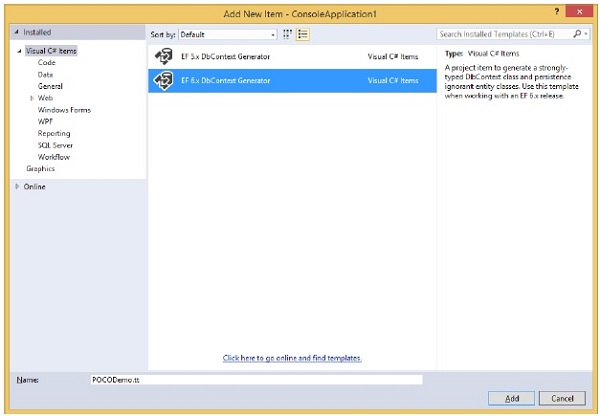
Step 3 − Select the EF 6.x DbContext Generator, write name and then click Add button.
You will see in your solution explorer that POCODemo.Context.tt and POCODemo.tt templates are generated.
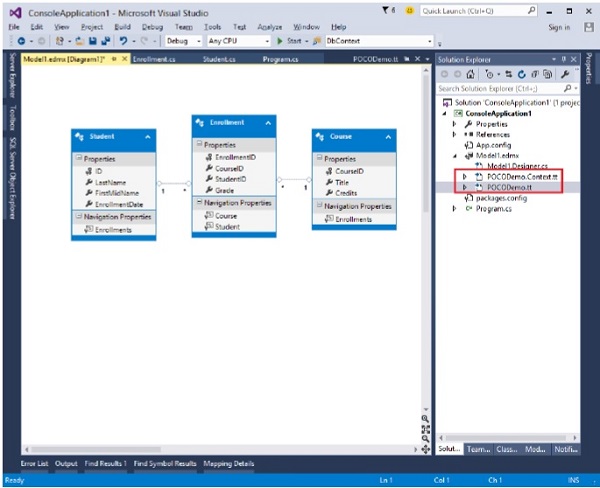
The POCODemo.Context generates the DbContext and the object sets that you can return and use for querying, say for context, Students and Courses, etc.
The other template deals with all the types Student, Courses, etc. Following is the code for Student class which is generated automatically from the Entity Model.
namespace ConsoleApplication1 {

   using System;
   using System.Collections.Generic;

   public partial class Student {

      [System.Diagnostics.CodeAnalysis.SuppressMessage("Microsoft.Usage",
         "CA2214:DoNotCallOverridableMethodsInConstructors")]

      public Student() {
         this.Enrollments = new HashSet<Enrollment>();
      }

      public int ID { get; set; }
      public string LastName { get; set; }
      public string FirstMidName { get; set; }
      public System.DateTime EnrollmentDate { get; set; }

      [System.Diagnostics.CodeAnalysis.SuppressMessage("Microsoft.Usage",
         CA2227:CollectionPropertiesShouldBeReadOnly")]

      public virtual ICollection<Enrollment> Enrollments { get; set; }

   }
}
Similar classes are generated for Course and Enrollment tables from the Entity Model.
Dynamic Proxy
When creating instances of POCO entity types, the Entity Framework often creates instances of a dynamically generated derived type that acts as a proxy for the entity. IT can also be said that it is a runtime proxy classes like a wrapper class of POCO entity.
You can override some properties of the entity for performing actions automatically when the property is accessed.
This mechanism is used to support lazy loading of relationships and automatic change tracking.
This technique also applies to those models which are created with Code First and EF Designer.
If you want the Entity Framework to support lazy loading of the related objects and to track changes in POCO classes, then the POCO classes must meet the following requirements −
Custom data class must be declared with public access.
Custom data class must not be sealed.
Custom data class must not be abstract.
Custom data class must have a public or protected constructor that does not have parameters.
Use a protected constructor without parameters if you want the CreateObject method to be used to create a proxy for the POCO entity.
Calling the CreateObject method does not guarantee the creation of the proxy: the POCO class must follow the other requirements that are described in this topic.
The class cannot implement the IEntityWithChangeTracker or IEntityWithRelationships interfaces because the proxy classes implement these interfaces.
The ProxyCreationEnabled option must be set to true.
The following example is of dynamic proxy entity class.
public partial class Course {

   public Course() {
      this.Enrollments = new HashSet<Enrollment>();
   }

   public int CourseID { get; set; }
   public string Title { get; set; }
   public int Credits { get; set; }
   public virtual ICollection<Enrollment> Enrollments { get; set; }
}
To disable creating proxy objects, set the value of the ProxyCreationEnabled property to false.
Entity Framework - Relationships
In relational databases, relationship is a situation that exists between relational database tables through foreign keys. A Foreign Key (FK) is a column or combination of columns that is used to establish and enforce a link between the data in two tables. The following diagram contains three tables.
- Student
- Course
- Enrollment
In the above diagram, you can see some sort of association/relationship between tables. There are three types of relationships between tables and the relationship between different tables depends on how the related columns are defined.
- One-to-Many Relationship
- Many-to-Many Relationship
- One-to-One Relationship
One-to-Many Relationship
A one-to-many relationship is the most common type of relationship.
In this type of relationship, a row in table A can have many matching rows in table B, but a row in table B can have only one matching row in table A.
The foreign key is defined in the table that represents the many end of the relationship.
For example, in the above diagram Student and Enrollment tables have one-tomany relationship, each student may have many enrollments, but each enrollment belongs to only one student.
In entity framework, these relationship can be created with code as well. Following is an example of Student and Enrollment classes which are associated with one to many relationship.
public class Student {
   public int ID { get; set; }
   public string LastName { get; set; }
   public string FirstMidName { get; set; }
   public DateTime EnrollmentDate { get; set; }

   public virtual ICollection<Enrollment> Enrollments { get; set; }
}

public class Enrollment {

   public int EnrollmentID { get; set; }
   public int CourseID { get; set; }
   public int StudentID { get; set; }

   public Grade? Grade { get; set; }
   public virtual Course Course { get; set; }
   public virtual Student Student { get; set; }
}
In the above code, you can see that Student class contains the collection of Enrollment, but Enrollment class has a single Student Object.
Many-to-Many Relationship
In many-to-many relationship, a row in table A can have many matching rows in table B, and vice versa.
You can create such a relationship by defining a third table, called a junction table, whose primary key consists of the foreign keys from both table A and table B.
For example, the Student and Course tables have many-to-many relationship that is defined by one-to-many relationship from each of these tables to the Enrollment table.
The following code contains the Course class and the above two classes, i.e., Student and Enrollment.
public class Course {
   [DatabaseGenerated(DatabaseGeneratedOption.None)]

   public int CourseID { get; set; }
   public string Title { get; set; }

   public int Credits { get; set; }
   public virtual ICollection<Enrollment> Enrollments { get; set; }
}
You can see that both Course class and Student class have collections of Enrollment objects which makes many-to-many relationship via junction class Enrollment.
One-to-One Relationship
In a one-to-one relationship, a row in table A can have no more than one matching row in table B, and vice versa.
A one-to-one relationship is created if both of the related columns are primary keys or have unique constraints.
In a one-to-one relationship, the primary key acts additionally as a foreign key and there is no separate foreign key column for either table.
This type of relationship is not common because most information related in this way would be all in one table. You might use a one-to-one relationship to −
- Divide a table with many columns.
- Isolate part of a table for security reasons.
- Store data that is short-lived and could be easily deleted by simply deleting the table.
- Store information that applies only to a subset of the main table.
The following code is to add another class name StudentProfile which contains the student email id and password.
public class Student {
   public int ID { get; set; }
   public string LastName { get; set; }
   public string FirstMidName { get; set; }
   public DateTime EnrollmentDate { get; set; }

   public virtual ICollection<Enrollment> Enrollments { get; set; }
   public virtual StudentProfile StudentProfile { get; set; }
}

public class StudentProfile {

   public StudentProfile() {}
   public int ID { get; set; }
   public string Email { get; set; }
   public string Password { get; set; }

   public virtual Student Student { get; set; }
}
You can see that Student entity class contains StudentProfile navigation property and StudentProfile contains Student navigation property.
Each student has only one Email and password to login in university domain. These information can be added to Student table but for security reasons it is separated to another table.
Entity Framework - Lifecycle
Lifetime
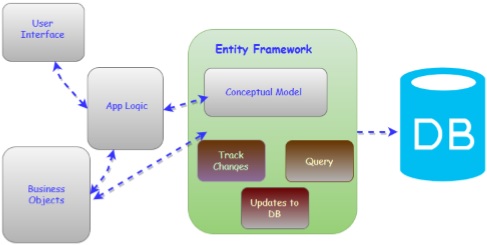
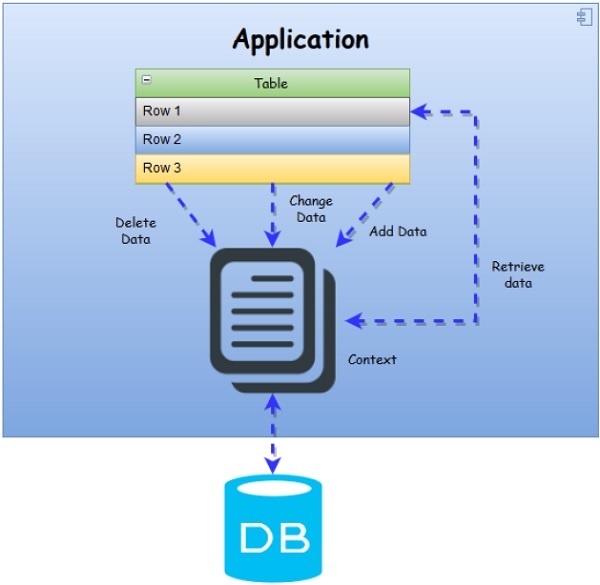
The lifetime of a context begins when the instance is created and ends when the instance is either disposed or garbage-collected.
Context lifetime is a very crucial decision to make when we use ORMs.
The context is performing like an entity cache, so it means it holds references to all the loaded entities which may grow very fast in memory consumption and it can also cause memory leaks.
In the below diagram, you can see the upper level of data workflow from application to database via Context and vice versa.
Entity Lifecycle
The Entity Lifecycle describes the process in which an Entity is created, added, modified, deleted, etc. Entities have many states during its lifetime. Before looking at how to retrieve entity state, lets take a look at what is entity state. The state is an enum of type System.Data.EntityState that declares the following values −
Added: The entity is marked as added.
Deleted: The entity is marked as deleted.
Modified: The entity has been modified.
Unchanged: The entity hasnt been modified.
Detached: The entity isnt tracked.
State Changes in the Entity Lifecycle
Sometimes state of entities are set automatically by the context, but it can also be modified manually by the developer. Even though all the combinations of switches from one state to another are possible, but some of them are meaningless. For example, Added entity to the Deleted state, or vice versa.
Lets discuss about different states.
Unchanged State
When an entity is Unchanged, its bound to the context but it hasnt been modified.
By default, an entity retrieved from the database is in this state.
When an entity is attached to the context (with the Attach method), it similarly is in the Unchanged state.
The context cant track changes to objects that it doesnt reference, so when theyre attached it assumes theyre Unchanged.
Detached State
Detached is the default state of a newly created entity because the context cant track the creation of any object in your code.
This is true even if you instantiate the entity inside a using block of the context.
Detached is even the state of entities retrieved from the database when tracking is disabled.
When an entity is detached, it isnt bound to the context, so its state isnt tracked.
It can be disposed of, modified, used in combination with other classes, or used in any other way you might need.
Because there is no context tracking it, it has no meaning to Entity Framework.
Added State
When an entity is in the Added state, you have few options. In fact, you can only detach it from the context.
Naturally, even if you modify some property, the state remains Added, because moving it to Modified, Unchanged, or Deleted makes no sense.
Its a new entity and has no correspondence with a row in the database.
This is a fundamental prerequisite for being in one of those states (but this rule isnt enforced by the context).

Modified State
When an entity is modified, that means it was in Unchanged state and then some property was changed.
After an entity enters the Modified state, it can move to the Detached or Deleted state, but it cant roll back to the Unchanged state even if you manually restore the original values.
It cant even be changed to Added, unless you detach and add the entity to the context, because a row with this ID already exists in the database, and you would get a runtime exception when persisting it.
Deleted State
An entity enters the Deleted state because it was Unchanged or Modified and then the DeleteObject method was used.
This is the most restrictive state, because its pointless changing from this state to any other value but Detached.
The using statement if you want all the resources that the context controls to be disposed at the end of the block. When you use the using statement, then compiler automatically creates a try/finally block and calls dispose in the finally block.
using (var context = new UniContext()) {

   var student = new Student {
      LastName = "Khan",
      FirstMidName = "Ali",
      EnrollmentDate = DateTime.Parse("2005-09-01")
   };

   context.Students.Add(student);
   context.SaveChanges();
}
When working with long-running context consider the following −
As you load more objects and their references into memory, the memory consumption of the context may increase rapidly. This may cause performance issues.
Remember to dispose of the context when it is no longer required.
If an exception causes the context to be in an unrecoverable state, the whole application may terminate.
The chances of running into concurrency-related issues increases as the gap between the time when the data is queried and updated grows.
When working with Web applications, use a context instance per request.
When working with Windows Presentation Foundation (WPF) or Windows Forms, use a context instance per form. This lets you use change-tracking functionality that context provides.
Rules of Thumb
Web Applications
It is now a common and best practice that for web applications, context is used per request.
In web applications, we deal with requests that are very short but holds all the server transaction they are therefore the proper duration for the context to live in.
Desktop Applications
For desktop application, like Win Forms/WPF, etc. the context is used per form/dialog/page.
Since we dont want to have the context as a singleton for our application we will dispose it when we move from one form to another.
In this way, we will gain a lot of the contexts abilities and wont suffer from the implications of long running contexts.
Entity Framework - Code First Approach
The Entity Framework provides three approaches to create an entity model and each one has their own pros and cons.
- Code First
- Database First
- Model First
In this chapter, we will briefly describe the code first approach. Some developers prefer to work with the Designer in Code while others would rather just work with their code. For those developers, Entity Framework has a modeling workflow referred to as Code First.
Code First modeling workflow targets a database that doesnt exist and Code First will create it.
It can also be used if you have an empty database and then Code First will add new tables too.
Code First allows you to define your model using C# or VB.Net classes.
Additional configuration can optionally be performed using attributes on your classes and properties or by using a fluent API.
Why Code First?
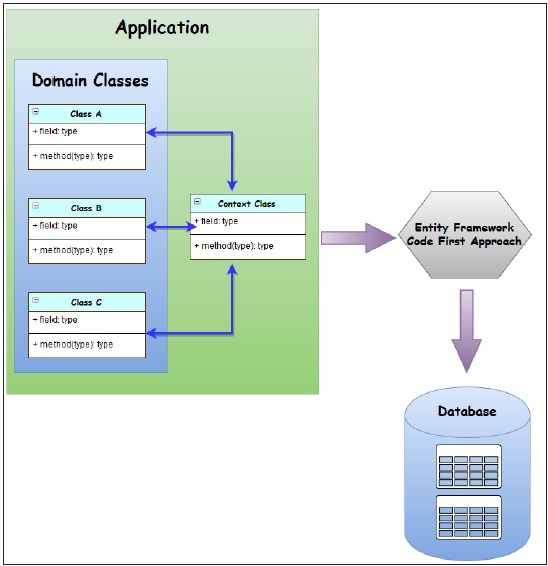
Code First is really made up of a set of puzzle pieces. First are your domain classes.
The domain classes have nothing to do with Entity Framework. They're just the items of your business domain.
Entity Framework, then, has a context that manages the interaction between those classes and your database.
The context is not specific to Code First. It's an Entity Framework feature.
Code First adds a model builder that inspects your classes that the context is managing, and then uses a set of rules or conventions to determine how those classes and the relationships describe a model, and how that model should map to your database.
All of this happens at runtime. You'll never see this model, it's just in memory.
Code First has the ability to use that model to create a database if required.
It can also update the database if the model changes, using a feature called Code First Migrations.
Entity Framework - Model First Approach
In this chapter, let us learn how to create an entity data model in the designer using the workflow referred to as Model First.
Model First is great for when you're starting a new project where the database doesn't even exist yet.
The model is stored in an EDMX file and can be viewed and edited in the Entity Framework Designer.
In Model First, you define your model in an Entity Framework designer then generate SQL, which will create database schema to match your model and then you execute the SQL to create the schema in your database.
The classes that you interact with in your application are automatically generated from the EDMX file.
Following is a simple example of creating a new console project using Model First approach.
Step 1 − Open Visual Studio and select File → New → Project
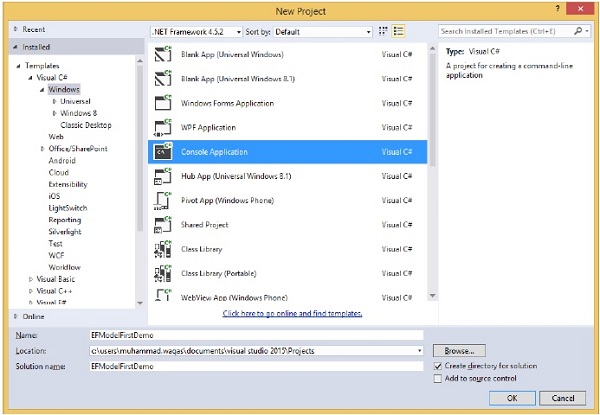
Step 2 − Select Installed → Templates → Visual C# → Windows from left pane and then in middle pane, select Console Application.
Step 3 − Enter EFModelFirstDemo in the Name field.
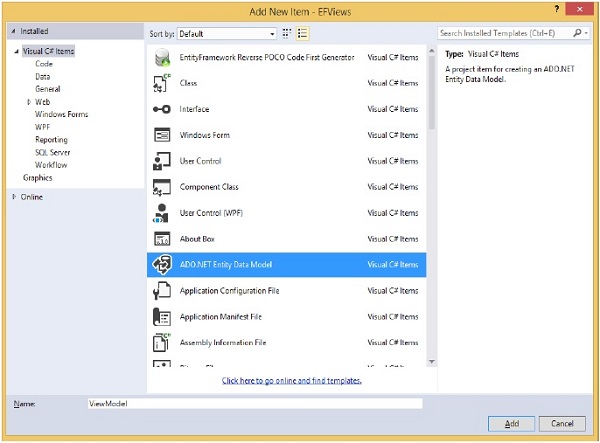
Step 4 − To create model, first right-click on your console project in solution explorer and select Add → New Items
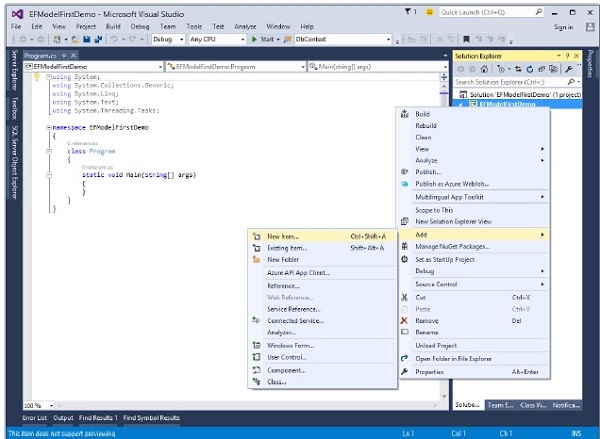
The following dialog will open.
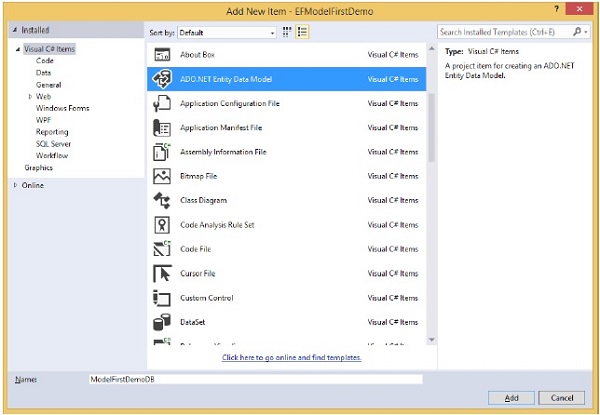
Step 5 − Select ADO.NET Entity Data Model from middle pane and enter name ModelFirstDemoDB in the Name field.
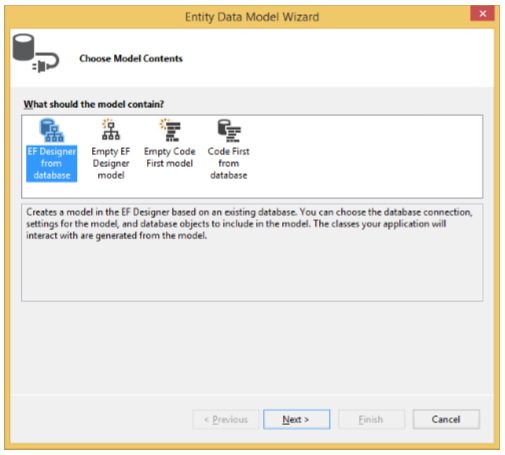
Step 6 − Click Add button which will launch the Entity Data Model Wizard dialog.
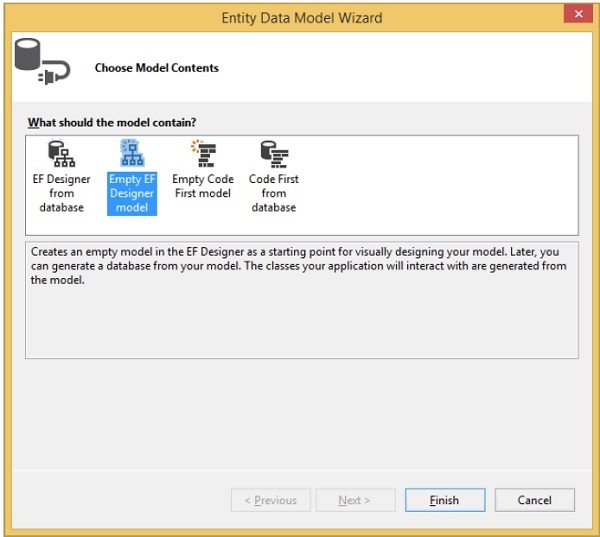
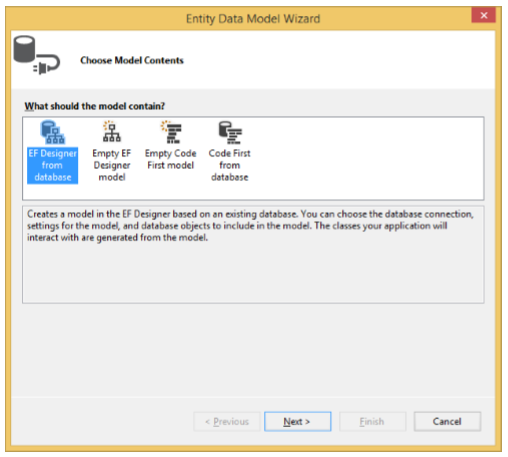
Step 7 − Select Empty EF Designer model and click Next button. The Entity Framework Designer opens with a blank model. Now we can start adding entities, properties and associations to the model.
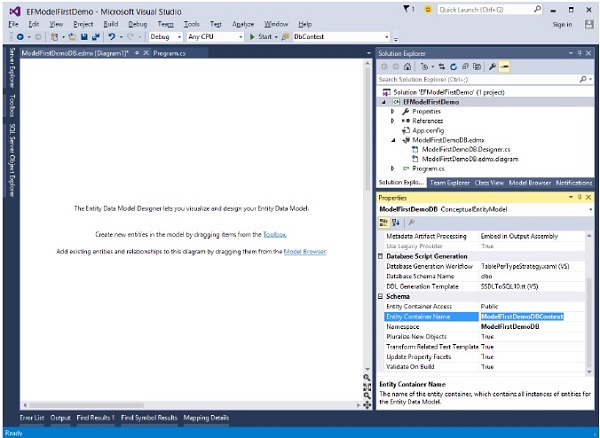
Step 8 − Right-click on the design surface and select Properties. In the Properties window, change the Entity Container Name to ModelFirstDemoDBContext.
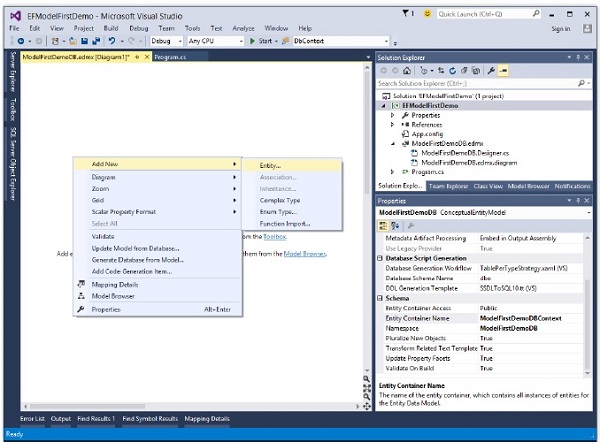
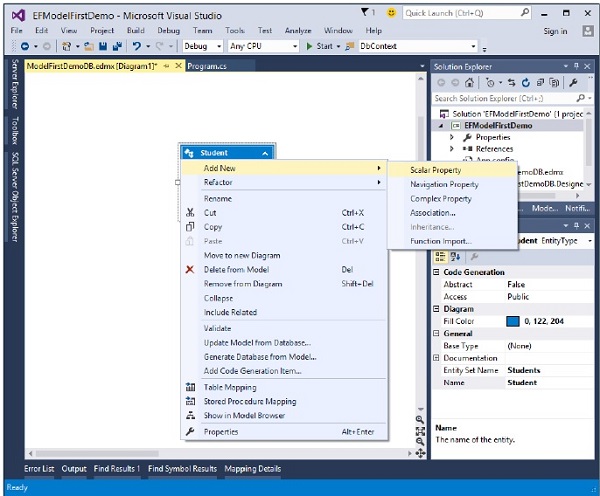
Step 9 − Right-click on the design surface and select Add New → Entity
Add Entity dialog will open as shown in the following image.
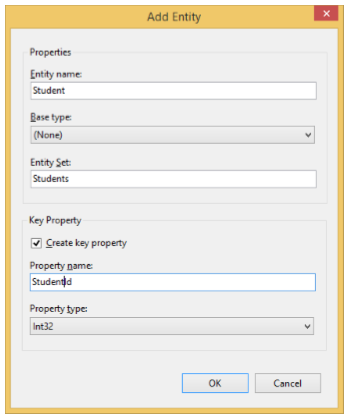
Step 10 − Enter Student as entity name and Student Id as property name and click Ok.
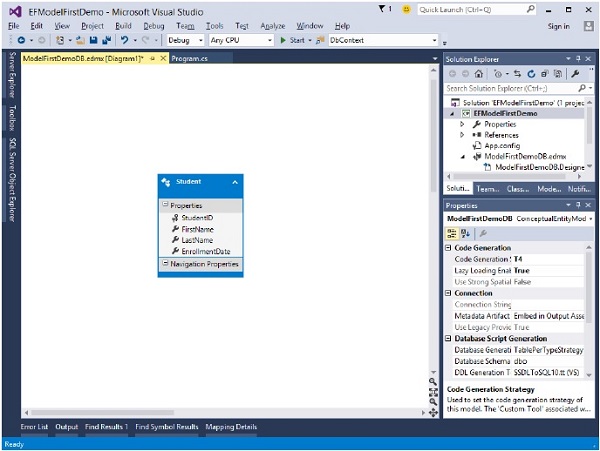
Step 11 − Right-click on the new entity on the design surface and select Add New → Scalar Property, enter Name as the name of the property.
Step 12 − Enter FirstName and then add another two scalar properties such as LastName and EnrollmentDate.
Step 13 − Add two more Entities Course and Enrollment by following all the steps mentioned above and also add some Scalar properties as shown in the following steps.
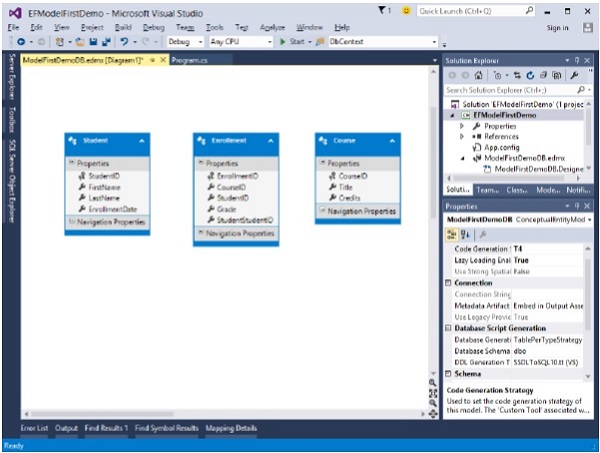
Step 14 − We have three entities in Visual Designer, lets add some association or relationship between them.
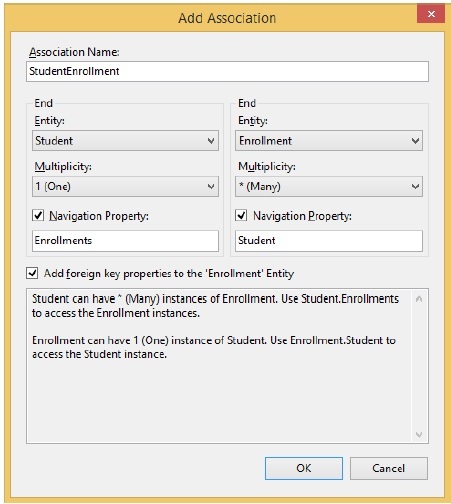
Step 15 − Right-click on the design surface and select Add New → Association
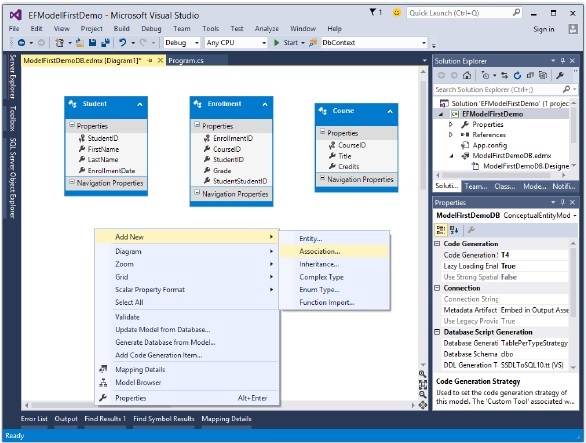
Step 16 − Make one end of the relationship point to Student with a multiplicity of one and the other end point to Enrollment with a multiplicity of many.

Step 17 − This means that a Student has many Enrollments and Enrollment belongs to one Student.
Step 18 − Ensure the Add foreign key properties to 'Post' Entity box is checked and click OK.
Step 19 − Similarly, add one more association between Course and Enrollment.
Step 20 − Your data model will look like the following screen after adding associations between entities.
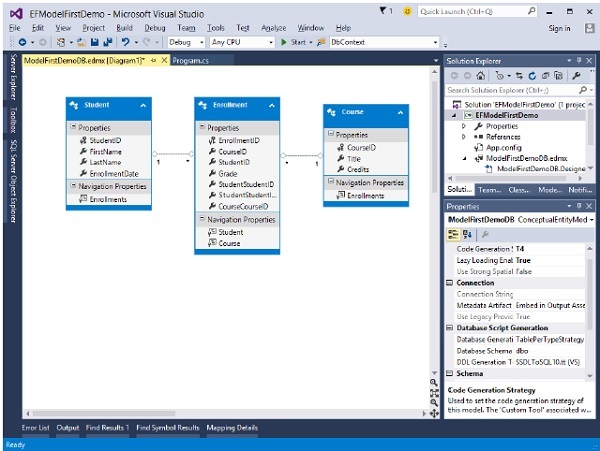
We now have a simple model that we can generate a database from and use to read and write data. Let's go ahead and generate the database.
Step 1 − Right-click on the design surface and select Generate Database from Model
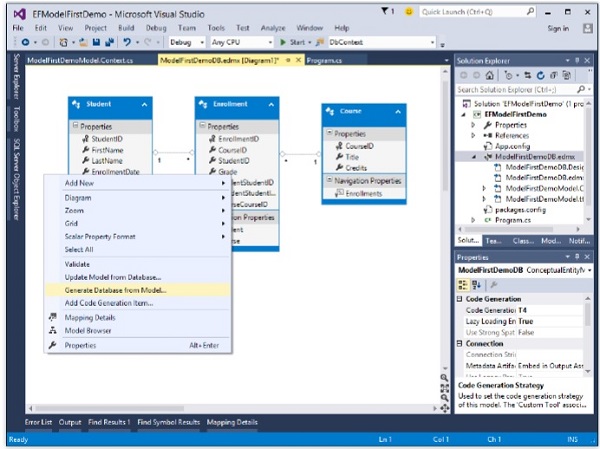
Step 2 − You can select existing database or create a new connection by clicking on New Connection
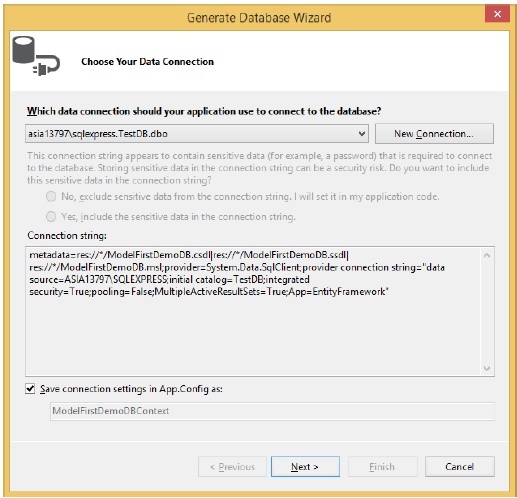
Step 3 − To create new Database, click on New Connection
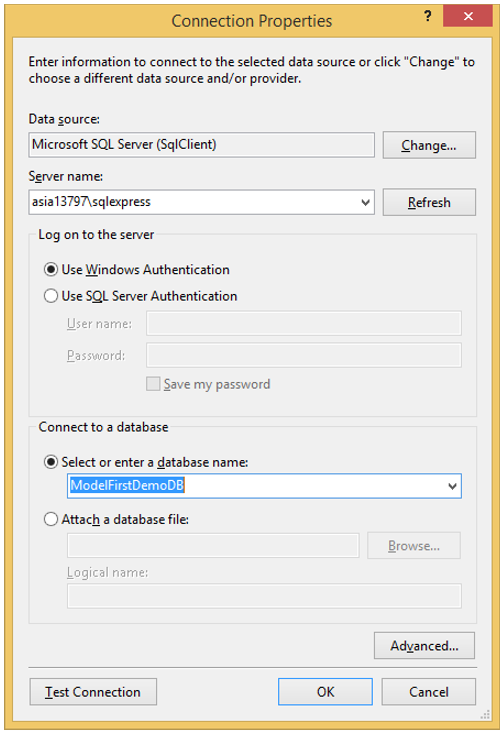
Step 4 − Enter Server name and database name.
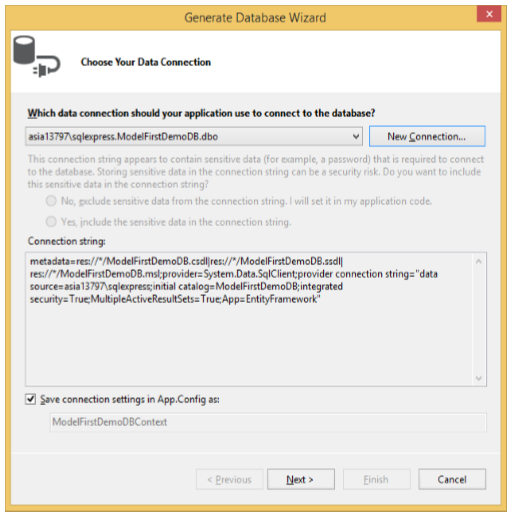
Step 5 − Click Next.
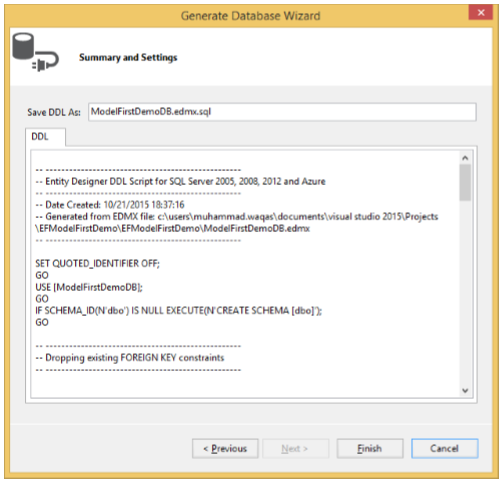
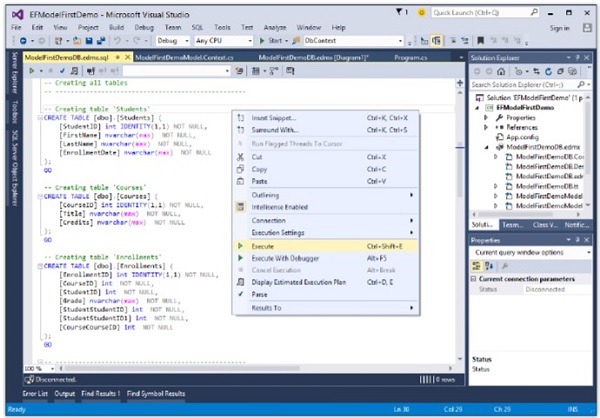
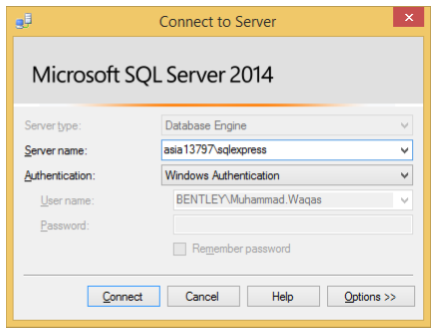
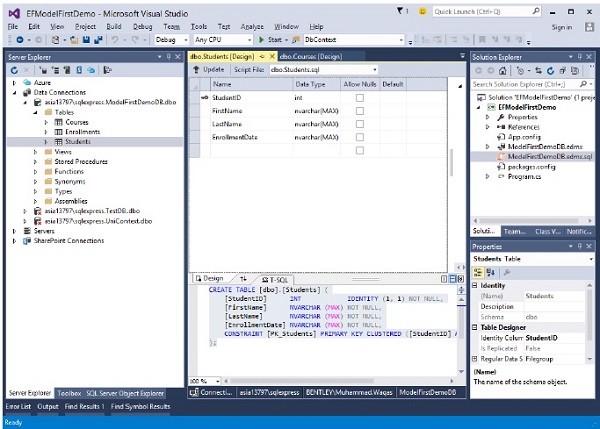
Step 6 − Click Finish. This will add *.edmx.sql file in the project. You can execute DDL scripts in Visual Studio by opening .sql file, then right-click and select Execute.
Step 7 − The following dialog will be displayed to connect to database.
Step 8 − On successful execution, you will see the following message.
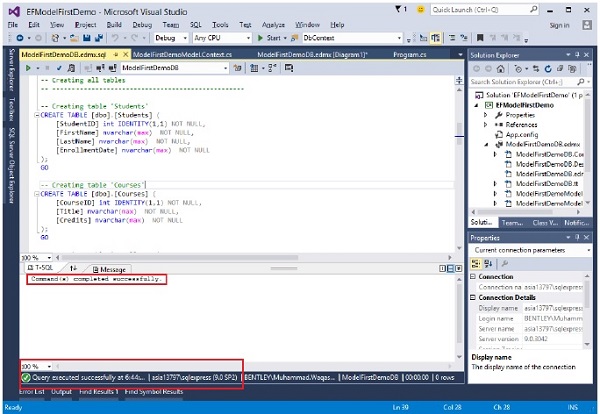
Step 9 − Go to the server explorer, you will see that the database is created with three tables which are specified.
Next, we need to swap our model to generate code that makes use of the DbContext API.
Step 1 − Right-click on an empty spot of your model in the EF Designer and select Add Code Generation Item
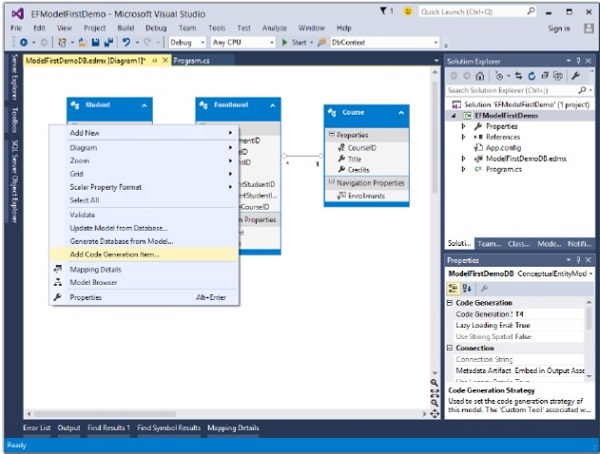
You will see that the following Add New Item dialog opens.
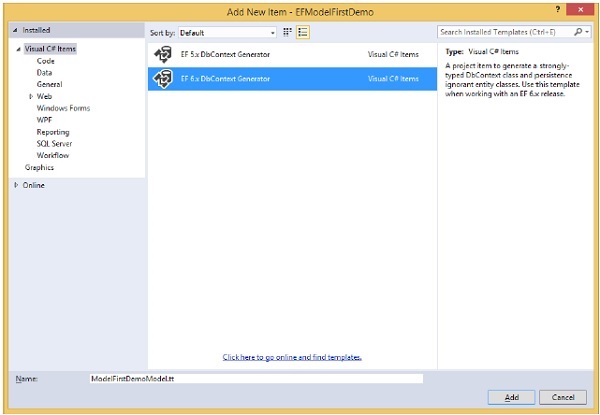
Step 2 − Select EF 6.x DbContext Generator in middle pane and enter ModelFirstDemoModel in Name field.
Step 3 − You will see in your solution explorer that ModelFirstDemoModel.Context.tt and ModelFirstDemoModel.tt templates are generated.
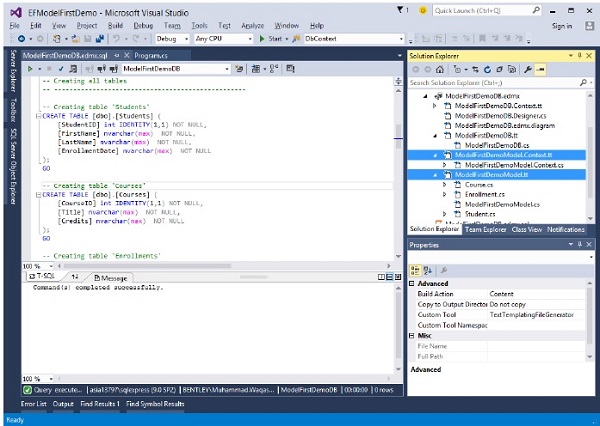
The ModelFirstDemoModel.Context generates the DbCcontext and the object sets that you can return and use for querying, say for context, Students and Courses etc.
The other template deals with all the types Student, Courses etc. Following is the Student class, which is generated automatically from the Entity Model.
Following is the C# code in which some data are entered and retrieved from database.
using System;
using System.Linq;

namespace EFModelFirstDemo {

   class Program {

      static void Main(string[] args) {

         using (var db = new ModelFirstDemoDBContext()) {

            // Create and save a new Student

            Console.Write("Enter a name for a new Student: ");
            var firstName = Console.ReadLine();

            var student = new Student {
               StudentID = 1,
               FirstName = firstName
            };

            db.Students.Add(student);
            db.SaveChanges();

            var query = from b in db.Students
               orderby b.FirstName select b;

            Console.WriteLine("All student in the database:");

            foreach (var item in query) {
               Console.WriteLine(item.FirstName);
            }

            Console.WriteLine("Press any key to exit...");
            Console.ReadKey();
         }
      }
   }
}
When the above code is executed, you will receive the following output −
Enter a name for a new Student:
Ali Khan
All student in the database:
Ali Khan
Press any key to exit...
We recommend you to execute the above example in a step-by-step manner for better understanding.
Entity Framework - Database First Approach
In this chapter, let us learn about creating an entity data model with Database First approach.
The Database First Approach provides an alternative to the Code First and Model First approaches to the Entity Data Model. It creates model codes (classes, properties, DbContext etc.) from the database in the project and those classes become the link between the database and controller.
The Database First Approach creates the entity framework from an existing database. We use all other functionalities, such as the model/database sync and the code generation, in the same way we used them in the Model First approach.
Lets take a simple example. We already have a database which contains 3 tables as shown in the following image.
Step 1 − Lets create a new console project with DatabaseFirstDemo name.
Step 2 − To create the model, first right-click on your console project in solution explorer and select Add → New Items

Step 3 − Select ADO.NET Entity Data Model from middle pane and enter name DatabaseFirstModel in the Name field.
Step 4 − Click Add button which will launch the Entity Data Model Wizard dialog.
Step 5 − Select EF Designer from database and click Next button.
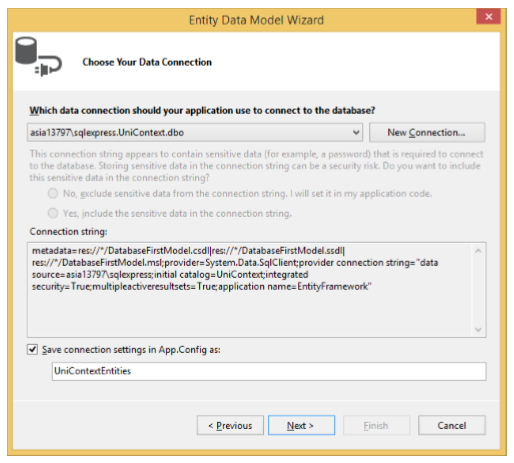
Step 6 − Select the existing database and click Next.
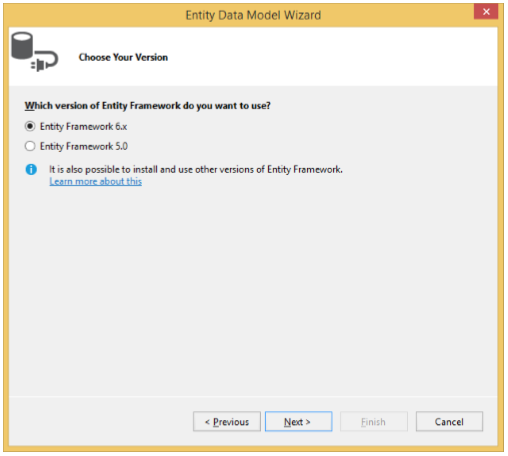
Step 7 − Choose Entity Framework 6.x and click Next.
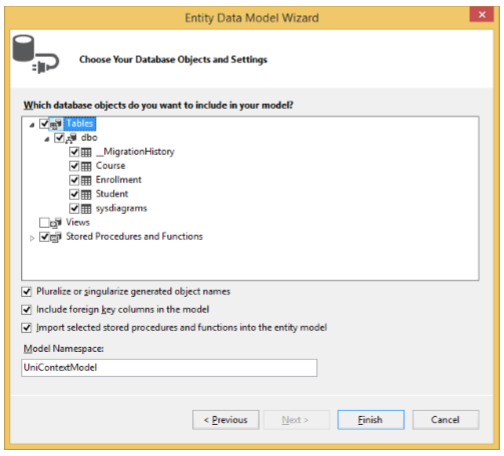
Step 8 − Select all the tables Views and stored procedure you want to include and click Finish.
You will see that Entity model and POCO classes are generated from the database.
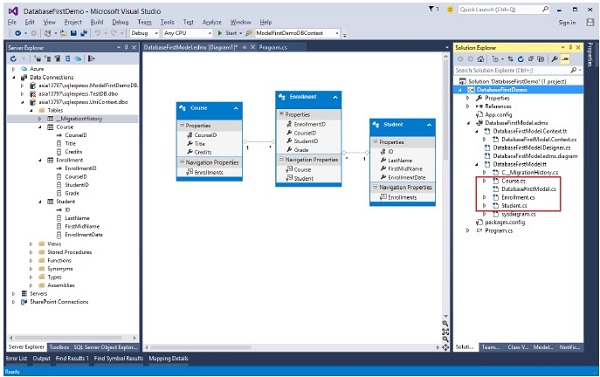
Let us now retrieve all the students from the database by writing the following code in program.cs file.
using System;
using System.Linq;

namespace DatabaseFirstDemo {

   class Program {

      static void Main(string[] args) {

         using (var db = new UniContextEntities()) {

            var query = from b in db.Students
               orderby b.FirstMidName select b;

            Console.WriteLine("All All student in the database:");

            foreach (var item in query) {
               Console.WriteLine(item.FirstMidName +" "+ item.LastName);
            }

            Console.WriteLine("Press any key to exit...");
            Console.ReadKey();
         }
      }
   }
}
When the above program is executed, you will receive the following output −
All student in the database:
Ali Khan
Arturo   finand
Bill Gates
Carson Alexander
Gytis Barzdukas
Laura Norman
Meredith Alonso
Nino Olivetto
Peggy Justice
Yan Li
Press any key to exit...
When the above program is executed, you will see all the students name which were previously entered in the database.
We recommend you to execute the above example in a step-by-step manner for better understanding.
Entity Framework - DEV Approaches
In this chapter, let us focus on building models with the Designer or Database First or just using Code First. Following are some guidelines which will help you decide which modeling workflow to choose.
We have already seen examples of Code First modeling, Database First modeling and a Model First modeling workflow.
The Database First and Model First workflows used the Designer but one starts with the database to create a model and the other starts at the model to create a database.
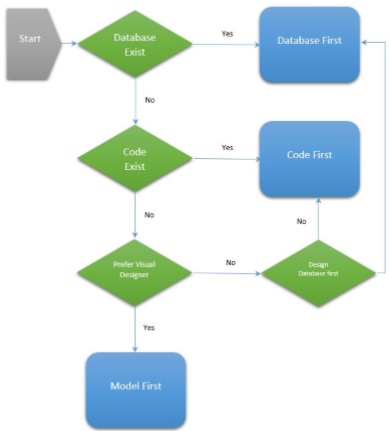
For those developers who do not want to use Visual Designer plus code generation, Entity Framework has a completely different workflow called Code First.
The typical workflow for Code First is great for brand new applications where you don't even have a database. You define your classes and code and then let Code First figure out what your database should look like.
It is also possible to start Code First with a database and that makes Code First a bit of a contradiction. But there's a tool to let you reverse engineer a database into classes which is a great way to get a head start on the coding.
Given these options, let's look at the Decision Tree.
If you prefer to work with a Visual Designer in generated code, then you'll want to choose one of the workflows that involves EF Designer. If your database already exists, then Database First is your path.
If you want to use a Visual Designer on a brand new project without a database, then you'll want to use Model First.
If you just want to work with code and not a Designer, then Code First is probably for you along with the option of using the tool that reverse engineers the database into classes.
If you have existing classes, then your best bet is to use them with Code First.
Entity Framework - Database Operations
In the previous chapters, you learned three different ways of defining an entity data model.
Two of them, Database First and Model First, depended on the Entity Framework designer combined with code generation.
The third, Code First, lets you skip a visual designer and just write your own code.
Regardless of which path you choose, you'll end up with domain classes and one or more Entity Framework DbContext classes allows you to retrieve and persist data relevant to those classes.
The DbContext API in your applications is used as a bridge between your classes and your database. The DbContext is one of the most important classes in the Entity Framework.
It enables to express and execute queries.
It takes query results from the database and transforms them into instances of our model classes.
It can keep track of changes to entities, including adding and deleting, and then triggers the creation of insert, update and delete statements that are sent to the database on demand.
Following are the domain ad context classes on which we will be performing different operations in this chapter. This is the same example which we have created in the chapater, Database First Approach.
Context Class Implementation
using System;
using System.Data.Entity;
using System.Data.Entity.Infrastructure;
using System.Data.Entity.Core.Objects;
using System.Linq;
namespace DatabaseFirstDemo {
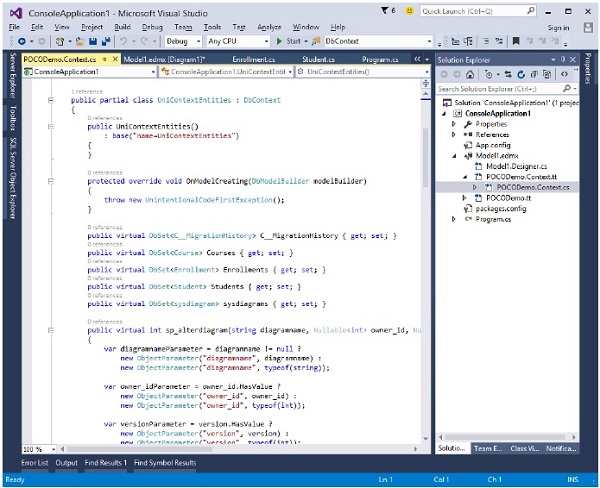
public partial class UniContextEntities : DbContext {
public UniContextEntities(): base("name = UniContextEntities") {}
protected override void OnModelCreating(DbModelBuilder modelBuilder) {
throw new UnintentionalCodeFirstException();
}
public virtual DbSet<Course> Courses { get; set; }
public virtual DbSet<Enrollment> Enrollments { get; set; }
public virtual DbSet<Student> Students { get; set; }
}
}
Domain Classes Implementation
Course class
namespace DatabaseFirstDemo {

   using System;
   using System.Collections.Generic;

   public partial class Course {

      [System.Diagnostics.CodeAnalysis.SuppressMessage("Microsoft.Usage",
         "CA2214:DoNotCallOverridableMethodsInConstructors")]

      public Course() {
         this.Enrollments = new HashSet<Enrollment>();
      }

      public int CourseID { get; set; }
      public string Title { get; set; }
      public int Credits { get; set; }

      [System.Diagnostics.CodeAnalysis.SuppressMessage("Microsoft.Usage",
         "CA2227:CollectionPropertiesShouldBeReadOnly")]

      public virtual ICollection<Enrollment> Enrollments { get; set; }
   }
}
Student class
namespace DatabaseFirstDemo {

   using System;
   using System.Collections.Generic;

   public partial class Student {

      [System.Diagnostics.CodeAnalysis.SuppressMessage("Microsoft.Usage",
         "CA2214:DoNotCallOverridableMethodsInConstructors")]

      public Student() {
         this.Enrollments = new HashSet<Enrollment>();
      }

      public int ID { get; set; }
      public string LastName { get; set; }
      public string FirstMidName { get; set; }
      public System.DateTime EnrollmentDate { get; set; }

      [System.Diagnostics.CodeAnalysis.SuppressMessage("Microsoft.Usage",
         "CA2227:CollectionPropertiesShouldBeReadOnly")]

      public virtual ICollection<Enrollment> Enrollments { get; set; }
   }
}
Enrollment class
namespace DatabaseFirstDemo {

   using System;
   using System.Collections.Generic;

   public partial class Enrollment {

      public int EnrollmentID { get; set; }
      public int CourseID { get; set; }
      public int StudentID { get; set; }
      public Nullable<int> Grade { get; set; }

      public virtual Course Course { get; set; }
      public virtual Student Student { get; set; }
   }
}
Create Operation
Adding a new object with Entity Framework is as simple as constructing a new instance of your object and registering it using the Add method on DbSet. The following code lets you add a new student to the database.
class Program {

   static void Main(string[] args) {

      var newStudent = new Student();

      //set student name

      newStudent.FirstMidName = "Bill";
      newStudent.LastName = "Gates";
      newStudent.EnrollmentDate = DateTime.Parse("2015-10-21");
      newStudent.ID = 100;

      //create DBContext object

      using (var dbCtx = new UniContextEntities()) {

         //Add Student object into Students DBset
         dbCtx.Students.Add(newStudent);

         // call SaveChanges method to save student into database
         dbCtx.SaveChanges();
      }
   }
}
Update Operation
Changing existing objects is as simple as updating the value assigned to the property(s) you want changed and calling SaveChanges. For example, the following code is used to change the last name of Ali from Khan to Aslam.
using (var context = new UniContextEntities()) {

   var student = (from d in context.Students where d.FirstMidName == "Ali" select d).Single();
   student.LastName = "Aslam";
   context.SaveChanges();
}
Delete Operation
To delete an entity using Entity Framework, you use the Remove method on DbSet. Remove works for both existing and newly added entities. Calling Remove on an entity that has been added but not yet saved to the database will cancel the addition of the entity. The entity is removed from the change tracker and is no longer tracked by the DbContext. Calling Remove on an existing entity that is being change-tracked will register the entity for deletion the next time SaveChanges is called. The following example is of a code where the student is removed from the database whose first name is Ali.
using (var context = new UniContextEntities()) {
   var bay = (from d in context.Students where d.FirstMidName == "Ali" select d).Single();
   context.Students.Remove(bay);
   context.SaveChanges();
}
Read Operation
Reading the existing data from the database is very simple. Following is the code in which all the data from the Student table are retrieved and then a program will be displayed with the students first and last name in alphabetical order.
using (var db = new UniContextEntities()) {

   var query = from b in db.Students orderby b.FirstMidName select b;
   Console.WriteLine("All All student in the database:");

   foreach (var item in query) {
      Console.WriteLine(item.FirstMidName +" "+ item.LastName);
   }

   Console.WriteLine("Press any key to exit...");
   Console.ReadKey();
}
Entity Framework - Concurrency
Any data access developer faces difficulty while answering the question regarding data concurrency, What happens if more than one person is editing the same data at the same time?
The more fortunate among us deal with business rules that say no problem, last one in wins.
In this case, concurrency is not an issue. More likely, its not as simple as that, and there is no silver bullet to solve every scenario at once.
By default, the Entity Framework will take the path of last one in wins, meaning that the latest update is applied even if someone else updated the data between the time data was retrieved and the time data was saved.
Lets take an example to understand it better. The following example adds a new column VersionNo in Course table.
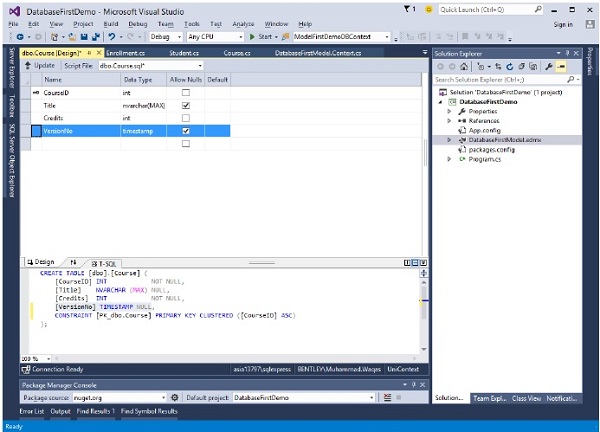
Go to the designer and right-click on the designer window and select update model from database
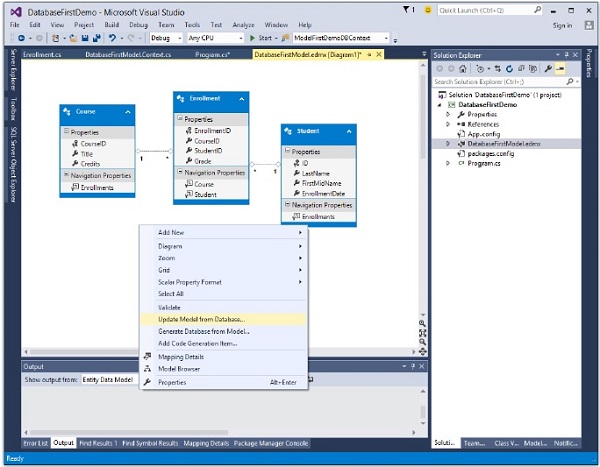
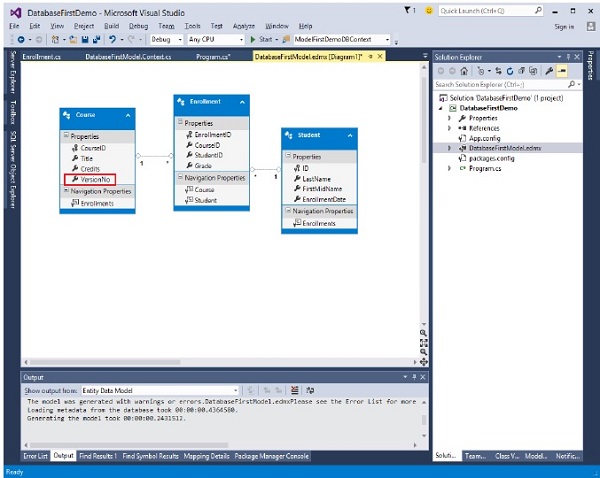
You will see that another column is added in Course Entity.
Right-click on the newly created column VersionNo and select Properties and change the ConcurrencyMode to Fixed as shown in the following image.
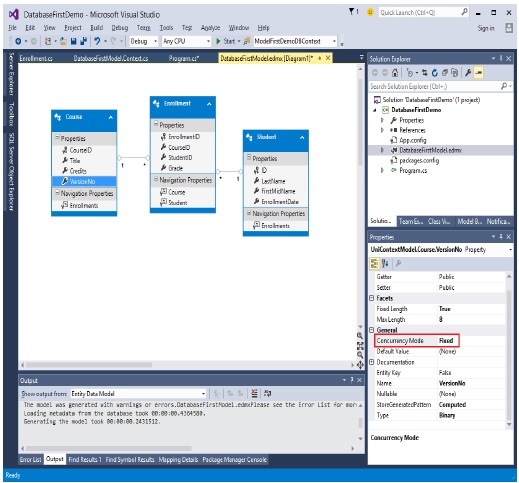
With the ConcurrencyMode of Course.VersionNo set to Fixed, anytime a Course is updated, the Update command will look for the Course using its EntityKey and its VersionNo property.
Lets take a look at a simple scenario. Two users retrieve the same course at the same time and user 1 changes the title of that course to Maths and saves changes before user 2. Later when user 2 changes the title of that course which was retrieved before user 1 save his changes, in that case user 2 will get concurrency exception "User2: Optimistic Concurrency exception occured".
using System;
using System.Data.Entity;
using System.Data.Entity.Infrastructure;
using System.Linq;

namespace DatabaseFirstDemo {

   class Program {

      static void Main(string[] args) {

         Course c1 = null;
         Course c2 = null;

         //User 1 gets Course

         using (var context = new UniContextEntities()) {
            context.Configuration.ProxyCreationEnabled = false;
            c1 = context.Courses.Where(s ⇒ s.CourseID == 1).Single();
         }

         //User 2 also get the same Course

         using (var context = new UniContextEntities()) {
            context.Configuration.ProxyCreationEnabled = false;
            c2 = context.Courses.Where(s ⇒ s.CourseID == 1).Single();
         }

         //User 1 updates Course Title
         c1.Title = "Edited from user1";

         //User 2 updates Course Title
         c2.Title = "Edited from user2";

         //User 1 saves changes first

         using (var context = new UniContextEntities()) {

            try {
               context.Entry(c1).State = EntityState.Modified;
               context.SaveChanges();
            } catch (DbUpdateConcurrencyException ex) {
               Console.WriteLine("User1: Optimistic Concurrency exception occurred");
            }
         }

         //User 2 saves changes after User 1.
         //User 2 will get concurrency exection
         //because CreateOrModifiedDate is different in the database

         using (var context = new UniContextEntities()) {

            try {
               context.Entry(c2).State = EntityState.Modified;
               context.SaveChanges();
            } catch (DbUpdateConcurrencyException ex) {
               Console.WriteLine("User2: Optimistic Concurrency exception occurred");
            }
         }
      }
   }
}
Entity Framework - Transaction
In all versions of Entity Framework, whenever you execute SaveChanges() to insert, update or delete the database, the framework will wrap that operation in a transaction. When you invoke SaveChanges, the context automatically starts a transaction and commits or rolls it back depending on whether the persistence succeeded.
This is all transparent to you, and youll never need to deal with it.
This transaction lasts only long enough to execute the operation and then completes.
When you execute another such operation, a new transaction starts.
Entity Framework 6 provides the following −
Database.BeginTransaction()
It is a simple and easier method within an existing DbContext to start and complete transactions for users.
It allows several operations to be combined within the same transaction and hence either all are committed or all are rolled back as one.
It also allows the user to more easily specify the isolation level for the transaction.
Database.UseTransaction()
It allows the DbContext to use a transaction, which was started outside of the Entity Framework.
Lets take a look into the following example where multiple operations are performed in a single transaction. The code is as −
class Program {

   static void Main(string[] args) {

      using (var context = new UniContextEntities()) {

         using (var dbContextTransaction = context.Database.BeginTransaction()) {

            try {

               Student student = new Student() {
                  ID = 200,
                  FirstMidName = "Ali",
                  LastName = "Khan",
                  EnrollmentDate = DateTime.Parse("2015-12-1")
               };

               context.Students.Add(student);

               context.Database.ExecuteSqlCommand(@"UPDATE Course SET Title =
                  'Calculus'" + "WHERE CourseID = 1045");

               var query = context.Courses.Where(c ⇒ c.CourseID == 1045);

               foreach (var item in query) {
                  Console.WriteLine(item.CourseID.ToString()
                     + " " + item.Title + " " + item.Credits);
               }

               context.SaveChanges();
               var query1 = context.Students.Where(s ⇒ s.ID == 200);

               foreach (var item in query1) {
                  Console.WriteLine(item.ID.ToString()
                     + " " + item.FirstMidName + " " + item.LastName);
               }

               dbContextTransaction.Commit();
            } catch (Exception) {
               dbContextTransaction.Rollback();
            }

         }
      }
   }
}
Beginning a transaction requires that the underlying store connection is open.
So calling Database.BeginTransaction() will open the connection, if it is not already opened.
If DbContextTransaction opened the connection then it will close it when Dispose() is called.
Entity Framework - Views
A view is an object that contains data obtained by a predefined query. A view is a virtual object or table whose result set is derived from a query. It is very similar to a real table because it contains columns and rows of data. Following are some typical uses of views −
- Filter data of underlying tables
- Filter data for security purposes
- Centralize data distributed across several servers
- Create a reusable set of data
Views can be used in a similar way as you can use tables. To use view as an entity, first you will need to add database views to EDM. After adding views to your model then you can work with it the same way as normal entities except for Create, Update, and Delete operations.
Lets take a look, how to add views into the model from the database.
Step 1 − Create a new Console Application project.
Step 2 − Right-click on project in solution explorer and select Add → New Item.
Step 3 − Select ADO.NET Entity Data Model from the middle pane and enter name ViewModel in the Name field.
Step 4 − Click Add button which will launch the Entity Data Model Wizard dialog.
Step 5 − Select EF Designer from database and click Next button.
Step 6 − Select the existing database and click Next.
Step 7 − Choose Entity Framework 6.x and click Next.
Step 8 − Select tables and views from your database and click Finish.
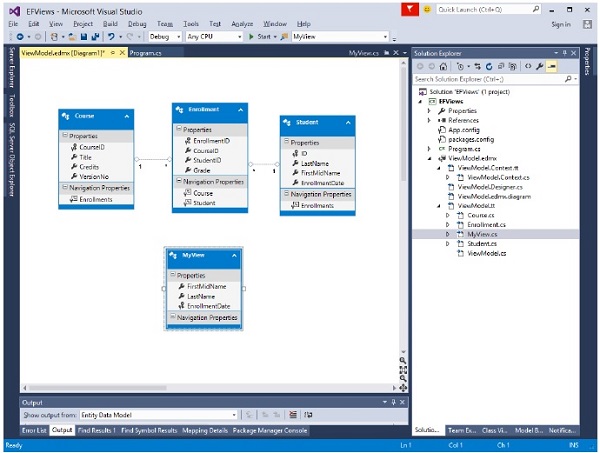
You can see in the designer window that a view is created and you can use it in the program as an entity.
In the solution explorer, you can see that MyView class is also generated from the database.
Lets take an example in which all data is retrieved from view. Following is the code −
class Program {

   static void Main(string[] args) {

      using (var db = new UniContextEntities()) {

         var query = from b in db.MyViews
            orderby b.FirstMidName select b;

         Console.WriteLine("All student in the database:");

         foreach (var item in query) {
            Console.WriteLine(item.FirstMidName + " " + item.LastName);
         }

         Console.WriteLine("Press any key to exit...");
         Console.ReadKey();
      }
   }
}
When the above code is executed, you will receive the following output −
All student in the database:
Ali Khan
Arturo   finand
Bill Gates
Carson Alexander
Gytis Barzdukas
Laura Norman
Meredith Alonso
Nino Olivetto
Peggy Justice
Yan Li
Press any key to exit...
We recommend you to execute the above example in a step-by-step manner for better understanding.
Entity Framework - Index
An index is an on-disk data structure that is based on tables and views. Indexes make the retrieval of data faster and efficient, in most cases. However, overloading a table or view with indexes could unpleasantly affect the performance of other operations such as inserts or updates.
Indexing is the new feature in entity framework where you can improve the performance of your Code First application by reducing the time required to query data from the database.
You can add indexes to your database using the Index attribute, and override the default Unique and Clustered settings to get the index best suited to your scenario.
Lets take a look at the following code in which Index attribute is added in Course class for CourseID.
public partial class Course {

   public Course() {
      this.Enrollments = new HashSet<Enrollment>();
   }

   [Index]
   public int CourseID { get; set; }
   public string Title { get; set; }

   public int Credits { get; set; }
   public byte[] VersionNo { get; set; }

   public virtual ICollection<Enrollment> Enrollments { get; set; }

}
The key created above is non-unique, non-clustered. There are overloads available to override these defaults −
To make an index a Clustered index, you need to specify IsClustered = true
Similarly, you can also make an index a unique index by specifying IsUnique = true
Lets take a look at the following C# code where an index is clustered and unique.
public partial class Course {

   public Course() {
      this.Enrollments = new HashSet<Enrollment>();
   }

   [Index(IsClustered = true, IsUnique = true)]
   public int CourseID { get; set; }
   public string Title { get; set; }

   public int Credits { get; set; }
   public byte[] VersionNo { get; set; }

   public virtual ICollection<Enrollment> Enrollments { get; set; }
}
Index attribute can be used to create a unique index in the database. However, this does not mean that EF will be able to reason about the uniqueness of the column when dealing with relationships, etc. This feature is usually referred to as support for unique constraints.
Entity Framework - Stored Procedures
The Entity Framework allows you to use stored procedures in the Entity Data Model instead of, or in combination with, its automatic command generation.
You can use stored procedures to perform predefined logic on database tables, and many organizations have policies in place that require the use of these stored procedures.
It can also specify that EF should use your stored procedures for inserting, updating, or deleting entities.
Although the dynamically built commands are secure, efficient, and generally as good as or better than those you may write yourself, there are many cases where stored procedures already exist and your company practices may restrict direct use of the tables.
Alternatively, you may just want to have explicit control over what is executed on the store and prefer to create stored procedures.
The following example creates a new project from File → New → Project.
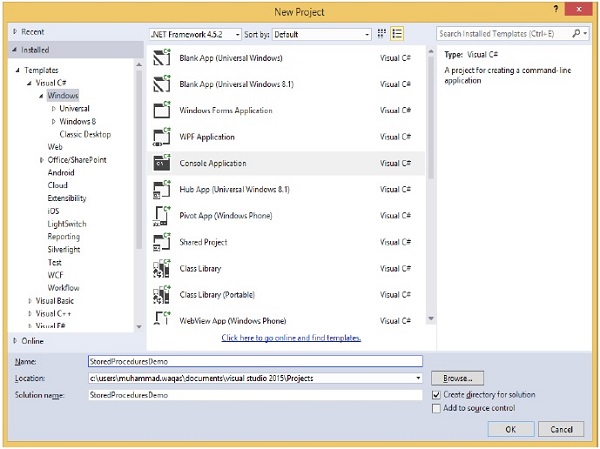
Step 1 − Select the Console Application from the middle pane and enter StoredProceduresDemo in the name field.
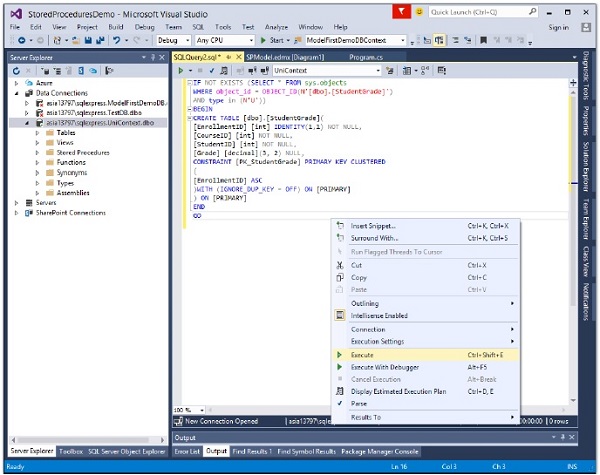
Step 2 − In Server explorer right-click on your database.
Step 3 − Select New Query and enter the following code in T-SQL editor to add a new table in your database.
IF NOT EXISTS (SELECT * FROM sys.objects WHERE object_id =
   OBJECT_ID(N'[dbo].[StudentGrade]') AND type in (N'U'))

BEGIN

   CREATE TABLE [dbo].[StudentGrade](

      [EnrollmentID] [int] IDENTITY(1,1) NOT NULL,
      [CourseID] [int] NOT NULL,
      [StudentID] [int] NOT NULL,
      [Grade] [decimal](3, 2) NULL,

      CONSTRAINT [PK_StudentGrade] PRIMARY KEY CLUSTERED (
         [EnrollmentID] ASC
      )

      WITH (IGNORE_DUP_KEY = OFF) ON [PRIMARY]

   ) ON [PRIMARY]

END
GO
Step 4 − Right-click on the editor and select Execute.
Step 5 − Right-click on your database and click refresh. You will see the newly added table in your database.
Step 6 − In Server explorer, right-click on your database again.
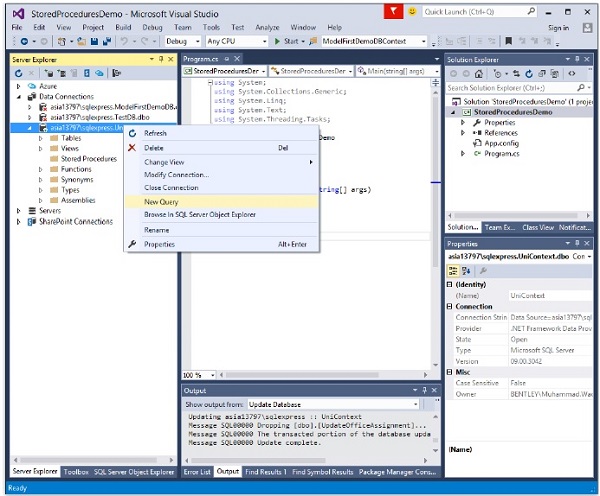
Step 7 − Select New Query and enter the following code in T-SQL editor to add a stored procedure in your database, which will return the Student grades.
IF NOT EXISTS (SELECT * FROM sys.objects WHERE object_id =
   OBJECT_ID(N'[dbo].[GetStudentGrades]') AND type in (N'P', N'PC'))

BEGIN

   EXEC dbo.sp_executesql @statement = N'
   CREATE PROCEDURE [dbo].[GetStudentGrades]
   @StudentID int
   AS
   SELECT EnrollmentID, Grade, CourseID, StudentID FROM dbo.StudentGrade
   WHERE StudentID = @StudentID
   '
END
GO
Step 8 − Right-click on the editor and select Execute.
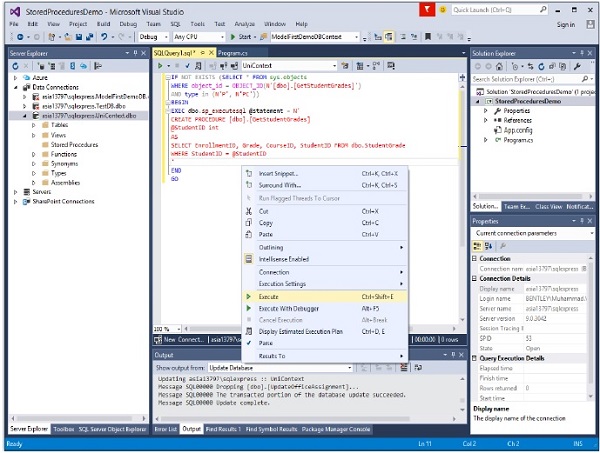
Step 9 − Right-click on your database and click refresh. You will see that a stored procedure is created in your database.
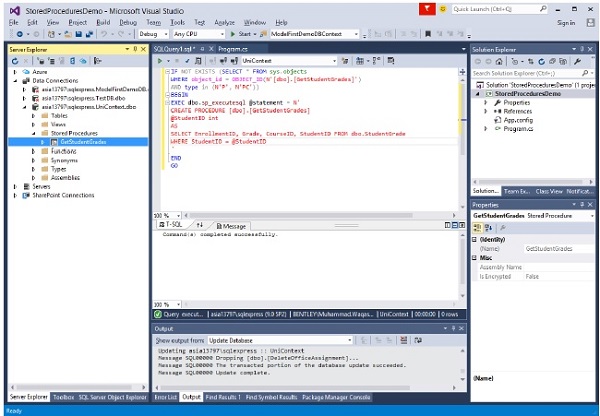
Step 10 − Right-click on the project name in Solution Explorer and select Add → New Item.
Step 11 − Then select ADO.NET Entity Data Model in the Templates pane.
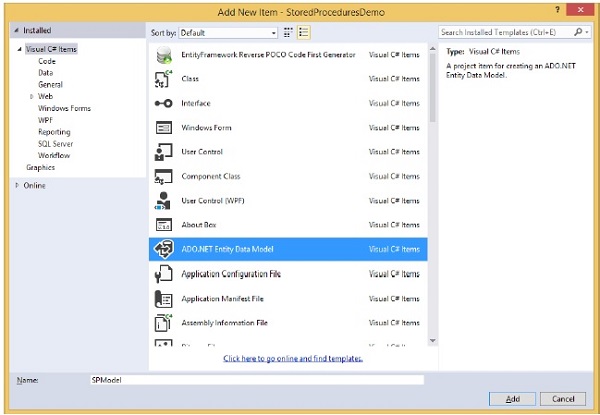
Step 12 − Enter SPModel as name, and then click Add.
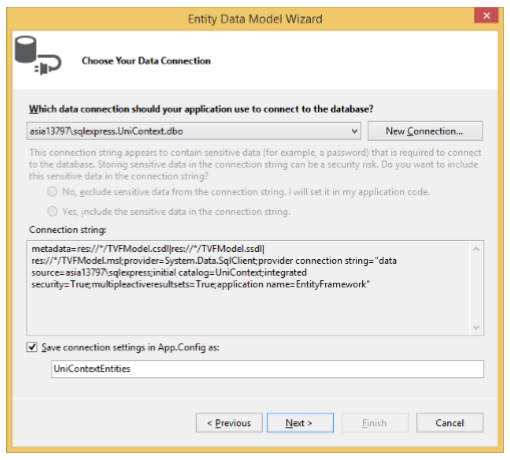
Step 13 − In the Choose Model Contents dialog box, select EF designer from database, and then click Next.
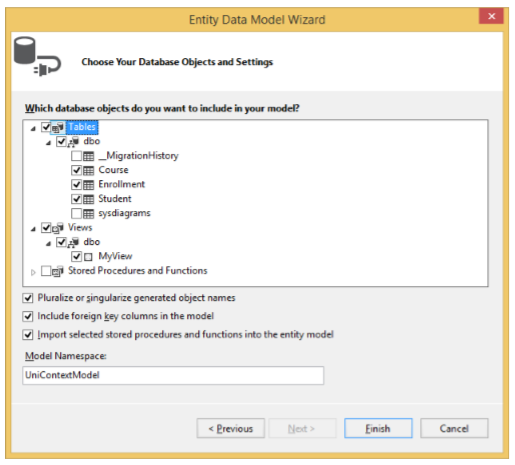
Step 14 − Select your database and click Next.
Step 15 − In the Choose Your Database Objects dialog box click on tables, views.

Step 16 − Select the GetStudentGradesForCourse function located under the Stored Procedures and Functions node and click Finish.
Step 17 − Select View → Other Windows → Entity Data Model Browser and right-click GetStudentGrades under Function Imports and select Edit.
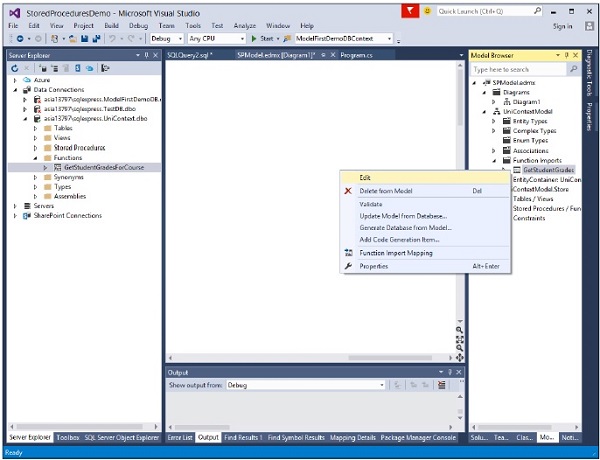
It will produce the following dialog.
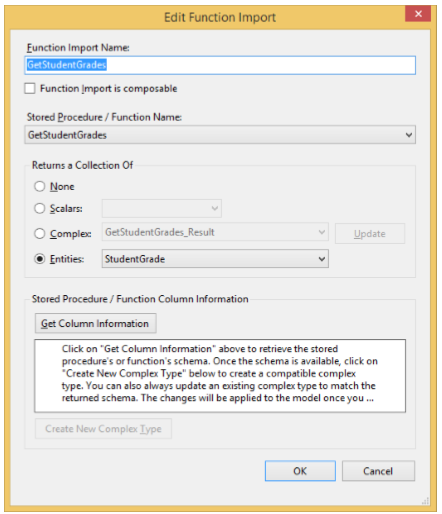
Step 18 − Click on Entities radio button and select StudentGrade from the combobox as return type of this stored procedure and click Ok.
Lets take a look at the following C# code in which all the grades will be retrieved by passing the student ID as parameter in GetStudentGrades stored procedure.
class Program {

   static void Main(string[] args) {

      using (var context = new UniContextEntities()) {

         int studentID = 22;
         var studentGrades = context.GetStudentGrades(studentID);

         foreach (var student in studentGrades) {
            Console.WriteLine("Course ID: {0}, Title: {1}, Grade: {2} ",
               student.CourseID, student.Course.Title, student.Grade);
         }

         Console.ReadKey();

      }
   }
}
When the above code is compiled and executed you will receive the following output −
Course ID: 4022, Title: Microeconomics, Grade: 3.00
Course ID: 4041, Title: Macroeconomics, Grade: 3.50
We recommend that you execute the above example in a step-by-step manner for better understanding.
Entity Framework - Disconnected Entities
In this chapter, let us look at how to make changes to entities that are not being tracked by a context. Entities that are not being tracked by a context are known as disconnected entities.
For most single-tier applications, where the user interface and database access layers run in the same application process, you will probably just be performing operations on entities that are being tracked by a context.
Operations on disconnected entities are much more common in N-Tier applications.
N-Tier applications involve fetching some data on a server and returning it, over the network, to a client machine.
The client application then manipulates this data before returning it to the server to be persisted.
Following are the two steps that needs to be taken with disconnected entity graph or even a single disconnected entity.
Attach entities with the new context instance and make context aware about these entities.
Set appropriate EntityStates to these entities manually.
Lets take a look at the following code in which Student entity is added with two Enrollment entities.
class Program {

   static void Main(string[] args) {

      var student = new Student {

         ID = 1001,
         FirstMidName = "Wasim",
         LastName = "Akram",

         EnrollmentDate = DateTime.Parse("2015-10-10"),
            Enrollments = new List<Enrollment> {

               new Enrollment{EnrollmentID = 2001,CourseID = 4022, StudentID = 1001 },
               new Enrollment{EnrollmentID = 2002,CourseID = 4025, StudentID = 1001 },
         }
      };

      using (var context = new UniContextEntities()) {

         context.Students.Add(student);
         Console.WriteLine("New Student ({0} {1}): {2}",
            student.FirstMidName, student.LastName, context.Entry(student).State);

         foreach (var enrollment in student.Enrollments) {
            Console.WriteLine("Enrollment ID: {0} State: {1}",
               enrollment.EnrollmentID, context.Entry(enrollment).State);
         }

         Console.WriteLine("Press any key to exit...");
         Console.ReadKey();
      }
   }
}
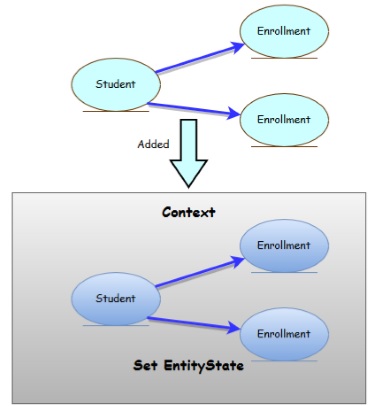
The code constructs a new Student instance, which also references two new Enrollment instances in its Enrollments property.
Then the new Student is added to a context using the Add method.
Once the Student is added, the code uses the DbContext.Entry method to get access to the change tracking information that Entity Framework has about the new Student.
From this change tracking information, the State property is used to write out the current state of the entity.
This process is then repeated for each of the newly created Enrollments that are referenced from the new Student. If you run the application, you will receive the following output −
New Student   (Wasim  Akram): Added
Enrollment ID: 2001 State: Added
Enrollment ID: 2002 State: Added
Press any key to exit...
While DbSet.Add is used to tell Entity Framework about new entities, DbSet.Attach is used to tell Entity Framework about existing entities. The Attach method will mark an entity in the Unchanged state.
Lets take a look at the following C# code in which a disconnected entity is attached with DbContext.
class Program {

   static void Main(string[] args) {

      var student = new Student {

         ID = 1001,
         FirstMidName = "Wasim",
         LastName = "Akram",
         EnrollmentDate = DateTime.Parse("2015-10-10"),

         Enrollments = new List<Enrollment> {
            new Enrollment { EnrollmentID = 2001, CourseID = 4022, StudentID = 1001 },
            new Enrollment { EnrollmentID = 2002, CourseID = 4025, StudentID = 1001 },
         }

      };

      using (var context = new UniContextEntities()) {

         context.Students.Attach(student);
         Console.WriteLine("New Student ({0} {1}): {2}",
            student.FirstMidName, student.LastName, context.Entry(student).State);

         foreach (var enrollment in student.Enrollments) {
            Console.WriteLine("Enrollment ID: {0} State: {1}", enrollment.EnrollmentID,
               context.Entry(enrollment).State);
         }

         Console.WriteLine("Press any key to exit...");
         Console.ReadKey();
      }
   }
}
When the above code is executed with Attach() method, you will receive the following output.
New Student   (Wasim  Akram): Unchanged
Enrollment ID: 2001 State: Unchanged
Enrollment ID: 2002 State: Unchanged
Press any key to exit...
Entity Framework - Table-Valued Function
In this chapter, let us learn how to map Table-valued Functions (TVFs) using the Entity Framework Designer and how to call a TVF from a LINQ query.
TVFs are currently only supported in the Database First workflow.
It was first introduced in Entity Framework version 5.
To use the TVFs you must target .NET Framework 4.5 or above.
It is very similar to stored procedures but with one key difference, i.e., the result of a TVF is composable. This means the results from a TVF can be used in a LINQ query while the results of a stored procedure cannot.
Lets take a look at the following example of creating a new project from File → New → Project.
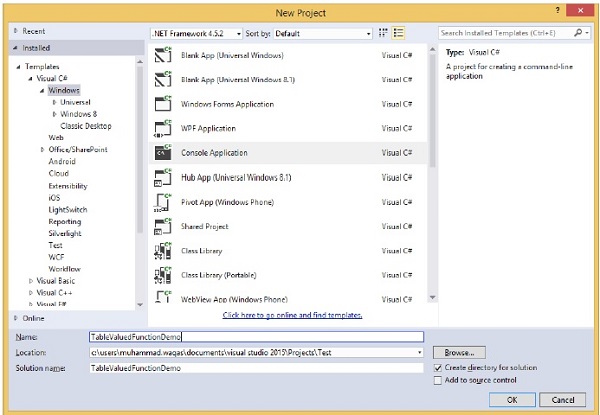
Step 1 − Select the Console Application from the middle pane and enter TableValuedFunctionDemo in the name field.
Step 2 − In Server explorer right-click on your database.
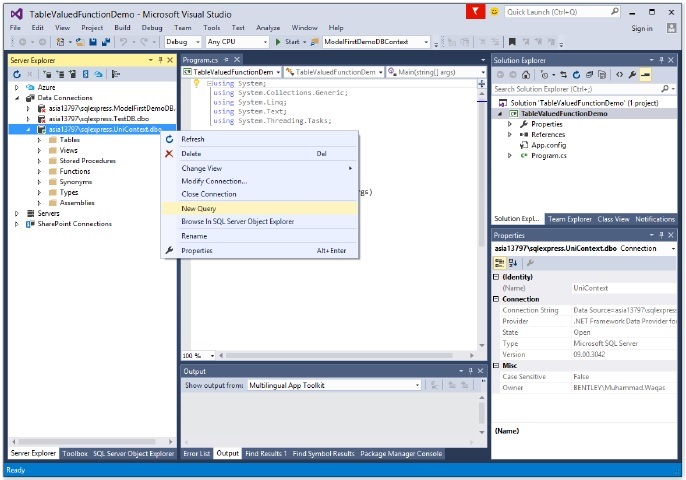
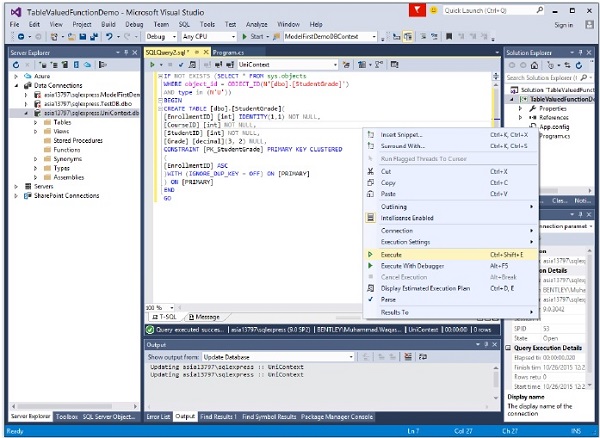
Step 3 − Select New Query and enter the following code in T-SQL editor to add a new table in your database.
IF NOT EXISTS (SELECT * FROM sys.objects WHERE object_id =
   OBJECT_ID(N'[dbo].[StudentGrade]') AND type in (N'U'))

BEGIN

   CREATE TABLE [dbo].[StudentGrade](

      [EnrollmentID] [int] IDENTITY(1,1) NOT NULL,
      [CourseID] [int] NOT NULL,
      [StudentID] [int] NOT NULL,
      [Grade] [decimal](3, 2) NULL,

      CONSTRAINT [PK_StudentGrade] PRIMARY KEY CLUSTERED ([EnrollmentID] ASC)

      WITH (IGNORE_DUP_KEY = OFF) ON [PRIMARY]

   ) ON [PRIMARY]

END
GO
Step 4 − Right-click on the editor and select Execute.
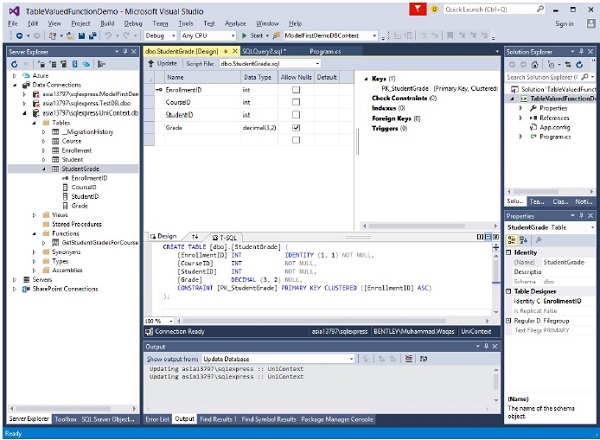
Step 5 − Right-click on your database and click refresh. You will see the newly added table in your database.
Step 6 − Now create a function that will return student grades for course. Enter the following code in T-SQL editor.
CREATE FUNCTION [dbo].[GetStudentGradesForCourse]

(@CourseID INT)

RETURNS TABLE

RETURN
   SELECT [EnrollmentID],
      [CourseID],
      [StudentID],
      [Grade]
   FROM   [dbo].[StudentGrade]
   WHERE  CourseID = @CourseID
Step 7 − Right-click on the editor and select Execute.
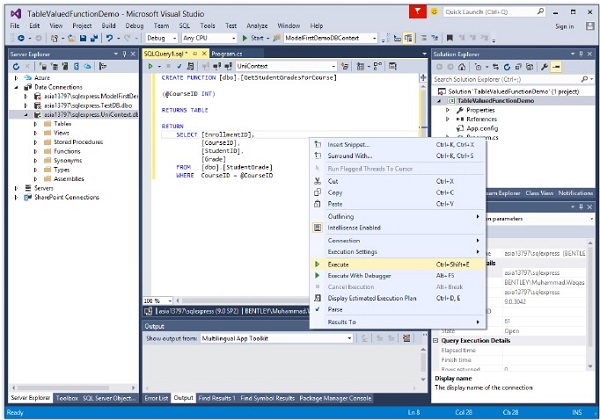
Now you can see that the function is created.
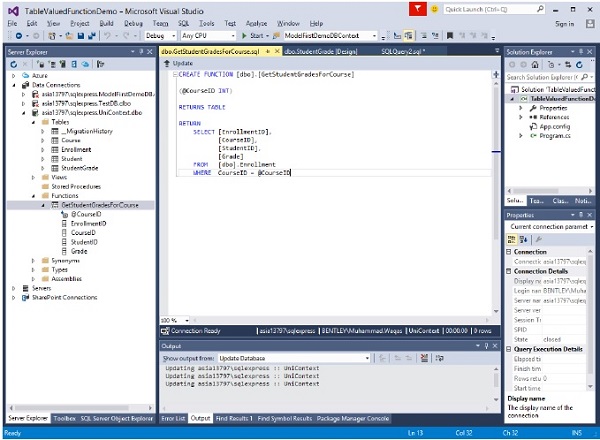
Step 8 − Right click on the project name in Solution Explorer and select Add → New Item.
Step 9 − Then select ADO.NET Entity Data Model in the Templates pane.
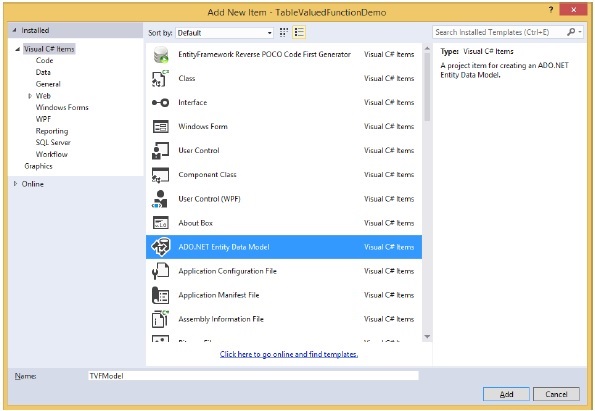
Step 10 − Enter TVFModel as name, and then click Add.
Step 11 − In the Choose Model Contents dialog box, select EF designer from database, and then click Next.
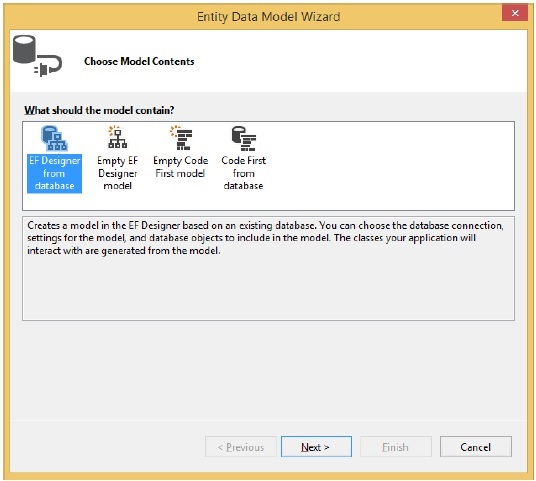
Step 12 − Select your database and click Next.
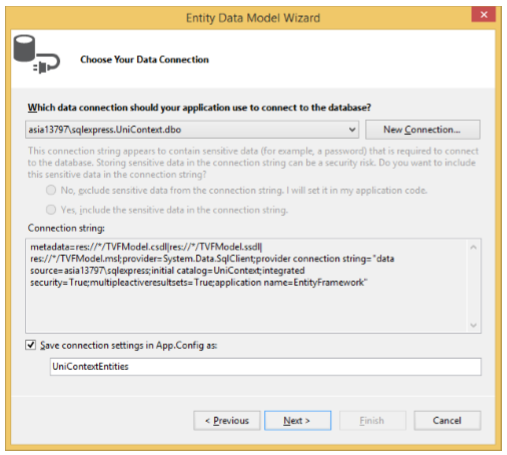
Step 13 − In the Choose Your Database Objects dialog box select tables, views.
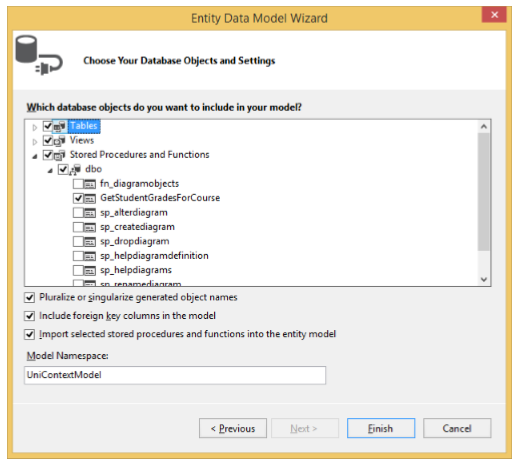
Step 14 − Select the GetStudentGradesForCourse function located under the Stored Procedures and Functions node and click Finish.
Step 15 − Select View → Other Windows → Entity Data Model Browser and right-click GetStudentGradesForCourse under Function Imports and select Edit.
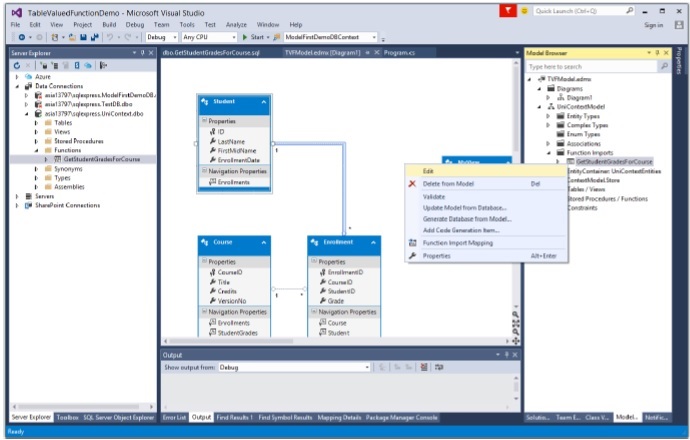
You will see the following dialog.
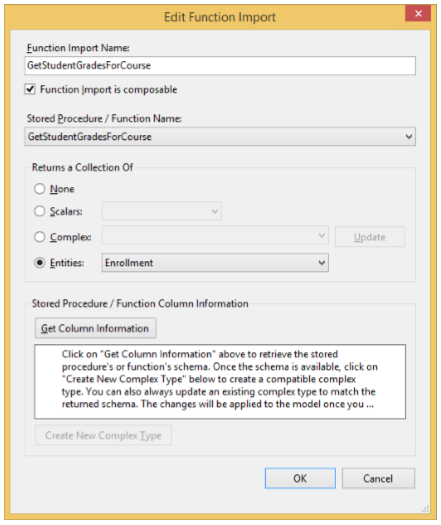
Step 16 − Click on Entities radio button and select Enrollment from the combobox as return type of this Function and click Ok.
Lets take a look at the following C# code in which all the students grade will be retrieved who are enrolled in Course ID = 4022 in database.
class Program {

   static void Main(string[] args) {

      using (var context = new UniContextEntities()) {

         var CourseID = 4022;

         // Return all the best students in the Microeconomics class.
         var students = context.GetStudentGradesForCourse(CourseID);

         foreach (var result in students) {
            Console.WriteLine("Student ID:  {0}, Grade: {1}",
               result.StudentID, result.Grade);
         }

         Console.ReadKey();
      }
   }
}
When the above code is compiled and executed you will receive the following output −
Student ID: 1, Grade: 2
Student ID: 4, Grade: 4
Student ID: 9, Grade: 3.5
We recommend that you execute the above example in a step-by-step manner for better understanding.
Entity Framework - Native SQL
In Entity Framework you can query with your entity classes using LINQ. You can also run queries using raw SQL directly against the database using DbCOntext. The techniques can be applied equally to models created with Code First and EF Designer.
SQL Query on Existing Entity
The SqlQuery method on DbSet allows a raw SQL query to be written that will return entity instances. The returned objects will be tracked by the context just as they would be if they were returned by a LINQ query. For example −
class Program {

   static void Main(string[] args) {

      using (var context = new UniContextEntities()) {

         var students = context.Students.SqlQuery("SELECT * FROM dbo.Student").ToList();

         foreach (var student in students) {
            string name = student.FirstMidName + " " + student.LastName;
            Console.WriteLine("ID: {0}, Name: {1}, \tEnrollment Date {2} ",
               student.ID, name, student.EnrollmentDate.ToString());
         }

         Console.ReadKey();
      }
   }
}
The above code will retrieve all the students from the database.
SQL Query for Non-entity Types
A SQL query returning instances of any type, including primitive types, can be created using the SqlQuery method on the Database class. For example −
class Program {

   static void Main(string[] args) {

      using (var context = new UniContextEntities()) {

         var studentNames = context.Database.SqlQuery
            <string>("SELECT FirstMidName FROM dbo.Student").ToList();

         foreach (var student in studentNames) {
            Console.WriteLine("Name: {0}", student);
         }

         Console.ReadKey();
      }
   }
}
SQL Commands to the Database
ExecuteSqlCommnad method is used in sending non-query commands to the database, such as the Insert, Update or Delete command. Lets take a look at the following code in which students first name is updated as ID = 1
class Program {

   static void Main(string[] args) {

      using (var context = new UniContextEntities()) {

         //Update command

         int noOfRowUpdated = context.Database.ExecuteSqlCommand("Update
            student set FirstMidName = 'Ali' where ID = 1");

         context.SaveChanges();

         var student = context.Students.SqlQuery("SELECT * FROM
            dbo.Student where ID = 1").Single();

         string name = student.FirstMidName + " " + student.LastName;

         Console.WriteLine("ID: {0}, Name: {1}, \tEnrollment Date {2} ",
            student.ID, name, student.EnrollmentDate.ToString());

         Console.ReadKey();
      }
   }
}
The above code will retrieve all the students first name from the database.
Entity Framework - Enum Support
In Entity Framework, this feature will allow you to define a property on a domain class that is an enum type and map it to a database column of an integer type. Entity Framework will then convert the database value to and from the relevant enum as it queries and saves data.
Enumerated types have all sorts of benefits when working with properties that have a fixed number of responses.
The security and reliability of an application both increase when you use enumerations.
Enumeration makes it much harder for the user to make mistakes, and issues such as injection attacks are nonexistent.
In Entity Framework, an enumeration can have the following underlying types −
- Byte
- Int16
- Int32
- Int64
- SByte
The default underlying type of the enumeration elements is int.
By default, the first enumerator has the value 0, and the value of each successive enumerator is increased by 1.
Lets take a look at the following example in which we will be creating an entity in designer and then will add some properties.
Step 1 − Create new project from File → New → Project menu option.
Step 2 − In the left pane, select the Console Application.
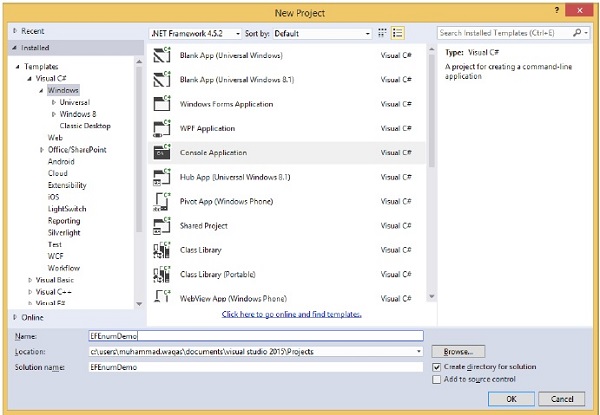
Step 3 − Enter EFEnumDemo as the name of the project and click OK.
Step 4 − Right-click on the project name in Solution Explorer and select Add → New Item menu option.
Step 5 − Select ADO.NET Entity Data Model in the Templates pane.
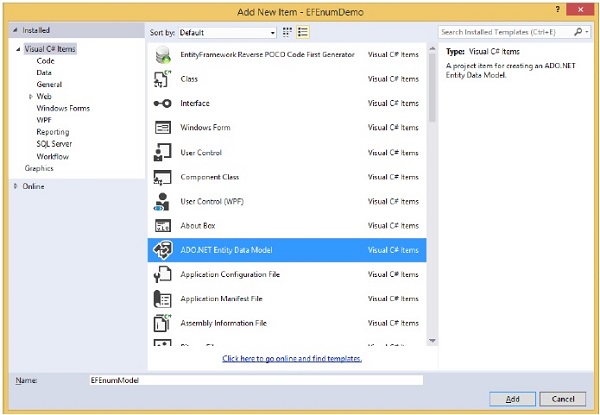
Step 6 − Enter EFEnumModel.edmx for the file name, and then click Add.
Step 7 − On the Entity Data Model Wizard page, select Empty EF designer Model.
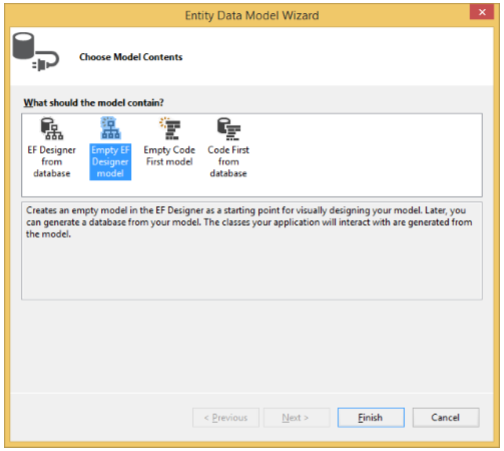
Step 8 − Click Finish
Step 9 − Then right click on designer window and select Add → Entity.
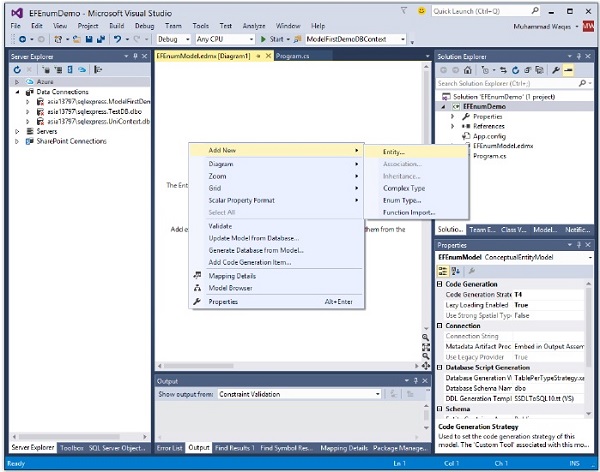
The New Entity dialog box appears as shown in the following image.
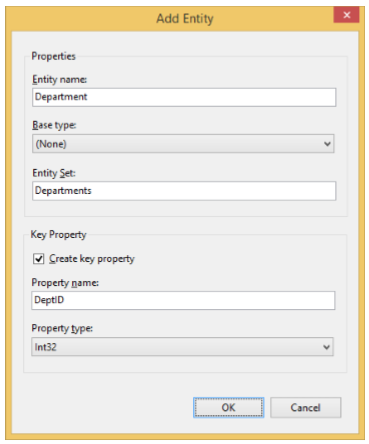
Step 10 − Enter Department as an Entity name and DeptID as a property name, leave the Property type as Int32 and click OK.
Step 11 − Right click the entity and select Add New → Scalar Property.

Step 12 − Rename the new property to DeptName.
Step 13 − Change the type of the new property to Int32 (by default, the new property is of String type).
Step 14 − To change the type, open the Properties window and change the Type property to Int32.
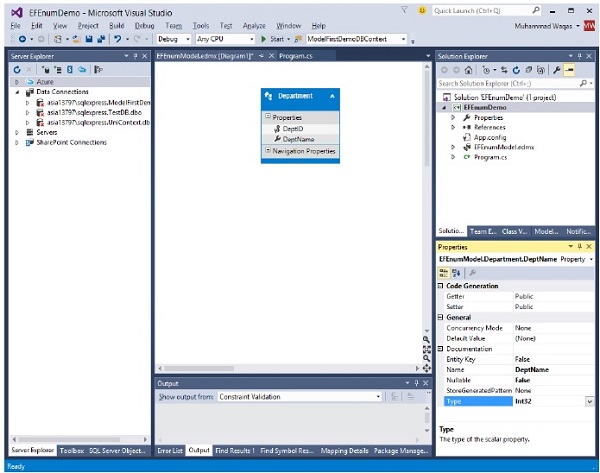
Step 15 − In the Entity Framework Designer, right click the Name property, select Convert to enum.
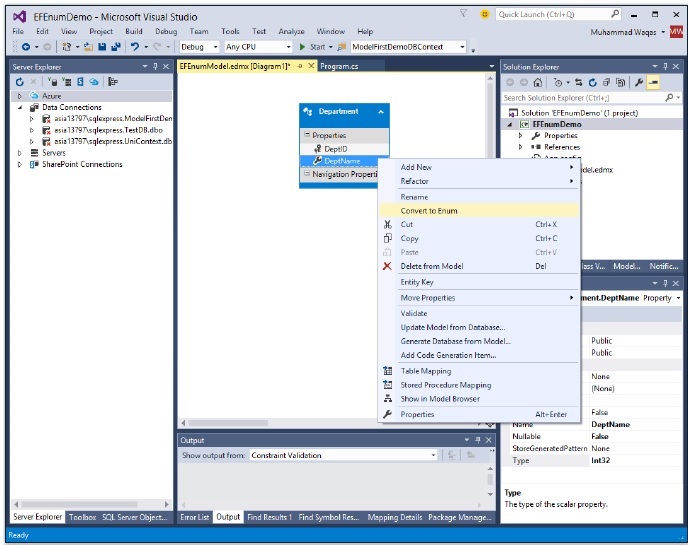
Step 16 − In the Add Enum Type dialog box, enter DepartmentNames for the Enum Type Name, change the Underlying Type to Int32, and then add the following members to the type: Physics, Chemistry, Computer, and Economics.
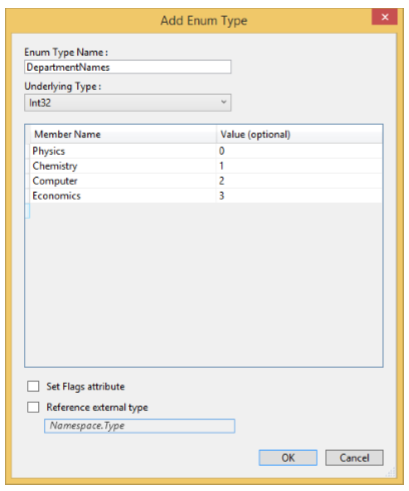
Step 17 − Click Ok.
If you switch to the Model Browser window, you will see that the type was also added to the Enum Types node.
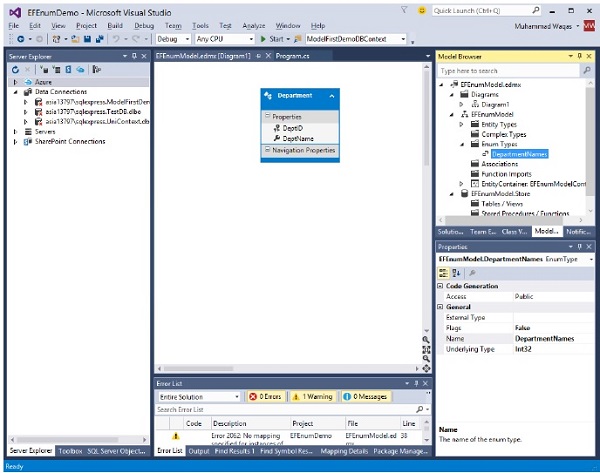
Lets generate database from model by following all the steps mentioned in Model First approach chapter.
Step 1 − Right click Entity Designer surface and select Generate Database from Model.
The Choose Your Data Connection Dialog Box of the Generate Database Wizard is displayed.
Step 2 − Click the New Connection button.
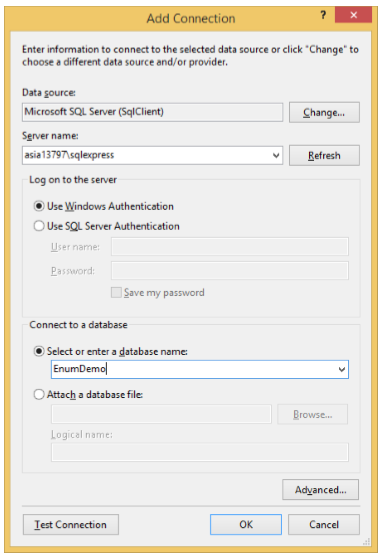
Step 3 − Enter the server name and EnumDemo for the database and click OK.
Step 4 − A dialog asking if you want to create a new database will pop up, click Yes.
Step 5 − Click Next and the Create Database Wizard generates data definition language (DDL) for creating a database. Now click Finish.
Step 6 − Right-click on T-SQL Editor and select Execute.
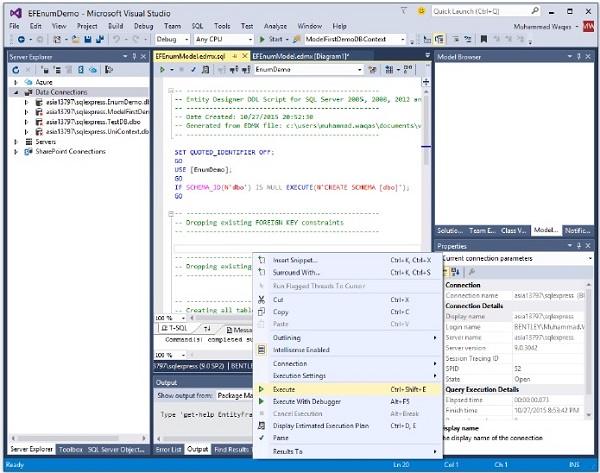
Step 7 − To view the generated schema, right click on the database name in SQL Server Object Explorer and select Refresh.
You will see the Departments table in the database.
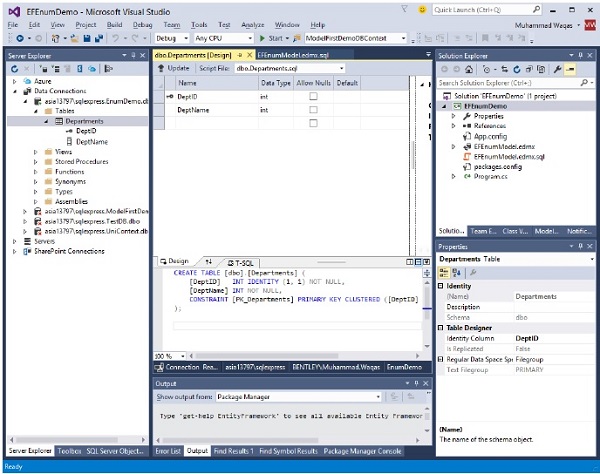
Lets take a look at the following example in which some new Department objects to the context are added and saved. And then retrieve the Computer department.
class Program {

   static void Main(string[] args) {

      using (var context = new EFEnumModelContainer()) {

         context.Departments.Add(new Department { DeptName = DepartmentNames.Physics});
         context.Departments.Add(new Department { DeptName = DepartmentNames.Computer});
         context.Departments.Add(new Department { DeptName = DepartmentNames.Chemistry});
         context.Departments.Add(new Department { DeptName = DepartmentNames.Economics});

         context.SaveChanges();

         var department = (
            from d in context.Departments
            where d.DeptName == DepartmentNames.Computer
            select d
         ).FirstOrDefault();

         Console.WriteLine(
            "Department ID: {0}, Department Name: {1}",
               department.DeptID, department.DeptName
         );

         Console.ReadKey();
      }
   }
}
When the above code is executed, you will receive the following output −
Department ID: 2, Department Name: Computer
We recommend that you execute the above example in a step-by-step manner for better understanding.
Entity Framework - Asynchronous Query
Asynchronous programming involves executing operations in the background so that the main thread can continue its own operations. This way the main thread can keep the user interface responsive while the background thread is processing the task at hand.
Entity Framework 6.0 supports asynchronous operations for querying and saving of data.
Asynchronous operations can help your application in the following ways −
- Make your application more responsive to user interactions
- Improve the overall performance of your application
You can execute asynchronous operations in various ways. But async/await keywords were introduced in .NET Framework 4.5 which makes your job simple.
The only thing you need to follow is the async/await pattern as illustrated by the following code fragment.
Lets take a look at the following example (without using async/await) in which DatabaseOperations method saves a new student to the database and then retrieves all students from the database and at the end some additional message is printed on the console.
class Program {

   static void Main(string[] args) {
      Console.WriteLine("Database Operations Started");
      DatabaseOperations();

      Console.WriteLine();
      Console.WriteLine("Database Operations Completed");
      Console.WriteLine();
      Console.WriteLine("Entity Framework Tutorials");
      Console.ReadKey();
   }

   public static void DatabaseOperations() {

      using (var context = new UniContextEntities()) {

         // Create a new student and save it

         context.Students.Add(new Student {
            FirstMidName = "Akram",
            LastName = "Khan",
            EnrollmentDate = DateTime.Parse(DateTime.Today.ToString())});

         Console.WriteLine("Calling SaveChanges.");
         context.SaveChanges();
         Console.WriteLine("SaveChanges completed.");

         // Query for all Students ordered by first name

         var students = (from s in context.Students
            orderby s.FirstMidName select s).ToList();

         // Write all students out to Console

         Console.WriteLine();
         Console.WriteLine("All Student:");

         foreach (var student in students) {
            string name = student.FirstMidName + " " + student.LastName;
            Console.WriteLine(" " + name);
         }
      }
   }
}
When the above code is executed, you will receive the following output −
Calling SaveChanges.
SaveChanges completed.
All Student:
Akram Khan
Ali Khan
Ali Alexander
Arturo Anand
Bill Gates
Gytis Barzdukas
Laura  Nornan
Meredith fllonso
Nino Olioetto
Peggy Justice
Yan Li

Entity Framework Tutorials
Lets use the new async and await keywords and make the following changes to Program.cs
Add System.Data.Entity namespace which will give EF async extension methods.
Add System.Threading.Tasks namespace which will allow us to use the Task type.
Update DatabaseOperations to be marked as async and return a Task.
Call the Async version of SaveChanges and await its completion.
Call the Async version of ToList and await the result.
class Program {

   static void Main(string[] args) {
      var task = DatabaseOperations();
      Console.WriteLine();
      Console.WriteLine("Entity Framework Tutorials");
      task.Wait();
      Console.ReadKey();
   }

   public static async Task DatabaseOperations() {

      using (var context = new UniContextEntities()) {

         // Create a new blog and save it

         context.Students.Add(new Student {
            FirstMidName = "Salman",
            LastName = "Khan",
            EnrollmentDate = DateTime.Parse(DateTime.Today.ToString())});

         Console.WriteLine("Calling SaveChanges.");
         await context.SaveChangesAsync();
         Console.WriteLine("SaveChanges completed.");

         // Query for all Students ordered by first name

         var students = await (from s in context.Students
            orderby s.FirstMidName select s).ToListAsync();

         // Write all students out to Console

         Console.WriteLine();
         Console.WriteLine("All Student:");

         foreach (var student in students) {
            string name = student.FirstMidName + " " + student.LastName;
            Console.WriteLine(" " + name);
         }
      }
   }
}
On execution, it will produce the following output.
Calling SaveChanges.
Entity Framework Tutorials
SaveChanges completed.
All Student:
Akram Khan
Ali Khan
Ali Alexander
Arturo Anand
Bill Gates
Gytis Barzdukas
Laura  Nornan
Meredith fllonso
Nino Olioetto
Peggy Justice
Salman Khan
Yan Li
Now that the code is asynchronous, you can observe a different execution flow of your program.
SaveChanges begins to push the new Student to the database and then the DatabaseOperations method returns (even though it hasn't finished executing) and program flow in the Main method continues.
Message is then written to the console.
The managed thread is blocked on the Wait call until the database operation completes. Once it completes, the remainder of our DatabaseOperations will be executed.
SaveChanges completes.
Retrieved all the student from the database and is written to the Console.
We recommend that you execute the above example in a step-by-step manner for better understanding.
Entity Framework - Persistence
Entity Framework now allows you to benefit from the Entity Framework without forcing every part of your application to be aware of the Entity Framework, separating entities from the infrastructure. You can create classes that can focus on their business rules without regard to how they are persisted (where the data is stored and how the data gets back and forth between your objects).
Creating Persistent Ignorant Entities
The preceding paragraph described a method that has no intimate knowledge of the source of the data it consumes. This highlights the essence of persistence ignorance, which is when your classes and many of our application layers around them dont care how the data is stored.
In the .NET 3.5 version of Entity Framework, if you wanted to use preexisting classes, you were required to modify them by forcing them to derive from EntityObject.
In .NET 4 this is no longer necessary. You dont have to modify your entities in order for them to participate in Entity Framework operations.
This allows us to build applications that embrace loose coupling and separation of concerns.
With these coding patterns, your classes are only concerned with their own jobs and, many layers of your application, including the UI, have no dependencies on external logic, such as the Entity Framework APIs, yet those external APIs are able to interact with our entities.
There are 2 ways (connected and disconnected) when persisting an entity with the Entity Framework. Both ways have their own importance. In the case of a connected scenario the changes are tracked by the context but in the case of a disconnected scenario we need to inform the context about the state of the entity.
Connected Scenarios
Connected scenario is when an entity is retrieved from the database and modified in the same context. For a connected scenario let us suppose we have a Windows service and we are doing some business operations with that entity so we will open the context, loop through all the entities, do our business operations and then save the changes with the same context that we opened in the beginning.
Lets take a look at the following example in which students are retrieved from database and update the students first name and then save changes to the database.
class Program {

   static void Main(string[] args) {

      using (var context = new MyContext()) {

         var studentList = context.Students.ToList();

         foreach (var stdnt in studentList) {
            stdnt.FirstMidName = "Edited " + stdnt.FirstMidName;
         }

         context.SaveChanges();

         //// Display all Students from the database

         var students = (from s in context.Students
            orderby s.FirstMidName select s).ToList<Student>();

         Console.WriteLine("Retrieve all Students from the database:");

         foreach (var stdnt in students) {
            string name = stdnt.FirstMidName + " " + stdnt.LastName;
            Console.WriteLine("ID: {0}, Name: {1}", stdnt.ID, name);
         }

         Console.ReadKey();
      }
   }
}
When the above code is compiled and executed you will receive the following output and you will see that Edited word is attached before the first name as shown in the following output.
Retrieve all Students from the database:
ID: 1, Name: Edited Edited Alain Bomer
ID: 2, Name: Edited Edited Mark Upston
Disconnected Scenarios
Disconnected scenario is when an entity is retrieved from the database and modified in the different context. Let's suppose we want to display some data in a Presentation Layer and we are using some n-tier application, so it would be better to open the context, fetch the data and finally close the context. Since here we have fetched the data and closed the context, the entities that we have fetched are no longer tracked and this is the disconnected scenario.
Lets take a look at the following code in which new disconnected Student entity is added to a context using the Add method.
class Program {

   static void Main(string[] args) {

      var student = new Student {
         ID = 1001,
         FirstMidName = "Wasim",
         LastName = "Akram",
         EnrollmentDate = DateTime.Parse( DateTime.Today.ToString())
      };

      using (var context = new MyContext()) {

         context.Students.Add(student);
         context.SaveChanges();

         //// Display all Students from the database

         var students = (from s in context.Students
            orderby s.FirstMidName select s).ToList<Student>();

         Console.WriteLine("Retrieve all Students from the database:");

         foreach (var stdnt in students) {
            string name = stdnt.FirstMidName + " " + stdnt.LastName;
            Console.WriteLine("ID: {0}, Name: {1}", stdnt.ID, name);
         }

         Console.ReadKey();
      }
   }
}
When the above code is compiled and executed, you will receive the following output.
Retrieve all Students from the database:
ID: 1, Name: Edited Edited Edited Alain Bomer
ID: 2, Name: Edited Edited Edited Mark Upston
ID: 3, Name: Wasim Akram
Entity Framework - Projection Queries
LINQ to Entities
One of the most important concepts to understand LINQ to Entities is that its a declarative language. The focus is on defining what information you need, rather than on how to obtain the information.
It means that you can spend more time working with data and less time trying to figure out the underlying code required to perform tasks such as accessing the database.
Its important to understand that declarative languages dont actually remove any control from the developer, but it helps the developer focus attention on whats important.
LINQ to Entities Essential Keywords
Its important to know the basic keywords used to create a LINQ query. There are only a few keywords to remember, but you can combine them in various ways to obtain specific results. The following list contains these basic keywords and provides a simple description of each one.
| Sr. No. | Keyword & Description |
|---|---|
| 1 | Ascending Specifies that a sorting operation takes place from the least (or lowest) element of a range to the highest element of a range. This is normally the default setting. For example, when performing an alphabetic sort, the sort would be in the range from A to Z. |
| 2 | By Specifies the field or expression used to implement a grouping. The field or expression defines a key used to perform the grouping task. |
| 3 | Descending Specifies that a sorting operation takes place from the greatest (or highest) element of a range to the lowest element of a range. For example, when performing an alphabetic sort, the sort would be in the range from Z to A. |
| 4 | Equals Used between the left and right clauses of a join statement to join the primary contextual data source to the secondary contextual data source. The field or expression on the left of the equals keyword specifies the primary data source, while the field or expression on the right of the equals keyword specifies the secondary data source. |
| 5 | From Specifies the data source used to obtain the required information and defines a range variable. This variable has the same purpose as a variable used for iteration in a loop. |
| 6 | Group Organizes the output into groups using the key value you specify. Use multiple group clauses to create multiple levels of output organization. The order of the group clauses determines the depth at which a particular key value appears in the grouping order. You combine this keyword with by to create a specific context. |
| 7 | In Used in a number of ways. In this case, the keyword determines the contextual database source used for a query. When working with a join, the in keyword is used for each contextual database source used for the join. |
| 8 | Into Specifies an identifier that you can use as a reference for LINQ query clauses such as join, group, and select. |
| 9 | Join Creates a single data source from two related data sources, such as in a master/detail setup. A join can specify an inner, group, or left-outer join, with the inner join as the default. You can read more about joins at msdn.microsoft.com |
| 10 | Let Defines a range variable that you can use to store subexpression results in a query expression. Typically, the range variable is used to provide an additional enumerated output or to increase the efficiency of a query (so that a particular task, such as finding the lowercase value of a string, need not be done more than one time). |
| 11 | On Specifies the field or expression used to implement a join. The field or expression defines an element that is common to both contextual data sources. |
| 12 | Orderby Creates a sort order for the query. You can add the ascending or descending keyword to control the order of the sort. Use multiple orderby clauses to create multiple levels of sorting. The order of the orderby clauses determines the order in which the sort expressions are handled, so using a different order will result in different output. |
| 13 | Where Defines what LINQ should retrieve from the data source. You use one or more Boolean expressions to define the specifics of what to retrieve. The Boolean expressions are separated from each other using the && (AND) and || (OR) operators. |
| 14 | Select Determines the output from the LINQ query by specifying what information to return. This statement defines the data type of the elements that LINQ returns during the iteration process. |
Projection
Projection queries improve the efficiency of your application, by only retrieving specific fields from your database.
Once you have the data, you may want to project or filter it as needed to shape the data prior to output.
The main task of any LINQ to Entities expression is to obtain data and provide it as output.
The Developing LINQ to Entities queries section of this chapter demonstrates the techniques for performing this basic task.
Lets take a look at the following code in which list of students will be retrieved.
using (var context = new UniContextEntities()) {

   var studentList = from s in context.Students select s;

   foreach (var student in studentList) {
      string name = student.FirstMidName + " " + student.LastName;
      Console.WriteLine("ID : {0}, Name: {1}", student.ID, name);
   }
}
Single Object
To retrieve a single student object you can use First() or FirstOrDefault enumerable methods which returns the first element of a sequence. The difference between First and FirstOrDefault is that First() will throw an exception, if there is no result data for the supplied criteria whereas FirstOrDefault() returns default value null, if there is no result data. In the below code snippet first student from the list will be retrieved whose first name is Ali.
using (var context = new UniContextEntities()) {

   var student = (from s in context.Students where s.FirstMidName
      == "Ali" select s).FirstOrDefault<Student>();

   string name = student.FirstMidName + " " + student.LastName;
   Console.WriteLine("ID : {0}, Name: {1}", student.ID, name);
}
You can also use Single() or SingleOrDefault to get a single student object which returns a single, specific element of a sequence. In the following example, a single student is retrieved whose ID is 2.
using (var context = new UniContextEntities()) {

   var student = (from s in context.Students where s.ID
      == 2 select s).SingleOrDefault<Student>();
   string name = student.FirstMidName + " " + student.LastName;

   Console.WriteLine("ID : {0}, Name: {1}", student.ID, name);
   Console.ReadKey();
}
List of Objects
If you want to retrieve the list of students whose first name is Ali then you can use ToList() enumerable method.
using (var context = new UniContextEntities()) {

   var studentList = (from s in context.Students where s.FirstMidName
      == "Ali" select s).ToList();

   foreach (var student in studentList) {
      string name = student.FirstMidName + " " + student.LastName;
      Console.WriteLine("ID : {0}, Name: {1}", student.ID, name);
   }

   Console.ReadKey();
}
Order
To retrieve data/list in any particular order you can used orderby keyword. In the following code, snippet list of student will be retrieved in ascending order.
using (var context = new UniContextEntities()) {

   var studentList = (from s in context.Students orderby
      s.FirstMidName ascending select s).ToList();

   foreach (var student in studentList) {
      string name = student.FirstMidName + " " + student.LastName;
      Console.WriteLine("ID : {0}, Name: {1}", student.ID, name);
   }

   Console.ReadKey();
}
Standard Vs Projection Entity Framework Query
Lets suppose, you have a Student model that contains the ID, FirstMidName, LastName and EnrollmentDate. If you want to return a list of Students, a standard query would return all the fields. But if you only want to get a list of students that contain ID, FirstMidName, and LastName fields. This is where you should use a projection query. Following is the simple example of projection query.
using (var context = new UniContextEntities()) {

   var studentList = from s in context.Students
      orderby s.FirstMidName ascending
      where s.FirstMidName == "Ali"

   select new {s.ID, s.FirstMidName, s.LastName};

   foreach (var student in studentList) {
      string name = student.FirstMidName + " " + student.LastName;
      Console.WriteLine("ID : {0}, Name: {1}", student.ID, name);
   }

   Console.ReadKey();
}
The projection query above excludes the EnrollmentDate field. This will make your application much quicker.
Entity Framework - Command Logging
In Entity Framework 6.0, a new feature is introduced which is known as Logging SQL. While working with Entity Framework, it sends commands or an equivalent SQL query to the database to do a CRUD (Create, Read, Update, and Delete) operations.
This feature of the Entity Framework is to capture an equivalent SQL query generated by Entity Framework internally and provide it as output.
Before Entity Framework 6, whenever there was a need to trace database queries and command, the developer had no option but to use some third party tracing utility or database tracing tool.
In Entity Framework 6, this new feature provides a simple way by logging all the operations performed by Entity Framework.
All the activities which are performed by Entity Framework are logged using DbContext.Database.Log.
Lets take a look at the following code in which a new student is added to the database.
class Program {

   static void Main(string[] args) {

      using (var context = new UniContextEntities()) {

         context.Database.Log = Console.Write;

         // Create a new student and save it

         context.Students.Add(new Student {
            FirstMidName = "Salman",
            LastName = "Khan",
            EnrollmentDate = DateTime.Parse(DateTime.Today.ToString())
         });

         context.SaveChanges();
         Console.ReadKey();
      }
   }
}
When the above code is executed, you will receive the following output, which is actually the log of all the activities performed by EF in the above code.
Opened connection at 10/28/2015 6:27:35 PM +05:00
Started transaction at 10/28/2015 6:27:35 PM +05:00
INSERT [dbo].[Student]([LastName], [FirstMidName], [EnrollmentDate])
VALUES (@0, @1, @2)
SELECT [ID]
FROM [dbo].[Student]
WHERE @@ROWCOUNT > 0 AND [ID] = scope_identity()
-- @0: 'Khan' (Type = String, Size = -1)
-- @1: 'Salman' (Type = String, Size = -1)
-- @2: '10/28/2015 12:00:00 AM' (Type = DateTime)
-- Executing at 10/28/2015 6:27:35 PM +05:00
-- Completed in 5 ms with result: SqlDataReader
Committed transaction at 10/28/2015 6:27:35 PM +05:00
Closed connection at 10/28/2015 6:27:35 PM +05:00
When the Log property is set the following activities are logged −
SQL for all different kinds of commands e.g. Queries, including inserts, updates, and deletes generated as part of SaveChanges
Parameters
Whether or not the command is being executed asynchronously
A timestamp indicating when the command started executing
The command completed successfully or failed
Some indication of the result value
The approximate amount of time it took to execute the command
Logging to Other Place
If you already have some logging framework and it defines a logging method then you can also log it to other place.
Lets take a look at the following example in which we have another class MyLogger.
class Program {

   static void Main(string[] args) {

      using (var context = new UniContextEntities()) {

         context.Database.Log = s ⇒ MyLogger.Log("EFLoggingDemo", s);

         // Create a new student and save it

         context.Students.Add(new Student {
            FirstMidName = "Salman",
            LastName = "Khan",
            EnrollmentDate = DateTime.Parse(DateTime.Today.ToString())
         });

         context.SaveChanges();
         Console.ReadKey();
      }
   }
}

public class MyLogger {

   public static void Log(string application, string message) {
      Console.WriteLine("Application: {0}, EF Message: {1} ",application, message);
   }
}
We recommend that you execute the above example in a step-by-step manner for better understanding.
Entity Framework - Command Interception
In Entity Framework 6.0, there is another new feature known as Interceptor or Interception. The interception code is built around the concept of interception interfaces. For example, the IDbCommandInterceptor interface defines methods that are called before EF makes a call to ExecuteNonQuery, ExecuteScalar, ExecuteReader, and related methods.
Entity Framework can truly shine by using interception. Using this approach you can capture a lot more information transiently without having to untidy your code.
To implement this, you need to create your own custom interceptor and register it accordingly.
Once a class that implements IDbCommandInterceptor interface has been created it can be registered with Entity Framework using the DbInterception class.
IDbCommandInterceptor interface has six methods and you need to implement all these methods. Following are the basic implementation of these methods.
Lets take a look at the following code in which IDbCommandInterceptor interface is implemented.
public class MyCommandInterceptor : IDbCommandInterceptor {

   public static void Log(string comm, string message) {
      Console.WriteLine("Intercepted: {0}, Command Text: {1} ", comm, message);
   }

   public void NonQueryExecuted(DbCommand command,
      DbCommandInterceptionContext<int> interceptionContext) {
         Log("NonQueryExecuted: ", command.CommandText);
   }

   public void NonQueryExecuting(DbCommand command,
      DbCommandInterceptionContext<int> interceptionContext) {
         Log("NonQueryExecuting: ", command.CommandText);
   }

   public void ReaderExecuted(DbCommand command,
      DbCommandInterceptionContext<DbDataReader> interceptionContext) {
         Log("ReaderExecuted: ", command.CommandText);
   }

   public void ReaderExecuting(DbCommand command,
      DbCommandInterceptionContext<DbDataReader> interceptionContext) {
         Log("ReaderExecuting: ", command.CommandText);
   }

   public void ScalarExecuted(DbCommand command,
      DbCommandInterceptionContext<object> interceptionContext) {
         Log("ScalarExecuted: ", command.CommandText);
   }

   public void ScalarExecuting(DbCommand command,
      DbCommandInterceptionContext<object> interceptionContext) {
         Log("ScalarExecuting: ", command.CommandText);
   }

}
Registering Interceptors
Once a class that implements one or more of the interception interfaces has been created it can be registered with EF using the DbInterception class as shown in the following code.
DbInterception.Add(new MyCommandInterceptor());
Interceptors can also be registered at the app-domain level using the DbConfiguration code-based configuration as shown in the following code.
public class MyDBConfiguration : DbConfiguration {

   public MyDBConfiguration() {
      DbInterception.Add(new MyCommandInterceptor());
   }
}
You can also configure interceptor config file using the code −
<entityFramework>
   <interceptors>
      <interceptor type = "EFInterceptDemo.MyCommandInterceptor, EFInterceptDemo"/>
   </interceptors>
</entityFramework>
Entity Framework - Spatial Data Type
Spatial type support was introduced in Entity Framework 5. A set of operators is also included to allow queries to analyze spatial data. For example, a query can filter based on the distance between two geographic locations.
Entity Framework will allow new spatial data types to be exposed as properties on your classes and map them to spatial columns in your database.
You will also be able to write LINQ queries that make use of the spatial operators to filter, sort, and group based on spatial calculations performed in the database.
There are two main spatial data types −
The geography data type stores ellipsoidal data, for example, GPS latitude and longitude coordinates.
The geometry data type represents Euclidean (flat) coordinate system.
Lets take a look into the following example of Cricket ground.
Step 1 − Create new project from File → New → Project menu option.
Step 2 − In the left pane, select the Console Application.
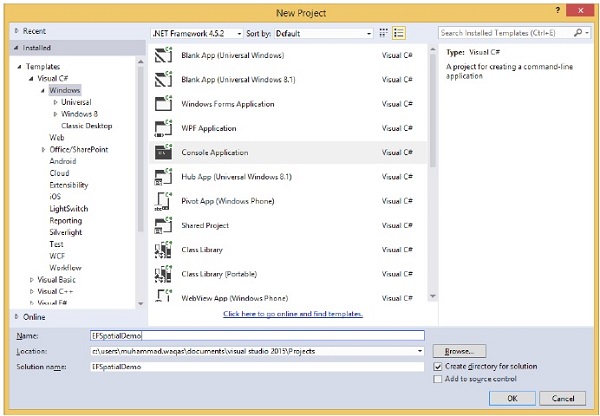
Step 3 − Right-click on project name and select Manage NuGet Packages
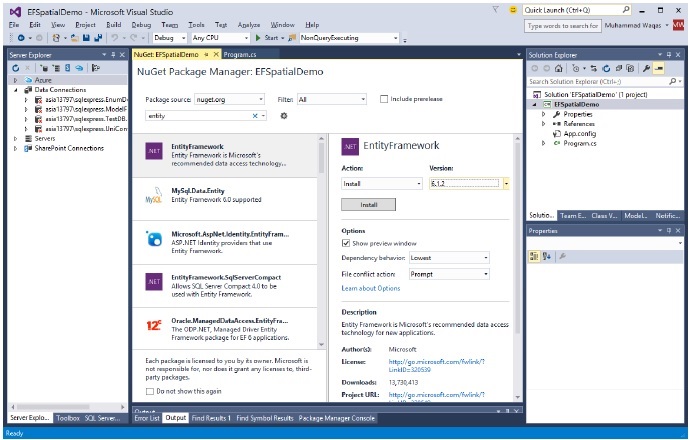
Step 4 − Install Entity Framework.
Step 5 − Add reference to System.Data.Entity assembly and also add the System.Data.Spatial using statement for spatial data types.

Step 6 − Add the following class in Program.cs file.
public class CricketGround {
   public int ID { get; set; }
   public string Name { get; set; }
   public DbGeography Location { get; set; }
}
Step 7 − In addition to defining entities, you need to define a class that derives from DbContext and exposes DbSet<TEntity> properties.
In the Program.cs add the context definition.
public partial class CricketGroundContext : DbContext {
   public DbSet<CricketGround> CricketGrounds { get; set; }
}
Step 8 − Add the following code into the Main function, which will add two new CricketGround objects to the context.
class Program {

   static void Main(string[] args) {

      using (var context = new CricketGroundContext()) {

         context.CricketGrounds.Add(new CricketGround() {
            Name = "Shalimar Cricket Ground",
            Location = DbGeography.FromText("POINT(-122.336106 47.605049)"),
         });

         context.CricketGrounds.Add(new CricketGround() {
            Name = "Marghazar Stadium", Location = DbGeography
               .FromText("POINT(-122.335197 47.646711)"),
         });

         context.SaveChanges();

         var myLocation = DbGeography.FromText("POINT(-122.296623 47.640405)");

         var cricketGround = (from cg in context.CricketGrounds
            orderby cg.Location.Distance(myLocation) select cg).FirstOrDefault();

         Console.WriteLine("The closest Cricket Ground to you is: {0}.", cricketGround.Name);
      }
   }
}
Spatial properties are initialized by using the DbGeography.FromText method. The geography point represented as WellKnownText is passed to the method and then saves the data. After that CricketGround object will be retrieved where its location is closest to the specified location.
When the above code is executed, you will receive the following output −
The closest Cricket Ground to you is: Marghazar Stadium
We recommend that you execute the above example in a step-by-step manner for better understanding.
Entity Framework - Inheritance
Inheritance makes it possible to create complex models that better reflect how developers think and also reduce the work required to interact with those models. Inheritance used with entities serves the same purpose as inheritance used with classes, so developers already know the basics of how this feature works.
Lets take a look at the following example and by creating a new console application project.
Step 1 − Add ADO.NET Entity Data Model by right-clicking on project name and select Add → New Item
Step 2 − Add one entity and name it Person by following all the steps mentioned in the chapter Model First approach.
Step 3 − Add some scalar properties as shown in the following image.
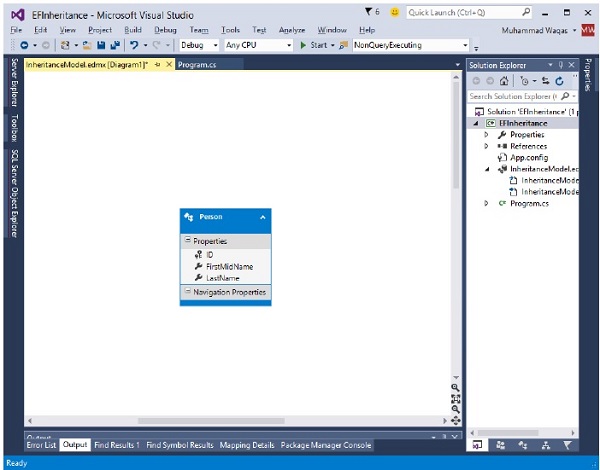
Step 4 − We will add two more entities Student and Teacher, which will inherit the properties from Person Table.
Step 5 − Now add Student entity and select Person from the Base type combobox as shown in the following image.
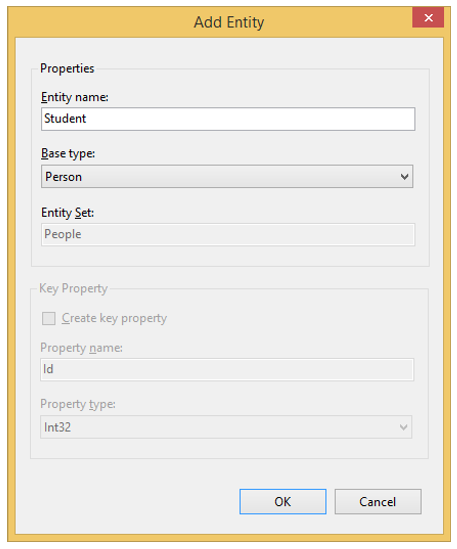
Step 6 − Similarly add Teacher entity.
Step 7 − Now add EnrollmentDate scalar property to student entity and HireDate property to Teacher entity.
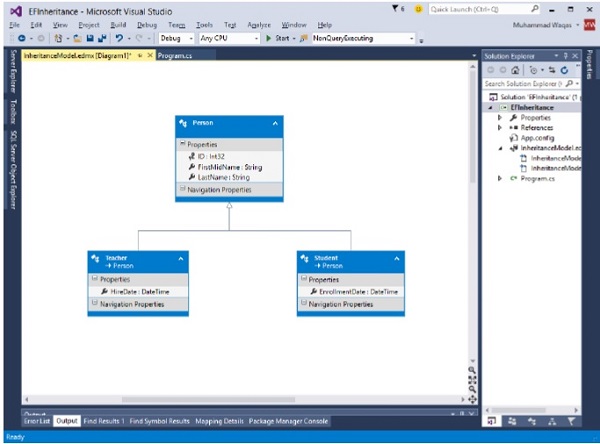
Step 8 − Let's go ahead and generate the database.
Step 9 − Right click on the design surface and select Generate Database from Model
Step 10 − To create new Database click on New ConnectionThe following dialog will open. Click OK.
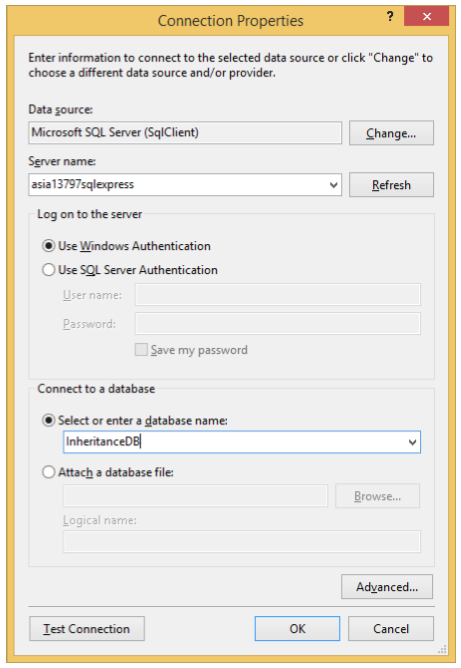
Step 11 − Click Finish. This will add *.edmx.sql file in the project. You can execute DDL scripts in Visual Studio by opening .sql file. Now right-click and select Execute.
Step 12 − Go to the server explorer you will see that the database is created with three tables which are specified.
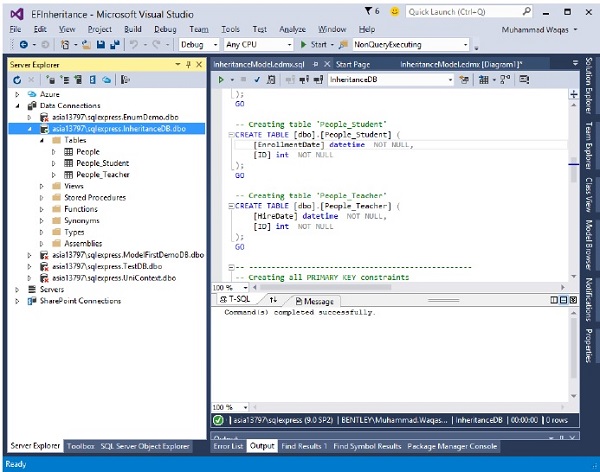
Step 13 − You can also see that the following domain classes are also generated automatically.
public partial class Person {
   public int ID { get; set; }
   public string FirstMidName { get; set; }
   public string LastName { get; set; }
}

public partial class Student : Person {
   public System.DateTime EnrollmentDate { get; set; }
}

public partial class Teacher : Person {
   public System.DateTime HireDate { get; set; }
}
Following is the Context class.
public partial class InheritanceModelContainer : DbContext {

   public InheritanceModelContainer() :
      base("name = InheritanceModelContainer") {}

   protected override void OnModelCreating(DbModelBuilder modelBuilder) {
      throw new UnintentionalCodeFirstException();
   }

   public virtual DbSet<Person> People { get; set; }
}
Lets add some Students and Teachers to the database and then retrieve it from the database.
class Program {

   static void Main(string[] args) {

      using (var context = new InheritanceModelContainer()) {

         var student = new Student {
            FirstMidName = "Meredith",
            LastName = "Alonso",
            EnrollmentDate = DateTime.Parse(DateTime.Today.ToString())
         };

         context.People.Add(student);

         var student1 = new Student {
            FirstMidName = "Arturo",
            LastName = "Anand",
            EnrollmentDate = DateTime.Parse(DateTime.Today.ToString())
         };

         context.People.Add(student1);

         var techaer = new Teacher {
            FirstMidName = "Peggy",
            LastName = "Justice",
            HireDate = DateTime.Parse(DateTime.Today.ToString())
         };

         context.People.Add(techaer);

         var techaer1 = new Teacher {
            FirstMidName = "Yan",
            LastName = "Li",
            HireDate = DateTime.Parse(DateTime.Today.ToString())
         };

         context.People.Add(techaer1);
         context.SaveChanges();
      }
   }
}
Students and teachers are added in the database. NTo retrieve students and teacher, the OfType method needs to be used, which will return Student and Teacher related to the specified department.
Console.WriteLine("All students in database");
Console.WriteLine("");

foreach (var student in context.People.OfType<Student>()) {
   string name = student.FirstMidName + " " + student.LastName;
   Console.WriteLine("ID: {0}, Name: {1}, \tEnrollment Date {2} ",
      student.ID, name, student.EnrollmentDate.ToString());
}

Console.WriteLine("");
Console.WriteLine("************************************************************ *****");
Console.WriteLine("");
Console.WriteLine("All teachers in database");
Console.WriteLine("");

foreach (var teacher in context.People.OfType<Teacher>()) {
   string name = teacher.FirstMidName + " " + teacher.LastName;
   Console.WriteLine("ID: {0}, Name: {1}, \tHireDate {2} ",
      teacher.ID, name, teacher.HireDate.ToString());
}

Console.WriteLine("");
Console.WriteLine("************************************************************ *****");
Console.ReadKey();
In the first query, when you use OfType<Student>() then you will not be able to access HireDate because HireDate property is part of Teacher Entity and similarly EnrollmentDate property will not be accessible when you use OfType<Teacher>()
When the above code is executed, you will receive the following output −
All students in database
ID: 1, Name: Meredith Alonso,   Enrollment Date 10/30/2015 12:00:00 AM
ID: 2, Name: Arturo Anand,      Enrollment Date 10/30/2015 12:00:00 AM
*****************************************************************
All teachers in database
ID: 3, Name: Peggy Justice,     HireDate 10/30/2015 12:00:00 AM
ID: 4, Name: Yan Li,    HireDate 10/30/2015 12:00:00 AM
*****************************************************************
We recommend that you execute the above example in a step-by-step manner for better understanding.
Entity Framework - Migration
In Entity Framework 5 and previous versions of Entity Framework, the code was split between core libraries (primarily System.Data.Entity.dll) shipped as part of the .NET Framework, and the additional libraries (primarily EntityFramework.dll) was distributed and shipped using NuGet as shown in the following diagram.
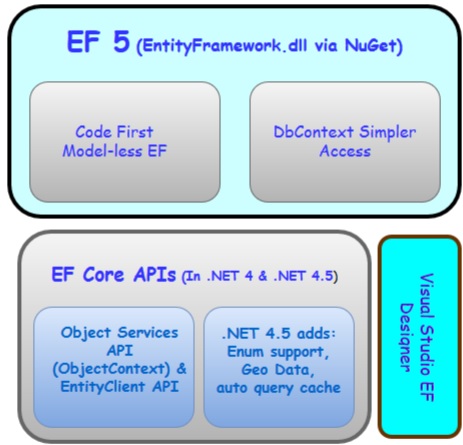
In Entity Framework 6, the core APIs which were previously part of .NET framework are also shipped and distributed as a part of NuGet package.
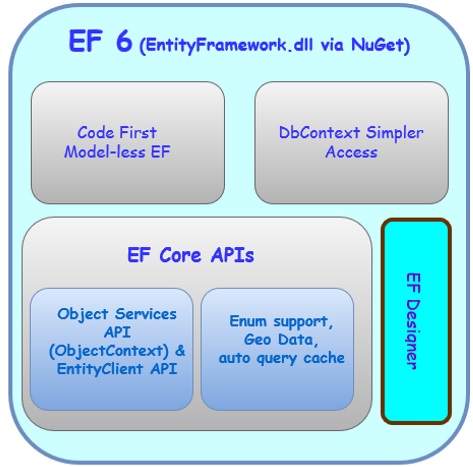
This was necessary to allow Entity Framework to be made open source. However, as a consequence applications will need to be rebuilt whenever there is a need to migrate or upgrade your application from older versions of Entity Framework to EF 6.
The migration process is straightforward if your application uses DbContext, which was shipped in EF 4.1 and later. But if your application is ObjectContext then little more work is required.
Lets take a look at the following steps you need to go through to upgrade an existing application to EF6.
Step 1 − The first step is to target .NET Framework 4.5.2 and later right click on your project and select properties.
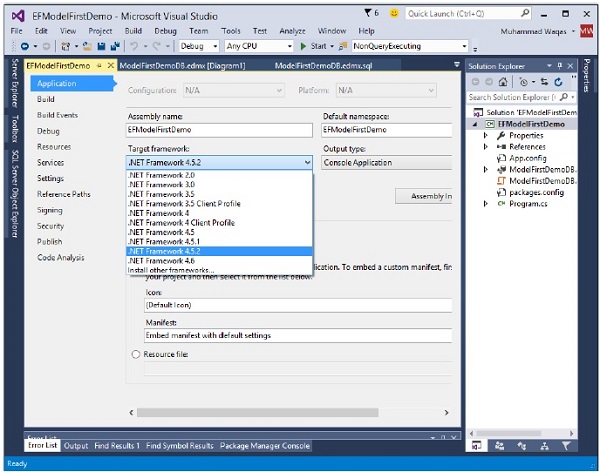
Step 2 − Right click on your project again and select Manage NuGet Packages...
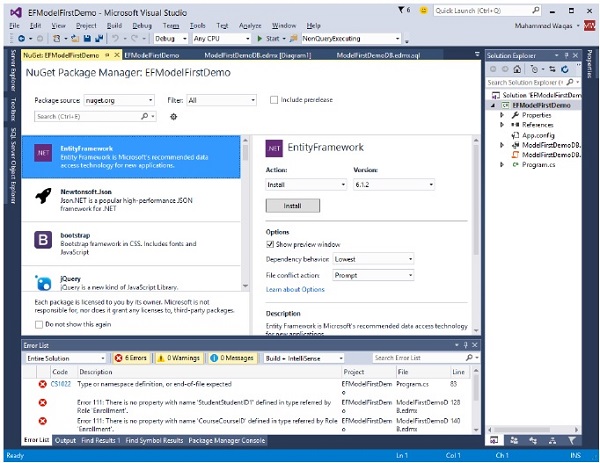
Step 3 − Under the Online tab select EntityFramework and click Install. Make sure that assembly references to System.Data.Entity.dll are removed.
When you install EF6 NuGet package it should automatically remove any references to System.Data.Entity from your project for you.
Step 4 − If you have any model which is created with the EF Designer, then you will also need to update the code generation templates to generate EF6 compatible code.
Step 5 − In your Solution Explorer under your edmx file, delete existing code-generation templates which typically will be named <edmx_file_name>.tt and <edmx_file_name>.Context.tt.
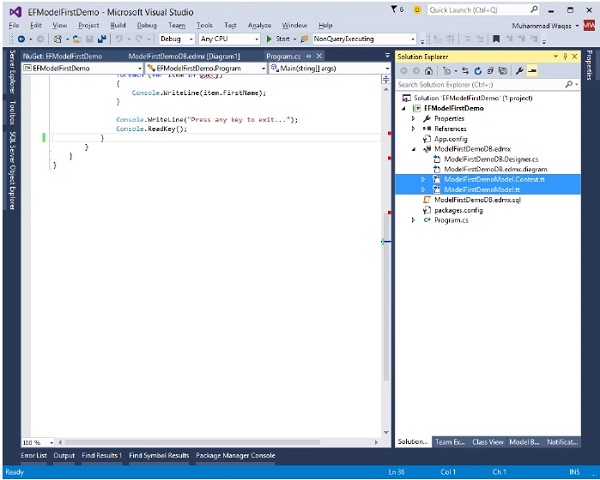
Step 6 − Open your model in the EF Designer, right click on the design surface and select Add Code Generation Item...
Step 7 − Add the appropriate EF 6.x code generation template.
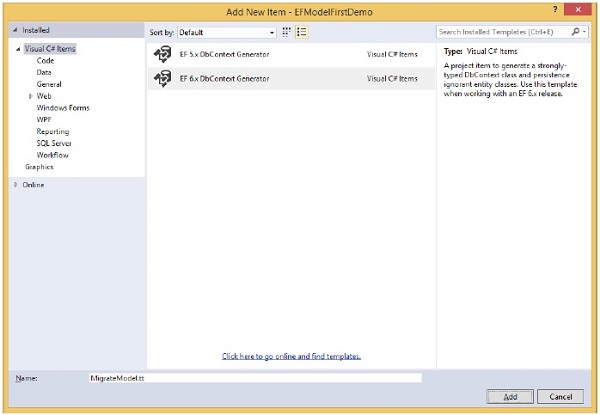
It will also generate EF6 compatible code automatically.
If your applications use EF 4.1 or later you will not need to change anything in the code, because the namespaces for DbContext and Code First types have not changed.
But if your application is using older version of Entity Framework then types like ObjectContext that were previously in System.Data.Entity.dll have been moved to new namespaces.
Step 8 − You will need to update your using or Import directives to build against EF6.
The general rule for namespace changes is that any type in System.Data.* is moved to System.Data.Entity.Core.*. Following are some of them −
- System.Data.EntityException ⇒ System.Data.Entity.Core.EntityException
- System.Data.Objects.ObjectContext ⇒ System.Data.Entity.Core.Objects.ObjectContext;
- System.Data.Objects.DataClasses.RelationshipManager ⇒ System.Data.Entity.Core.Objects.DataClasses.RelationshipManager;
Some types are in the Core namespaces because they are not used directly for most DbContext-based applications.
- System.Data.EntityState ⇒ System.Data.Entity.EntityState
- System.Data.Objects.DataClasses.EdmFunctionAttribute ⇒ System.Data.Entity.DbFunctionAttribute
Your existing Entity Framework project will work in Entity Framework 6.0 without any major changes.
Entity Framework - Eager Loading
Eager loading is the process whereby a query for one type of entity also loads related entities as part of the query. Eager loading is achieved by the use of the Include method.
It means that requesting related data be returned along with query results from the database. There is only one connection made to the data source, a larger amount of data is returned in the initial query.
For example, when querying students, eager-load their enrollments. The students and their enrollments will be retrieved in a single query.
Lets take a look at the following example in which all the students with their respective enrollments are retrieved from the database by using eager loading.
class Program {

   static void Main(string[] args) {

      using (var context = new UniContextEntities()) {
         // Load all students and related enrollments
         var students = context.Students
            .Include(s ⇒ s.Enrollments).ToList();

         foreach (var student in students) {
            string name = student.FirstMidName + " " + student.LastName;
            Console.WriteLine("ID: {0}, Name: {1}", student.ID, name);

            foreach (var enrollment in student.Enrollments) {
               Console.WriteLine("Enrollment ID: {0}, Course ID: {1}",
                  enrollment.EnrollmentID, enrollment.CourseID);
            }
         }

         Console.ReadKey();
      }
   }
}
When the above code is compiled and executed you will receive the following output.
ID: 1, Name: Ali Alexander
       Enrollment ID: 1, Course ID: 1050
       Enrollment ID: 2, Course ID: 4022
       Enrollment ID: 3, Course ID: 4041
ID: 2, Name: Meredith Alonso
       Enrollment ID: 4, Course ID: 1045
       Enrollment ID: 5, Course ID: 3141
       Enrollment ID: 6, Course ID: 2021
ID: 3, Name: Arturo Anand
       Enrollment ID: 7, Course ID: 1050
ID: 4, Name: Gytis Barzdukas
       Enrollment ID: 8, Course ID: 1050
       Enrollment ID: 9, Course ID: 4022
Below are some of the other forms of eager loading queries which can be used.
// Load one Student and its related enrollments

var student1 = context.Students
   .Where(s ⇒ s.FirstMidName == "Ali")
   .Include(s ⇒ s.Enrollments).FirstOrDefault();

// Load all Students and related enrollments
// using a string to specify the relationship

var studentList = context.Students
   .Include("Enrollments").ToList();

// Load one Student and its related enrollments
// using a string to specify the relationship

var student = context.Students
   .Where(s ⇒ s.FirstMidName == "Salman")
   .Include("Enrollments").FirstOrDefault();
Multiple Levels
It is also possible to eagerly load multiple levels of related entities. The following queries show examples of Student, Enrollments and Course.
// Load all Students, all related enrollments, and all related courses

var studentList = context.Students
   .Include(s ⇒ s.Enrollments.Select(c ⇒ c.Course)).ToList();

// Load all Students, all related enrollments, and all related courses
// using a string to specify the relationships

var students = context.Students
   .Include("Enrollments.Course").ToList();
We recommend that you execute the above example in a step-by-step manner for better understanding.
Entity Framework - Lazy Loading
Lazy loading is the process whereby an entity or collection of entities is automatically loaded from the database the first time that a property referring to the entity/entities is accessed. Lazy loading means delaying the loading of related data, until you specifically request for it.
When using POCO entity types, lazy loading is achieved by creating instances of derived proxy types and then overriding virtual properties to add the loading hook.
Lazy loading is pretty much the default.
If you leave the default configuration, and dont explicitly tell Entity Framework in your query that you want something other than lazy loading, then lazy loading is what you will get.
For example, when using the Student entity class, the related Enrollments will be loaded the first time the Enrollments navigation property is accessed.
Navigation property should be defined as public, virtual. Context will NOT do lazy loading if the property is not defined as virtual.
Following is a Student class which contains navigation property of Enrollments.
public partial class Student {

   public Student() {
      this.Enrollments = new HashSet<Enrollment>();
   }

   public int ID { get; set; }
   public string LastName { get; set; }
   public string FirstMidName { get; set; }
   public System.DateTime EnrollmentDate { get; set; }
   public virtual ICollection<Enrollment> Enrollments { get; set; }
}
Lets take a look into a simple example in which student list is loaded from the database first and then it will load the enrollments of a particular student whenever you need it.
class Program {

   static void Main(string[] args) {

      using (var context = new UniContextEntities()) {

         //Loading students only
         IList<Student> students = context.Students.ToList<Student>();

         foreach (var student in students) {

            string name = student.FirstMidName + " " + student.LastName;
            Console.WriteLine("ID: {0}, Name: {1}", student.ID, name);

            foreach (var enrollment in student.Enrollments) {
               Console.WriteLine("Enrollment ID: {0}, Course ID: {1}",
                  enrollment.EnrollmentID, enrollment.CourseID);
            }
         }

         Console.ReadKey();
      }
   }
}
When the above code is compiled and executed, you will receive the following output.
ID: 1, Name: Ali Alexander
       Enrollment ID: 1, Course ID: 1050
       Enrollment ID: 2, Course ID: 4022
       Enrollment ID: 3, Course ID: 4041
ID: 2, Name: Meredith Alonso
       Enrollment ID: 4, Course ID: 1045
       Enrollment ID: 5, Course ID: 3141
       Enrollment ID: 6, Course ID: 2021
ID: 3, Name: Arturo Anand
       Enrollment ID: 7, Course ID: 1050
ID: 4, Name: Gytis Barzdukas
       Enrollment ID: 8, Course ID: 1050
       Enrollment ID: 9, Course ID: 4022
ID: 5, Name: Yan Li
       Enrollment ID: 10, Course ID: 4041
ID: 6, Name: Peggy Justice
       Enrollment ID: 11, Course ID: 1045
ID: 7, Name: Laura Norman
       Enrollment ID: 12, Course ID: 3141
Turn Off Lazy Loading
Lazy loading and serialization dont mix well, and if you arent careful you can end up querying for your entire database just because lazy loading is enabled. Its a good practice to turn lazy loading off before you serialize an entity.
Turning Off for Specific Navigation Properties
Lazy loading of the Enrollments collection can be turned off by making the Enrollments property non-virtual as shown in the following example.
public partial class Student {

   public Student() {
      this.Enrollments = new HashSet<Enrollment>();
   }

   public int ID { get; set; }
   public string LastName { get; set; }
   public string FirstMidName { get; set; }
   public System.DateTime EnrollmentDate { get; set; }
   public ICollection<Enrollment> Enrollments { get; set; }
}
Turn Off for All Entities
Lazy loading can be turned off for all entities in the context by setting a flag on the Configuration property to false as shown in the following example.
public partial class UniContextEntities : DbContext {

   public UniContextEntities(): base("name=UniContextEntities") {
      this.Configuration.LazyLoadingEnabled = false;
   }

   protected override void OnModelCreating(DbModelBuilder modelBuilder) {
      throw new UnintentionalCodeFirstException();
   }
}
After turning off lazy loading, now when you run the above example again you will see that the Enrollments are not loaded and only student data is retrieved.
ID: 1, Name: Ali Alexander
ID: 2, Name: Meredith Alons
ID: 3, Name: Arturo Anand
ID: 4, Name: Gytis Barzduka
ID: 5, Name: Yan Li
ID: 6, Name: Peggy Justice
ID: 7, Name: Laura Norman
ID: 8, Name: Nino Olivetto
We recommend you to execute the above example in a step-by-step manner for better understanding.
Entity Framework - Explicit Loading
When you disabled the lazy loading, it is still possible to lazily load related entities, but it must be done with an explicit call.
Unlike lazy loading, there is no ambiguity or possibility of confusion regarding when a query is run.
To do so you use the Load method on the related entitys entry.
For a one-to-many relationship, call the Load method on Collection.
And for a one-to-one relationship, call the Load method on Reference.
Lets take a look at the following example in which lazy loading is disabled and then the student whose first name is Ali is retrieved.
Student information is then written on console. If you look at the code, enrollments information is also written but Enrollments entity is not loaded yet so foreach loop will not be executed.
After that Enrollments entity is loaded explicitly now student information and enrollments information will be written on the console window.
class Program {

   static void Main(string[] args) {

      using (var context = new UniContextEntities()) {

         context.Configuration.LazyLoadingEnabled = false;

         var student = (from s in context.Students where s.FirstMidName ==
            "Ali" select s).FirstOrDefault<Student>();

         string name = student.FirstMidName + " " + student.LastName;
         Console.WriteLine("ID: {0}, Name: {1}", student.ID, name);

         foreach (var enrollment in student.Enrollments) {
            Console.WriteLine("Enrollment ID: {0}, Course ID: {1}",
               enrollment.EnrollmentID, enrollment.CourseID);
         }

         Console.WriteLine();
         Console.WriteLine("Explicitly loaded Enrollments");
         Console.WriteLine();

         context.Entry(student).Collection(s ⇒ s.Enrollments).Load();
         Console.WriteLine("ID: {0}, Name: {1}", student.ID, name);

         foreach (var enrollment in student.Enrollments) {
            Console.WriteLine("Enrollment ID: {0}, Course ID: {1}",
               enrollment.EnrollmentID, enrollment.CourseID);
         }

         Console.ReadKey();
      }
   }
}
When the above example is executed, you will receive the following output. First only student information is displayed and after explicitly loading enrollments entity, both student and his related enrollments information is displayed.
ID: 1, Name: Ali Alexander
Explicitly loaded Enrollments
ID: 1, Name: Ali Alexander
       Enrollment ID: 1, Course ID: 1050
       Enrollment ID: 2, Course ID: 4022
       Enrollment ID: 3, Course ID: 4041
We recommend that you execute the above example in a step-by-step manner for better understanding.
Entity Framework - Validation
In this chapter let us learn about the validation techniques that can be used in ADO.NET Entity Framework to validate the model data. Entity Framework provides a great variety of validation features that can be implemented to a user interface for client-side validation or can be used for server-side validation.
In Entity Framework, data validation is part of the solution for catching bad data in an application.
Entity Framework validates all data before it is written to the database by default, using a wide range of data validation methods.
However, Entity Framework comes after the user-interface data validation. So in that case there is a need for entity validation to handle any exceptions that EF throws and show a generic message.
There are some techniques of data validation to improve your error checking and how to pass error messages back to the user.
DbContext has an Overridable method called ValidateEntity. When you call SaveChanges, Entity Framework will call this method for each entity in its cache whose state is not Unchanged. You can put validation logic directly in here as shown in the following example for the Student Entity.
public partial class UniContextEntities : DbContext {

   protected override System.Data.Entity.Validation
      .DbEntityValidationResult ValidateEntity(DbEntityEntry entityEntry,
      System.Collections.Generic.IDictionary<object, object> items) {

         if (entityEntry.Entity is Student) {

            if (entityEntry.CurrentValues.GetValue<string>("FirstMidName") == "") {

               var list = new List<System.Data.Entity
                  .Validation.DbValidationError>();

               list.Add(new System.Data.Entity.Validation
                  .DbValidationError("FirstMidName", "FirstMidName is required"));

               return new System.Data.Entity.Validation
                  .DbEntityValidationResult(entityEntry, list);
            }
         }

         if (entityEntry.CurrentValues.GetValue<string>("LastName") == "") {

            var list = new List<System.Data.Entity
               .Validation.DbValidationError>();

            list.Add(new System.Data.Entity.Validation
               .DbValidationError("LastName", "LastName is required"));

            return new System.Data.Entity.Validation
               .DbEntityValidationResult(entityEntry, list);
         }

         return base.ValidateEntity(entityEntry, items);
   }
}
In the above ValidateEntity method, Student entity FirstMidName and LastName properties are checked if any of these property have an empty string, then it will return an error message.
Lets take a look at a simple example in which a new student is created, but the students FirstMidName is empty string as shown in the following code.
class Program {

   static void Main(string[] args) {

      using (var context = new UniContextEntities()) {

         Console.WriteLine("Adding new Student to the database");
         Console.WriteLine();

         try {

            context.Students.Add(new Student() {
               FirstMidName = "",
               LastName = "Upston"
            });

            context.SaveChanges();
         } catch (DbEntityValidationException dbValidationEx) {

            foreach (DbEntityValidationResult entityErr in
               dbValidationEx.EntityValidationErrors) {

               foreach (DbValidationError error in entityErr.ValidationErrors) {
                  Console.WriteLine("Error: {0}",error.ErrorMessage);
               }
            }
         }

         Console.ReadKey();
      }
   }
}
When the above example is compiled and executed, you will receive the following error message on the console window.
Adding new Student to the database
Error: FirstMidName is required
We recommend you to execute the above example in a step-by-step manner for better understanding.
Entity Framework - Track Changes
Entity Framework provides ability to track the changes made to entities and their relations, so the correct updates are made on the database when the SaveChanges method of context is called. This is a key feature of the Entity Framework.
The Change Tracking tracks changes while adding new record(s) to the entity collection, modifying or removing existing entities.
Then all the changes are kept by the DbContext level.
These track changes are lost if they are not saved before the DbContext object is destroyed.
DbChangeTracker class gives you all the information about current entities being tracked by the context.
To track any entity by the context, it must have the primary key property.
In Entity Framework, change tracking is enabled by default. You can also disable change tracking by setting the AutoDetectChangesEnabled property of DbContext to false. If this property is set to true then the Entity Framework maintains the state of entities.
using (var context = new UniContextEntities()) {
   context.Configuration.AutoDetectChangesEnabled = true;
}
Lets take a look at the following example in which the students and their enrollments are retrieved from the database.
class Program {

   static void Main(string[] args) {

      using (var context = new UniContextEntities()) {

         context.Configuration.AutoDetectChangesEnabled = true;
         Console.WriteLine("Retrieve Student");

         var student = (from s in context.Students where s.FirstMidName ==
            "Ali" select s).FirstOrDefault<Student>();

         string name = student.FirstMidName + " " + student.LastName;
         Console.WriteLine("ID: {0}, Name: {1}", student.ID, name);
         Console.WriteLine();
         Console.WriteLine("Retrieve all related enrollments");

         foreach (var enrollment in student.Enrollments) {
            Console.WriteLine("Enrollment ID: {0}, Course ID: {1}",
               enrollment.EnrollmentID, enrollment.CourseID);
         }

         Console.WriteLine();

         Console.WriteLine("Context tracking changes of {0} entity.",
            context.ChangeTracker.Entries().Count());

         var entries = context.ChangeTracker.Entries();

         foreach (var entry in entries) {
            Console.WriteLine("Entity Name: {0}", entry.Entity.GetType().Name);
            Console.WriteLine("Status: {0}", entry.State);
         }

         Console.ReadKey();
      }
   }
}
When the above example is compiled and executed you will receive the following output.
Retrieve Student
ID: 1, Name: Ali Alexander
Retrieve all related enrollments
       Enrollment ID: 1, Course ID: 1050
       Enrollment ID: 2, Course ID: 4022
       Enrollment ID: 3, Course ID: 4041
Context tracking changes of 4 entity.
Entity Name: Student
Status: Unchanged
Entity Name: Enrollment
Status: Unchanged
Entity Name: Enrollment
Status: Unchanged
Entity Name: Enrollment
Status: Unchanged
You can see that all data is only retrieved from the database thats why the status is unchanged for all the entities.
Let us now take a look at another simple example in which we will add one more enrollment and delete one student from the database. Following is the code in which new enrollment is added and one student is deleted.
class Program {

   static void Main(string[] args) {

      using (var context = new UniContextEntities()) {

         context.Configuration.AutoDetectChangesEnabled = true;

         Enrollment enr = new Enrollment() {
            StudentID = 1, CourseID = 3141
         };

         Console.WriteLine("Adding New Enrollment");
         context.Enrollments.Add(enr);
         Console.WriteLine("Delete Student");

         var student = (from s in context.Students where s.ID ==
            23 select s).SingleOrDefault<Student>();

         context.Students.Remove(student);
         Console.WriteLine("");

         Console.WriteLine("Context tracking changes of {0} entity.",
            context.ChangeTracker.Entries().Count());
         var entries = context.ChangeTracker.Entries();

         foreach (var entry in entries) {
            Console.WriteLine("Entity Name: {0}", entry.Entity.GetType().Name);
            Console.WriteLine("Status: {0}", entry.State);
         }

         Console.ReadKey();
      }
   }
}
When the above example is compiled and executed, you will receive the following output.
Adding New Enrollment
Delete Student
Context tracking changes of 2 entity.
Entity Name: Enrollment
Status: Added
Entity Name: Student
Status: Deleted
You can now see that the status of enrollment entity is set to added, and the status of student entity is deleted, because new enrollment has been added and one student is removed from the database.
We recommend that you execute the above example in a step-by-step manner for better understanding.
Entity Framework - Colored Entities
In Entity Framework, Colored Entity is mainly all about changing the color of entity in the designer so that it is easy for developers to identify related groups of entities in the Visual Studio designer. This feature was first introduced in Entity Framework 5.0.
This feature has nothing to do with performance aspects.
When you have a large scale project and many entities in one edmx file, then this feature is very helpful to separate your entities in different modules.
If you are working with edmx file and you have opened it in designer, to change the color, select an entity on the design windows. Then right click and select Properties.
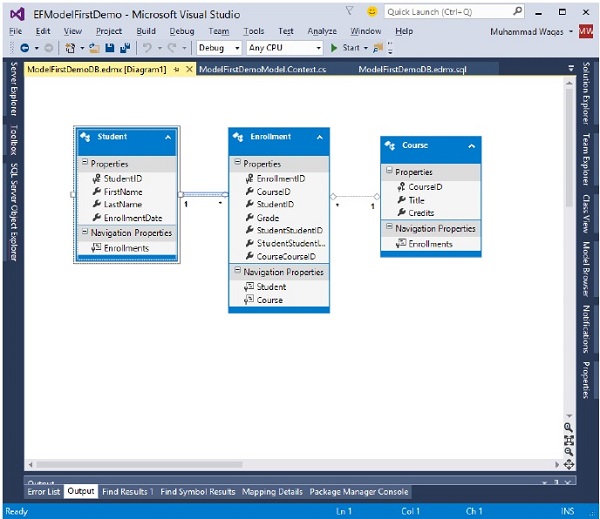
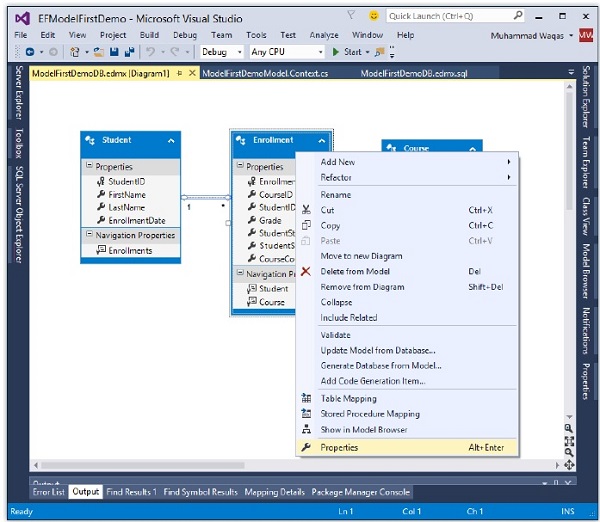
In the Properties window, select the Fill Color property.
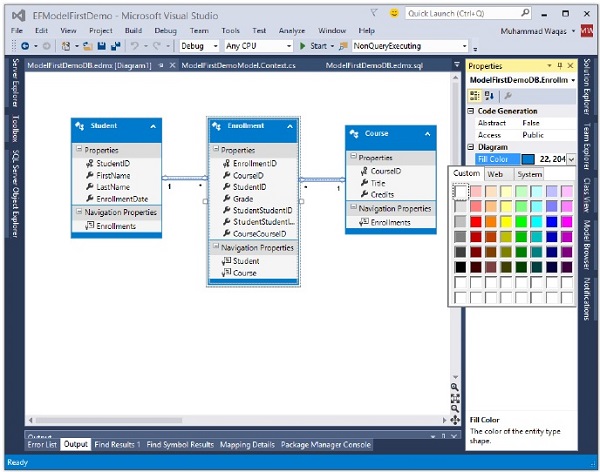
Specify the color using either a valid color name, for example, Green or a valid RGB (255, 128, 128) or you can also select from the color picker.
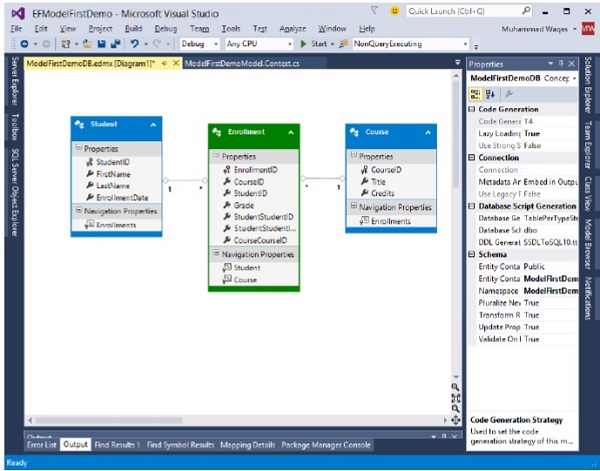
To change the color of multiple entities in one go, select multiple entities and change Fill Color for all of them using the property window.
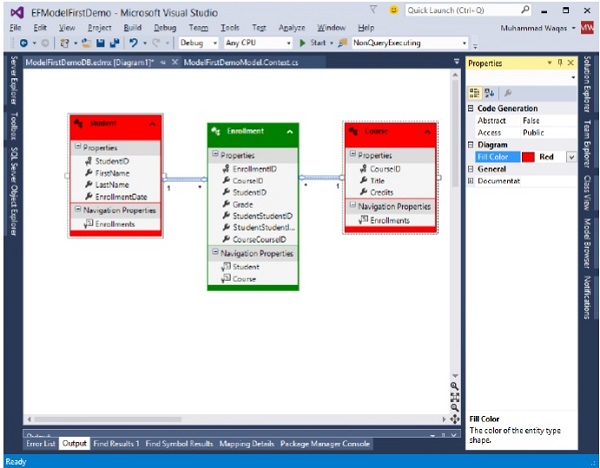
You can also change the format of properties by selecting any of the following options −
- Display Name
- Display Name and Type
By default, display name option is selected. To change the property format, right-click on the designer window.
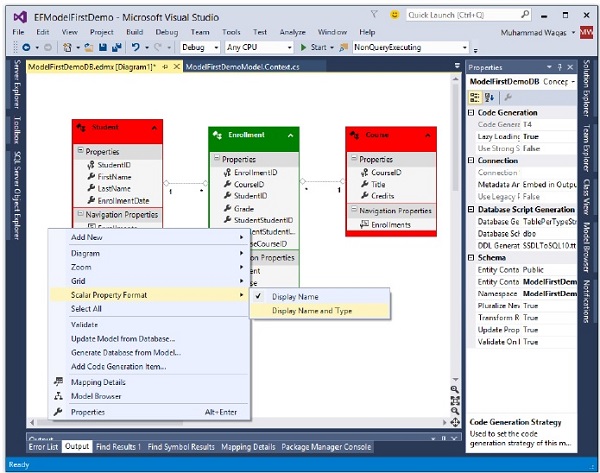
Select Scalar Property Format → Display Name and Type.
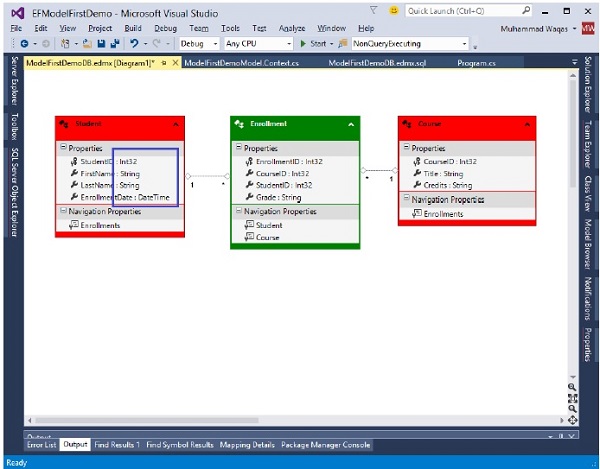
You can now see that the type is also displayed along with the name.
Entity Framework - Code First Approach
The Entity Framework provides three approaches to create an entity model and each one has their own pros and cons.
- Code First
- Database First
- Model First
In this chapter, we will briefly describe the code first approach. Some developers prefer to work with the Designer in Code while others would rather just work with their code. For those developers, Entity Framework has a modeling workflow referred to as Code First.
Code First modeling workflow targets a database that doesnt exist and Code First will create it.
It can also be used if you have an empty database and then Code First will add new tables to it.
Code First allows you to define your model using C# or VB.Net classes.
Additional configuration can optionally be performed using attributes on your classes and properties or by using a fluent API.
Why Code First?
Code First is really made up of a set of puzzle pieces. First are your domain classes.
The domain classes have nothing to do with Entity Framework. They're just the items of your business domain.
Entity Framework, then, has a context that manages the interaction between those classes and your database.
The context is not specific to Code First. It's an Entity Framework feature.
Code First adds a model builder that inspects your classes that the context is managing, and then uses a set of rules or conventions to determine how those classes and the relationships describe a model, and how that model should map to your database.
All of this happens at runtime. You'll never see this model, it's just in memory.
Code First also has the ability to use that model to create a database if you wanted to.
It can also update the database if the model changes, using a feature called Code First Migrations.
Environment Setup
To start working with EF Code First approach you need the following tools to be installed on your system.
- Visual Studio 2013 (.net framework 4.5.2) or later version.
- MS SQL Server 2012 or latter.
- Entity Framework via NuGet Package.
Install EF via NuGet Package
Step 1 − First, create the console application from File → New → Project
Step 2 − Select Windows from the left pane and Console Application from the template pane.
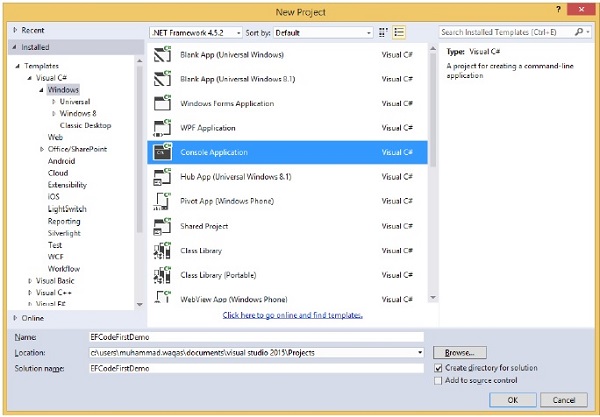
Step 3 − Enter EFCodeFirstDemo as the name and select OK.
Step 4 − Right-click on your project in the solution explorer and select Manage NuGet Packages
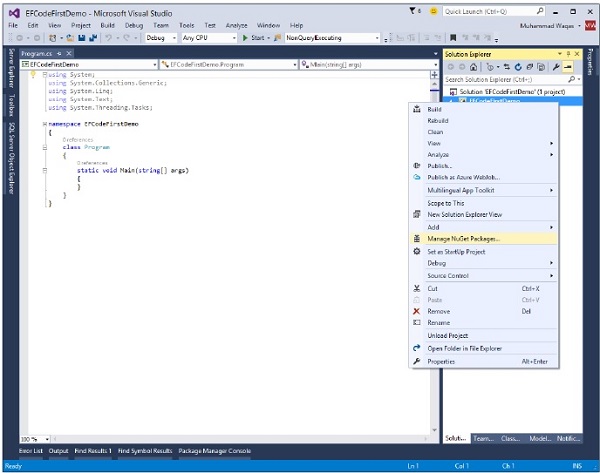
This will open NuGet Package Manager, and search for EntityFramework. This will search for all the packages related to Entity Framework.
Step 5 − Select EntityFramework and click on Install. Or from the Tools menu click NuGet Package Manager and then click Package Manager Console. In the Package Manager Console window, enter the following command: Install-Package EntityFramework.
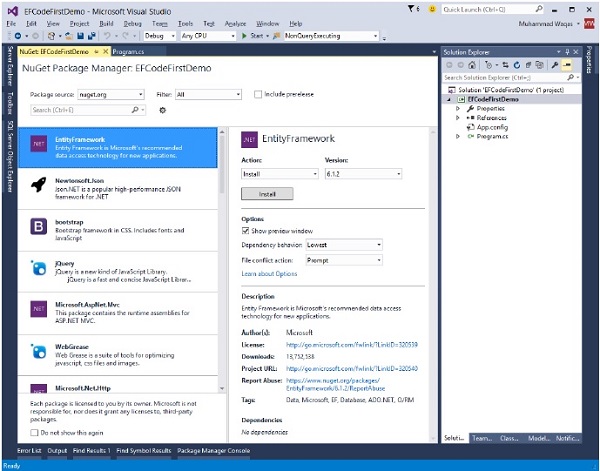
When the installation is complete, you will see the following message in the output window Successfully installed 'EntityFramework 6.1.2' to EFCodeFirstDemo.
After installation, EntityFramework.dll will be included in your project, as shown in the following image.
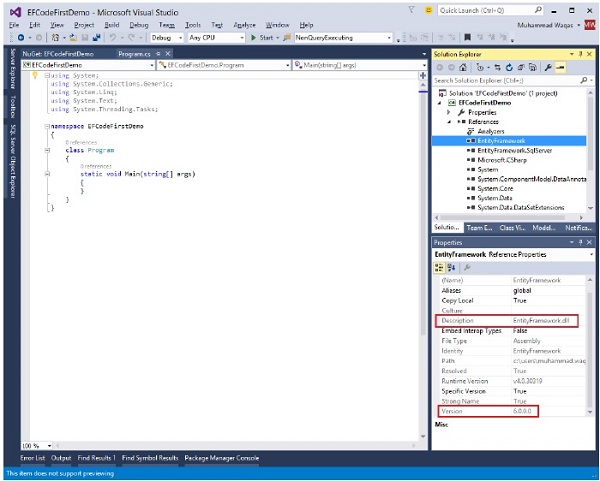
Now you are ready to start working on Code First approach.
Entity Framework - First Example
Lets define a very simple model using classes. Were just defining them in the Program.cs file but in a real-world application you will split your classes into separate files and potentially a separate project. Following is a data model which we will be creating using Code First approach.
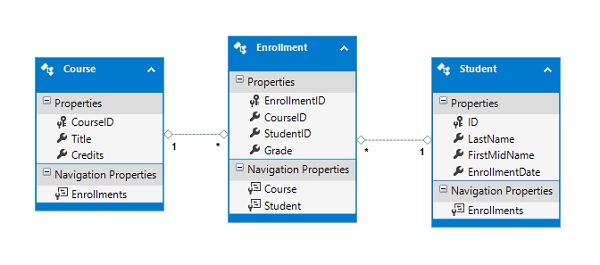
Create Model
Add the following three classes in Program.cs file using the following code for Student class.
public class Student {
   public int ID { get; set; }
   public string LastName { get; set; }
   public string FirstMidName { get; set; }
   public DateTime EnrollmentDate { get; set; }

   public virtual ICollection<Enrollment> Enrollments { get; set; }
}
The ID property will become the primary key column of the database table that corresponds to this class.
The Enrollments property is a navigation property. Navigation properties hold other entities that are related to this entity.
In this case, the Enrollments property of a Student entity will hold all of the Enrollment entities that are related to that Student entity.
Navigation properties are typically defined as virtual so that they can take advantage of certain Entity Framework functionality such as lazy loading.
If a navigation property can hold multiple entities (as in many-to-many or one-tomany relationships), its type must be a list in which entries can be added, deleted, and updated, such as ICollection.
Following is the implementation for Course class.
public class Course {
   public int CourseID { get; set; }
   public string Title { get; set; }
   public int Credits { get; set; }

   public virtual ICollection<Enrollment> Enrollments { get; set; }
}
The Enrollments property is a navigation property. A Course entity can be related to any number of Enrollment entities.
Following is the implementation for Enrollment class and enum.
public enum Grade {
   A, B, C, D, F
}

public class Enrollment {
   public int EnrollmentID { get; set; }
   public int CourseID { get; set; }
   public int StudentID { get; set; }
   public Grade? Grade { get; set; }

   public virtual Course Course { get; set; }
   public virtual Student Student { get; set; }
}
The EnrollmentID property will be the primary key.
The Grade property is an enum. The question mark after the Grade type declaration indicates that the Grade property is nullable.
A grade that's null is different from a zero grade. Null means a grade isn't known or hasn't been assigned yet.
The StudentID and CourseID properties are foreign keys, and the corresponding navigation properties are Student and Course.
An Enrollment entity is associated with one Student and one Course entity, so the property can only hold a single Student and Course entity.
Create Database Context
The main class that coordinates Entity Framework functionality for a given data model is the database context class which allows to query and save data. You can create this class by deriving from the DbContext class and exposing a typed DbSet
public class MyContext : DbContext {
   public virtual DbSet<Course> Courses { get; set; }
   public virtual DbSet<Enrollment> Enrollments { get; set; }
   public virtual DbSet<Student> Students { get; set; }
}
Following is the complete code in Program.cs file.
using System.ComponentModel.DataAnnotations.Schema;
using System.Data.Entity;
using System.Linq;
using System.Text;
using System.Threading.Tasks;

namespace EFCodeFirstDemo {

   class Program {
      static void Main(string[] args) {}
   }

   public enum Grade {
      A, B, C, D, F
   }

   public class Enrollment {
      public int EnrollmentID { get; set; }
      public int CourseID { get; set; }
      public int StudentID { get; set; }
      public Grade? Grade { get; set; }

      public virtual Course Course { get; set; }
      public virtual Student Student { get; set; }
   }

   public class Student {
      public int ID { get; set; }
      public string LastName { get; set; }
      public string FirstMidName { get; set; }
      public DateTime EnrollmentDate { get; set; }

      public virtual ICollection<Enrollment> Enrollments { get; set; }
   }

   public class Course {
      public int CourseID { get; set; }
      public string Title { get; set; }
      public int Credits { get; set; }

      public virtual ICollection<Enrollment> Enrollments { get; set; }
   }

   public class MyContext : DbContext {
      public virtual DbSet<Course> Courses { get; set; }
      public virtual DbSet<Enrollment> Enrollments { get; set; }
      public virtual DbSet<Student> Students { get; set; }
   }

}
The above code is all we need to start storing and retrieving data. Lets add some data and then retrieve it. Following is the code in main method.
static void Main(string[] args) {

   using (var context = new MyContext()) {
      // Create and save a new Students
      Console.WriteLine("Adding new students");

      var student = new Student {
         FirstMidName = "Alain", LastName = "Bomer",
            EnrollmentDate = DateTime.Parse(DateTime.Today.ToString())
      };

      context.Students.Add(student);

      var student1 = new Student {
         FirstMidName = "Mark", LastName = "Upston",
            EnrollmentDate = DateTime.Parse(DateTime.Today.ToString())
      };

      context.Students.Add(student1);
      context.SaveChanges();

      // Display all Students from the database
      var students = (from s in context.Students
         orderby s.FirstMidName select s).ToList<Student>();

      Console.WriteLine("Retrieve all Students from the database:");

      foreach (var stdnt in students) {
         string name = stdnt.FirstMidName + " " + stdnt.LastName;
         Console.WriteLine("ID: {0}, Name: {1}", stdnt.ID, name);
      }

      Console.WriteLine("Press any key to exit...");
      Console.ReadKey();
   }
}
When the above code is executed, you will receive the following output.
Adding new students
Retrieve all Students from the database:
ID: 1, Name: Alain Bomer
ID: 2, Name: Mark Upston
Press any key to exit...
Now the question that comes to mind is, where is the data and the database in which we have added some data and then retrieved it from database. By convention, DbContext has created a database for you.
If a local SQL Express instance is available then Code First has created the database on that instance.
If SQL Express isnt available, then Code First will try and use LocalDb.
The database is named after the fully qualified name of the derived context.
In our case, SQL Express instance is available, and the database name is EFCodeFirstDemo.MyContext as shown in the following image.
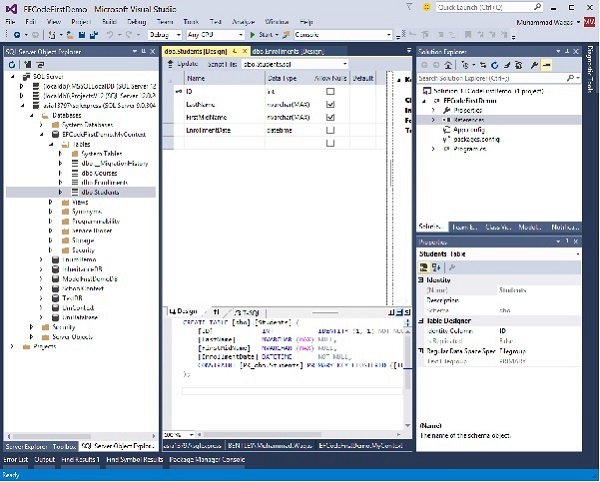
These are just the default conventions and there are various ways to change the database that Code First uses.
As you can see in the above image, it has created Students, Courses and Enrollments tables and each table contains columns with appropriate datatype and length.
The column names and datatype also matches with the properties of the respective domain classes.
Database Initialization
In the above example, we have seen that Code First creates a database automatically, but if you want to change the name of the database and server, let us see how Code First decides the database name and server while initializing a database. Take a look at the following diagram.
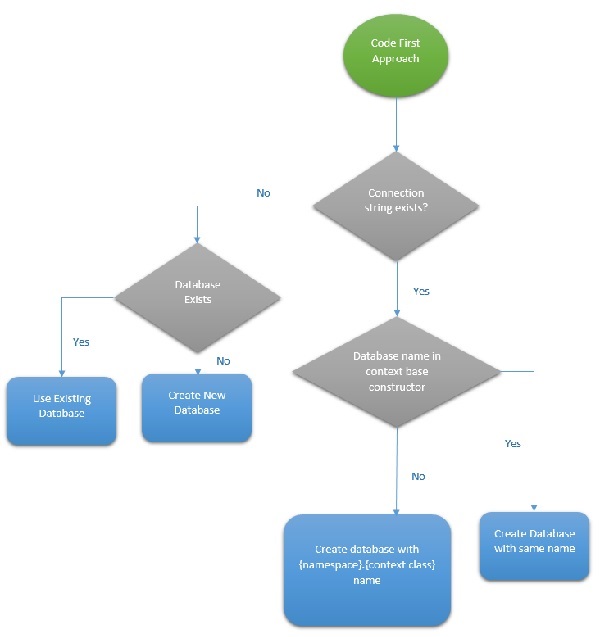
You can define the base constructor of the context class in the following ways.
- No Parameter
- Database Name
- Connection String Name
No Parameter
If you specify the base constructor of the context class without any parameter as shown in the above example, then entity framework will create a database in your local SQLEXPRESS server with a name {Namespace}.{Context class name}.
In the above example, the database which is created automatically has the name EFCodeFirstDemo.MyContext. If you look at the name, you will find that EFCodeFirstDemo is the namespace and MyContext is the context class name as shown in the following code.
public class MyContext : DbContext {
   public MyContext() : base() {}

   public virtual DbSet<Course> Courses { get; set; }
   public virtual DbSet<Enrollment> Enrollments { get; set; }
   public virtual DbSet<Student> Students { get; set; }
}
Database Name
If you pass the database name as a parameter in a base constructor of the context class, then Code First will create a database automatically again, but this time the name will be the one passed as parameter in the base constructor on the local SQLEXPRESS database server.
In the following code, MyContextDB is specified as parameter in the base constructor. If run your application, then the database with MyContextDB name will be created in your local SQL server.
public class MyContext : DbContext {
   public MyContext() : base("MyContextDB") {}
   public virtual DbSet<Course> Courses { get; set; }
   public virtual DbSet<Enrollment> Enrollments { get; set; }
   public virtual DbSet<Student> Students { get; set; }
}
Connection String Name
This is an easy way to tell DbContext to use a database server other than SQL Express or LocalDb. You may choose to put a connection string in your app.config file.
If the name of the connection string matches the name of your context (either with or without namespace qualification), then it will be found by DbContext when the parameter less constructor is used.
If the connection string name is different from the name of your context, then you can tell DbContext to use this connection in Code First mode by passing the connection string name to the DbContext constructor.
public class MyContext : DbContext {
   public MyContext() : base("name = MyContextDB") {}
   public virtual DbSet<Course> Courses { get; set; }
   public virtual DbSet<Enrollment> Enrollments { get; set; }
   public virtual DbSet<Student> Students { get; set; }
}
In the above code, snippet of context class connection string is specified as a parameter in the base constructor.
Connection string name must start with "name=" otherwise, it will consider it as a database name.
This form makes it explicit that you expect the connection string to be found in your config file. An exception will be thrown if a connection string with the given name is not found.
<connectionStrings>
   <add name = "MyContextDB"
      connectionString = "Data Source =.;Initial Catalog = EFMyContextDB;Integrated Security = true"
      providerName = "System.Data.SqlClient"/>
</connectionStrings>
The database name in the connection string in app.config is EFMyContextDB. CodeFirst will create a new EFMyContextDB database or use existing EFMyContextDB database at local SQL Server.
Domain Classes
So far weve just let EF discover the model using its default conventions, but there are going to be times when our classes dont follow the conventions and we need to be able to perform further configuration. But you can override these conventions by configuring your domain classes to provide EF with the information it needs. There are two options to configure your domain classes −
- Data Annotations
- Fluent API
Data Annotations
DataAnnotations is used to configure your classes which will highlight the most commonly needed configurations. DataAnnotations are also understood by a number of .NET applications, such as ASP.NET MVC which allow these applications to leverage the same annotations for client-side validations.
Following are the data annotations used in student class.
public class Enrollment {

   [Key]
   public int EnrollmentID { get; set; }
   public int CourseID { get; set; }
   public int StudentID { get; set; }
   public Grade? Grade { get; set; }

   [ForeignKey("CourseID")]
   public virtual Course Course { get; set; }

   [ForeignKey("ID")]
   public virtual Student Student { get; set; }
}
Fluent API
Most model configuration can be done using simple data annotations. The fluent API is a advanced way of specifying model configuration that covers everything that data annotations can do, in addition to some more advanced configuration not possible with data annotations. Data annotations and the fluent API can be used together.
To access the fluent API you override the OnModelCreating method in DbContext. Now lets rename the column name in student table from FirstMidName to FirstName as shown in the following code.
public class MyContext : DbContext {

   protected override void OnModelCreating(DbModelBuilder modelBuilder) {
      modelBuilder.Entity<Student>().Property(s ⇒ s.FirstMidName)
         .HasColumnName("FirstName");
   }

   public virtual DbSet<Course> Courses { get; set; }
   public virtual DbSet<Enrollment> Enrollments { get; set; }
   public virtual DbSet<Student> Students { get; set; }
}
Entity Framework - Data Annotations
DataAnnotations is used to configure the classes which will highlight the most commonly needed configurations. DataAnnotations are also understood by a number of .NET applications, such as ASP.NET MVC which allows these applications to leverage the same annotations for client-side validations. DataAnnotation attributes override default CodeFirst conventions.
System.ComponentModel.DataAnnotations includes the following attributes that impacts the nullability or size of the column.
- Key
- Timestamp
- ConcurrencyCheck
- Required
- MinLength
- MaxLength
- StringLength
System.ComponentModel.DataAnnotations.Schema namespace includes the following attributes that impacts the schema of the database.
- Table
- Column
- Index
- ForeignKey
- NotMapped
- InverseProperty
Key
Entity Framework relies on every entity having a key value that it uses for tracking entities. One of the conventions that Code First depends on is how it implies which property is the key in each of the Code First classes.
Convention is to look for a property named Id or one that combines the class name and Id, such as StudentId.
The property will map to a primary key column in the database.
The Student, Course and Enrollment classes follow this convention.
Now lets suppose Student class used the name StdntID instead of ID. When Code First does not find a property that matches this convention, it will throw an exception because of Entity Frameworks requirement that you must have a key property. You can use the key annotation to specify which property is to be used as the EntityKey.
Lets take a look at the following code of a Student class which contains StdntID, but it doesnt follow the default Code First convention. So to handle this, a Key attribute is added which will make it a primary key.
public class Student {

   [Key]
   public int StdntID { get; set; }
   public string LastName { get; set; }
   public string FirstMidName { get; set; }
   public DateTime EnrollmentDate { get; set; }

   public virtual ICollection<Enrollment> Enrollments { get; set; }
}
When you run your application and look into your database in SQL Server Explorer you will see that the primary key is now StdntID in Students table.
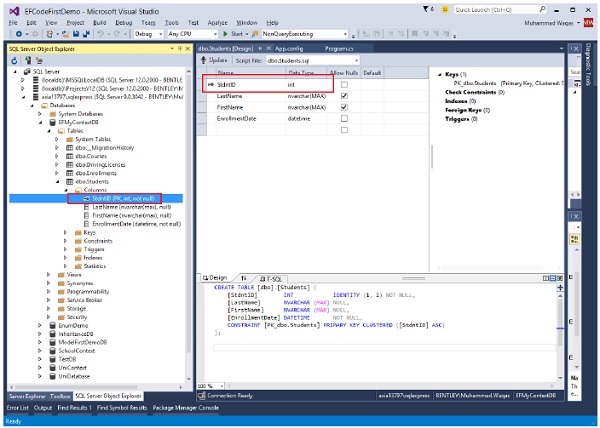
Entity Framework also supports composite keys. Composite keys are also primary keys that consist of more than one property. For example, you have a DrivingLicense class whose primary key is a combination of LicenseNumber and IssuingCountry.
public class DrivingLicense {

   [Key, Column(Order = 1)]
   public int LicenseNumber { get; set; }
   [Key, Column(Order = 2)]
   public string IssuingCountry { get; set; }
   public DateTime Issued { get; set; }
   public DateTime Expires { get; set; }
}
When you have composite keys, Entity Framework requires you to define an order of the key properties. You can do this using the Column annotation to specify an order.
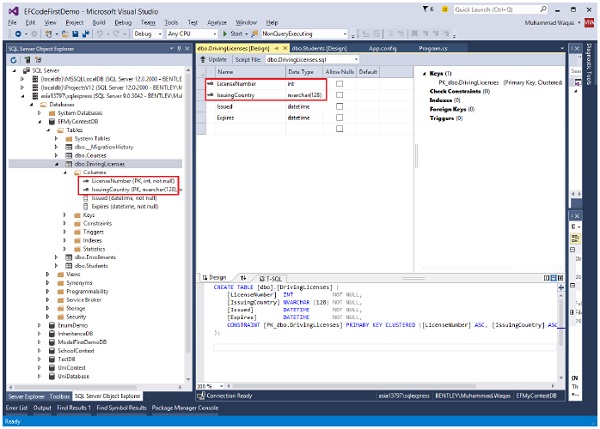
Timestamp
Code First will treat Timestamp properties the same as ConcurrencyCheck properties, but it will also ensure that the database field that code first generates is non-nullable.
It's more common to use rowversion or timestamp fields for concurrency checking.
Rather than using the ConcurrencyCheck annotation, you can use the more specific TimeStamp annotation as long as the type of the property is byte array.
You can only have one timestamp property in a given class.
Lets take a look at a simple example by adding the TimeStamp property to the Course class −
public class Course {

   public int CourseID { get; set; }
   public string Title { get; set; }
   public int Credits { get; set; }
   [Timestamp]
   public byte[] TStamp { get; set; }

   public virtual ICollection<Enrollment> Enrollments { get; set; }
}
As you can see in the above example, Timestamp attribute is applied to Byte[] property of the Course class. So, Code First will create a timestamp column TStamp in the Courses table.
ConcurrencyCheck
The ConcurrencyCheck annotation allows you to flag one or more properties to be used for concurrency checking in the database when a user edits or deletes an entity. If you've been working with the EF Designer, this aligns with setting a property's ConcurrencyMode to Fixed.
Lets take a look at a simple example of how ConcurrencyCheck works by adding it to the Title property in Course class.
public class Course {

   public int CourseID { get; set; }
   [ConcurrencyCheck]
   public string Title { get; set; }
   public int Credits { get; set; }
   [Timestamp, DataType("timestamp")]
   public byte[] TimeStamp { get; set; }

   public virtual ICollection<Enrollment> Enrollments { get; set; }
}
In the above Course class, ConcurrencyCheck attribute is applied to the existing Title property. Now, Code First will include Title column in update command to check for optimistic concurrency as shown in the following code.
exec sp_executesql N'UPDATE [dbo].[Courses]
   SET [Title] = @0
   WHERE (([CourseID] = @1) AND ([Title] = @2))
   ',N'@0 nvarchar(max) ,@1 int,@2 nvarchar(max) ',@0=N'Maths',@1=1,@2=N'Calculus'
go
Required Annotation
The Required annotation tells EF that a particular property is required. Lets take a look at the following Student class in which Required id is added to the FirstMidName property. Required attribute will force EF to ensure that the property has data in it.
public class Student {

   [Key]
   public int StdntID { get; set; }

   [Required]
   public string LastName { get; set; }

   [Required]
   public string FirstMidName { get; set; }
   public DateTime EnrollmentDate { get; set; }

   public virtual ICollection<Enrollment> Enrollments { get; set; }
}
As seen in the above example, Required attribute is applied to FirstMidName and LastName. So, Code First will create a NOT NULL FirstMidName and LastName columns in the Students table as shown in the following image.
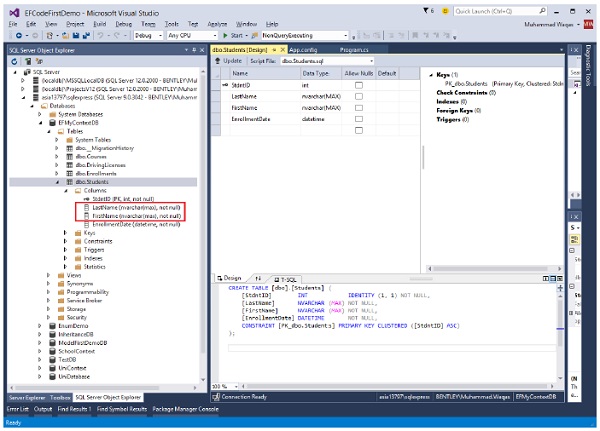
MaxLength
The MaxLength attribute allows you to specify additional property validations. It can be applied to a string or array type property of a domain class. EF Code First will set the size of a column as specified in MaxLength attribute.
Lets take a look at the following Course class in which MaxLength(24) attribute is applied to Title property.
public class Course {

   public int CourseID { get; set; }
   [ConcurrencyCheck]
   [MaxLength(24)]
   public string Title { get; set; }
   public int Credits { get; set; }

   public virtual ICollection<Enrollment> Enrollments { get; set; }
}
When you run the above application, Code First will create a nvarchar(24) column Title in the CourseId table as shown in the following image.
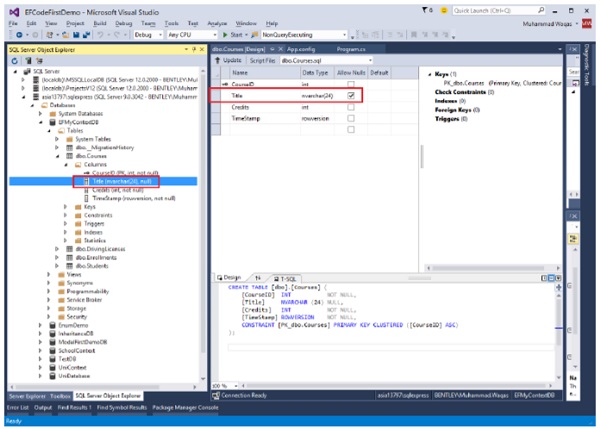
When the user sets the Title which contains more than 24 characters, then EF will throw EntityValidationError.
MinLength
The MinLength attribute also allows you to specify additional property validations, just as you did with MaxLength. MinLength attribute can also be used with MaxLength attribute as shown in the following code.
public class Course {

   public int CourseID { get; set; }
   [ConcurrencyCheck]
   [MaxLength(24) , MinLength(5)]
   public string Title { get; set; }
   public int Credits { get; set; }

   public virtual ICollection<Enrollment> Enrollments { get; set; }
}
EF will throw EntityValidationError, if you set a value of Title property less than the specified length in MinLength attribute or greater than specified length in MaxLength attribute.
StringLength
StringLength also allows you to specify additional property validations like MaxLength. The only difference is that StringLength attribute can only be applied to a string type property of Domain classes.
public class Course {

   public int CourseID { get; set; }
   [StringLength (24)]
   public string Title { get; set; }
   public int Credits { get; set; }

   public virtual ICollection<Enrollment> Enrollments { get; set; }
}
Entity Framework also validates the value of a property for StringLength attribute. If the user sets the Title which contains more than 24 characters, then EF will throw EntityValidationError.
Table
Default Code First convention creates a table name similar to the class name. If you are letting Code First create the database, and also want to change the name of the tables it is creating. Then −
You can use Code First with an existing database. But it's not always the case that the names of the classes match the names of the tables in your database.
Table attribute overrides this default convention.
EF Code First will create a table with a specified name in Table attribute for a given domain class.
Lets take a look at the following example in which the class is named Student and by convention, Code First presumes this will map to a table named Students. If that's not the case, you can specify the name of the table with the Table attribute as shown in the following code.
[Table("StudentsInfo")]
public class Student {

   [Key]
   public int StdntID { get; set; }
   [Required]
   public string LastName { get; set; }
   [Required]
   public string FirstMidName { get; set; }
   public DateTime EnrollmentDate { get; set; }

   public virtual ICollection<Enrollment> Enrollments { get; set; }
}
Now you can see that Table attribute specifies the table as StudentsInfo. When the table is generated, you will see the table name StudentsInfo as shown in the following image.
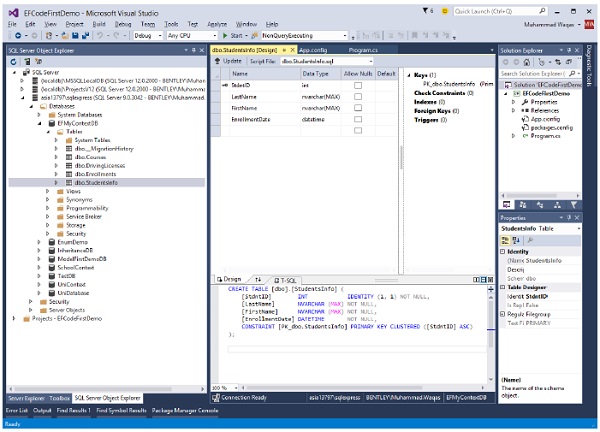
You cannot only specify the table name but you can also specify a schema for the table using Table attribute as shown in the following code.
[Table("StudentsInfo", Schema = "Admin")]
public class Student {

   [Key]
   public int StdntID { get; set; }
   [Required]
   public string LastName { get; set; }
   [Required]
   public string FirstMidName { get; set; }
   public DateTime EnrollmentDate { get; set; }

   public virtual ICollection<Enrollment> Enrollments { get; set; }
}
You can see in the above example, the table is specified with admin schema. Now Code First will create StudentsInfo table in Admin schema as shown in the following image.
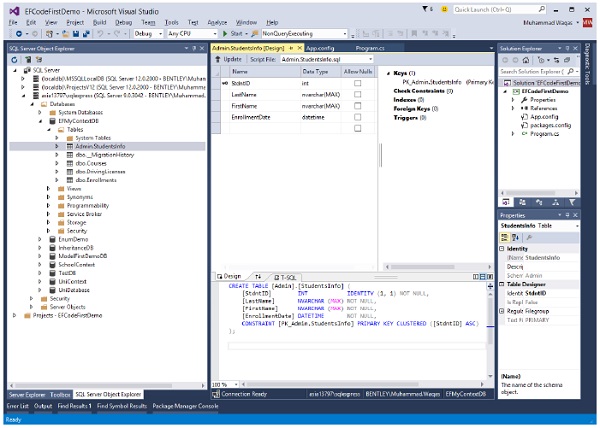
Column
It is also the same as Table attribute, but Table attribute overrides the table behavior while Column attribute overrides the column behavior. Default Code First convention creates a column name similar to the property name. If you are letting Code First create the database, and also want to change the name of the columns in your tables. Then −
Column attribute overrides the default convention.
EF Code First will create a column with a specified name in the Column attribute for a given property.
Lets take a look at the following example in which the property is named FirstMidName and by convention, Code First presumes this will map to a column named FirstMidName.
If that's not the case you can specify the name of the column with the Column attribute as shown in the following code.
public class Student {

   public int ID { get; set; }
   public string LastName { get; set; }
   [Column("FirstName")]
   public string FirstMidName { get; set; }
   public DateTime EnrollmentDate { get; set; }

   public virtual ICollection<Enrollment> Enrollments { get; set; }
}
You can see that Column attribute specifies the column as FirstName. When the table is generated, you will see the column name FirstName as shown in the following image.
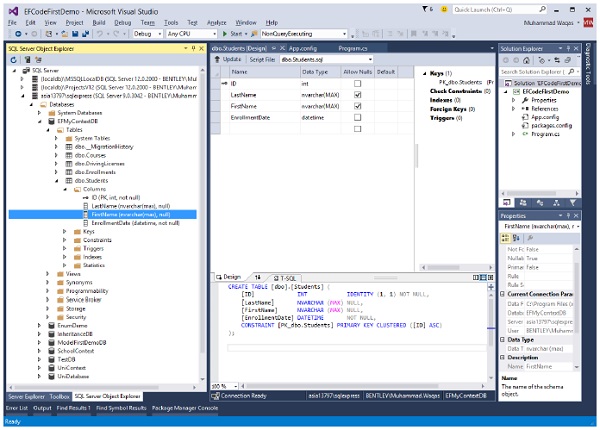
Index
The Index attribute was introduced in Entity Framework 6.1. If you are using an earlier version, the information in this section does not apply.
You can create an index on one or more columns using the IndexAttribute.
Adding the attribute to one or more properties will cause EF to create the corresponding index in the database when it creates the database.
Indexes make the retrieval of data faster and efficient, in most cases. However, overloading a table or view with indexes could unpleasantly affect the performance of other operations such as inserts or updates.
Indexing is the new feature in Entity Framework where you can improve the performance of your Code First application by reducing the time required to query data from the database.
You can add indexes to your database using the Index attribute, and override the default Unique and Clustered settings to get the index best suited to your scenario.
By default, the index will be named IX_<property name>
Lets take a look at the following code in which Index attribute is added in Course class for Credits.
public class Course {
   public int CourseID { get; set; }
   public string Title { get; set; }
   [Index]
   public int Credits { get; set; }

   public virtual ICollection<Enrollment> Enrollments { get; set; }
}
You can see that the Index attribute is applied to the Credits property. When the table is generated, you will see IX_Credits in Indexes.
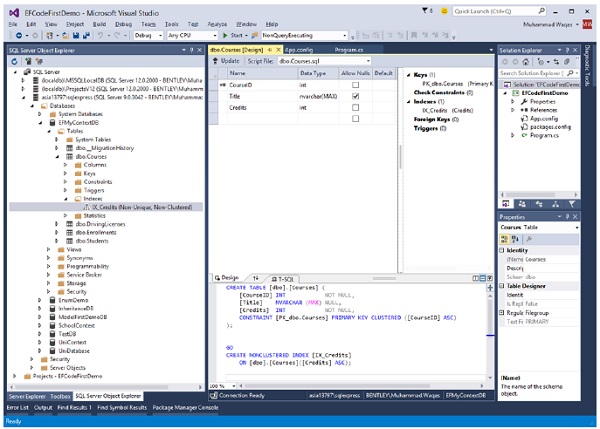
By default, indexes are non-unique, but you can use the IsUnique named parameter to specify that an index should be unique. The following example introduces a unique index as shown in the following code.
public class Course {
   public int CourseID { get; set; }
   [Index(IsUnique = true)]

   public string Title { get; set; }
   [Index]

   public int Credits { get; set; }
   public virtual ICollection<Enrollment> Enrollments { get; set; }
}
ForeignKey
Code First convention will take care of the most common relationships in your model, but there are some cases where it needs help. For example, by changing the name of the key property in the Student class created a problem with its relationship to Enrollment class.
public class Enrollment {
   public int EnrollmentID { get; set; }
   public int CourseID { get; set; }
   public int StudentID { get; set; }
   public Grade? Grade { get; set; }

   public virtual Course Course { get; set; }
   public virtual Student Student { get; set; }
}

public class Student {
   [Key]
   public int StdntID { get; set; }
   public string LastName { get; set; }
   public string FirstMidName { get; set; }
   public DateTime EnrollmentDate { get; set; }

   public virtual ICollection<Enrollment> Enrollments { get; set; }
}
While generating the database, Code First sees the StudentID property in the Enrollment class and recognizes it, by the convention that it matches a class name plus ID, as a foreign key to the Student class. However, there is no StudentID property in the Student class, but it is StdntID property is Student class.
The solution for this is to create a navigation property in the Enrollment and use the ForeignKey DataAnnotation to help Code First understand how to build the relationship between the two classes as shown in the following code.
public class Enrollment {
   public int EnrollmentID { get; set; }
   public int CourseID { get; set; }
   public int StudentID { get; set; }

   public Grade? Grade { get; set; }
   public virtual Course Course { get; set; }
   [ForeignKey("StudentID")]

   public virtual Student Student { get; set; }
}
You can see now that the ForeignKey attribute is applied to the navigation property.
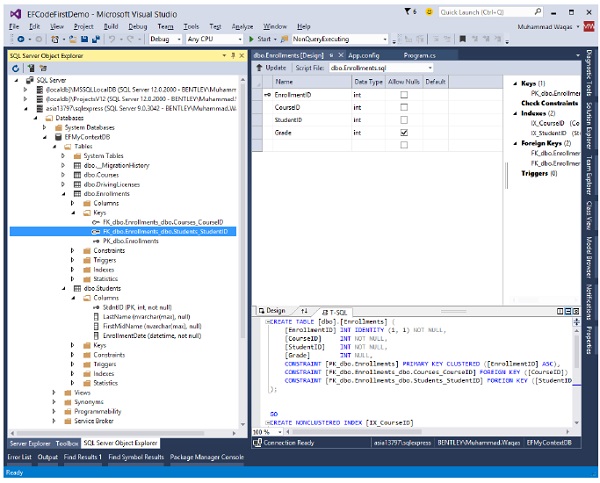
NotMapped
By default conventions of Code First, every property that is of a supported data type and which includes getters and setters are represented in the database. But this isnt always the case in your applications. NotMapped attribute overrides this default convention. For example, you might have a property in the Student class such as FatherName, but it does not need to be stored. You can apply NotMapped attribute to a FatherName property which you do not want to create a column of in the database as shown in the following code.
public class Student {
   [Key]
   public int StdntID { get; set; }
   public string LastName { get; set; }
   public string FirstMidName { get; set; }

   public DateTime EnrollmentDate { get; set; }
   [NotMapped]

   public int FatherName { get; set; }
   public virtual ICollection<Enrollment> Enrollments { get; set; }
}
You can see that NotMapped attribute is applied to the FatherName property. When the table is generated you will see that FatherName column will not be created in a database, but it is present in Student class.
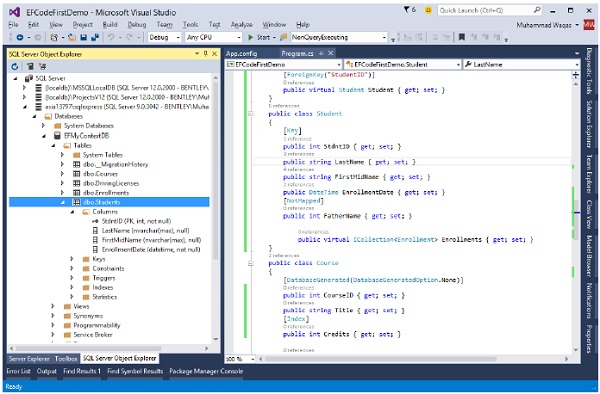
Code First will not create a column for a property, which does not have either getters or setters as shown in the following example of Address and Age properties of Student class.
InverseProperty
InverseProperty is used when you have multiple relationships between classes. In the Enrollment class, you may want to keep track of who enrolled a Current Course and Previous Course. Lets add two navigation properties for the Enrollment class.
public class Enrollment {
   public int EnrollmentID { get; set; }
   public int CourseID { get; set; }
   public int StudentID { get; set; }
   public Grade? Grade { get; set; }

   public virtual Course CurrCourse { get; set; }
   public virtual Course PrevCourse { get; set; }
   public virtual Student Student { get; set; }
}
Similarly, youll also need to add in the Course class referenced by these properties. The Course class has navigation properties back to the Enrollment class, which contains all the current and previous enrollments.
public class Course {

   public int CourseID { get; set; }
   public string Title { get; set; }
   [Index]

   public int Credits { get; set; }
   public virtual ICollection<Enrollment> CurrEnrollments { get; set; }
   public virtual ICollection<Enrollment> PrevEnrollments { get; set; }
}
Code First creates {Class Name}_{Primary Key} foreign key column, if the foreign key property is not included in a particular class as shown in the above classes. When the database is generated, you will see the following foreign keys.
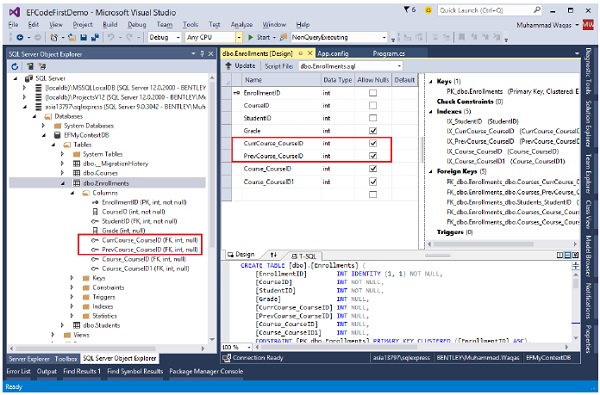
As you can see that Code first is not able to match up the properties in the two classes on its own. The database table for Enrollments should have one foreign key for the CurrCourse and one for the PrevCourse, but Code First will create four foreign key properties, i.e.
- CurrCourse _CourseID
- PrevCourse _CourseID
- Course_CourseID, and
- Course_CourseID1
To fix these problems, you can use the InverseProperty annotation to specify the alignment of the properties.
public class Course {

   public int CourseID { get; set; }
   public string Title { get; set; }
   [Index]

   public int Credits { get; set; }
   [InverseProperty("CurrCourse")]

   public virtual ICollection<Enrollment> CurrEnrollments { get; set; }
   [InverseProperty("PrevCourse")]

   public virtual ICollection<Enrollment> PrevEnrollments { get; set; }
}
As you can see the InverseProperty attribute is applied in the above Course class by specifying which reference property of Enrollment class it belongs to. Now, Code First will generate a database and create only two foreign key columns in Enrollments table as shown in the following image.
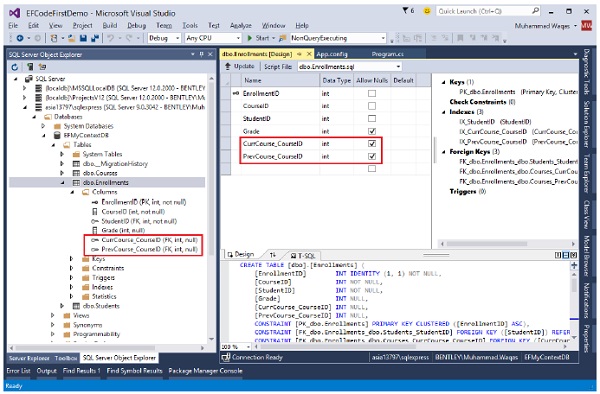
We recommend that you execute the above example in a step-by-step manner for better understanding.
Entity Framework - Fluent API
Fluent API is an advanced way of specifying model configuration that covers everything that data annotations can do in addition to some more advanced configuration not possible with data annotations. Data annotations and the fluent API can be used together, but Code First gives precedence to Fluent API > data annotations > default conventions.
Fluent API is another way to configure your domain classes.
The Code First Fluent API is most commonly accessed by overriding the OnModelCreating method on your derived DbContext.
Fluent API provides more functionality for configuration than DataAnnotations. Fluent API supports the following types of mappings.
In this chapter, we will continue with the simple example which contains Student, Course and Enrollment classes and one context class with MyContext name as shown in the following code.
using System.Data.Entity;
using System.Linq;
using System.Text;
using System.Threading.Tasks;

namespace EFCodeFirstDemo {

   class Program {
      static void Main(string[] args) {}
   }

   public enum Grade {
      A, B, C, D, F
   }

   public class Enrollment {
      public int EnrollmentID { get; set; }
      public int CourseID { get; set; }
      public int StudentID { get; set; }
      public Grade? Grade { get; set; }

      public virtual Course Course { get; set; }
      public virtual Student Student { get; set; }
   }

   public class Student {
      public int ID { get; set; }
      public string LastName { get; set; }
      public string FirstMidName { get; set; }

      public DateTime EnrollmentDate { get; set; }

      public virtual ICollection<Enrollment> Enrollments { get; set; }
   }

   public class Course {
      public int CourseID { get; set; }
      public string Title { get; set; }
      public int Credits { get; set; }

      public virtual ICollection<Enrollment> Enrollments { get; set; }
   }

   public class MyContext : DbContext {
      public virtual DbSet<Course> Courses { get; set; }
      public virtual DbSet<Enrollment> Enrollments { get; set; }
      public virtual DbSet<Student> Students { get; set; }
   }

}
To access Fluent API you need to override the OnModelCreating method in DbContext. Lets take a look at a simple example in which we will rename the column name in student table from FirstMidName to FirstName as shown in the following code.
public class MyContext : DbContext {

   protected override void OnModelCreating(DbModelBuilder modelBuilder) {
      modelBuilder.Entity<Student>().Property(s ⇒ s.FirstMidName)
      .HasColumnName("FirstName");}

      public virtual DbSet<Course> Courses { get; set; }
      public virtual DbSet<Enrollment> Enrollments { get; set; }
      public virtual DbSet<Student> Students { get; set; }
}
DbModelBuilder is used to map CLR classes to a database schema. It is the main class and on which you can configure all your domain classes. This code centric approach to building an Entity Data Model (EDM) is known as Code First.
Fluent API provides a number of important methods to configure entities and its properties to override various Code First conventions. Below are some of them.
| Sr. No. | Method Name & Description |
|---|---|
| 1 | ComplexType<TComplexType> Registers a type as a complex type in the model and returns an object that can be used to configure the complex type. This method can be called multiple times for the same type to perform multiple lines of configuration. |
| 2 | Entity<TEntityType> Registers an entity type as part of the model and returns an object that can be used to configure the entity. This method can be called multiple times for the same entity to perform multiple lines of configuration. |
| 3 | HasKey<TKey> Configures the primary key property(s) for this entity type. |
| 4 | HasMany<TTargetEntity> Configures a many relationship from this entity type. |
| 5 | HasOptional<TTargetEntity> Configures an optional relationship from this entity type. Instances of the entity type will be able to be saved to the database without this relationship being specified. The foreign key in the database will be nullable. |
| 6 | HasRequired<TTargetEntity> Configures a required relationship from this entity type. Instances of the entity type will not be able to be saved to the database unless this relationship is specified. The foreign key in the database will be non-nullable. |
| 7 | Ignore<TProperty> Excludes a property from the model so that it will not be mapped to the database. (Inherited from StructuralTypeConfiguration<TStructuralType>) |
| 8 | Property<T> Configures a struct property that is defined on this type. (Inherited from StructuralTypeConfiguration<TStructuralType>) |
| 9 | ToTable(String) Configures the table name that this entity type is mapped to. |
Fluent API lets you configure your entities or their properties, whether you want to change something about how they map to the database or how they relate to one another. There's a huge variety of mappings and modeling that you can impact using the configurations. Following are the main types of mapping which Fluent API supports −
- Entity Mapping
- Properties Mapping
Entity Mapping
Entity mapping is just some simple mappings that will impact Entity Framework's understanding of how the classes are mapped to the databases. All these we discussed in data annotations and here we will see how to achieve the same things using Fluent API.
So rather than going into the domain classes to add these configurations, we can do this inside of the context.
The first thing is to override the OnModelCreating method, which gives the modelBuilder to work with.
Default Schema
The default schema is dbo when the database is generated. You can use the HasDefaultSchema method on DbModelBuilder to specify the database schema to use for all tables, stored procedures, etc.
Lets take a look at the following example in which admin schema is applied.
public class MyContext : DbContext {
   public MyContext() : base("name = MyContextDB") {}

   protected override void OnModelCreating(DbModelBuilder modelBuilder) {
      //Configure default schema
      modelBuilder.HasDefaultSchema("Admin");
   }

   public virtual DbSet<Course> Courses { get; set; }
   public virtual DbSet<Enrollment> Enrollments { get; set; }
   public virtual DbSet<Student> Students { get; set; }
}
Map Entity to Table
With default convention, Code First will create the database tables with the name of DbSet properties in the context class such as Courses, Enrollments and Students. But if you want different table names then you can override this convention and can provide a different table name than the DbSet properties, as shown in the following code.
protected override void OnModelCreating(DbModelBuilder modelBuilder) {

   //Configure default schema
   modelBuilder.HasDefaultSchema("Admin");

   //Map entity to table
   modelBuilder.Entity<Student>().ToTable("StudentData");
   modelBuilder.Entity<Course>().ToTable("CourseDetail");
   modelBuilder.Entity<Enrollment>().ToTable("EnrollmentInfo");
}
When the database is generated, you will see the tables name as specified in the OnModelCreating method.
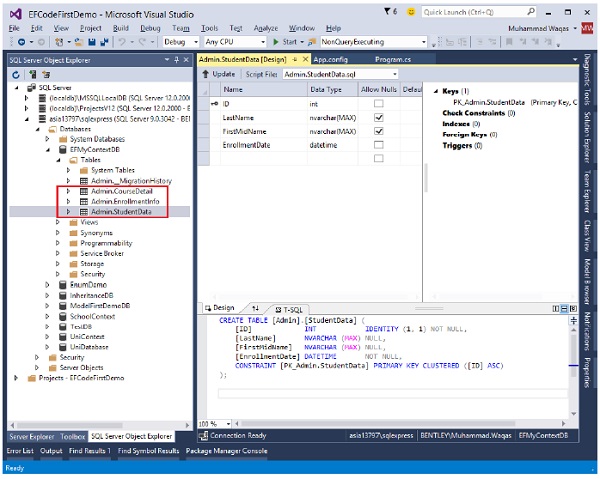
Entity Splitting (Map Entity to Multiple Table)
Entity Splitting lets you combine data coming from multiple tables into a single class and it can only be used with tables that have a one-to-one relationship between them. Lets take a look at the following example in which Student information is mapped into two tables.
protected override void OnModelCreating(DbModelBuilder modelBuilder) {
   //Configure default schema
   modelBuilder.HasDefaultSchema("Admin");

   //Map entity to table
   modelBuilder.Entity<Student>().Map(sd ⇒ {
      sd.Properties(p ⇒ new { p.ID, p.FirstMidName, p.LastName });
      sd.ToTable("StudentData");
   })

   .Map(si ⇒ {
      si.Properties(p ⇒ new { p.ID, p.EnrollmentDate });
      si.ToTable("StudentEnrollmentInfo");
   });

   modelBuilder.Entity<Course>().ToTable("CourseDetail");
   modelBuilder.Entity<Enrollment>().ToTable("EnrollmentInfo");
}
In the above code, you can see that Student entity is split into the following two tables by mapping some properties to StudentData table and some properties to StudentEnrollmentInfo table using Map method.
StudentData − Contains Student FirstMidName and Last Name.
StudentEnrollmentInfo − Contains EnrollmentDate.
When the database is generated you see the following tables in your database as shown in the following image.
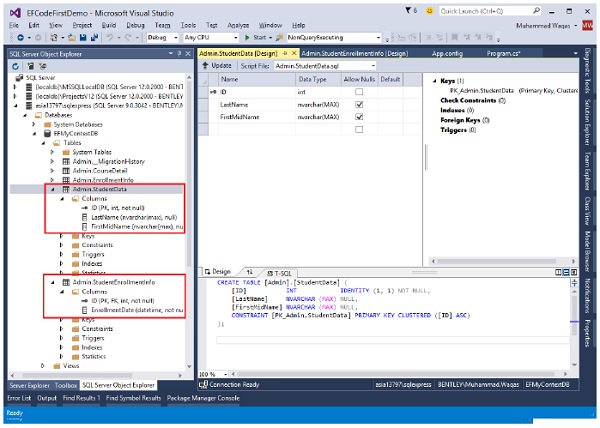
Properties Mapping
The Property method is used to configure attributes for each property belonging to an entity or complex type. The Property method is used to obtain a configuration object for a given property. You can also map and configure the properties of your domain classes using Fluent API.
Configuring a Primary Key
The default convention for primary keys are −
- Class defines a property whose name is ID or Id
- Class name followed by ID or Id
If your class doesnt follow the default conventions for primary key as shown in the following code of Student class −
public class Student {
   public int StdntID { get; set; }
   public string LastName { get; set; }
   public string FirstMidName { get; set; }
   public DateTime EnrollmentDate { get; set; }

   public virtual ICollection<Enrollment> Enrollments { get; set; }
}
Then to explicitly set a property to be a primary key, you can use the HasKey method as shown in the following code −
protected override void OnModelCreating(DbModelBuilder modelBuilder) {
   //Configure default schema
   modelBuilder.HasDefaultSchema("Admin");

   // Configure Primary Key
   modelBuilder.Entity<Student>().HasKey<int>(s ⇒ s.StdntID);
}
Configure Column
In Entity Framework, by default Code First will create a column for a property with the same name, order, and datatype. But you can also override this convention, as shown in the following code.
protected override void OnModelCreating(DbModelBuilder modelBuilder) {

   //Configure default schema
   modelBuilder.HasDefaultSchema("Admin");

   //Configure EnrollmentDate Column
   modelBuilder.Entity<Student>().Property(p ⇒ p.EnrollmentDate)

   .HasColumnName("EnDate")
   .HasColumnType("DateTime")
   .HasColumnOrder(2);
}
Configure MaxLength Property
In the following example, the Course Title property should be no longer than 24 characters. When the user specifies value longer than 24 characters, then the user will get a DbEntityValidationException exception.
protected override void OnModelCreating(DbModelBuilder modelBuilder) {
   //Configure default schema
   modelBuilder.HasDefaultSchema("Admin");
   modelBuilder.Entity<Course>().Property(p ⇒ p.Title).HasMaxLength(24);
}
Configure Null or NotNull Property
In the following example, the Course Title property is required so IsRequired method is used to create NotNull column. Similarly, Student EnrollmentDate is optional so we will be using IsOptional method to allow a null value in this column as shown in the following code.
protected override void OnModelCreating(DbModelBuilder modelBuilder) {

   //Configure default schema
   modelBuilder.HasDefaultSchema("Admin");
   modelBuilder.Entity<Course>().Property(p ⇒ p.Title).IsRequired();
   modelBuilder.Entity<Student>().Property(p ⇒ p.EnrollmentDate).IsOptional();

   //modelBuilder.Entity<Student>().Property(s ⇒ s.FirstMidName)
   //.HasColumnName("FirstName");
}
Configuring Relationships
A relationship, in the context of databases, is a situation that exists between two relational database tables, when one table has a foreign key that references the primary key of the other table. When working with Code First, you define your model by defining your domain CLR classes. By default, the Entity Framework uses the Code First conventions to map your classes to the database schema.
If you use the Code First naming conventions, in most cases you can rely on Code First to set up relationships between your tables based on the foreign keys and navigation properties.
If they don't meet up with those conventions, there are also configurations you can use to impact relationships between classes and how those relationships are realized in the database when you're adding configurations in Code First.
Some of them are available in the data annotations and you can apply some even more complicated ones with a Fluent API.
Configure One-to-One Relationship
When you define a one-to-one relationship in your model, you use a reference navigation property in each class. In database, both tables can have only one record on either side of the relationship. Each primary key value relates to only one record (or no records) in the related table.
A one-to-one relationship is created if both of the related columns are primary keys or have unique constraints.
In a one-to-one relationship, the primary key acts additionally as a foreign key and there is no separate foreign key column for either table.
This type of relationship is not common because most information related in this way would all be in one table.
Lets take a look at the following example where we will add another class into our model to create a one-to-one relationship.
public class Student {
   public int ID { get; set; }
   public string LastName { get; set; }
   public string FirstMidName { get; set; }
   public DateTime EnrollmentDate { get; set; }

   public virtual StudentLogIn StudentLogIn { get; set; }
   public virtual ICollection<Enrollment> Enrollments { get; set; }
}

public class StudentLogIn {
   [Key, ForeignKey("Student")]
   public int ID { get; set; }
   public string EmailID { get; set; }
   public string Password { get; set; }

   public virtual Student Student { get; set; }
}
As you can see in the above code that Key and ForeignKey attributes are used for ID property in StudentLogIn class, in order to mark it as Primary Key as well as Foreign Key.
To configure one-to-zero or one relationship between Student and StudentLogIn using Fluent API, you need to override OnModelCreating method as shown in the following code.
protected override void OnModelCreating(DbModelBuilder modelBuilder) {

   //Configure default schema
   modelBuilder.HasDefaultSchema("Admin");

   // Configure ID as PK for StudentLogIn
   modelBuilder.Entity<StudentLogIn>()
   .HasKey(s ⇒ s.ID);

   // Configure ID as FK for StudentLogIn
   modelBuilder.Entity<Student>()

   .HasOptional(s ⇒ s.StudentLogIn) //StudentLogIn is optional
   .WithRequired(t ⇒ t.Student); // Create inverse relationship
}
In most cases, the Entity Framework can infer which type is the dependent and which is the principal in a relationship. However, when both ends of the relationship are required or both sides are optional the Entity Framework cannot identify the dependent and the principal. When both ends of the relationship are required, you can use HasRequired as shown in the following code.
protected override void OnModelCreating(DbModelBuilder modelBuilder) {

   //Configure default schema
   modelBuilder.HasDefaultSchema("Admin");

   // Configure ID as PK for StudentLogIn
   modelBuilder.Entity<StudentLogIn>()
   .HasKey(s ⇒ s.ID);

   // Configure ID as FK for StudentLogIn
   modelBuilder.Entity<Student>()
   .HasRequired(r ⇒ r.Student)
   .WithOptional(s ⇒ s.StudentLogIn);
}
When the database is generated you will see that relationship is created as shown in the following image.
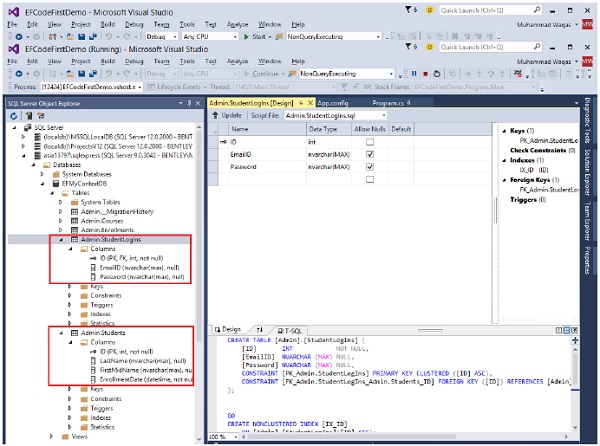
Configure One-to-Many Relationship
The primary key table contains only one record that relates to none, one, or many records in the related table. This is the most commonly used type of relationship.
In this type of relationship, a row in table A can have many matching rows in table B, but a row in table B can have only one matching row in table A.
The foreign key is defined on the table that represents the many end of the relationship.
For example, in the above diagram Student and Enrollment tables have one-tomany relationship, each student may have many enrollments, but each enrollment belongs to only one student.
Below are the Student and Enrollment which has one-to-many relationship, but the foreign key in Enrollment table is not following the default Code First conventions.
public class Enrollment {
   public int EnrollmentID { get; set; }
   public int CourseID { get; set; }

   //StdntID is not following code first conventions name
   public int StdntID { get; set; }
   public Grade? Grade { get; set; }

   public virtual Course Course { get; set; }
   public virtual Student Student { get; set; }
}

public class Student {
   public int ID { get; set; }
   public string LastName { get; set; }
   public string FirstMidName { get; set; }
   public DateTime EnrollmentDate { get; set; }

   public virtual StudentLogIn StudentLogIn { get; set; }
   public virtual ICollection<Enrollment> Enrollments { get; set; }
}
In this case, to configure one-to-many relationship using Fluent API, you need to use HasForeignKey method as shown in the following code.
protected override void OnModelCreating(DbModelBuilder modelBuilder) {

   //Configure default schema
   modelBuilder.HasDefaultSchema("Admin");

   //Configure FK for one-to-many relationship
   modelBuilder.Entity<Enrollment>()

   .HasRequired<Student>(s ⇒ s.Student)
   .WithMany(t ⇒ t.Enrollments)
   .HasForeignKey(u ⇒ u.StdntID);
}
When the database is generated you will see that the relationship is created as shown in the following image.
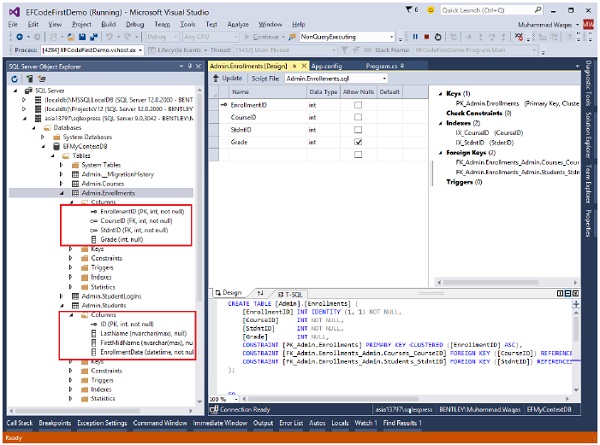
In the above example, the HasRequired method specifies that the Student navigation property must be Null. So you must assign Student with Enrollment entity every time you add or update Enrollment. To handle this we need to use HasOptional method instead of HasRequired method.
Configure Many-to-Many Relationship
Each record in both tables can relate to any number of records (or no records) in the other table.
You can create such a relationship by defining a third table, called a junction table, whose primary key consists of the foreign keys from both table A and table B.
For example, the Student table and the Course table have many-to-many relationship.
Following are the Student and Course classes in which Student and Course has many-tomany relationship, because both classes have navigation properties Students and Courses that are collections. In other words, one entity has another entity collection.
public class Student {
   public int ID { get; set; }
   public string LastName { get; set; }
   public string FirstMidName { get; set; }
   public DateTime EnrollmentDate { get; set; }

   public virtual ICollection<Course> Courses { get; set; }
   public virtual ICollection<Enrollment> Enrollments { get; set; }
}

public class Course {
   public int CourseID { get; set; }
   public string Title { get; set; }
   public int Credits { get; set; }

   public virtual ICollection<Student> Students { get; set; }
   public virtual ICollection<Enrollment> Enrollments { get; set; }
}
To configure many-to-many relationship between Student and Course, you can use Fluent API as shown in the following code.
protected override void OnModelCreating(DbModelBuilder modelBuilder) {

   //Configure default schema
   modelBuilder.HasDefaultSchema("Admin");

   // Configure many-to-many relationship
   modelBuilder.Entity<Student>()
   .HasMany(s ⇒ s.Courses)
   .WithMany(s ⇒ s.Students);
}
The default Code First conventions are used to create a join table when database is generated. As a result, the StudentCourses table is created with Course_CourseID and Student_ID columns as shown in the following image.
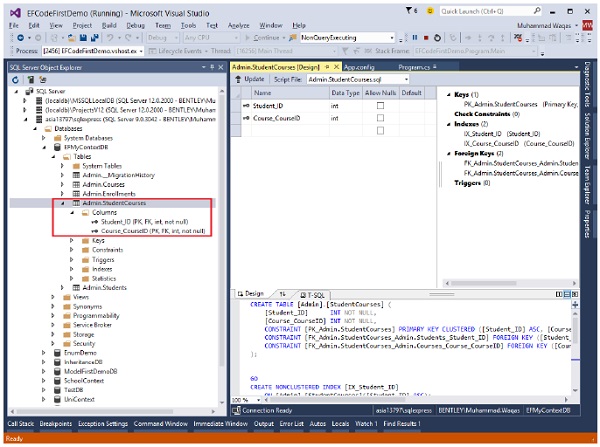
If you want to specify the join table name and the names of the columns in the table you need to do additional configuration by using the Map method.
protected override void OnModelCreating(DbModelBuilder modelBuilder) {

   //Configure default schema
   modelBuilder.HasDefaultSchema("Admin");

   // Configure many-to-many relationship
   modelBuilder.Entity<Student>()

   .HasMany(s ⇒ s.Courses)
   .WithMany(s ⇒ s.Students)

   .Map(m ⇒ {
      m.ToTable("StudentCoursesTable");
      m.MapLeftKey("StudentID");
      m.MapRightKey("CourseID");
   });
}
You can see when the database is generated, the table and columns name are created as specified in the above code.
We recommend that you execute the above example in a step-by-step manner for better understanding.
Entity Framework - Seed Database
In Entity Framework, Seed was introduced in EF 4.1 and works with database initializers. The general idea of a Seed Method is to initialize data into a database that is being created by Code First or evolved by Migrations. This data is often test data, but may also be reference data such as lists of known Students, Courses, etc. When the data is initialized, it does the following −
- Checks whether or not the target database already exists.
- If it does, then the current Code First model is compared with the model stored in metadata in the database.
- The database is dropped if the current model does not match the model in the database.
- The database is created if it was dropped or didnt exist in the first place.
- If the database was created, then the initializer Seed method is called.
The Seed method takes the database context object as an input parameter, and the code in the method uses that object to add new entities to the database. To seed data into your database, you need to override the Seed method. Lets take a look at the following example in which some of the default data are initiated into the database in an internal class.
private class UniDBInitializer<T> : DropCreateDatabaseAlways<MyContext> {

   protected override void Seed(MyContext context) {

      IList<Student> students = new List<Student>();

      students.Add(new Student() {
         FirstMidName = "Andrew",
         LastName = "Peters",
         EnrollmentDate = DateTime.Parse(DateTime.Today.ToString())
      });

      students.Add(new Student() {
         FirstMidName = "Brice",
         LastName = "Lambson",
         EnrollmentDate = DateTime.Parse(DateTime.Today.ToString())
      });

      students.Add(new Student() {
         FirstMidName = "Rowan",
         LastName = "Miller",
         EnrollmentDate = DateTime.Parse(DateTime.Today.ToString())
      });

      foreach (Student student in students)
      context.Students.Add(student);
      base.Seed(context);
   }
}
In the above code, student table is initialized. You need to set this DB initializer class in context class as shown in the following code.
public MyContext() : base("name=MyContextDB") {
   Database.SetInitializer<MyContext>(new UniDBInitializer<MyContext>());
}
Following is the complete class implementation of MyContext class, which also contains the DB initializer class.
public class MyContext : DbContext {

   public MyContext() : base("name=MyContextDB") {
      Database.SetInitializer<MyContext>(new UniDBInitializer<MyContext>());
   }

   public virtual DbSet<Course> Courses { get; set; }
   public virtual DbSet<Enrollment> Enrollments { get; set; }
   public virtual DbSet<Student> Students { get; set; }

   private class UniDBInitializer<T> : DropCreateDatabaseAlways<MyContext> {

      protected override void Seed(MyContext context) {

         IList<Student> students = new List<Student>();

         students.Add(new Student() {
            FirstMidName = "Andrew",
            LastName = "Peters",
            EnrollmentDate = DateTime.Parse(DateTime.Today.ToString())
         });

         students.Add(new Student() {
            FirstMidName = "Brice",
            LastName = "Lambson",
            EnrollmentDate = DateTime.Parse(DateTime.Today.ToString())
         });

         students.Add(new Student() {
            FirstMidName = "Rowan",
            LastName = "Miller",
            EnrollmentDate = DateTime.Parse(DateTime.Today.ToString())
         });

         foreach (Student student in students)
         context.Students.Add(student);
         base.Seed(context);
      }
   }
}
When the above example is compiled and executed, you can see the data in a database as shown in the following image.
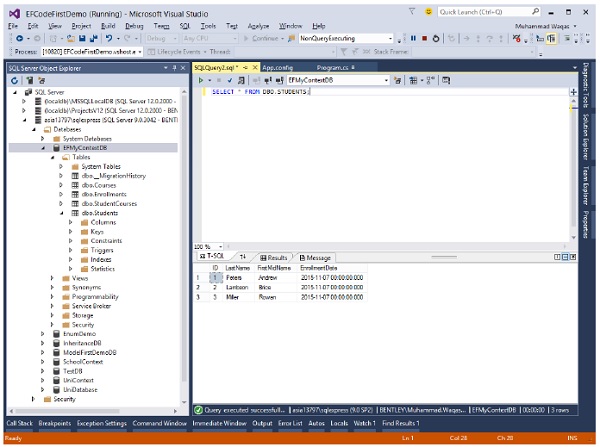
We recommend that you execute the above example in a step-by-step manner for better understanding.
Entity Framework - Code First Migration
Entity Framework 4.3 includes a new Code First Migrations feature that allows you to incrementally evolve the database schema as your model changes over time. For most developers, this is a big improvement over the database initializer options from the 4.1 and 4.2 releases that required you to manually update the database or drop and recreate it when your model changed.
Before Entity Framework 4.3, if you already have data (other than seed data) or existing Stored Procedures, triggers, etc. in your database, these strategies used to drop the entire database and recreate it, so you would lose the data and other DB objects.
With migration, it will automatically update the database schema, when your model changes without losing any existing data or other database objects.
It uses a new database initializer called MigrateDatabaseToLatestVersion.
There are two kinds of Migration −
- Automated Migration
- Code based Migration
Automated Migration
Automated Migration was first introduced in Entity framework 4.3. In automated migration you don't need to process database migration manually in the code file. For example, for each change you will also need to change in your domain classes. But with automated migration you just have to run a command in Package Manager Console to get done this.
Lets take a look at the following step-by-step process of automated migration.
When you use Code First approach, you don't have a database for you application.
In this example we will be starting with our 3 basic classes such as Student, Course and Enrollment as shown in the following code.
public class Enrollment {
   public int EnrollmentID { get; set; }
   public int CourseID { get; set; }
   public int StudentID { get; set; }
   public Grade? Grade { get; set; }

   public virtual Course Course { get; set; }
   public virtual Student Student { get; set; }

}

public class Student {
   public int ID { get; set; }
   public string LastName { get; set; }
   public string FirstMidName { get; set; }
   public DateTime EnrollmentDate { get; set; }

   public virtual ICollection<Enrollment> Enrollments { get; set; }

}

public class Course {
   public int CourseID { get; set; }
   public string Title { get; set; }
   [Index]
   public int Credits { get; set; }

   public virtual ICollection<Enrollment> Enrollments { get; set; }

}
Following is the context class.
public class MyContext : DbContext {
   public MyContext() : base("MyContextDB") {}
   public virtual DbSet<Course> Courses { get; set; }
   public virtual DbSet<Enrollment> Enrollments { get; set; }
   public virtual DbSet<Student> Students { get; set; }
}
Before running the application, you need to enable automated migration.
Step 1 − Open Package Manger Console from Tools → NuGet Package Manger → Package Manger Console.
Step 2 − To enable automated migration run the following command in Package Manager Console.
PM> enable-migrations -EnableAutomaticMigrations:$true
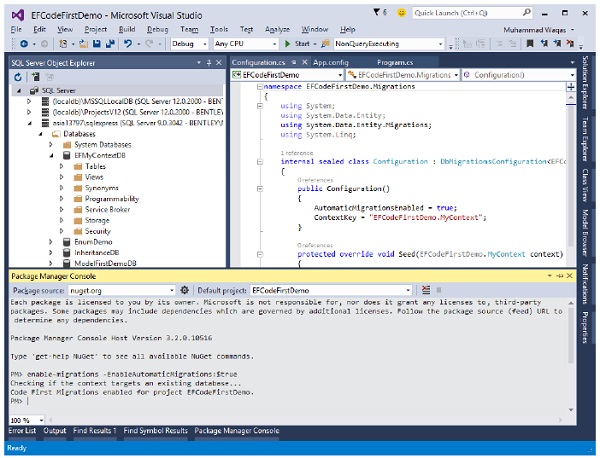
Step 3 − Once the command runs successfully, it creates an internal sealed Configuration class in the Migration folder of your project as shown in the following code.
namespace EFCodeFirstDemo.Migrations {

   using System;
   using System.Data.Entity;
   using System.Data.Entity.Migrations;
   using System.Linq;

   internal sealed class Configuration : DbMigrationsConfiguration<EFCodeFirstDemo.MyContext> {

      public Configuration() {
         AutomaticMigrationsEnabled = true;
         ContextKey = "EFCodeFirstDemo.MyContext";
      }

      protected override void Seed(EFCodeFirstDemo.MyContext context) {

         //  This method will be called after migrating to the latest version.
         //  You can use the DbSet<T>.AddOrUpdate() helper extension method
         //  to avoid creating duplicate seed data. E.g.

         //  context.People.AddOrUpdate(
            //  p ⇒ p.FullName,
            //  new Person { FullName = "Andrew Peters" },
            //  new Person { FullName = "Brice Lambson" },
            //  new Person { FullName = "Rowan Miller" }
         //  );
      }
   }
}
Step 4 − Set the database initializer in the context class with the new DB initialization strategy MigrateDatabaseToLatestVersion.
public class MyContext : DbContext {

   public MyContext() : base("MyContextDB") {
      Database.SetInitializer(new MigrateDatabaseToLatestVersion<MyContext,
         EFCodeFirstDemo.Migrations.Configuration>("MyContextDB"));
   }

   public virtual DbSet<Course> Courses { get; set; }
   public virtual DbSet<Enrollment> Enrollments { get; set; }
   public virtual DbSet<Student> Students { get; set; }

}
Step 5 − You have set up automated migration. When you execute your application, then it will automatically take care of migration, when you change the model.

Step 6 − As you can see that one system table __MigrationHistory is also created in your database with other tables. In __MigrationHistory, automated migration maintains the history of database changes.
Step 7 − When you add another entity class as your domain class and execute your application, then it will create the table in your database. Lets add the following StudentLogIn class.
public class StudentLogIn {
   [Key, ForeignKey("Student")]
   public int ID { get; set; }
   public string EmailID { get; set; }
   public string Password { get; set; }

   public virtual Student Student { get; set; }
}
Step 8 − Dont forget to add the DBSet for the above mentioned class in your context class as shown in the following code.
public virtual DbSet<StudentLogIn> StudentsLogIn { get; set; }
Step 9 − Run your application again and you will see that StudentsLogIn table is added to your database.
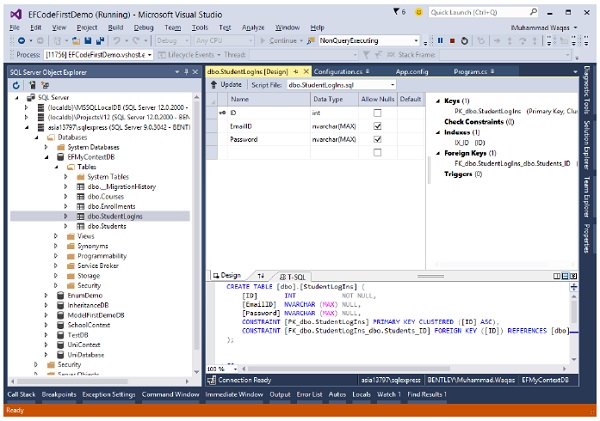
The above steps mentioned for automated migrations will only work for your entity. For example, to add another entity class or remove the existing entity class it will successfully migrate. But if you add or remove any property to your entity class then it will throw an exception.
Step 10 − To handle the property migration you need to set AutomaticMigrationDataLossAllowed = true in the configuration class constructor.
public Configuration() {
   AutomaticMigrationsEnabled = true;
   AutomaticMigrationDataLossAllowed = true;
   ContextKey = "EFCodeFirstDemo.MyContext";
}
Code Based Migration
When you develop a new application, your data model changes frequently, and each time the model changes, it gets out of sync with the database. You have configured the Entity Framework to automatically drop and re-create the database each time you change the data model. Code-based migration is useful when you want more control on the migration.
When you add, remove, or change entity classes or change your DbContext class, the next time you run the application it automatically deletes your existing database, creates a new one that matches the model, and seeds it with test data.
The Code First Migrations feature solves this problem by enabling Code First to update the database schema instead of dropping and re-creating the database. To deploy the application, you'll have to enable Migrations.
Here is the basic rule to migrate changes in the database −
- Enable Migrations
- Add Migration
- Update Database
Lets take a look at the following step-by-step process of code-base migration.
When you use code first approach, you don't have a database for you application.
In this example we will be starting again with our 3 basic classes such as Student, Course and Enrollment as shown in the following code.
public class Enrollment {
   public int EnrollmentID { get; set; }
   public int CourseID { get; set; }
   public int StudentID { get; set; }
   public Grade? Grade { get; set; }

   public virtual Course Course { get; set; }
   public virtual Student Student { get; set; }

}

public class Student {
   public int ID { get; set; }
   public string LastName { get; set; }
   public string FirstMidName { get; set; }
   public DateTime EnrollmentDate { get; set; }

   public virtual ICollection<Enrollment> Enrollments { get; set; }

}

public class Course {
   public int CourseID { get; set; }
   public string Title { get; set; }
   [Index]
   public int Credits { get; set; }

   public virtual ICollection<Enrollment> Enrollments { get; set; }

}
Following is the context class.
public class MyContext : DbContext {

   public MyContext() : base("MyContextDB") {
      Database.SetInitializer(new MigrateDatabaseToLatestVersion<
         MyContext, EFCodeFirstDemo.Migrations.Configuration>("MyContextDB"));
   }

   public virtual DbSet<Course> Courses { get; set; }
   public virtual DbSet<Enrollment> Enrollments { get; set; }
   public virtual DbSet<Student> Students { get; set; }

}
Step 1 − Before running the application you need to enable migration.
Step 2 − Open Package Manager Console from Tools → NuGet Package Manger → Package Manger Console.
Step 3 − Migration is already enabled, now add migration in your application by executing the following command.
PM> add-migration "UniDB Schema"
Step 4 − When the command is successfully executed then you will see a new file has been created in the Migration folder with the name of the parameter you passed to the command with a timestamp prefix as shown in the following image.
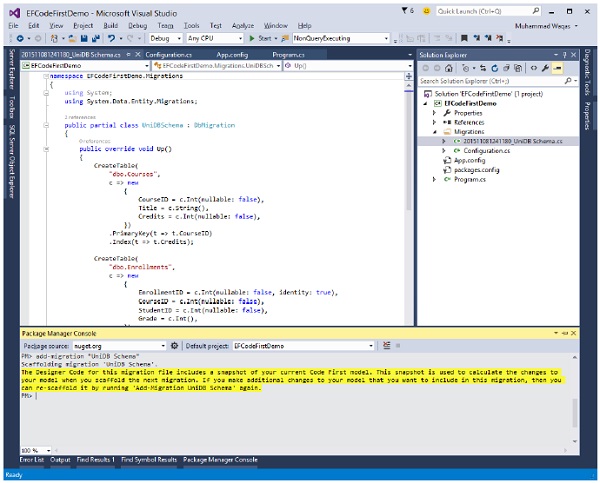
Step 5 − You can create or update the database using the update-database command.
PM> Update-Database -Verbose
The "-Verbose" flag specifies to show the SQL Statements being applied to the target database in the console.
Step 6 − Lets add one more property Age in the student class and then execute the update statement.
public class Student {
   public int ID { get; set; }
   public string LastName { get; set; }
   public string FirstMidName { get; set; }
   public int Age { get; set; }
   public DateTime EnrollmentDate { get; set; }

   public virtual ICollection<Enrollment> Enrollments { get; set; }

}
When you execute PM → Update-Database Verbose, when the command is successfully executed you will see that the new column Age is added in your database.
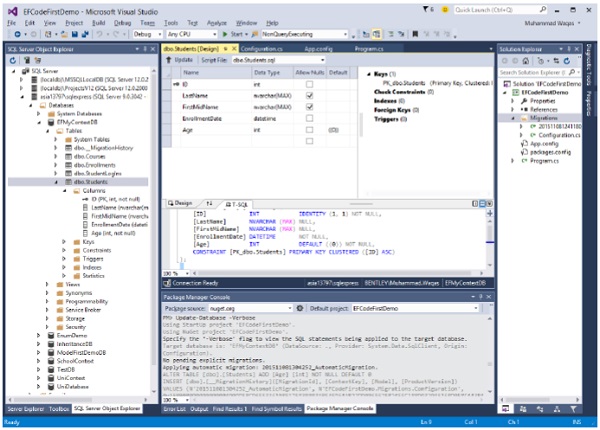
We recommend that you execute the above example in a step-by-step manner for better understanding.
Entity Framework - Multiple DbContext
In this chapter, we will be learning how to migrate changes into the database when there are multiple DbContext classes in the application.
- Multiple DbContext was first introduced in Entity Framework 6.0.
- Multiple context classes may belong to a single database or two different databases.
In our example, we will define two Context classes for the same database. In the following code, there are two DbContext classes for Student and Teacher.
public class Student {
   public int ID { get; set; }
   public string LastName { get; set; }
   public string FirstMidName { get; set; }
   public DateTime EnrollmentDate { get; set; }
}

public class MyStudentContext : DbContext {
   public MyStudentContext() : base("UniContextDB") {}
   public virtual DbSet<Student> Students { get; set; }
}

public class Teacher {
   public int ID { get; set; }
   public string LastName { get; set; }
   public string FirstMidName { get; set; }
   public DateTime HireDate { get; set; }
}

public class MyTeacherContext : DbContext {
   public MyTeacherContext() : base("UniContextDB") {}
   public virtual DbSet<Teacher> Teachers { get; set; }
}
As you can see in the above code, there are two models called Student and Teacher. Each one is associated with a particular corresponding context class, i.e., Student is associated with MyStudentContext and Teacher is associated with MyTeacherContext.
Here is the basic rule to migrate changes in database, when there are multiple Context classes within the same project.
enable-migrations -ContextTypeName <DbContext-Name-with-Namespaces> MigrationsDirectory:<Migrations-Directory-Name>
Add-Migration -configuration <DbContext-Migrations-Configuration-Class-withNamespaces> <Migrations-Name>
Update-Database -configuration <DbContext-Migrations-Configuration-Class-withNamespaces> -Verbose
Lets enable migration for MyStudentContext by executing the following command in Package Manager Console.
PM→ enable-migrations -ContextTypeName:EFCodeFirstDemo.MyStudentContext
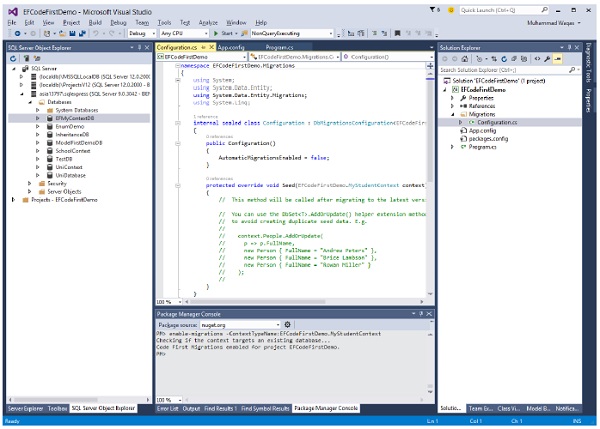
Once it is executed, we will add the model in the migration history and for that, we have to fire add-migration command in the same console.
PM→ add-migration -configuration EFCodeFirstDemo.Migrations.Configuration Initial
Let us now add some data into Students and Teachers tables in the database.
static void Main(string[] args) {

   using (var context = new MyStudentContext()) {

      //// Create and save a new Students
      Console.WriteLine("Adding new students");

      var student = new Student {
         FirstMidName = "Alain",
         LastName = "Bomer",
         EnrollmentDate = DateTime.Parse(DateTime.Today.ToString())
         //Age = 24
      };

      context.Students.Add(student);

      var student1 = new Student {
         FirstMidName = "Mark",
         LastName = "Upston",
         EnrollmentDate = DateTime.Parse(DateTime.Today.ToString())
         //Age = 30
      };

      context.Students.Add(student1);
      context.SaveChanges();
      // Display all Students from the database
      var students = (from s in context.Students orderby s.FirstMidName
         select s).ToList<Student>();

      Console.WriteLine("Retrieve all Students from the database:");

      foreach (var stdnt in students) {
         string name = stdnt.FirstMidName + " " + stdnt.LastName;
         Console.WriteLine("ID: {0}, Name: {1}", stdnt.ID, name);
      }

      Console.WriteLine("Press any key to exit...");
      Console.ReadKey();
   }

   using (var context = new MyTeacherContext()) {

      //// Create and save a new Teachers
      Console.WriteLine("Adding new teachers");

      var student = new Teacher {
         FirstMidName = "Alain",
         LastName = "Bomer",
         HireDate = DateTime.Parse(DateTime.Today.ToString())
         //Age = 24
      };

      context.Teachers.Add(student);

      var student1 = new Teacher {
         FirstMidName = "Mark",
         LastName = "Upston",
         HireDate = DateTime.Parse(DateTime.Today.ToString())
         //Age = 30
      };

      context.Teachers.Add(student1);
      context.SaveChanges();

      // Display all Teachers from the database
      var teachers = (from t in context.Teachers orderby t.FirstMidName
         select t).ToList<Teacher>();

      Console.WriteLine("Retrieve all teachers from the database:");

      foreach (var teacher in teachers) {
         string name = teacher.FirstMidName + " " + teacher.LastName;
         Console.WriteLine("ID: {0}, Name: {1}", teacher.ID, name);
      }

      Console.WriteLine("Press any key to exit...");
      Console.ReadKey();
   }
}
When the above code is executed, you will see that two different tables are created for two different models as shown in the following image.
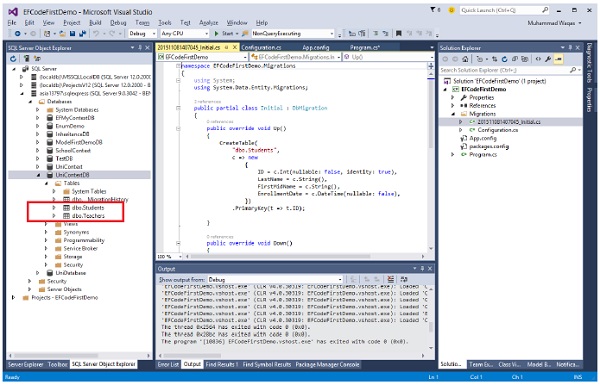
We recommend that you execute the above example in a step-by-step manner for better understanding.
Entity Framework - Nested Entity Types
Prior to Entity Framework 6, Entity Framework didn't recognize entities or complex types that were nested within other entities or complex types. When Entity Framework generated the model, the nested types just disappeared.
Lets take a look at a simple example in which we have our basic model with three entities Student, Course and Enrollment.
Lets add a property Identity, which is a Person type. Person is another entity, contains BirthDate and FatherName properties.
In Entity Framework terms, because it has no identity and is part of an entity, it's an Entity Framework complex type, and we've actually had support for complex types since the first version of Entity Framework.
The Person type isn't nested as shown in the following code.
public class Student {
   public int ID { get; set; }
   public string LastName { get; set; }
   public string FirstMidName { get; set; }
   public DateTime EnrollmentDate { get; set; }
   public Person Identity { get; set; }

   public virtual ICollection<Enrollment> Enrollments { get; set; }
}

public class Person {

   public Person(string fatherName, DateTime birthDate) {
      FatherName = fatherName;
      BirthDate = birthDate;
   }

   public string FatherName { get; set; }
   public DateTime BirthDate { get; set; }
}
Entity Framework will know how to persist Person types when it is used in previous versions as well.
By using Entity Framework Power Tool we will see how Entity Framework interprets the model. Right click on Program.cs file and select Entity Framework → View Entity Data Model (Read only)
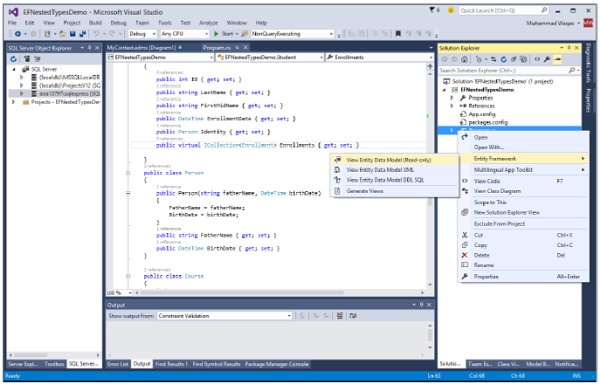
Now you will see that Identity property is defined in Student class.
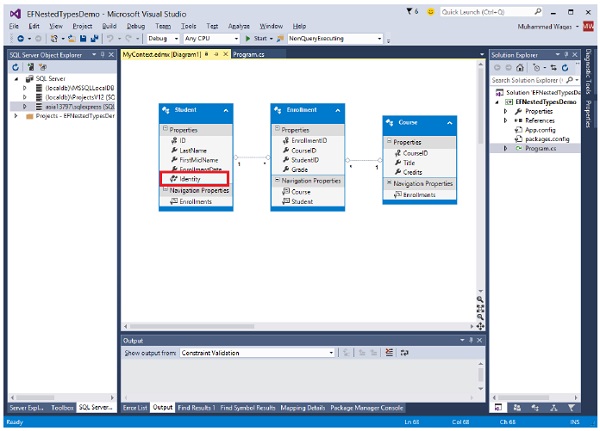
If this Person class won't be used by any other entity, then we can nest it inside the Student class, but this earlier version of Entity Framework doesn't acknowledge nested types.
In older version, you generate the model again, not only is the type not recognized, but because it's not there, the property isn't there either, so Entity Framework won't persist the Person type at all.
public class Student {
   public int ID { get; set; }
   public string LastName { get; set; }
   public string FirstMidName { get; set; }

   public DateTime EnrollmentDate { get; set; }
   public Person Identity { get; set; }

   public virtual ICollection<Enrollment> Enrollments { get; set; }

   public class Person {

      public Person(string fatherName, DateTime birthDate) {
         FatherName = fatherName;
         BirthDate = birthDate;
      }

      public string FatherName { get; set; }
      public DateTime BirthDate { get; set; }
   }
}
With Entity Framework 6, nested entities and complex types are recognized. In the above code, you can see that Person is nested within the Student class.
When you use the Entity Framework Power Tool to show how Entity Framework interprets the model this time, there's true Identity property, and Person complex type. So Entity Framework will persist that data.
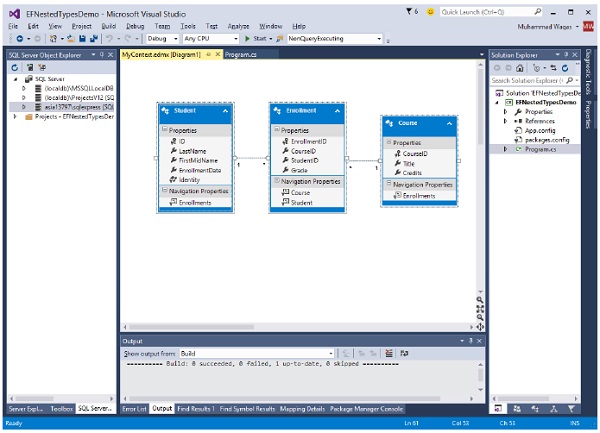
Now you can see that Identity is a nested entity type, which was not supported before Entity Framework 6.
We recommend that you execute the above example in a step-by-step manner for better understanding.
