- Entity Framework - Home
- Entity Framework - Overview
- Entity Framework - Architecture
- Entity F - Environment Setup
- Entity Framework - Database Setup
- Entity Framework - Data Model
- Entity Framework - DbContext
- Entity Framework - Types
- Entity Framework - Relationships
- Entity Framework - Lifecycle
- Entity F - Code First Approach
- Entity F - Model First Approach
- Entity F - Database First Approach
- Entity Framework - DEV Approaches
- Entity F - Database Operations
- Entity Framework - Concurrency
- Entity Framework - Transaction
- Entity Framework - Views
- Entity Framework - Index
- Entity F - Stored Procedures
- Entity F - Disconnected Entities
- Entity F - Table-Valued Function
- Entity Framework - Native SQL
- Entity Framework - Enum Support
- Entity F - Asynchronous Query
- Entity Framework - Persistence
- Entity F - Projection Queries
- Entity F - Command Logging
- Entity F - Command Interception
- Entity Framework - Spatial Data Type
- Entity Framework - Inheritance
- Entity Framework - Migration
- Entity Framework - Eager Loading
- Entity Framework - Lazy Loading
- Entity Framework - Explicit Loading
- Entity Framework - Validation
- Entity Framework - Track Changes
- Entity Framework - Colored Entities
- Entity F - Code First Approach
- Entity Framework - First Example
- Entity Framework - Data Annotations
- Entity Framework - Fluent API
- Entity Framework - Seed Database
- Entity F - Code First Migration
- Entity F - Multiple DbContext
- Entity F - Nested Entity Types
- Entity Framework - Quick Guide
- Entity Framework - Useful Resources
- Entity Framework - Bulk Extensions
- Entity Framework - Discussion
Entity Framework - Code First Migration
Entity Framework 4.3 includes a new Code First Migrations feature that allows you to incrementally evolve the database schema as your model changes over time. For most developers, this is a big improvement over the database initializer options from the 4.1 and 4.2 releases that required you to manually update the database or drop and recreate it when your model changed.
Before Entity Framework 4.3, if you already have data (other than seed data) or existing Stored Procedures, triggers, etc. in your database, these strategies used to drop the entire database and recreate it, so you would lose the data and other DB objects.
With migration, it will automatically update the database schema, when your model changes without losing any existing data or other database objects.
It uses a new database initializer called MigrateDatabaseToLatestVersion.
There are two kinds of Migration −
- Automated Migration
- Code based Migration
Automated Migration
Automated Migration was first introduced in Entity framework 4.3. In automated migration you don't need to process database migration manually in the code file. For example, for each change you will also need to change in your domain classes. But with automated migration you just have to run a command in Package Manager Console to get done this.
Lets take a look at the following step-by-step process of automated migration.
When you use Code First approach, you don't have a database for you application.
In this example we will be starting with our 3 basic classes such as Student, Course and Enrollment as shown in the following code.
public class Enrollment {
   public int EnrollmentID { get; set; }
   public int CourseID { get; set; }
   public int StudentID { get; set; }
   public Grade? Grade { get; set; }

   public virtual Course Course { get; set; }
   public virtual Student Student { get; set; }

}

public class Student {
   public int ID { get; set; }
   public string LastName { get; set; }
   public string FirstMidName { get; set; }
   public DateTime EnrollmentDate { get; set; }

   public virtual ICollection<Enrollment> Enrollments { get; set; }

}

public class Course {
   public int CourseID { get; set; }
   public string Title { get; set; }
   [Index]
   public int Credits { get; set; }

   public virtual ICollection<Enrollment> Enrollments { get; set; }

}
Following is the context class.
public class MyContext : DbContext {
   public MyContext() : base("MyContextDB") {}
   public virtual DbSet<Course> Courses { get; set; }
   public virtual DbSet<Enrollment> Enrollments { get; set; }
   public virtual DbSet<Student> Students { get; set; }
}
Before running the application, you need to enable automated migration.
Step 1 − Open Package Manger Console from Tools → NuGet Package Manger → Package Manger Console.
Step 2 − To enable automated migration run the following command in Package Manager Console.
PM> enable-migrations -EnableAutomaticMigrations:$true
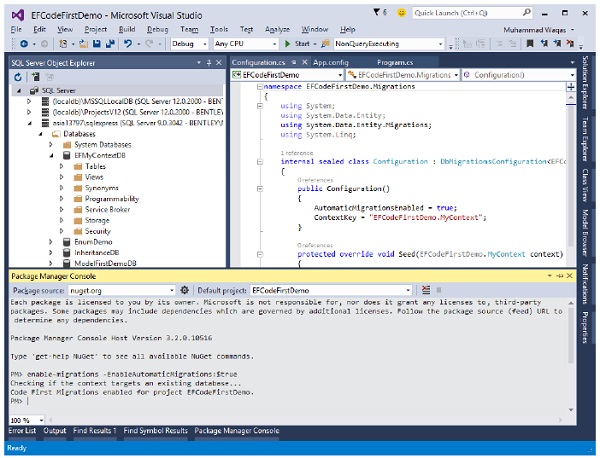
Step 3 − Once the command runs successfully, it creates an internal sealed Configuration class in the Migration folder of your project as shown in the following code.
namespace EFCodeFirstDemo.Migrations {

   using System;
   using System.Data.Entity;
   using System.Data.Entity.Migrations;
   using System.Linq;

   internal sealed class Configuration : DbMigrationsConfiguration<EFCodeFirstDemo.MyContext> {

      public Configuration() {
         AutomaticMigrationsEnabled = true;
         ContextKey = "EFCodeFirstDemo.MyContext";
      }

      protected override void Seed(EFCodeFirstDemo.MyContext context) {

         //  This method will be called after migrating to the latest version.
         //  You can use the DbSet<T>.AddOrUpdate() helper extension method
         //  to avoid creating duplicate seed data. E.g.

         //  context.People.AddOrUpdate(
            //  p ⇒ p.FullName,
            //  new Person { FullName = "Andrew Peters" },
            //  new Person { FullName = "Brice Lambson" },
            //  new Person { FullName = "Rowan Miller" }
         //  );
      }
   }
}
Step 4 − Set the database initializer in the context class with the new DB initialization strategy MigrateDatabaseToLatestVersion.
public class MyContext : DbContext {

   public MyContext() : base("MyContextDB") {
      Database.SetInitializer(new MigrateDatabaseToLatestVersion<MyContext,
         EFCodeFirstDemo.Migrations.Configuration>("MyContextDB"));
   }

   public virtual DbSet<Course> Courses { get; set; }
   public virtual DbSet<Enrollment> Enrollments { get; set; }
   public virtual DbSet<Student> Students { get; set; }

}
Step 5 − You have set up automated migration. When you execute your application, then it will automatically take care of migration, when you change the model.

Step 6 − As you can see that one system table __MigrationHistory is also created in your database with other tables. In __MigrationHistory, automated migration maintains the history of database changes.
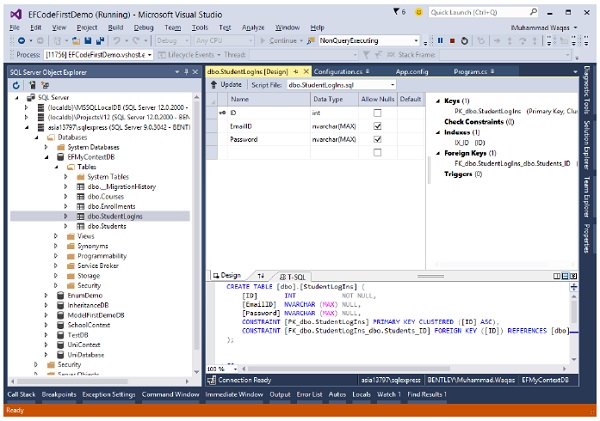
Step 7 − When you add another entity class as your domain class and execute your application, then it will create the table in your database. Lets add the following StudentLogIn class.
public class StudentLogIn {
   [Key, ForeignKey("Student")]
   public int ID { get; set; }
   public string EmailID { get; set; }
   public string Password { get; set; }

   public virtual Student Student { get; set; }
}
Step 8 − Dont forget to add the DBSet for the above mentioned class in your context class as shown in the following code.
public virtual DbSet<StudentLogIn> StudentsLogIn { get; set; }
Step 9 − Run your application again and you will see that StudentsLogIn table is added to your database.
The above steps mentioned for automated migrations will only work for your entity. For example, to add another entity class or remove the existing entity class it will successfully migrate. But if you add or remove any property to your entity class then it will throw an exception.
Step 10 − To handle the property migration you need to set AutomaticMigrationDataLossAllowed = true in the configuration class constructor.
public Configuration() {
   AutomaticMigrationsEnabled = true;
   AutomaticMigrationDataLossAllowed = true;
   ContextKey = "EFCodeFirstDemo.MyContext";
}
Code Based Migration
When you develop a new application, your data model changes frequently, and each time the model changes, it gets out of sync with the database. You have configured the Entity Framework to automatically drop and re-create the database each time you change the data model. Code-based migration is useful when you want more control on the migration.
When you add, remove, or change entity classes or change your DbContext class, the next time you run the application it automatically deletes your existing database, creates a new one that matches the model, and seeds it with test data.
The Code First Migrations feature solves this problem by enabling Code First to update the database schema instead of dropping and re-creating the database. To deploy the application, you'll have to enable Migrations.
Here is the basic rule to migrate changes in the database −
- Enable Migrations
- Add Migration
- Update Database
Lets take a look at the following step-by-step process of code-base migration.
When you use code first approach, you don't have a database for you application.
In this example we will be starting again with our 3 basic classes such as Student, Course and Enrollment as shown in the following code.
public class Enrollment {
   public int EnrollmentID { get; set; }
   public int CourseID { get; set; }
   public int StudentID { get; set; }
   public Grade? Grade { get; set; }

   public virtual Course Course { get; set; }
   public virtual Student Student { get; set; }

}

public class Student {
   public int ID { get; set; }
   public string LastName { get; set; }
   public string FirstMidName { get; set; }
   public DateTime EnrollmentDate { get; set; }

   public virtual ICollection<Enrollment> Enrollments { get; set; }

}

public class Course {
   public int CourseID { get; set; }
   public string Title { get; set; }
   [Index]
   public int Credits { get; set; }

   public virtual ICollection<Enrollment> Enrollments { get; set; }

}
Following is the context class.
public class MyContext : DbContext {

   public MyContext() : base("MyContextDB") {
      Database.SetInitializer(new MigrateDatabaseToLatestVersion<
         MyContext, EFCodeFirstDemo.Migrations.Configuration>("MyContextDB"));
   }

   public virtual DbSet<Course> Courses { get; set; }
   public virtual DbSet<Enrollment> Enrollments { get; set; }
   public virtual DbSet<Student> Students { get; set; }

}
Step 1 − Before running the application you need to enable migration.
Step 2 − Open Package Manager Console from Tools → NuGet Package Manger → Package Manger Console.
Step 3 − Migration is already enabled, now add migration in your application by executing the following command.
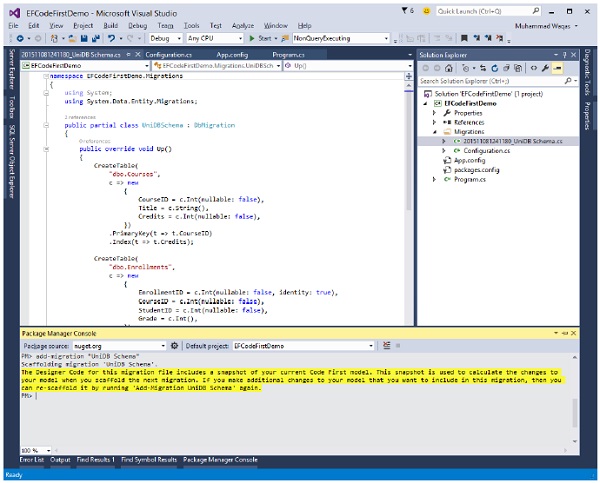
PM> add-migration "UniDB Schema"
Step 4 − When the command is successfully executed then you will see a new file has been created in the Migration folder with the name of the parameter you passed to the command with a timestamp prefix as shown in the following image.
Step 5 − You can create or update the database using the update-database command.
PM> Update-Database -Verbose
The "-Verbose" flag specifies to show the SQL Statements being applied to the target database in the console.
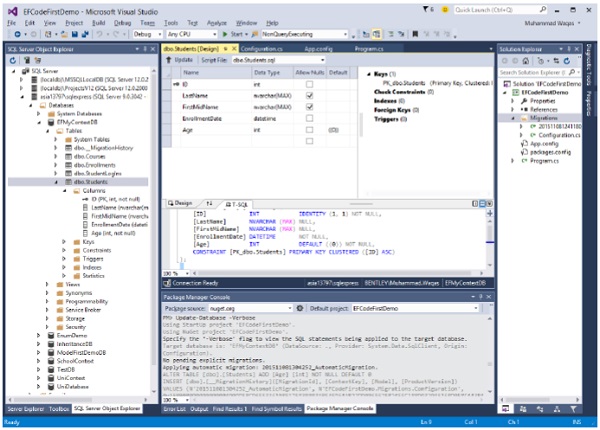
Step 6 − Lets add one more property Age in the student class and then execute the update statement.
public class Student {
   public int ID { get; set; }
   public string LastName { get; set; }
   public string FirstMidName { get; set; }
   public int Age { get; set; }
   public DateTime EnrollmentDate { get; set; }

   public virtual ICollection<Enrollment> Enrollments { get; set; }

}
When you execute PM → Update-Database Verbose, when the command is successfully executed you will see that the new column Age is added in your database.
We recommend that you execute the above example in a step-by-step manner for better understanding.
