- Entity Framework - Home
- Entity Framework - Overview
- Entity Framework - Architecture
- Entity F - Environment Setup
- Entity Framework - Database Setup
- Entity Framework - Data Model
- Entity Framework - DbContext
- Entity Framework - Types
- Entity Framework - Relationships
- Entity Framework - Lifecycle
- Entity F - Code First Approach
- Entity F - Model First Approach
- Entity F - Database First Approach
- Entity Framework - DEV Approaches
- Entity F - Database Operations
- Entity Framework - Concurrency
- Entity Framework - Transaction
- Entity Framework - Views
- Entity Framework - Index
- Entity F - Stored Procedures
- Entity F - Disconnected Entities
- Entity F - Table-Valued Function
- Entity Framework - Native SQL
- Entity Framework - Enum Support
- Entity F - Asynchronous Query
- Entity Framework - Persistence
- Entity F - Projection Queries
- Entity F - Command Logging
- Entity F - Command Interception
- Entity Framework - Spatial Data Type
- Entity Framework - Inheritance
- Entity Framework - Migration
- Entity Framework - Eager Loading
- Entity Framework - Lazy Loading
- Entity Framework - Explicit Loading
- Entity Framework - Validation
- Entity Framework - Track Changes
- Entity Framework - Colored Entities
- Entity F - Code First Approach
- Entity Framework - First Example
- Entity Framework - Data Annotations
- Entity Framework - Fluent API
- Entity Framework - Seed Database
- Entity F - Code First Migration
- Entity F - Multiple DbContext
- Entity F - Nested Entity Types
- Entity Framework - Quick Guide
- Entity Framework - Useful Resources
- Entity Framework - Bulk Extensions
- Entity Framework - Discussion
Entity Framework - Fluent API
Fluent API is an advanced way of specifying model configuration that covers everything that data annotations can do in addition to some more advanced configuration not possible with data annotations. Data annotations and the fluent API can be used together, but Code First gives precedence to Fluent API > data annotations > default conventions.
Fluent API is another way to configure your domain classes.
The Code First Fluent API is most commonly accessed by overriding the OnModelCreating method on your derived DbContext.
Fluent API provides more functionality for configuration than DataAnnotations. Fluent API supports the following types of mappings.
In this chapter, we will continue with the simple example which contains Student, Course and Enrollment classes and one context class with MyContext name as shown in the following code.
using System.Data.Entity;
using System.Linq;
using System.Text;
using System.Threading.Tasks;

namespace EFCodeFirstDemo {

   class Program {
      static void Main(string[] args) {}
   }

   public enum Grade {
      A, B, C, D, F
   }

   public class Enrollment {
      public int EnrollmentID { get; set; }
      public int CourseID { get; set; }
      public int StudentID { get; set; }
      public Grade? Grade { get; set; }

      public virtual Course Course { get; set; }
      public virtual Student Student { get; set; }
   }

   public class Student {
      public int ID { get; set; }
      public string LastName { get; set; }
      public string FirstMidName { get; set; }

      public DateTime EnrollmentDate { get; set; }

      public virtual ICollection<Enrollment> Enrollments { get; set; }
   }

   public class Course {
      public int CourseID { get; set; }
      public string Title { get; set; }
      public int Credits { get; set; }

      public virtual ICollection<Enrollment> Enrollments { get; set; }
   }

   public class MyContext : DbContext {
      public virtual DbSet<Course> Courses { get; set; }
      public virtual DbSet<Enrollment> Enrollments { get; set; }
      public virtual DbSet<Student> Students { get; set; }
   }

}
To access Fluent API you need to override the OnModelCreating method in DbContext. Lets take a look at a simple example in which we will rename the column name in student table from FirstMidName to FirstName as shown in the following code.
public class MyContext : DbContext {

   protected override void OnModelCreating(DbModelBuilder modelBuilder) {
      modelBuilder.Entity<Student>().Property(s ⇒ s.FirstMidName)
      .HasColumnName("FirstName");}

      public virtual DbSet<Course> Courses { get; set; }
      public virtual DbSet<Enrollment> Enrollments { get; set; }
      public virtual DbSet<Student> Students { get; set; }
}
DbModelBuilder is used to map CLR classes to a database schema. It is the main class and on which you can configure all your domain classes. This code centric approach to building an Entity Data Model (EDM) is known as Code First.
Fluent API provides a number of important methods to configure entities and its properties to override various Code First conventions. Below are some of them.
| Sr. No. | Method Name & Description |
|---|---|
| 1 | ComplexType<TComplexType> Registers a type as a complex type in the model and returns an object that can be used to configure the complex type. This method can be called multiple times for the same type to perform multiple lines of configuration. |
| 2 | Entity<TEntityType> Registers an entity type as part of the model and returns an object that can be used to configure the entity. This method can be called multiple times for the same entity to perform multiple lines of configuration. |
| 3 | HasKey<TKey> Configures the primary key property(s) for this entity type. |
| 4 | HasMany<TTargetEntity> Configures a many relationship from this entity type. |
| 5 | HasOptional<TTargetEntity> Configures an optional relationship from this entity type. Instances of the entity type will be able to be saved to the database without this relationship being specified. The foreign key in the database will be nullable. |
| 6 | HasRequired<TTargetEntity> Configures a required relationship from this entity type. Instances of the entity type will not be able to be saved to the database unless this relationship is specified. The foreign key in the database will be non-nullable. |
| 7 | Ignore<TProperty> Excludes a property from the model so that it will not be mapped to the database. (Inherited from StructuralTypeConfiguration<TStructuralType>) |
| 8 | Property<T> Configures a struct property that is defined on this type. (Inherited from StructuralTypeConfiguration<TStructuralType>) |
| 9 | ToTable(String) Configures the table name that this entity type is mapped to. |
Fluent API lets you configure your entities or their properties, whether you want to change something about how they map to the database or how they relate to one another. There's a huge variety of mappings and modeling that you can impact using the configurations. Following are the main types of mapping which Fluent API supports −
- Entity Mapping
- Properties Mapping
Entity Mapping
Entity mapping is just some simple mappings that will impact Entity Framework's understanding of how the classes are mapped to the databases. All these we discussed in data annotations and here we will see how to achieve the same things using Fluent API.
So rather than going into the domain classes to add these configurations, we can do this inside of the context.
The first thing is to override the OnModelCreating method, which gives the modelBuilder to work with.
Default Schema
The default schema is dbo when the database is generated. You can use the HasDefaultSchema method on DbModelBuilder to specify the database schema to use for all tables, stored procedures, etc.
Lets take a look at the following example in which admin schema is applied.
public class MyContext : DbContext {
   public MyContext() : base("name = MyContextDB") {}

   protected override void OnModelCreating(DbModelBuilder modelBuilder) {
      //Configure default schema
      modelBuilder.HasDefaultSchema("Admin");
   }

   public virtual DbSet<Course> Courses { get; set; }
   public virtual DbSet<Enrollment> Enrollments { get; set; }
   public virtual DbSet<Student> Students { get; set; }
}
Map Entity to Table
With default convention, Code First will create the database tables with the name of DbSet properties in the context class such as Courses, Enrollments and Students. But if you want different table names then you can override this convention and can provide a different table name than the DbSet properties, as shown in the following code.
protected override void OnModelCreating(DbModelBuilder modelBuilder) {

   //Configure default schema
   modelBuilder.HasDefaultSchema("Admin");

   //Map entity to table
   modelBuilder.Entity<Student>().ToTable("StudentData");
   modelBuilder.Entity<Course>().ToTable("CourseDetail");
   modelBuilder.Entity<Enrollment>().ToTable("EnrollmentInfo");
}
When the database is generated, you will see the tables name as specified in the OnModelCreating method.
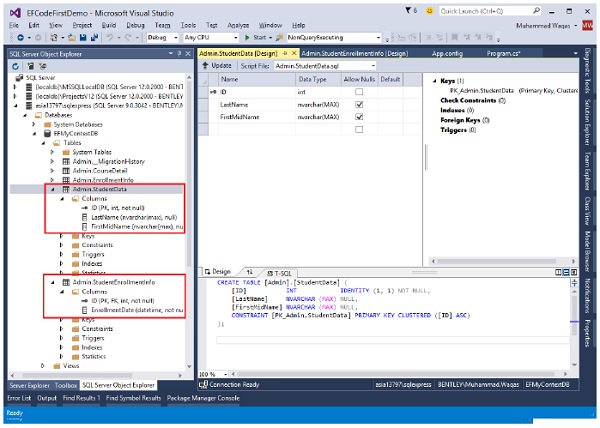
Entity Splitting (Map Entity to Multiple Table)
Entity Splitting lets you combine data coming from multiple tables into a single class and it can only be used with tables that have a one-to-one relationship between them. Lets take a look at the following example in which Student information is mapped into two tables.
protected override void OnModelCreating(DbModelBuilder modelBuilder) {
   //Configure default schema
   modelBuilder.HasDefaultSchema("Admin");

   //Map entity to table
   modelBuilder.Entity<Student>().Map(sd ⇒ {
      sd.Properties(p ⇒ new { p.ID, p.FirstMidName, p.LastName });
      sd.ToTable("StudentData");
   })

   .Map(si ⇒ {
      si.Properties(p ⇒ new { p.ID, p.EnrollmentDate });
      si.ToTable("StudentEnrollmentInfo");
   });

   modelBuilder.Entity<Course>().ToTable("CourseDetail");
   modelBuilder.Entity<Enrollment>().ToTable("EnrollmentInfo");
}
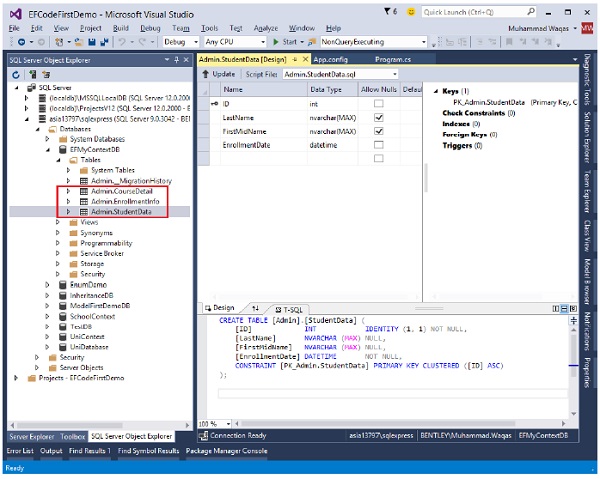
In the above code, you can see that Student entity is split into the following two tables by mapping some properties to StudentData table and some properties to StudentEnrollmentInfo table using Map method.
StudentData − Contains Student FirstMidName and Last Name.
StudentEnrollmentInfo − Contains EnrollmentDate.
When the database is generated you see the following tables in your database as shown in the following image.
Properties Mapping
The Property method is used to configure attributes for each property belonging to an entity or complex type. The Property method is used to obtain a configuration object for a given property. You can also map and configure the properties of your domain classes using Fluent API.
Configuring a Primary Key
The default convention for primary keys are −
- Class defines a property whose name is ID or Id
- Class name followed by ID or Id
If your class doesnt follow the default conventions for primary key as shown in the following code of Student class −
public class Student {
   public int StdntID { get; set; }
   public string LastName { get; set; }
   public string FirstMidName { get; set; }
   public DateTime EnrollmentDate { get; set; }

   public virtual ICollection<Enrollment> Enrollments { get; set; }
}
Then to explicitly set a property to be a primary key, you can use the HasKey method as shown in the following code −
protected override void OnModelCreating(DbModelBuilder modelBuilder) {
   //Configure default schema
   modelBuilder.HasDefaultSchema("Admin");

   // Configure Primary Key
   modelBuilder.Entity<Student>().HasKey<int>(s ⇒ s.StdntID);
}
Configure Column
In Entity Framework, by default Code First will create a column for a property with the same name, order, and datatype. But you can also override this convention, as shown in the following code.
protected override void OnModelCreating(DbModelBuilder modelBuilder) {

   //Configure default schema
   modelBuilder.HasDefaultSchema("Admin");

   //Configure EnrollmentDate Column
   modelBuilder.Entity<Student>().Property(p ⇒ p.EnrollmentDate)

   .HasColumnName("EnDate")
   .HasColumnType("DateTime")
   .HasColumnOrder(2);
}
Configure MaxLength Property
In the following example, the Course Title property should be no longer than 24 characters. When the user specifies value longer than 24 characters, then the user will get a DbEntityValidationException exception.
protected override void OnModelCreating(DbModelBuilder modelBuilder) {
   //Configure default schema
   modelBuilder.HasDefaultSchema("Admin");
   modelBuilder.Entity<Course>().Property(p ⇒ p.Title).HasMaxLength(24);
}
Configure Null or NotNull Property
In the following example, the Course Title property is required so IsRequired method is used to create NotNull column. Similarly, Student EnrollmentDate is optional so we will be using IsOptional method to allow a null value in this column as shown in the following code.
protected override void OnModelCreating(DbModelBuilder modelBuilder) {

   //Configure default schema
   modelBuilder.HasDefaultSchema("Admin");
   modelBuilder.Entity<Course>().Property(p ⇒ p.Title).IsRequired();
   modelBuilder.Entity<Student>().Property(p ⇒ p.EnrollmentDate).IsOptional();

   //modelBuilder.Entity<Student>().Property(s ⇒ s.FirstMidName)
   //.HasColumnName("FirstName");
}
Configuring Relationships
A relationship, in the context of databases, is a situation that exists between two relational database tables, when one table has a foreign key that references the primary key of the other table. When working with Code First, you define your model by defining your domain CLR classes. By default, the Entity Framework uses the Code First conventions to map your classes to the database schema.
If you use the Code First naming conventions, in most cases you can rely on Code First to set up relationships between your tables based on the foreign keys and navigation properties.
If they don't meet up with those conventions, there are also configurations you can use to impact relationships between classes and how those relationships are realized in the database when you're adding configurations in Code First.
Some of them are available in the data annotations and you can apply some even more complicated ones with a Fluent API.
Configure One-to-One Relationship
When you define a one-to-one relationship in your model, you use a reference navigation property in each class. In database, both tables can have only one record on either side of the relationship. Each primary key value relates to only one record (or no records) in the related table.
A one-to-one relationship is created if both of the related columns are primary keys or have unique constraints.
In a one-to-one relationship, the primary key acts additionally as a foreign key and there is no separate foreign key column for either table.
This type of relationship is not common because most information related in this way would all be in one table.
Lets take a look at the following example where we will add another class into our model to create a one-to-one relationship.
public class Student {
   public int ID { get; set; }
   public string LastName { get; set; }
   public string FirstMidName { get; set; }
   public DateTime EnrollmentDate { get; set; }

   public virtual StudentLogIn StudentLogIn { get; set; }
   public virtual ICollection<Enrollment> Enrollments { get; set; }
}

public class StudentLogIn {
   [Key, ForeignKey("Student")]
   public int ID { get; set; }
   public string EmailID { get; set; }
   public string Password { get; set; }

   public virtual Student Student { get; set; }
}
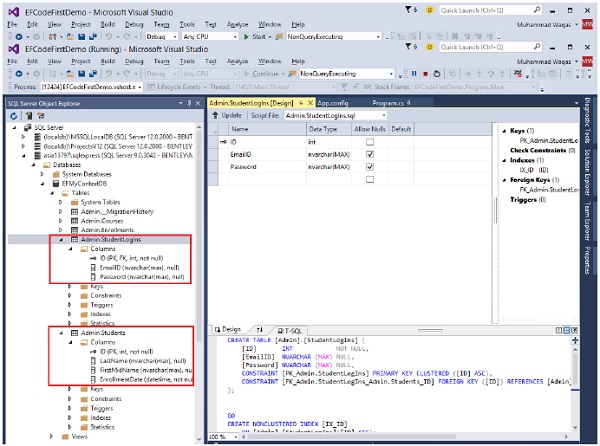
As you can see in the above code that Key and ForeignKey attributes are used for ID property in StudentLogIn class, in order to mark it as Primary Key as well as Foreign Key.
To configure one-to-zero or one relationship between Student and StudentLogIn using Fluent API, you need to override OnModelCreating method as shown in the following code.
protected override void OnModelCreating(DbModelBuilder modelBuilder) {

   //Configure default schema
   modelBuilder.HasDefaultSchema("Admin");

   // Configure ID as PK for StudentLogIn
   modelBuilder.Entity<StudentLogIn>()
   .HasKey(s ⇒ s.ID);

   // Configure ID as FK for StudentLogIn
   modelBuilder.Entity<Student>()

   .HasOptional(s ⇒ s.StudentLogIn) //StudentLogIn is optional
   .WithRequired(t ⇒ t.Student); // Create inverse relationship
}
In most cases, the Entity Framework can infer which type is the dependent and which is the principal in a relationship. However, when both ends of the relationship are required or both sides are optional the Entity Framework cannot identify the dependent and the principal. When both ends of the relationship are required, you can use HasRequired as shown in the following code.
protected override void OnModelCreating(DbModelBuilder modelBuilder) {

   //Configure default schema
   modelBuilder.HasDefaultSchema("Admin");

   // Configure ID as PK for StudentLogIn
   modelBuilder.Entity<StudentLogIn>()
   .HasKey(s ⇒ s.ID);

   // Configure ID as FK for StudentLogIn
   modelBuilder.Entity<Student>()
   .HasRequired(r ⇒ r.Student)
   .WithOptional(s ⇒ s.StudentLogIn);
}
When the database is generated you will see that relationship is created as shown in the following image.
Configure One-to-Many Relationship
The primary key table contains only one record that relates to none, one, or many records in the related table. This is the most commonly used type of relationship.
In this type of relationship, a row in table A can have many matching rows in table B, but a row in table B can have only one matching row in table A.
The foreign key is defined on the table that represents the many end of the relationship.
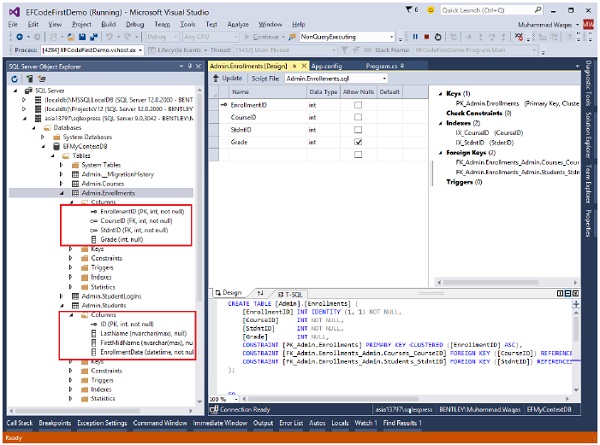
For example, in the above diagram Student and Enrollment tables have one-tomany relationship, each student may have many enrollments, but each enrollment belongs to only one student.
Below are the Student and Enrollment which has one-to-many relationship, but the foreign key in Enrollment table is not following the default Code First conventions.
public class Enrollment {
   public int EnrollmentID { get; set; }
   public int CourseID { get; set; }

   //StdntID is not following code first conventions name
   public int StdntID { get; set; }
   public Grade? Grade { get; set; }

   public virtual Course Course { get; set; }
   public virtual Student Student { get; set; }
}

public class Student {
   public int ID { get; set; }
   public string LastName { get; set; }
   public string FirstMidName { get; set; }
   public DateTime EnrollmentDate { get; set; }

   public virtual StudentLogIn StudentLogIn { get; set; }
   public virtual ICollection<Enrollment> Enrollments { get; set; }
}
In this case, to configure one-to-many relationship using Fluent API, you need to use HasForeignKey method as shown in the following code.
protected override void OnModelCreating(DbModelBuilder modelBuilder) {

   //Configure default schema
   modelBuilder.HasDefaultSchema("Admin");

   //Configure FK for one-to-many relationship
   modelBuilder.Entity<Enrollment>()

   .HasRequired<Student>(s ⇒ s.Student)
   .WithMany(t ⇒ t.Enrollments)
   .HasForeignKey(u ⇒ u.StdntID);
}
When the database is generated you will see that the relationship is created as shown in the following image.
In the above example, the HasRequired method specifies that the Student navigation property must be Null. So you must assign Student with Enrollment entity every time you add or update Enrollment. To handle this we need to use HasOptional method instead of HasRequired method.
Configure Many-to-Many Relationship
Each record in both tables can relate to any number of records (or no records) in the other table.
You can create such a relationship by defining a third table, called a junction table, whose primary key consists of the foreign keys from both table A and table B.
For example, the Student table and the Course table have many-to-many relationship.
Following are the Student and Course classes in which Student and Course has many-tomany relationship, because both classes have navigation properties Students and Courses that are collections. In other words, one entity has another entity collection.
public class Student {
   public int ID { get; set; }
   public string LastName { get; set; }
   public string FirstMidName { get; set; }
   public DateTime EnrollmentDate { get; set; }

   public virtual ICollection<Course> Courses { get; set; }
   public virtual ICollection<Enrollment> Enrollments { get; set; }
}

public class Course {
   public int CourseID { get; set; }
   public string Title { get; set; }
   public int Credits { get; set; }

   public virtual ICollection<Student> Students { get; set; }
   public virtual ICollection<Enrollment> Enrollments { get; set; }
}
To configure many-to-many relationship between Student and Course, you can use Fluent API as shown in the following code.
protected override void OnModelCreating(DbModelBuilder modelBuilder) {

   //Configure default schema
   modelBuilder.HasDefaultSchema("Admin");

   // Configure many-to-many relationship
   modelBuilder.Entity<Student>()
   .HasMany(s ⇒ s.Courses)
   .WithMany(s ⇒ s.Students);
}
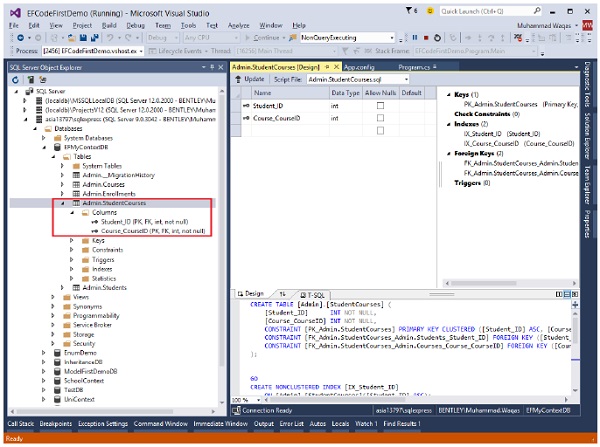
The default Code First conventions are used to create a join table when database is generated. As a result, the StudentCourses table is created with Course_CourseID and Student_ID columns as shown in the following image.
If you want to specify the join table name and the names of the columns in the table you need to do additional configuration by using the Map method.
protected override void OnModelCreating(DbModelBuilder modelBuilder) {

   //Configure default schema
   modelBuilder.HasDefaultSchema("Admin");

   // Configure many-to-many relationship
   modelBuilder.Entity<Student>()

   .HasMany(s ⇒ s.Courses)
   .WithMany(s ⇒ s.Students)

   .Map(m ⇒ {
      m.ToTable("StudentCoursesTable");
      m.MapLeftKey("StudentID");
      m.MapRightKey("CourseID");
   });
}
You can see when the database is generated, the table and columns name are created as specified in the above code.
We recommend that you execute the above example in a step-by-step manner for better understanding.
