- Arduino - Home
- Arduino - Overview
- Arduino - Board Description
- Arduino - Installation
- Arduino - Program Structure
- Arduino - Data Types
- Arduino - Variables & Constants
- Arduino - Operators
- Arduino - Control Statements
- Arduino - Loops
- Arduino - Functions
- Arduino - Strings
- Arduino - String Object
- Arduino - Time
- Arduino - Arrays
- Arduino Function Libraries
- Arduino - I/O Functions
- Arduino - Advanced I/O Function
- Arduino - Character Functions
- Arduino - Math Library
- Arduino - Trigonometric Functions
- Arduino Advanced
- Arduino - Due & Zero
- Arduino - Pulse Width Modulation
- Arduino - Random Numbers
- Arduino - Interrupts
- Arduino - Communication
- Arduino - Inter Integrated Circuit
- Arduino - Serial Peripheral Interface
- Arduino Projects
- Arduino - Blinking LED
- Arduino - Fading LED
- Arduino - Reading Analog Voltage
- Arduino - LED Bar Graph
- Arduino - Keyboard Logout
- Arduino - Keyboard Message
- Arduino - Mouse Button Control
- Arduino - Keyboard Serial
- Arduino Sensors
- Arduino - Humidity Sensor
- Arduino - Temperature Sensor
- Arduino - Water Detector / Sensor
- Arduino - PIR Sensor
- Arduino - Ultrasonic Sensor
- Arduino - Connecting Switch
- Motor Control
- Arduino - DC Motor
- Arduino - Servo Motor
- Arduino - Stepper Motor
- Arduino And Sound
- Arduino - Tone Library
- Arduino - Wireless Communication
- Arduino - Network Communication
Arduino - PIR Sensor
PIR sensors allow you to sense motion. They are used to detect whether a human has moved in or out of the sensors range. They are commonly found in appliances and gadgets used at home or for businesses. They are often referred to as PIR, "Passive Infrared", "Pyroelectric", or "IR motion" sensors.
Following are the advantages of PIR Sensors −
- Small in size
- Wide lens range
- Easy to interface
- Inexpensive
- Low-power
- Easy to use
- Do not wear out

PIRs are made of pyroelectric sensors, a round metal can with a rectangular crystal in the center, which can detect levels of infrared radiation. Everything emits low-level radiation, and the hotter something is, the more radiation is emitted. The sensor in a motion detector is split in two halves. This is to detect motion (change) and not average IR levels. The two halves are connected so that they cancel out each other. If one-half sees more or less IR radiation than the other, the output will swing high or low.
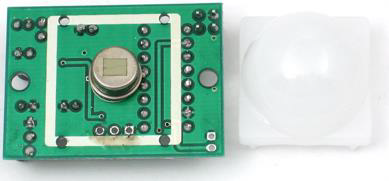
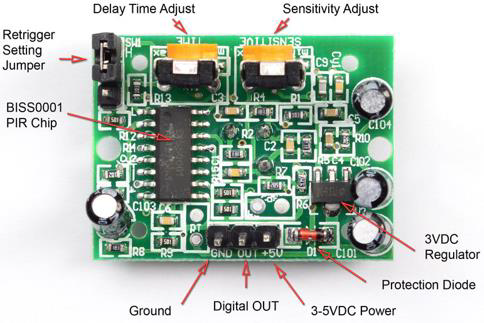
PIRs have adjustable settings and have a header installed in the 3-pin ground/out/power pads.
For many basic projects or products that need to detect when a person has left or entered the area, PIR sensors are great. Note that PIRs do not tell you the number of people around or their closeness to the sensor. The lens is often fixed to a certain sweep at a distance and they are sometimes set off by the pets in the house.
Components Required
You will need the following components −
- 1 × Breadboard
- 1 × Arduino Uno R3
- 1 × PIR Sensor (MQ3)
Procedure
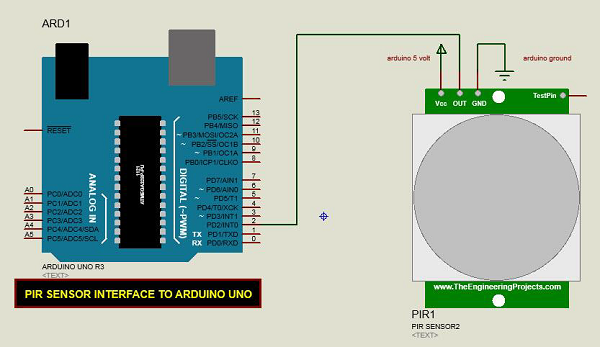
Follow the circuit diagram and make the connections as shown in the image below.
Sketch
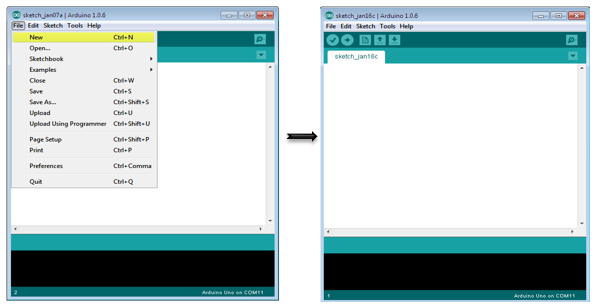
Open the Arduino IDE software on your computer. Coding in the Arduino language will control your circuit. Open a new sketch File by clicking New.
Arduino Code
#define pirPin 2
int calibrationTime = 30;
long unsigned int lowIn;
long unsigned int pause = 5000;
boolean lockLow = true;
boolean takeLowTime;
int PIRValue = 0;

void setup() {
   Serial.begin(9600);
   pinMode(pirPin, INPUT);
}

void loop() {
   PIRSensor();
}

void PIRSensor() {
   if(digitalRead(pirPin) == HIGH) {
      if(lockLow) {
         PIRValue = 1;
         lockLow = false;
         Serial.println("Motion detected.");
         delay(50);
      }
      takeLowTime = true;
   }
   if(digitalRead(pirPin) == LOW) {
      if(takeLowTime){
         lowIn = millis();takeLowTime = false;
      }
      if(!lockLow && millis() - lowIn > pause) {
         PIRValue = 0;
         lockLow = true;
         Serial.println("Motion ended.");
         delay(50);
      }
   }
}
Code to Note
PIR sensor has three terminals - Vcc, OUT and GND. Connect the sensor as follows −
- Connect the +Vcc to +5v on Arduino board.
- Connect OUT to digital pin 2 on Arduino board.
- Connect GND with GND on Arduino.
You can adjust the sensor sensitivity and delay time via two variable resistors located at the bottom of the sensor board.

Once the sensor detects any motion, Arduino will send a message via the serial port to say that a motion is detected. The PIR sense motion will delay for certain time to check if there is a new motion. If there is no motion detected, Arduino will send a new message saying that the motion has ended.
Result
You will see a message on your serial port if a motion is detected and another message when the motion stops.
