 Data Structure
 Networking
 RDBMS
RDBMS Operating System
 Java
Java MS Excel
 iOS
iOS HTML
HTML CSS
CSS Android
 Python
 C Programming
 C++
C++ C#
C# MongoDB
 MySQL
MySQL Javascript
 PHP
PHP
- Selected Reading
- UPSC IAS Exams Notes
- Developer's Best Practices
- Questions and Answers
- Effective Resume Writing
- HR Interview Questions
- Computer Glossary
- Who is Who
Align buttons and labels in each row with Tkinter
Tkinter is a popular Python GUI toolkit that provides a wide range of widgets for building graphical user interfaces. When designing an application with Tkinter, it is common to have rows of buttons and labels that need to be aligned properly. Aligning these elements ensures a clean and organized layout, enhancing the overall user experience. In this article, we will explore how to align buttons and labels in each row using Tkinter. We will provide a step-by-step guide and a complete implementation example to demonstrate this process.
Understanding Row Alignment in Tkinter
Tkinter offers various layout managers, such as grid, pack, and place, to arrange widgets within a window. To align buttons and labels in each row, we can use the grid layout manager, which provides a flexible and efficient way to create a grid-like structure.
Step 1: Import the Necessary Modules
To begin, import the required modules for our implementation: tkinter.
import tkinter as tk
Tkinter provides the GUI framework for creating the window and widgets.
Step 2: Create a Tkinter Window
Next, create a new Tkinter window using the Tk() constructor.
# Create a Tkinter window
window = tk.Tk()
window.geometry("720x250")
window.title("Align Buttons and Labels")
In this code snippet, we create a new window and set its title to "Align Buttons and Labels".
Step 3: Define Buttons and Labels
Now, let's define the buttons and labels that we want to align in each row.
# Define labels and buttons
labels = ["Label 1", "Label 2", "Label 3"]
buttons = ["Button 1", "Button 2", "Button 3"]
In this example, we create a list of labels and a list of buttons. You can customize the labels and buttons according to your requirements.
Step 4: Align Buttons and Labels in Each Row
To align the buttons and labels in each row, we will use the grid layout manager. The grid layout manager allows us to specify the row and column positions for each widget.
# Iterate over the labels and buttons
for i in range(len(labels)):
   label = tk.Label(window, text=labels[i])
   button = tk.Button(window, text=buttons[i])
   label.grid(row=i, column=0, padx=10, pady=10)
   button.grid(row=i, column=1, padx=10, pady=10)
In this code snippet, we iterate over the labels and buttons using a for loop. For each iteration, we create a Label widget and a Button widget. We then use the grid() method to specify the row and column positions for each widget. The padx and pady arguments are used to add padding around each widget, providing some spacing between them.
By setting the row value for each widget to i and the column value to 0 for labels and 1 for buttons, we ensure that they are aligned in each row.
Example
# Import the necessary module
import tkinter as tk

# Create a Tkinter window
window = tk.Tk()
window.geometry("720x250")
window.title("Align Buttons and Labels")

# Define labels and buttons
labels = ["Label 1", "Label 2", "Label 3"]
buttons = ["Button 1", "Button 2", "Button 3"]

# Iterate over the labels and buttons
for i in range(len(labels)):
   # Create a Label widget for each label
   label = tk.Label(window, text=labels[i])
   # Create a Button widget for each button
   button = tk.Button(window, text=buttons[i])

   # Use grid layout manager to align widgets in rows and columns
   label.grid(row=i, column=0, padx=10, pady=10)
   button.grid(row=i, column=1, padx=10, pady=10)

# Start the Tkinter event loop
window.mainloop()
In this complete implementation example, we have incorporated all the steps outlined in the article. We create a Tkinter window and define the labels and buttons to align in each row. Using the grid layout manager, we iterate over the labels and buttons, creating Label and Button widgets for each iteration and specifying their row and column positions. Finally, we start the Tkinter event loop with the mainloop() method.
Output
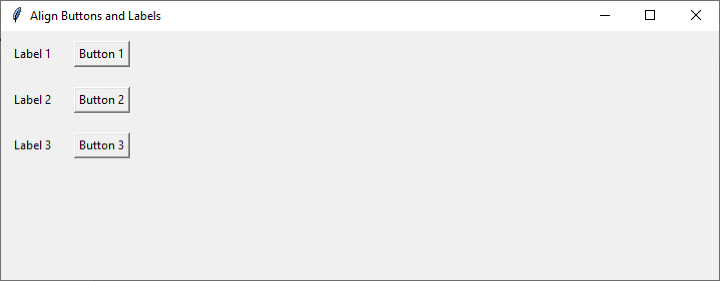
By running this example, you will see a window with three rows, each containing a label and a button aligned in two columns. The buttons and labels are properly aligned and spaced, providing a neat and organized layout.

Conclusion
In conclusion, aligning the buttons and labels in each row with Tkinter is made easy by utilizing the grid layout manager. By assigning row and column positions to the widgets, we can achieve a neat and organized layout. The provided implementation example demonstrates how to create a Tkinter window with multiple rows, where each row contains a label and a button. Through the use of the grid() method, we align the widgets in their respective positions, ensuring proper spacing and alignment. This approach allows for the creation of visually appealing and user-friendly interfaces. With the step-by-step guide and implementation example, you are now equipped to create well-organized layouts for your Tkinter applications.

