- ReactJS Tutorial
- ReactJS - Home
- ReactJS - Introduction
- ReactJS - Installation
- ReactJS - Features
- ReactJS - Advantages & Disadvantages
- ReactJS - Architecture
- ReactJS - Creating a React Application
- ReactJS - JSX
- ReactJS - Components
- ReactJS - Nested Components
- ReactJS - Using Newly Created Components
- ReactJS - Component Collection
- ReactJS - Styling
- ReactJS - Properties (props)
- ReactJS - Creating Components using Properties
- ReactJS - props Validation
- ReactJS - Constructor
- ReactJS - Component Life Cycle
- ReactJS - Event management
- ReactJS - Creating an Event−Aware Component
- ReactJS - Introduce Events in Expense Manager APP
- ReactJS - State Management
- ReactJS - State Management API
- ReactJS - Stateless Component
- ReactJS - State Management Using React Hooks
- ReactJS - Component Life Cycle Using React Hooks
- ReactJS - Layout Component
- ReactJS - Pagination
- ReactJS - Material UI
- ReactJS - Http client programming
- ReactJS - Form Programming
- ReactJS - Controlled Component
- ReactJS - Uncontrolled Component
- ReactJS - Formik
- ReactJS - Conditional Rendering
- ReactJS - Lists
- ReactJS - Keys
- ReactJS - Routing
- ReactJS - Redux
- ReactJS - Animation
- ReactJS - Bootstrap
- ReactJS - Map
- ReactJS - Table
- ReactJS - Managing State Using Flux
- ReactJS - Testing
- ReactJS - CLI Commands
- ReactJS - Building and Deployment
- ReactJS - Example
- Hooks
- ReactJS - Introduction to Hooks
- ReactJS - Using useState
- ReactJS - Using useEffect
- ReactJS - Using useContext
- ReactJS - Using useRef
- ReactJS - Using useReducer
- ReactJS - Using useCallback
- ReactJS - Using useMemo
- ReactJS - Custom Hooks
- ReactJS Advanced
- ReactJS - Accessibility
- ReactJS - Code Splitting
- ReactJS - Context
- ReactJS - Error Boundaries
- ReactJS - Forwarding Refs
- ReactJS - Fragments
- ReactJS - Higher Order Components
- ReactJS - Integrating With Other Libraries
- ReactJS - Optimizing Performance
- ReactJS - Profiler API
- ReactJS - Portals
- ReactJS - React Without ES6 ECMAScript
- ReactJS - React Without JSX
- ReactJS - Reconciliation
- ReactJS - Refs and the DOM
- ReactJS - Render Props
- ReactJS - Static Type Checking
- ReactJS - Strict Mode
- ReactJS - Web Components
- Additional Concepts
- ReactJS - Date Picker
- ReactJS - Helmet
- ReactJS - Inline Style
- ReactJS - PropTypes
- ReactJS - BrowserRouter
- ReactJS - DOM
- ReactJS - Carousel
- ReactJS - Icons
- ReactJS - Form Components
- ReactJS - Reference API
- ReactJS Useful Resources
- ReactJS - Quick Guide
- ReactJS - Useful Resources
- ReactJS - Discussion
ReactJS - UNSAFE_componentWillUpdate() Method
In web development, UNSAFE_componentWillUpdate() functions as a warning. It occurs just when we are going to make modifications to a section of a website.
Remember that this warning shows only when we update anything, not when we first create it. So, UNSAFE_componentWillUpdate() acts as a warning, helping us in detecting problems when making updates to a website.
Syntax
UNSAFE_componentWillUpdate(nextProps, nextState)
Parameters
This method accepts two parameters: nextProps and nextState.
nextProps − These are the new characteristics (like information) that our web component will be given. It is just like getting a fresh set of instructions.
nextState − This reflects the new state of our component. It is similar to being aware of the current situation.
Return Value
UNSAFE_componentWillUpdate() returns no results. It is more of a starting point before making changes, so it doesn't provide a result or answer.
Examples
Example 1
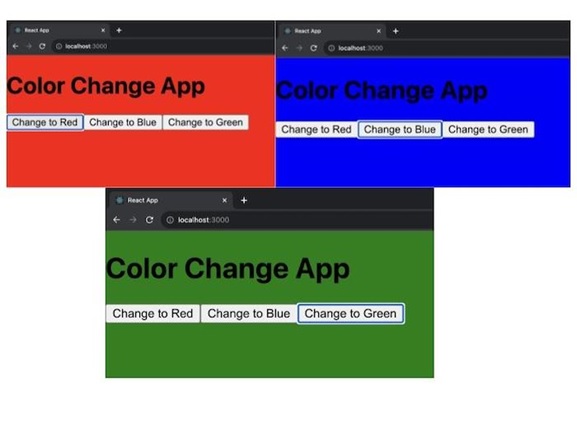
In this example, we will use the UNSAFE_componentWillUpdate() function in a React app to create a simple example.
We will have a basic React component called App. It will let us change the background color of the page by clicking buttons. The UNSAFE_componentWillUpdate() function will detect changes in the background color and adjust the page's background color accordingly.
import React, { Component } from 'react';

class App extends Component {
   constructor(props) {
      super(props);
      this.state = {
         backgroundColor: 'white',
      };
   }

   // This is the UNSAFE_componentWillUpdate() function.
   UNSAFE_componentWillUpdate(nextProps, nextState) {
      if (nextState.backgroundColor !== this.state.backgroundColor) {
         document.body.style.backgroundColor = nextState.backgroundColor;
      }
   }
   handleChangeColor = (color) => {
      this.setState({ backgroundColor: color });
   }

   render() {
      return (
         <div>
            <h1>Color Change App</h1>
            <button onClick={() => this.handleChangeColor('red')}>Change to Red</button>
            <button onClick={() => this.handleChangeColor('blue')}>Change to Blue</button>
            <button onClick={() => this.handleChangeColor('green')}>Change to Green</button>
         </div>
      );
   }
}

export default App;
Output
Example 2
In this example we will use the UNSAFE_componentWillUpdate() function to update the temperature from celsius to fahrenheit. We can enter a temperature in either Celsius or Fahrenheit, and the program will adjust the other temperature value right away. If we enter a temperature in Celsius, for example, the app will display the comparable temperature in Fahrenheit, and vice versa. When we enter a new temperature, it handles the conversions using the UNSAFE_componentWillUpdate() method.
So below is the code for the same −
// TempConverterApp.js
import React, { Component } from 'react';
import './App.css';

class TempConverterApp extends Component {
      constructor(props) {
      super(props);
      this.state = {
         celsius: 0,
         fahrenheit: 32,
      };
   }

   // Usage of UNSAFE_componentWillUpdate() to update the temperature values
   UNSAFE_componentWillUpdate(nextProps, nextState) {
      if (nextState.celsius !== this.state.celsius) {

         // Convert Celsius to Fahrenheit
         nextState.fahrenheit = (nextState.celsius * 9) / 5 + 32;
      } else if (nextState.fahrenheit !== this.state.fahrenheit) {

         // Convert Fahrenheit to Celsius
         nextState.celsius = ((nextState.fahrenheit - 32) * 5) / 9;
      }
   }
   handleChangeCelsius = (value) => {
      this.setState({ celsius: value });
   };
   handleChangeFahrenheit = (value) => {
      this.setState({ fahrenheit: value });
   };

   render() {
      return (
         <div className='App'>
            <h1>Temperature Converter</h1>
            <label>
               Celsius:
               <input
                  type="number"
                  value={this.state.celsius}
                  onChange={(e) => this.handleChangeCelsius(e.target.value)}
               />
               </label>
               <br />
            <label>
               Fahrenheit:
               <input
                  type="number"
                  value={this.state.fahrenheit}
                  onChange={(e) => this.handleChangeFahrenheit(e.target.value)}
               />
            </label>
         </div>
      );
   }
}

export default TempConverterApp;
Output

Normal: For normal text.
Example 3
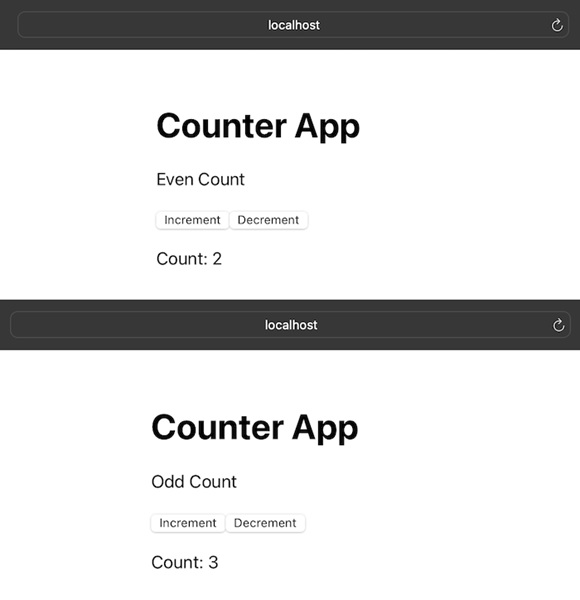
This application is a simple counter app that can count up and down. There are two buttons: one to increase the count and one to decrease it. The program will also tell us if the current count is even or odd. It updates a message based on whether the count is even or odd by calling the UNSAFE_componentWillUpdate() method. If we have an even number, it will read "Even Count," and if we have an odd number, it will say "Odd Count."
So the code for this application is as follows −
// CounterApp.js
import React, { Component } from 'react';
import './App.css';

class CounterApp extends Component {
   constructor(props) {
      super(props);
      this.state = {
         count: 0,
         message: '',
      };
   }

   // Usage of UNSAFE_componentWillUpdate() to update the message based on the count value
   UNSAFE_componentWillUpdate(nextProps, nextState) {
      if (nextState.count !== this.state.count) {
         nextState.message = nextState.count % 2 === 0 ? 'Even Count' : 'Odd Count';
      }
   }
   handleIncrement = () => {
      this.setState((prevState) => ({ count: prevState.count + 1 }));
   };
   handleDecrement = () => {
      this.setState((prevState) => ({ count: prevState.count - 1 }));
   };

   render() {
      return (
         <div className='App'>
            <h1>Counter App</h1>
            <p>{this.state.message}</p>
            <button onClick={this.handleIncrement}>Increment</button>
            <button onClick={this.handleDecrement}>Decrement</button>
            <p>Count: {this.state.count}</p>
         </div>
      );
   }
}

export default CounterApp;
Output
Note
So we can see in the output image as shown above, there are two buttons available: one for Increment and the other one is for Decrement. And the message shown as per the even and odd counts.
Summary
UNSAFE_componentWillUpdate() is a React function that is used shortly before a component updates and re-renders. It gives us the chance to get ready for the future changes.
To Continue Learning Please Login